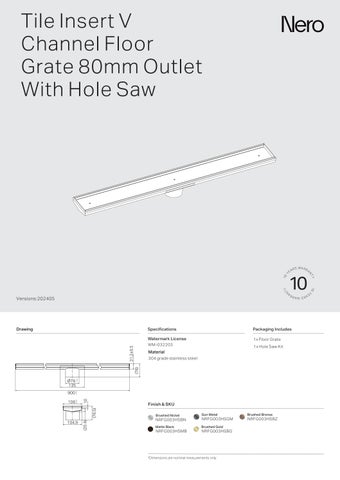
Tile Insert V Channel Floor Grate 80mm Outlet
With Hole Saw
Versions:202405

Drawing
WM-032203

NRFG003HSBN
NRFG003HSMB


NRFG003HSGM NRFG003HSBZ
NRFG003HSBG

Versions:202405
Drawing
WM-032203
NRFG003HSBN
NRFG003HSMB
NRFG003HSGM NRFG003HSBZ
NRFG003HSBG
GENERAL INSTRUCTIONS:
- This product must be installed by a licensed plumber. Ensure that your plumbing installation conforms to the Australian/New Zealand Standard AS/NZS 3500
- Do not pour concrete around floor grate. Always use timber to form the channel for the floor grate and install after the concrete has cured
- Waterproof membrane to AS3740 should always be between floor and floor grate and the laying of tiles
MAINTENANCE AND CARE:
- Regularly clean the floor grate to maintain proper water flow and prevent blockages
- Use a soft brush or cloth to gently remove any debris or buildup
- If the drain outlet becomes clogged, avoid using sharp objects to clear it
- Instead, use appropriate tools such as a plunger or drain snake to prevent damage to the floor grate
INSTALLATION GUIDE:
- Ensure there is adequate slope or fall in the floor to direct water efficiently into the channel or sump
- The floor grate should be installed so that it sits 1 to 2 mm lower than the finished level of the surrounding tiles or floor
- The gap between the tile insert or grate and the channel or sump must be clean and free of debris such as grout or adhesive
- A paint-on waterproof membrane is recommended for the inside of the stainless tray. This prevents metal contaminants from contacting the stainless steel, which could lead to tile deterioration. The waterproofing membrane must always be installed between the floor grate and the flange. Waterproofing should conform to AS3740, directing any sub-surface moisture into the puddle flange and waste pipe
- For outdoor installations, apply a bead of suitable sealant around the base of the floor grate before laying the adhesive bed and tiles
- Tile Insert Depth:The 11 2 mm deep insert can accommodate tiles up to 10 mm thick, including adhesive
Insert Grate
Grate Base
Tile Preparation:
For tile cutting, cut the tiles to dimensions of 903 x 109 mm to ensure a neat and aesthetically pleasing finish. Make sure the tiles are sloped correctly to direct water toward the edges of the floor grate. When applying cement, apply it around the perimeter of the floor grate to secure the tiles and prevent water ingress
Drain Installation:
To create the drain opening, use a 70 mm hole saw to create an opening in the center of the floor grate that aligns with the drainage pipe. For attaching the floor grate outlet, use adhesive to attach the drain outlet to the floor grate, ensuring it is securely adhered to the floor. Insert the drain outlet into the drainage pipe, pressing firmly to create a tight seal. Ensure the top of the floor grate is slightly below the tile surface, then wipe off any excess cement
Tile Cutting and Placement:
For the final tile cutting, cut the tiles to dimensions of 890 x 86 mm. Apply filler material in the floor grate cover area. Apply adhesive and place the cut tiles, making sure they are level with the edges of the tile insert grate
Final Placement and Cleaning:
Place the tile insert grate securely into the floor grate, and clean up any debris around the area to complete the installation