INSTALLATION INSTRUCTION
GENERAL INSTRUCTIONS AND WARNINGS
- Before installation, make sure the wall surface is clean and dry to ensure a secure attachment.
- When tightening screws, do not apply excessive force to prevent damage to the wall or the fixtures.
- Use the correct tools: a drill with a 8mm or 3mm bit, screwdriver, and level.
- Wear appropriate safety gear, such as gloves and safety glasses, to protect yourself during installation.
- Before drilling, check the wall for any hidden pipes or electrical wires to avoid accidental damage.
- Ensure all measurements are accurate before drilling holes to prevent misalignment of the accessories.
WARNING
These rails are designed to be mounted onto wall studs or masonry walls. Installation is recommended to be completed by qualified trades person who complies with the New Zealand NZS 4121 design for access and mobility standard
It is recommended rail location is determined by a qualified occupational therapist or trained professional to the New Zealand NZS 4121 standard. Correct installation is required to ensure safe, long term operation. Incorrect mounting can result in reduced capacity of the rail which can result in injury to user and damage to the wall
The clearance above a horizontal grab rail shall extend above the top of the grab rail by not less than 600 mm. The clearance below a horizontal or angled rail shall be a minimum of 50 mm except at fixing points
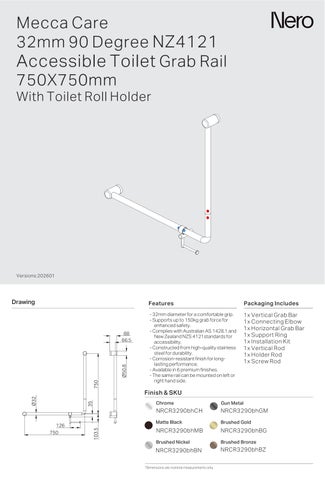
1. Unscrew the 3 mounting brackets from the two grab bars and support ring using a Allen key
OPTIONAL Adjustable Toilet Roll Holder
Mark Hole Positions
2. Locate wall studs, install into at least one stud.
Place wall seal/mounting bracket on wall at correct height over centre of stud and mark hole positions on wall refer above picture (minimum 2 supplied screws per bracket)
Tip1: Rail height is 700mm above the ground
Tip2: Position the connecting elbow according to above picture and your toilet location, then red end of connecting elbow should connect to the rail marked red sticker, and blue end of it connect to the rail marked blue sticker
Plugs
3. Drill pilot holes into wall stud approximately 60mm deep to suit mounting screws (and expansion plug if required)
Tip:3mm hole for screw into timber or 8mm hole for expansion plug.
Wall
4. Apply small amount of silicon to mounting brackets and wall in and around the screw holes
5. Insert the expansion plugs into the drilled holes using a hammer. Secure the three brackets
firmly with expansion screws
Tip: Use appropriate mounting screws for the wall stud material, supplied screws are for timber wall studs
6. Connect the Vertical Grab Bar (with the red sticker) to the Connecting Elbow with the red sticker on one end as shown in the figure 1. This is the correct connection If the Vertical Grab Bar(with the red sticker ) to the Connecting Elbow( with the bule sticker) on one end, the situation shown in the figure 2 which is an incorrect connection and should be avoided
Note: When connect the Connecting Elbow to the Vertical Grab Bar and Horizontal Grab Bar, make sure to match the sticker colors correctly red to red, blue to blue.
Figure 1
Figure 2
7. Disassemble the support ring as above picture
8. Connect the vertical rod, the holder rod and the support ring by a screw rod. Do not over tighten the screw rod.
9. Slide the support ring onto the horizontal grab bar, and then connect the horizontal grab bar with the connecting elbow
10. Align the grab rail with the three brackets and screw it firmly using Allen key
11. Unscrew the screw rod of support ring, and screw the grub screw in the support ring to tighten the support ring, then screw the screw rod back to the support ring
12. Confirm that all connections are securely tightened.
MAINTENANCE AND CARE
- Clean the accessories with a soft, damp cloth. Avoid using abrasive cleaners, which can damage the finish.