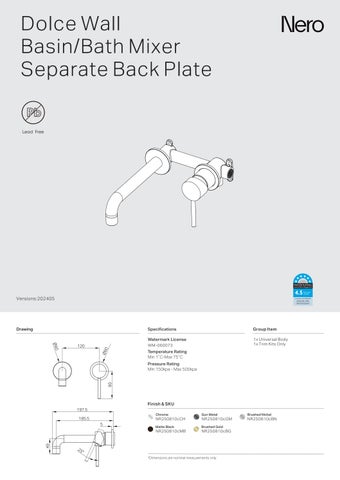
Separate Back Plate
Versions:202405

Drawing
WM-060073

NR250810cMB


NR250810cBG

NR250810cCH
NR250810cGM
Installation Instruction For Body
GENERAL INSTRUCTIONS:
- This product must be installed by a licensed plumber. Ensure that your plumbing installation conforms to the Australian/New Zealand Standard AS/NZS 3500
- All pipework must be thoroughly flushed prior to the installation of the mixer. In-line filters must be fitted on both hot and cold supplies to prevent foreign particles from damaging the ceramic cartridge
- All outlets used primarily for personal hygiene must deliver water at a safe temperature in accordance with regional regulations
1. Secure the mixer body (1) to the nogging, ensuring an installation depth of 51-68mm from the nogging to the ceramic tile
Note: Do not remove the plastic sleeve (2)from the mixer body
2. Connect the cold and hot water supply lines and perform a leak test
3. Drill a o50mm and a o40mm hole in the plasterboard for mixer body installation, and then position the plasterboard as shown in the above imaqe
4 Mark the plastic sleeve (2) 4-7mm from the ceramic tile surface to the body and waterproof the gap between the plasterboard and body
5 Remove the self-tapping screw, washer, and plastic sleeve, then cut the sleeve at the marked point
6 Reattach the self-tapping screw, washer, and plastic sleeve
7 Waterproof the gap between the plasterboard and body
Installation Instruction
Plasterboard
Recommend 51-68mm
screw
1. Drill a φ50mm and a φ40mm hole in the ceramic tile, then position it as shown in the above diagram
2. Undo the self-taping screw to remove the plastic sleeve, and release the grub screws to remove the water testing plug
Plasterboard Ceramic Tile
Ceramic Tile
Recommend 51-68mm
Ceramic Tile Plasterboard O ring
Dressing Ring Cartridge Bell Do Waterproof Treatment
Recommend 51-68mm
3. Insert the O ring to the cartridge bell groove, and slide the dressing ring onto cartridge.
4. Apply waterproof treatment to the area indicated in the diagram above
5 Tighten up the dressing ring on the cartridge bell
6. Slide the plate and washer onto the wall, set the spout in place, and secure it tightly using the grub screw
7. Slide the plate onto the wall, attach the washer to the cartridge rod, position the handle, tighten it with a grub screw using an Allen key, and cap the grub screw hole
Please note: there is a washer between backplate and the spout Do Waterproof Treatment
MAINTENANCE AND CARE:
- Regularly check the mixer and connections for signs of wear or leaks
- Clean the tap with mild soapy water to maintain its appearance, avoiding harsh chemicals and abrasive materials that may damage the
FINAL INSPECTION:
- Ensure the tap operates smoothly and that there are no leaks at the connections
- Clean the area and the newly installed tap with a soft cloth to remove any installation residues