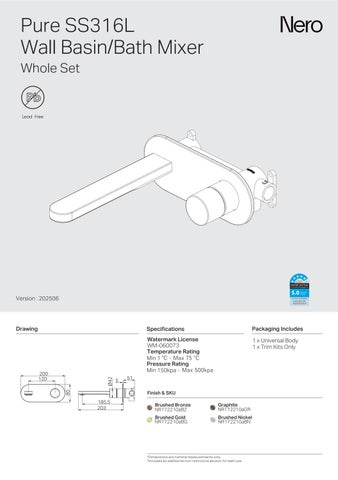
Pure SS316L Wall Basin/Bath Mixer
Whole Set
Version : 202506
Drawing
Specifications
Watermark License
Packaging Includes 1 x Universal Body 1 x Trim Kits Only WM-060073
Temperature
Finish & SKU


Installation Instruction For Body
GENERAL INSTRUCTIONS:
- Th s product must be nstalled by a censed plumber. Ensure that your plumbing installation conforms to the Austral an/New Zealand
Standard AS/NZS 3500
Plasterboard Ceramic Tile
Plasterboard Ceramic Tile
Installation Instruction For Trim Kits
7
51-68mm Recommended 120
51-68mm
Recommended
1 Secure the mixer body (1) to the nogging ensuring an installation depth of 51-68mm from the nogging to the ceramic tile
Note: Do not remove the plast c sleeve (2)from the m xer body
2 Connect the cold and hot water supply lines and perform a leak test
3 Dri a o50mm and a o40mm hole in the p asterboard for mixer body nstallation and then posit on the p asterboard as shown in the above d agram
Plasterboard Ceramic Tile
Recommended Ø40 4-7mm from the tile surface (1
Off
App y Waterproof Treatment
Plasterboard
1 Drill a ø50mm and a ø40mm hole in the ceram c t e then pos tion it as shown in the above diagram
2 Undo the se f-taping screw to remove the protective s eeve, and release the grub screws to remove the water testing plug
3 Insert the O-ring to the cartridge be groove and sl de the dress ng r ng onto cartr dge
4 Apply waterproofing to the area indicated in the diagram above
5 Tighten up the dressing r ng on the cartridge bell
51-68mm
Recommended 51-68mm
4 Measure 4–7 mm inward from the tile s outer surface and mark the corresponding position on the plast c sleeve Then, waterproof the gap between the plasterboard and body
5 Remove the self-tapping screw, washer and p astic sleeve, then cut the sleeve at the marked point
6 Reattach the se f-tapp ng screw washer, and plast c sleeve
6 Slide the back plate and washer onto the wall, set the spout in place, and secure it tight y us ng the grub screw
7 Pos tion the hand e, t ghten t with a grub screw us ng an a en key and cap the grub screw hole
p ease note: there is a washer between back p ate and the spout
MAINTENANCE AND CARE:
- Regularly check the mixer and connections for signs of wear or leaks.
- Clean the tap with mild soapy water to maintain its appearance, avoiding harsh chemicals and abrasive materials that may damage the finish.
FINAL INSPECTION:
- Ensure the tap operates smoothly and that there are no leaks at the connections.
- Clean the area and the newly installed tap with a soft cloth to remove any installation residues.