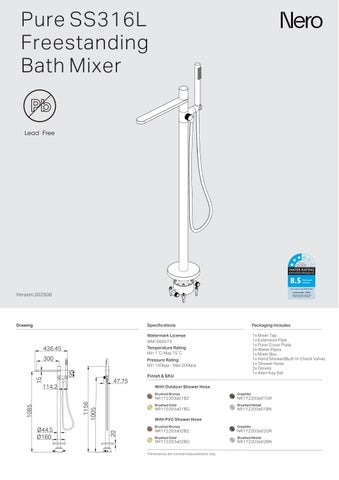
Pure SS316L Freestanding Bath Mixer
Version:202506
Drawing
WM-060073
1x Mixer Tap 1x Extension Pipe
1x Floor Cover Plate
2x Water Pipes
1x Mixer Box
1x Hand Shower(Built-In Check Valve) 1x Shower Hose
2x Gloves 1x Allen Key Set
NR172203a01BZ
NR172203a01BG
Shower Hose
NR172203a01GR
NR172203a01BN With Outdoor Shower Hose
NR172203a02BG NR172203a02BN With
NR172203a02BZ NR172203a02GR
Installation Instruction
GENERAL INSTRUCTIONS:
- This product must be installed by a licensed plumber. Ensure that your plumbing installation complies with the Australian/New Zealand Standard AS/NZS 3500
- All pipework must be thoroughly flushed prior to the installation of the mixer. In-line filters must be fitted on both hot and cold supplies to prevent foreign particles from damaging the ceramic cartridge
- All outlets used primarily for personal hygiene must deliver water at a safe temperature in accordance with regional regulations.
Parts
01. Mixer Tap x 1
02 Extension Tube x 1
03 Cover Plate x 1 Floor
04. Pipes x 2 Water
05 Screws x 4 Hex
06 x 1 Flange Base
07. Spirit Level x 1
08. Testing Plugs x 2
09. Mixer Box x 1
10. Dynabolts x 4
11. Hand Shower x 1
12. Shower Hose x 1
13. Gloves x 1
14. Manual x 1
15. Allen Key Set x 1
16 Check Valve x 2
Note: Verify the floor structure supports the installation for mixer box
New Construction
Floor opening must have a minimum depth of 50mm for full mixer box embedding
Plan and install hot and cold water pipes before pouring the slab, ensuring correct alignment
Existing Concrete Slab
Cut channels for hot and cold water pipes. Create a 50mm-deep recess for the mixer box
Carefully mark and plan the layout for accurate positioning
1. Mark the points on the floor according to the dimensions, then drill holes at the marked l o c a t i o n s , e n s u r i n g t h e c o r r e c t d i s t a n c e between the bathtub and the mixer box
Ø125(4-Ø8, depth of 65mm or more)
Drilling
3 Connect the inlet pipes, adhering to the hot and cold water indicators Conduct a water pressure test to ensure there are no leaks
2. Position the mixer box using the spirit level to ensure it is level Secure it with M6 dynabolts
4 Protect the mixer box during the process of building up the floor
5. Remove the screws and flange base, take out the spirit level and test plugs
6 Slide the floor cover plate onto the extension tube from the top, then connect the mounting plate to the extension tube
7. Connect the water pipes to the mixer tap using an H8 Allen key, ensure correct alignment of hot and cold water pipes
8. Connect and secure the mixer tap to the extension tube.
9 Insert the water pipe into the corresponding hole of the mixer box, adjust the position of spout outlet and the bathtub, then connect the mounting plate with the mixer box using extension tube screws.
10 First, ensure the check valve is installed on the water outlet. Then, connect the hand shower to the main body using the shower hose(note that there are rubber washers at both ends of the shower hose).
Rubber Washers
MAINTENANCE AND CARE:
- Regularly check the mixer and connections for signs of wear or leaks
- Clean the tap with mild soapy water to maintain its appearance, avoiding harsh chemicals and abrasive materials that may damage the finish.
FINAL INSPECTION:
- Ensure the tap operates smoothly and there are no leaks at the connections
- Clean the area and the newly installed tap with a soft cloth to remove any installation residues