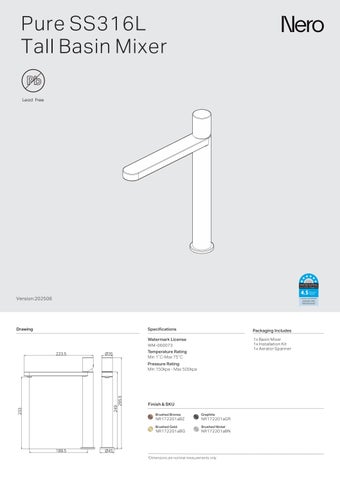
Pure SS316L Tall Basin Mixer
Version:202506
Drawing
WM-060073


Finish & SKU
Version:202506
Drawing
WM-060073
Mixer Body
35mm Bentchtop Surface
Rubber Washer
Metal Washer
Locking Nut
Flex ble Hoses
GENERAL INSTRUCTIONS:
- Th s product must be installed by a censed plumber. Ensure that your plumb ng nstal at on comp ies w th the Australian/New Zealand Standard AS/NZS 3500.
- All pipework must be thoroughly flushed prior to the installation of the mixer. In- ine filters must be fitted on both hot and co d supplies to prevent fore gn particles from damag ng the ceramic cartridge
- All outlets used pr marily for personal hygiene must de ver water at a safe temperature in accordance with regiona regu at ons
NOTE:
- Do not hydrostatic test the installation w th th s m xer insta ed. Damage to the ceramic cartridge may occur
- Do not remove the ceramic cartridge from the mixer when installing
- After insta at on, a connections must be checked for leaks
- This mixer s not recommended for use in uncontrolled heating systems such as wet-backs or so ar heating units un ess a su table tempering valve is fitted
- If imited water flow s experienced, locate aerator and filter washers and clean away fore gn material as required
- It is the responsib lity of the plumber to ensure a waterproof sea is achieved between the product and mounting surface. If in doubt about the quality of the sea remove the product and reinstall
- The flexib e hoses are fixed and cannot be replaced with other hoses.
MAINTENANCE AND CARE:
- Regularly check the m xer and connections for s gns of wear or leaks
- Clean the tap w th mild soapy water to ma nta n its appearance, avoid ng harsh chem ca s and abrasive materials that may damage the finish
40mm Max φ35
1. Pre-dr l or create a hole with a diameter of 35mm at the proper ocation P ease note that the th ckness of the surface should be between 20mm-40mm
2. Place the mixer body and pass the Pex hoses through the hole in the bentchtop Ensuring the O-r ng sits within the bottom groove of the base plate to prevent water leakage through the cabinet
3. Insta the rubber and metal washers, tighten the locking nut securely with the two M6 screws to ensure the mixer is firmly attached to the bentchtop Avo d over tightening to prevent damage to the components
4. Connect the Pex Hose to the corresponding hot and cold water supply va ves. Tighten the Female cone nuts by hand(According to Pex hose instruct on) Ensuring they are secure yet not overtightened to avo d thread damage
5. Check all connect ons for leaks If any fitt ngs are leaking shut off the water as necessary to stop the leaks Contact the supplier for warranty claim. Refer to warranty page
FINAL INSPECTION
- Ensure the tap operates smooth y and that there are no eaks at the connections
- Clean the area and the newly installed tap with a soft cloth to remove any installation residues