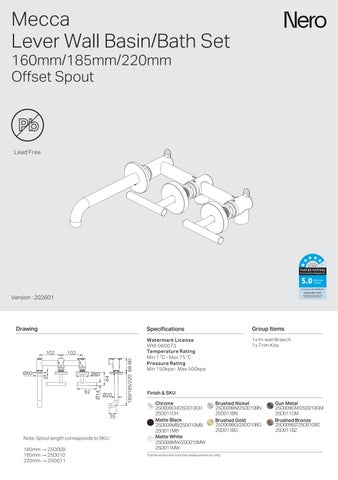
Lever Wall Basin/Bath Set
160mm/185mm/220mm
Offset Spout
Version : 202601
Drawing
Note: Spout length corresponds to SKU:
→ 25D009
→ 25D010
→ 25D011
Specifications
Watermark License
WM-060073
Temperature Rating Min 1 ℃ - Max 75 ℃
Pressure Rating Min 150kpa - Max 500kpa
Finish & SKU

25D009CH/25D010CH 25D011CH
25D009MB/25D010MB 25D011MB
25D009MW/25D010MW 25D011MW


Group Items
25D009BN/25D010BN 25D011BN
25D009BG/25D010BG 25D011BG


25D009GM/25D010GM 25D011GM
25D009BZ/25D010BZ 25D011BZ
IMPORTANT
- Ensure the spindles and waterproofing sleeves are installed and the waterproofing is completed before installing the tile, stone or marble wall finish, as shown below.
Install The In-wall Breech
Install Spindle Cartridge
Fit Waterproofing Sleeve
Apply waterproofing membrane and then install the tile/stone/marble wall finish.
INSTALLATION INSTRUCTIONS
GENERAL INFORMATION
- This product must be installed by a licensed plumber. Ensure that the installation complies with the Australian/New Zealand Standard AS/NZS 3500
- All pipework must be thoroughly flushed prior to the installation of the mixer. In-line filters must be fitted on both hot and cold supplies to prevent foreign particles from damaging the ceramic cartridge
- All outlets used primarily for personal hygiene must deliver water at a safe temperature in accordance with regional regulations
NOTE
- Do not hydrostatic test the installation with this mixer installed. Damage to the ceramic cartridge may occur.
- Do not remove the ceramic cartridge from the mixer when installing
- After installation, all connections must be checked for leaks.
- This mixer is not recommended for use in uncontrolled heating systems such as wet-backs or solar heating units unless a suitable tempering valve is fitted.
- If limited water flow is experienced, locate aerator and filter washers and clean away foreign material as required
- It is the responsibility of the plumber to ensure a waterproof seal is achieved between the product and mounting surface. If in doubt about the quality of the seal, remove the product and reinstall
Tile/Stone/Marble
Plasterboard
Full Flow Aerator
Aerator Key
Trim Kits
Plate
Gasket
Grub Screw x 2
Spout
Handle x 2
Plate x 2
Grub Screw x 6
Wear Ringx 2
Spindle Nut
Fibre Washer
Cartridge Rod
Allen Key B
Allen Key A
Spindle Cartridgex 2
Spindle Connector x 2
Waterproofing Sleevex2
In-Wall Breech
INSTALLATION STEPS FOR IN-WALL BREECH
Wall Stud
Nogging depth: 40 mm or 50 mm
Nogging
Plasterboard
Tile /Stone/ Marble
1.Nogging Set-out Guide
Required distance to finished wall surface: 68-80 mm
Wall Stud
Setback:68-80mm
Wall Finish Finished Wall Thickness Nogging Depth
Tile 18-30 mm
Stone / Marble 28-40 mm
Note: Finished wall thickness includes plasterboard, waterproofing membrane, adhesive and tile
Plasterboard
Tile/Stone/Marble Wall Surface
Body
Cutting Gauge
Setback: 68-80mm
Plastic Plug
2. Fix the in-wall breech to the nogging
Ensure a set-out depth of 68–80 mm from the finished tile / stone / marble wall surface. (Alternatively, the reference mark on the plastic plug should align 23–35 mm from the wall surface )
3. Connect the hot and cold water pipes
Turn on the water supply and pressure test to ensure there are no leaks
4. Install the plasterboard and drill Ø40 mm holes as shown.
Note: Ensure the spindles and waterproofing sleeves are installed and the waterproofing is completed before installing the tile, stone or marble wall finish
INSTALLATION STEPS FOR TRIM KITS
Plasterboard
Plastic Plug
1. Remove the on both sides. plastic plug
Plasterboard
Cartridge Rod
Fibre Gasket
Spindle Connector
2. Tighten the rod firmly into the in- cartridge wall breech with a torque wrench . Recommend torque: 6–8 Nm.
3. Place the fibre washer onto the cartridge rod.
4. Tighten the spindle nut onto the cartridge rod with a torque wrench.
Recommend torque: 15–18 Nm.
5. Turn on the water to test the spindle cartridge, ensuring there are no leaks .
Recommend 4-7mm
Plasterboard
Waterproofing Sleeve x2
O-ring Tile/Stone/ Marble
Waterproof
Waterproofing Sleeve
Cut Off
6 Fix the waterproofing sleeves with an O-ring onto the body properly
Temporarily reference the finished tile/stone/marble surface and mark the waterproofing sleeves 4–7mm below the finished surface level Remove the sleeves
Waterproof
Waterproof
Plasterboard
Waterproofing Sleeve
7. Apply waterproofing membrane to the gaps where the plasterboard, waterproofing sleeve, and outlet fitting meets.
Plasterboard
Tile/Stone/Marble
8. Install the tile/stone/marble and drill three holes as shown in the diagram.
Waterproof Waterproof
Spindle Connector
The Excess Length
9. Screw the spindle connectors onto the spindle nuts and measure the length protruding beyond the finished tile/stone/marble wall surface
10. Remove the spindle connectors and cut off the excess length
Plasterboard
Tile/Stone/Marble
11. Fix the cut spindle connectors onto the spindle nuts, ensuring they sit flush against the finished tile / stone / marble surface.
12. Apply waterproofing membrane to seal the gaps around the tile / stone / marble surface, waterproofing sleeve, spindle connection and outlet pipe
13. Slide the wear ring onto the spindle connection
14. Rotate the left spindle clockwise and the right spindle counter-clockwise to the OFF position
Attach the handle and plate, ensuring the handle stem is aligned as shown
15. Slide the plate outward and tighten the grub screws on both handles using the Allen key A
Wear Ring
Allen Key A Plate
Handle Grub Screws Cut Off
Grub Screws
Test Plug
16. Slide the handle plates inward and handtighten until secure
17. Remove the test plug from the outlet pipe
Allen Key B Grub Screws
Plate Gasket Spout
18. Slide the plate, gasket and spout onto the mixer body. Secure the spout using the grub screws and Allen key B .
Note: Apply silicone sealant around the mounting hole.
Complete ( Off Position)
19 Turn on the water supply and check all connections for leaks
FINAL INSPECTION
- Ensure the product operates smoothly and that there are no leaks at the connections
- Clean the area and the newly installed tap with a soft cloth to remove any installation residues
MAINTENANCE AND CARE
- Regularly check the product and connections for signs of wear or leaks
- Clean the product with mild soapy water to maintain its appearance, avoiding harsh chemicals and abrasive materials that may damage the finish