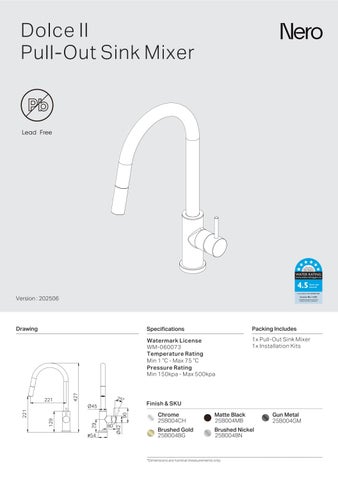
Dolce II Pull-Out Sink Mixer

Version : 202506
Drawing
Specifications
Watermark License
WM-060073
Temperature Rating
Min 1 ℃ - Max 75 ℃
Pressure Rating
Min 150kpa - Max 500kpa


Packing Includes

Version : 202506
Drawing
Specifications
Watermark License
WM-060073
Temperature Rating
Min 1 ℃ - Max 75 ℃
Pressure Rating
Min 150kpa - Max 500kpa
Packing Includes
GENERAL INSTRUCTIONS:
- This product must be installed by a licensed plumber. Ensure that your plumbing installation complies with the Australian/New Zealand Standard AS/NZS 3500
- All pipework must be thoroughly flushed prior to the installation of the mixer In-line filters must be fitted on both hot and cold supplies to prevent foreign particles from damaging the ceramic cartridge
- All outlets used primarily for personal hygiene must deliver water at a safe temperature in accordance with regional regulations
NOTE:
- Do not hydrostatic test the installation with this mixer installed. Damage to the ceramic cartridge may occur
- Do not remove the ceramic cartridge from the mixer when installing
- After installation, all connections must be checked for leaks
- This mixer is not recommended for use in uncontrolled heating systems such as wet-backs or solar heating units unless a suitable tempering valve is fitted.
- If limited water flow is experienced, locate aerator and filter washers and clean away foreign material as required
- It is the responsibility of the plumber to ensure a waterproof seal is achieved between the product and mounting surface If in doubt about the quality of the seal, remove the product and reinstall.
Mixer
Built-in Check Valve
Pull-Out Nozzle
Benchtop
Rubber Washer
Stabilizer
Metal Washer
Counterweight
Philips Screw x 2
Quick-Connect Hose
Built-in check valve
Locking Nut
Philips Screw x 2
Flexible Hose x 2
Pull-out hose
Quick-Connect Hose
Pull-out Hose
Mixer
01. Pre-drill or create a mounting hole with a diameter of 35mm in the benchtop.
NOTE: If the stabilizer is used, the maximum benchtop thickness should not exceed 30mm Without the stabilizer, the benchtop thickness can be up to 40mm.
Rubber Washer Stabilizer
Metal Washer
Locking Nut
Philips Screws
Base Plate
Benchtop
Braided Flexible Hoses
02. Place the mixer body on the benchtop, with the quick-connect hose and braided flexible hoses passing through the hole in the benchtop.
NOTE: Ensuring the O-ring sits within the bottom groove of the base plate to prevent water leakage.
03. Slide the rubber washer (stabilizer if needed) and metal washer over the threaded tube, secure the mixer firmly to the benchtop with locking nut and Philips screws.
04. Connect the pull-out hose to the quick-connect hose.
05. Install the counterweight onto the pull-out hose using the screws provided It is recommended to position the counterweight approximately 350mm below the base of the mixer.
06. Connect the flexible hoses to the corresponding hot and cold water supply valves. 07. Check all connections for leaks. If any fittings are leaking, shut off the water as necessary to stop the leaks. Contact the supplier for warranty claim.
MAINTENANCE AND CARE:
- Regularly check the mixer and connections for signs of wear or leaks. - Clean the tap with mild soapy water to maintain its appearance, avoiding harsh chemicals and abrasive materials.