4 minute read
Masking a password with unobtrusive JavaScript

from html and css
Unobtrusive JavaScript
This is great, but not complete. Now it's time for some cleanup. Let's go through some scenarios that we want to avoid. We do not want to be able to submit an empty input or keep adding more lines of Hello World.
Advertisement
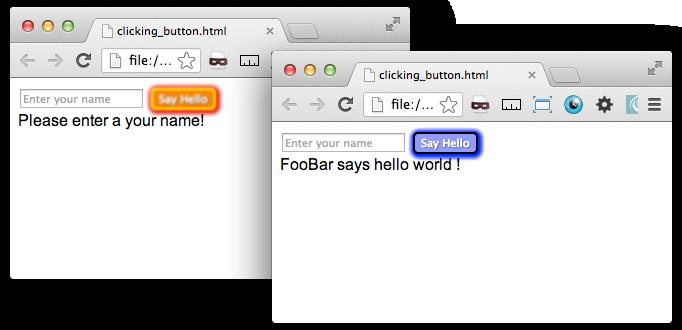
First, take care of the blank input box. Let us add an if condition to check that the input text is not blank before we append it to the HTML. After the line that gets the input value, add a new line with the conditional statement checking that the variable is not a blank string. This condition wraps the append statement. Also add an else statement for when the input is a blank string. Inside it, copy the .append() method with text reminding the user to enter a value in the text input.
var bar = $('input').val(); if (bar != ""){ $(this).parent().append("<div class='newText'>" + bar + " says " + foo + "!</div>"); } else { $(this).parent().append("Please enter a your name!") };
This adds some validation to your form that will nag your user to enter your name if the submit button is clicked with a blank text box. There are two more clean-up items left, so hang on for a few more minutes.
First, we want the appended HTML to reset each time. So add a line right after your if conditional statement and before the else statement, removing the .newText element added earlier.
$(".newText").remove();
Finally, right before the end of the if conditional, reset the input form to have a blank value by using the .val() method. Also add an ID attribute to the text input to connect the value to the input.
$('input#fooBar').val("");
That's it! We have kind of over killed it, but we have a pretty good Hello World web app.
How it works...
Unobtrusive JavaScript works by loading up the script on page load and operates by using listeners to wait for specific events to occur on the page. This may be an adjustment in how you write, but then there is an advantage in being able to separate the interaction from the presentation.
164
Chapter 7
Creating a glowing "submit" button with the event listener
Working with forms is often an overlooked aspect of most web design topics, even more so, responsive web design. Often non-transactional pages do not use forms beyond the simple Contact Us page, therefore the form design is often an afterthought. However, in the realm of transactional e-commerce and Software as a Service industries, forms are the most important elements the user interacts with. In this world, responsive design is more than just responsive layouts and images, it includes thoughtful interaction. In this recipe we can imagine a scenario where a user is at the end of a form process and is ready to submit the form.
It's not an uncommon occurrence to see a person rather comically click the submit button and watch the page just sit there, seemingly doing nothing (but it is actually performing the post action of the form) and react by clicking the same button again and again and again. In the simple Contact Us scenario, this could generate some additional form submission e-mails, but in the transactional situation, this could activate a long string of business logic and become disruptive to other processes.
On the user side, there can be the idea that if nothing happens immediately after clicking the submit button, something has gone wrong and the site has failed; and the end result is the abandoned transaction and the damaged trust of your site. There are a number of things you can and should do about this. One of them is adding visual cues to let the user know that they have successfully clicked the button, and something is going to happen. Consider the transaction being performed behind the scenes and the time it will take. If you anticipate a long wait, be aware that your user might not know this. People usually expect that in the Internet world of instant gratification everything is instant, and anything that isn't instant is broken.
Getting ready
In the Writing "Hello World" unobtrusively recipe, we wrote a simple submit button function. We can use this as the basic building block for this recipe. If you do not have that code handy, you can get the finished version of it online at Packt Publishing's website (http://www.packtpub.com/).
How to do it...
First we need to break out the meat of the submit function into a separate function that is called by the .click() event function. Cut out everything from inside the function and paste it outside the $(document).ready(function() {...}); function. Replace everything that you have cut out with a function call to the new function. In the function call, include the declared variable foo with the ID value of $(this) by the .attr() method. Then, wrap the code you pasted in a new function of the same name, and assign it to receive the two variables. Finally add an ID attribute to your submit input. Your code should look similar to the following:
$(document).ready(function(){
165