Tools for Blended Learning & Assignments WWETB | O365 GUIDELINES | DIGITAL LEARNING Student Handbook OFFICE 365 & TEAMS

Contents ........................................................................0 STUDENT GUIDELINES FOR PC/LAPTOP 1 Login To Office 365 on a PC, Laptop or mobile device at Home 1 OFFICE 365 Dashboard 1 Using email (outlook) to communicate with your teacher/tutor ........................................2 Use Word, PowerPoint, Excel at home – share a folder with your teacher/tutor ................................3 Teacher/tutor sharing work and handouts............................................................................................3 Recording Video/Audio or Photos to OneDrive for Subjects or Modules .............................................4 USE EMAIL ON MOBILE PHONE 6 Access College/Center/email on your Mobile Phone 6 Send work to your teacher/tutor using email 6 Send handwritten work to your teacher/tutor......................................................................................7 INSTALL THE TEAMS APP ON YOUR MOBILE PHONE ..............................................................................9 WHAT IS MICROSOFT TEAMS? ..............................................................................................................11 Getting started 11 Posts in channels (FOR LEARNER ENGAGEMENT) 11 Document sharing and collaboration 12 OneNote Class Notebook 12 ACCESSING AND HANDING IN TEAMS ASSIGNMENTS ..........................................................................15 Assignments.........................................................................................................................................16 Immersive Reader in Assignments.......................................................................................................17 Hand in an Assignment 17 Returned Assignments 17 Teacher/Tutor Feedback in Assignments 18 Group Assignments in Teams................................................................................................................18 TAKE A PHOTO OR VIDEO directly INTO ONEDRIVE..............................................................................20 UPLOAD Files (photos/videos/files) to OneDrive from a Phone ...........................................................23 USING microsoft LENS TO SUBMIT AN ASSIGNMENT 25 Use Microsoft Lens on Android 25
Create a PDF.........................................................................................................................................25 Add the PDF to an Assignment in Teams.............................................................................................26 Watch the video below to see how it works! 26 28 Similarity checker 29 Inserting citations ................................................................................................................................30 Translate ..............................................................................................................................................30 Dictate..................................................................................................................................................30 immersive reader 32 In the Edge Browser 32 Immersive Reader in Word Online 33 Immersive Reader in Teams Assignments 36 Collections in Microsoft Edge................................................................................................................38 Start a Collection..................................................................................................................................38 Add to your Collection 38 Add a note to your Collection 39 Pin a Collection 39 Remove an item from the Collection 39 Share a Collection ................................................................................................................................39 Sharing to Word...................................................................................................................................40 Collections on an iOS device ................................................................................................................40 Collections on an Android device 41 ONLINE EXAM GUIDELINES 43 ACCESS THE EXAM 43 ANSWERING THE QUESTIONS..............................................................................................................43 Join a Breakout Room in a Teams’ Class Meeting.................................................................................45 Join an online Class in Teams...............................................................................................................45 Join a breakout room...........................................................................................................................45 Chat in a breakout room 46 TROUBLESHOOTING OneNote problems on your phone 48 Using OneNote App 48 STEP 1: Sync All Notebooks..................................................................................................................48 STEP 2: Close and reopen the Notebook .............................................................................................48 STEP 3: Check for an App update.........................................................................................................49 STEP 4: Open the notebook in OneNote online 49 Microsoft Student Support Centre. 51
STUDENT GUIDELINES FOR PC/LAPTOP

LOGIN TO OFFICE 365 ON A PC, LAPTOP OR MOBILE DEVICE AT HOME
• Open a browser to access the internet – Google Chrome, Microsoft Edge, FireFox, Safari.
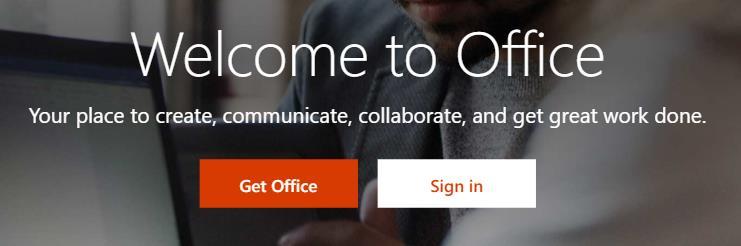
• In the Address bar type Office.com
• Select the link Sign in.
• Enter your Office 365 Username and Password.
• Remember:
o Your login begins with the year you started at your college/center.
o Your password begins with a CAPITAL letter.
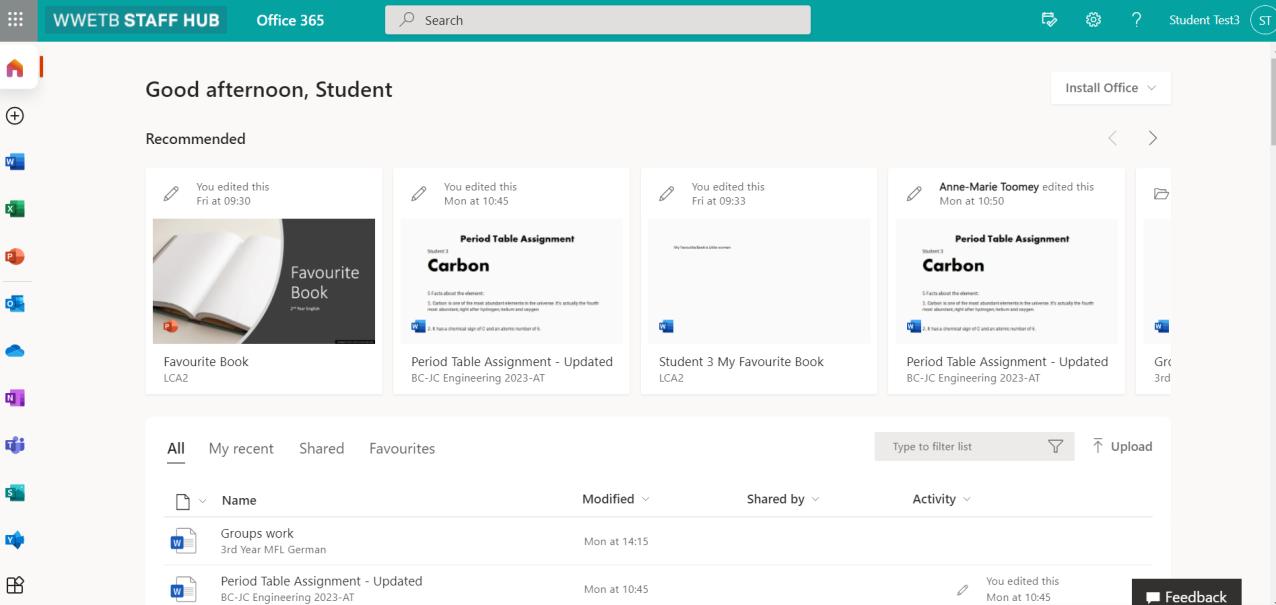
OFFICE 365 DASHBOARD
Digital Learning | Resources 1
Figure 1 Office 365 Dashboard
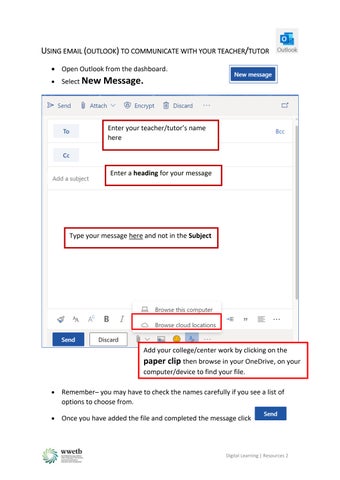
USING EMAIL (OUTLOOK) TO COMMUNICATE WITH YOUR TEACHER/TUTOR
• Open Outlook from the dashboard.
• Select New Message.
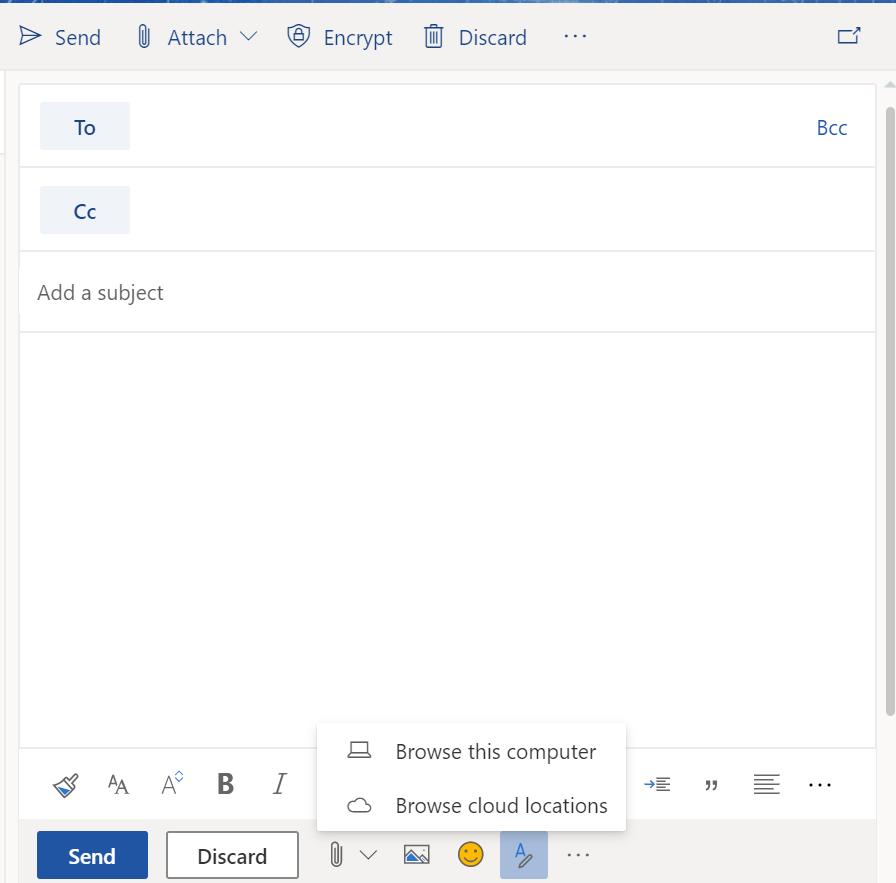
Enter your teacher/tutor’s name here Enter a heading for your message
Type your message here and not in the Subject
Add your college/center work by clicking on the paper clip then browse in your OneDrive, on your computer/device to find your file.
• Remember– you may have to check the names carefully if you see a list of options to choose from.
• Once you have added the file and completed the message click

Digital Learning | Resources 2
– SHARE A FOLDER WITH YOUR TEACHER/TUTOR
• From the Office 365 dashboard select your OneDrive.
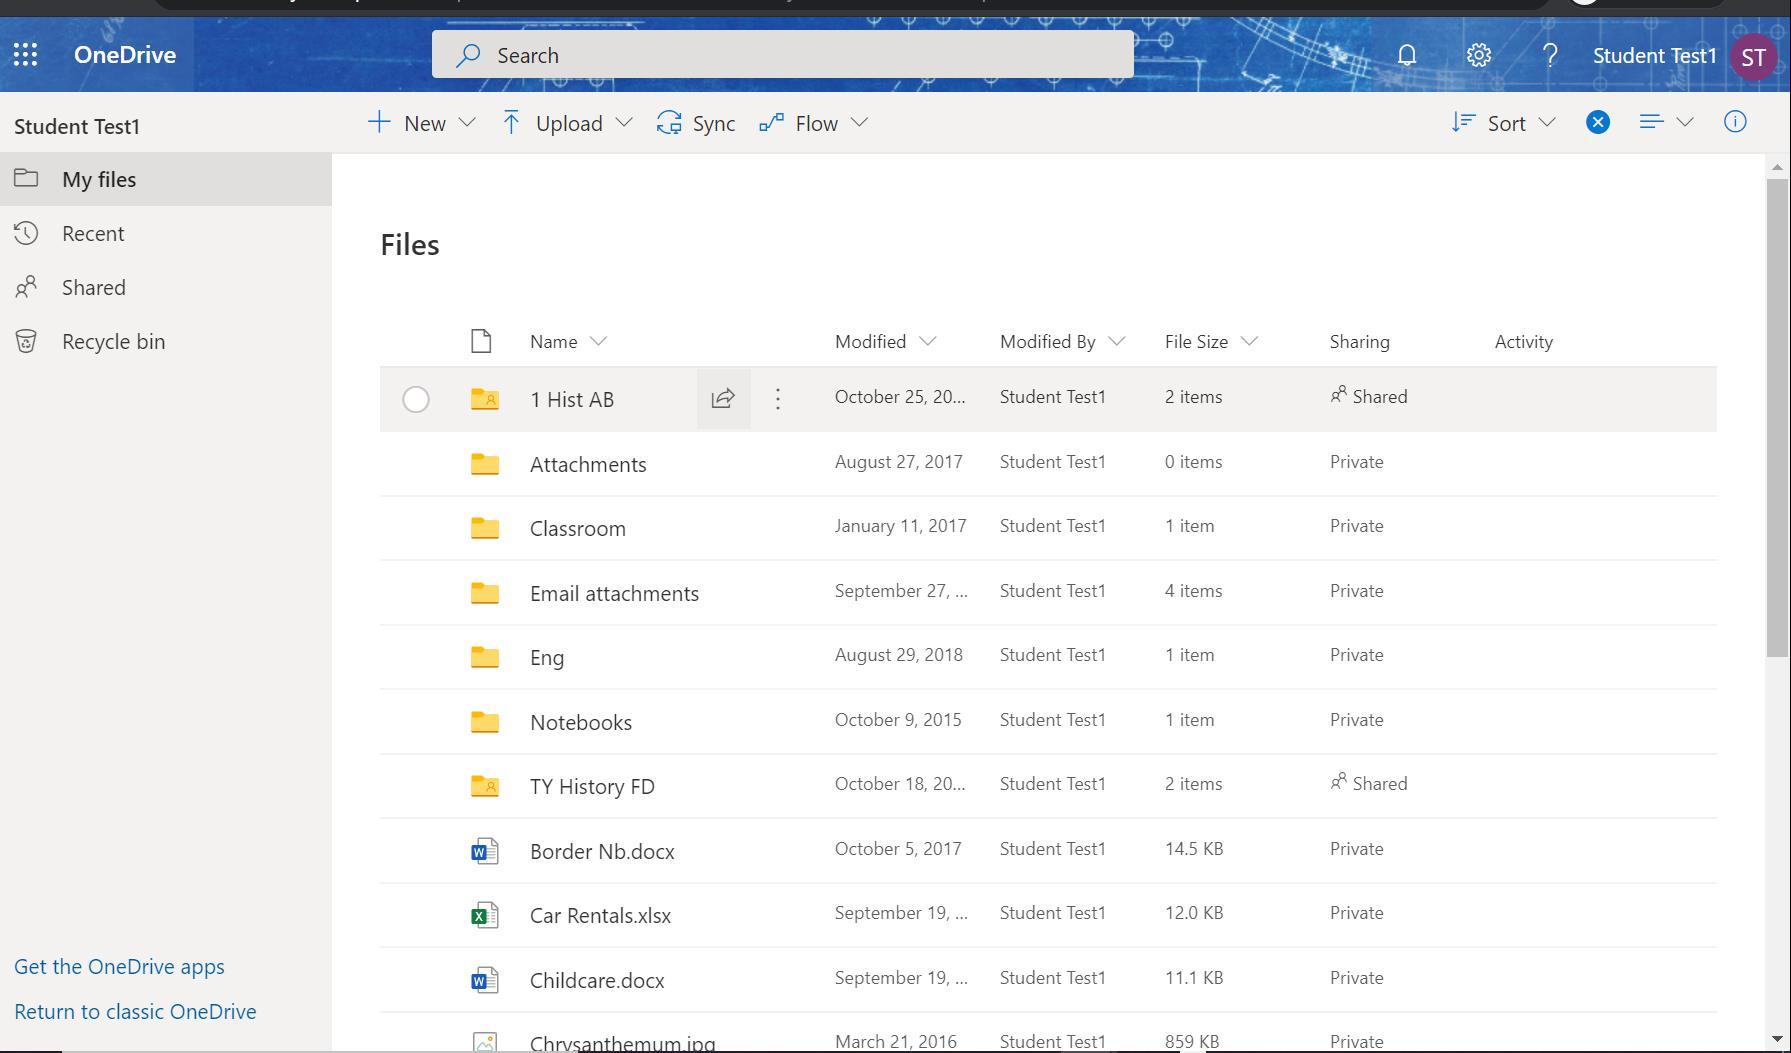
• Create a folder to share with your teacher/tutor. Share the folder with your teacher/tutor. (See image below) Now any files you create in this folder are visible to your teacher/tutor/tutor.
• Open the folder.
• From the ribbon select New > Word document.
• Type a name for the file.
Create a folder for your teacher/tutor: New > Folder >Type Name – make sure you put your initials at the end.
Share the folder with your teacher/tutor: Click the Share button > type in the teacher/tutor’s email address > Send Link.
• When you open a file in Word online or any of the other office apps to continue your work the file will save automatically and is constantly updated. If it is in the shared folder your teacher/tutor will have access to your work.
TEACHER/TUTOR SHARING WORK AND HANDOUTS
• If a teacher/tutor/tutor shares a folder with you to provide you with access to notes or assignments, you will receive an email to let you know. Check your Outlook mail regularly.
• This email will contain a link to the folder > Click on the link and you will be link to the folder location where you can access the files shared.
Digital Learning | Resources 3 USE WORD, POWERPOINT, EXCEL AT
HOME
• You can now open any resource or document your teacher/tutor may have shared with you.
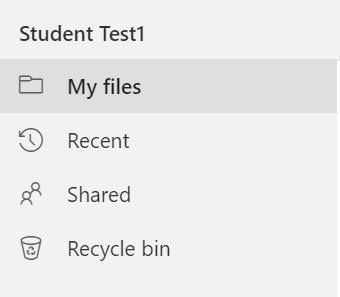
• Remember: This folder will not be visible in your files in One Drive but will appear in Shared in the navigation pane of your OneDrive.
If your teacher/tutor/tutor Shares a folder with you, it will appear in Shared with me and not in My files (your OneDrive)
RECORDING VIDEO/AUDIO OR PHOTOS TO ONEDRIVE FOR SUBJECTS OR MODULES
• Open Google Chrome on your phone - Log in to your Office 365 account and select OneDrive.
• Remember use the Chrome browser.
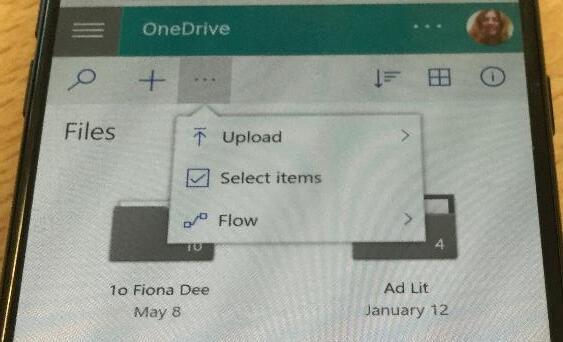
• Select the ellipses (three dots) (…) on the ribbon.
• Select Upload.
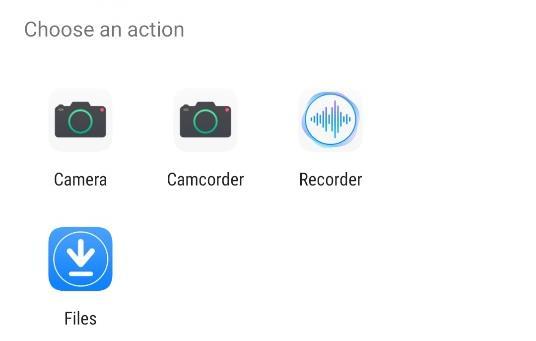
• Select an Action – Here is a screenshot for a Samsung or Android phone. This will be different on an iPhone.
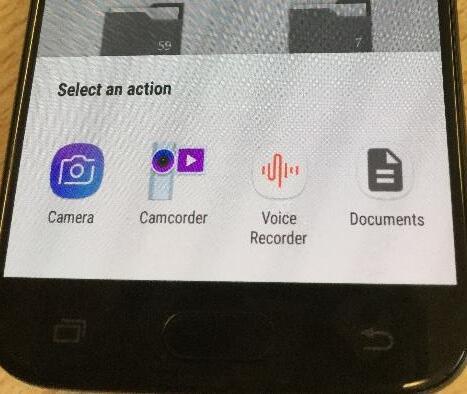
• You can take a photo, record a short video, record a brief audio file, or upload an existing file using Actions
• When the file upload you will be able to rename it as follows:
• Tap and hold the file name and select Rename from the menu displayed. Type in a meaningful name making it easier to access the file later.
Digital Learning | Resources 4
Samsung phone - Actions will vary from phone to phone
Digital Learning | Resources 5
USE EMAIL ON MOBILE PHONE
ACCESS COLLEGE/CENTER/EMAIL ON YOUR MOBILE PHONE
• Open Google Chrome on your mobile phone and type office.com into the address bar

• Sign into your O365 account using your college/center email address and password.
• Select Outlook from your O365 dashboard.
• To create a shortcut on your phone screen for your email:
• Select Google Settings in the top right corner of the screen.
• Add to Home Screen.
SEND WORK TO YOUR TEACHER/TUTOR USING EMAIL
• If you have created a Word, Excel, or PowerPoint document you can send it to your teacher/tutor using your email if this is what you have been asked to do.
• Open your email account > New Message > Type in your message.
• Attach your file – you will be able to access files in your OneDrive, on your USB key or in your Documents folder.
• Once you have located the file click Open – the file will upload to the message and will be visible under the Subject of the email.
• Click Send.
Digital Learning | Resources 6
SEND HANDWRITTEN WORK TO YOUR TEACHER/TUTOR
• If you have handwritten answers to questions, you can send a photo of it to your teacher/tutor using your email.
• Take a photo of the page using your mobile phone Many phone cameras have an option to take a photo of a document – this setting will cut out the surrounding area around your page and create a more focused copy.
• Share this photo by attaching to an email. You can also upload the picture to your phone.
• Open your email account > New Message > Type in your message
• Attach your file – you will be able to access files in your OneDrive or in your Documents folder.
• Once you have located the file click Open – the file will upload to the message and will be visible under the Subject of the email.
• Click Send.
Digital Learning | Resources 7
Digital Learning | Resources 8
INSTALL THE TEAMS APP ON YOUR MOBILE PHONE
You have the Microsoft Teams app as part of your Office 365 account. If you are accessing O365 on your mobile phone you will need to install the app on your phone.
Check out the video to install the Teams app on your mobile phone. These instructions are for an Android phone. Hold down CTRL on your keyboard and Click on the image below to follow the link to the step-bystep guidelines.
Digital Learning | Resources 9
Digital Learning | Resources 10
WHAT IS MICROSOFT TEAMS?
Microsoft Teams is a digital hub that brings conversations, content, and apps together in one place. If your classes are using Teams, you will be able to connect with your teacher/tutors, ask your teacher/tutor questions, work on your homework and projects, and track the work you have coming up in one place.
Note: Some of these features may disabled in Microsoft Teams due to the settings of your college/center. You need your college/center email to log in to Teams.
GETTING STARTED
Make sure you are logged into Microsoft Teams with your college/center email and are all set and connected to your classes. Select Teams from the dashboard to view any class teams you have been added to.
POSTS IN CHANNELS (FOR LEARNER ENGAGEMENT)
Within each of your class teams, you will see channels. All teams have a General channel that is made up of Tabs in the header area.
Other channels are created by your teacher/tutor and may be organised around units, topics, or small group work. Select a class team to view the tabs you share with everyone in your class (not just the people working in the channel).
• The Posts tab is where you will be doing a lot of collaborating with your teacher/tutor.
• Teams conversations are like instant messaging in WhatsApp you make posts, reply to other posts, and @mention your teacher/tutor’s name to get their attention.
• You may be asked to reply to Posts from your teacher/tutor that require you to respond in different ways – this can be as follows:
Respond to a Post
Write a Reply
1. Acknowledge a post by selecting the Thumbs up emoji


2. Select More options (…) to access the Immersive Reader
Select Reply below the message, type your message and hit Send

Digital Learning | Resources 11
Respond to a Poll question
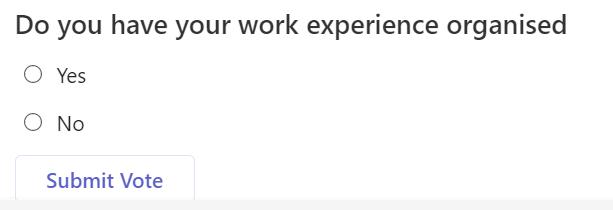
1. Select the radio button beside your chosen answer and click/tap
Submit Vote’
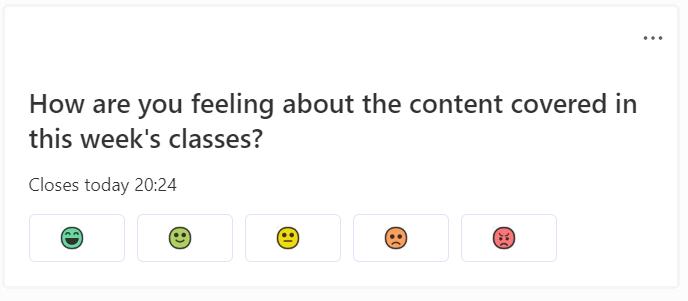
Respond to a Reflection
1. Select the emoji from the 5 options presented that best represents how you are feeling
2. From the list of words subsequently displayed, refine your answer by choosing the word that best describes your choice of emoji.
DOCUMENT SHARING AND COLLABORATION
Your teacher/tutor may be uploading resources to the Class Materials folder for you to access. If you open any of the files for your own use, you will be prompted to save a copy of the file to your OneDrive storage. Any files in the Class Materials folder are read-only
Every time a file is shared by your teacher/tutor in a conversation, it automatically gets added to the Files library of that channel. So, even if a channel piles up with different conversations and you can no longer see the file in a conversation, you will know where to go to see that file again. Everyone in your class has access to these files, and any changes made will affect the content for everyone.
ONENOTE CLASS NOTEBOOK
Depending on how your teacher/tutor runs their class, you may be given access to a OneNote Class Notebook. Select Class Notebook from the navigation on the left. Your OneNote Class Notebook will have different sections:
Content Library: Like a textbook with pages, you can read for class.
Collaboration Space: Pages that you can work on with other students. Your teacher/tutor may use this for group work. You can copy pages from the collaboration space to your own space in the Notebook.
Digital Learning | Resources 12
‘
Your own workspace: This workspace is private to you and your teacher/tutor and includes sections that your teacher/tutor has created. Use this space to add pages, notes, and thoughts, or work on assignments that your teacher/tutor distributes directly to you.
• You can also insert a document here for your teacher/tutor to correct.
• OneNote Class Notebook pages don’t act like normal document pages. Each one can go as long or as wide as you need, and you can draw or write on them with a touch screen device, add images, and move things around just by selecting and dragging.
Digital Learning | Resources 13
Digital Learning | Resources 14
ACCESSING AND HANDING IN TEAMS ASSIGNMENTS
Assignments can be accessed from Assignments in the Navigation Area, the Assignments tab in a Class Team or from a Post in the Team.
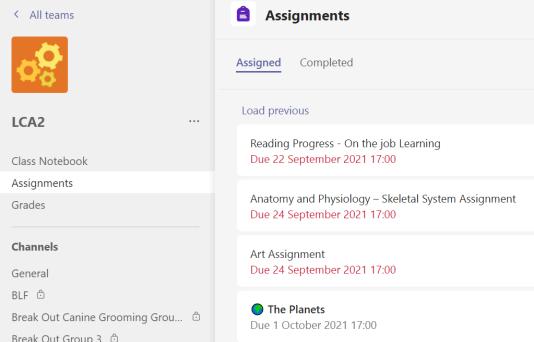
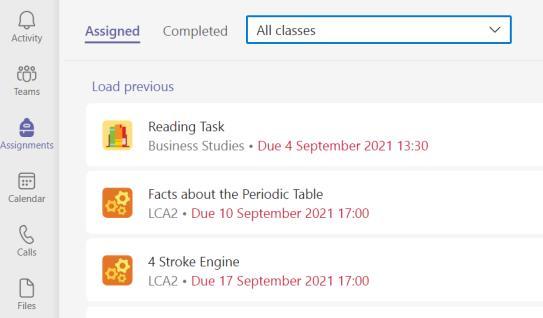
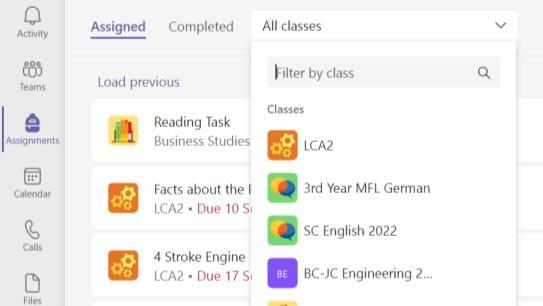
Assignments can be accessed from the Navigation area on the left-hand side of Teams. If you select Assignments from here, you will see all your assignments across all Teams.
You will see Assigned and Completed Assignments.
You can also filter your assignments by Class Teams.
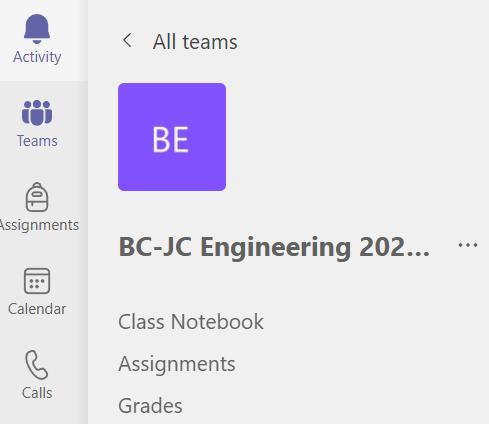
You can also access Assignments in the Assignments tab in a Class Team. The Assignments tab in under the name of the Team.
Select the Assignment that you would like to work on.
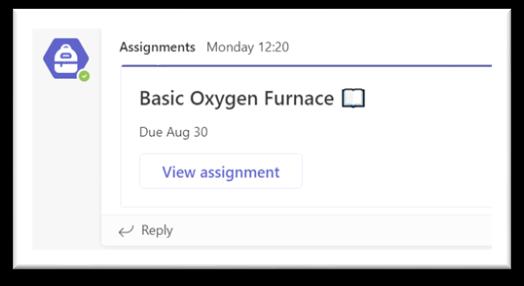
Assignments can also be accessed from Posts. This will take you directly to the Assignment.
Digital Learning | Resources 15
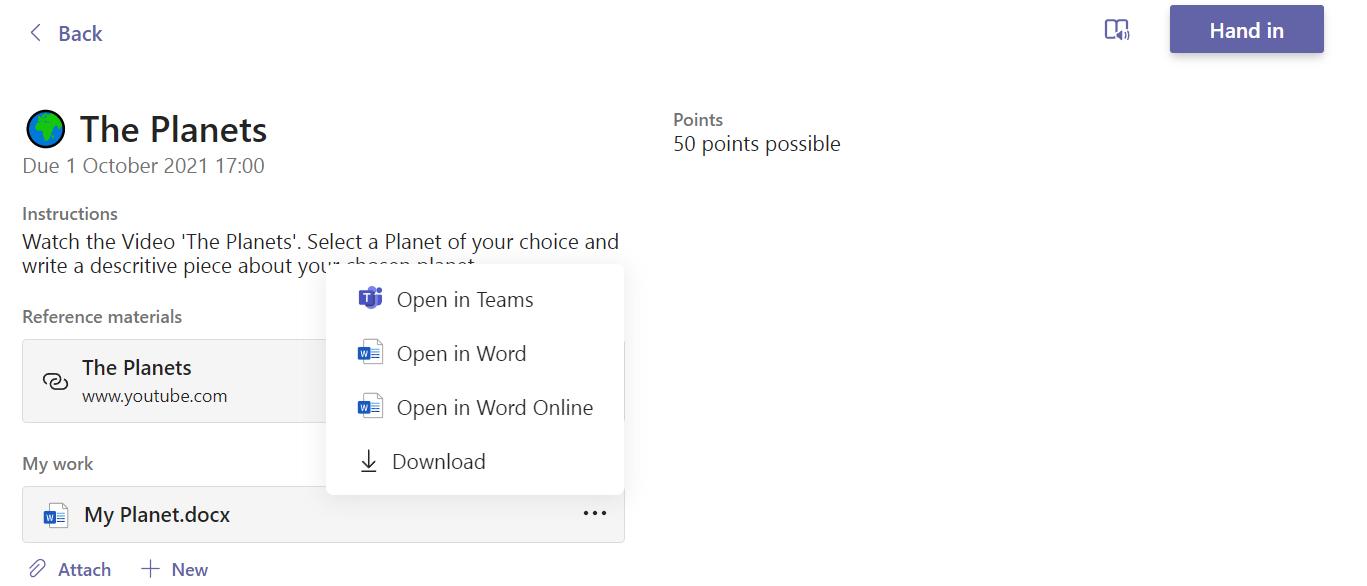
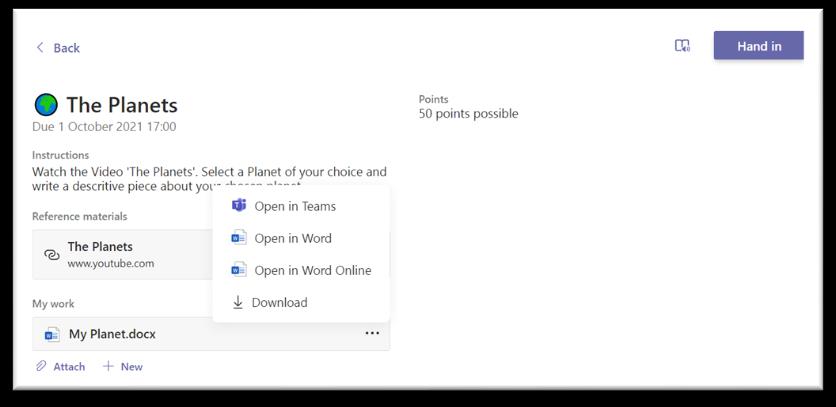
In this assignment the teacher/tutor has added a YouTube video called ‘The Planets’ to watch (Reference Material) and a Word document called ‘My Planet’ for students to work on (My Work).
Select the 3 dots, Open in Teams. You can open the File in Word (if you have Word on your device) or Word Online (if you don’t have Word or are accessing on a phone).
Don’t select Download. If you do, you will have to upload the file again when you are finished.
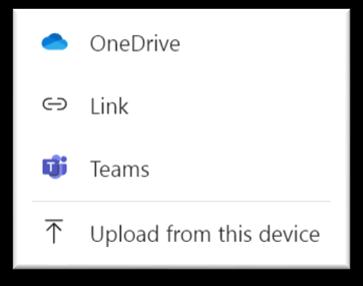
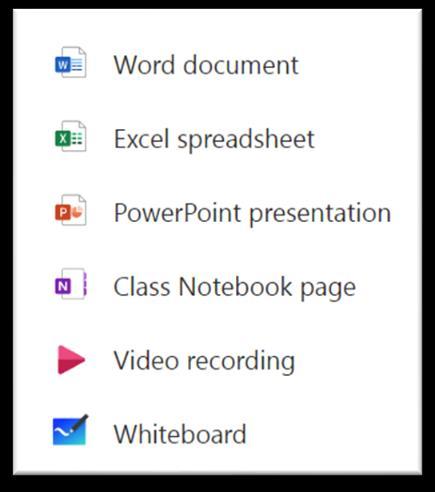
You can attach other files as part of your work by selecting Attach. E.g., a photo of handwritten work, a file from your OneDrive or device, a link. +New if you would like to attach a new Word document, Excel spreadsheet, PowerPoint presentation or a Class Notebook page, a Video recording (with or without video), or a Whiteboard.
ASSIGNMENTS
View your assignments
In a class: Located on the left-hand side under the name of the Team or in the navigation area down the left-hand side under Teams and above Calendar.
• Or you can look at all your assignments across all your classes: Select the Assignments icon in your navigation bar.
• On your phone: Select the Assignments icon.
• All your assignments will appear as cards. Just select one to open it.
Digital Learning | Resources 16
+New
Attach
IMMERSIVE READER IN ASSIGNMENTS
You also have access to the Immersive Reader in Assignments. This will allow you to personalise your reading experience to what suits you best.
Immersive Reader
Text Preferences
• font size
• line spacing
• font type
• background colour
Grammar Options
Read Aloud
• Translate to your chosen language
HAND IN AN ASSIGNMENT
When you are finished working on your Assignment, you do not need to save it. Close the file in the top right-hand corner.
You can go back and work on an assignment several times. You don’t have to complete an Assignment all in one session. When you are finished the assignment, you then select ‘Hand in’.
You need to ‘Hand in’ the assignment so that your teacher/tutor can give you feedback. When you ‘Hand in’ you will see an animation, if that feature has been turned on and the date and time that it was handed in.

RETURNED ASSIGNMENTS
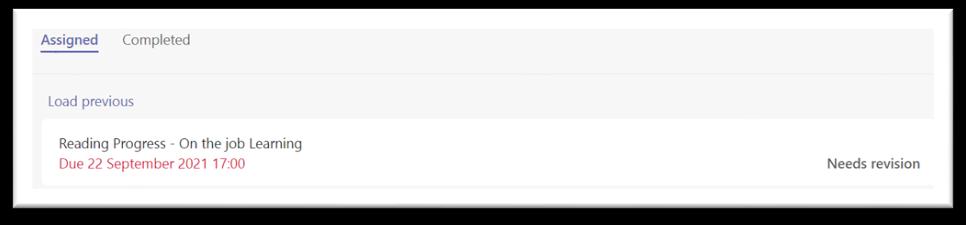
The teacher/tutor can Return an Assignment or Return for Revision. Assignments that have been Returned for Revision will go to Assigned. This will allow you to make changed based on the Feedback given by your teacher/tutor. You will be able to open the Assignment again and make the changes and Hand in again.
Returned Assignments: if there are no revisions needed the Assignment will be moved to Completed.
Digital Learning | Resources 17
TEACHER/TUTOR FEEDBACK IN ASSIGNMENTS
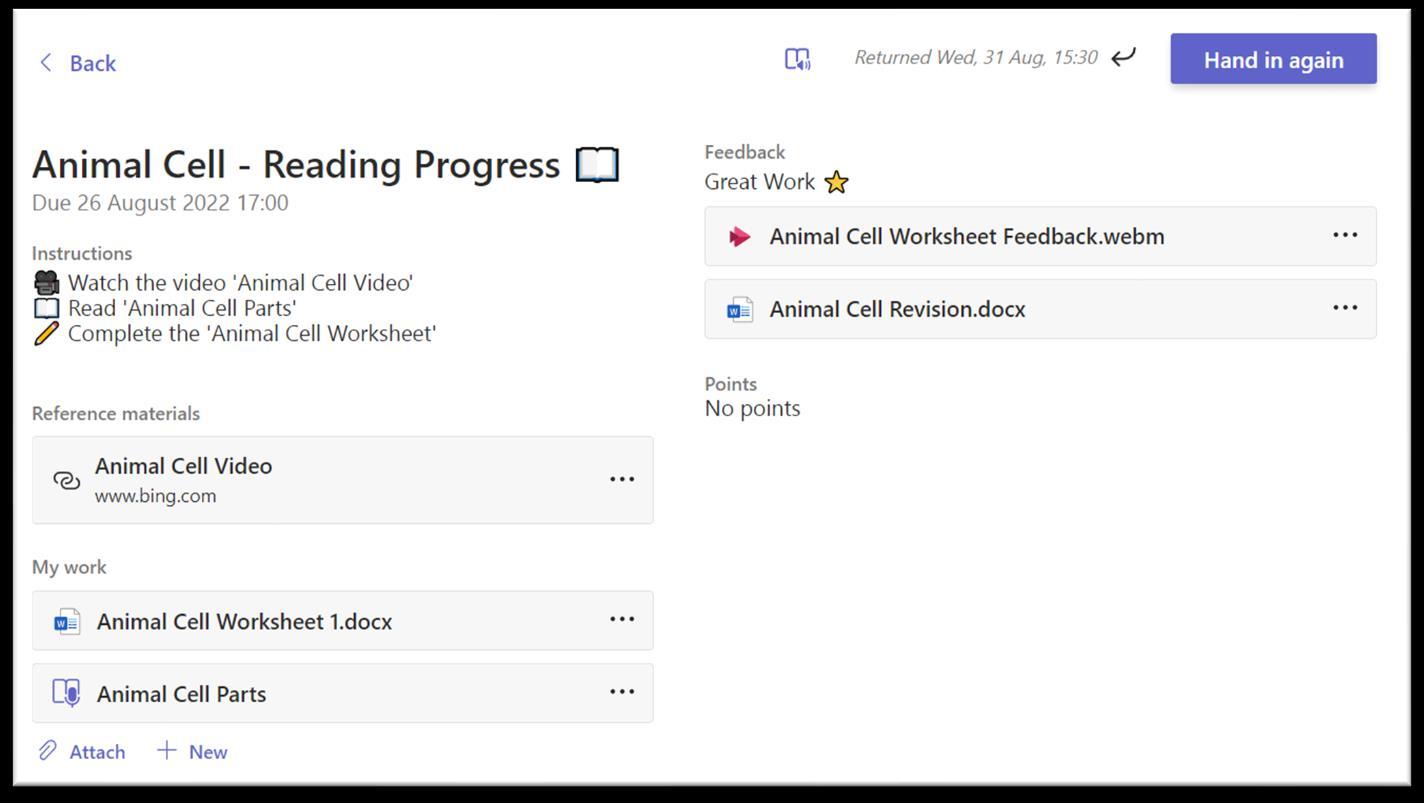
Your teacher/tutor may give you feedback in several different ways.
feedback comment in the feedback box
video or audio file with Feedback file with revision notes/correct answers
Depending on the setting in the Assignment, you can:
• Hand in again
• Hand in late
• Not handed in (if late hand-ins are not allowed)
• Undo hand in
GROUP ASSIGNMENTS IN TEAMS
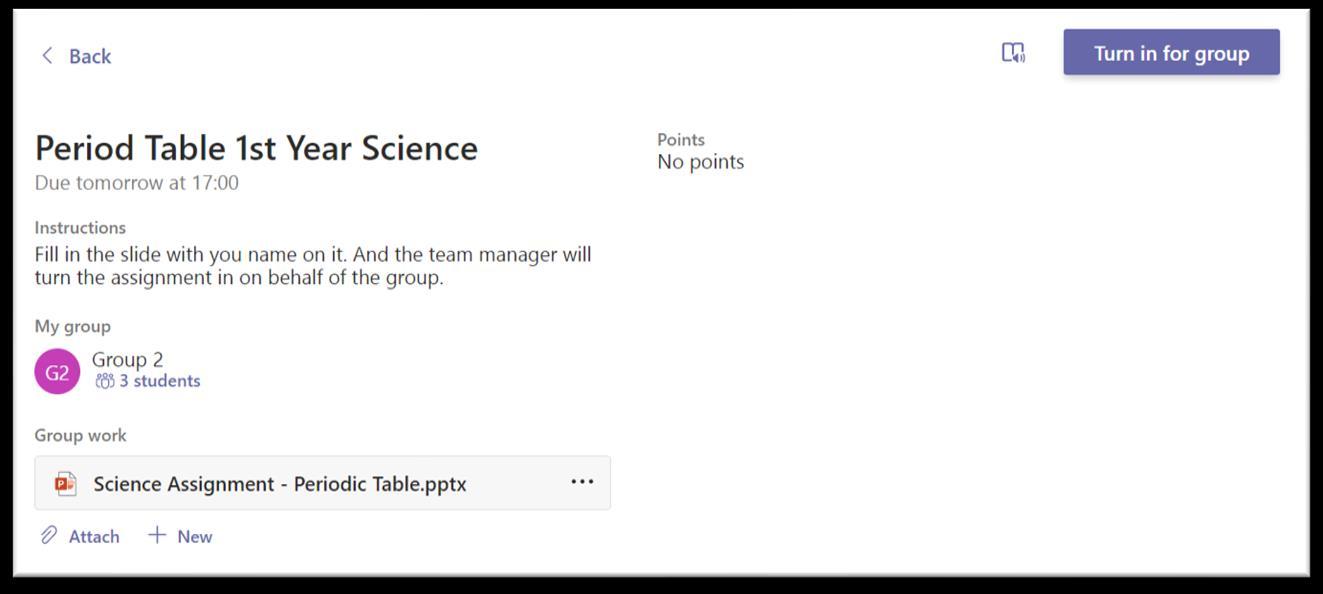
Your teacher/tutor might assign an assignment to a group in Teams.
Digital Learning | Resources 18
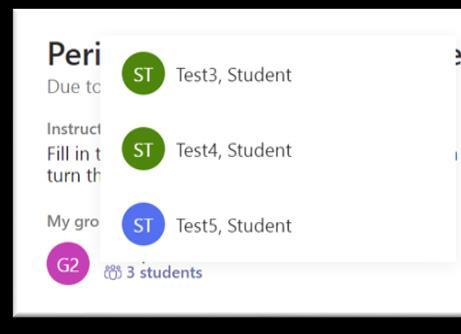
If you select the group icon, you will be able to see the other students in your Group.
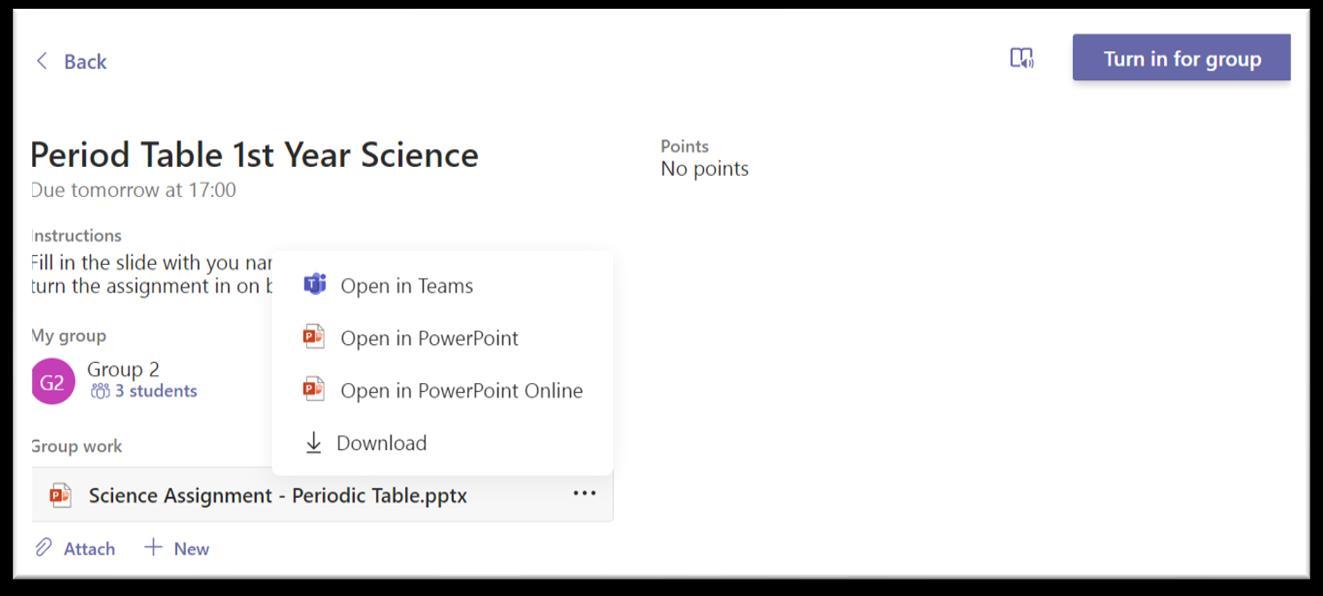
Select the (…) to edit the assignment. Make changes to the file and select close. You can also attach files for your work. Only one person from the group turns in the assignment on behalf of the group. Your teacher/tutor may appoint a group manager who will be responsible for turning in the assignments for the group.
Digital Learning | Resources 19
Digital Learning | Resources 20
TAKE A PHOTO OR VIDEO DIRECTLY INTO ONEDRIVE
o Log in to your O365 account through Google Chrome on your phone or device – Use your college/center email address and password.
o Select OneDrive from your O365 dashboard – Create a shortcut on your phone screen.
Tap Settings in the top right corner > Add to Home Screen
o Open the folder where the recording or photo will be stored.
Tap More (three dots) … on the ribbon.
Tap Upload > Tap File.
Select Camera from the options displayed at the bottom of the screen. If you have the Document option on your camera select this to take a photo of your written work.
Locate the new file (Photo) in the OneDrive folder – it will have a long name made up of letters and numbers and will be highlighted as a new file in the folder.
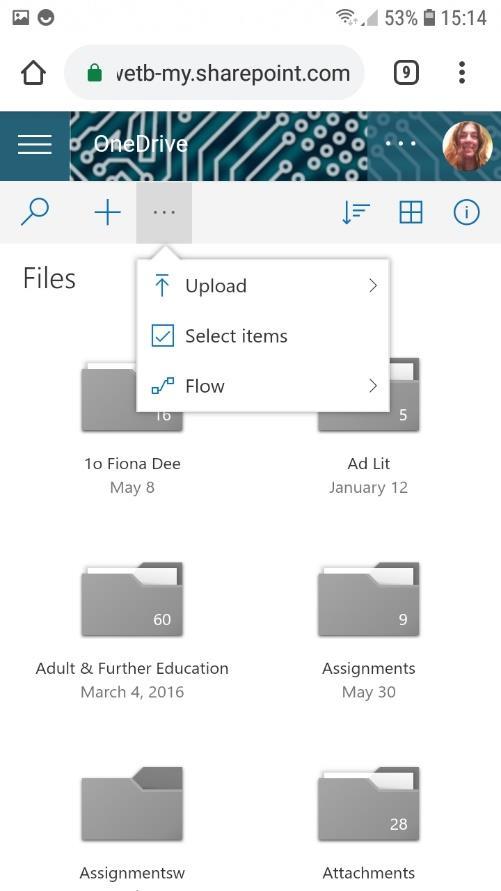
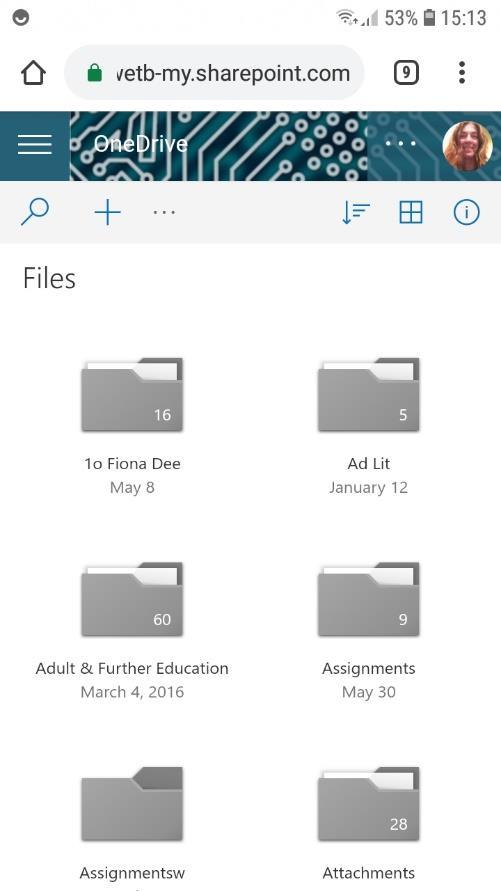
Tap and hold the file name > tap rename form the menu and type in a more suitable name for the photo. You can now add the photo using Add Work in Assignments in Teams.

Digital Learning | Resources 21
Tap More on the Menu bar
Select Upload from the drop-down menu
Select Files or Folders
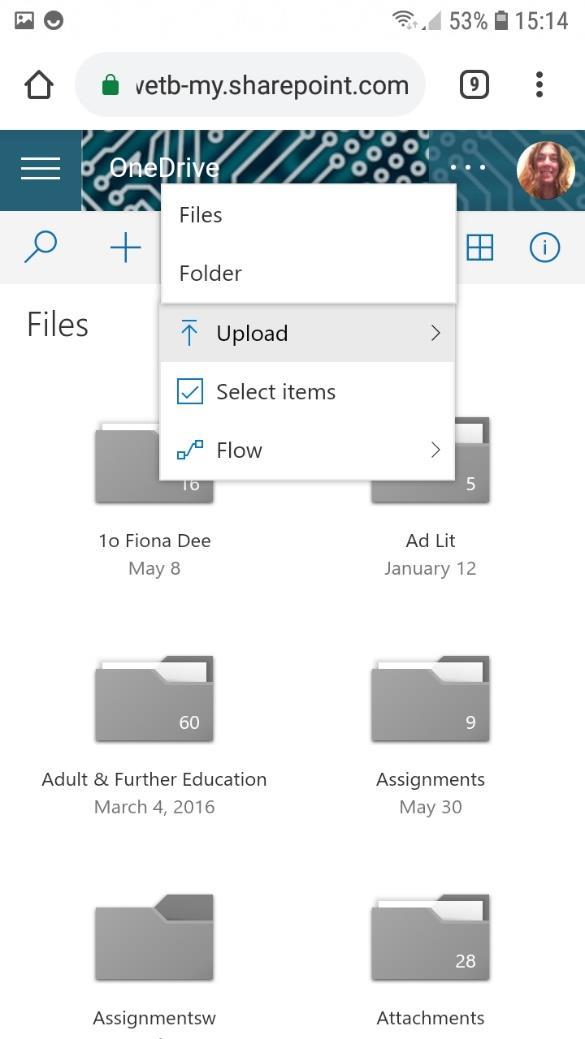
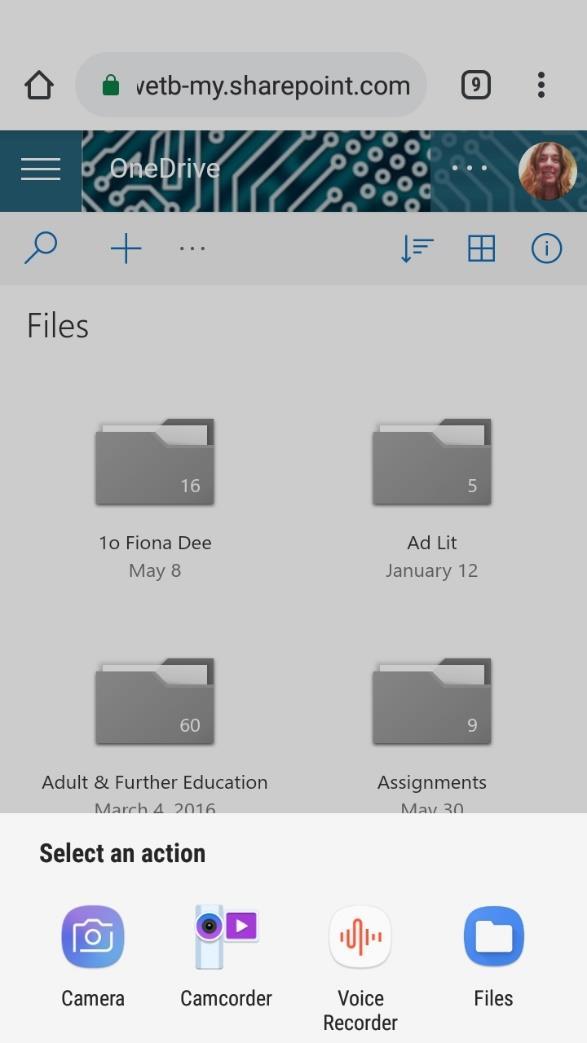
Select from Options displayed as shown (may vary)
o NOTE: The options you can see here might be slightly different on your phone.
o NOTE: Video recordings may take a few minutes to upload fully – you do not have to wait for one recording to upload before commencing another however you do need to stay connected to the Wi-Fi for the duration of the upload.
Digital Learning | Resources 22
UPLOAD FILES (PHOTOS/VIDEOS/FILES) TO ONEDRIVE FROM A PHONE
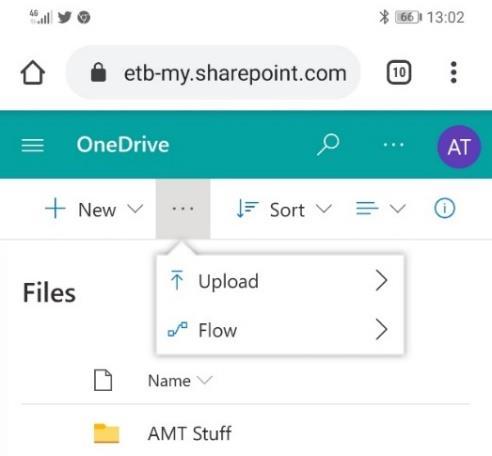
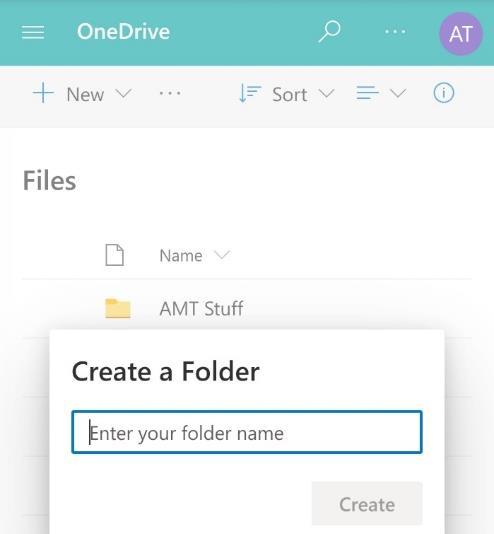
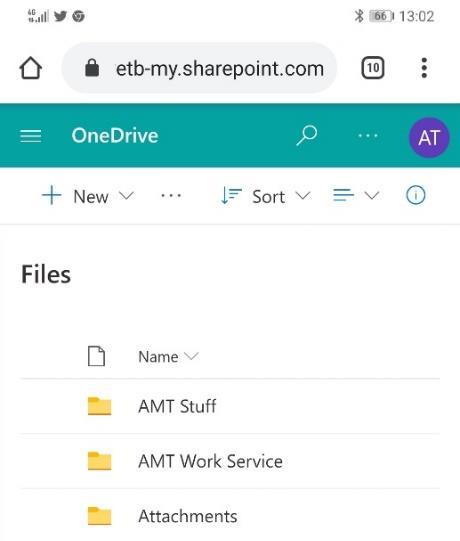
These files could then be shared with your teacher/tutor or added to an assignment.
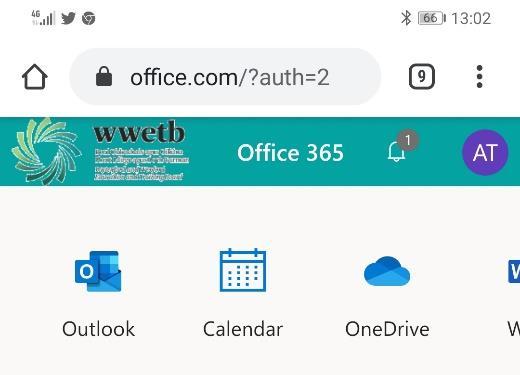
Step 1: Log into Office.com using any browser with your college/center email address and password. This will bring you the Office 365 Dashboard.
Step 2: From the Office 365 DashboardSelect OneDrive
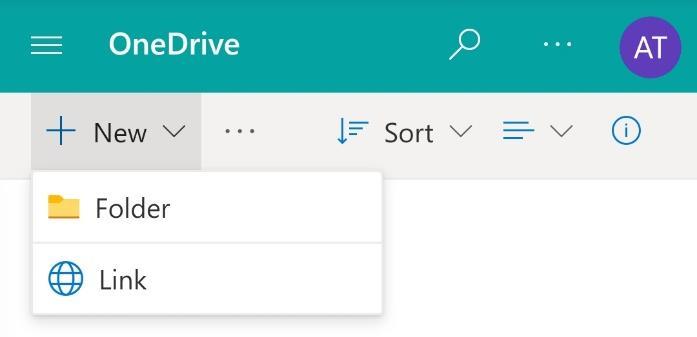
Step 3: If you don’t have a folder to upload to, Select ‘New’ and create a New Folder that you can Upload your files/photos/videos to.
Step 4: Create a Folder. Give it a name and then select this folder to upload the files to.
Step 5: Select the 3 dots and select upload. Step 6: Select Upload Files and select the videos/photos/files you want to upload.
Digital Learning | Resources 23

Digital Learning | Resources 24
USING MICROSOFT LENS TO SUBMIT AN ASSIGNMENT
Microsoft Lens is a scanning app or portable scanner allowing you to capture pictures of whiteboards, documents, and receipts to save and edit them digitally. This makes it easy to submit class work to your teacher/tutor This guide explains how to use Microsoft Lens to:
• Convert multiple handwritten pages into a single PDF document
• Submit this PDF as an assignment in your Class Teams
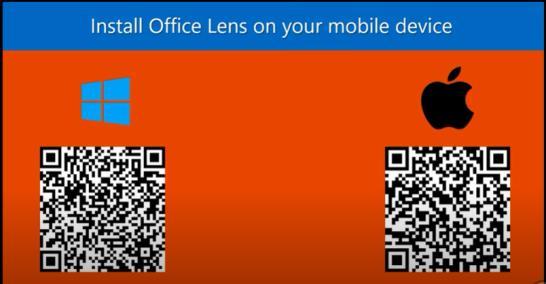
Before you begin, you must download and sign-in to Microsoft Lens with your student O365 login.
Microsoft Lens Download Microsoft Lens
USE MICROSOFT LENS ON ANDROID
The following sections describe how to use Microsoft Lens on an Android device:
• Create a PDF
• Submit your PDF as an assignment on Canvas
CREATE A PDF
1. Open the Microsoft Lens app.
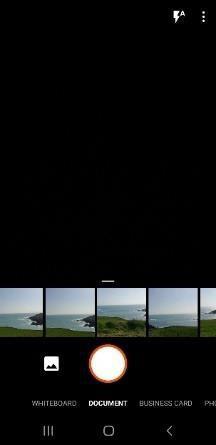
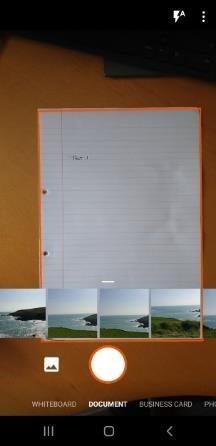
2. On the screen that displays, ensure Document is selected.
Note: To add your student email, choose the three vertical dots in the upper, right-hand corner. Select Settings, and then choose Manage accounts.
3. Centre the document on the screen and tap the white circle to take a photo.
Note: A red box displays on the screen to help you align the document.
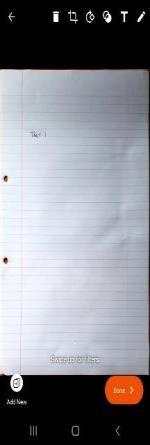
4. To add more pages to the document, choose Add New.
5. Repeat steps 3 and 4 for each page to be included in the document. After you capture all pages, choose the orange arrow button, and then choose Done.
Digital Learning | Resources 25
Note: Before you choose Done, swipe across the screen to view each page in the document. Use the controls at the top of the screen to crop, edit, and delete pages, as needed.
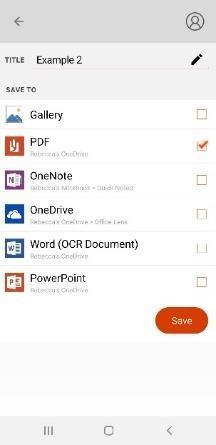
7. On the save screen, select PDF, and then choose the Save button.
Note: You can also edit the title of the document by choosing the Pencil icon.

Note: The file automatically saves to your OneDrive if you are signed in.
ADD THE PDF TO AN ASSIGNMENT IN TEAMS
• Once the file has been saved as a PDF into OneDrive it can be added as work to an Assignment in Microsoft Teams.
• Open your Class Team and from the navigation select the Assignments link.
• Open the assignment from the list displayed on the Assignments landing page and click on the Add work button.
• Locate the PDF file you saved using office lens and click Open to attach to your assignment
Don't forget to submit your work by selecting Turn in when you are finished.
WATCH THE VIDEO BELOW TO SEE HOW IT WORKS!
Using Office Lens
Using Office Lens to scan multi-page homework assignments and directly uploading to Canvas
How to use Immersive Reader in Office Lens for iPhone
A step-by-step tutorial on how to use Office Lens for Android.
Digital Learning | Resources 26


Digital Learning | Resources 27
Digital Learning | Resources 28
SIMILARITY CHECKER
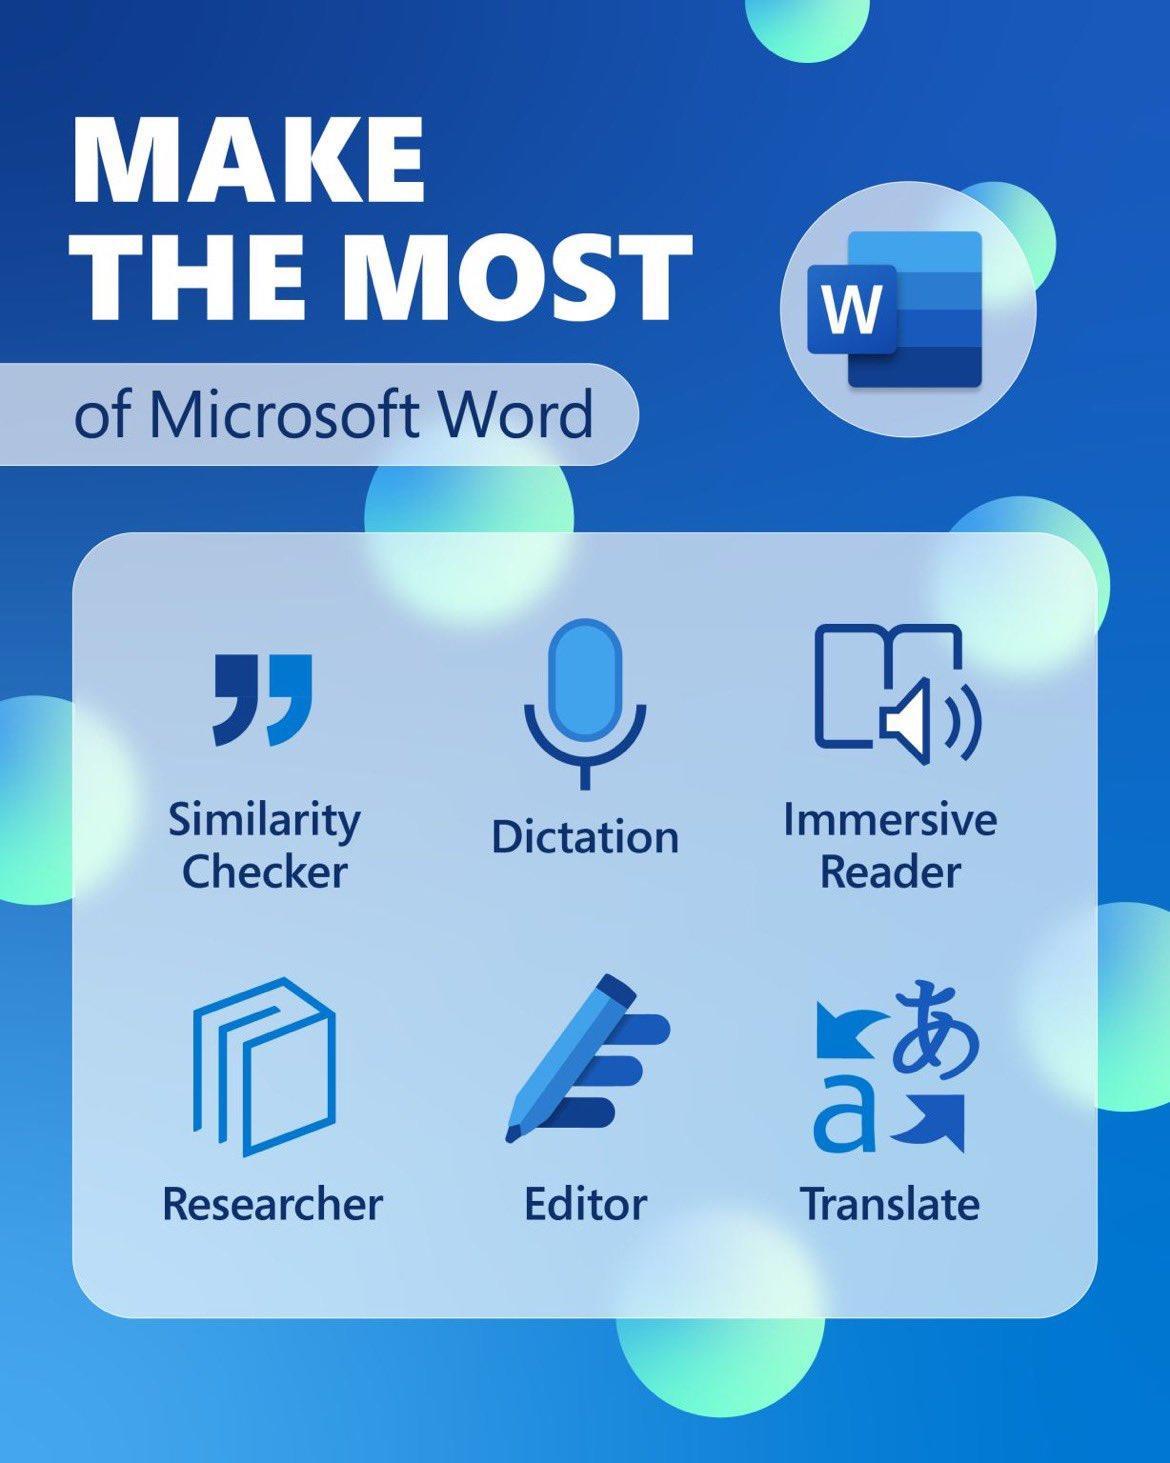
Microsoft Editor includes a similarity checker, which helps you create original work and reference the work of others. The similarity checker shows you how much content in your document is original, and it makes it easy to insert citations when necessary.
•
• On the Home tab, select Editor.
In the Editor pane, find Similarity, and click or tap Check for similarity to online sources

• When the check is complete, Editor shows you how much of your content matches text that it found online (indicated as a percent), and the number of distinct passages in the document for you to review.
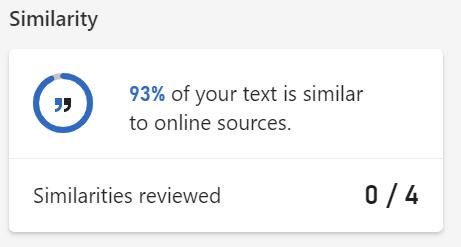
• To review the passages, click or tap Similarities reviewed.
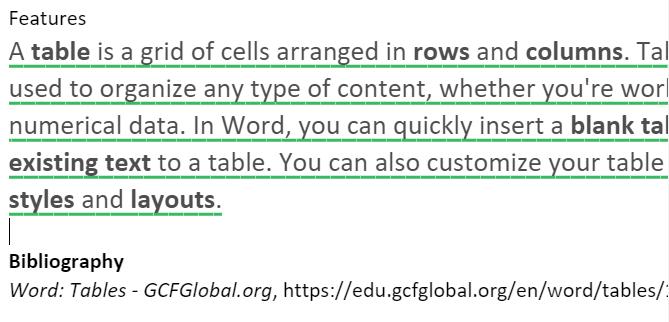
• After a passage has been reviewed, Editor underlines it in green. Clicking or tapping in the passage opens the citation suggestion again, which is helpful if you want to re-read the online source or add a citation to a passage that you previously ignored.
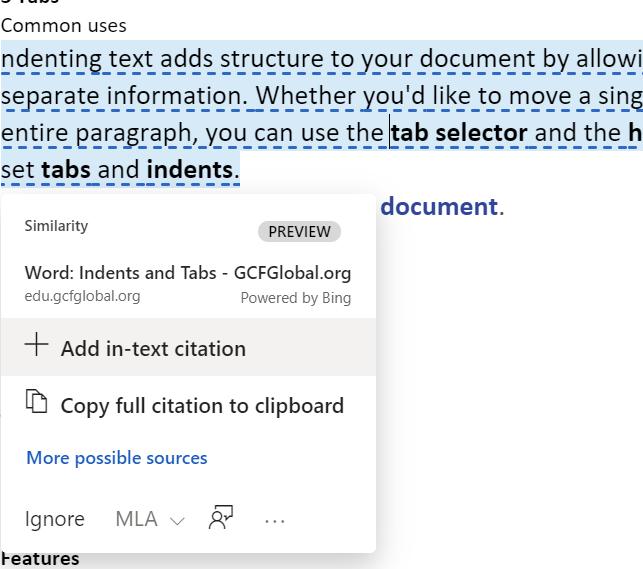
Editor takes you to the first passage, where the text is underlined with a blue broken line. You can choose if you want to insert a citation. A link to the online content lets you judge for yourself whether this is warranted. If you decide not to add a citation/reference, choose Ignore. Otherwise, you can add an intext citation or copy the link to the clipboard.
Digital Learning | Resources 29
INSERTING CITATIONS

• Inserting an in-text citation places the citation immediately following the passage. Depending on the situation, Editor might also surround the passage with quotation marks. If you don't want the quotation marks, just delete them.

• If your document includes a bibliography or a list of works cited, use Copy full citation, and paste the citation into the bibliography, or the works cited.
TRANSLATE
From the Review tab on the ribbon select the drop-down in the Language group
Translate Selection will open the Translator pane on the right of the screen – select your language to translate content to.
Translate Document will open the translated file in a new document.
DICTATE
Speech-to-Text is available through the Dictate button on the Home tab in the Voice group on the ribbon Practice using Dictate Commands for Inserting and Editing text: Dictate your documents in Word - Microsoft Support
Inserting Editing
Full stop . delete [word or phrase]
Say delete followed by the word you want to delete Comma , Note: If there is more than one occurrence of the word a number will appear above each occurrence – Say the number of the word you want to delete
Digital Learning | Resources 30
New line Cursor moves down one line Undo Undo the last action New Paragraph Cursor creates paragraph space Insert space Insert space between words Open bracket, Close bracket Inserts parenthesis in the sentence Backspace Delete to the left
Digital Learning | Resources 31
IMMERSIVE READER
The Microsoft Immersive Reader is a free tool, built into Word, OneNote, Outlook, Office Lens, Microsoft Teams, Forms, Flipgrid, Wakelet, Minecraft Education Edition and the Edge browser. Immersive Reader is available in PowerPoint online by selecting any text on the slide and then select the Immersive Reader.
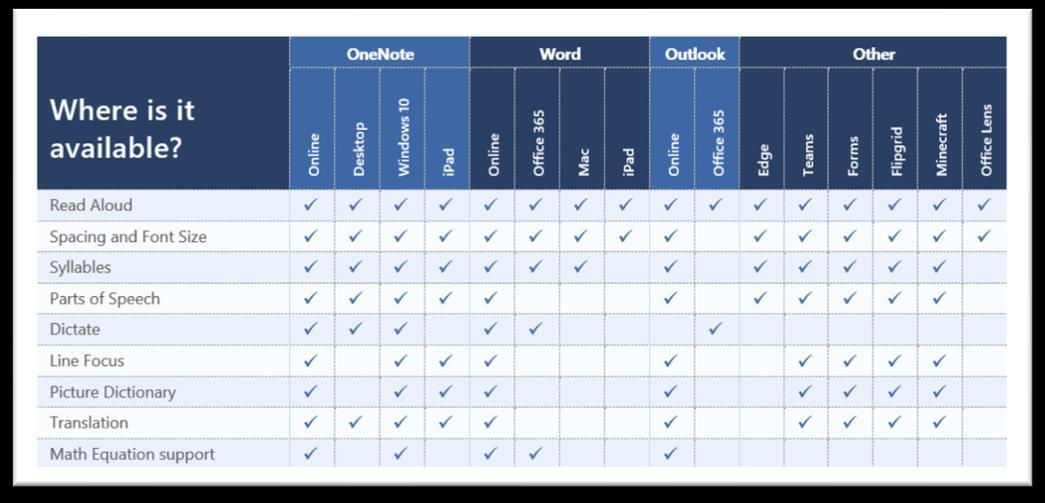
Immersive Reader allows you to declutter a page when using the Edge Browser. It will allow you to personalise your reading experience: change the font size, background colour, line spacings, highlight verbs, nouns, and adjectives. You will have access to a picture dictionary. You can use the translate feature and read the text aloud.
IN THE EDGE BROWSER
Reading View (Ctrl + Shift +R) or click on the book icon to get the Reading View.
The clutter will be removed. It will just show the article.
Read Aloud (Ctrl + Shift + G)
Digital Learning | Resources 32
Grammar Tools
Reading Preferences
IMMERSIVE READER IN WORD ONLINE

The Immersive Reader will also work on the ‘Click to Run’ Version of Word (You will see the AutoSave if the ‘Click to Run’ Version is being used).
Click on View and access Immersive Reader.
Digital Learning | Resources 33
Preferences
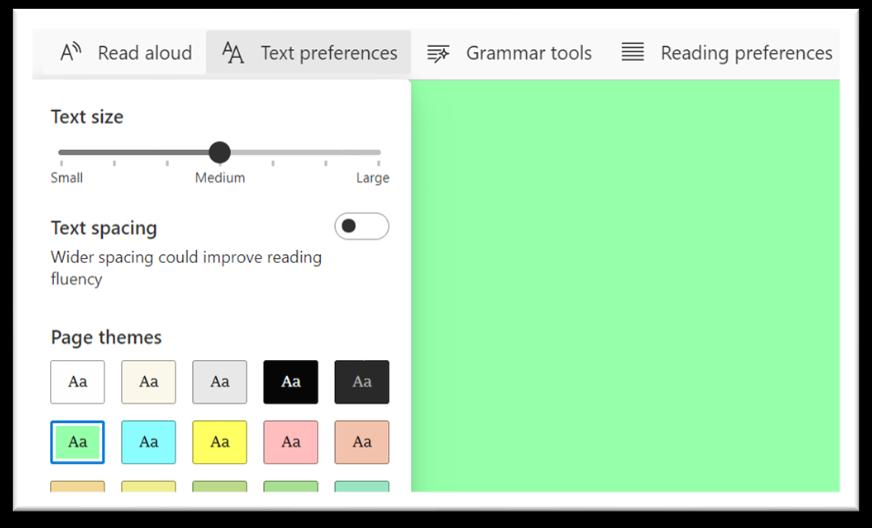
Text
Text Preferences
Text Size and Spacing, Font Style and Page Theme.
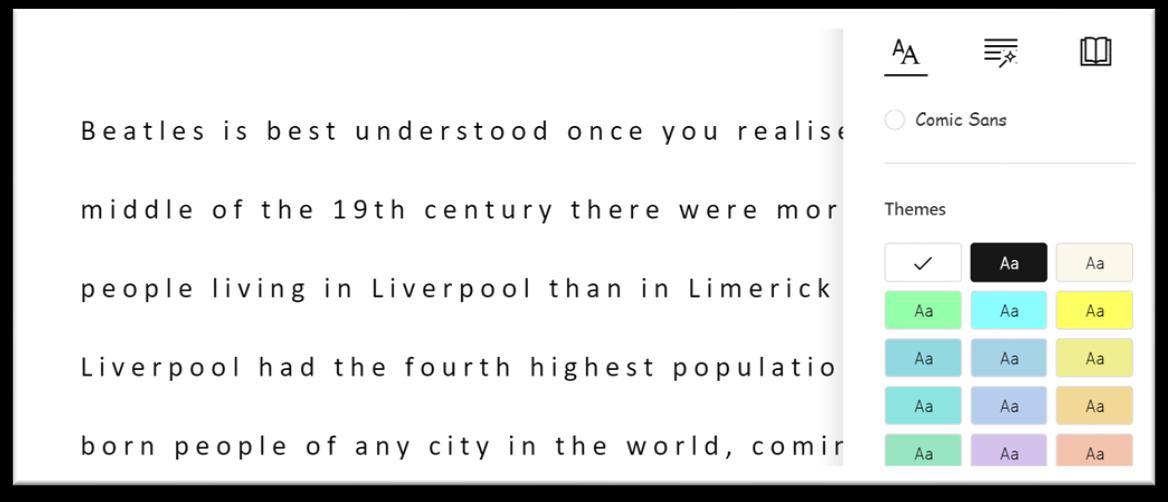
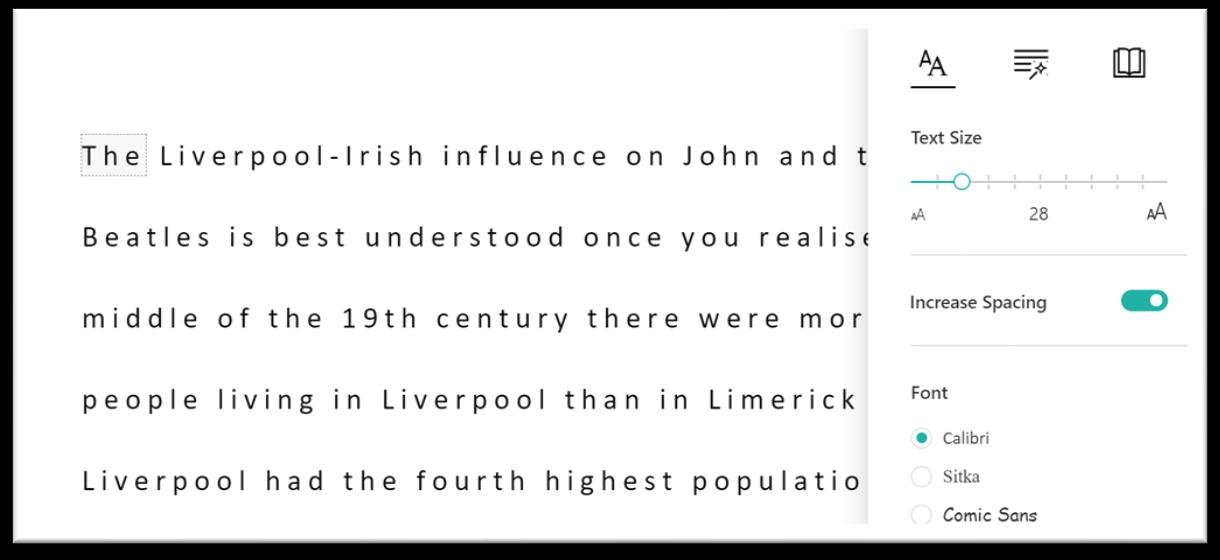
Page Theme - Change the background colour
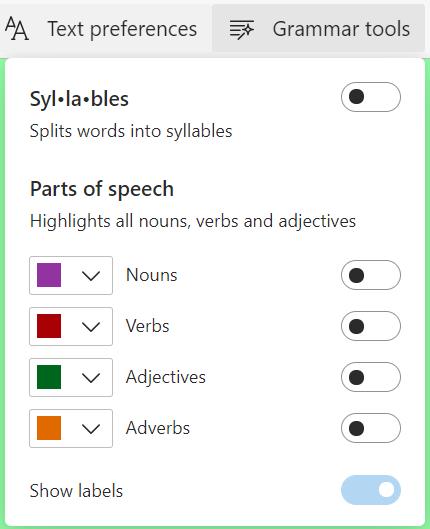
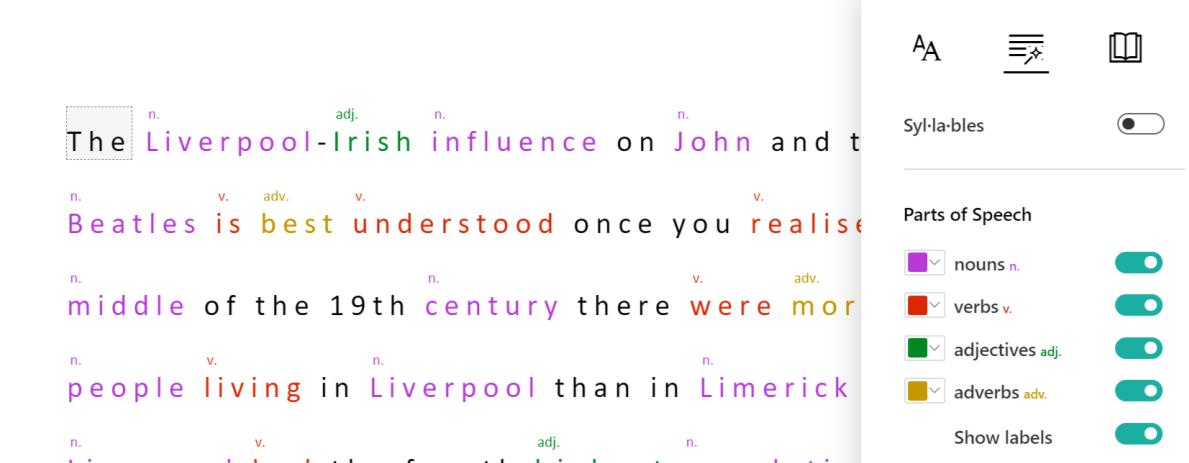
Grammar Preferences
Highlights nouns, verbs, adjectives, and adverbs. And shows labels.
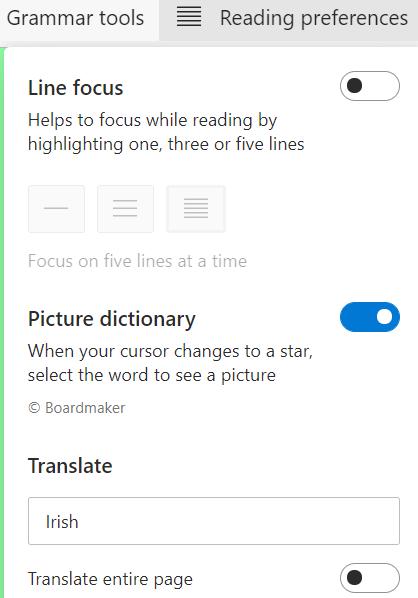
Reading Preferences
Digital Learning | Resources 34
Line Focus, Picture Dictionary, Translate (by word or document)

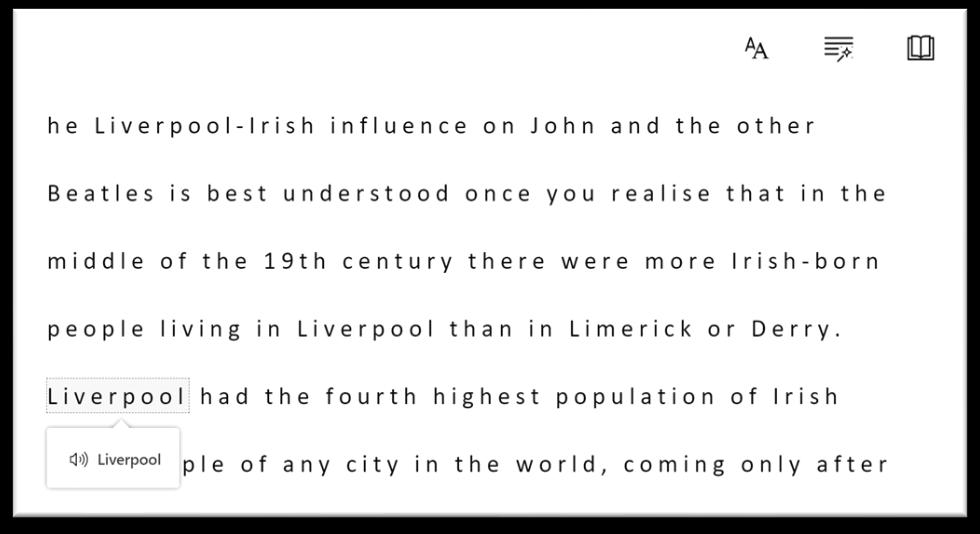
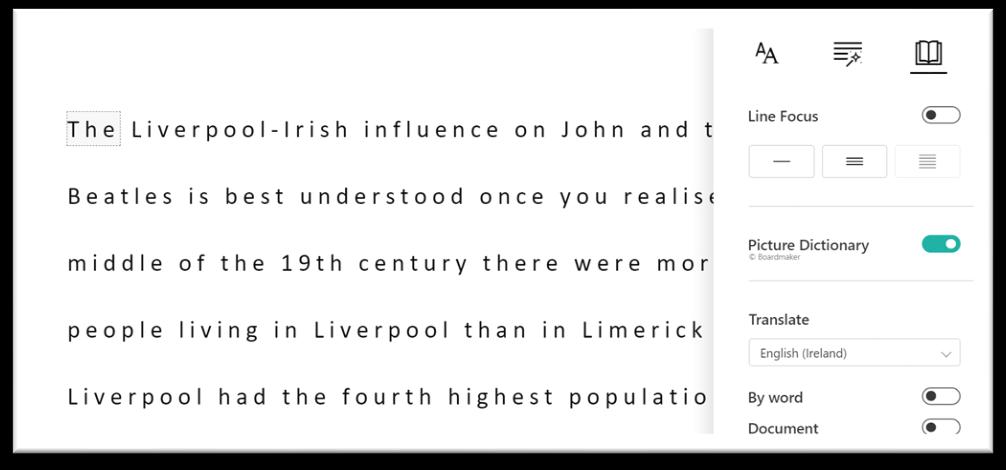
Click on the word and it will pronounce the word.
Picture Dictionary
Gives a picture of the word and will pronounce the word.
Voice Settings
Digital Learning | Resources 35
IMMERSIVE READER IN TEAMS ASSIGNMENTS
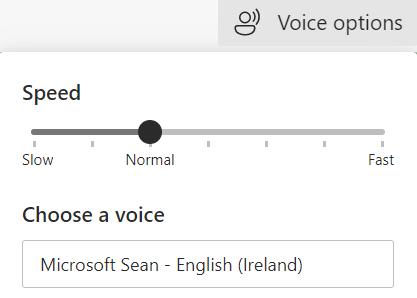
You can use the Immersive Reader in Assignments if you would like to personalise your reading experience. You can change the font size, line spacing, font type and colour of the background. You can listen to the instructions and translate the text.
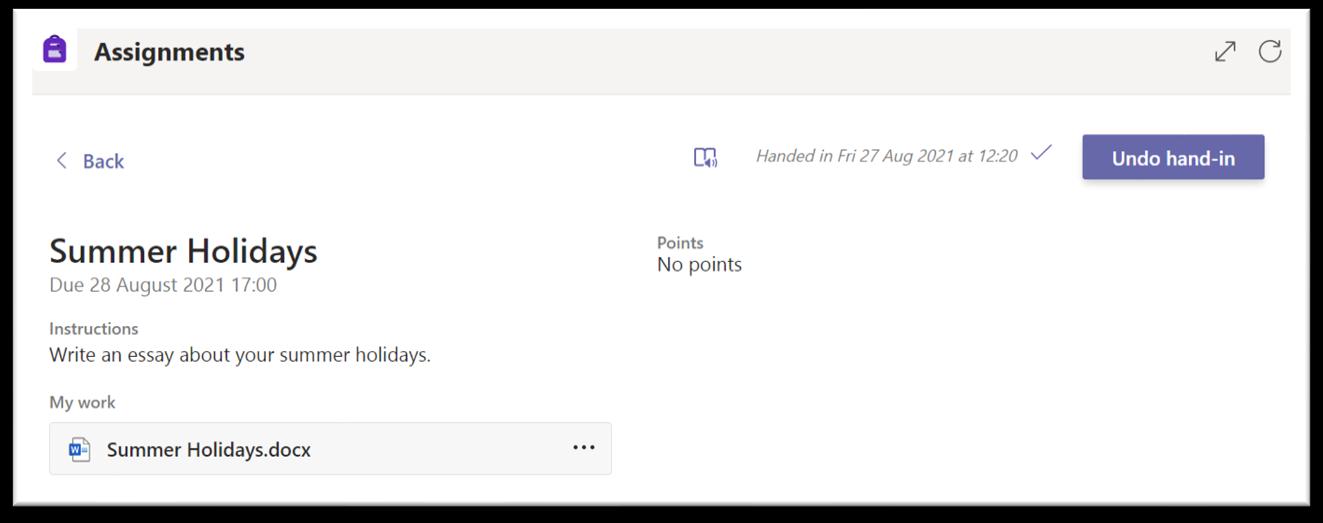
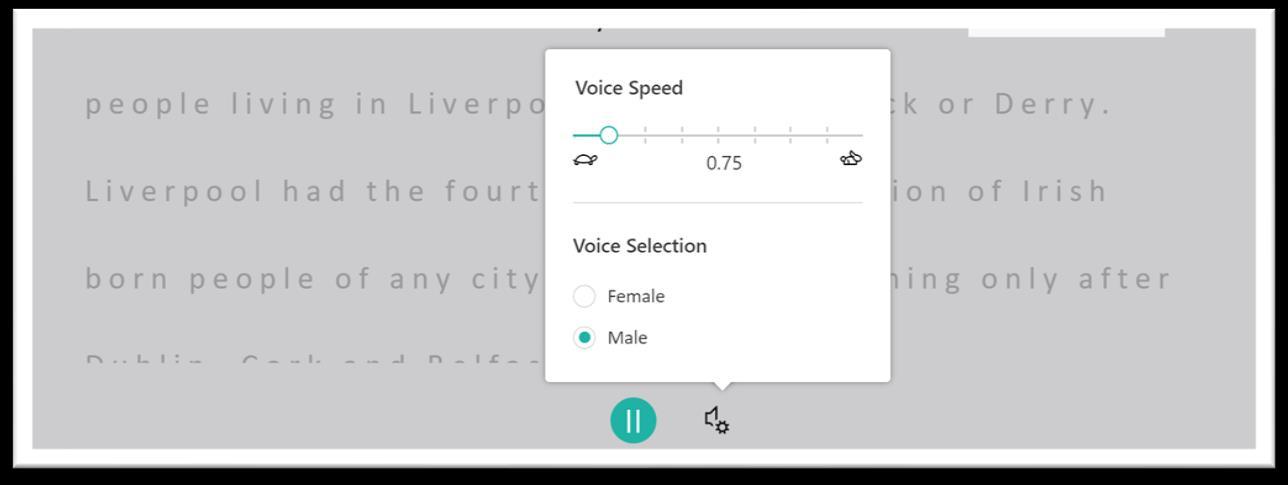
Digital Learning | Resources 36 Voice Speed and Voice Selection


Digital Learning | Resources 37
COLLECTIONS IN MICROSOFT EDGE
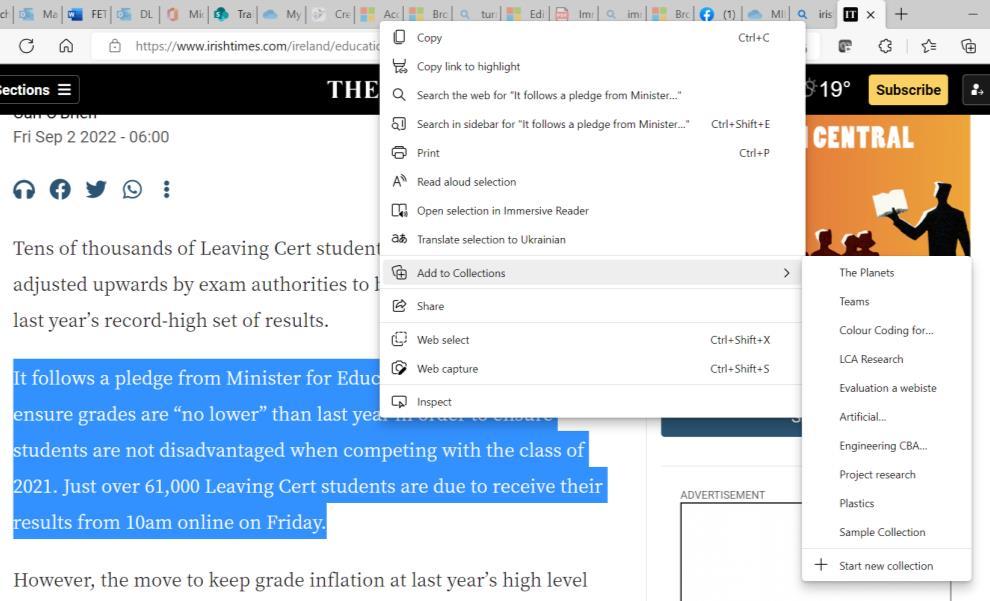
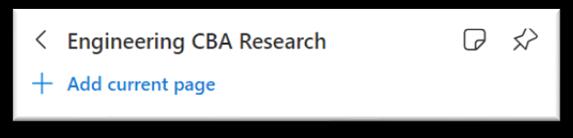
Collections in Microsoft Edge can help you keep track of your ideas on the web, collecting notes for research, or if you want to pick up from where you left off the last time you were browsing the internet.
START A COLLECTION
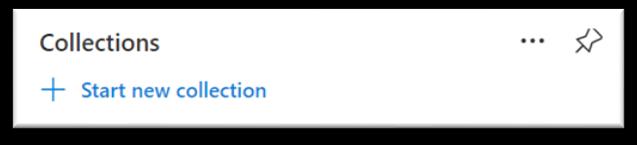
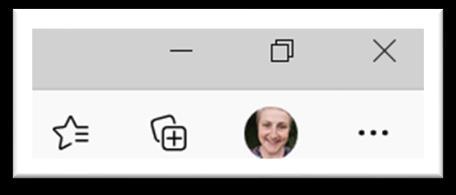
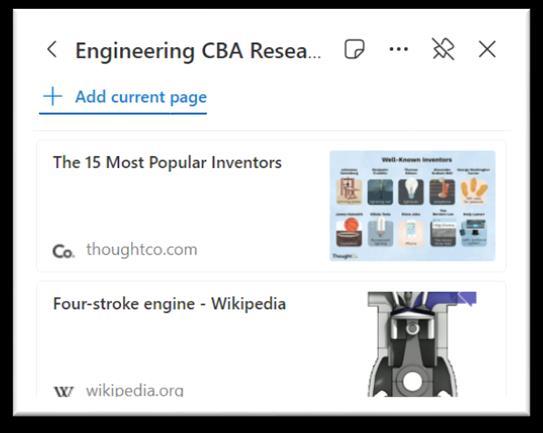
Select Collections in the top right-hand corner of the Edge Browser and select Start New Collection.
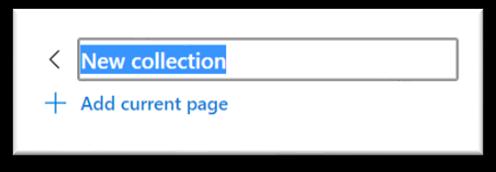
Give your Collection a name.
ADD TO YOUR COLLECTION
You are now ready to start adding to your Collection.
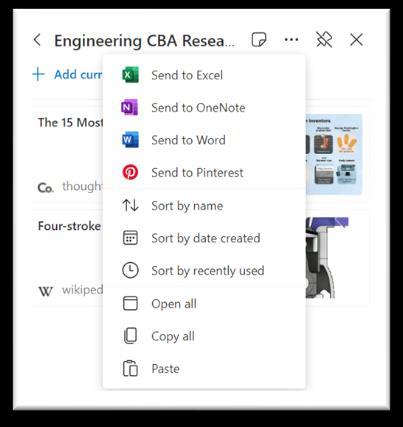
You can drag an image/text across and drop it into your Collection. Add Current Page to Save a webpage to your collection.
You can select text/image, right click and Add to a Collection or Start a new Collection
Digital Learning | Resources 38
ADD A NOTE TO YOUR COLLECTION
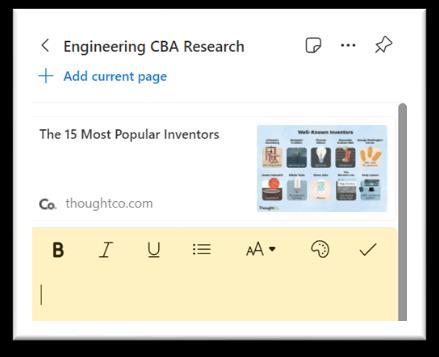
When you have added to your Collection, you can add a Note as to why you added the page/image/text to your Collection.
PIN A COLLECTION
You can Pin the Collection to make it easier to drop content into the Collection.
REMOVE AN ITEM FROM THE COLLECTION
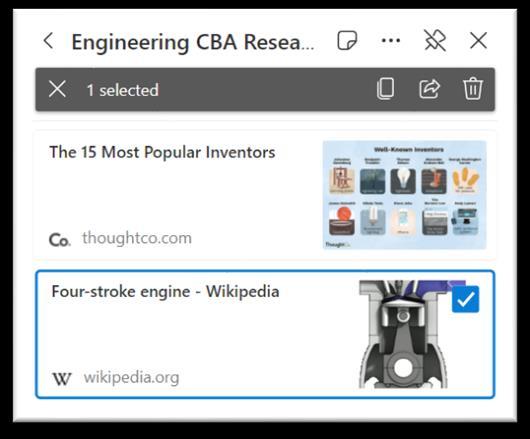
To remove items from the Collection. Select the item and then select the bin to remove it.
SHARE A COLLECTION
Digital Learning | Resources 39
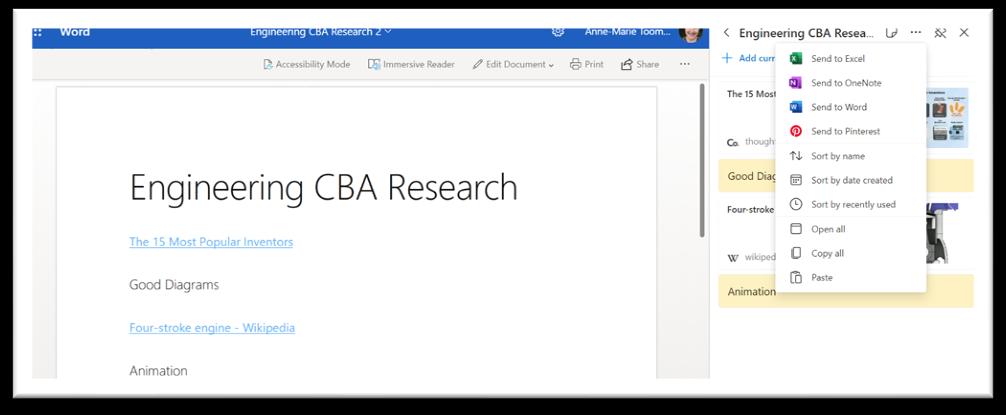
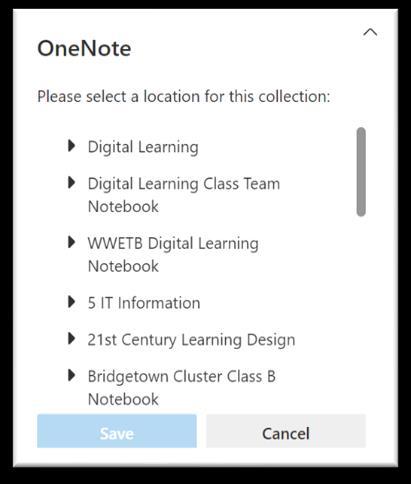
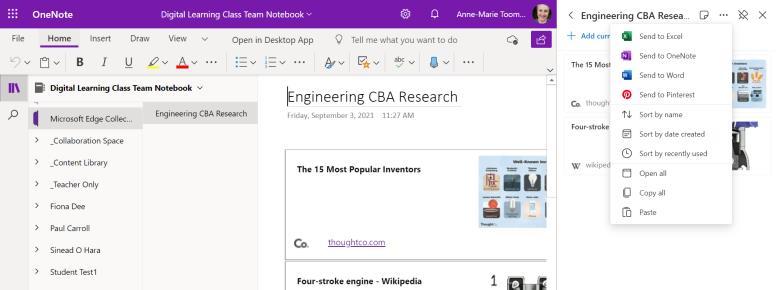
If you Share a Collection to OneNote, it will give you the option to select the Notebook you would like to add the Collection to. The Collection will then open directly into OneNote online
SHARING TO WORD
COLLECTIONS ON AN IOS DEVICE
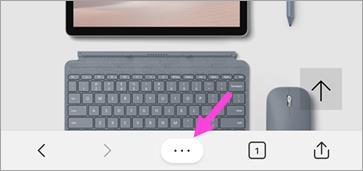
1. At the bottom of the screen, tap the ... menu and then tap Collections.
2. Tap the + button at the bottom of the screen.
3. Type a name for your collection and then tap Done.
4. Tap your new collection to open it, and then tap + to add the webpage you're currently viewing.
Digital Learning | Resources 40
COLLECTIONS ON AN ANDROID DEVICE
1. At the bottom of the screen, tap the menu ... and then tap Collections.
2. Tap the + button at the top of the screen.
3. Type a name for your collection and then tap create.
4. Tap your new collection to open it, and then tap + to add the webpage you're currently viewing.
Note: You can’t add notes to Collections on iOS or Android devices, but any notes you add on your computer will sync to your collection on a mobile device.
Digital Learning | Resources 41

Digital Learning | Resources 42
ONLINE EXAM GUIDELINES
ACCESS THE EXAM
• Open your Outlook in Office 365.
• Locate the email with the link to the exam.
ANSWERING THE QUESTIONS
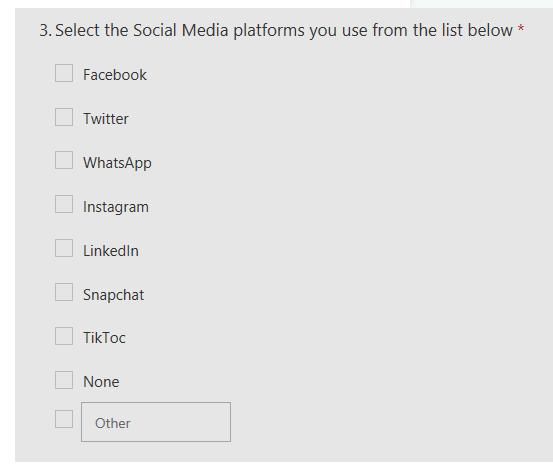
In the online exam you will be asked to answer different types of questions. These may include Multiple Choice, Text and Upload.
MULTIPLE CHOICE
• Select the radio button beside the answer you wish to choose

• If you are asked for more than one correct answer, select more than one options by ticking the select box beside your answers.
TEXT
• Click into the text box below the question and type in your answer. It will be automatically saved.
UPLOAD FILE
You may have been asked to answer a question in a Word or Excel document. To upload this answer to the online test
• Click Upload File below the question.
• Locate the file on your computer > Click Open.
SUBMIT EXAM
Make sure you scroll to the end of the exam and click on the Submit button to return your exam to your teacher/tutor.

Digital Learning | Resources 43

Digital Learning | Resources 44
JOIN A BREAKOUT ROOM IN A TEAMS’ CLASS MEETING
First, join a class meeting
You can join breakout rooms from Teams for desktop, iOS, or Android.
1. Navigate to Calendar in your app bar.
2. Find the class meeting and open it, then select Join 5
Note: Only meeting organisers can create breakout rooms.
JOIN AN ONLINE CLASS IN TEAMS
Device
• Open the Class team where the online class will take place.
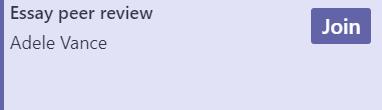
• In Posts you will see a meeting notification – click on the notification to see the meeting details and click Join. If the meeting is not visible in Posts, select Calendar in the Navigation bar at the side.
• You will see the online class scheduled in the calendar > select Join to attend.
Mobile Phone
• Open the Teams app on your phone.
• You will find the Join button in the Posts of the class team or in your calendar.
NOTE: It is important you follow your teacher/tutor’s instructions when you are taking part in an online class.
JOIN A BREAKOUT ROOM
▪ By default, you will be moved into your assigned breakout room as soon as your teacher/tutor opens the room. No action is required on your part.
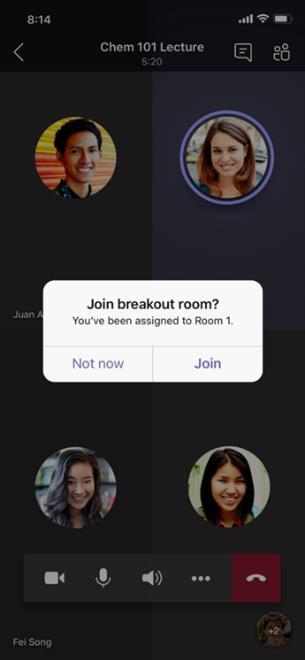
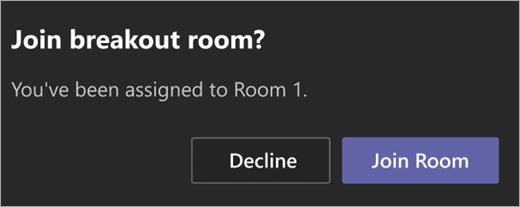
▪ If your teacher/tutor has turned off the automatic setting, you will receive a message notifying you of the open breakout room. Select Join Room on desktop or Join on mobile to join the room.
▪ If you are joining from your mobile device, do not navigate away from the meeting while your teacher/tutor is setting up rooms.
▪ You will also receive notifications to re-join the main meeting or if you are moved into another room.
▪ If you need to switch devices during the meeting or join with two devices, you will still stay in the correct breakout room.
Digital Learning | Resources 45
CHAT IN A BREAKOUT ROOM
Each breakout room will have its own chat. You will be able to access it from your chats list and from Chat in the breakout room.
▪ You will be added to a breakout room chat when your teacher/tutor starts the room. You will be removed from the chat when the room is closed.
▪ NOTE: the organiser of the meeting will see the chat history, files and recordings.
What will learners see after the meeting?
▪ Chat: the chat is not available to the student when the room is closed or the meeting ends.
▪ Files: Any files shared during the breakout session will be available to the student in the student OneDrive – Select Recent or Shared in the navigation pane after the breakout room is closed.

▪ Recordings: If the student recorded the breakout room session it will be available in the Recordings folder in their OneDrive. It will not be available to the other learners who were in the room.
Digital Learning | Resources 46
Digital Learning | Resources 47
TROUBLESHOOTING ONENOTE PROBLEMS ON YOUR
PHONE
USING ONENOTE APP
If you have installed the app to your phone and are having trouble accessing a section of your Notebook, try the following steps
STEP 1: SYNC ALL NOTEBOOKS
• Open the OneNote app and Tap Notebooks at the bottom of the screen to display all notebooks.
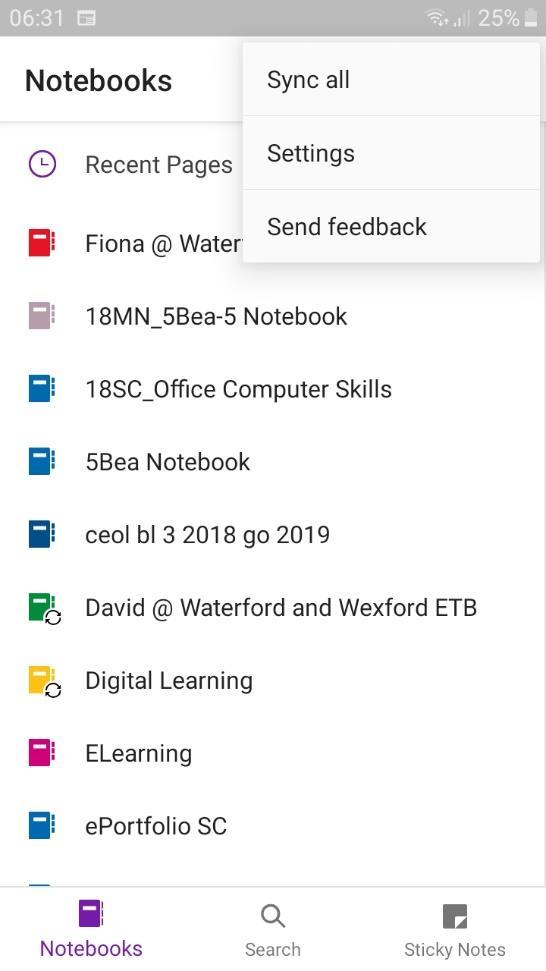
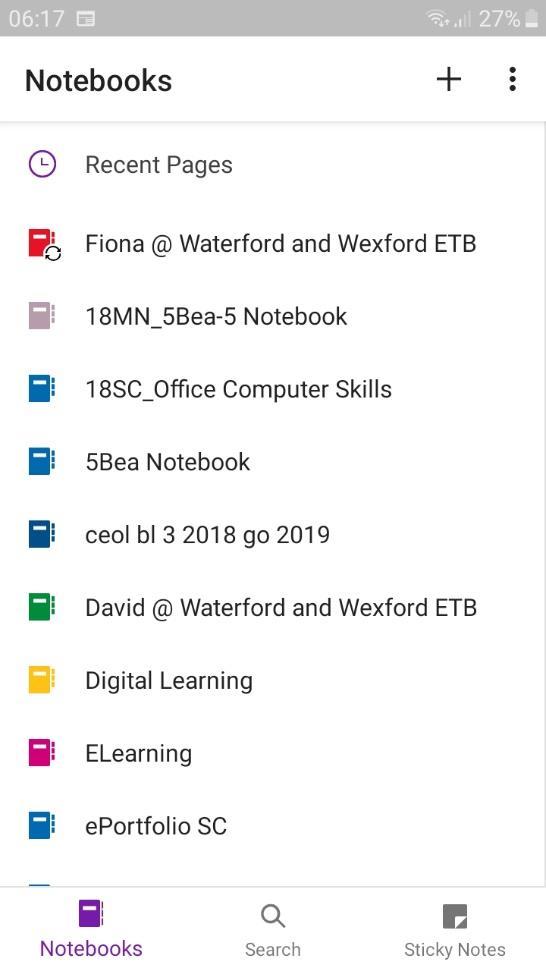
• Tap the 3 dots (ellipses) in the header > From the menu Tap Sync all.
STEP 2: CLOSE AND REOPEN THE NOTEBOOK
• Tap Notebooks at the bottom of the screen.
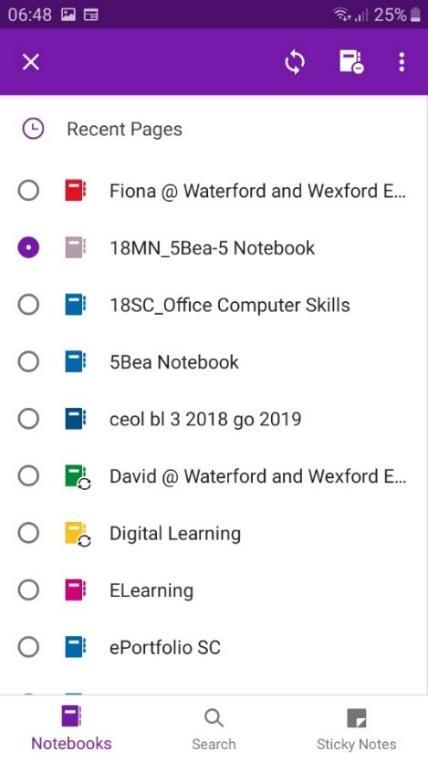
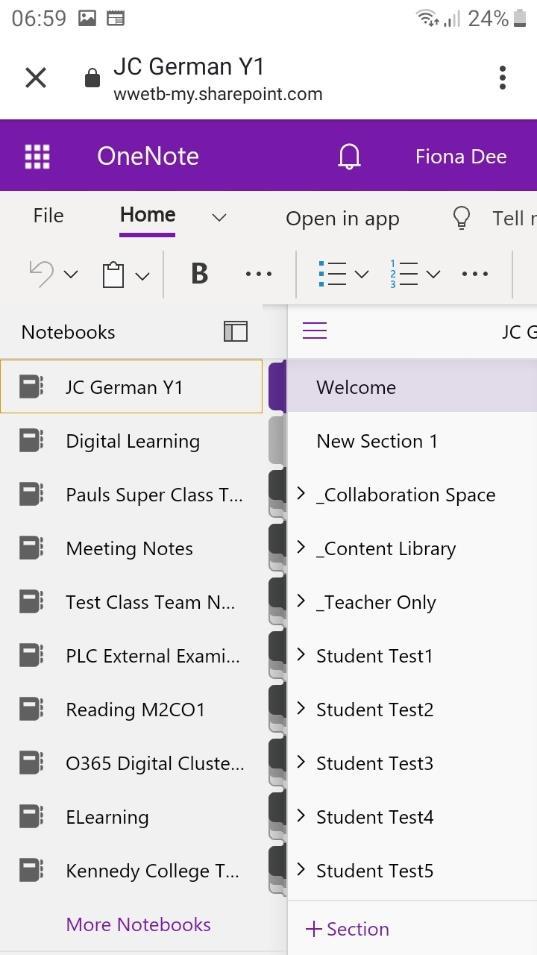
• Tap and hold on the name of the notebook causing problems > Tap the Close Notebook button. (See Page 2)
• Tap More Notebooks at the bottom of the list of Notebooks and reopen the notebook.
Digital Learning | Resources 48
If you still have problems with the notebook app, try the following:
STEP 3: CHECK FOR AN APP UPDATE
• Open the Play Store or App store on your phone.
• Search for the OneNote app
• If it says Update instead of Open, click on the Update button.
• When finished updating open the app.
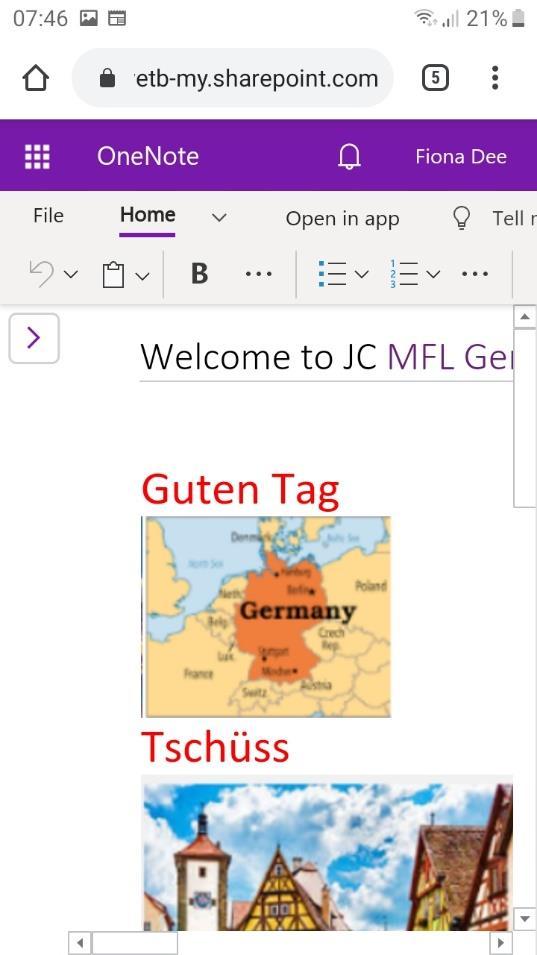
STEP 4: OPEN THE NOTEBOOK IN ONENOTE ONLINE
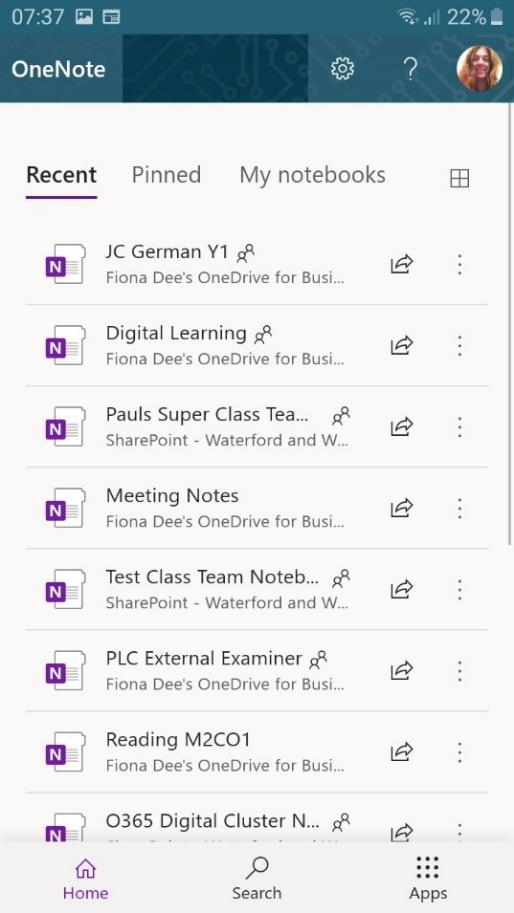
• Log in to your O365 account through Google Chrome on your phone or device –type in Office.com > Sign in > Use your college/center email address and password.
• Swipe the screen left to see the OneNote app > Tap to open OneNote from your O365 dashboard
• Your notebooks will be displayed under the Recent tab.
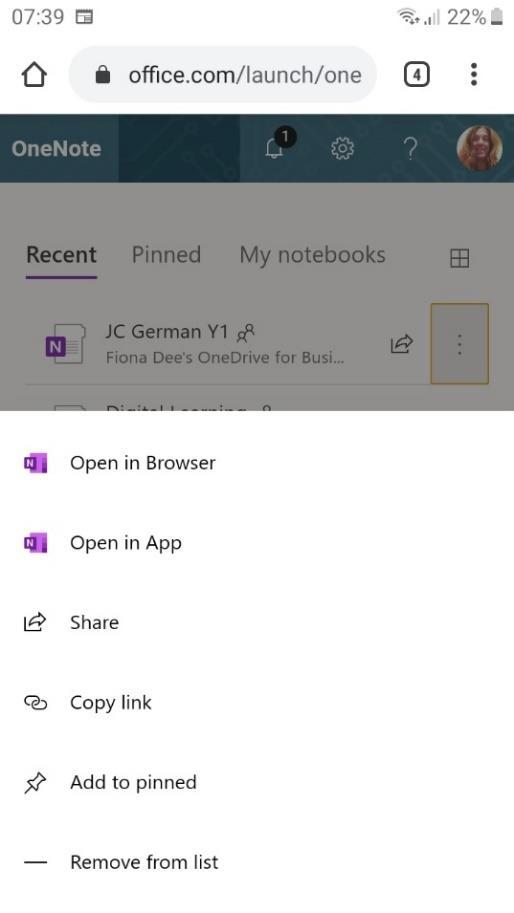
• Tap the 3 dots to the right of the notebook you want to open > Open in Browser.
• Tap the large arrow on the left of the notebook to show all the Sections in your notebook (See page 3).
• When you have checked all the sections are available and are now working for you, you can open in the OneNote app.
Digital Learning | Resources 49
Digital Learning | Resources 50
MICROSOFT STUDENT SUPPORT CENTRE.
Click on the image below
Digital Learning | Resources 51