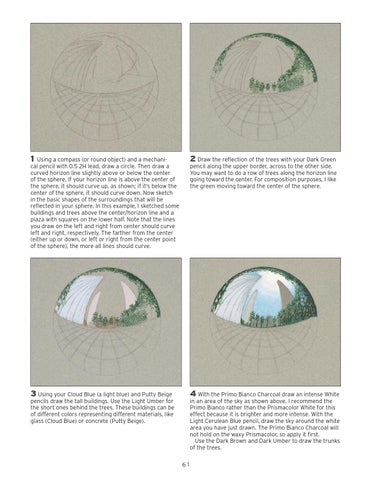
1 Using a compass (or round object) and a mechanical pencil with 0.5 2H lead, draw a circle. Then draw a curved horizon line slightly above or below the center of the sphere. If your horizon line is above the center of the sphere, it should curve up, as shown; if it’s below the center of the sphere, it should curve down. Now sketch in the basic shapes of the surroundings that will be reflected in your sphere. In this example, I sketched some buildings and trees above the center/horizon line and a plaza with squares on the lower half. Note that the lines you draw on the left and right from center should curve left and right, respectively. The farther from the center (either up or down, or left or right from the center point of the sphere), the more all lines should curve.
2 Draw the reflection of the trees with your Dark Green pencil along the upper border, across to the other side. You may want to do a row of trees along the horizon line going toward the center. For composition purposes, I like the green moving toward the center of the sphere.
3 Using your Cloud Blue (a light blue) and Putty Beige pencils draw the tall buildings. Use the Light Umber for the short ones behind the trees. These buildings can be of different colors representing different materials, like glass (Cloud Blue) or concrete (Putty Beige).
4 With the Primo Bianco Charcoal draw an intense White in an area of the sky as shown above. I recommend the Primo Bianco rather than the Prismacolor White for this effect because it is brighter and more intense. With the Light Cerulean Blue pencil, draw the sky around the white area you have just drawn. The Primo Bianco Charcoal will not hold on the waxy Prismacolor, so apply it first. Use the Dark Brown and Dark Umber to draw the trunks of the trees. 61
060-063_chp2_Chrome_Sphere_final REVISED.indd 61
7/25/15 5:04 PM