D E N TA L S O L U T I O N S
AUG / SEPT 2021
32 - 41
68 - 69
52 - 66
ENDODONTIC SOLUTIONS
INFECTION CONTROL SOLUTIONS
ORAL HEALTH SOLUTIONS
INDEX Our Solutions 3D Printing Solutions
Our Brands 78-79
3M
24-25, 48-49
Henry Schein One
4-5
Business Solutions
4-7
3Shape 74-75
Hu-friedy
CAD CAM Solutions
70
Ansell 62-63
Invisalign Go
8-31
AquaCare 13
Isolite 64-65
Digital Solutions
72-77
Asiga 78-79
Itero 72-73
Endodontic Solutions
32-41
BL 34
Komet 39-41
Handpiece Solutions
67
Busa
Kuraray Noritake
Cosmetic & Restorative
32-33, 35
26-28, 54-55, 68-69 71
14-17
Infection Control Solutions
52-66
Colgate 42-45
Mocom 58-59
Instrument Solutions
68-69
Coltene
Morita
Oral Health Solutions
44-51
Dentisan 66
Philips 50-51
Orthodontic Solutions
71
EdgeEndo 32-33
Planmeca 76-77 Renfert 82-83
20-23, 36-37, 60-61
8-12, 46-47, 70
38, 67
Preventative Solutions
42-43
GC
Prosthetic Solutions
80-83
GKE 53
Septodont
Henry Schein
Vita 80-81
56-57
6-7, 29-31
White Dental Beauty 18-19
2
DIGITAL SOLUTIONS Whilst 2021 continues to pose challenges to many industries and business, Henry Schein is committed to supporting our customers and our mission of focusing on practice care so dental professionals can focus on patient care. One of the ways we are doing this is to continue to develop our online offering whether through our website HenrySchein.com.au or through our education platform DentalEducationHub.com.au. Beyond the articles and information in this publication we would like to give you a snapshot of a few exciting development going on behind the scenes at Henry Schein. LIVE CHAT In July 2021 we launched Live Chat functionality to Henry Schein online, so if you have any questions or queries when logged in to our website you can chat directly to one of our local, friendly and experienced Customer Care Team Schein Members who are always happy to help. The aim for this is to make it simple, quick and easy for you to contact us in the medium that is most convenient, whilst hopefully saving your practice time and giving you the answers, you need. If you have not had chance to use it yet we encourage you to check it out for your next enquiry.
EQUIPMENT WEBSITE At Henry Schein we pride ourselves in supplying and servicing Australia’s largest portfolio of leading dental equipment brands, with the goal of providing the perfect solution for your practice tailored to your needs and requirements. To support this, in July 2021 we released a brand-new website HenryScheinEquipment.com.au, aimed at providing all the information, images and brochures you need to start your journey towards your new purchase. In addition to this at ADX21 we launched our 3 Stage Surgery Setup programme aimed at providing customers who are looking to setup a new practice with a simple process to get everything the new practice needs.
From equipment to your core consumables setup and business software, the programme is setup to provide you with a seamless setup process and huge initial and ongoing savings for your practice. To find out more, check out our range and enquire through HenryScheinEquipment.com.au today.
DENTAL EDUCATION HUB We continue to grow our educational offering through DentalEducationHub.com.au, reaching its first birthday at the end of July, the site has seen nearly 25,000 individual visitors from across the globe. The website host over 250 pieces of clinical and educational content including webinars, articles, videos, publications and more, most of which are completely free to access. The team continue to add new content on a daily basis including new live and on-demand webinars every month. So, if you are looking to kill some time on an evening, weekend or whilst in a lockdown, check out DentalEducationHub.com.au. Education remains a focus at Henry Schein and we would love to hear from you about what you would like to see and how we can improve. Take this short 5-minute survey about the Dental Solutions and Dental Education Hub to provide your feedback.
ONLINE
TV
CALUM COOGAN Marketing Communications Digital & CX Manager h en r y sc h e i n .c o m .a u
3
BUSINESS SOLUTIONS
BUILD TRUST WITH YOUR PATIENTS AND INCREASE TREATMENT ACCEPTANCE RATES
A recurring problem for dental practices is low treatment acceptance. At your practice, you’re likely familiar with scenarios where a patient needs urgent treatment but may not go ahead with it because of the high cost. As professionals, this can be frustrating for you because you want the best for your patients. And, low treatment acceptance ultimately means lower income and profits for your practice. Joseline Fraser is Henry Schein One’s Business Development Specialist for New South Wales and the Australian Capital Territory. She has helped countless dental practices optimise their practice performance, and has many valuable tips to share to help you boost yours.
WHAT IS THE BIGGEST ISSUE SLOWING DOWN DENTAL PRACTICES’ GROWTH? One very common problem, and a recurring fact within practices we see, is dentists losing patients and their treatment plans. We all know how hard it is to acquire new patients. When we do acquire them, we must do everything possible to over-exceed their expectations and provide the best possible patient experience. When they have a good experience at a practice and trust their dentist, they’re more likely to accept the treatment plan that’s recommended.
4
BUSINESS SOLUTIONS
If a practice came to you for advice on this issue, what would you tell them?
What is your advice for anyone who is apprehensive about embracing change?
Having good clinical skills is not enough to grow your business.
It is highly rewarding when we see we have been able to help dentists achieve their best, and to reach their practice’s goals. The proof is in the data we have gathered from, and the research conducted on, thousands of practices.
By enabling the right patient experience, we cultivate patients’ trust and reduce the risk of cancellations or treatment plan rejection. We plant the seeds of commitment and care. Patients know their best interests are being looked out for. When patients have these feelings, they’re more likely to refer a practice to their friends and family, and are more likely to immediately accept treatment plans. Nowadays, in dentistry, it’s not enough to have excellent skills; you need to know how to best deliver these. ‘How’ we reach the best outcome is actually not that difficult. It comes down to creating the right environment in your practice, and having the right proven, researched methods and systems in place. This allows you to separate your practice from the competition and maximise its full potential.
You may or may not know—but are perhaps starting to realise now—that the way you have been running your business hasn’t led to the best outcomes for your practice. We have the tools to help you improve case acceptance, take control of your business, and to become excited again about how you run it. Once you apply Henry Schein One’s methods appropriately, you will see your practice thriving. Our methods enable security and revenue growth, unlike other methods some practices in the industry use. The foundation for achieving your goals and becoming the successful practice you have always wanted to be is only one step away with Henry Schein One.
There is real value behind this: for me, it is about equipping your practice, teams and patients with the best systemic solutions for the greatest possible outcome, while landscaping the way to success.
Take advantage of our complementary business reviews for tailored expert advice: If you need help reviewing your practice performance, book a complimentary business review online: https://henryscheinone.com.au/businessreview or by calling 1300 889 668.
h en r y sc h e i n .c o m .a u
5
BUSINESS SOLUTIONS
OVERCOMING BUSINESS CHALLENGES AND OPTIMISING YOUR PRACTICE
Summary: Dentists worldwide have taken a substantial financial hit from COVID-19 closures. Rather than providing relief, the re-opening of practices is bringing a whole new set of business challenges: increased PPE costs, reduced patient volumes, and the restriction of aerosol-generating procedures, to name but a few. With the situation becoming financially untenable and the pandemic continuing with no clear end in sight, we discuss how recent research can help you can adapt, optimise and strengthen your business to overcome the challenges ahead. The impact of COVID-19 on the dental practice As we know, SARS-CoV-2 is primarily transmitted via infected droplets and aerosols. With the need for close patient contact and the high potential for aerosol generation, the dental operatory was considered one of the riskiest environments as the COVID-19 pandemic took hold. As a result, clinics worldwide were forced to close to all but the most urgent of cases. It didn’t take long for dentists to feel the financial pressure. By June 2020, only 8% of British Dental Association members reported that they felt confident in their ability to maintain financial sustainability throughout the closures. But rather than providing much-needed relief, the re-opening of practices has come with its own set of business challenges. One substantial challenge is the ongoing need for strict infection control protocols. Although absolutely necessary, the cost of additional PPE is a burden on already-stretched budgets. Meanwhile, patient volume (and practice revenue) is restricted by longer fallow times and enhanced disinfection procedures. And to complicate matters further, dentists are still limited in the range of procedures they can perform because of the need to minimise aerosols. These conditions are becoming financially untenable for dentists. With the end of the pandemic not yet in sight, how can you strengthen your business and overcome the challenges ahead? 1. Optimise drill usage In a 2020 study published in the Journal of Oral Rehabilitation, researchers discovered that aerosols generated from the use of a high-speed air turbine
6
could be found up to four metres away from the treatment site, taking up to 30 minutes to dissipate. While this validates the restriction of aerosol-generating procedures (AGPs) to date, researchers from Imperial and King’s College recognise that we cannot avoid AGPs indefinitely. After analysing aerosol generation during dental procedures, the team identified a number of ways to mitigate contamination risk in the dental operatory. The research team found that rotary instruments that used both water and air as a coolant projected droplets at speeds in excess of 12m/s. They recommend using water-only instruments, which were observed to significantly reduce small droplets compared to water- and air-cooled devices. The team also found that using high-torque electric micromotor drills at speeds below 100,000 rpm, without air streams, produced 60x fewer droplets than air turbines. They identified an ideal speed range of 80,000-100,000 rpm to minimise projection while maintaining cutting efficiency. Co-author Professor Owen Addison acknowledges that the slower use of drills will inevitably mean that some procedures still cannot be performed. Nonetheless, he points out that these new parameters will allow dentists to safely expand the range of treatments beyond the restrictions currently in place. 2. Try the ART procedure Thanks to techniques like Atraumatic Restorative Treatment (ART), certain high-risk AGPs like caries removal can now be performed without using any mechanical instruments at all.
BUSINESS SOLUTIONS
ART relies on slow-speed hand instruments to excavate decayed tissue, greatly reducing aerosol generation and SARS-CoV-2 transmission risk. The overlying restoration can be placed in the same session, reducing the need for further visits and limiting exposure. With the need for high-quality products becoming more apparent than ever, consider using a bio bulk-fill material like Biodentine™ for your restorations. This allin-one, bioactive and biocompatible dentine substitute is able to fully replace dentine in both the crown and the root, from the pulp all the way to the top of the cavity. Thanks to its high resistance to compressive strength and superior sealant qualities, Biodentine™ has consistently proven to be an effective and reliable dentine substitute under composite restorations. In a study published in the Journal of Conservative Dentistry, Biodentine™ used in conjunction with a handpiece was found to have a success rate of 83.3% in pulp capping procedures. Being able to offer your patients exceptional results with quick, minimally invasive treatment is a surefire way to guarantee their satisfaction, during the pandemic and beyond. And of course, happier patients and efficient treatment times translate to a healthier bottom line for your practice. 3. Use combined evacuation systems Despite your best efforts to minimise it, some degree of aerosol generation is inevitable in the dental operatory. In response to this risk, researchers from Loma Linda University investigated the effectiveness of various evacuation systems.
4. Communicate with your patients As the pandemic unfolded, the dental operatory was deemed unsafe and dental professionals were ranked among the highest for infection risk. Despite this, the Dental Tribune reports that there are currently no recorded cases of dental patients contracting COVID-19 during the course of treatment. Further, they report that the infection rate among dentists is lower than 1%. What does this mean for business? Well, reducing fallow time and optimising procedures means that you can see more patients — in theory. In practice, though, we know that some patients are still delaying treatment due to fears about virus exposure. If you can’t get your patients through the door, then none of the other measures you take will matter when it comes to your bottom line. The findings reported in the Dental Tribune strongly suggest that the precautions you’ve been taking to keep yourself, your staff and your patients safe have been very successful. Consider how you can proactively communicate this to your patients to reassure them that your practice is a safe place to receive treatment. While the dental profession is still some way from “business as usual”, research is identifying new opportunities to rebuild and fortify your practice every day. The challenges ahead will no doubt continue to test us, but for the dentist who keeps on adapting, innovating and optimising, they can certainly be conquered.
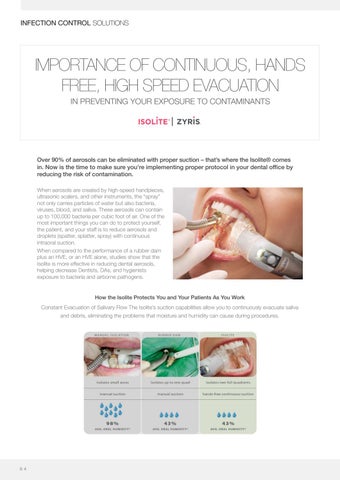
During the use of ultrasonic scalers, the research team tested conditions including high-volume evacuation (HVE) and a combination of HVE and an intraoral suction device. The combination of both resulted in the greatest reduction of microbial aerosols. For dentists, this could present an effective way to reduce not just transmission risk, but also costly fallow time between appointments.
h en r y sc h e i n .c o m .a u
Septodont Corporate Read the article online
7
COSMETIC & RESTORATIVE
G2-BOND UNIVERSAL THE NEW STANDARD OF 2 BOTTLE UNIVERSAL BONDING
Challenged to improve on existing 2-bottle benchmarks, GC researchers focused on strengthening the adhesive layer and significantly reducing the potential for water degradation over time. The new GC proprietary Dual-H Technology provides a smooth transition from hydrophilic to hydrophobic characteristics in the primed surface, which is then further strengthened by a truly hydrophobic protective bond layer.1 Hydrophilic primer wets and self-etches the tooth surface effectively
Highly hydrophobic bond layer results in strong bonding to composite
Without hydrophilicity?
Without hydrophobicity?
•
•
•
Insufficient resin infiltration to dentin surfaces Higher risk for gap formation
•
Hydrolytic degradation of bond layer Increased risk of debonding
All-round performance of a unique composition
• • • •
4-MET for a reliable adhesion to enamel and detin MDP for an excellent adhesion to enamel and dentin, zirconia, alumina and non-precious metals MDTP to bond to precious metals HEMA free bonding system for a clinically proven outstanding durability 2
SUPERIOR CLINICAL HANDLING Direct Restorations 10
5
sec
Select your preferred tech., Etch for 10-15s, rinse & dry.
Apply 1-PRIMER and wait 10 sec.
sec
Dry with MAX air.
IDS Technique
Make a uniform bond film with gentle air.
Light cure 10 sec.
Optional
10
5
sec
Apply 1-PRIMER and wait 10 sec.
Apply 2-BOND.
sec
Dry with MAX air.
Apply 2- BOND.
Make a uniform bond with gentle air.
Light cure.
Remove unpolymerized layer.
1 GC R&D, Japan, 2020, Data on File. 2 van Dijken JW (2013). A randomized controlled 5-year prospective study of two HEMA-free adhesives, a 1-step selfetching, and a 3-step etch-and-rinse, in non-carious cervical lesions. Dent Mater.29(11):e271-80.
8
COSMETIC & RESTORATIVE
G-ÆNIAL A’CHORD THE ADVANCED UNIVERSAL COMPOSITE WITH UNISHADE SIMPLICITY
G-ænial A’CHORD is a universal composite that delivers long lasting*, invisible restorations. Designed to save time and therefore costs, it brings together superior technology in a straightforward product. Now you can feel truly confident using a material with effortless handling even in challenging cases. Invisible aesthetics even for extreme challenges. In addition to its 5 core shades G-ænial A’CHORD extends its portfolio with 2 cervical shades for elderly patients, 3 opaque for masking discolouration, 2 enamel for life-like translucency and 2 bleach shades for brighter smiles, thus making it possible to create invisible fillings even for extreme challenges.
Simply universal G-ænial A’CHORD offers the combination of aesthetics and strength for both anterior and posterior restorations in one straightforward package.
Images courtesy of Dr A. Mak, Australia
Images courtesy of Dr R. Asparuhov, Bulgaria
*Source: GC R&D, Japan, 2020. Data on file.
h en r y sc h e i n .c o m .a u
9
COSMETIC & RESTORATIVE
RESINTMMODIFIED GLASS TM - a predictable GCPLUS Fuji PLUS - a predictable & reliable luting solution Fuji & reliable luting solution IONOMER CEMENT Resin-modified glasscement ionomer cement Resin-modified glass ionomer A PREDICTABLE & RELIABLE LUTING SOLUTION
™ Fuji oneFuji of the most well-known andproducts it isaconsidered amaterial benchmark material material in GC PLUS is one of the most and it is considered a benchmark onePLUS of theis most well-known products andproducts itwell-known is considered benchmark in class, offering the tooth protection of a glass ionomer cement balanced with the strength of a in its class, offering the tooth protection of a glass ionomer cement balanced with the strength g the tooth protection of a glass ionomer cement balanced with the strength of a n 20 years proven of clinically proven performance, it is one ofluting the popular luting of aover resin cement. ithcement. over 20With years of clinically performance, it is one of the popular ice that gives confidence and reliability. GC Fuji PLUS is moisture tolerant during placement s confidenceWith andover reliability. Fuji PLUS moisture tolerant placement 20 years GC of clinically provenisperformance, it is one ofduring the popular luting choice that gives confidence willbond chemically toGC dentine, enamel and cementum providing predictable seal ally to dentine, enamel cementum providing predictable seal that bond and bond reliability. Fujiand PLUS is moisture tolerant duringa placement andawill chemically to that dentine, enamel and ures the of providing post insertion sensitivity is extremely low. dence ofincidence postcementum insertion sensitivity is extremely low. a predictable seal that ensures the incidence of post insertion sensitivity is extremely low.
Fuji PLUS is simple, easy to use and a versatile cement solution. Fuji PLUS is GC simple, easyplus use and a versatile cement solution. simple, easy to use and a to versatile cement solution.
Proven and predictable performance for most routine cases Proven and predictable most routine cases and predictable performance forperformance most routinefor cases
Clinical images courtesy of Dr Emmanual d’incau, France
Easy excess removal Easy excess removal Easy excess removal
Predictable and worry-free solution Predictable and worry-free solution Predictable and reliable solution
Clinical images Clinical images courtesy of Dr Emmanuel d’Incau,courtesy France of Dr Emmanuel d’Incau, France
Simple step-by- step technique Simple step-by-step technique e step-by-step technique 1. Clean the prepared teeth 1. Clean the prepared teeth with pumice and water. As with pumice and water. As an option for increased an option for increased retention - apply Fuji PLUSretention - apply Fuji PLUS conditioner for 20 seconds.conditioner for 20 seconds. Rinse and gently dry. Rinse and gently dry.
2. Mix GC Fuji PLUS. Coat the internal surface of the restoration with 1mm of cement and seat within 30 seconds.
2. Mix GC Fuji PLUS. Coat the internal surface of the restoration with 1mm of cement and seat within 30 seconds.
Clean and prepare teeth with Mix GC Fuji PLUS. Coat the 4. Maintain Remove excess at the until Maintain isolation until the final isolation until 4.cement Maintain isolation pumice and water. internal surface of the restoration ofthegel stage set is verified (approx 4 minutes). 3. Remove excess As an 3. Remove excess the finalfirst set isformation verified final set is verified cement at the first retention 4 minutes).1 minute cement at the first (approx. minutes). option for increased with 1mm of cement and seat (approx.(approx. after4 seating). formation of gel stage formation of gel stage 30 seconds. - apply Fuji PLUS conditioner within (approx. 1 minute after (approx. 1 minute after for 20seating). seconds. seating).
A wide range of indications
range of indications A wide range of indications
•
Cementation of all types of metal, porcelain fused to metal and resin crowns, inlays, onlays and bridges • Cementation of porcelain inlays • C e m e n t a t i o n • oCf ea m l l et ny tpaet si oo nf om fe at al l l ,t yppo er sc eo lfa mi ne ft ua sl ,e pd ot roc m e leat ianl faunsde d t o m e t a l a n d prefabricated pin, posts r e s i n c r o w• n s , Cementation nl ad ybsr, iof do gncore el as y smaterial ri ne lsai yn sc, r oo nwl naof sy ,sall i an types a n d b r including idges • C e m e n t a t i o nand o recneposts • oCf epcast m t laat ii no ni nol fa yp so r c e l a i n i n l a y s
• C e m e n t a t i o n • oCf ea m l l et ny tpaet si oonf oc of rael l mt ay pt ee rsi ao lf icnoc rl eu dmi an tge pr ir ae lf ai nb cr il cu ad ti en g p r e f a b r i c a t e d p i n , p o s t s a ndd pci an s, t p po os st st sa n d c a s t p o s t s
A great partner for your Zirconia crowns
e a t p a r t n e r f o r y oAu gr rZeiar ct opnai rat ncer ro wf onrs y o u r Z i r c o n i a c r o w n s
1 0
COSMETIC & RESTORATIVE
G-CEM ONE - SIMPLY THE ONE SELF-ADHESIVE RESIN CEMENT
G-CEM ONE is a truly universal, non-technique sensitive cement with optimal bond strength to tooth and all substrates: Enamel, Dentin, Zirconia, Metal, Glass ceramics2, Hybrid ceramics2, for both retentive and non-retentive1 preparations thanks to the unique GC Touch Cure ability of the optional Adhesive Enhancing Primer. It simplifies all your cementation procedures and gives you more predictable results and peace of mind. G-CEM ONE can be used for a wide range of indications. Aesthetic
*5um film thickness includes the cement and the AEP
One optimised flow
After six months
One easy excess removal with 1 second tack curing
Exceptional self-curing^ for your peace of mind, tack-cure feature for easy excess removal and clean up, moisture and saliva tolerance1, optimised flow of the paste and virtually no post-operative sensitivity3.
1 With Adhesive Enhancing Primer. GC R&D Data on file. 2 With G-Multi Primer. GC R&D Data on file. 3 Field survey results. Using G-CEM ONE only. GC Data on file. ^Miyazaki S (2020). Excellent curing properties: chemical polymerization and comfortable clinical practice compatibility of G-Cem ONE. Clinical Advance; 7:167-169.
h en r y sc h e i n .c o m .a u
Images courtesy of Dr. Kazunori Otani, Japan
Before treatment
Images courtesy of Dr. Masayuki Okawa, Japan
Invisible, wear resistant margin for the aesthetic outcomes. Low film thickness (5um) and high wear resistance keep the invisible cement line*.
1 1
COSMETIC & RESTORATIVE
G-CEM VENEER LIGHT-CURING RESIN CEMENT
Unique handling, superior strength*. An aesthetic cement with simple application and high mechanical properties, similar to paste-like composites, yet with easy handling from the low viscosity. It’s unique consistency allows it to have balanced flow without the need for pre-heating the composite allowing ample working time to ensure proper placement of the restoration. Combined with G-Multi PRIMER a universal primer, and G-Premio BOND, a universal bonding, G-CEM Veneer ensures a stable and durable adhesion to all types of substrates and preparations^. Cementation of composite and ceramic veneers, inlays & onlays become truly standardised. G-CEM Veneer can be efficiently light-cured through restorations <2 mm with sufficient translucency. Natural aesthetics G-CEM Veneer adapts to all demanding aesthetic cases, by providing a natural result.
Images courtesy of Dr. J Mattiussi, Italy
Four Shades cover all
Four shades with optimised blend-ability were carefully selected for a perfect colour integration in all cases while limiting the required number of shades. With the try-in paste, you can verify that the selected shade will give you the desired aesthetic result. GC Luting Guide A solution for every luting challenge
A2
TRANSLUCENT
OPAQUE
BLEACH
^ K. Sai et al. (2016). Influence of degradation conditions on dentin bonding durability of three universal adhesives. Journal of Dentistry 54 (2016) 56–61. *GC R&D Data on file
1 2
Download your copy of the new GC Luting Guide
COSMETIC & RESTORATIVE
AQUACARE – ESSENTIAL FOR MINIMALLY INVASIVE DENTISTRY
Minimally invasive dentistry (MID) advocates the maximum preservation of intact and repairable dental hard tissues through minimising the unnecessary alteration of healthy tooth structure. As an enthusiastic advocate of the application of the principles of MI dentistry in everyday dental care, the AquaCare has been a revelation in helping me to achieve improved outcomes for patients under my care. The unit allows ease of use for polishing and abrasion techniques with a change in function at the turn of a switch. For polishing, surface stains are removed efficiently and selectively without damaging the underlying sound tooth structure. There is no heat generation or damage to soft tissues and the result is immediately pleasing to both clinician and patient. For air abrasion, the particles are emitted at high velocity within a fluid stream from an easy to use nozzle and are hence easily controlled and directed ensuring comfort for the patient as well as ease of vision for the operator. The air abrasion particles remove adherent extrinsic surface stains and debris without vibration or heat generation, minimising the risk of pulpal damage. The lack of vibration also improves comfort for the patient.
Bonding to the cleaned tooth surface is also enhanced making this technique ideally suited to modern adhesive dentistry, particularly with regards to the repair and refurbishment of existing restorations, which is now such a key component of MID. From being brought up in the age of the high-speed handpiece, the AquaCare is now my go-to unit for cavity preparation and tooth repair. This is one of those pieces of kit that I can find further uses for every day and that the patients under my care much prefer compared to the conventional rotary handpiece.
Bioactive powders have the potential for remineralisation and will selectively remove damaged tooth structures with much greater precision than conventional mechanical techniques.
View on the Henry Schein web site
MICHAEL THOMAS Senior Specialist Clinical Teacher Kings College London, UK
h en r y sc h e i n .c o m .a u
1 3
COSMETIC & RESTORATIVE
ACHIEVING A DURABLE ZIRCONIA BOND
With over 40 years of success in the commercial dental products market, Kuraray Noritake Dental has firmly established its commitment to providing leading-edge solutions for adhesive dentistry. The 1983 introduction of the PANAVIA™ EX resin cement, which utilised Kuraray’s original MDP monomer technology, set the industry standard for adhesion and has continued to do so for over 30 years since. With PANAVIA™ V5, and PANAVIA™ SA Cement Universal which is the latest addition to the PANAVIA™ family, Kuraray Noritake Dental presents a pair of resin cements designed for strong, durable bonding for zirconia-based and other restorations.
PANAVIA™ V5 is a resin cement with exceptional procedural simplicity and predictability. It sets a new standard for adhesion to the KATANA™ Zirconia Block or other zirconia, allowing for self-cure dentine bond strengths equal to our gold-standard light-cure bonding agent, CLEARFIL™ SE BOND. PANAVIA™ V5 offers natural aesthetic stability in shading through its amine-free paste, which is available in five shades and has been scientifically proven to demonstrate a lower level of post-curing colour variance than other cements.
PANAVIA™ SA Cement Universal is a forerunner in self-adhesive resin cements that adheres virtually to all materials including glass ceramics. The original silane coupling agent, LCSi monomer, incorporated in the paste, creates a strong chemical bond to porcelain, lithium disilicate and composite resin. Available in an 8.2gm dual barrel automix syringe, its high concentration of MDP monomer allows for increased chemical reactiveness with zirconia, which, combined with mechanical retention created by sandblasting, has been demonstrated as crucial for durable bonding to this material. Building upon the success of our PANAVIA™ SA Cement Plus, it offers a wide range of indications for adhesion and is suitable for crowns/bridges, inlays/ onlays, posts and even adhesion bridges.
1 4
COSMETIC & RESTORATIVE
15 YEARS OF EVIDENCE FOR THE BONDING EFFECTIVENESS OF MDP TO ZIRCONIA CERAMICS
“In particular, primers and composite cements that contain 10-methacryloyloxy-decyl-dihydrogenphosphate (10-MDP) resulted in a relatively high bond strength and durability.” N.Nagaoka et al: “Chemical interaction mechanism of 10-MDP with zirconia” Nature, Sci Rep. 2017; 7: 45563.
“For most zirconia-bonding techniques, the use of an “MDP-containing primer” also appeared to have a positive effect” B. Van Meerbeek et al: “Meta-analyis of Bonding Effectiveness to Zirconia Ceramics” J. Dent. Res. 93(4), 2014, 329-334.
“Based on the direct interaction of the phosphate-ester group of MDP with the metal oxides at the zirconia surface, a relatively favourable bonding effectiveness was recorded.” B. Van Meerbeek et al: “Durable bonding to mechanically and/or chemically pre-treated dental zirconia”, J. Dent. 41 (2013) 170-179.
“Dental zirconia can no longer be considered unbondable to tooth tissue (…) This also indicates that Al2O3 sandblasting is best followed by a chemical pre-treatment with an MDP containing primer”. M. Inokoshi et al: “Meta-analysis of Bonding Effectiveness to Zirconia Ceramics”, J. Dent. Res. 93(4): 329-334, 2014.
“Clinical data provide strong evidence that air-abrasion at a moderate pressure in combination with using phosphate monomer containing primers and/or luting resins provide long-term durable bonding to glassinfiltrated alumina and zirconia ceramic under the humid and stressful oral conditions.” M. Kern: “Bonding to oxide ceramics-laboratory testing versus clinical outcome”, Dent. Mater. Vol. 31 (1), 2016, 8–14.
“A high and reliable resin bond to alumina and zirconia ceramics was also achieved with airborne particle abrasion and by using a phosphate monomer (MDP) containing resin composite luting cement.” M. Özcan et al: “Effect of surface conditioning methods on the bond strength of luting cements to ceramics”, Dent. Mat. 19, 2003, 725-732.
“The data of the present work confirm the assumption of another study [13], that MDP bonds chemically to zirconia ceramic” C.H.F. Hämmerle et al: “Effect of thermocycling on bond strength of luting cements to zirconia ceramic”, Dent. Mat. 22, 2006, 195-200. “In the present study, the use of the MDP-containing bonding/silane agent resulted in significantly higher bond strengths before and after long-term storage and thermal cycling with two types of resin luting agents.” M.B. Blatz et al: “In vitro evaluation of shear bond strengths of resin to densely-sintered highpurity zirconium-oxide ceramic after long-term storage and thermal cycling”, J. Prosth. Dent. 91, 2004, 356-362.
“Airborne-particle abrasion of zirconia surface is one of the most-investigated methods, provides good bond strength to zirconia when combined with phosphate ester monomer” M. Ferrari et al: “Effect of surface pre-treatments on the zirconia ceramic–resin cement microtensile bond strength”, Dent. Mat. 27, 2011, 1024-1030. “An acidic adhesive monomer such as MDP shows chemical bonding to zirconia-based ceramics. The phosphate ester group of the acidic monomer results in chemical bonding to metal oxides (MxOy, oxidized surface of base-metal alloys), zirconia-based ceramics and other ceramics.” J.M. Powers et al: “Guide to Zirconia Bonding Essentials”, New York, NY: Kuraray America Inc, 2009, 1-13
h en r y sc h e i n .c o m .a u
1 5
COSMETIC & RESTORATIVE
RAPID BOND TECHNOLOGY CLEARFIL™ UNIVERSAL BOND QUICK
In 2005 Kuraray developed the first one-step self-etch adhesive CLEARFIL™ TRI-S BOND, the aim of which was to deliver ease of use. This simplified adhesive didn’t cause phase separation meaning that the adhesive mixture stayed homogenous over time. Thanks to a unique proprietary technology, both primer and bonding agent functions of CLEARFIL™ SE BOND were incorporated into one bottle. More than a decade on, CLEARFIL™ Universal Bond Quick takes this revolutionary technology to a whole new level.
The drive behind the development of CLEARFIL™ Universal Bond Quick was to create a universal adhesive that simplifies the application process and reduces the number of steps required to achieve a lasting and reliable bond.
Kuraray Noritake Dental’s Rapid Bond Technology combines the original MDP monomer with revolutionary new hydrophilic amide monomers which work together to deliver optimum stability and resistance to moisture for a lasting result. In fact, Kuraray Noritake Dental’s original MDP has been trusted by dentists for more than 30 years to deliver outstanding levels of chemical adhesion to hydroxyapatite. Kuraray Noritake Dental’s new hydrophilic amide monomer is central to this new Rapid Bond Technology. Bonding to dentine isn’t easy; the adhesive solution needs to penetrate the wet dentine. CLEARFIL™ Universal Bond Quick utilises hydrophilic amide monomer technology to penetrate the dentine by exploiting its superior hydrophilicity properties when compared to traditional hydrophilic HEMA-monomer.
RAPID BOND TECHNOLOGY
1 6
4 n-octanol water
3 log Pow
Unlike other one-bottle universal adhesives which utilise ‘slow monomers’ that need time to penetrate, CLEARFIL™ Universal Bond Quick introduces Rapid Bond Technology.
Amide monomer hydrophilicity (Partition coefficient; log Pow)
2 1 0 -1
Hydrophilic HEMA amide monomer
TEGDMA
Bis-GMA
Partition coefficient= log10Pow = log10Cn-octanol/Cwater Cn-octanol: Concentration of the monomer in n-octanol layer (mol/L) Cwater: Concentration of the monomer in water layer (mol/L)
Source: Kuraray Noritake Dental Inc.
COSMETIC & RESTORATIVE
Water sorption in μg/mm3 120
80
Source: Kuraray Noritake Dental
Water sorption µg/mm3
100
60 40 20 0
CLEARFIL™ Tri-S Bond Plus
Prepared dentine with smear layer. Due to its hydrophilicity we need a very hydrophilic bonding to be able to optimally penetrate the dentine.
Having low water sorption is one of the most significant characteristics of adhesives. The organic matrix of the adhesive absorbs water in the long term. High water sorption of adhesives is cited as a factor in the deterioration of physical characteristics and secondary caries. CLEARFIL™ Universal Bond Quick showed the lowest water sorption among the tested materials, even though it contains highly hydrophilic amide monomers. This could be attributed to a high cross-linking property of the new hydrophilic amide monomers.
CLEARFIL™ SE Bond
CLEARFIL™ Universal Bond Quick
Dentine bonded with CLEARFIL™ Universal Bond Quick. During curing CLEARFIL™ Universal Bond Quick creates a highly cross linked polymer network. As a result, the bonding has a very low water absorption which gives a long lasting restoration.
By introducing Rapid Bond Technology clinicians are assured of a quick developing and strong bond to the materials they want to bond to, especially to dentine, being the most challenging substrate. Rapid Bond Technology used in CLEARFIL™ Universal Bond Quick is proven to be very effective. A tight seal of the dentine without any voids is the result. Using either self-etch or total etch, a tight interaction zone between the bond and the dentine is present. No voids were seen.
2 μm
2 μm
Self-etch mode TEM
Etch and rinse mode TEM
TEM pictures courtesy of Dr. Kumiko Yoshihara and Dr. Noriyuki Nagaoka, Okayama University, Japan
h en r y sc h e i n .c o m .a u
1 7
COSMETIC & RESTORATIVE
CONFIDENT SMILE WITH DENTAL BLEACHING
There are several causes and types of teeth discolorations and each of them need careful diagnosis and examination in order to select the proper treatment. Using home bleaching technique can be considered one of the minimal invasive approach for the treatment of teeth discolorations. The aim of this article is to show how to achieve success through the bleaching to reestablish the natural appearance of discolored teeth and to improve our patients’ confident smile.
Fig. 1
A 23-year-old male patient visited our dental clinic complaining about teeth discoloration, asking for a solution to have a brighter smile under one condition, no drilling
Fig. 3
Air-polishing by sodium carbonate powder with AquaCare device in order to remove all the stains from the enamel surface.
1 8
Fig. 2
Pre-operative picture is very important to select the proper shade and to evaluate bleaching progress (the initial shade is A3.5 VITA classical).
Fig. 4
After polishing by AquaCare twin device (sodium carbonate powder) the teeth now is ready for bleaching.
COSMETIC & RESTORATIVE
Fig. 5
The buccal surface of models teeth can be waxed-up to create a reservoir for the bleaching gel before tray fabrication, even when there is no difference in the rate of bleaching with or without reservoirs. There is no need to scallop the tray on each tooth. Only One or Two millimeters above the cervical area of each tooth.
Fig. 6
One or two gel syringes should be delivered to the patient, so that the treatment can be done for a week. The patient should be instructed to report any abnormal change of the teeth and gingival tissue. The 16% carbide peroxide selected bleaching agent (White Dental Beauty) was to be used for 2-3 weeks from 2-4 hours a day, as long as no sensitivity is reported due to Novon technology. In case of sensitive teeth, 5% carbamide peroxide gel is recommended to be used.
Fig. 7
The custom tray fit was checked for accuracy, tissue adaptation, and retention, the patient is instructed on how to insert the custom trays and how to apply the 16% carbamide peroxide gel (one drop per tooth).
Fig. 8
After 14 days of bleaching with 16% carbamide peroxide (White Dental Beauty), we verified the color obtained with the same shade guide (the final shade is A1 VITA classical).
Fig. 9
Patient smiling satisfied with the result. A few tips were given to preserve the effects of the treatment longer.
Fig. 10
Comparison between the initial and the final smile.
Conclusions Bleaching is an everyday procedure which we propose to many of our patients. We usually suggest the home bleaching option, as it is the most cost-effective and safest way to whiten teeth without or with minimum side effects, minimizing sensitivity following an office bleaching.
DR. AHMED SAAD DSD Certified member Silver Member at Styleitaliano Baghdad, Iraq
h en r y sc h e i n .c o m .a u
1 9
COSMETIC & RESTORATIVE
BRILLIANT EverGlow BRILLIANT EVERGLOW EDITOR’S CHOICE
Product insights you can trust.
RATING SYSTEM: Excellent + + + + +
++++
Very Good
Good
+++
96%
Coltène/Whaledent
overall
www.everglow.coltene.com
rating
Description BRILLIANT EverGlow is a highly esthetic and user-friendly universal submicron hybrid composite. Its filler technology is designed for gloss properties such as a high polishability and long-lasting high luster. It also has convenient sculptability without slumping and good wettability Description for easy handling. The BRILLIANT EverGlow shade system has three translucency levels and exceptional blending properties allowing for highly esthetic flexibleesthetic single-shade and multi-shade BRILLIANT EverGlow is a and highly and user restorations.The medium-translucent Universal shades provide an exceptional blending making themhybrid ideal for seamless, single-shadeIts restorations. Duo friendly universal effect, submicron composite. Shades, which match two VITA shades in one (e.g. A2/B2), help reduce decision time and the amount of material in storage. filler technology isshade designed for gloss properties For use in multirestorations, the Universal shades can be combined with opaque masses and translucent masses. Eachhigh BRILLIANT EverGlow such as a high polishability and enamel long-lasting shade is available separately as a syringe (3 g) or in boxes with 20 unidose tips (0.2 g each). Kits containing 4 or 9 shades luster. It also has and convenient sculptability withoutare also provided include a Shade Guide with original material for free.
slumping and good wettability for easy handling. Special Features The BRILLIANT EverGlow shadesmooth system hasand non-slumping • Excellent sculptability, consistency • High polishability and gloss retention three translucency levels and exceptional • Adheres to the bonded tooth surfaces blending rather than sticking to the instrument properties allowing for highly esthetic and flexible • Esthetic single-shade restorations Versatile shade system with three translucencies single-shade and• multi-shade restorations.The Indications medium-translucent Universal shades provide an • All anterior and posterior direct composite exceptional blendingsingle effect, making them ideal for and multi-shade restorations • Luting and repairing of ceramic and “SUPERB seamless, singleshade restorations. Duo Shades, composite restorations LIFE-LIKE which match two Consultants’ VITA shades Comments in one (e.g. A2/ ESTHETICS AND LUSTER.” B2), help reduce decision time and the amount of • “Excellent consistency and handling. It is material in storage. easy to dispense, flows well and doesn’t slump.” • “Packs well, good marginal adaptation and can be sculpted.”
For use in multi- shade restorations, theandUniversal • “Great chameleon-like properties one of the easiest composites to finish that I’ve tried.” shades can be combined with opaque masses • “Great polishability!” and translucent enamel masses. Each BRILLIANT • “Blends well. The blended shade is brilliant for that one patient who’s in between shades.” EverGlow shade is available separately as a syringe • “Love all the shade options.” (3 g) or in boxes with 20 uni- dose tips (0.2 g each). • “A little hard to dispense and adapt well.” Kits containing 4 or 9 shades are also provided and • “Layers were challenging without having visible lines/seams.” include a Shade Guide with original material for free. Special Features
2 0
•
Versatile shade system with three translucencies Clinical Tips Indications
•
restorations. All endodontic anterioraccess andopening posterior direct composite single • For shade matching, extrude a little bit on the tooth and light cure it to check. and multi-shade restorations • Great for teeth with minimum remaining coronal structure.
•
Versatile shade system with three translucencies Evaluation Highlights
•
The opaque shades match/adapt well with porcelain repairs and
BRILLIANT EverGlow was evaluated by 33 consultants, and used 771 times.
Indications • Versatile system with multiple translucency levels •
Easy to handle and place
•
All and posterior direct composite single • anterior Good adaptability • Esthetic and high luster and multi-shade restorations • Unique hard plastic syringe sleeve to avoid cross contamination and
•
Luting with aand surfacerepairing disinfectant of ceramic and “SUPERB composite restorations
damage to label when disinfecting. Syringe sleeve may be wiped down
Consultants comments “Excellent consistency and handling. It is easy to dispense, flows well and doesn’t slump.” “Packs well, good marginal adaptation and can be sculpted.” “Great chameleon-like properties and one of the easiest composites to finish that I’ve tried.” “Great polishability!”
d e n t a l a d v i s o r. c o m
DENTAL ADVISOR 3110 West Liberty, Ann Arbor, Michigan 48103 l (800) 347-1330 l connect@dentaladvisor.com l © 2018 Dental Consultants, Inc.
•
Excellent sculptability, smooth consistency and non-slumping
• •
High polishability and gloss retention
•
Esthetic single-shade restorations
Adheres to the bonded tooth surfaces rather than sticking to the instrument
“Blends well. The blended shade is brilliant for that one patient who’s in between shades.” “Love all the shade options.” “A little hard to dispense and adapt well.” “Layers were challenging without having visible/ seams.
highly esthetic and flexible single-shade and multi-shade restorations. The BRILLIANT EverGlow Universal is a highlyshades estheticprovide and user-friendly universal medium-translucent an exceptional blending submicron hybrid composite. filler technology is designed for gloss effect, making them ideal forIts seamless, single-shade restorations. Duo properties such as a high long-lasting highhelp luster. It Shades, which match twopolishability VITA shadesand in one (e.g. A2/B2), reduce also has convenient sculptability slumping andFor good decision time and the amount ofwithout material in storage. usewettability in multifor easyrestorations, handling. Thethe BRILLIANT system has shade Universal EverGlow shades canshade be combined withthree opaque translucency and exceptional blending properties allowing for masses andlevels translucent enamel masses. Each BRILLIANT EverGlow highly and flexible single-shade and(3multi-shade restorations. The shadeesthetic is available separately as a syringe g) or in boxes with 20 unimedium-translucent Universal shades provide an exceptional dose tips (0.2 g each). Kits containing 4 or 9 shades are alsoblending provided effect, makingathem ideal for seamless, single-shade Duo and include Shade Guide with original material forrestorations. free. Shades, which match two VITA shades in one (e.g. A2/B2), help reduce decision time and the amount of material in storage. For use in multiSpecial Features shade restorations, the Universal shades can be combined with opaque • Excellent sculptability, smooth consistency and non-slumping masses and translucent enamel masses. Each BRILLIANT EverGlow • High polishability and gloss shade is available separately as aretention syringe (3 g) or in boxes with 20 uni• Adheres the bonded tooth surfaces than to the dose tips (0.2to g each). Kits containing 4 or 9rather shades aresticking also provided instrument and include a Shade Guide with original material for free. • Esthetic single-shade restorations Special • Versatile Features shade system with three translucencies Clinical Tips smooth consistency and non-slumping • Excellent sculptability, •Indications High polishability and gloss retention Clinical Tips shades match/adapt with porcelain AllThe anterior andbonded posterior direct composite •• Adheres toopaque the tooth surfaces rather than well sticking to the single and multi-shade restorations instrument • repairs The opaque shades match/adapt well restorations. with and endodontic access opening Luting and repairing of ceramic and “SUPERB •• Esthetic single-shade restorations porcelain repairs and endodontic access For shade matching, extrude a little bit on composite restorations • Versatile shade system with three translucenciesLIFE-LIKE the tooth opening restorations. ESTHETICS and light cure it to check. Consultants’ Comments Indications • For shade matching, extrude a AND littleLUSTER. bit on”the
Clinical Tips • • •
The opaque shades match/adapt well with porcelain repairs and endodontic access opening restorations. RESTORATIVE SOLUTIONS COSMETIC & RESTORATIVE For shade matching, extrude a little bit on the tooth and light cure it to check. Great for teeth with minimum remaining coronal structure.
Clinical TipsHighlights Evaluation •BRILLIANT The opaque shadeswas match/adapt with porcelain repairs and EverGlow evaluated well by 33 consultants, and used 771 times. accesswith opening restorations. • endodontic Versatile system multiple translucency levels •• ForEasy shade matching, to handle andextrude place a little bit on the tooth and light cure it to check. •• Great for teeth with minimum remaining coronal structure. Good adaptability • Esthetic and high luster Evaluation Highlights • Unique hard plastic syringe sleeve to avoid cross contamination and BRILLIANT EverGlow evaluated by 33Syringe consultants, 771 times. damage to labelwas when disinfecting. sleeveand mayused be wiped down with a surface • Versatile systemdisinfectant with multiple translucency levels • Easy to handle and place • Good adaptability • Esthetic and high luster • Unique hard plastic syringe sleeve to avoid cross contamination and damage to label when disinfecting. Syringe sleeve may be wiped down with a surface disinfectant
Great for teeth with minimum remaining coronal
• • All anterior and posterior direct composite “Excellent consistency and handling. is tooth and light cure it toItcheck. structure. single and multi-shade easy to dispense, flowsrestorations well and doesn’t slump.” • Great for teeth withand minimum remaining • Luting and repairing of ceramic “SUPERB coronal • composite “Packsstructure. well, good marginal adaptation and canLIFE-LIKE be sculpted.” restorations
Evaluation Highlights
ESTHETICS • “Great chameleon-like properties and one of the easiest Consultants’ Comments AND LUSTER. composites to finish that I’ve tried. ” evaluated BRILLIANT EverGlow was by 33 ” Evaluation HIghlights
•• “Excellent consistency and used handling. It istimes. consultants, and 771 “Great polishability!” BRILLIANT was evaluated easy to dispense,EverGlow flows well and doesn’t slump.” by 33 • consultants “Blends well. Theand blended shade is brilliant for that one patient used 771 times. • in Versatile system with multiple translucency • “Packs good marginal who’s well, between shades.” adaptation and can be sculpted.”
•
Versatile system with multiple translucency levels
levels •• “Great properties and one of the easiest “Love chameleon-like all the shade options. ” composites toto finish that I’veand tried. ” place • Easy handle place • Easy to handle and • “A little hard to dispense and adapt well.” • “Great polishability!” adaptability • Good Good adaptability • • “Layers were challenging without having visible lines/seams.” • “Blends well. The blended shade is brilliant for that one patient • • inEsthetic and high lustre Esthetic and luster who’s between shades. ” high
d e n t a l a d v i s o r. c o m • • allUnique hard plastic syringe sleeve to to avoid Unique hard plastic syringe sleeve avoid • “Love the shade options. ”
DENTAL ADVISOR 3110 West Liberty, Ann Arbor, Michigan 48103 l (800) 347-1330 l connect@dentaladvisor.com l © 2018 Dental Consultants, Inc.
cross contamination and damage to label within cross contamination and • “A little hard to dispense and adapt well. ” damage to label when disinfecting. Syringe sleeve may be wiped down
disinfecting. Syringe sleeve be wiped down • “Layerswith were having visiblemay lines/seams. ” achallenging surface without disinfectant. with a surface disinfectant
d e n t a l a d v i s o r. c o m DENTAL ADVISOR 3110 West Liberty, Ann Arbor, Michigan 48103 l (800) 347-1330 l connect@dentaladvisor.com l © 2018 Dental Consultants, Inc.
h ehner ny rsycshcehi en i. nc .ocmo .ma .ua u
2 14 7
RESTORATIVE SOLUTIONS COSMETIC & RESTORATIVE
IMPLANT IMPRESSION WITH AFFINIS MONOBODY
BONDED PORCELAIN RECONSTRUCTION ON Bonded Porcelain Reconstruction on Implants IMPLANTS - IMPLANT WITH AFFINIS MONOBODY Implant Impression with Affinis IMPRESSION Monobody Erwin T. Egloff DDS, M.S. St. Gallen Erwin T. Egloff DDS, M.S. St. Gallen A patient withwith goodgood periodontal health lost premolars 14 and 15. To14 ensure A 70 70year yearold old patient periodontal health lost premolars and optimal 15. To ensure reconstruction of the maxilla which would not interfere with the healthy teeth, the dentist and patient optimal reconstruction of the maxilla which would not interfere with the healthy teeth, decided on implantation.
the dentist and patient decided on implantation.
Following Following the the treatment treatment of of two two implants, implants, the the patient came for a follow up visit patient came for a follow up visit four four months months later to expose the submerged healed implants later to expose the submerged healed im- plants (fig. 1). Using a minimally invasive procedure, the (fig. 1).screws Using awere minimally invasive procedure, cover located and removed (fig. the 2). cover werethe located and removed At the screws same time, peri-implant gingiva(fig. was2). At the same the peri-implant was thinned usingtime, a scalpel (fig. 3). The gingiva implants were exposed and an impression was taken duringwere a thinned using a scalpel (fig. 3). The implants single session, the reconstruction was inathe exposed and ansince impression was taken during posterior region.since Slight alterations in the was gingival single session, the reconstruction in the contour in this region did not rep- resent a problem. posterior region. Slight alterations in the gingival contour in this region did not rep- resent a problem.
Fig. :
Fig. :
4 24 2
Two Two sessions sessions were were necessary neces- saryforforprocedures procedurestotobebe performed in the anterior region. In performed in the anterior region. In order order to to ensure ensure the desired contour of the marginal gingiva, the the desired contour of the marginal gingiva, the gingiva must first heal completely in such clinical gingiva must first an heal completely in be such clinical situations before impression can taken. situations before an impression can be taken. The impression posts are placed and a diamond The impression aretoplaced a dia-they mondcoated tweezersposts is used checkand whether are in their correct final position (fig. 4). During this step, coated tweezers is used to check whether they are itinistheir important ensure that (fig. the 4). implant parts correcttofinal position During thisare step, assembled correctly for taking the impressions and it is important to ensure that the implant parts are for precise transfer of the implant position. assembled correctly for taking the impressions and for precise transfer of the implant position.
Fig. 2
Fig. 3
Fig. 5
Fig. 6
COSMETIC & RESTORATIVE RESTORATIVE SOLUTIONS
Fig. 9
Fig. 8
Fig. 7
Fig. 11
Fig. 10
Since there is a low risk of tray material flowing flow- ing away away thissituation gap situation (themolar last molar distallydistally in thisingap (the last acts as acts as a stopper) and AFFINIS MonoBody has an a stopper) and AFFINIS MonoBody has an optimal optimal thixotropic con- sistency, stock impression thixotropic con- sistency, a stock a impression tray was tray was used. For crowns and bridges, it is not used. For crowns and bridges, it is not necessary necessary to take an impression of the palate, which is more to take an impression of theThe palate, which is more comfortable for the patient. repositioning aids comfortable for the patient. The repositioning are placed on the impression posts and the working aids placed on the area are is prepared forthe an impression impression.posts In myand experience, working area is prepared for an impression. In my the addition-curing silicone elastomeres have proven experience, the addition-curing silicone elastomeres optimal. AFFINIS MonoBody has a medium viscosity have proven optimal. AFFINIS MonoBody has a which makes it ideally suitable as a tray and wash medium viscosity which makes it ideally suitable material the sin- material gle-phase technique. It as a trayfor and wash forimpression the sin- gle-phase is easy to fill the tray and impression syringe impression technique. It is easy to fill the trayusing and the mixer with AFFINIS MonoBody system impression syringe using the mixer with360. AFFINIS MonoBody system 360. It is important that the wash material is syringed in a It is important the wash material is syringed in the circular motionthat around the impression posts with a circular motion the impression with reposition caps inaround the correct position toposts ensure stable the reposition caps in the correct to ensure fixation and correct position of theposition reposition copings stable fixation and correct position of the reposition in the impression (fig. 5). The tasteless impression copings in the impression (fig. 5). The tasteless material is in the mouth for less than three minutes impression material is in the mouth for less than making it user and patient friendly. I value this material`s three minutes making it user and patient friendly. high tear strength, which I regard as one of the key
requirements a stablehigh andtear precise impression I value this for material`s strength, which I regard one ofimpressions the key requirements material foras implant (fig. 6). for a stable and precise impression material for implant According to the manufacturer, model fabrication can impressions (fig. 6). take place after only 30 minutes when elastic recovery According to the manufacturer, model fabrication is complete. can take place after only 30 minutes when elastic In order to prevent an unplasant odour in the screw recovery is complete. aperture, it is advisable to coat the healing cap In an order to prevent an unplasant odour in the screw with antiseptic ointment (fig. 7 and 8). Its effect aperture, it is advisable to coat the healing cap continues until the restoration is fitted after about two with an antiseptic ointment (fig.(fig. 7 and effect weeks. After choosing the shade 9), 8). theIts centric continues until the restoration is fitted after about occlusion is registered using JET BLUE BITE (fig. 10). twothe weeks. After choosing the shade 9), the Since bite registration material has a (fig. mousse-like centric occlusion is registered using JET BLUE BITE consistency, the patient can close their teeth without (fig. 10). Since the bite registration material has resistance. Due to the high final hardness of JET BLUE a mousse-like consistency, the patient can close BITE, material is easy to workDue with. theirthe teeth without resistance. toFor theinstance, high final it can be ground or cut. Thus, the models can hardness of JET BLUE BITE, the material is later easy be to articulated precisely and securely by the dental work with. For instance, it can be ground or cut. technician. Thus, the models can later be articulated precisely and securely by the dental technician. After taking an impression of the opposing dentition After taking(fig. an 11), impression of the opposing dentition with alginate the impressions are sent to the with alginate (fig. 11), the impressions are sent dental laboratory for fabrication of the restoration. to the dental laboratory for fabrication of the restoration.
h e n1 r3y 0s 0c h6e5i n 8. 8 c o 2m2. a u
2 43 5
RESTORATIVE SOLUTIONS COSMETIC & RESTORATIVE
SHORTER CATCHY TOTAL ETCH HEADLINE ? ADHESIVE BONDING
Total-Etch Adhesive Bonding of BONDING a Glass Ceramic TOTAL-ETCH ADHESIVE OFVeneer A and Self-Adhesive Cementation of a Zirconia Crown
GLASS CERAMIC VENEER AND SELF-ADHESIVE CEMENTATION OF A Case ZIRCONIA CROWN Clinical by Dr. Paulo Monteiro, Portugal Clinical Case by Dr. Paulo Monteiro, Portugal The author holds an wanted International Certification in 24-year-old patient to enhance aesthetics, especially Aesthetic in the upper incisors. She had an Advanced andcentral Restorative Dentistry old zirconia crown on tooth 11 with some and teaches at Instituto Universitário Egas Moniz, discolouration and an inadequate cervical margin. Caparica, Portugal. Tooth 21 had old composite restorations. About the case In the treatment plan, it wastodecided replace the 24-year-old patient wanted enhancetoaesthetics, crown on tooth 11 with a new zirconia crown and especially in the upper central incisors. She had make a glass ceramic veneer for tooth 21. A direct an old zirconia crown on tooth 11 with some composite restoration was planned on tooth 22 as discolouration and an inadequate cervical margin. well to create a more harmonious smile curve. Tooth 21 had old composite restorations. ™ ™ Universal Cementto was used the for In3M the RelyX treatment plan, itResin was decided replace both the of crown the zirconia crown on self-adhesive tooth 11 with cementation a new zirconia and crown as well as the aesthetic bonding of the glass make a glass ceramic veneer for tooth 21. A direct ceramic veneer. This allowed for a streamlined, more composite restoration was planned on tooth 22 as efficient seating process vs. using multiple resin well to create a more harmonious smile curve. cements. 3M™ RelyX™ Universal Resin Cement was used for The author holds an International Certification in both the self-adhesive cementation ofDentistry the zirconia Advanced Aesthetic and Restorative and crown as well as the aesthetic bonding of the glass teaches at Instituto Universitário Egas Moniz, ceramic veneer. This allowed for a streamlined, more Caparica, Portugal.
Initial situation
Preparation
efficient seating process vs. using multiple resin cements.
Final situation after two months Final situation
4 0 2 4
COSMETIC & RESTORATIVE RESTORATIVE SOLUTIONS
1
Prepared anterior teeth for both a crown and a veneer restoration. 4
2
3
Lab made veneered zirconia crown and glass ceramic veneer.
Try-In with 3M™ RelyX™ Try-in Paste, shade TR.
5
6
Preparation
Preparation Sandblasting of the zirconia crown. No primer required. 7
HF etching of the glass ceramic veneer.
Application of 3M™ Scotchbond™ Universal Plus Adhesive followed by air drying.
8
9
Rubber dam in place, preparations ready for pre-treatment.
Total-etch of veneer preparation.
Application of 3M™ Scotchbond™ Universal Plus Adhesive followed by air drying.
10
11
12
Veneer and crown restorations ready for cementation.
Application of 3M™ RelyX™ Universal Resin Cement to the zirconia crown.
Application of 3M™ RelyX™ Universal Resin Cement to the veneer.
13
14
Light-cure after clean-up.
Final clean-up at margins.
pic of author ? DR. PAULO MONTEIRO PORTUGAL
h e n1 r3y0s 0c h6e5i n8. 8c o 2m2 . a u
21 5 4
COSMETIC & RESTORATIVE
PORCELAIN VS. ENAMEL A CONSERVATIVE RECONSTRUCTION OF TEETH DAMAGED BY A CONSTRICTED CHEWING PATTERN.
Background An ASA II, otherwise healthy 73 year old male patient presented to the practice for a comprehensive examination. Clinically, certain restorative needs were identified, amongst which a primary concern was the “progressive wear” of the lower anterior teeth against porcelain fused to zirconia (PFZ) crowns which had been placed many years ago. Indeed, on closer examination, the teeth not only suffered from attritive damage, but also erosive damage, as evidenced by the lack of tooth to tooth contact on the concave dentin lesions located in both mid-facial as well as incisal positions. Additionally, the patient had a past aggressive brushing habit, which left him with moderate cervical abrasion lesions on the same teeth. Procedure A constricted envelope of function was predicted as the attritive wear was limited to the lower anterior sextant. It was surmised that with conservative bonded composite, the dentin could be protected in the same instance as esthetic volume recovery of the worn and eroded teeth, this facilitated by a moderate recontouring of the palatal axial surfaces of teeth 13 to 23. Following anesthesia with 1.5 carpules of 2% Lignocaine with 1:100,000 epinephrine, a rubber dam was secured which featured limited and incomplete access to the subgingival cervical abrasion lesions even with a Brinker B4 secondary clamp, which was unstable. It was decided that the incisal half of the restorations would be completed first under full rubber dam, followed by a split dam procedure for the cervical abrasion lesions. Excavation of all old restorations and bevelling of enamel margins were completed prior to micro air abrasion using 27 micron aluminum oxide. A Garrison Fusion Anterior Matrix was fitted to the mesiolingual aspect of tooth 33 and secured using their proprietary curved wedge, which allowed maximal stability of the matrix assembly along the axial curvature. Overall, the patient was extremely pleased that restoration of both aesthetics and structural volumetric loss could be achieved in a virtually non-invasive manner and integrated within his existing restorations. He is looking forward to completing the contralateral side in the near future as part of his treatment plan.
2 6
A total etch approach was completed using 33% orthophosphoric acid (Ultra-Etch, Ultradent Products, UT). A 2% Chlorhexidine dwell (Vista Products, WI) was placed on the lesions and scrubbed for 30 seconds to neutralize matrix metalloproteins as well as to re-wet the dentin surfaces. The dentin surfaces were puff dried to a moist dentin state before scrubbing in of a 7th generation adhesive, G-Premio Bond (GC America). Initial restorative layers consisted of multiple microlayered flowable composites (G-Aenial Universal Injectable, GC America) in 0.25mm increments before layering with AO3 and A3 shades, replacing dentin and enamel volumes, respectively. This shade combination was critical to neutralize the color of chromatic dentin and create a natural translucency and vitalescence to the final restorations. The restorations were finished and polished to high shine using single-sided abrasive discs (Sof-Lex, 3M Corp.) and diamond-impregnated silicone brush polishers (A.S.A.P., Clinicians Choice) after occlusion was adjusted to feature light, centric contacts and balanced protrusive and lateroexcursive contacts as per the envelope of function.
Scan the QR code to check out the Akro-Flex in action
COSMETIC & RESTORATIVE
Choice of Instrumentation The Garrison Fusion anterior matrix system was developed to allow predictable proximoaxial contour re-creation in restorative dentistry without the complications encountered when a simple clear Mylar strip and wedge are used. These problems include proximocervical and proximoincisal overhangs and loose contacts due to incorrect curvature in the area of the contact point. The Garrison Fusion system aims create an anatomically correct proximofacial or proximolingual line angle along with the proximal extension, which automatically becomes useful in “freehand” Class IV direct resin reconstruction cases. The Hu-Friedy Akroflex is a hyperflexible nickel titanium solid brush that allows gentle finessing and blending of composite increments in both anterior and posterior restorative dentistry. The instrument allows for unparalled access into cervicoproximal regions prior to curing Class III defects preventing the formation of significant overhangs. The thinness of the brushes is useful for access to sculpting direct posterior composite anatomy. A limitation of the brush is that it should not be flexed in any direction greater than 45 degrees, but its ability to be reprocessed and re-used is truly a boon to the modern dental practice whilst uplifting HuFriedy’s commitment to environmental sustainability.
Excavation of old composite restoration on tooth 33MIB, partial excavation on tooth 31.
Baseline Situation exhibiting combination attritive and erosive wear limited to the lower anterior sextant, a classic demonstration of a case with a Constricted Envelope of Function/Constricted Chewing Pattern.
Rubber dam Isolation baseline (Dermadam, Ultradent, UT)
Placement of initial linguoincisal increment of G-Aenial A’Chord Shade AO3 (GC America) using the Akroflex nickel titanium brush (Hu-Friedy Corp.) with the aim to lengthen and balance the incisal edge positions of the treated teeth.
h en r y sc h e i n .c o m .a u
2 7
COSMETIC & RESTORATIVE
The Akroflex is used to shape the mesial frame (AO3, G-Aenial A’Chord) of the MIB lesion on tooth 33 prior to light curing.
The Akroflex is used to shape the mesial frame (AO3, G-Aenial A’Chord) of the MIB lesion on tooth 33 prior to light curing.
Removal of rubber dam prior to split dam placement showing the unfinished restorations in the incisal 2/3rds of teeth 31, 32 and 33.
Check out the Skooltoolz Kit here
Final occlusion-adjusted view after adhesive bonding and layering restoring cervical abrasion lesions. Restorations finished and polished to high shine showing superb esthetic integration.
Dr Clarence Tam also runs her highly successful handson program in Australia and NZ featuring her specially designed composite kits from Hu-Friedy.
DR. CLARENCE TAM DDS, Chairperson & Director of New Zealand Academy of Cosmetic Dentistry Sydney, Australia
2 8
COSMETIC & RESTORATIVE
BIODENTINE IN IRREVERSIBLE PULPITIS TREATMENT
Conservative Treatment for a Symptomatic Irreversible Pulpitis using Tricalcium Silicate Maximiliano Casa Herzmann, Septodont - Case Studies Collection - February 2021
Introduction I would like to share an interesting and challenging situation for today’s odontologist. For decades we have been taught that, for a symptomatic irreversible pulpitis, we always had to perform a complete biopulpectomy because it was not possible to clinically and clearly identify the extent of the inflammation contained inside the neurovascular bundle. The objective of the treatment after exposing the pulp is to encourage the healing of the pulp tissue and facilitate the formation of restorative dentin to maintain the vitality and health of the pulp (Abarajithan M, Velmurugan N, Kandaswamy D, 2010). Sensitivity tests guide the professional tentatively in interpreting the condition of the pulp, whether it is healthy, reversibly inflamed, or so inflamed that the only treatment option is to remove it completely. Currently, thanks to histopathological understanding and to advances in biomaterials such as those based on tricalcium silicate like Biodentine™ (Septodont, Saint-Maur- des-Fossés, France), used in regenerative treatments where the resulting response of the dentin-pulp tissue is evidently better, the doors have been opened to attempt to go beyond the paradigms established in this respect. The choice of Biodentine™ is underpinned by its excellent biological properties such as
biocompatibility (Kettering J.D., Torabinejad M.1995), (Osorio R.M., Hefti A., Vertucci F.J., Shawley A.L, 1998), (Septodont, 2013); low induction of inflammation, bioactivity, good interaction with different tissues such as periodontal ligament and pulp (Lee S.J., Monsef M., Torabinejad M, 1993), (Abedi H.R., Ingle J.I. 1995), antibacterial capacity, (Torabinejad M., Hong C.U., McDonald F., Pitt Ford T.R, 1995); (Torabinejad M., Hong C.U., Pitt Ford T.R., Kettering J.D, 1995), but specifically in cases of repairing interradicular furcation perforations, as well as its great compressive and flexural strength, similar to dentin, capable of withstanding mastication forces without fracturing (Septodont. Biodentine™ Active Biosilicate Technology Scientific File, 2013). It is precisely in this respect that these things may not be so accurate: where these precepts rooted deep in our consciousness begin to fall apart and where we understand that interpreting the symptoms a patient expresses, to which we attribute a histological meaning to then prescribe a treatment. This leaves the professional in a delicate position of having to establish some preparatory steps, which we can indicate as progressive development, before the indicated treatment. Cases have been published (Qudeimat and others 2017, Taha et al. 2017) which showed successful results in teeth with partial irreversible pulpitis and apical periodontitis, respectively.
h en r y sc h e i n .c o m .a u
2 9
RESTORATIVE SOLUTIONS
COSMETIC & RESTORATIVE
The presence of apical radiolucency has been The presence of apical radiolucency has been assumed to be a contraindication to performing assumed to be a contraindication to performing therapy on the vital pulp in permanent teeth. therapy on the vital pulp in permanent teeth. However, However, a retrospective study showed a high a retrospective study showed a high percentage of percentage of success, including in teeth that success, including in teeth that underwent pulpectomy underwent using MTA (mineral trioxide et using MTA pulpectomy (mineral trioxide aggregate) (Linsuwanont aggregate) al. 2017). (Linsuwanont et al. 2017). Clinical case Clinical case 9-year-old male patient presenting at the 9-year-old male patient presenting at the Autonomous Autonomous University of Chile, comprehensive University of Chile, comprehensive paediatric chair paediatric chair II, with a pulp diagnosis of II, with a pulp diagnosis of symptomatic irreversible symptomatic pulpitisofdue to the lesion that pulpitis due toirreversible the progression a carious progression of a carious lesion that was was evidenced clinically by occlusion of evidenced tooth 4.6 clinically by occlusion of tooth and near the (Fig. 1) and radiographically by4.6 the(Fig. large1)cavity radiographically by the large cavity near the pulp pulp chamber (Fig. 2). chamber (Fig. 2).
Fig.1: Clinical examination of the carious lesion.
Fig. 3: Inhibiting haemorrhage while cutting.
Fig. 2: Radiographic examination of the extent of the carious lesion.
Fig. 4: Macroscopic examination of the remaining pulp.
At this this point, point, itit was was decided decided to to remove remove the the pulp pulp At completely from the pulp chamber (Fig. 3), thus completely from the pulp chamber (Fig. 3), thus containing the haemorrhage, using a sterile gauze containing the haemorrhage, using a sterile gauze moistened in saline solution for two minutes, to assess moistened in saline solution for two minutes, to possible inflammation of the radicular pulp. assess possible inflammation of the radicular pulp. Gratifyingly, there was no spontaneous bleeding of Gratifyingly, there was no spontaneous bleeding of the remaining pulp, thus suggesting a tissue without the remaining pulp, thus suggesting a tissue without irreversible inflammation from a macroscopic point of irreversible inflammation from a macroscopic point of view (Fig. 4). view (Fig. 4).
3 0
In so doing, jumping to conclusions and indicating In so doing, jumping to conclusions and indicating an irreversible treatment for a symptom is not an irreversible treatment for a symptom is not recommended. It is recommended to move forward recommended. It is recommended to move forward gradually while observing those macroscopic clinical gradually while observing those macroscopic clinical signs that provide us with some missing data in order that provide us with some missing data in to signs determine the appropriate treatment. order to determine the appropriate treatment. Following the pattern of confronting the previously outlined conservative treatments, it was decided to move forward gradually while removing the Following the pattern of-confronting the previously unsupported enamel the dentin was completely outlined conservative wasseen decided decayed - exposingtreatments, a pulp that itwas to be to clinically move forward gradually while removing the then inflamed. Spontaneous haemorrhage unsupported enamel - the dentin was completely occurred after removing 2 millimetres of pulp. decayed - exposing a pulp that was seen to be clinically inflamed. Spontaneous haemorrhage then occurred after removing 2 millimetres of pulp.
1 3 0 0
6 5
Fig. 5: Biodentine™, protecting the remaining pulp.
Thanks to to thethe excellent qualities of of bioceramics Thanks excellent qualities bioceramics such as Biodentine™ (Septodont, Saint-Maur-dessuch as Biodentine™ (Septodont, Saint-Maur-desFossés, France), pulp remnants areare protected (Fig. 5) Fossés, France), pulp remnants protected (Fig. and benefit from its biocompatibility, bioactivity, and 5) and benefit from its biocompatibility, bioactivity, excellent mechanical properties that provide it with a and excellent mechanical properties that provide suitable and conducive medium to begin the healing it with a suitable and conducive medium to begin process, also benefiting from its mineral tissue-inducing the healing process, also benefiting from its mineral property. tissue-inducing property.
8 8
2 2
3 9
COSMETIC & RESTORATIVE
RESTORATIVE SOLUTIONS
The patient had a follow-up examination at 7 months, at which the tooth was asymptomatic, functional in so far as there was no radiographic sign of apical pathology (Fig. 6), and responding positively to sensitivity tests. Discussion It is essential to reassess the position of the professional when interpreting the signs and symptoms presented by the patient. Fig. 6: Radiographic control examination at 7 months. It is important to understand that the histology will not always be accurately reflected clinically; knowledge of this fact should be enough to consider the possibility of the tooth undergoing conservative treatment, regardless of the initial symptomatology. It is recommended to move forward gradually while observing those macroscopic clinical signs that provide potential missing data in order to determine the appropriate treatment. Author Dr. Maximiliano Casa Herzmann Odontologist, National University of La Plata, Buenos Aires, Argentina, 1996. Dental Surgeon. University of Chile, 2005. Degree in Odontology, University of Chile, 2005 Specialist in Endodontics, 2006, (Autonomous National Body for the Certification of Odontological Specialities, CONACEO). Director of the Specialisation in Endodontics, Autonomous University of Chile (Santiago-Temuco). Director of the “Diploma in Mechanised Clinical Endodontics with Apical Surgery” (Santiago-Temuco). 25 years of experience as a Lecturer training pre- and postgraduates in the Endodontics and Odontopaediatrics departments. Co-author of chapter 1 “Métodos de diagnóstico y tratamiento de lesiones inflamatorias de la pulpa” (Diagnostic and treatment methods for inflammatory pulp lesions) in the book “Endodontia clinica sob Controle” (Clinical Endodontics Under Control), Ed Napoleon-Quintessence, 2020. Author of practical work guides in the area of Endodontics and Odontopaediatrics. Speaker at national and international scientific seminars and conferences, including: Scientific Universities and Societies of Chile; National University of La Plata, Buenos Aires, Argentina; Odontology College of Córdoba, Argentina; Universities of Córdoba, Argentina; Conferences in the Endodontics Society in Uruguay; Conferences in the CEOLAHELO (Latin American Dental Study Club - Latin American Dental Association) Odontology Association, Miami, USA, among others. Active member of the Endodontics Society of Chile. Coordinator in the area of conservative treatments in immature permanent teeth, in the Autonomous University of Chile. Private professional practice for 24 years.
Biodentine™ Biodentine can be used wherever dentin is damaged, both in the crown and in the root: In the crown: temporary enamel restoration, permanent dentin restoration, deep or large carious lesions, deep cervical or radicular lesions, pulp capping, pulpotomy (reversible and irreversible pulpitis). In the root: root and furcation perforations, internal/external resorptions, apexification, retrograde surgical filling.
Dr. Maximiliano Casa Herzmann
4 0
h en r y sc h e i n .c o m .a u
3 1
ENDODONTIC SOLUTIONS
CLINICAL CASES EDGEFILE X7 A SIMPLIFIED TECHNIQUE FOR ALL CASES
The patient was referred to our endodontic practice for evaluation and treatment of tooth 36. Clinically #36 had MOD composite restoration, a negative response to cold, and tenderness to percussion. Pre-op x-ray revealed #36 had a small periapical radiolucency associated with the Mesial root and a moderate size associated with the Distal root. Endodontic diagnosis: Pulpal Necrosis with Symptomatic Apical Periodontitis.
Pre-Op
3 2
Tooth #36 was accessed, located MB, ML, and DB and DL canals. Canals instrumented with Edge X7 rotary files using a crown down technique.
Microscope
Post Obturation
Final
Working lengths were determined via apex locator followed by radiographic confirmation. The canal system was obturated with BUSA BC GP and bio-ceramic sealer.
The access was immediately restored with a fiber reinforced dual cure core material.
ENDODONTIC SOLUTIONS
CLINICAL CASES EDGEFILE X7 FLEXIBILITY PAIRED WITH THE STRENGTH FOR COMPLEX CURVATURES
The patient was referred to our endodontic practice for evaluation and treatment of tooth 46. Clinically #46 had an all ceramic crown, a negative response to cold, and tenderness to percussion. Pre-op x-ray revealed #46 had a periapical radiolucency associated with the Distal root and severe D root curvature in the apical third. Endodontic diagnosis: Pulpal Necrosis with Symptomatic Apical Periodontitis.
Cone-Fit Tooth #47 accessed, located MB, ML, and DB and DL canals. Canals instrumented with Edge X7 rotary files using a crown down technique.
Pre-Op
Post Op Working lengths were determined via apex locator followed by radiographic confirmation. The canal system was obturated with BUSA BC GP & bio-ceramic sealer. Access was restored with a fiber reinforced dual cure core material.
DR. JAMES A. WEALLEANS Cert Endodontics, Diplomate American Board of Endodontics, Clinician Sydney’s Northern Beaches and Central Coast Sydney Australia
h en r y sc h e i n .c o m .a u
3 3
ENDODONTIC SOLUTIONS
TIPS FOR WARM VERTICAL CONDENSATION
1. You need two devices – one heated plugger and one back fill unit. (e.g. B&L SuperEndo Alpha and Beta) and to take your treatment to the next level we suggest endodontic pluggers such as B&L’s NiTi/SS Kondensors. 2. Ensure the canals are prepared adequately, disinfected and dried. True warm vertical obturation works consistently with small apical size and larger taper preparation techniques eg. #25 .06.
7. Activate the heated plugger and Insert into the canal, applying firm pressure. Stop 1mm from the marked stopper. 8. De-activate the heat, whilst still maintaining apical pressure for approximately 8-10 seconds. Alpha unit
10. Condense the apical GP with the fine NiTi end of the B&L Kondensor.
3. Select your master GP point based on the minimum size of the apical constriction and ensure there is adequate tug back. 4. Select a plugger tip that goes within 4-5mm of your working length. Mark the depth at which it binds to the canal with a rubber stopper.
Beta unit
5. Insert your sealer coated master GP point into the canal and trim off the excess at orifice level using the B&L Alpha heated plugger. 6. Condense your GP at the orifice level using the large SS end of your B&L Kondensor.
3 4
9. Activate the plugger again and push 1mm apically and swiftly pull the plugger out along the curvature of the canal. Do this step quickly in 1-2 seconds. This will leave an apical plug.
11. Place the pre-heated needle of the backfill unit (B&L Beta) into the canal, resting on the apical portion of the GP. Extrude the warmed GP and let the pressure of the extruded GP push the tip out of the canal. Do not pull back as this can create voids! 12. Condense the expressed GP into the canal carefully with an endodontic plugger.
B&L Kondensors
It is recommended that you practice on extracted teeth first to gain confidence.
ENDODONTIC SOLUTIONS
ENDOSEQUENCE BC SEALER™ SINGLE CONE COMING OF AGE
Unlike conventional base/catalyst sealers, BC Sealer utilises the moisture naturally present in the dentinal tubules to initiate its setting reaction. This highly radiopaque and hydrophilic sealer forms hydroxyapatite upon setting and chemically bonds to both dentine and to our bioceramic points (EndoSequence BC Points). BC Sealer is anti-bacterial during setting due to its highly alkaline pH and unlike traditional sealers, BC Sealer exhibits absolutely zero shrinkage.
Never before has an obturation system been able to make these claims.* How does your current system compare? BC Sealer and Points
Your Current System
Biocompatible and Osteogenic
✔
?
Chemical Bond of Sealer to Dentin
✔
?
Chemical Bond of Sealer to Filling Material
✔
?
Cost Effective (Considerably less expensive than carriers)
✔
?
Highly Antibacterial (12+ pH upon setting)
✔
?
Highly Radiopaque
✔
?
Hydrophilic
✔
?
Hydroxyapatite Producing
✔
?
Ideal Working and Setting Time
✔
?
User Friendly (Premixed Syringable Sealer)
✔
?
Zero Shrinkage of Sealer and Filling Material
✔
?
3-D Bonded Obturation at Room Temperature
✔
?
*Research and other support materials available at www.BrasselerUSA.com/Bioceramics
EndoSequence BC Sealer / BC Point Interface EndoSequence BC Sealer /Dentin Interface
Radiograph courtesy of Dr. Gilberto Debelian, DMD, PhD, Adjunct Associate Professor, Dept of Endodontics at Universities of North Carolina and Pennsylvania
h en r y sc h e i n .c o m .a u
Micro CT Courtesy of Dr. Adam Lloyd, Chair of Department of Endodontics, UTHSC
3 5
ENDODONTIC SOLUTIONS
HYFLEX REMOVER
PRESS RELEASE Removers leave a lasting impression - Single-file revision system for endodontic treatment proves convincing for dentists in practice test Following the market launch of its new revision files last year, Swiss dental specialist COLTENE recently launched a test initiative among dentists and endodontic specialists, followed up by a survey on their experience with the Remover for HyFlex and MicroMega file systems. The initial verdict of users is conclusive: in particular, switching from various hand files to a revision with a single NiTi file provides significant benefits in dental practice. “The removal of insufficient, endodontic restorations has become a standard treatment in practices due to an increase in revision treatment. The new Removers employ the latest technologies such as asymmetrical design, electropolishing as well as thermal treatment to make treatment safe, easy and fast. A look at the responses from the clinicians shows that the benefits were clearly seen in practice: “The new Remover makes gutta-percha removal very easy and fast”, “Perfect harmony between efficient removal and sensitive tactile feedback”, “Respects complex root canal anatomies” and “Makes my ‘endodontic life’ more convenient” were among the dentists’ comments. One endodontic expert concluded as follows: “A single instrument for removing old gutta-percha: the HyFlex Remover fulfills the dream of many dentists”.
3 6
Fast, reliable, intuitive - participants in test confirm excellent efficacy and faster treatment As part of a Europe-wide test initiative, dentists and group practices were given the opportunity of trying out the Remover extensively over the past few months. The initial survey results confirmed that more than 80 per cent of the participants regarded the file as demonstrating excellent or good efficiency at removing insufficient obturation material. Almost half of the responders were thus able to perform their work significantly faster than before. The Removers in size 30/.07 are optimally designed for the situation of a previously prepared canal and, due to their intricate shape, adapt to the natural contour of the canal to efficiently loosen the existing dental material. The file removes gutta-percha mechanically from the root canal, thereby eliminating the need for an additional solvent which may be toxic for the patient. At the same time, the surrounding tooth structure benefits from the intelligent file design: a non-cutting tip provides additional safety during preparation. Handling is extremely simple and intuitive, as was confirmed by more than 80 per cent of the responders. More than three quarters were instantly so convinced of the advantages that they would not wish to do without the new file in their practice in the future.
ENDODONTIC SOLUTIONS
ENDODONTIC SOLUTIONS ENDODONTIC SOLUTIONS Product evaluation Remover for HyFlex and MicroMega file systems* How effective was the Remover file for Would you use the Remover for further Product evaluation Remover for HyFlex and MicroMega systems* removing thefile insufficient root canal filling? revision cases in your practice? Would you use the Remover for further revision your practice? 77% cases Yes, ininany case
How effective was the Remover file for removing the insufficient root canal filling? 38% Good
38% Good
77% Yes, in any case
46% Excellent *Result online survey Remover trial promotion September - December 2020
46% Excellent
*Result online survey Remover trial promotion September - December 2020
The Remover file is available in 19 and 23 mm. A large number of cases can be treated with 19 mm. The last millimetres can then be cleaned with the The Remover file EDM is available in 19 and the 23 Remover mm. A matching HyFlex and CM. Here, large number of cases can be treated with mm. file is fully integrated into these file systems,19 which The last millimetres can then be with the are then also used to perform thecleaned subsequent matching HyFlex EDM and CM. Here, the finishing of the missing root canal cleaning.Remover file is fully integrated into these file systems, which are then alsointo used todental perform the subsequent Integration the practice finishing of the missing root canal cleaning. On www.coltene.com or one of the innovation leader’s social media channels, interested dentists Integration into the dental practice can currently find out about the latest trends and On www.coltene.com or oneinofthe thecomfort innovation ideas from the dental world of their leader’s social media channels, interested dentists own homes. This way, even endo beginners will be can find out aboutand the efficient latest trends and able currently to achieve competent preparation ideas from the dental world in the comfort of their after only a short time. own homes. This way, even endo beginners will be able to achieve competent and efficient preparation after only a short time. h en r y sc h e i n .c o m .a u
On www.coltene.com or one of the innovation leader’s social media channels, interested dentists can currently
3 7
ENDODONTIC SOLUTIONS
APEX LOCATION AN ENDODONTIST’S PERSPECTIVE
“We’ve always bought and used Morita ZX apex locators and the Dentaport ZX that we are currently using is a number of years old now. Apex locators are manufactured by a lot of different companies and there are many models on the market. I’m sure they’re all good instruments, however, I prefer the Morita apex locators because of their reliability and longstanding track record.” Dr John Barbat, North Shore Endodontic Services, Chatswood, NSW
The History Prior to the early ’90s, electronic apex locators were notoriously unreliable. They used a single current that would often complete the electronic circuit when the file wasn’t at the apex. The Morita ZX system eliminates this electronic variability by using two currents of different wave frequencies simultaneously. The relationship between these two currents changes as the biologic constriction is approached. The Research There’s a plethora of research into this particular instrument. It’s a favourite of endodontic master’s students to investigate and write their thesis. Most of the research shows that this apex locator is highly accurate to within 0.5 and 1mm of the biologic constriction of the tooth.
The Benefits It improves efficiency, saves time and reduces patient radiation. The locator gives a very accurate length measurement that is confirmed with an X-ray. This means you know where you are before taking the X-ray. Without the locator reading, it’s highly likely that a succession of X-rays would be needed to achieve the same result. Recommendations There is a degree of technique sensitivity when using this instrument. Care must be taken that short circuits aren’t created by metal restorations. Irrigants used in canals are electrolytic, so if there is any leakage it can also create false readings. However, any errors are pretty obvious and these can usually be overcome.
DENTAPORT ZX Apex Locator
3 8
ROOT ZX Mini
ENDODONTIC SOLUTIONS
KOMET PROCODILE FAST CUTTING BY NATURE
With its completely revised file design, Procodile is a totally new species in the kingdom of root canal preparation. The innovative, variably-tapered file core makes Procodile noticeably more efficient and flexible and, therefore, ideally suited for the perfect shaping of the root canal and a high-quality preparation. Procodile can be distinguished from all other files at first glance by its unmistakable green colored ring. Hungry: Fast and efficient substance removal. Thanks to the innovative, variably-tapered file core, the chip space of the Procodile files is increased by up to 12 %*. Infected tissue is removed even more efficiently from the root canal thereby allowing for optimum preparation time. Flexible: Optimum preparation even of curved root canals. Thanks to its variably-tapered core and double-S cross section, the intelligent design of this file offers up to 44 % more flexibility. For this reason, even curved root canals can be prepared in complete safety without alterations of the shape.
Large chip space for perfect evacuation of debris
+44%
Reference product
Adapted instrument core for great flexibility.
* Compared to R6 ReziFlow instruments
Procodile
Reference product
Up to 120% safer
Procodile
Improved flexibility Procodile compared to R6 ReziFlow, based on in-house tests. Supporting data are available.
Fracture-resistant for greater patient safety Compared to other reciprocating file systems, Procodile is up to 120 % more resistant to cyclic fatigue. This decreases the risk of fatigue fracture and increases the safety of the patient. The single-use instruments are supplied in sterile packaging to reduce the risk of possible cross-contamination. A new movement, adaptable in the EndoPilot Designed for work in all commonly used reciprocating endo motors for an easy-to-achieve and safe performance. That’s not all: Procodile files now perform a new, patented motion in the EndoPilot: Suitable for use in both straightforward and more complex canal anatomies, the intelligent ReFlex movement unites the advantages of rotary and reciprocating motions. Resistance to cyclic fatigue Procodile files compared to leading competitors, based on in-house tests. Supporting data is available.
h en r y sc h e i n .c o m .a u
3 9
ENDODONTIC SOLUTIONS
PROCODILE RECIPROCATING FILE AGILE, FAST CUTTING, HUNGRY
The clear and concise Procodile system is comprised of 4 main sequences for narrow, medium and wide canals. Each sequence contains a small selection of files for an easier choice and greater clarity. For perfect obturations, we provide matching paper and gutta-percha points. • Optimum preparation of even curved root canals – thanks to a variably tapered file core • Fast and efficient substance removal – due to an enlarged chip space • Increased patient safety – thanks to greater resistance to cyclic fatigue • Suitable for use in all established reciprocating motors
Option for narrow canals
PR0C6L25.204.020
PPPR06.000.020
GPPR06.000.020
PR0C6L25.204.025
PPPR06.000.025
GPPR06.000.025
PPPR05.000.040
GPPR05.000.040
PPPR04.000.050
GPPR04.000.050
Option for medium canals
PR0C5L25.204.040
Option for wide canals
PR0C4L25.204.050
4 0
1
ENDODONTIC SOLUTIONS
10000666v001_BRO_EN_Procodile_Endo.indd 1
06.09.19 10:19
[ 01 ] Generous preparation of the canal entrance region, for example with the reciprocating Opener OPR08L19.
[ 02 ] Creation of a glide path for example with a K-file in size 015. Choosing the matching Procodile file depends on the previously used (manual) file size. General rule: Skip one ISO file size. [ 03 ] Preparation of the canal with the Procodile file. [ 04 ] Obturation with a matching gutta-percha point.
2
3
4
h en r y sc h e i n .c o m .a u
Komet Available exclusively at Henry Schein
4 1
PREVENTATIVE SOLUTIONS
DON’T LET PATIENTS WITH SENSITIVITY SETTLE FOR LESS
Give them the solution with superior* pain-blocking power1,2 Colgate® Sensitivity Pro-Relief toothpaste is a clinical solution for both instant†1 and long lasting‡2 relief. Instant†1 relief 60.5% teeth sensitivity reduction‡ immediately after application. Long lasting§2 relief 80.5% teeth sensitivity reduction‡ at 8 weeks. Recommend instant†1 and long lasting§2 relief with Colgate® Sensitive Pro-Relief
Instant†1 reduction in teeth sensitivity (air blast test)
Long lasting‡2 reduction in teeth sensitivity (air blast test)
• Colgate® Sensitive Pro-Relief • 2% potassium ion toothpaste
• Colgate® Sensitive Pro-Relief • 2% potassium ion toothpaste
References: 1. Nathoo S, Delgado E, Zhang YP, et al. Comparing the efficacy in providing instant relief of dentin hypersensitivity of a new toothpaste containing 8.0% arginine, calcium carbonate, and 1450 ppm fluoride relative to a benchmark desensitizing toothpaste containing 2% potassium ion and 1450 ppm fluoride, and to a control toothpaste with 1450 ppm fluoride: a three-day clinical study in New Jersey, USA. J Clin Dent. 2009;20(Spec lss):123 -130. 2. Docimo R, Montesani L, Maturo P, et al. Comparing the efficacy in reducing dentin hypersensitivity of a new toothpaste containing 8.0% arginine, calcium carbonate, and 1450 ppm fluoride to a commercial sensitive toothpaste containing 2% potassium ion: an eight-week clinical study in Rome, Italy. J Clin Dent. 2009;20(Spec lss):17- 22. Colgate Sensitive Pro-Relief Toothpaste. For the relief of tooth sensitivity. Colgate Palmolive Pty Ltd 345 George Street, Sydney 2000 & Colgate Palmolive Ltd 45 Knights Road Lower Hutt, NZ *vs sensitive toothpaste containing 2% potassium ion.
4 2
†
For instant relief, apply toothpaste directly to the sensitive tooth with finger tip and gently massage for 1 minute.
‡
Lasting relief with 2x daily continued brushing.
PREVENTATIVE SOLUTIONS
TOPICAL FLUORIDE USE MODE OF ACTION
The benefits of topical fluorides, without the addition of calcium and phosphate, have been firmly established by a sizeable and robust body of evidence from randomised controlled clinical trials which have been scrutinised and reported in several Cochrane reviews.1 How Fluoride protects teeth
1
CaF2
CaF2
Applied to the teeth via toothpaste, mouthwash, gel or varnish
3 Excess fluoride is stored as CaF2
CaF2
Ca
FCa++
2
Fluoroapatite forms in areas of demineralisation at near- neutral pH
Ca++
(calcium fluoride) globules on the tooth surface and in plaque
4 When pH becomes acidic,
FCa++
CaF2 breaks down and is available for remineralisation
Evidence for the use of topical fluorides
Caries prevented fraction
Cochrane reviews of randomised controlled trials (on people using the product as directed) have shown fluoride to be extremely effective in preventing dental decay without the addition of calcium and phosphate to products.
Varnish: 43% (Primary teeth 37%)
Rinse: 26%
Gel: 28%
Toothpaste: 24%
Prevented fraction is the percentage reduction in D(M)FS/d(e)fs in the test population vs placebo/no-treatment.1
Cochrane Reviews Evidence based practice draws on the best available and most respected scientific evidence. Cochrane reviews are so highly respected because they are based on meta-analyses in systematic reviews of large groups of RCTs (randomised controlled trials). in vitro trials ‘in vitro’ comes from Latin, meaning ‘in glass’. In vitro trials are done in a laboratory, allowing scientists to do initial tests using artificial substrates, animal tissues or human tissues such as extracted teeth in isolation and propose modes of action for products. The dynamics of the oral cavity with teeth, soft tissue, plaque and saliva are impossible to replicate in vitro. That’s why in vitro studies can only take you to a position of a theory about how a product might work in a real situation. In order to investigate effectiveness and safety for any new product or approach, randomised controlled trials in humans should be undertaken to determine outcomes in real people. 1 Marhino, V.C. (2014). Cochrane fluoride reviews: an overview of the evidence on caries prevention with fluoride treatments. Faculty Dental Journal; Vol 5 (2). DOI 10.1308/204268514X13939420839106.
h en r y sc h e i n .c o m .a u
4 3
ORAL HEALTH SOLUTIONS
WHO SHOULD USE A FLUORIDE MOUTH RINSE AND WHY?
We often think of mouthwash or mouth rinse as our go-to for a minty fresh kiss or whiter smile. But mouth rinse - especially fluoride mouth rinse - can provide more oral health benefits than merely fresh breath. Just as dental professionals recommend brushing with fluoride toothpaste, fluoride mouth rinse can help strengthen tooth enamel and provide extra protection for children and adults. Ask your dental professional if you or a family member (six years or older) would benefit from adding a fluoride rinse to your home oral care regimen. What is fluoride mouth rinse? Fluoride mouth rinse is a solution that contains fluoride. A naturally found mineral, fluoride is known to strengthen enamel and dentine and reduce cavities in children and adults. According to the Australian Dental Association (ADA), fluoride helps our teeth in two ways. It fortifies our teeth against acid attacks (keeps teeth strong), and it also repairs the early stages of tooth decay (helps the tooth to recover). Acid attacks come from plaque, a sticky substance containing bacteria, that forms on our teeth. When the bacteria eat sugar, it releases acid, which causes teeth to lose minerals and can eventually result in cavities - diets high in sugar increase this amount of acid. When the fluoride rinse reaches your teeth, fluoride is absorbed into the enamel and helps to remineralise and replenish the lost calcium and phosphorate that make up your tooth’s hard tissue structure. Fluoride mouthwash is available over the counter (OTC), and the most common form of fluoride for daily use is sodium fluoride. Who should use a fluoride mouth rinse? Fluoride mouthwashes are safe and effective for daily use by anyone looking for additional protection of their smile (providing they are the appropriate age, check your product label for directions). They can be especially beneficial for people with a high risk of
4 4
tooth decay. However, the Australian Dental Association recommends that children under the age of six years should not use a fluoride rinse because of the risk of ingestion. Similarly, an adult should always supervise children under the age of 12 years while they use any mouthwash. Several conditions or circumstances might make you more susceptible to tooth decay. Therefore, if you experience any of the following, consider speaking to your dental professional about adding a fluoride mouthwash to your oral hygiene routine. Dry mouth Saliva is your natural tooth-cleaner between brushing sessions because it washes food particles off your teeth and neutralises decay-causing acids produced by bacteria. It also contains calcium, phosphate and other vital components which help to remineralise your teeth daily. When you are dehydrated, or your mouth becomes dry, it puts you at higher risk of tooth decay. Many medications or medical conditions can cause dry mouth. Research from the Australian Dental Journal states that more than one in 10 Australians experience dry mouth, while for older Australians, the numbers are one in four. If you suffer from dry mouth, a fluoride rinse may be beneficial. A fluoride rinse can help to prevent decay, while also providing some moisture for temporary relief from dryness.
ORAL HEALTH MONTH ORAL HEALTH SOLUTIONS
Gum recession
Fillings, crowns and bridges
When plaque forms around your gums, they can become irritated, inflamed and bleed easily. This inflammation can also cause the gums to recede, exposing some of the tooth’s root surface. Because this root surface is not as strong as enamel, you are more susceptible to root decay. Treating more advanced gum disease also reduces inflammation, which may cause the gums to shrink and leave root surfaces partially exposed.
If you have a history of cavities, your dental professional may suggest extra protection by using a fluoride mouth rinse. Extensive dental work, such as crowns and bridges, provide perfect hiding spots for bacteria to begin the decay process again.
Other people who do not have gum disease may have exposed roots from brushing their teeth and gums too hard, so remember always to use a softbristled toothbrush. Depending on the severity of the gum recession, your dental professional may recommend multiple forms of fluoride protection, including a fluoride rinse. Orthodontic braces Plaque and sugars can demineralise the tooth enamel, causing areas of decalcification on your teeth. This decalcification creates chalky white spots which you may not be aware of while wearing braces. Once your braces are removed, however, these white lesions become apparent. Not only are they less than aesthetically pleasing, but they can also turn into fully fledged tooth cavities. This is why orthodontists sometimes prescribe a fluoride mouth rinse to limit decalcification.
By regularly using a fluoride rinse, you may stop the decay process in its tracks, and allow the tooth to repair. Fluoride rinse just gives you that added bit of protection beyond twice daily brushing. How to use a fluoride mouth rinse When using a fluoride mouthwash, always use as directed, including the dose, frequency and time in the mouth. Make sure you read the directions on the label. Some manufacturers recommend using the product either before or after brushing to maximise effectiveness. A fluoride mouth rinse can benefit someone who is especially prone to tooth decay. However, it’s only one tool in your oral hygiene toolkit. Combine the use of fluoride mouthwash with brushing twice a day and flossing once a day to help prevent decay and plaque build-up. Practice these regularly, and you’ll be well on the road to maintaining a healthy smile.
This article is intended to promote understanding of and knowledge about general oral health topics. It is not intended to be a substitute for professional advice, diagnosis or treatment. Always seek the advice of your dentist or other qualified healthcare provider with any questions you may have regarding a medical condition or treatment.
hh ee nn rr yy ss cc hh ee ii nn .. cc oo m m .. aa uu
4 53
ORAL HEALTH SOLUTIONS
GC TRI PLAQUE ID GEL HELPING YOUR PATIENTS TO SEE IN 3 DIMENSIONS
An Innovative plaque disclosing gel that identifies new, mature and acid producing biofilms.
Images courtesy of Professor Ian Meyers
Pink / Red A thin deposit of plaque will stain pink/red. These are areas where surfaces have been cleaned recently and the biofilm is immature. Light Blue Areas that are Light Blue indicate acid production from the plaque bacteria and the biofilm will have a pH of approximately 4.5 or lower. This is a high risk if biofilm.
AFTER
Clinical Observations “We are using a new dye, which can now also show the ‘worst’ acid producing plaque (the light blue colour). This light blue plaque shows where the decay on your teeth is already starting, it even happens between your teeth”
4 6
A patient with significant plaque build-up at the contact point for a partial denture.
A 30 year old male with high caries activity and multiple posterior carious lesions.
“A 46 year old female presents with some thick plaque adhering to calculus on the lingual of the lower posterior teeth”
“As only the pink/red and blue/purple colours emerged, it suggests thicker and older plaque, but no acid producing plaque, as would possibly be the case where calculus is present. “
“After removing the plaque and calculus, the gingival displacement is obvious, but the enamel looks very sound. Thus in this case we discussed the gingival and periodontal implications being of greater concern than the enamel demineralisation.”
Images and text courtesy of Dr Andrew Brostek
BEFORE
Images and text courtesy of Professor Ian Meyers
Blue / Purple Thick deposits of plaque will stain blue/purple. These are areas which have not been cleaned in the past 48+ hours and a complex biofilm has developed. This thick plaque can be a cause of gingivitis.
ORAL HEALTH SOLUTIONS
DRY MOUTH GEL RELIEF FOR DRY MOUTH SUFFERERS
What is dry mouth? A dry mouth can occur when your body does not produce enough saliva, which at times can feel unpleasant. What are the causes of dry mouth? Taking multiple medications at the same time is one of the most common causes of a dry mouth. Radiation therapy, Sjögren’s syndrome and mouth breathing during sleep are also linked to dry mouth symptoms. In addition, dry mouth can also be experienced by someone with a chronic disease such as diabetes mellitus, chronic hepatitis C infection, and connective tissue auto-immune diseases such as systemic lupus erythematosus. What are the consequences of not producing enough saliva? Saliva is very important for our wellbeing. Saliva initiates food digestion, controls antimicrobial activity in the mouth, keeps the mouth clean, balances pH, offers lubrication and remineralizes teeth. Therefore, reduced saliva production can generate dental and overall health problems. For example, lack of sufficient saliva promotes tooth decay development and acid erosion.
GC Dry Mouth Gel is a clear gel that provides oral comfort and lubrication by moistening and lubricating the mouth, tongue, and throat. It has a pleasant taste and forms a long-lasting layer which protects the delicate oral tissues. GC Dry Mouth Gel is used to provide comfort and relief for dry mouth conditions, to provide a protective coating for teeth and oral tissue, and to help control bad breath. Available in 5 delicious flavours, dry mouth gel provides a variety of pleasant taste alternatives to help keep the mouth feeling fresh and comfortable over time.
Download your patient information brochure here
To achive and maintain a healthy oral environment, dry mouth suffers need your guidance and a home care plan.
h en r y sc h e i n .c o m .a u
4 7
ORAL HEALTH SOLUTIONS
PROTECTION OF PERMANENT MOLARS WITH FISSURE SEALANT by Dr. Jacqueline Esch 3M Health Academy
Especially in paediatric patients with a high risk of caries the use of fissure sealants can be an effective method of caries prevention [1]. By sealing the enamel pits and fissures on the occlusal surfaces of permanent molars with a resin-based material, an impermeable barrier is created between the enamel and the oral environment. The risk of caries development in the particularly vulnerable parts of molar teeth is reduced significantly. Since the retention of sealants is better on sound enamel than on questionably carious tooth surfaces [2], we use to seal permanent molars of children who are likely to develop caries a short time after the complete eruption of the teeth. For the first molars the treatment is usually carried out at the age of six to seven. The procedure is explained by means of the following patient case.
Figure 1 : Initial situation: Mandibular right first molar after the placement of rubber dam.
Clinical case The seven-year-old female patient presented in our practice for paediatric dentistry for one of her regular check-ups and prevention appointments after her permanent maxillary and mandibular first molars had erupted. Due to her high caries risk we decided to seal the fissures with 3M™ Clinpro™ Sealant.
Figure 2 : A rose-head bur is used for fissure preparation: The fissures are opened slightly and the surface is cleaned.
Figure 3 : Alternatively 3M™ Clinpro™ Prophy Powder can be applied to the tooth surface with an air-polishing device to create a clean surface, followed by rinsing with water.
4 8
ORAL HEALTH SOLUTIONS
Figure 4 : Application of 3M™ Scotchbond™ Universal Etchant on the enamel surfaces to be sealed. The etchant should be removed after 15 to 60 seconds. Here the exposure time was 20 seconds.
Figure 5 : Situation after removal of the etchant with water and subsequent air-drying.
Figure 6 : Dispensing of 3M™ Clinpro™ Sealant into the pits and fissures of the molar. The pink colour ensures clear visibility and precise control over the location and amount of sealant placed.
Figure 7 : Result: After light-curing the sealant appears white. It provides a barrier that protects the vulnerable occlusal surface from plaque adhesion. For optimal results, the use of a fluoride containing varnish is recommended.
Résumé The described procedure is a quick and effective way of reducing the caries risk in paediatric patients. In order to provide for durable results, the quality of the sealant layer should be assessed on a regular basis and replaced if necessary [3]. NOTE: Clinpro™ Prophy Powder is not available in Australia & New Zealand References
[1] Ahovuo-Saloranta A, Hiiri A, Nordblad A, Mäkelä M, Worthington H. Pit and fissure sealants for preventing dental decay in the permanent teeth of children and adolescents. The Cochrane Database of Systematic Reviews 2008; Issue 4:Art. No.: CD001830. DOI: 10.1002/14651858.CD001830.pub3. [2] Michalaki MG, Oulis, CJ, Lagouv ardos, P. Microleakage of three different sealants on sound and questionable occlusal surfaces of permanent molars: an in vitro study. Eur Arch Paediatr Dent. 2010 Feb, 11 (1): 26-31. [3] Mejare I, Lingstrom P, Petersson L, Holm AK, Twetman S, Kallestal C, et al. Caries preventive effect of fissure sealants: a systematic review. Acta Odontol Scand 2003;61(6):321-30.
Dr. Jacqueline Esch graduated from the University of Regensburg (Germany) in 1991. She worked as an assistant teacher at the Universityof Regensburg for 6 years. In 1997 she joined a private practice for paediatric dentistry in Munich, where she developed a keen interest in all aspects of paediatric dentistry.
DR. JACQUELINE ESCH Specialist Paediatric Dentistry Munich, Germany
h en r y sc h e i n .c o m .a u
4 9
ORAL HEALTH SOLUTIONS
HELP YOUR PATIENTS ACHIEVE AND MAINTAIN A BRIGHTER SMILE
Are you concerned that your patients’ oral hygiene is not improving despite your many attempts in oral hygiene instruction? Isn’t it time to consider that your patient may need tools to help them achieve their oral health goals? Philips has worked closely with dental practitioners to develop tools to assist patients to achieve oral health when you can’t be there to guide them. Through the Sonicare range of power toothbrushes, Philips has developed a variety of solutions for plaque control, to target gum disease and to help your patients achieve and maintain a brighter smile. Sonicare’s sonic technology creates a unique brush head movement that is a combination of high frequency and high amplitude in a wide sweeping motion, giving 62,000 bristle movements per minute. It also has a second motion - a pulsation that penetrates through the thickness of average biofilm (20-100 µm) and breaks it up, making it easier to remove with the brush head sweeping motion.
5 0
This unique movement results in a dynamic cleaning action that drives fluid between teeth, gently and effectively removing plaque interdentally and along the gum line. This movement drives toothpaste and saliva deeper between the teeth to disrupt the plaque biofilm; the fluoride in the toothpaste can then aid in remineralization and the saliva can physically clean food and debris from between the teeth. There are several Sonicare models that help you customise the toothbrush that is right for your patients, when considering their lifestyle, their budget and their oral health needs. And Sonicare has clinical evidence to support it claims.
ORAL HEALTH SOLUTIONS
The benefits of Sonicare technology are: • It provides an exceptional clean • It is gentle to the teeth and gums. • It is great for people wearing braces or retainers and for crowns and into hard-to-reach places. So, if for example, your patients have gingival problems, it is ideal to choose a Sonicare that has a Gum mode feature, where the toothbrush will run for 3 minutes and 20 seconds. Chapple1 et al stated that for periodontitis patients, brushing for 2 minutes is likely to be insufficient. Sonicare also has a Gum Head brush head which is designed with • Extra soft edge bristles to target plaque at the gumline. • Up to 7x healthier gingivae in just 2 weeks • A smaller head allowing for easier access to molars • 2 x more surface area coverage So, for those of your patients who struggle to maintain a good oral hygiene regimen and where there is evidence of gingivitis, the Sonicare solution for your patients would be the DiamondClean Smart or the DiamondClean9000. The DiamondClean9000 is the perfect brush to target gingival problems and for those patients who want whiter, healthier teeth or want to maintain their white smile at home, by removing surface stains. This toothbrush with multiple modes allows the brush to change as the patient’s needs change. And if the patient has trouble developing correct brushing habits, the DiamondClean 9000 App will help them brush correctly and hold them accountable. The App provides data on their brushing and also allows you to input information into the App, such as the areas that they need to focus on. Alternatively you could recommend Philips Sonicare DiamondClean Smart, a premium product that is more than just a toothbrush, it’s a complete oral care system which delivers Sonicare’s best results for a healthier mouth. It brings together the ultimate in Sonicare performance and smart sensor technology for personalised coaching while delivering 10x better plaque removal than a manual brush. Philips also has a solution for interdental cleaning, the Sonicare AirFloss Ultra. It provides an easier way to clean in between the teeth through innovative microburst technology, whereby AirFloss Ultra mechanically disrupts interproximal biofilm. It is ideal for patients who struggle with flossing and for those who want to supplement their oral health care regimen. 1. Chapple et al. “Primary prevention of periodontitis: managing gingivitis”. Journal of Clinical Periodontology, 2015, pp. S71-S76 DISCLAIMER Dr Hera Dimitriadis, BDS, BA, MHM is the Dental Professional Relations Manager in Australia and New Zealand for Philips Oral Health Care. Hera has an extensive career in dentistry and health care in both NSW and Qld, including clinical practice, health management, dental practice accreditation, and dental and public health education.
h en r y sc h e i n .c o m .a u
View on the Henry Schein web site
5 1
INFECTION CONTROL SOLUTIONS
INFECTION CONTROL YOUR TRUSTED INFECTION PREVENTION PROFESSIONALS OFFERING EXPERT ADVICE AND PRODUCTS TO MATCH PROTOCOLS.
To all our valued customers for reading the Infection Control segment, thank you. This Infection Control segment is themed around SAFETY, so we have tried to capture and input relevant information and products to match this.
Safety and infection control really do go hand in hand, in daily practice we are exposed to many risks, so safety is often at the forefront of our minds. Let Henry Schein guide you through some key areas where you can practice safely to protect and prevent.
IC
� � ON N FF II D D EE N CCO NTTIIAALL
We partner products with infection control protocols in order to help demonstrate the how to the why with these questions.
IC Confidential was created to reach out to customers via a free webinar to demystify some popular infection control questions. Presented by
Emma Jones CICP-P CLICK HERE
What’s the latest that have we covered in our IC Confidential Episodes? We have launched 7 episodes of IC Confidential since the start of 2021. With over 400 attendees, we are excited to continue to reach out to customers through this free webinar and keep answering infection control questions. To review, here is what we have covered in our IC Confidential Episodes thus far: Episode 1 - Ultrasonic Bath Performance Episode 2 - Surface Management Episode 3 - Correct Pouching Techniques Episode 4 - Are Your Waterlines Safe? Episode 5 - When did you last shock treat your dental chair? Episode 6 - Instrument Re-Processing & Avoiding Sharps Risk Episode 7 - Safe & Effective Suction Cleaning Coming Soon! Episode 8 - Autoclave audit ready – are you tracking correctly?
5 2
You can find the previous episodes on the Infection Control Archive Page on our Dental Education Hub. To view all previous episodes, scan this QR Code
INFECTION CONTROL SOLUTIONS
WHY SHOULD WE DO ROUTINE MONITORING?
Validation as well as Routine Monitoring for steam sterilisation processes are concepts outlined in the ISO Standard 17665-1:2006 . This ISO standard is referenced in our Australian Standard AS/NZS 4187:2014. Validation (usually done annually, upon installation, after a major repair etc) and daily start-up testing (Daily Air Removal and Steam Penetration Test / Bowie Dick Test) are conducted on sterilisers to prove that the intended result is always reached under the same conditions, i.e. reproducibility of the sterilisation process and an assurance that our instruments have been sterilised to an acceptable level for use on patients. But a validated and tested process only remains efficient if it is reproduceable on a day-to-day and cycle-to-cycle basis. Additionally, a correctly working steriliser is never proof that all items have been sterilised successfully, which leads to the concept of routine monitoring. ISO 17665-1 makes the statement that “Routine monitoring and control shall be performed on each operating cycle.” Steam penetration into the internal surfaces of hollow instruments is a critical parameter of a sterilisation process and the only way this parameter can be monitored is through the use of a Process Challenge Device (PCD). Hollow instruments in a dental setting include items like hand pieces and burs. If the parameters of temperature, time and steam delivery are met, a steriliser will deem the process successful. These parameters will be detailed on the chart print out. We might also use an external or package chemical indicator to tell us this information. But what the steriliser and chemical indicators cannot tell is whether the magnitude of air removal and steam penetration inside hollow lumens and cavities of instruments was sufficient. Only a PCD can tell us this information. While some sterilisers also have in-built air detectors now, these detectors can only tell what’s happening inside the chamber and not inside the instruments. Again, only a PCD can tell us whether the requirements for air removal and steam penetration of our hollow instruments has been successful, and this must be done for every load where we have sterilised those hollow instruments.
Additionally, use of the gke PCD in every load can pick up where a fault with the steriliser may start to occur, keeping you ahead of the game. For example, a deficiency with the vacuum pump, or introduced air into the chamber which will block steam penetration from occurring. If we don’t use a PCD in every load, we will have no way of knowing when a fault started to occur with the steriliser. So, if we run our Daily Air Removal and Steam Penetration Test this morning and it passed but run it again tomorrow and it fails, every single load we sterilised since yesterday morning no longer has a sterility assurance level, meaning an introduced level of risk for our patients. Why run that risk? Risk management ensures we are minimising the risk to patients. If best practice ensures any risks are mitigated, then why wouldn’t we adopt an extra step in our monitoring to ensure the best possible outcome for our patients? ISO 17665-1:2006 Sterilization of health care products – Moist heat – Requirements for the development, validation and routine control of a sterilization process for medical devices. GK-F200-026
GKE Orange PCD Bowie Dick/Helix Test EN867 GK-DPL03
GKE Dental Practice Steriliser Log Book 33 Pages
Our NEXT Episode of IC Confidential covers this topic ‘Autoclave audit ready Are you tracking correctly?’ Scan here to register for this episode to catch it when it launches on Friday, 27 August
h en r y sc h e i n .c o m .a u
5 3
INFECTION CONTROL SOLUTIONS
SAFETY CONSIDERATIONS FOR HANDLING INSTRUMENTS
Minimal handling is key to minimizing risk of sharps injuries from instruments. The Hu Friedy Instrument Management System (IMS) cassette range offers a safer and effective way to handle / store / process your instruments. IMS is an integrated practice Instrument Management System designed to keep instruments organized and intact from cleaning to chairside. It eliminates instrument scrubbing and sorting, protects against breakage, and reduces the risk of injury.Focusing more on the safety aspect the IMS cassettes allows users to safely place instruments back in the cassette after use. They have lockable latches which ensure instruments do not fall out when transported. Due to their design they also offer enough gaps for excellent cleaning and even extend the life span of your instruments. It prevents the need for the dental staff to handle multiple instruments at a time reducing the risk to sharps incidents. DID YOU KNOW using IMS greatly reduces the chance of a sharps injury which on average cost a practice USD $3,000*? (according to*”SHARPS INJURY PREVENTION WORKBOOK” page 6. CDC.) HF-IMN6050 HF-IMN60511 HF-IMN5080 HF-IMN50811 HF-IMN5084 HF-IMN4163 HF-IMN4164
IMS Cassette Infinity Series 5 Instruments Red IMS Cassette Infinity Series 5 Instruments Ocean Blue IMS Cassette Infinity Series 8 Instruments Red IMS Cassette Infinity Series 8 Instruments Ocean Blue IMS Cassette Infinity Series 8 Instruments Purple IMS Cassette Infinity Series 16 Instruments Orange IMS Cassette Infinity Series 16 Instruments Purple
Scan here for to watch Improve Safety with Instrument Management
5 4
INFECTION CONTROL SOLUTIONS
SAFETY CONSIDERATIONS FOR INSTRUMENT REPROCESSING
The use of heavy duty gloves / utility gloves are clearly stated as a must in our Australian Dental Association Guidelines for infection prevention and control: “Heavy-duty utility, puncture-resistant gloves must be used during manual instrument cleaning, rather than disposable latex gloves. These utility gloves can be reused, but must be washed in detergent after each use, stored dry and replaced if torn, cracked, peeling or showing signs of deterioration” are we able to italicise this as it is extracted from the guidelines?.” ADA’s Guidelines for Infection Control Third Edition ©2015 Authorised by DR RICK OLIVE AM RFD, Federal President, Australian Dental Association.
The Hu Friedy Lilac Utility Gloves are puncture and chemical resistant with a non-slip grip. Steam autoclavable to 250°F/121°C up to five times. For use in the sterilization area, and during operatory breakdown and disinfection processes. • Nitrile, lilac utility gloves stand out to professionals as the color of dental hygiene • Flocklined for increased ease of donning and doffing • Resist chemicals better than exam gloves • Puncture resistant for improved protection • Molded texture improves tactile feel and grip • Can be autoclaved up to 250˚F/121˚C up to five times. • Not made with natural rubber latex Utility gloves Gloves LILAC UTILITY Nitrile Size 7 Small 3 pairs HF-LILACGLVMD Gloves LILAC UTILITY Nitrile Size 8 Medium 3 pairs HF-LILACGLVLG Gloves LILAC UTILITY Nitrile Size 9 Large 3 pairs HF-LILACGLVXL Gloves LILAC UTILITY Nitrile Size 10 Extra Large 3 pairs HF-LILACGLVSM
Scan here to watch IC Confidential Episode 6 Instrument Re-Processing & Avoiding Sharps Risk
h en r y sc h e i n .c o m .a u
5 5
INFECTION CONTROL SOLUTIONS
SAFE SURFACES
In the current climate we know how important it is to ensure clean surfaces, especially those that are frequently contaminated. Cleaning with a neutral detergent removes bioburden from surfaces, it also assists with breaking down proteins and has better cleaning capabilities than alcohol for example. Using something like an alcohol wipe alone will harden proteins and If you’ve ever used alcohol on blood you will know how blood can harden and become very difficult to remove When surfaces are exposed to say blood splatter using a neutral detergent followed by a disinfectant is best practice. Using a disinfectant wipe in a 2 step approach means you firstly clean the area by removing the blood and then use a second disinfectant wipe allowing the surface to dry will ensure the any viruses or multi-resistant organisms on the surface are killed in the specified time the wipe manufacturer has advised. When using products to clean medical devices such as dental chairs It’s important to ensure you follow the guidance from the manufacture of the medical device to ensure compatibility. Areas in the practice that also become soiled frequently are doors handles, waiting room chairs/tables, front counter, eftpos machines and public bathrooms. Whilst you may not clean after every touch you may want to consider a cleaning schedule a couple of times per day.
5 6
INFECTION CONTROL SOLUTIONS
Whilst cleaning surfaces is important to ensure residue does not build up. Therefore, we would recommend that at the end of the day using a microfibre cloth that is rung out from warm water to wipe off the days product build up. This will ensure surfaces are clean/dry and free from residue. Surfaces will look newer for longer. Henry Schein CleanND Wipe is a Neutral wipe approved for use with medical devices. Pre-soaked in a pH neutral, biodegradable detergent solution, these wipes do not stain nor leave streaks.
Henry Schein Surface Disinfectant Wipes are a premium quality wipe soaked in a cleaning and broad-spectrum disinfection solution. Fast acting disinfection including activity against SARS-CoV-2 (Covid 19) in 2 mins. The wipes are absorbent, lint free and textured to aid cleaning.
HS-572-2628
HS-5722626
CLeanND Wipe Henry Schein Neutral Detergent 180 Wipes
180 Wipes
HS SURFACE Disinfectant Wipes Hospital Grade
Scan here to watch IC Confidential Episode 2 Surface Management
h en r y sc h e i n .c o m .a u
5 7
INFECTION CONTROL SOLUTIONS
CYCLE RECORD COMPLIANCE WITHOUT THE NEED OF A PRINTER
The Mocom range of sterilisers meets the intended requirements of Australian Standard/s without the need for a printer. Mocom are internationally recognised as experts in the design and manufacture of sterilisers and hold compliance certificates for all relevant international standards. The Supreme, Futura and Classic series have been specifically designed by Mocom to meet onscreen parametric release requirements. AS4815 is the applicable Australian standard currently for General Practice (“office-based practice”). A summary of the sections that refer to Parametric Release (i.e. the “authorised person” checking that all the required parameters have been met before “releasing” the load for use) are as follows: Table 7.1 - Cycle monitoring (every load) – this says you must have: • Print-out of cycle parameters or • Direct observation and recording of cycle parameters (i.e. writing them down every 10 seconds!) or • Class 4, 5 or 6 chemical indicator (where no print-out is available). And… • Class 1 chemical indicator in each load of unwrapped items. • Class 1 external chemical indicator on the outside of every packaged item in the load. And optionally: • Biological/enzymatic indicator(s). • Chemical indicator-on tray or inside pack(s) (Class 1, 4, 5 or 6). • Process challenge device(s) reflective of the type of loads processed. Clause 7.7.4.1 says in relation to the physical parameters to be monitored: • They shall include time and temperature, and, where applicable, pressure. • The parameters shall be automatically measured and permanently recorded (by print-out or non-volatile electronic record). • The monitoring must identify that critical physical parameters have been met (cycle type / time / temp / pressure) • At the end of each cycle, the operator shall …verify that correct cycle parameters were met and record it to permit later identification (of the operator). • For existing steam sterilizers (with no printer), …a Class 4, 5 or 6 chemical indicator shall be used with each load.
5 8
INFECTION CONTROL SOLUTIONS
So, the “parameters” that the authorised operator must verify prior to “release” of the load are: 1. The correct (intended) cycle was run (identifying the cycle name and number) 2. The target sterilising time was achieved 3. The target sterilising temp was reached and was within limits 4. The target sterilising pressure was reached and within limits 5. The cycle was completed fully and had a “positive” result 6. The operator who released the load can be identified AND 7. The packs are dry 8. The packs are intact 9. The correct cycle was run for the pack/s being processed
The Mocom range presents all of the required physical parameters on the screen at the end of each cycle, then requires the operator to identify themselves, before the steriliser opens the door. This cycle and operator detail are recorded within the steriliser for later download.
Below is a typical Mocom Futura “Completed” cycle screen and the Operator Screens that follow, showing that points 1 – 6 listed above confirm that this data is presented to the operator at completion of a cycle, therefore no printer is required.
This “onscreen parametric release” functionality in the Mocom range of sterilisers meets all the requirements for authorised parametric release without the need for a printer. The operator must select their name and enter their (unique) pin number in order to open the door of the steriliser, adding an extra layer of security and preventing unauthorised (or accidental) release of a load. You may have experienced other steriliser brands that show a “completed” screen without detail at the end of the cycle, but the Mocom “completed” screen includes all parametric release data and still will not open the steriliser door without recording the authorised operator. In our view this more than meets the requirements and intent of the standard. In our view, Onscreen Parametric Release is only acceptable if the authorised operator can identify all parameters and the operator can be identified and securely recorded permanently. We strongly agree with the view that “Completed” is not enough (unless a Class 4,5,6 Indicator is used and recorded). JIM OWEN Sales Relationship Manager Mocom Australia h en r y sc h e i n .c o m .a u
5 9
INFECTION CONTROL SOLUTIONS
TESTING YOUR ULTRASONIC BATH CORRECTLY AND SAFELY
As part of our daily testing requirements as required by the AS/NZ 4815:2006 standard it specifies that daily performance testing e.g. foil test or pencil load test is required. The most common method we see in practice is the foil test, however, there seems to be varied techniques and types of foil being used. As a general rule you should always refer to the manufacture of the ultrasonic cleaner to determine how a foil test is to be performed. But also become familiar from a safety perspective how to handle and operate the machine and tests. Safety First! No part of your hands should be submerged into the cleaner during operation as the ultrasonic waves are enough to cause damage to joint tissues and could result in long-term arthritic conditions. The lid should also be closed in order to prevent excess emission of noise and aerosols. Lastly the product you’re using should be handled carefully and diluted correctly to prevent skin irritations and workplace health and safety concerns.
Step 1: Fill tank with tempered water
Step 2: Add recommended dose of solution
Step 3: Degas
Step 4: Run foil test or pencil load test
Step 5: Add basket and instruments
Step 6: Close lid
Step 7: Run Ultrasonic Cleaner
Step 8: Remove basket and set on unit to drain
Step 9: Rinse instruments off with water
Step 10: End of day– empty tank
Step 11: Rinse the tank and wipe clean with a soft cloth moistened with a mineral deposit remover and then with a mild disinfectant
aner Ultrasonic Cle de Reference Gui
2
1 Ultrasonic Clea Reference Guid ner e nded dose of
recomme Step 2: Add
with Step 1: Fill tank
tempered water
solution
3
Step 7: Run Ultrasonic Cleaner
foil test Step 4: Run
or pencil load
5
Step 3: Degas
4
7
8
test
6
Step 8: Remove basket
9
and set on unit
to drain
10
Step 9: Rinse instrument
s off with water
lid Step 6: Close basket and Step 5: Add
instruments
11
Step 10: End of day–
empty tank
6 0
Coltène/Whaled Raiffeisenstrasse ent GmbH + Co. KG 89129 Langenau 30 Tel. +49 (0)7345 / Germany Fax +49 (0)7345 805 0 info.de@coltene.c805 201 om
P/N31629A
Step 11: Rinse the tank and moistened with wipe clean with a soft cloth a then with a mild mineral deposit remover and disinfectant Coltène/Whaled ent Inc. 235 Ascot Parkway Cuyahoga Falls, OH 44223/USA Tel. USA and Canada +1 800 +1 330 916 221 3046 8800 Fax +1 330 645 8704 info.us@coltene.c www.coltene.com om
Scan here to view the full Coltene Ultrasonic Cleaner Reference Guide
INFECTION CONTROL SOLUTIONS
A MORE RELIABLE STERILISATION POUCH TO CONSIDER
Maxima Self Seal Sterilisation Pouches are made from 60gsm quality medical grade paper and have external/ internal process indicators. There is no latex in this product and the inks are lead free. These pouches have adhesive reinforced sides and a reinforced chevron end to prevent instruments from tearing through. When you are ready to use the instruments, the thumb notch at the top end makes it easy to peel the see-though blue film. As Class 1 chemical indicators, their colour change shows that the pouch and its contents have been exposed to the sterilisation process (steam and EO). Having two indicators - one on the outside and one on the inside gives you piece of mind that the instruments inside have been sterilised. Most other pouches on the market only have external indicators.
HS-9006155 HS-9006156 HS-9006157 HS-9006158 HS-9006159 HS-9006153 HS-9006154
Sterilisation Pouch MAXIMA Sterilisation Pouch MAXIMA Sterilisation Pouch MAXIMA Sterilisation Pouch MAXIMA Sterilisation Pouch MAXIMA Sterilisation Pouch MAXIMA Sterilisation Pouch MAXIMA
57x100 mm 70x230 mm 90x140 mm 90x255 mm 133x255 mm 190x330 mm 230x380 mm
(2.25x4”) (2.75x9”) (3.5x 5.5”) (3.5x10”) (5.25x10”) (7.5x13”) (9x15”)
Box of 200 Box of 200 Box of 200 Box of 200 Box of 200 Box of 200 Box of 200
We’ve put together a brief video regarding our Maxima Sterilisation Pouches and their indicators. Scan here to watch it
h en r y sc h e i n .c o m .a u
6 1
INFECTION CONTROL SOLUTIONS
SAFE IN YOUR HANDS CHOOSING THE RIGHT GLOVE IN YOUR DENTAL PRACTICE
In your dental practice, using quality medical gloves as personal protective equipment (PPE) plays an important part of a broader infection control and prevention strategy and acts as a barrier to ensure the safety of dental staff and patients alike. In Australia, gloves must adhere to strict regulatory requirements that will dictate manufacturing standards and regulations to safeguard quality and reliably if used as recommended, reduce or prevent the transmission of disease or micro-organisms (such as bacteria or viruses) and protect from potential chemical exposure. As well as understanding that the glove manufacturer is adhering to pre-established criteria, the wearer should also be aware of added features to provide extra protection. Choosing the right glove with a stricter Acceptable Quality Level (AQL) ensures the highest quality and safety standards and freedom from holes. Why is AQL important?
Considering Chemical Permeation
AQL is an internationally recognised industry standard statistical sampling process for evaluating quality and measuring the percentage likelihood of pinhole defects in a manufactured batch of gloves. Various international standards, as shown in Table 1 (scan QR code on the following page to view Table 1) determine the AQL that manufacturers must comply to. Manufacturers can also set their own standards as long as they are stricter than the international standards dictated. The lower and stricter the AQL, the lower the chance of finding a defect in the batch of gloves, and the higher the quality of the product.
Dental professionals should also carefully choose their gloves in part based on the chemicals they may be exposed to in their daily practice. Many chemicals can permeate through medical gloves and irritate skin or cause even more serious health problems. In addition, some studies suggest that when chemicals compromise the barrier integrity of gloves, there can be increased microbial penetration.2 Increased microbial penetration can lead to higher risk of infection and cross contamination.3
In the case of Ansell, they have set their AQL Standards at a stricter level to ensure a better quality and safer product: • Surgical gloves are 0.65 (natural rubber latex and nonlatex), exceeding world standards of 1.0 - 1.5. • Examination gloves are 1.5, meeting or exceeding world standards of 1.5-2.5
6 2
Different types of gloves protect against different types of chemicals. A medical glove’s ability to resist chemicals is also limited in time. After a while, the chemical will penetrate the medical glove material, often without being noticed.5
INFECTION CONTROL SOLUTIONS
Factors that influence the length of time of chemical resistance include: • • • • • •
Type of glove material Quality of the glove formulation and manufacturing process Thickness of the glove material Composition and concentration of chemical in the product or chemical mixture chemicals Frequency and duration of contact with the chemical mixture (short or long period of time) Nature of chemical contact (total immersion, or exposure to a “splash”).
Selecting the right glove for the right situation When selecting gloves in your dental practice, it is important to ensure that the product is both functional and effective. Evaluate gloves for quality, flexibility, handling grip, durability, chemical permeability and other key indicators. This chart provides dental professionals with an easy to use glove application guide.6 (scan QR Code to view the Glove Selection Guide) Glove Selection Guide Medical gloves are critical to protect both healthcare workers patients and must therefore be manufactured to a very high standard at all times. Ansell’s GAMMEX surgical glove portfolio, and Micro-Touch and MICROFLEX examination gloves guarantee higher quality with their stricter AQL, including all other necessary and desirable attributes.
References 1. Ansell (2015). Acceptable Quality Level (AQL). web page address Accessed June 22, 2021” change to: 1. Ansell (2021) Why Acceptable Quality Level (AQL) Matters https://www.ansell.com/au/en/medical/services/ansellcares/clinical-evidence/gloveperforation-and-failure, Accessed June 22, 2021 2. Richards JM, Sydiskis RJ, Davidson WM., et al. Permeability of latex gloves after contact with dental materials. Am J Orthod Dentofacial Orthop. 1993 Sep;104(3):224-9. 3. Girou E, Chai SH, Oppein F., et al. Misuse of gloves: the foundation for poor compliance with hand hygiene and potential for microbial transmission? J Hosp Infect. 2004 Jun;57(2):162-9. 4. National Health & Medical Research Council, Australian Commission on Safety and Quality in Health Care. Australian Guidelines for the Prevention and Control of Infection in Healthcare. Canberra: Commonwealth of Australia; 2019. 5. Zimmerman Mikael (2020) Protecting Hands from Chemicals in Dentistry [White Paper]. https://www.ansell.com/au/en/medical/professions/dental/pageconfiguration/anz/chemicals-in-dentistry , Accessed May 24, 2021. 6. Ansell Clinical Bulletin (2017) A Guide To Medical Glove Selection, Choosing The Right Glove For The Right Situation https://www.ansell.com/au/en/medical/ services/ansellcares/clinical-evidence/glove-perforation-and-failure Accessed May 24, 2021.
Scan QR Code to view the two reference tables mentioned in the article
h en r y sc h e i n .c o m .a u
6 3
INFECTION CONTROL SOLUTIONS
IMPORTANCE OF CONTINUOUS, HANDS FREE, HIGH SPEED EVACUATION IN PREVENTING YOUR EXPOSURE TO CONTAMINANTS
Over 90% of aerosols can be eliminated with proper suction – that’s where the Isolite® comes in. Now is the time to make sure you’re implementing proper protocol in your dental office by reducing the risk of contamination. When aerosols are created by high-speed handpieces, ultrasonic scalers, and other instruments, the “spray” not only carries particles of water but also bacteria, viruses, blood, and saliva. These aerosols can contain up to 100,000 bacteria per cubic foot of air. One of the most important things you can do to protect yourself, the patient, and your staff is to reduce aerosols and droplets (spatter, splatter, spray) with continuous intraoral suction. When compared to the performance of a rubber dam plus an HVE, or an HVE alone, studies show that the Isolite is more effective in reducing dental aerosols, helping decrease Dentists, DAs, and hygienists exposure to bacteria and airborne pathogens.
How the Isolite Protects You and Your Patients As You Work Constant Evacuation of Salivary Flow The Isolite’s suction capabilities allow you to continuously evacuate saliva and debris, eliminating the problems that moisture and humidity can cause during procedures.
6 4
INFECTION CONTROL SOLUTIONS
Intra Oral Illumination With intra oral illumination, in your choice of 3 levels of bright white light, Isolite’s LED lighting provides durable, long lasting visibility into the oral cavity so you can work safely and accurately.
Superior Isolation and Airway Protection The Isolite provides superior isolation through fitted one time use mouthpieces, protecting soft tissues and airways in addition to providing necessary retraction.
Learn how an ISOLITE, ISODRY, or ISOVAC can help you to reduce dental aerosol and spatter in Your Practice.
View on the Henry Schein web site
View the Zyris web site
h en r y sc h e i n .c o m .a u
6 5
INFECTION CONTROL SOLUTIONS
SAFE WATERLINES IF YOU DON’T TEST HOW DO YOU KNOW?
There are many risks associated with biofilm formation and contaminated water, in the context of dental unit waterlines the best way to determine if your water is SAFE is to complete a water dip slide test. Dentisan have a very effective testing water dip slide test by where the result is ready within 72 hours! It uses a clear red dot spot system: 1 or more you’re good to go 2 or more than a shock treatment needs to be performed as this is an indication of biofilm formation.
Written in the ADA Guidelines for Infection Control Third Edition (page 14 section 2. Waterlines and water quality) are the guidance around waterline compliance and what CFU/ml needs to be followed for patient water supply: The number of bacteria in water used as a coolant/irrigant for non-surgical dental procedures should be less than 500 CFU/mL, since this is a widely used international limit for safe drinking water.9
We’ve made a very useful video on how to perform a water test on your dental chair please click the video below for more information
When treating immunocompromised patients, it is recommended that water from dental unit waterlines contain less than 200 CFU/mL. Bacterial levels can be tested using commercially available test strips or through commercial microbiology laboratories. The Dentisan dip slides can be used to test the dental chair water supply, the input water quality to the building and even the patient water drinking fountain. After all, wouldn’t you want to ensure safe water throughout the whole work place?
QD-DS026
Dentisan Bioclear Dip Slides x 10 slides Water Test
Scan here to download a Water Test Protocol / Record Sheet
6 6
Scan this QR Code to watch a video on how to perform a water test on your dental chair
HANDPIECE SOLUTIONS
HANDPIECE LUBRICATION
HANDPIECE SOLUTIONS
The Benefits of Automated Handpiece Lubrication for Optimal Performance
Dental handpieces are a costly investment and every dental practice could benefit from having a simplified protocol to ensure the proper care and maintenance of their handpiece inventory. Poorly maintained dental handpieces can compromise the quality of performance, lead to potential health and safety risks and can cause costly and time-consuming repairs. It is important to follow the maintenance recommendations of the handpiece manufacturer but almost universally they recommend handpieces are lubricated, purged and chuck maintenance performed on both highspeed and speed increasing red band contra angle handpieces. Automating handpiece maintenance provides precise and consistent lubrication and purging of handpieces which ensures optimal performance and longevity, increases efficiency as multiple handpieces can be lubricated in one cycle and can significantly reduce the amount of lubricant required. Morita’s Lubrina 2, with programmable maintenance modes, can effectively and efficiently perform purging and lubrication of 4 handpieces (highspeed or contra angle), automatically. The new Clean AirBlow function with double-conduit design, ensures residual water is removed from the handpiece prior to oiling, maximising lubrication results. The Clean Air-Blow also effectively removes any surplus oil prior to bagging and autoclaving your handpiece.
HANDPIECE LUBRICATION
The Lubrina 2 is the cornerstone of a standardised, efficient and effective handpiece maintenance protocol for dental practices, minimising maintenance costs and maximising handpiece longevity.
• NEW OF Clean Air-Blow System THE BENEFITS AUTOMATED HANDPIECE LUBRICATION • Dedicated built-in, -one touch, Chuck FOR OPTIMAL PERFORMANCE Maintenance port • • •
M-LUBR
NEW Oil mist suction removal The Lubrina 2 is the cornerstone of a standardised Dental handpieces are a costly investment and every dental practice could benefit from having a simplified efficient and effective handpiece maintenance 20 second high speed handpiece maintenance protocol to ensure the proper care and maintenance protocol for dental practices, minimising of their handpiece inventory. maintenance costs and maximising handpiece Programmable maintenance modes for different longevity. Poorly maintained dental handpieces can handpiece types
compromise the quality of performance, lead to potential health and safety risksup and to can4cause Maintains handpieces costly and time-consuming repairs.
• in • one NEWcycle Clean Air-Blow System • Dedicated built-in, one touch, Chuck • to Multiple handpiece coupling options available It is important follow the maintenance Maintenance port recommendations of the handpiece manufacturer • Compatible for use with other manufacturer’s • NEW Oil mist suction removal but almost universally they recommend handpieces lubricant are lubricated, purged and chuck maintenance performed on both highspeed and speed increasing Quiet operation red band contra angle handpieces.
• Automating maintenance provides • handpiece Simple unit maintenance
precise and consistent lubrication and purging of handpieces which ensures optimal performance and M-LUBRINA longevity, increases efficiency as multiple handpieces can be lubricated in one cycle and can significantly reduce the amount of lubricant required.
•
20 second high speed handpiece maintenanc
•
Programmable maintenance modes for differe handpiece types
•
Maintains up to 4 handpieces in one cycle
•
Multiple handpiece coupling options available
•
Compatible for use with other manufacturer’s lubricant
•
Morita’s Lubrina 2, with programmable maintenance modes, can effectively and efficiently perform • purging and lubrication of 4 handpieces (highspeed or contra angle), automatically. The new Clean AirBlow function with double-conduit design, ensures residual water is removed from- the handpiece Video Lubrina 2 prior to oiling, maximising lubrication results. The Clean Seamless Auto-Maintenance Air-Blow also effectively removes any surplus oil prior for dental handpieces to bagging and autoclaving your handpiece.
Quiet operation Simple unit maintenance
VIDEO Lubrina 2 Seamless Auto-Maintenance for dental handpieces
5 6
h en r y sc h e i n .c o m .a u
6 7
INSTRUMENT SOLUTIONS
NEW CLEAR COLLECTION DESIGNED TO ENHANCE THE ADAPTABILITY OF CLEAR ALIGNERS
When Hu-Friedy first introduced the Clear Collection for Clear Aligners, they wanted to make it easier for dental professionals to manipulate invisible aligners without the need to heat the instrument. The original line-up of instruments – The Tear Drop, The Vertical, The Horizontal, and The Hole Punch – were a big hit, and in the years following their introduction, treatment with clear aligners has only continued to grow in popularity among patients. Today, the majority of orthodontists utilize clear aligner therapy in their practice. Naturally, as more patients adopt clear aligners, there is a greater need for additional flexibility when it comes to manipulating aligners, chairside. Indeed, there are many ways to accent, individualize, and optimize the biomechanics of invisible aligners. That’s why HuFriedy again teamed with Dr. Jay Bowman, who originated the design of the Clear Collection. Consequently, HuFriedy are introducing five brand-new instruments to provide even more options to enhance aligner treatments.
The Spot
The Petite Puch
The Spot creates a tiny, rounded dimple for spot contacts to accent small individual tooth movements for added aligner retention.
Similar in design to the Hole Punch from the original Clear Collection, The Petite Punch cuts a 4.5-milimeter half-moon cutout in an aligner for relief of the plastic around bonded buttons for smaller teeth like premolars. This instrument can be used to create cut-outs in either the buccal or lingual marginal plastic, anywhere desired along an aligner. The Petite Punch can also be used to “nip away” plastic at the edge of aligners to provide relief from soft tissue impingement or irritation.
It can be used to accent movements on any tooth in the aligner that needs just a “nudge.” The Spot’s small depression placed adjacent to the gingival embrasures can also enhance the retentiveness of an aligner or retainer. Why is this important? Dr. Bowman explains: “Occasionally, near the end of a series of aligners, a single tooth is just not in ideal position and could benefit from a little push. In this manner, a small indent in the last few aligners from The Spot instrument may preclude the need for another complete refinement.” Product Code HF-678-804
According to Dr. Bowman: “The original Hole Punch was created to assist in placing buttons on large molar teeth. In contrast, The Petite Punch was designed to provide clearance for adding bonded buttons on narrower teeth like premolars and canines.” Product Code HF-678-805
6 8
INSTRUMENT SOLUTIONS
The Clockwise Wedge and The Counter Clockwise Wedge
The Eraser
These two new Wedge instruments are used to enhance the rotational movement of specific teeth, one of the least predictable movements with aligners. The Wedges produce an indent in either the mesial or distal side on the facial (near the line angle of the tooth) with the intent of functioning similar to a typical “rotational wedge” used with braces. This can be combined by using the same Wedge instrument on the lingual side of the aligner, but on the (mesial or distal) line angle on the opposite side of the tooth. In this manner, the two opposing Wedge indents can create the force for a rotational couple. In other words, by producing an indent on the mesial or distal side of the facial plastic and a corresponding, but opposite, depression on the lingual side of the tooth, a rotational force couple is produced. It is important to keep in mind that aligners do flex to accommodate Clear Collection indents. For organizational purposes, The Counter Clockwise Wedge is used to affect a mesial rotation of the Mandibular Right and Maxillary Left teeth. This instrument is also used to affect a distal rotation of Mandibular Left and Maxillary Right. In contrast, The Clockwise Wedge is used to affect a distal rotation of Mandibular Right and Maxillary Left teeth. It is also used to affect a mesial rotation of Mandibular Left and Maxillary Right.
The Eraser is designed to reverse or remove unwanted indents placed by other instruments in the Clear Collection by flattening the plastic where a depression was inadvertently positioned or where the accent indent is no longer required. Indents can be erased with just a few squeezes of the instrument. As Dr. Bowman explains: “Once an accent indent (like from The Spot, The Vertical or The Horizontal instruments) is no longer required in an aligner, The Eraser is used to eliminate them.” Clear aligner manipulation is as much an art as it is a science, and these new instruments provide enhanced flexibility when it comes to making precise adjustments. As dental professionals, that means better outcomes for your patients with less effort. So, add to your Clear Collection today for more transformative smiles. Product Code HF-678-811
As an alternative, the Wedge instruments can also produce a “reservoir” depression in an aligner (from the inside out) in a location where a bonded attachment is desired. This reservoir is filled with composite, applied to the tooth, and cured. A scan or impression can then be taken to create aligners that employ the new attachment(s). Dr. Bowman adds, “Rotational movements, especially of laterals and canines, have been recognized as having poor predictability. This may warrant the application of customized rotational wedges, hence the need for these new Wedge instruments.”
View Brochure
Product Codes HF-678-808 & HF-678-807
h en r y sc h e i n .c o m .a u
6 9
CAD / CAM SOLUTIONS
Your complete YOUR COMPLETE CAD/CAM Your complete Yourcomplete complete Your Your complete Your complete WORKFLOW GC CAD/CAM GC CAD/CAM GC CAD/CAM GC CAD/CAM GCCAD/CAM CAD/CAM GC workflow. workflow. workflow. workflow. workflow. workflow. CERASMART™ 270 offers the modern busy practice a truly fast, effective milling solution with flexibility in clinical
Shade Selection, HT or LT CERASMART Shade Selection, HT or LT270 provides improved strength, more natural aesthetics and fluorescence, higher 1 1applications. affording both clinicians and patients a no-compromise quality outcome, making it the perfect choice Shade Selection, HT Shade Selection, HT or LTororLT 1 1radiopacity Selection, LT 1 Shade for inlay, onlay and implantHT restorations. A1 HT Selection, A2 HT HT or A3 LT HT A3.5 HT B1 HT A1 LT A2 LT A3 LT A3.5 LT B1 LT Bleach (BL) 1 A11. Shade HTShadeA2 HT A3 HT or LT A3.5 HT B1 HT A1 LT A2 LT A3 LT A3.5 LT B1 LT Bleach (BL) Selection, HT ™
†
HTHT A3.5 HT A3.5 B1HT HT A1 HTA1 HTA1 HT A2 HTA2 HT A2 HTA3 HTA3A3 A3.5 HT HT B1 HTB1 A1 HT
A2 HT
A3 HT
A3.5 HT
Scanning and milling Scanning and milling ™ 2 22. CERASMART 270 Blocks Scanning and milling ™and 2 Scanning and milling Scanning milling Scanning and milling CERASMART 270 Blocks 2 2 CERASMART 270 Blocks ™ ™ CERASMART 270Blocks Blocks CERASMART CERASMART™ 270270 Blocks 2 Scanning and™ milling ™
CERASMART 270 Blocks
Cerasmart™ 270 milling is fast and efficient, making it possible to create a qualitative restoration with fine margins and optimal fit in a single visit.
After etching with HF etching with HF 5After After etching with HF or sandblasting 5 55. or sandblasting After etching with HF After etching with etching with HF HF or sandblasting G-Multi PRIMER 5 5 After G-Multi PRIMER or sandblasting or sandblasting or sandblasting G-Multi PRIMER After etching with HF G-Multi PRIMER G-Multi PRIMER 5 G-Multi PRIMER
or sandblasting G-Multi PRIMER
Apply silane coupling agent, eg. G-Multi PRIMER and dry. No bonding agent is required after the application of G-Multi PRIMER.
B1 HT
A1 LT A1A1 LT LT A1 LT
A2 LT A2A2 LTLT A2 LT
A3.5 LT B1B1 A3 A3.5LT LT Bleach (BL) (BL) A3LT LT A3 LT A3.5 LT LT B1 LT Bleach (BL) Bleach A3 LT
Finishing and polishing 3Finishing and polishing 33. Finishing DIAPOLISHER PASTE Finishing and polishing 3 and polishing Finishing and polishing Finishing and polishing DIAPOLISHER PASTE 3 3 DIAPOLISHER PASTE DIAPOLISHER PASTE DIAPOLISHER PASTE DIAPOLISHER PASTE 3 Finishing and polishing DIAPOLISHER PASTE
An impressive gloss level can be obtained by just some simple polishing steps, utilising standard polishing wheels and points.
cementation Adhesiveresin resin cementation 6 Adhesive 6 Adhesive resin cementation G-CEM LinkForce ™ 66. Adhesive G-CEM LinkForce resin resin™ cementation Adhesive Adhesive resin cementation G-CEM LinkForce 6 6 cementation ™ ™ G-CEM LinkForce G-CEM LinkForce Adhesive resin cementation 6 G-CEM LinkForce™ ™ ™
G-CEM LinkForce
G-CEM LinkForce™ is a universal resin cement solution built on three strong links that ensure uncompromising, reliable adhesion and is the perfect cementation partner for your CAD/CAM restorations.
A3.5 LT
B1 LT
Bleach (BL)
Characterisation 4Characterisation 4 OPTIGLAZE color Characterisation 4 4Characterisation 4. Characterisation Characterisation OPTIGLAZE color 4 OPTIGLAZE color OPTIGLAZE OPTIGLAZE colorcolorcolor OPTIGLAZE 4 Characterisation OPTIGLAZE color
Add character to your restoration with the stroke of a brush. You can choose from a wide variety of colours or use the clear glaze to add a long-lasting, high and repair glossMaintenance coating.* Maintenance and repair
7 7 Maintenance and G-Multi PRIMER and repair 7 G-Multi PRIMER and 7. Maintenance and and repair Maintenance and repair Maintenance and repair G-Multi PRIMER G-ænial Universal Injectable 7 ™ 7 G-ænial Universal Injectable ™ G-Multi PRIMER and and G-Multi PRIMER and G-Multi PRIMER G-ænial Universal Injectable ™ and Maintenance repair G-aenial™ Universal Injectable ™ G-ænial Universal Injectable 7 G-ænial Universal Injectable ™
G-Multi PRIMER and G-ænial™ Universal Injectable
G-Multi PRIMER used in conjunction with GC's full strength injectable composite resin for ease of maintenance and repair if required.
* N.Tekçe et al. The effect of glazing and aging on the surface properties of CAD/CAM resin blocks. J Adv Prosthodont 2018; 10:50-57. † Neiva G, Valcanaia A. In-vitro Surface Roughness of Novel Chairside Resilient CAD/CAM Material. J Dent Res 2019 Vol 98 (Spec Iss A): 2479 (https://iadr.abstractarchives.com/abstract/19iags-3184930/in-vitro-surfaceroughness-of-novel-chairside-resilient-cadcam-material). † Ergucu Z, Balci M, Güneri P, Boyacioglu HL, Turkun S. Comparative Radiopacity of Different Posterior Restorative Materials. J Dent Res 2019 Vol 98 (Spec Iss B): 0406.
7 0
www.gcaustralasia.com
ORTODONTIC SOLUTIONS
THE IMPACT OF INVISALIGN GO ON MY PRACTICE
Why did you want to take up Invisalign Go? Many patients in Australia want to have a beautiful, perfectly aligned smile and it is easy to see why. The rapid acceleration in alignment technology means it is now easier to achieve a beautiful smile without necessarily having to through braces. Invisalign Go clear aligners can achieve similar results to traditional braces at a cheaper price, less timeframes and with less discomfort.
Most importantly patients now feel good about themselves as a result of Invisalign Go, and they have told others about the positive experience that they have had with us. Word of mouth is important in small communities like Flagstone and our practice has now been branded as a smile rehabilitation centre! The practice has now invested in more technology (digital scanning) and this has led to significant growth.
The system offers an easy treatment option that can fix numerous issues such as crooked teeth, crowded teeth, overlapping teeth, or teeth with gaps, and many other issues for our patients.
How did you build confidence with Invisalign Go?
In summary, Invisalign Go is versatile, invisible,
Low maintenance and easy Invisalign patients meant that more time was invested in patient assessment and treatment planning.
comfortable, easy, safe, quick, and affordable. How has it changed & benefitted your practice? Invisalign Go has helped our practice grow. A good number of patients have visited us specifically for Invisalign treatment. Most patients who need Invisalign Go treatment have other treatment needs that are addressed within the clinic. More examinations, cleans, whitening, OPGs, restorations and extractions have been done as a direct result of Invisalign Go treatment.
As we did more and more cases, our confidence in the ability to deliver healthy smiles has increased.
Digital scanning technology improved communication between dentist-patient, dentist-lab, and the turnaround times have improved significantly. A clear support system from our Henry Schein rep and Invisalign Go rep, usually a phone call or email away has given the practice the confidence that Invisalign Go services are safe for our patients. I’m happy to continue offering Invisalign Go to my patients.
More and more patients who have had braces in the past (teeth have moved) are now attracted to our practice because they don’t expect to go through the same invasive, long, and uncomfortable orthodontic treatment. A good rapport and trust have been built between the practice and patients as a result of Invisalign Go. Patients now understand procedures better, and they are more open to ask questions or seek clarifications regarding their care. This has led to greater acceptance of other procedures offered by the practice. DR MATT NCUBE Flagstone Dental Centre QLD
h en r y sc h e i n .c o m .a u
7 1
DIGITAL SOLUTIONS
ITERO SCANNER DIGITAL MODEL QUICK GUIDE TO EVALUATING
Whether you’re planning a simple crown or a full edentulous case, using an iTero intraoral scanner in your practice can streamline your workflow, improve your treatments, and help boost patient engagement. How to evaluate the digital model Rotate the model to evaluate occlusal, lingual, buccal, mesial, and distal surfaces of the adjacent teeth.
Once the segments have been scanned, tap the view icon at the top of the touchscreen display to view the digital model in high resolution. After the case has been processed, evaluate the model to ensure that it is accurate and complete (i.e., check for any missing areas of anatomy).
Prep review checklist: Margin is clearly visible, prep is fully captured, prep is clear of overlapping tissue or other obstructions that affect the margin.
Verify that the patient’s bite is in centric occlusion.
7 2
DIGITAL SOLUTIONS How to leverage the additional tools Occlusal Clearance Tool The Occlusal Clearance Tool ensures that the prep has sufficient reduction for the material chosen in the Rx.
Occlusal Clearance Legend •
•
•
• • • • •
Utilise the Occlusal Clearance Legend to determine the distance between opposing teeth. Red areas on the prep indicate areas of inadequate occlusal clearance for the restoration, reduce the prep as required and rescan using the Eraser Tool. To make any adjustments ensure that you are in the buccal view, then select the Eraser Tool. Circle the area that will be modified on the model. Adjust the clearance on patient’s tooth. Select Scan Tool to scan the modified circled area. Activate View Tool. Confirm the reduction was adequate.
Prep Separation Tool The Prep Separation Tool is used to analyse the tooth prep and surrounding areas in high resolution.
Prep Separation Tool • • •
Allows recording the tooth anatomy before the tooth preparation. Enables the lab to copy the original anatomy to the new restoration. Data will be available on the following CAD-CAM System: 3 Shape and Exocad. 1 Pre-treatment, indicated by the green background.
Visit iTero.com for more information or to book a demo.
2 Post-treatment, indicated by the blue background.
Visit iTeroEducationandTraining.com to access education resources on the iTero imaging system.
h en r y sc h e i n .c o m .a u
7 3
DIGITAL SOLUTIONS
PLACEMENT OF IMPLANT-RETAINED PROVISIONAL BRIDGE USING GUIDED SURGERY AND A FULL DIGITAL WORKFLOW
The utilization of a full digital workflow eliminates the disadvantages and difficulties commonly associated with conventional analog techniques. Some of these common limitations include patient discomfort commonly associated with the impression procedure, the potential for distortion of the impression material and inaccuracies of subsequent steps in the manufacturing process, the potential of damage to the dental cast and delay, due to logistics of sending lab work between the dental practice and the laboratory. These disadvantages do not occur in the full digital workflow where the impression is taken with an intraoral scanner and the design of the prosthesis is done on CAD software. The data from the digital impression is also simply sent over the Internet, significantly reducing the time needed to manufacture the wax-ups and prosthesis. The following case report presents a fully digital workflow from the treatment planning to the guided surgery phase in the provision of an immediate implant retained fixed provisional bridge. There are many advantages of a fixed provisional over a removable provisional that includes: • • • • •
stability of the prosthesis and associated implants aesthetics less interference of speech patterns better mastication and comfort for the patient most importantly minimize soft tissue complications associated around the peri-implant site
Case information A patient in his early 80s presented with the chief complaint of recurrent pain, discomfort and swelling from his lower dentition. An examination revealed moderate to advanced bone loss of his remaining mandibular teeth. Peri-apical radiolucencies associated with chronic apical periodontitis were also diagnosed on the lower anterior segment. His lower dentition at the time of presentation was restored with fixed crown and bridge prosthesis with implant fixtures on the 37 and 47 site, placed 20 years prior. The implant fixtures were abutments for fixed bridges that were linked to natural teeth abutments (Fig. 1). The patient’s health history was unremarkable.
7 4
Fig. 1. Failed lower dentition and very old sterioss implants
DIGITAL SOLUTIONS
The patient requested for his lower dentition to be rehabilitated with the use of dental implants due his good perception of longevity stemming from his past treatment experience. It was the patient’s brief and request that the procedure be simple and not time consuming due to several factors. These factors included: 1.
His struggle to keep his mouth open for long periods of time.
2.
Difficulty in tolerating conventional impression techniques.
3.
His perceived age and health status.
In treatment planning the case, the following criteria were established with the goal of delivering a fixed implant retained provisional bridge. 1. To deliver the complete treatment process in 3 appointments with the appointments being: The consultation and treatment planning phase utilizing intraoral scanning with the 3Shape TRIOS intraoral scanner, BioHorizon’s Digital Library, 3Shape Implant Studio and a CBCT from Instrumen-tarium Maxio OP. Extraction of all lower natural teeth and immediate placement of implant fixtures utilizing a fully guided surgical placement protocol. An intra-oral scan will then be completed utilizing implant scan markers to allow the fabrication of the provisional prosthesis.Delivery of a fixed provisional implant retained bridge. 2. To deliver the planned treatment utilizing a full digital protocol without the use of conventional impression techniques. 3. For implant surgery to be fully guided keeping the surgical procedure simple, accurate with minimal trauma and discomfort.
Fig. 2. The Pre-Operative Presentation Occlusal View
Fig. 3. The Pre-Operative Presentation Labial View
Fig. 4. The Pre-Operative Presentation OPG
Fig. 5. The Preoperative Intraoral Scan Occlusal View
Fig. 6. The Pre-Operative Intraoral ScanView Labial View
Fig. 7. Virtual extractions for digital implant planning - Labial view
DR ANTHONY MAK Dentist BDS, Grad Dip Clin Dent (Oral Implants) (USyd)
h en r y sc h e i n .c o m .a u
7 5
DIGITAL SOLUTIONS
USING DIGITAL IMPRESSIONS OF THE UPPER JAW FOR A FULL-ARCH DENTAL BRIDGE TREATMENT
Taking digital impressions of the soft tissues of the mouth can be challenging - but not if you are using Planmeca Emerald™ intraoral scanners. The following case report by Dr Koby Sharvit
illustrates how intraoral scans, captured of the mucosa in full natural colours, can help designing advanced dental restorations quickly and accurately. Dr Koby Sharvit, MD, DMD, is an Israeli dentist and expert in CAD/CAM technology. He is currently working in PerioCenter Ltd. A dental centre, managed by Dr Yaniv Mayer and Dr Eran Gabay, both specialists in periodontology. The clinic is located in Haifa, Israel.
Emerald™ S intraoral scanner. With the scanner, Dr. Sharvit could easily capture the patient’s mucosa and available dentition for the design of an implantsupported full-arch dental bridge. Compared to traditional impressions, intraoral scanning would be much more comfortable and faster for the patient.
Dr Sharvit was approached by a patient who needed dental restorations for the entire upper jaw. The patient, a 45-year-old woman, had lost all her upper teeth due to an advanced periodontal disease. She had previously undergone dental surgery conducted by Dr Yaniv Mayer, who performed two open maxillary sinus augmentations with the installation of ten Alpha-Bio implants with 3.75mm diameter, which were placed to the maxilla.
After the patient had agreed with the treatment plan, a digital impression was captured with the Planmeca Emerald S intraoral scanner using scan bodies on the implants. Planmeca Emerald S captures impressions in full natural colours and was therefore able to capture the soft tissues precisely.
As the patient suffers from a prominent gag reflex, she did not want to use a temporary denture for the healing period. A year after the implant placement, it was time for the restoration design. Due to the patient’s gag reflex and high-level of anxiety, Dr. Sharvit suggested taking digital impressions of the mouth with the Planmeca
Thanks to the latest update of Planmeca Romexis® and Planmeca PlanCAD® Easy software, the scanning procedure was easy and smooth. With the new global alignment feature of the software, the scanning pattern can be chosen more freely, and the most scanning errors are automatically corrected. Even in this challenging case, the scan result was excellent, and the dental technician of the clinic was able to start working with the model right away.
Fig. 1.–2. Patient had previously had ten dental implants placed to the upper jaw. * GC R&D Data on file
7 6
DIGITAL SOLUTIONS
With the open system of Planmeca, dental professionals can choose their preferred way of working and, for example, easily export scan data to third-party software or to external partners. For the restoration design of this case, the dental technician Shimon Shoval, CDT, the CEO of Smile Tech Dental Laboratory in Israel, exported the scan data to Exocad software and built a zirconia bridge using a virtual Hanau articulator. A week after the first appointment, the bridge was delivered to the patient. Some minor occlusal adjustments were performed during the delivery, but the fit of the bridge itself was very good and did not require any adjustments. The patient started eating solid food already within a couple of days after the restoration was placed. With the dental bridge, her phonetics and aesthetics were fully restored.
Fig. 3.–5. The patient’s dentition and mucosa were captured with Planmeca Emerald™ S intraoral scanner using Planmeca PlanCAD® Easy module of Planmeca Romexis® software.
Fig. 6.–7. Implant-supported dental bridge was designed based on the scanned model.
Fig. 8–9. The aesthetics and phonetics of the patient were restored with the perfectly fitting restoration.
About the dentist Dr Koby Sharvit graduated as Doctor of Medicine from Technion, Israel Institute of Technology, in 1991 and received the degree of Doctor of Medicine in Dentistry from Tel Aviv University in 1996. He is currently working with complex prosthetic dental cases in the Periocenter dental clinic in Haifa, Israel. Expert in utilising CAD/CAM technology, he also works as a CAD/CAM specialist at Avidor Medical Dental Equipment Ltd. Copy: Mari Koivunen Images: Dr Koby Sharvit, Periocenter dental clinic
h en r y sc h e i n .c o m .a u
7 7
3D PRINTING SOLUTIONS
DIGITAL WORKFLOW IN IMPLANT AND RESTORATIVE DENTISTRY PART 2: SECONDARY TEMPORISATION
In this second article we will discuss the second set of temporary restorations, from capturing the intraoral situation effectively using a special intraoral scan technique, to the fabrication of the provisional crowns and bridges on natural tooth abutments and implants to favour the development of the gingival emergence profile.
Healing phase Following implant surgery and placement of healing caps, the first provisional temporary was left in place for a four-month healing period (fig. 1). During the healing phase, tooth 24 (upper left first premolar) developed signs and symptoms of pulpal necrosis, which was treated. The second phase of temporization involved individual temporary restorations, (implants and tooth abutmentsupported), printed in GC Temprint resin using the Asiga Max UV printer. This second provisional phase would allow for the extraction of tooth 15, development of the soft tissue emergence profile and gingival contours, and the verification of the aesthetics and occlusion. The implant on 11 needed stage 2 implant surgery to uncover the implant as we had to bone graft that site at the time of surgery. We have found that on implant sites it is always better to place a temporary implant restoration to develop the soft tissue and emergence profile around that site. This is especially important in an aesthetic zone. Since 15 was extracted and would be replaced by a pontic in an implant bridge, the temporary implant bridge would allow the development of the soft tissue in the pontic site, hence further improving the aesthetic outcome. Since the patient had approved the shape and occlusion of the initial provisional bridge, the plan was to replicate the aesthetic and occlusal scheme as individual restorations.
7 8
3D PRINTING SOLUTIONS
The treatment plan for this phase involved: •
•
Finalisation of the preparations and fabrication of single unit provisional crowns for teeth 13, 12, 22, 23 and 24; Fabrication of single unit implant retained provisional crowns for 11, 21 and 25;
•
Fabrication of this implant-retained three-unit provisional fixed bridge from 16 to 14;
•
The extraction of tooth 15 (which would become the pontic for the three-unit implantretained bridge);
•
Development of the soft tissue emergence profile and contours on the 11, 21 and 15.
The Mak optimised scan strategy and spaghetti technique First a pre-preparation scan was done, with the healing abutments and temporary bridge in situ (fig. 2). This was done using the “Mak optimized scan strategy and spaghetti technique” (figs. 3a & b), thus named because the wax looks like spaghetti. This novel scan strategy allows the intra oral scanner to capture areas of soft tissue where the availability of ‘landmarks’ is often limited. This optimizes image acquisition and enables the accurate stitching of the images taken, providing the most accurate of scans. There is an abundant of literature and evidence showing that the accuracy of IOS scans are largely dependent on the experience of the operator and the minimization of soft tissues capture in the scans.
DR. ANDREW CHIO BDSc. (Melb)
DR ANTHONY MAK Dentist BDS, Grad Dip Clin Dent (Oral Implants) (USyd)
h en r y sc h e i n .c o m .a u
7 9
PROSTHETIC SOLUTIONS
FULL DENTURES CAN BE INTEGRATED INTO THE EVERYDAY DIGITAL LABORATORY PROCESS
VITA VIONIC VIGO makes the difference For many years, digital dentures were thought to be impractical. However, as with most areas of digitalization, the pace of development has been rapid in recent years. Sometimes just one small component is missing before new technologies can be utilized in a variety of everyday uses. In the case of full digital dentures, the innovative optimization of the VITA VIONIC VIGO digital denture tooth has led to a major new technology. Due to its threedimensional anatomical layering, the smart tooth has a vibrant and highly esthetic appearance, similar to what we are used to seeing from highly filled premium teeth for conventional denture fabrication. Dental technician Darius Northey (Buderim, Australia) is already working with CAD/CAM in a number of areas. As a lab owner, he not only focuses on precision and esthetics, but also on efficiency and cost-effectiveness. Until now, he has not routinely manufactured full dentures in a digital workflow. The process seemed too complicated and not particularly economical. He has tested the new ready-to-use VITA VIONIC VIGO denture tooth with his existing hardware and software and shares his experiences in the following interview.
Fig. 1: The self-curing, two-component bonding system VITA VIONIC BOND.
8 0
Does a lab have to meet special hardware and software requirements in order to manufacture digital dentures using VITA VIONIC? That was a question that was on my mind when I was looking into this process. As a lab owner, you don’t want to completely upend established workflows because of the implementation of a new type of treatment. It was a real surprise for me to see just how easy it was to integrate VITA VIONIC VIGO into our existing digital workflow. Everything ran seamlessly without requiring any further upgrades to the hardware and software. Did you use additive or subtractive techniques to fabricate the denture base? What were your reasons for using this particular process? I deliberately decided to use additive manufacturing with a 3D printer. The decisive factor for me was saving time. Printing is faster than milling and much faster than conventional fabrication methods. We were already using the NextDent 5100 3D printer in the lab. I purchased Opaque Pink 3D+ as the denture base material. That was all it took to start producing denture bases with the additive approach.
Fig. 2: VITA VIONIC BOND when applied to the alveoli of the denture base.
PROSTHETIC SOLUTIONS
What advantages does the VITA VIONIC VIGO denture tooth offer you when it comes to CAD/CAM-supported fabrication of full dentures? VITA VIONIC VIGO has been specially developed for digital workflows. The shape was designed to eliminate the need to grind the tooth cervically or occlusally. It comes preconditioned straight out of the packaging and is bonded in place immediately. On top of that, it has outstanding esthetics compared to other teeth that are milled or printed in a digital workflow. That made the decision easy for me.
Fig. 3: The denture base was fabricated using additive manufacturing in a 3D printer. The VITA VIONIC VIGO denture teeth were bonded in place.
How does the process of bonding the denture teeth into the milled or printed denture bases work? The VITA VIONIC BOND bonding system is ready for use immediately after mixing. The basal design of VITA VIONIC VIGO without undercuts and with precise fit in the range of 20 microns makes it really easy to bond the teeth into the denture base. The teeth fit into the alveoli without rotation, so that the virtually planned position of the teeth can be perfectly reproduced. Every dental technician can do this.
Fig. 4: Lingualized occlusion provides freedom for centric and eccentric movements.
Will you continue to fabricate your full denture restorations using the digital workflow? How will this technology develop in the future? We will continue to fabricate our new full denture cases using the digital workflow. The economic aspects were especially convincing for me. I can take care of other tasks while the denture base is being printed. I think the use of intraoral scanners will steadily increase, and the software and hardware will just get better and better. CAD/CAM-supported fabrication of full dentures will be mainstream in dental laboratories in the near future.
Fig. 5: The virtual setup could be completely individualized in the anterior region.
DARIUS NORTHEY Jade Dental Laboratory Pty Ltd
h en r y sc h e i n .c o m .a u
8 1
PROSTHETIC SOLUTIONS
PRACTICE-INTEGRATED, EFFICIENT AFTERCARE CONCEPTS AS THE BASIS FOR SUCCESS IN IMPLANT PROSTHETICS
The success of endosseous implants has been proven by comprehensive data in numerous clinical studies. Initially interest was focussed on the success rate of osseointegrated implants in different areas of indication and bone quality as well as the effect of various implant designs (Esposito et al. 1998). It was only later that implant failures, which occurred during the functional phase of the restoration, also became a focus of interest. Apart from technical complications, biological problems are an example of failure risks in the functional period of the restoration (Norowski and Bumgardner 2009). The main cause of biologically induced problems in the late phase is progressive peri-implant in-flammation, which leads to destruction of the peri-implant hard tissue and consequently implant loss in the final stage (Lang et al. 2001). Infection pattern The development of peri-implant mucositis has been proven to have a close causal relationship with bacterial plaque, despite the anatomical differences between teeth and implants (Beikler et al.2005). The microbial colonisation and formation of a multispecies biofilm follow the same pat- tern as on natural teeth. The submucosal biofilm accumulation is also an important aetiological factor with periimplant diseases. The microflora associated with peri-im- plantitis consists of periodontal pathogen species, which resemble the spectrum of periodontitis (Luterbacher et al. 2000). It can be assumed that bacterial processes on dental implants follow the same pattern as periodontitis – through translocation of bacterial germs from ecological niches in the oral cavity (back of the tongue, tonsils, buccal mucosa) as well as the supragingival and subgingival environment of the existing dentition (Klinge et al. 2002). Limits in therapy require prevention Occasionally extensive dental interventions are required with peri-implant diseases in order to maintain the function of an implant. In addition, not all current therapy options have been scientifically validated, as they only partly enable restitutio ad integrum. Effective prevention of peri- implantitis is therefore in the interest of the patient and cost bearers as well as in that of the medical provider. Based on the knowledge that the aetiological infection pattern on the teeth and implants progresses
8 2
in a similar manner the basic diagnostic methods used in periodontology can be applied with implant patients (Beik- ler et al. 2005). To ensure early diagnosis of peri-implant complications, it is highly recommended that patients with implants are included in an integrated aftercare concept (Esposito et al. 1999). Recall intervals of 3 months have proven successful in the case of partially edentulous patients and patients treated with implants. The recall interval should be 3 to 5 months (depend- ing on the individual status of oral hygiene) for edentulous patients who have been treated with an implant-supported restoration (Lang et al. 2000). The peri-implant probe depth should be recorded regularly at six-month intervals using the clinical parameter bleeding on probing. To ensure optimal aftercare, these values should be compared with the initial findings when the implant was first loaded. Recording the pocket probing depth at implants using special plastic periodontal probes, which was a requirement for many years, is now no longer considered necessary. Conven- tional metal periodontal probes not only just alter the rough implant surface to an insignificant degree but also ensure more reliable and reproducible diagnoses due to their more slender diameter and greater inherent rigidity in comparison with plastic probes. The radiological check of the peri-implant bone site is also given greater significance; a radiological check is recommended after 1, 3, and 5 years of pros- thetic loading and if there is normal clinical progress, it should be completed every 5 years (Zitzmann el. 2006).
PROSTHETIC SOLUTIONS Peri-implant aftercare concept
Efficient, effective cleaning
At this present point in time there are no generally accepted guidelines for cleaning implant surfaces. The use of a combined mechanical anti-infective therapy similar to periodontitis therapy seems practical (Beikler et al. 2005, Esposito et al. 1999, Zitzmann et al. 2006). Mechanical removal of the bacterial biofilm is mainly used in the routine aftercare of implant patients.
Needle-cleaning techniques have been recommended for cleaning dentures for some years. The term needle cleaning is derived from the metal pins, which are used as a second component in combination with liquid during cleaning. A rotary magnetic field sets the pins in motion, which then produce gentle mechanical removal of the surface accretion. The rotating needles heat up the cleaning solution to approx. 45 °C and so accelerate the chemical reaction.
Air-powder-water sprays with a minimally abrasive blasting agent and also silicone cups with polishing paste or specially developed sonic scalers with silicone tips are suitable for subgingival cleaning of the polished surfaces of implant shoulders and superstructures (Mombelli & Lang 2000). With periimplant bone loss any cleaning of the predominantly rough implant surface that is necessary can also be performed using conventional sonic scalers, as instrumentation only alters the property of the implant surface to an insignificant degree (Lang et al. 1999). At present, the minimally abrasive air polishing technique using a glycine-based agent seems to be the most efficient and gentle method for conditioning submucosal implant surfaces. Adjuvant procedures in the aftercare concept Operator-removable superstructures should be removed, if possible, during implantological aftercare. This not only cre- ates better access to the individual implants but also enables the superstructure to be cleaned separately. In the case of implant- retained overdentures separate cleaning of the attachments and overdenture is particularly important, as there could be accretion, discoloration or calculus on these units. In the majority of cases the use of ultrasonic cleaners alone is not adequate for producing a satisfactory result. Gener- ally in these instances further cleaning is required using rotary instruments and drills - a procedure that is very time consuming and that is not sufficiently cost-effective in terms of business management.
Before cleaning
Before cleaning
This technique allows dentures that have been in situ to be cleaned fully automati- cally. Stubborn discoloration and calculus can be eliminated without removing any material, even on areas that are difficult to access. Many years of clinical experience with these systems indicate that interdental spaces, fissures and complex structures of precision attachments and retentive ele- ments are also effectively cleaned using this technique. Needle cleaning can be provid- ed as a practical additional service within the parameters of a structured prophylaxis programme. Generally patients who under- go implant prosthetic treatment are more compliant than patients who undergo conventional prosthetic treatment. The primary target group for additional services in a prophylaxis programme is therefore to be found in this segment: these patients attend the practice regularly and they have already exhibited their willingness to pay by opting for a high-quality restoration. A newly developed unit (SYMPRO, Renfert) based on the needle cleaning technique was recently introduced to the market. This unit is much more efficient than previ- ously available units, as it is possible to clean a denture effectively within 15 to 20 minutes. This means that the full cleaning cycle for the restoration can be completed parallel to the prophylaxis appointment - when the peri-implant aftercare is complete, the removable restoration has also been cleaned.
After cleaning with SYMPRO
After cleaning with SYMPRO
h en r y sc h e i n .c o m .a u
DR. SVEN RINKE Hanau and Alzenau, Germany
8 3
1300 65 88 22 henryschein.com.au