
About these instructions
Read the entire manual before starting assembly. Follow the directions in the manual to make sure the product complies with current standards.
The purpose of these assembly instructions is to facilitate correct installation and to inform of risks and how to avoid them. Bear in mind that the instructions are for your safety and the safety of others.
Use the assembly instructions and instructions for use in conjunction with:
* assembly
* regular inspections (together with the periodic inspection template)
* taking corrective action as directed
Each installation must be fitted with a load sign located in a clearly visible place.
Perform regular checks to ensure the technical safety of the pallet racking. Information about pallet racking inspections are available on our website www.blsab.se.
Parts of the installation instructions and instructions for use refer to the Swedish Standard SS-EN 15635:2008 - Steel static storage systems – Application and maintenance of storage equipment. If necessary, the purchaser or user can obtain the above standard from SIS. See www.sis.se for further information.
Links for downloading BLS installation instructions & instructions for use can be found at www.blsab.se
If in doubt, or for further information, please contact Brännehylte Lagersystem: CONTACT US
Telephone
Email Website
Postal address
Street address
+46 370 30 50 00
info@blsab.se www.blsab.se
P.O. Box 12, SE 335 04 Hillerstorp, Sweden
Brännehylte Lagersystem AB
High Chaparral
SE 335 96 Kulltorp, Sweden
Before you begin
Recommended tools
Supplied fasteners
Self-drilling screw
5,5x19 part 111616-4-19
Distance tube 30/43 30 mm - part 111056*/** 43 mm - part 111056-43***
M8x20 /30/ M10x20 part 111308-1-20-7 part 111310-1-20-7
* Applies to C90
** Applies to C110
*** Applies to C120
M8 / M10 nut with flange part 111308-7-0-7 part 111310-8-0-7
Beam safety pin part 111021
M10 nut lock part 111310-6-0-7
Base plate XL
C90 - part 90-002*
C110 - part 110-002**
C120 - part 120-002***
M10x75/105/110
75 mm - part 111310-1-75-7*/** 105 mm - part 111310-1-105-7***
The client/user must make sure the floor is able to bear the relevant loads.
Underlying surface Anchoring
Pallet racks must be anchored to the floor to prevent the uprights from moving when mechanical handling equipment is used in or near warehouse fixtures.
Safety
Correct rack assembly is essential for a safe structure. Assembly must be carried out professionally and in accordance with these instructions.
Fasteners not included
alternativt
Multi-Monti
10x80 part 111009-14
Expander bolt
M10x90 part 111009
Distance Spacer
150 mm - art 111005
200 mm - art 111210-200
250 mm - art 111210-250
300 mm - art 111210-300
*Leveling Plate base plate XL
mm - part 90-002-1
mm - part 90-002-2
mm - part 90-002-3 **/*** Leveling Plate base plate XL
- part 110-002-3
Floor attachment specification
Securing in concrete - Concrete screw
Multi-Monti M10×60
Drilled hole Ø8
Drill depth 65 mm, cleaned hole
Max. Mounting thickness 10 mm
Multi-Monti M10×80
Drilled hole Ø8
Drill depth 85 mm, cleaned hole
Max. Mounting thickness 30 mm
Multi-Monti M10×100
Drilled hole Ø8
Drill depth 105 mm, cleaned hole
Max. Mounting thickness 50 mm
Max torque impact wrench
Multi-Monti M10, 600 Nm
Securing in asphalt - Concrete screw
Multi-Monti M10×100
Drilled hole Ø8
Drill depth 115 mm
Max. Mounting thickness 50 mm
Multi-Monti M10×140
Drilled hole Ø8
Drill depth 155 mm
Max. Mounting thickness 90 mm
Always use concrete screws and anchoring compound when installing on asphalt.
H = Mounting thickness L = Drill depth
Drilled hole diameter T = Thickness of concrete slab
Bracing diagram
Table of dimensions Frame depth 450 mm
Table of dimensions Frame depth 500 mm
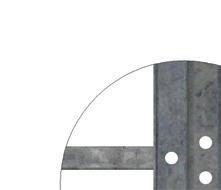


4.
1. Frame 2. Beam 3. Distance spacers
Tyre support brace
5. Floor Rail
6. Frame barrier
7. Load sign
Installing frames
1. Installing upright base plates (A)
2. Locate the braces according to the bracing diagram on pages 6. (B) The braces shall be mounted back-to-back, with the openings facing outwards.
3. Place distance tubes at single braces at the ends of the frame. (C)
4. Tighten the braces.
2pcs M8x20
2pcs
M10x75
Installing bays
1. Level the floor. Starting from the highest point, adjust any unevenness using levelling plates. Anchor base plates using 2 pcs Multi-Monti 10×80 (for concrete). (D)
2. Erect a starter bay and install beam safety pins in the beam safety holes. (E)
DLeveling plate
3. Check that the frames do not exceed the specified tolerances with regard to incline.
The incline in relation to plumb may not exceed 3 mm per metre in depth and laterally.
Multi-Monti 4pcs M10x80
Multi-Monti 4pcs M10x80
2 pcs beam safety pins per beam
Installing Distance Spacers
1. Install 2 distance spacers between each frame pair. Install distance spacers where braces meet.
Use 2 distance spacers per bay for bays up to 7 metres. If the bay is bigger than 7 metres, use a 3rd distance spacer.
Distance spacers are only fitted for double racks. (F)
2pcs M10x20
2pcs M10 with flange
Installing Floor Rails
Tyre Ø700 c/c 360 mm
Tyre Ø750 c/c 370 mm
Tyre Ø800 c/c 380 mm
Multi-Monti 2pcs M10x80
Multi-Monti 2pcs M10x80
Installing Tyre support brace
Tyre support braces are positioned centrally between the beams. (H)
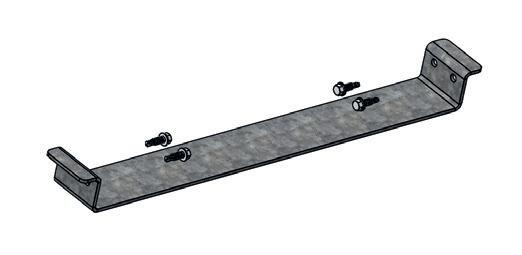
4pcs Self-drilling screw 5,5x19 Ø750 / Ø800
Tyre support brace
Installing frame barriers
Frame barrier, single rack
Frame barriers, double rack
Floor bracket Profile End caps
4 pcs Multi-Monti 10×80 /Expander bolt M10×90
2 pcs M8×110
2 pcs M8×30
2 pcs M8 with flange
Installing load signs
At least one load sign per rack must be clearly visible.
Inspection & Maintenance
Inspection and service according to SS-EN 15635
SS EN-15635 is the European standard for steel static storage systems and outlines guidelines for the installation, operation, and maintenance of the storage system.
Assembly inspection
Inspect the assembly before putting the pallet racking into service to confirm compliance with the assembly instructions.
Regular inspection
Storage systems must undergo a visual inspection every week or at other regular intervals to ensure that no load-bearing parts are damaged. A formal written report must be prepared for the regular inspections.
Periodic inspection
Storage systems must be inspected annually by an individual with the requisite technical knowledge.
The inspection, along with specified risks and measures, must be documented in a report and submitted to the person responsible.
Damage to the storage systems
Damage to load-bearing parts in the racking must be remedied immediately by replacing the part as this poses a safety risk. Other parts may be repaired.
For more information, refer to SS-EN 15635 Steel static storage systems - Installation, operation and maintenance
Checks during regular inspections
1. Check that there are beam safety pins on all sides of the beams.
2. Check that there is no damage to the beams, uprights, and bracing members. If necessary, replace damaged components immediately as they pose a safety hazard.
3. Check that there is a load sign and that it refers to the relevant racking configuration. At least one sign must be clearly visible.
4. Check to ensure the pallets and beams are not overloaded.
5. Check that there is an upright protector on the frames and uprights, and that the forklift aisles are correctly sized.
6. Check to ensure the floor is not damaged and that the racking is anchored to the floor.
Incline
The incline in relation to plumb may not exceed 3 mm per metre in depth and laterally.
Damage
In the event of damage of a local nature (dents, kinks, tears and cracks), always replace the parts.
Tolerance
The maximum residual vertical deformation (after unloading from the maximum load) must not exceed the beam length L/200. Maximum residual horizontal deformation L/400.
Deformed uprights
Uprights may deform outwards a maximum of 5 mm/m in relation to plumb along the length of the racking, and a maximum of 3 mm/m along the depth..
Brace deformation
Brace deformation must not exceed 10 mm per metre. This applies regardless of the direction of deformation.