


Anytime


Jerry Lohr and his team helped pioneer the now world-class winegrowing regions of Monterey and Paso Robles. In 1998, Arroyo Vista Chardonnay and Hilltop Cabernet Sauvignon debuted as the first two wines of the J. Lohr Vineyard Series. Today, with a fresh look, they eloquently speak to our long experience in our home appellations.


“Food feeds our souls. It is the single great uni er across all cultures.”
–LIDIA BASTIANICH
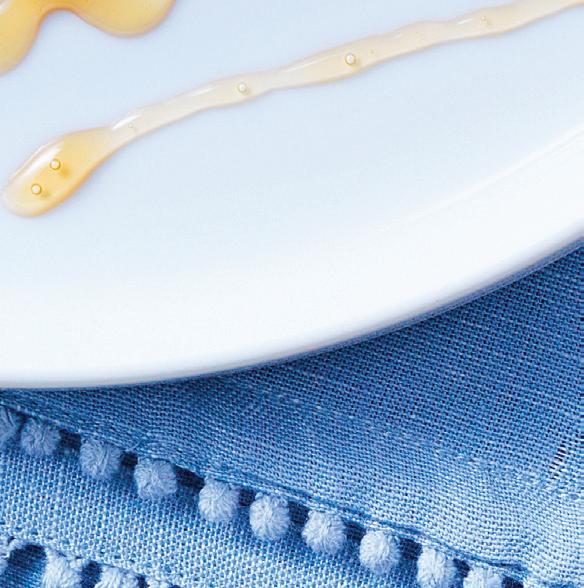
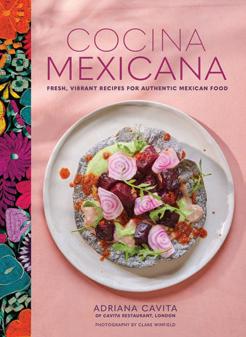
Enjoy the world-famous avors of Mexican cuisine from your own “cocina.”
RECIPES BY ADRIANA
CAVITA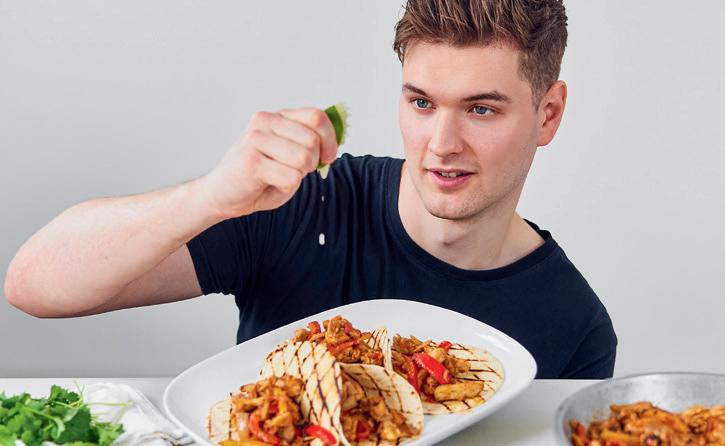
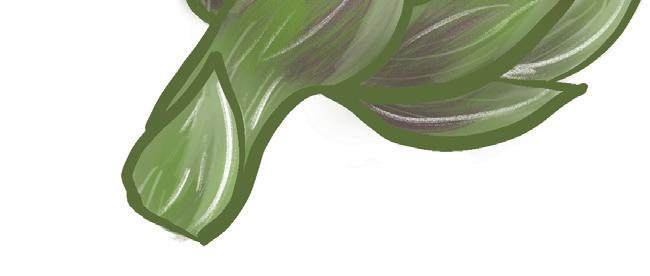
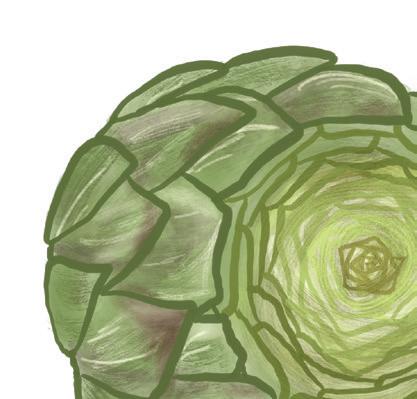
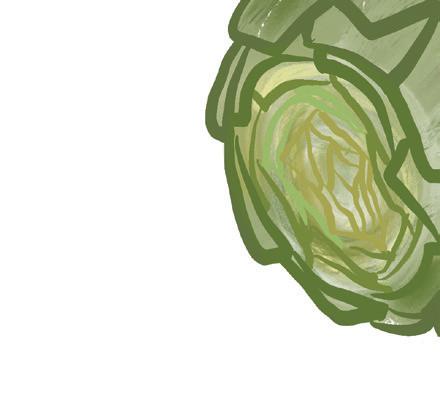
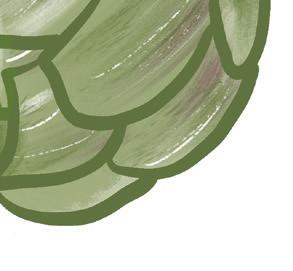
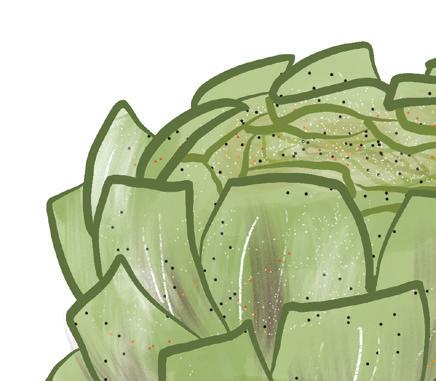
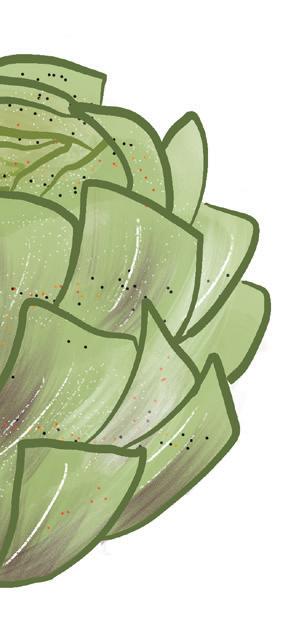
The art of artichokes: A guide to prepping, cooking, and eating the versatile vegetable.
BY MACY HARDER6 Four of a Kind
Sweet, juicy strawberries add a delicious pop of nutrition to recipes.
BY MARY SUBIALKA17 Tips and Tools
Add air and nesse to your culinary repertoire with these egg gadgets.
BY ALESHA TAYLORBring the best of both worlds together with this savory and sweet feast.
BY ROBIN ASBELL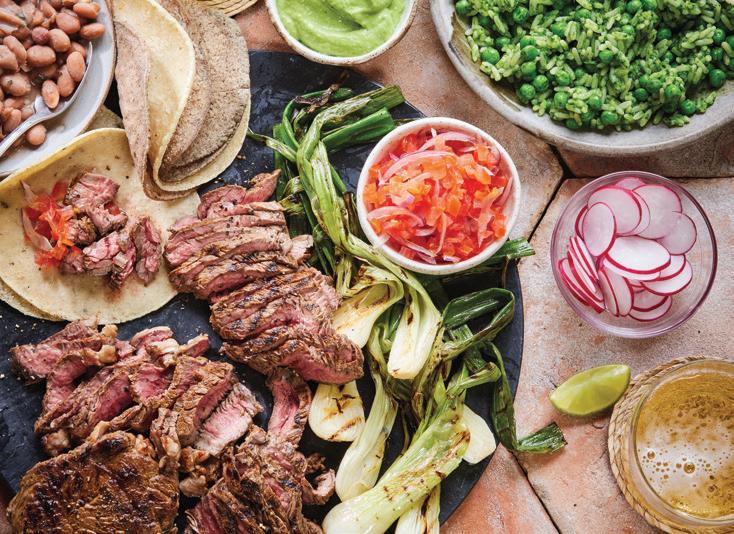
Chef Sam Way dishes on his culinary journey and his new cookbook “Sam’s Eats.”
BY EMMA ENEBAKA probiotic path can lead to digestive harmony.
BY ALESHA TAYLORBring the family together with these approachable dishes.


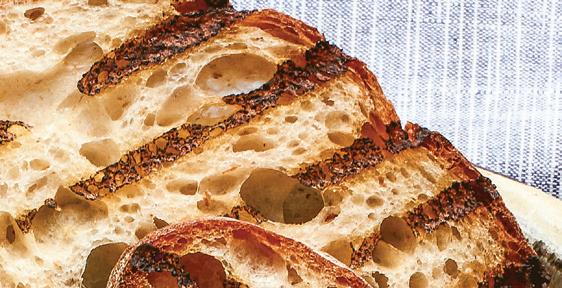
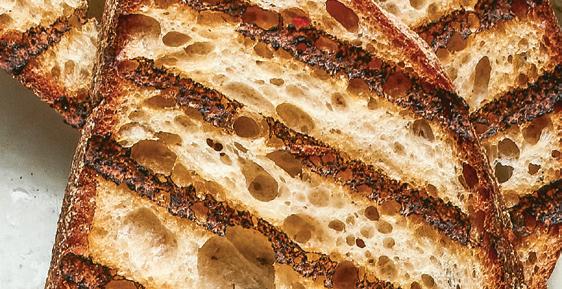
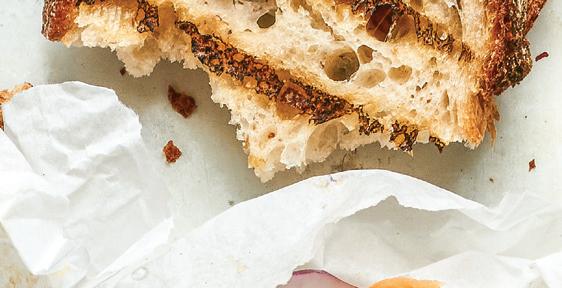
44 Art of the Sandwich
A ention to detail can make your meal between slices of bread a masterpiece.
BY MARY SUBIALKA56 Pairings

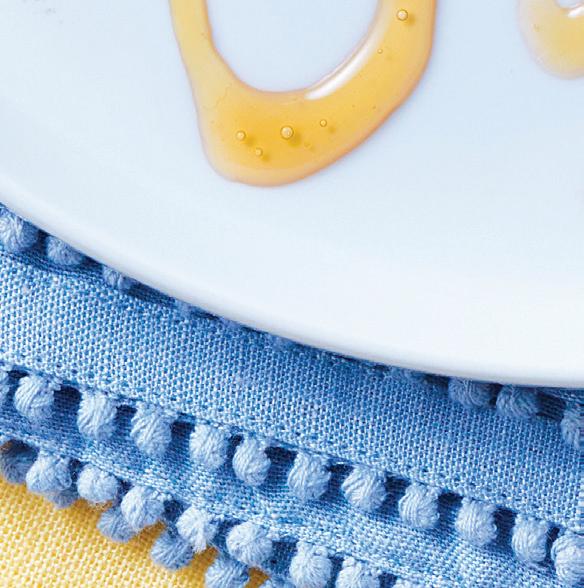
ON THE COVER
Maple Dijon Pork Tenderloin, page 28
PHOTOGRAPHER
Terry Brennan
FOOD STYLIST
Lara Miklasevics
PUBLISHER
Tammy Galvin
EDITORIAL DIRECTOR
Alesha Taylor
CONTENT DIRECTOR
Mary Subialka
CONTRIBUTING EDITORS
Emma Enebak
Macy Harder
CREATIVE DIRECTOR
Ted Rossiter
ART DIRECTOR
Olivia Curti
PRODUCTION DIRECTOR
Deidra Anderson
ADVERTISING COORDINATOR
Sydney Kell
SALES & MARKETING SPECIALIST
Tausha Martinson-Bright
VOLUME 20, NUMBER 1


RECIPES BY THEO A.


Fruity Fizz: Juice peps up sparkling wine for brunchtime cocktails.
BY MARY SUBIALKAReal Food magazine is published quarterly by Greenspring Media, LLC, 9401 James Ave. S., Suite 152, Bloomington, MN 55431, 612.371.5800, Fax 612.371.5801. All rights reserved. No part of this publication may be reprinted or otherwise reproduced without written permission from the publisher. Real Food is exclusively operated and owned by Greenspring Media, LLC. Printed in the USA.
realfoodmag.com


MAKE FUSS-FREE POACHED EGGS WITH THIS HANDY TOOL, PLUS MORE EGG-CELLENT IDEAS. See page 17
The pages between the covers of this magazine (except for any inserted material) are printed on paper made from wood fiber that was procured from forests that are sustainably managed to remain healthy, productive and biologically diverse.
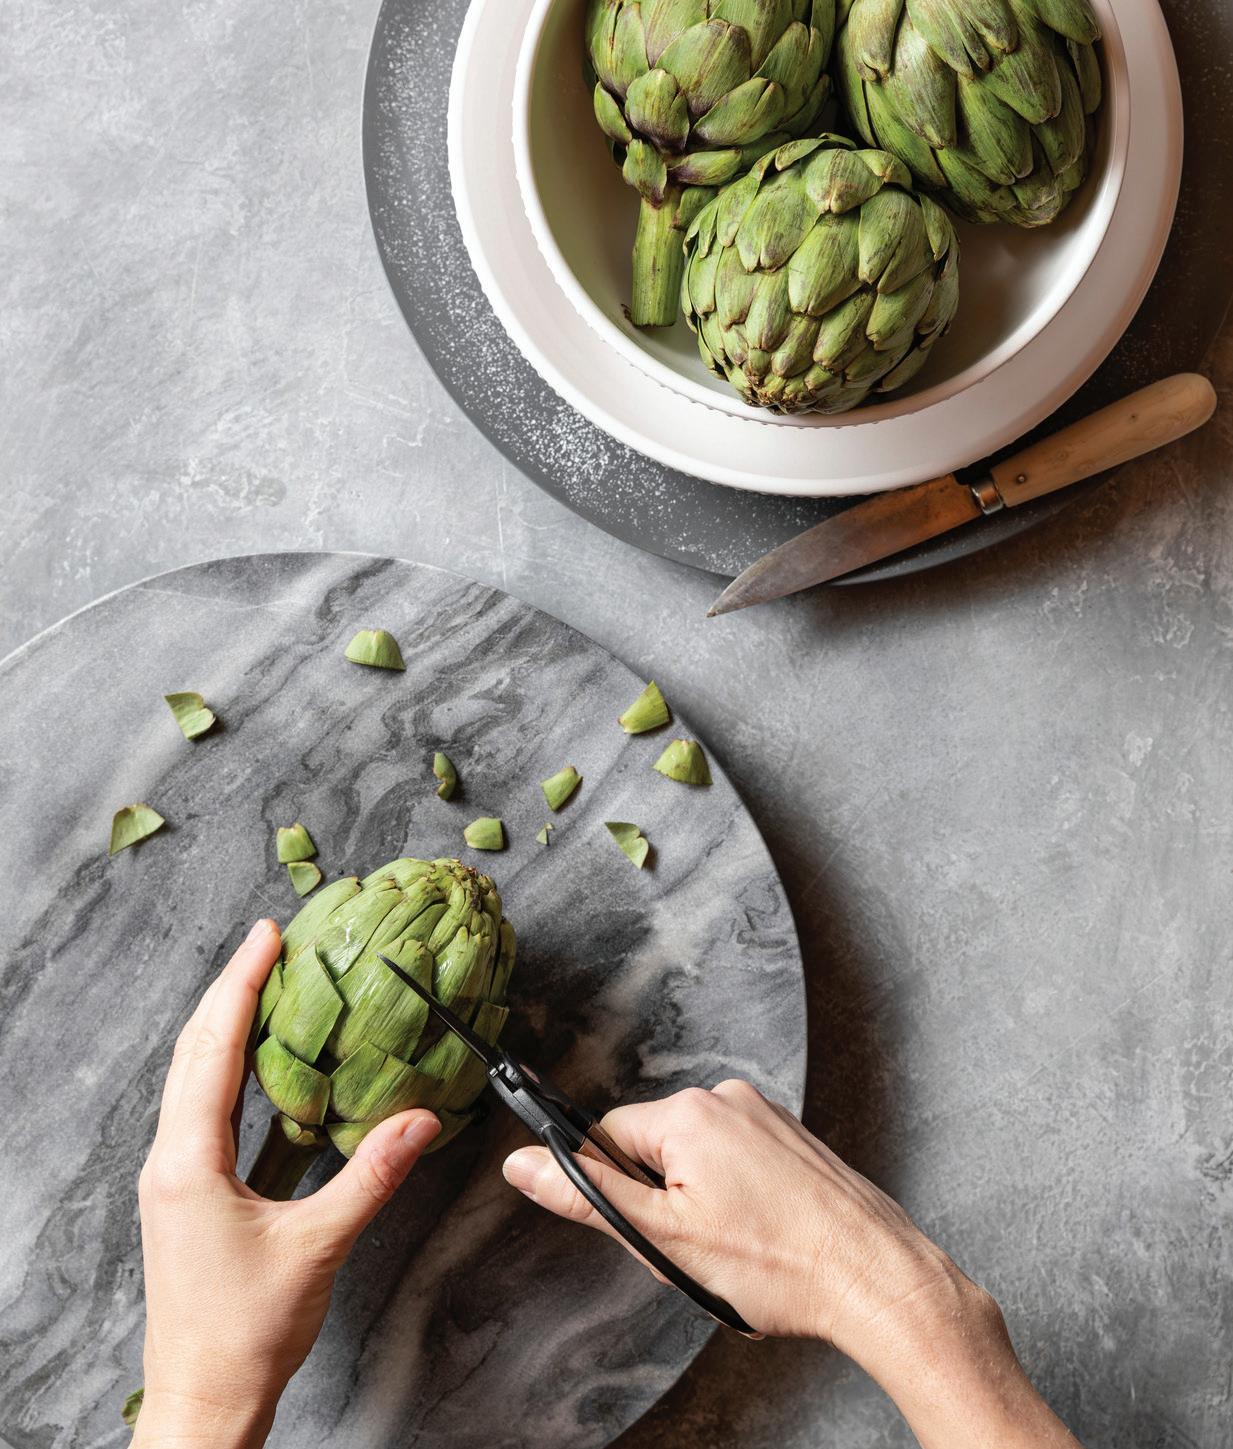
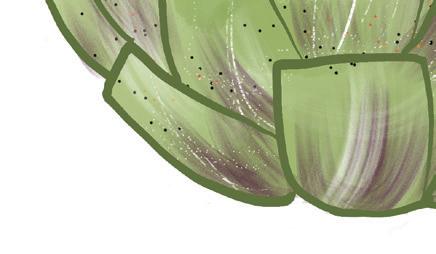
Before diving into any artichoke recipe, it’s helpful to understand the basic anatomy of the vegetable. The meaty core, or the “heart,” is topped by a fuzzy center known as the “choke” and protected by layers of inner and outer petals. The base of the petals and the heart are completely edible, while the choke should be discarded. Baby artichokes, on the other hand, are smaller and entirely edible.
how to prepare and eat
When it comes to intricate vegetables like artichokes, the prep work is o en just as important as the cooking. Here’s how to properly prepare an artichoke, according to the CAAB.


t rst glance, it’s clear that the artichoke is more than your average veggie. In fact, despite being classi ed as a vegetable, it is actually the immature ower bud of thistle plants. Each plant can produce multiple buds, with the largest at the top and smaller buds below. While handling their thorny outer petals and layered interior might seem like a daunting task, the bene ts of eating artichokes are worth the e ort—they are rich in ber, antioxidants, and other nutrients. One medium-size artichoke is a good source of vitamin C, folate, and potassium, the California Artichoke Advisory Board (CAAB) notes on its website. Artichokes can aid in digestion, heart and liver health, and improving cholesterol levels.
They are available year-round, but spring is when domestic artichokes are most abundant. Artichokes are a versatile ingredient that can be boiled, baked, microwaved, steamed, or grilled. From dips to casseroles and beyond, the ways to bring artichokes to your table are almost endless.
1. Wash under cold running water. A soft kitchen brush can be used to lightly clean the exterior.


2. Using a sharp serrated knife, cut about 1 inch o the top of the artichoke and ¼ inch o the stem. The stem is a continuation of the heart, so don’t cut it completely o unless you need the artichoke to sit flat on a plate.


3. With scissors or kitchen shears, remove all thorns from the tips of petals. This step can be optional, as the thorns tend to soften when cooked.
4. If you’d like, spread open the petals slightly to allow seasonings to fall in between.
Ditch the knives and forks and start the evening with finger food—an artichoke with a delicious dip.
½ cup sour cream ½ cup mayonnaise
1 ½ tablespoons chopped chives
1 tablespoon prepared horseradish ½ teaspoon salt Chopped chives, to garnish
1. Wash and trim stem so artichoke stands upright.
2. Cut o the top quarter of artichoke; if desired, snip tips o remaining petals with kitchen scissors.
3. Stand prepared artichoke in deep saucepan or pot with 3 inches of boiling water. Oil, lemon juice, and seasoning may be added to cooking water, if desired.
4. Cover and boil gently, checking water level occasionally, for 25 to 40 minutes depending upon size or until a petal near the center pulls out easily.

5. In a bowl, combine sour cream, mayonnaise, chives, horseradish, and salt; chill.
6. Garnish with additional chives. Serve with steamed artichoke(s).
1. Stand prepared artichoke in deep saucepan or pot with 3 inches boiling water. (If desired, oil, lemon juice, and seasonings can be added to cooking water.)
2. Cover and boil gently 25 to 40 minutes, depending on size, or until petal near the center pulls out easily.
3. Stand artichoke upside down on a rack to drain.
1. Set 2 medium-size prepared artichokes upside down in a small glass bowl with ½ cup water, ½ teaspoon lemon juice, and ½ teaspoon oil. Cover with plastic wrap.
2. Cook on high 7 to 10 minutes. Test for doneness by piercing the bottom of the artichoke with a toothpick. It should feel like a baked potato. If you feel a hard spot, cook for another minute and test again.
Or, test by pulling a petal out. If it comes o easily, the artichoke is done. If not, cook for another minute and test again. Let stand covered 5 minutes after cooking.
Prepared and cooked artichokes are delicious when eaten on their own. But don’t bite out of the side like an apple—instead, follow these steps from the CAAB.
1. Pull o outer petals one at a time.
2. Dip the base of the petal into sauce or melted butter; pull through teeth to remove the soft, pulpy portion of the petal. Continue until all petals have been removed.
3. Spoon out the fuzzy center at base and discard. The bottom, or heart, of the artichoke is entirely edible. Cut into small pieces and dip into sauce.


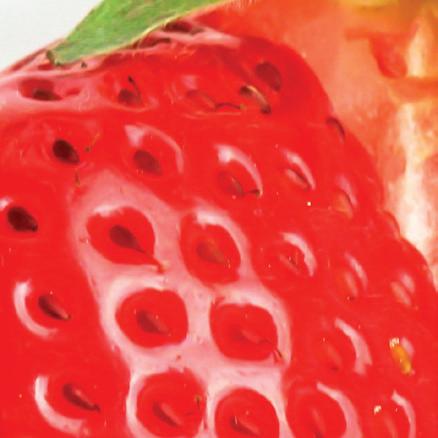
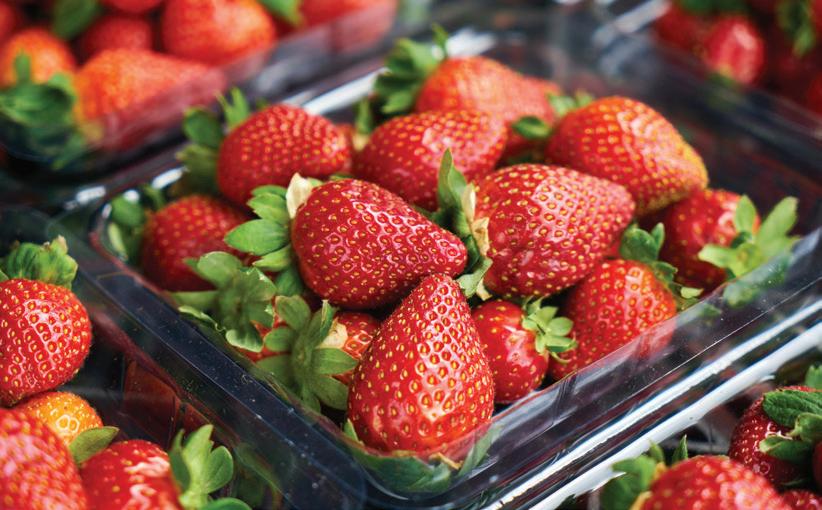
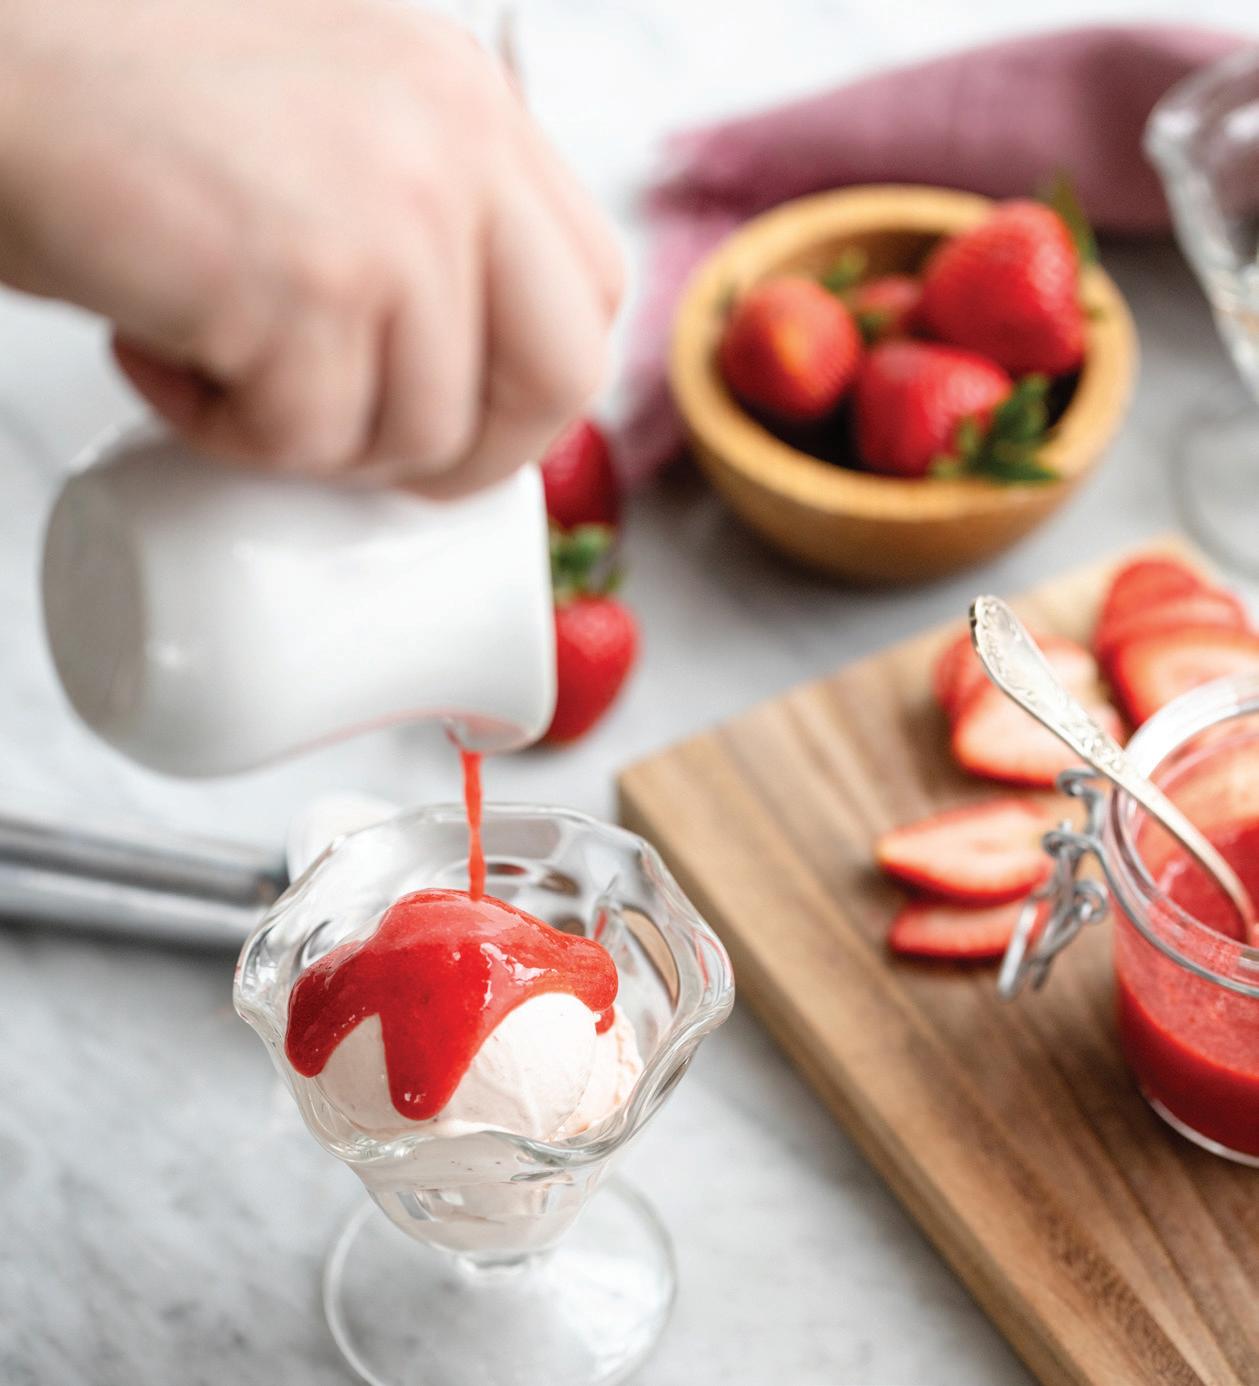
It’s the perfect time of year to pick up some sweet, juicy strawberries. About 88% of domestic strawberries are grown in California, and while we enjoy them throughout the year since they are harvested in different regions up and down the coast, peak strawberry season in the Golden State begins in early spring and runs to fall so these delicate fruits are most abundant and at their best.
Since strawberries are fully ripe at the time they are picked, they won’t continue to ripen after harvesting. Soon after they’re picked, the berries are taken to a cooler to be prepped for shipping, then refrigerated trucks take them across the country and they arrive in stores within three to four days.


If you resolved to eat healthier, adding more fruits to your diet is a perfect choice. Strawberries are naturally fat-free, a good source of dietary fiber, folic acid, and antioxidants that might help reduce the chances of heart disease and some cancers. Second only to blueberries in antioxidant levels, they also have more vitamin C than other berries. A 1-cup serving—about eight whole berries— has only 50 calories and fulfills the recommended value of vitamin C for an entire day.
selection and storage
■ Choose strawberries with a bright red color, tips that aren’t too seedy, and ones that still have their green caps (known as calyxes) attached.
■ Refrigerate strawberries as soon as possible in the original clamshell or layer the berries in a container lined with a paper towel.
■ Keep berries dry and refrigerated since moisture can hasten their decay. Wash them just prior to use—rinse under cool running water. Under ideal conditions, strawberries will last 2 to 5 days.
Fresh strawberries are most flavorful at room temperature, so if you have the time, let them warm up a bit after removing from the fridge. Enjoy them on their own, in salads, atop cereal or yogurt, swirled in ice cream, or blended into a smoothie. You can also easily freeze whole or sliced strawberries and have them on hand to bake into muffins, pies, cakes, and other delicious desserts. Speaking of dessert, you probably enjoy a sweet treat several times a week, so including strawberries can help add some health benefits. In the recipes here, which are courtesy of the California Strawberry Commission, try sweet ideas plus a savory twist, too.


a bounty of berries ON AVERAGE, AROUND 1.8 BILLION POUNDS OF STRAWBERRIES ARE HARVESTED ANNUALLY IN CALIFORNIA, ACCORDING TO THE CALIFORNIA STRAWBERRY COMMISSION.


did you know?

Strawberries have grown wild in Europe and the Americas for centuries, but the garden strawberry, which is the plant of choice for most commercial growers, was first bred during the mid-1700s by crossing a North American strawberry and a Chilean strawberry.
do small strawberries taste better than larger ones?
Flavor is influenced by growing conditions like weather, stage of ripeness when harvested, and variety, according to the California Strawberry Commission. Size is not a factor in determining flavor.


These are the quintessential strawberry dessert—so easy to make, and perfect for all occasions, even just a weeknight. Combining chocolate, the crunch of nuts, and the sweet juiciness of strawberries is fun to make and delicious. ✁

These lettuce cups are the perfect combination of sweet, savory, and refreshing. Paired with peanut sauce, these can be enjoyed as a meal or as an appetizer.

This decadent but lightened up little sweet treat can be made ahead of time and with just 10 minutes of hands-on time and 8 ingredients. Perfect for a party and definitely a crowd-pleaser!
Cut these out and use the recipes on the reverse side to make creative dishes with strawberries.
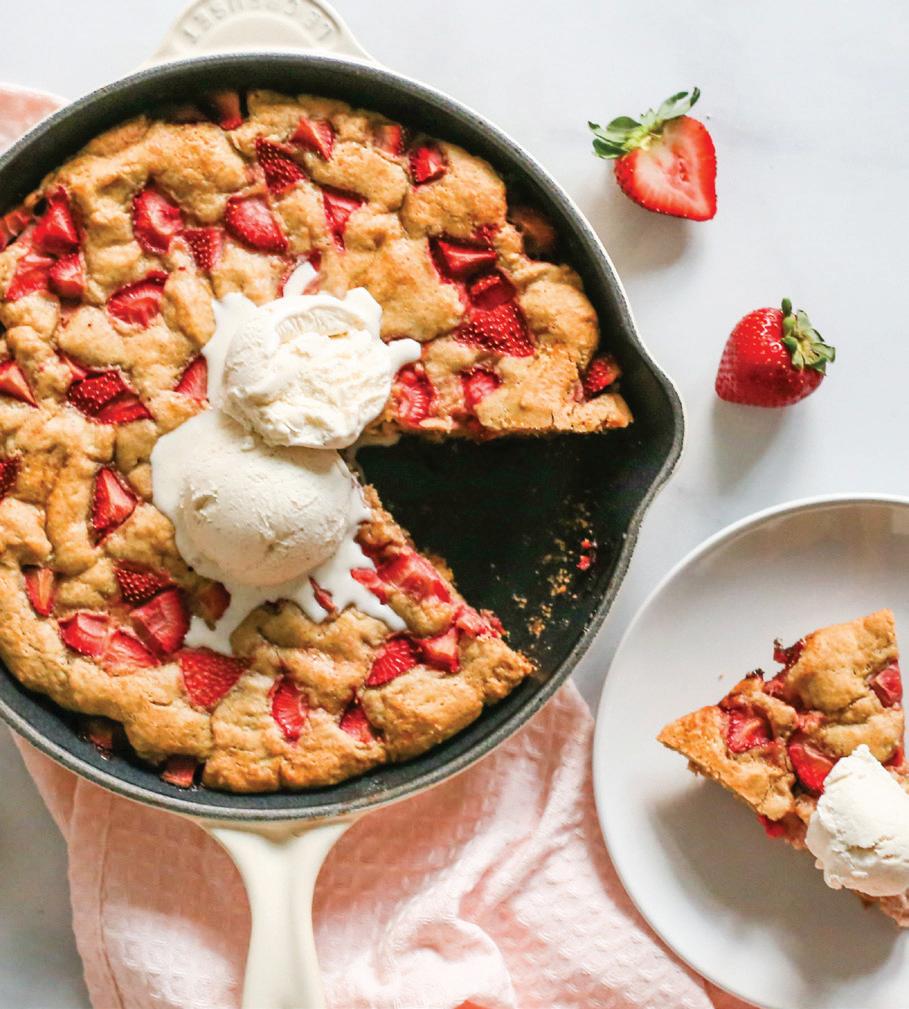
This classic snickerdoodle cookie is filled with cinnamon and fresh strawberries. Just make the dough, put it in a skillet, and bake! Serve it warm and top with your favorite vanilla ice cream.
MAKES 12 MINI CHEESECAKES | RECIPE BY DANCING FOR DONUTS COURTESY CALIFORNIA STRAWBERRY COMMISSION
6 graham crackers pulsed in a food processor or crushed to make crumbs
3 tablespoons melted butter
12 strawberries, divided
1 (8-ounce) package light cream cheese at room temperature
1 cup 2% Greek yogurt (or regular yogurt)
2 eggs
½ cup granulated sweetener (such as monk fruit or cane sugar)
1 teaspoon vanilla
1. Heat the oven to 325°F. Line a muffin tin with paper or silicone cups.
2. In a blender, pulse together the graham crackers and melted butter. Scoop about 1½ tablespoons of the mixture into prepared muffin tin cups and press down. Bake for 10 minutes.
3. For the filling, beat together the cream cheese, Greek yogurt, eggs, vanilla, and sweetener. Once smooth, finely dice 6 of the strawberries and fold them into the batter.
4. Scoop the batter onto the graham cracker base and bake for 25 to 30 minutes, or until slightly firm to the touch.
5. Let cool completely (you can even put them in the freezer to speed up the process). Slice the remaining strawberries and top each cheesecake bite with a strawberry slice. Store in the fridge in an airtight container for up to 5 days or in the freezer for 2 weeks.
MAKES 10 SERVINGS |
COURTESY CALIFORNIA STRAWBERRY COMMISSION
1 cup butter, softened
1 ¼ cups granulated sugar
2 large eggs
1 teaspoon vanilla extract
2 ¼ cups all-purpose flour
1 teaspoon baking soda
1 teaspoon cinnamon
1 teaspoon salt
1 ½ cups chopped strawberries
1. Heat oven to 350°F and lightly grease a skillet with butter or cooking spray.
2. Once the butter is softened, beat it in a large bowl with an electric mixer. Add in the sugar and beat until the mixture is fluffy. Add eggs and vanilla extract and beat until smooth.
3. Add flour, baking soda, cinnamon, and salt and mix on a low setting until ingredients are combined.
4. Use the spatula to transfer the dough into the skillet, spreading it out evenly. Add the strawberries, pressing them into the dough with your hands.
5. Bake for about 30 to 35 minutes or until the cookie is lightly golden brown.
6. Let the cookie cool; then serve with ice cream or whipped cream, if desired.
MAKES ABOUT 9 SERVINGS (4 STRAWBERRIES PER SERVING) |
COURTESY CALIFORNIA STRAWBERRY COMMISSION
2 pounds California strawberries
⅓ cup each semisweet, milk, and white chocolate chips
Finely chopped toasted almonds or pistachios (optional)
1. Line a large baking sheet with waxed paper. Rinse strawberries and pat dry with paper towels.
2. Melt chocolate according to package directions. If using the microwave, heat slowly in 20-second increments, stirring between.
3. Holding strawberry by stem end, dip into chocolate to cover about three-fourths of berry; dip into nuts, if desired, and lay on baking sheet. Repeat with remaining strawberries, chocolate, and nuts. Refrigerate until chocolate is set.
4. After first coating of chocolate is set, if you wish, dip into contrasting chocolate, leaving part of the first coating exposed. Repeat with third chocolate, if you wish, allowing each layer to set between dips.
to drizzle strawberries with chocolate
Microwave chocolate in small plastic bag until melted; squeeze into one corner of bag. Lay strawberries close together on baking sheet. Cut a small hole in corner of bag, and move back and forth over strawberries, squeezing bag gently. Or, drizzle contrasting chocolate over strawberries that have been dipped. Refrigerate until set.
MAKES 12 | RECIPE BY CARRIE WALDER, MS, RD
COURTESY CALIFORNIA STRAWBERRY COMMISSION
for the peanut sauce
¼ cup peanut butter
2 tablespoons rice wine vinegar
1 tablespoon soy sauce
1 teaspoon garlic powder
½ teaspoon ground ginger
2 tablespoons water or to desired consistency
1 cup cooked quinoa
36 large shrimp thawed, deveined, and tails removed
1 tablespoon olive oil
1 cup chopped strawberries
1 cup chopped cherry or grape tomatoes
1 cup chopped cucumber
12 leaves Bibb, Butter, or Romaine lettuce Black pepper, to taste Chopped green onion, to garnish (optional)
1. Make peanut sauce by whisking together all sauce ingredients in a small bowl. Add water until sauce reaches your desired consistency.
2. Toss shrimp in olive oil. Heat a pan to medium-high and cook shrimp for 1 to 2 minutes each side, until pink and opaque. Remove from heat and set aside.
3. In a large bowl, mix cooked quinoa with chopped strawberries, tomatoes, and cucumber.
4. Place individual lettuce leaves on a plate. Top with a small amount of strawberry-quinoa mixture and 3 shrimp per cup. Drizzle with peanut sauce, black pepper, and chopped green onion.
Apple Valley: 612-255-5500
Bloomington: 952-896-0092
Burnsville: 952-892-5600
Chanhassen: 952-474-1298
Eagan: 651-686-9669
Eden Prairie: 952-525-8000
Edina
50th Street: 952-926-6833
France Avenue: 952-831-3601
Golden Valley: 763-544-8846
Maple Grove: 763-416-1611
Minneapolis
Downtown: 612-379-5040
Nokomis: 612-729-4000
Northeast: 612-548-3820
Uptown: 612-825-2440
Minnetonka
Glen Lake: 952-512-7700
Highway 7: 952-935-0198
Ridgedale: 952-541-1414
Navarre: 952-471-8473
Plymouth: 763-268-1624
Prior Lake: 952-440-3900
Richfield: 612-861-1881
Roseville: 651-633-6949
St. Cloud: 320-252-4112
St. Louis Park: 952-929-2100
St. Paul
Downtown: 651-999-1600
Highland Bridge: 651-698-5845
Wayzata: 952-476-2222
White Bear Lake: 651-653-0000
Woodbury: 651-999-1200
SHOP ONLINE
Shop.LundsandByerlys.com
CATERING
LundsandByerlys.com/Catering 952-897-9800
L&B EXTRAS
Get extra o ers and tools to make shopping easier.
LundsandByerlys.com/Extras
DOWNLOAD OUR APP
LundsandByerlys.com/Mobile
STAY CONNECTED
Follow us on social media and sign up for our e-newsletter.
LundsandByerlys.com/StayConnected
FOOD QUESTIONS?
Call our FoodE experts: 952-548-1400
REAL FOOD COMMENTS
Aaron Sorenson: 952-927-3663

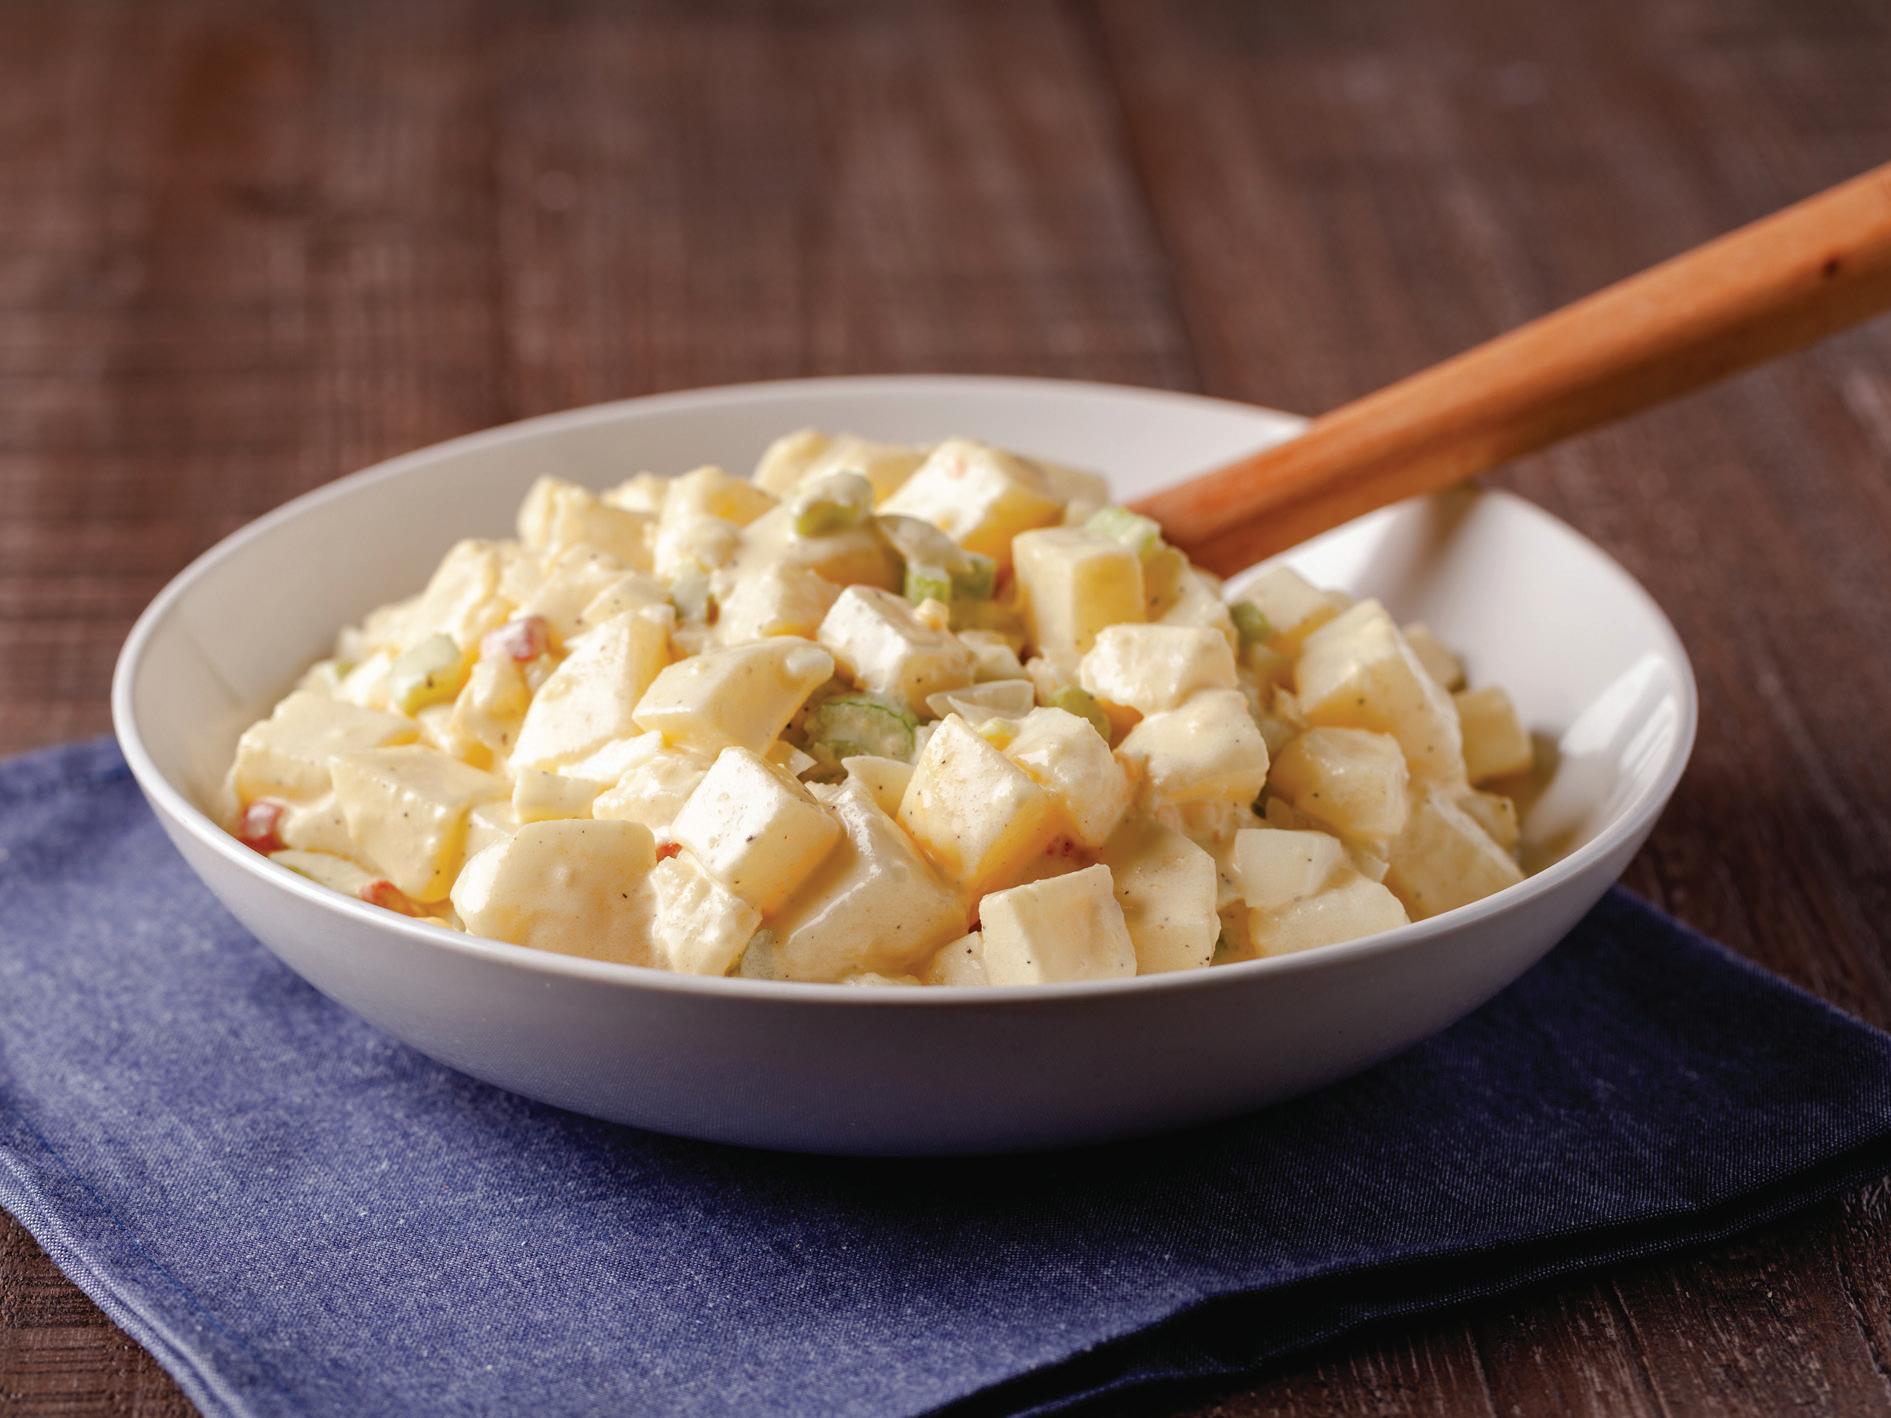
Coke or Pepsi. Star Wars or Star Trek. Lunds Original Potato Salad or Byerly’s Original Potato Salad. These are just a few of the great debates that will never be settled.
I got a good laugh as I was reading a story from James Lileks in the Star Tribune last summer. While shopping at one of our stores, he went to the deli counter to pick up some potato salad but “froze” when our team member asked if he would like the Lunds or Byerly’s Original Potato Salad.
As James shared in the story, he didn’t realize a er all these years that we continue to o er both potato salads to our customers. He jokingly wrote, “The very existence of a potato-salad schism suggests deep and irreconcilable factions within the organization, does it not? Stalwarts and patriots devoted to the old ways, secret hand signals ashed in the hallway, meetings in dimly lit rooms. People who never accepted the entente, and rally around the ag of the true potato salad.”
While we know our brands have always been be er together, who are we to arbitrarily se le this great debate over two customer favorites? As we share in our blog, the recipe for our Lunds Original Potato Salad came from a friend of the Lund family, Molly Geng, in the early 1970s. She was an excellent cook and loved making potato salad for her friends, which included my grandfather, Russell T. Lund Sr.
This potato salad features diced potatoes, a generous helping of hardboiled eggs, onions, celery, and red peppers and a dressing that is a bit on the sweet side. My grandfather enjoyed her potato salad so much that he wanted to start serving it to our customers. So, in 1974 it became a new o ering and has continued to grow in popularity ever since.
Our Byerly’s Original Potato Salad was developed around the same time in the Byerly’s kitchen. This potato salad features diced potatoes, eggs, onions, celery, and a mixture of mayonnaise and salad dressing. There’s also a hint of mustard.
You’ll find the recipe for our Lunds Original Potato Salad on page 12. We don’t yet have a customer-friendly version of our Byerly’s Original Potato Salad, so that is something we should probably add to our to-do list so as not to appear to favor one side or the other in this great debate.
If you’re wondering what my preference is, you might think “like grandfather, like grandson.” In reality, I truly enjoy both potato salads and would have a hard time choosing one over the other. No potatosalad schism here as I will proudly put a flag in the ground for two true potato salads.


As we celebrate our company’s 85th anniversary this year, we are so grateful to have the opportunity for generations of our L&B family to serve generations of your family.
Sincerely,
 Tres Lund president and ceo


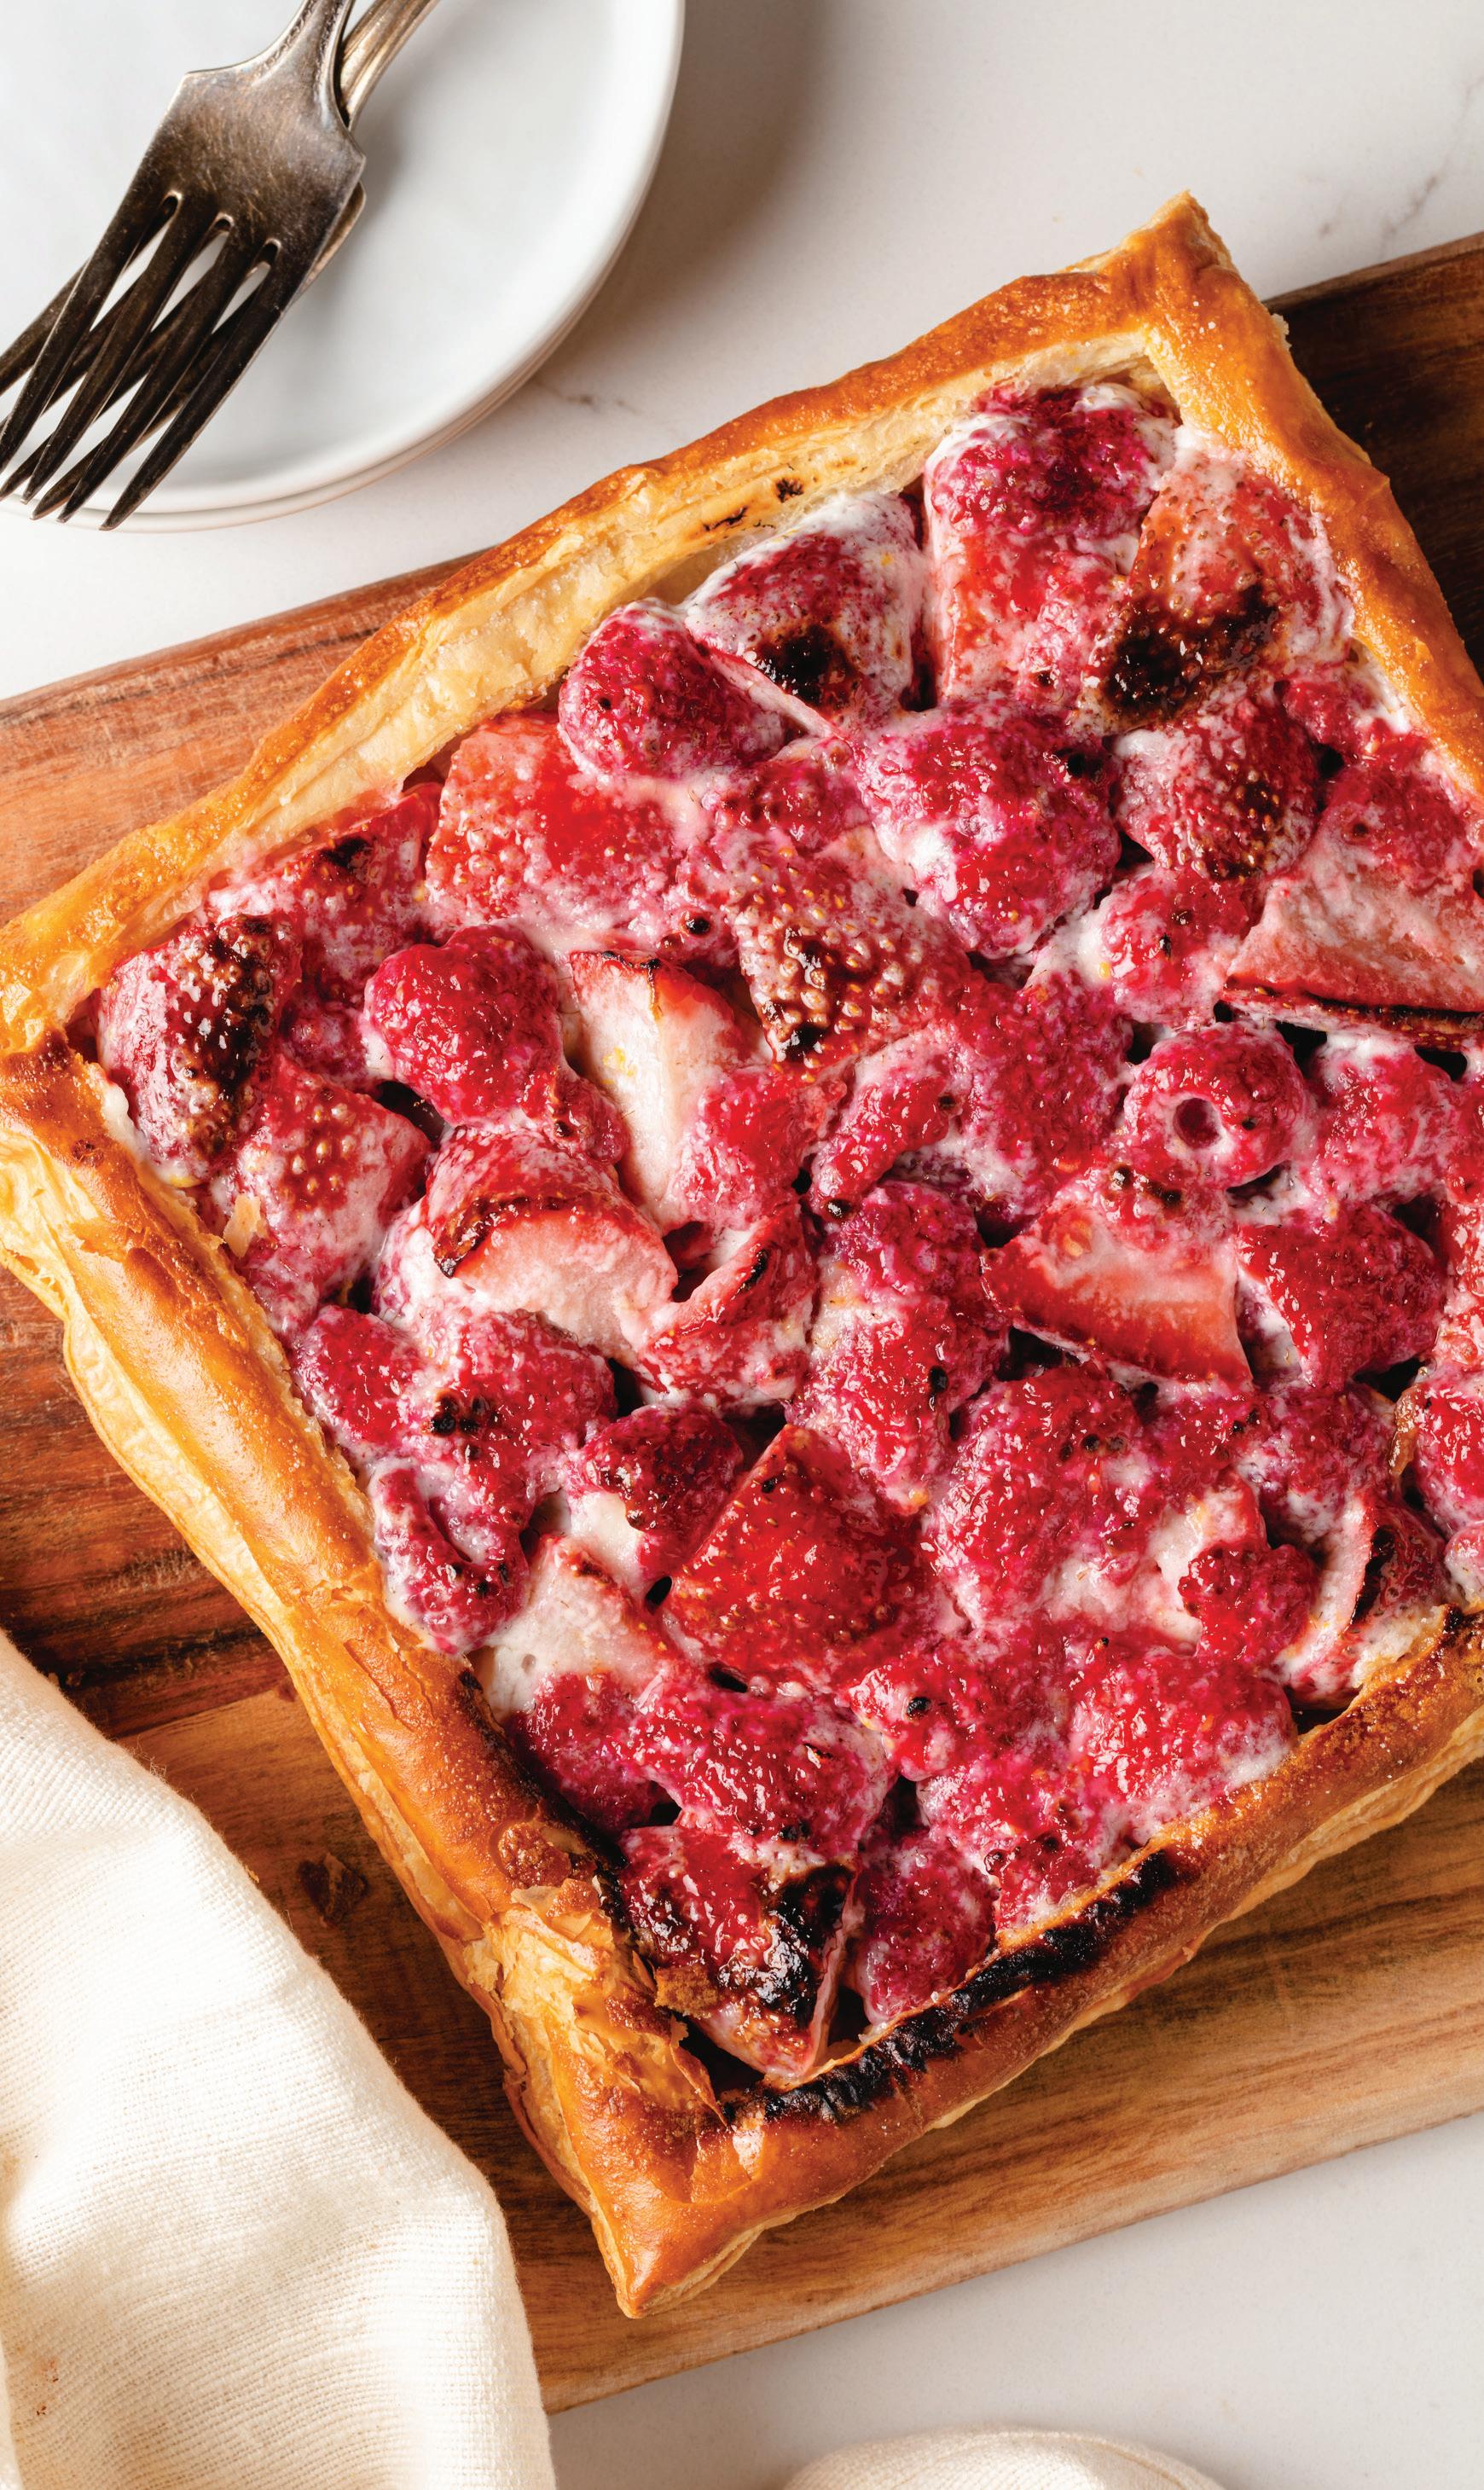
These sweet berry recipes put a spring in our step! Try them for brunch, dessert, or any time you need a delicious pick-me-up.
MAKES 6 TO 8 SERVINGS
PREPARATION 10 MINUTES;
COOK TIME 20 MINUTES
All-purpose flour, for dusting
1 sheet frozen puff pastry, thawed
1 egg
1 teaspoon cool water
¼ cup plain Greek yogurt
¼ cup heavy cream
1½ teaspoons, plus 3 tablespoons granulated sugar, divided
¼ teaspoon vanilla extract
½ teaspoon lemon zest
Pinch ground nutmeg
18 ounces mixed berries, rinsed and patted dry
1. Heat the oven to 400°F.
2. On a lightly floured work surface, roll out the puff pastry just to smooth the creases. Trim the edges, transfer it to a sheet pan, and using a sharp knife, lightly score a square 1 inch in from the edges.
3. In a small bowl, whisk together the egg and water. Brush this egg wash over the dough.
4. Bake the pastry for 15 to 20 minutes or until puffed and golden brown. Let cool completely, then using the back of a fork,
press the inside rectangle down to flatten it, leaving the edges tall to form a crust.
5. In a medium bowl, whisk together the yogurt, cream, 1½ teaspoons of the sugar, vanilla, lemon zest, and a pinch of nutmeg. Add the berries and stir until well coated.
6. Transfer the berries to the cooked pastry shell and spread evenly.
7. Sprinkle the berries with the remaining
sugar. Place an oven rack 5 inches from the top and heat the oven to broil.
8. Cover the galette crust with aluminum foil. Broil, watching carefully, until the sugar melts, browns, and begins to harden, about 5 minutes.
9. Transfer the galette to a cutting board and let cool for 5 minutes. Slice and serve immediately.
MAKES 1 QUART | PREPARATION 30 MINUTES (PLUS 2 HOURS TO CHILL CUSTARD); ACTIVE COOKING 20 MINUTES; ICE CREAM MACHINE 20 MINUTES
for the strawberry sauce
1 pound fresh strawberries, hulled and chopped
¾ cup sugar
1 tablespoon lemon juice
for the frozen custard
2 cups heavy cream
¾ cup whole milk
½ teaspoon vanilla extract or 1 whole vanilla bean
5 egg yolks
½ cup sugar
¼ teaspoon salt
1. To make the strawberry sauce: In a medium saucepan, combine all the ingredients over medium heat. Bring to a simmer and simmer for 30 minutes.
2. Mash the fruit with a potato masher and simmer for another 10 minutes.
3. Allow the sauce to cool for 10 minutes, and then transfer it to a blender and puree. Set aside.
4. To make the custard: In a medium pot, combine the heavy cream, whole milk, and vanilla over medium heat. Bring it to a simmer, whisking intermittently. Note: This can take up to 20 minutes. Try not to rush this process or you’ll overheat the cream.
5. While the cream is heating, combine the egg yolks, sugar, and salt in a separate bowl and whisk vigorously until they have about doubled in size or become a little frothy and pale.
6. Once the cream is simmering, remove it from the heat and allow it to cool for about 10 minutes.
7. Remove the vanilla bean from the cream and discard. Pour the cream into the egg yolks in a slow, steady stream, whisking continuously until they’re fully incorporated.
8. Transfer the custard mixture to the sauce pot and warm it over medium low heat, stirring gently, until the mixture thickens slightly and coats the back of a spoon.
9. Transfer the custard to the bowl to cool. Once it is at room temperature, put it in the refrigerator to cool for at least 1 hour. (If you’re not going to use it immediately, custard can be stored in the fridge for up to 3 days.)
10. Pour the custard mixture into an ice cream machine and churn until thick, about 12 to 15 minutes. Working in batches, churn half of the strawberry sauce into the custard.
11. Serve directly from the ice cream machine for soft serve, or put it in the freezer to firm up, about 6 hours. Garnish with scoops of strawberry sauce and enjoy!

MAKES 1 SERVING
4 ounces Lillet Blanc
2 dashes Angostura bitters Ice
2 strawberries, 1 sliced and 1 whole, divided
3 ounces Fever-Tree Premium Indian Tonic Water
1 orange twist, for garnish
1. In a highball glass, combine the Lillet Blanc and bitters. Stir to combine.
2. Fill the glass with ice, layering the ice with the strawberry slices.
3. Top the cocktail with the tonic water.
4. Squeeze the orange twist over the glass to release a fragrant mist of citrus oil. Garnish with the orange twist and the whole strawberry.
Customers have been enjoying Lunds Original Potato Salad in our deli for years—and now you can make it at home
Lunds Original Potato Salad
MAKES 19 (1/2 CUP) SERVINGS | PREPARATION: 40 MINUTES
3 pounds potatoes (Yukon Gold work well)
½ cup sugar
2½ teaspoons salt
1¼ teaspoons freshly ground black pepper
1¾ cups mayonnaise
2 tablespoons yellow mustard
1 tablespoon white vinegar
2 hard-boiled eggs, coarsely chopped
¾ cup diced celery
¼ cup chopped onion
4 teaspoons diced pimientos, drained
1. Peel potatoes and cut into ¾-inch cubes.
2. Add the potato cubes to a pot, cover with water by about 1 inch, and add a pinch of salt.
3. Bring water to a boil, then reduce to a simmer. Cook until potatoes are just tender, 8 to 12 minutes.
4. To assemble salad: Combine sugar, salt, and pepper in a large mixing bowl and stir to blend. Add warm cooked potatoes and mix gently.
5. In a small bowl combine mayonnaise, mustard, and vinegar and stir until smooth.
6. Add mayonnaise mixture to potatoes and mix gently.
7. Add eggs, celery, onion, and pimientos to potato mixture and mix just until all ingredients are coated.
8. Refrigerate, covered, several hours or overnight. love this recipe?
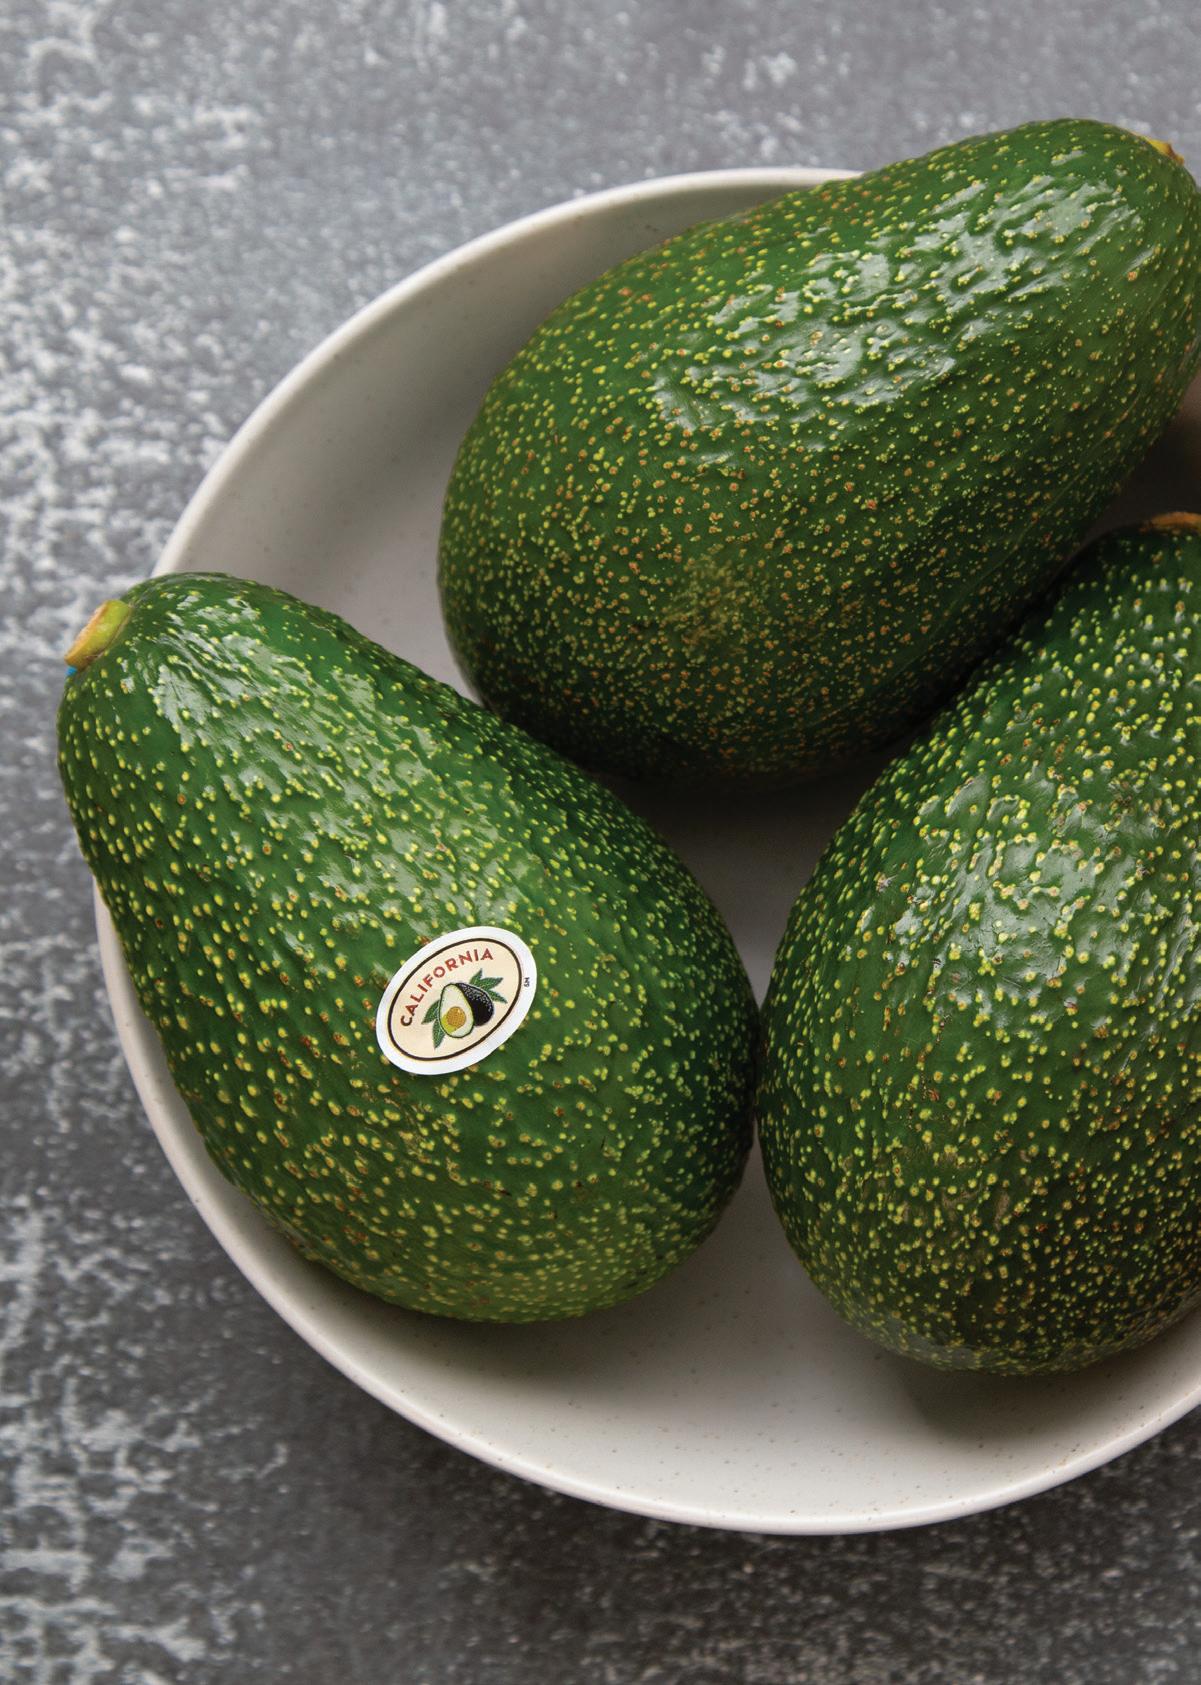
GEM is a new variety of avocado that was developed by California avocado growers and named after the initials of University of California researcher Grey E. Martin, who selected the variety. The GEM variety is similar to Hass avocados that are typically found in stores.
The GEM is characterized by a gold-speckled skin that, when ripe, turns black. Like the Hass, GEM avocados have a creamy, nutty flesh and medium-size seed.
The skin is thick, which makes it easy to peel. Peeling the skin is preferred over scooping out the flesh because the most nutrient-dense part of the fruit is next to the peel.
California GEM avocados are available for a limited time from late April–June, so be sure to visit the produce department and pick up some!
avocado tips
How do you know when an avocado is ripe? The easiest way to tell if an avocado is ready to use is to gently squeeze it in the palm of your hand. Ripe, ready-to-eat avocados will yield to gentle pressure.
What if it’s not ripe—can I do anything to help it along?
To ripen an avocado, place it in a paper bag with an apple, banana, or kiwi for 2 to 5 days at room temperature (these fruits accelerate the ripening process). If you’re not quite ready to enjoy your avocados, ripe, uncut fruit can be stored in the refrigerator for 2 to 3 days.
What is the best way to cut an avocado? The easiest and safest way to remove the avocado seed is to quarter the avocado. Carefully cut the avocado in half lengthwise around the seed, with the fruit flat on the cutting board. Then, rotate the avocado a quarter turn and cut lengthwise around the seed, creating quarter avocado segments; put down the knife. By separating the quarters, the seed can be removed seamlessly with your fingertips.
How do you keep a leftover avocado or guacamole from browning? To store cut avocados, sprinkle with lemon juice, lime juice, or white vinegar, wrap tightly in plastic wrap, and store in the refrigerator. To store guacamole, place in an airtight container and press clear plastic wrap on the surface of the guacamole before covering to help prevent oxidation, then refrigerate.

Lunds & Byerlys experts share favorite finds and L&B products you’ll want to check out


Monini Balsamic Glaze with BBQ Flavors


For decades, Monini has been known for its award-winning Italian extra virgin olive oil, and now, for its incredible balsamic vinegar of Modena IGP. The “IGP” on the label stands for “protected geographical indication,” and means the vinegar was produced and bottled authentically in Modena, Italy. The new squeeze bottle balsamic glazes make dinner even easier, and the sweet and tangy BBQ flavor pairs perfectly with slow-roasted proteins such as chicken, beef, and pork. It’s also exceptional when drizzled over grilled or roasted veggies.


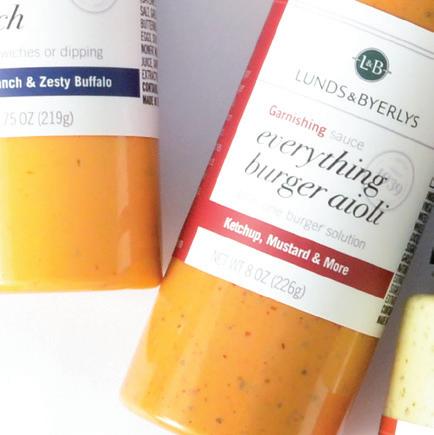
Level up your favorite dishes with our new L&B Garnishing Sauces. All five varieties are made in small batches with premium ingredients and really provide that extra pop of flavor you’re looking for. These garnishing sauces can be used on everything from burgers, sandwiches, and wraps to tacos, pizza, or chicken wings. Plus, they make great dipping sauces for french fries, Tater Tots, and onion rings. Flavors include bu alo ranch, smoky chipotle, basil pesto aioli, everything burger aioli, and Sriracha horseradish.

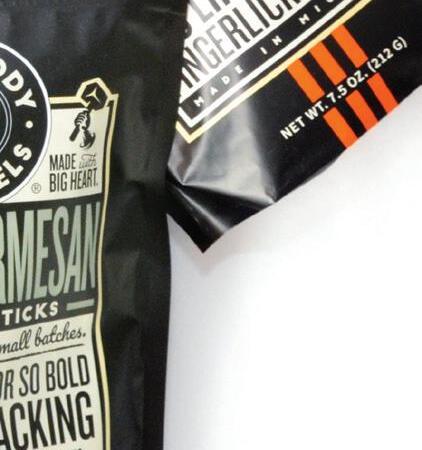


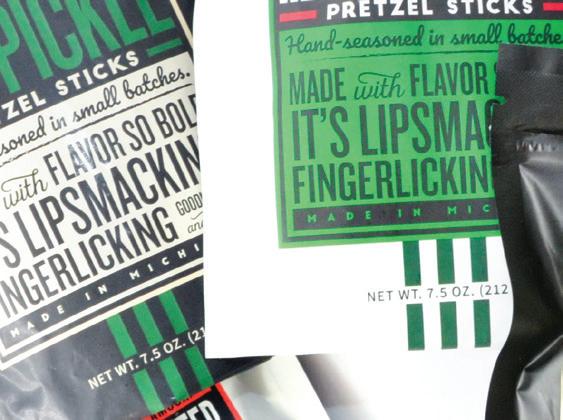
Mark and Erin Sarafa started Pop Daddy Snacks as a passion project after looking for a healthier alternative to traditional microwave popcorn. After their popcorn business took o , they added seasoned pretzels to the mix. The crave-worthy, crunchy pretzels are made in small batches and handseasoned. Packed with big, bold flavor, the pretzels come in fun varieties including dill pickle, Mexican street corn, garlic Parmesan, smoked Gouda, and maple and brown butter.


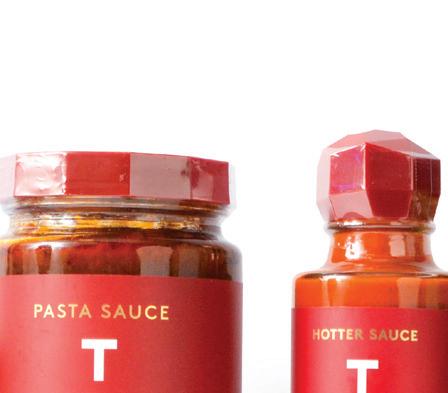
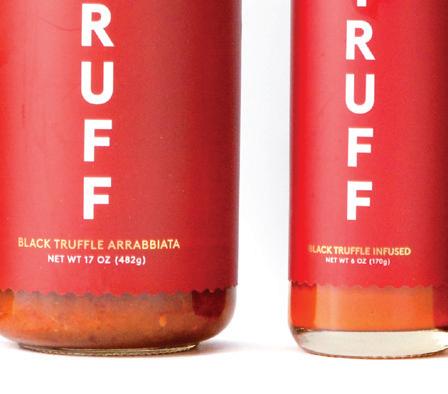
TRUFF aims to elevate every meal with its lineup of luxury condiments—hot sauce, pasta sauce, infused oil, and mayo. Each item is infused with umami-rich black winter tru es to create a truly one-of-a-kind taste. The black tru e oil is perfect for finishing dishes, including tru e fries, pizza, or popcorn. The mayo and spicy mayo add a boost of flavor to burgers, sandwiches, dressings, and more. And the hot sauce goes with anything—avocado toast, nachos, eggs, you name it! The intricate blend of chili peppers, tru e, agave, and spice will have your taste buds going wild.


Locally brewed in New Ulm, Minnesota, 1919 Classic American Draft Root Beer and Buddy’s Soda got their start during Prohibition. Between 1919 and 1933, when breweries were faced with the prospect of closing due to Prohibition, they turned to small batch sodas, which kept brewers employed and created another revenue stream. The classic 1919 is made with real sugar and vanilla, resulting in a creamy, full-bodied root beer and comes in 7.5-ounce cans, 16-ounce cans, and 5-liter mini kegs. Buddy’s Soda comes in four delicious flavors—lemon sour, strawberry, grape, and orange.

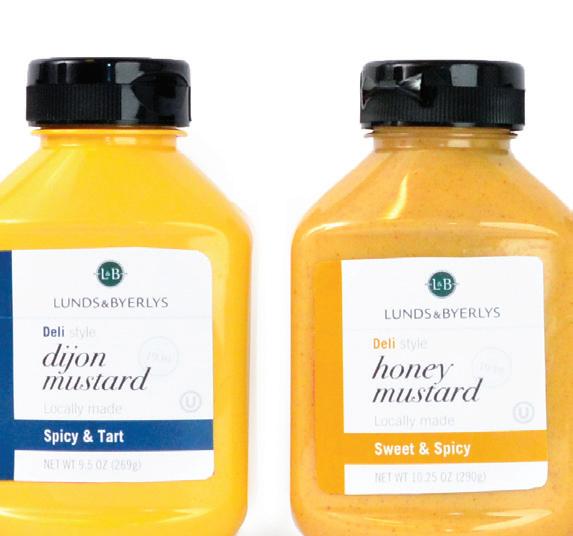

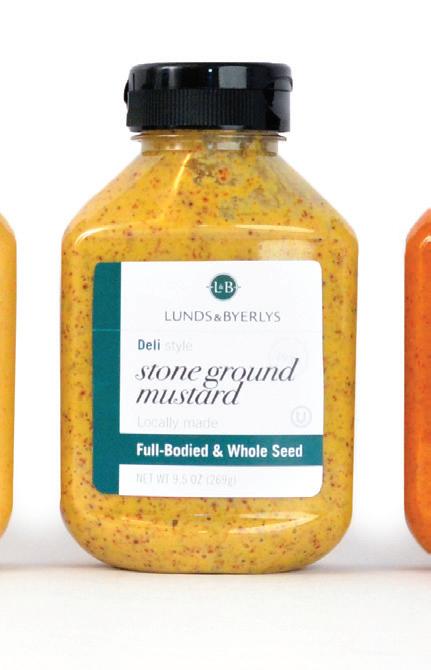
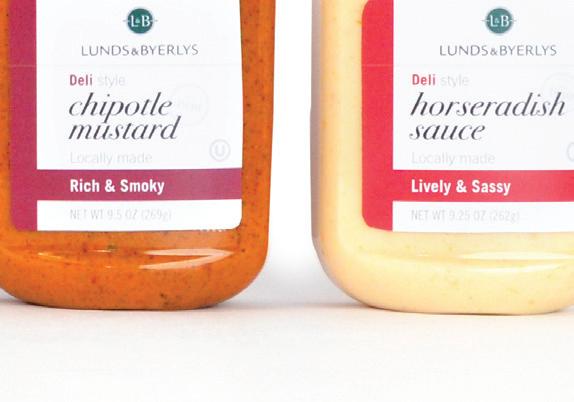
Our new L&B mustards are locally made in small batches. The deli-style mustards come in big, bold flavors that add incredible depth of flavor to your sandwiches, burgers, wraps, or anything else that needs a little oomph! This lineup includes classic varieties such as tangy yellow mustard, spicy Dijon mustard, whole seed stone ground mustard, and sweet and spicy honey mustard. Plus, try a few new favorites—rich, smoky chipotle mustard and a lively, sassy horseradish sauce. Find them in the deli.


Whether you’re an aspiring home cook or a seasoned chef, these five egg tools can add flair and finesse to your culinary repertoireby alesha taylor
Bid farewell to awkward and messy shell-cracking maneuvers with an egg separator. This nifty tool ensures a clean separation of yolk and white, perfect for recipes that require precision—such as meringues or hollandaise sauce. Look for a separator with a firm grip and easy cleaning features to streamline your kitchen routine.


Meet the unsung hero of flawless boiled eggs—the egg piercer. This tiny tool prevents cracked shells during boiling by creating a small hole in the eggshell. You simply place the wide end of a raw egg on top of the device and gently press down to pierce the eggshell. This gadget ensures a smooth peel every time, perfect for deviled eggs or egg salad.


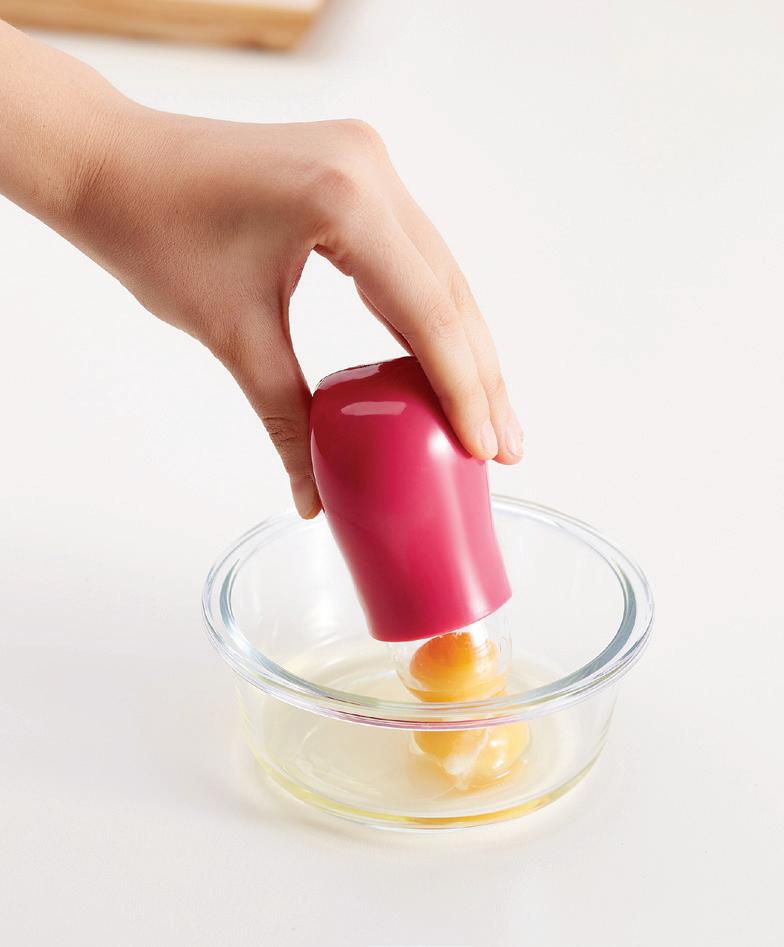
Perfectly poached eggs are no longer reserved for brunch outings. Invest in an egg poacher for a foolproof method of achieving velvety, runny yolks and tender whites. Look for silicone poaching cups for easy cleaning and a nonstick cooking experience.


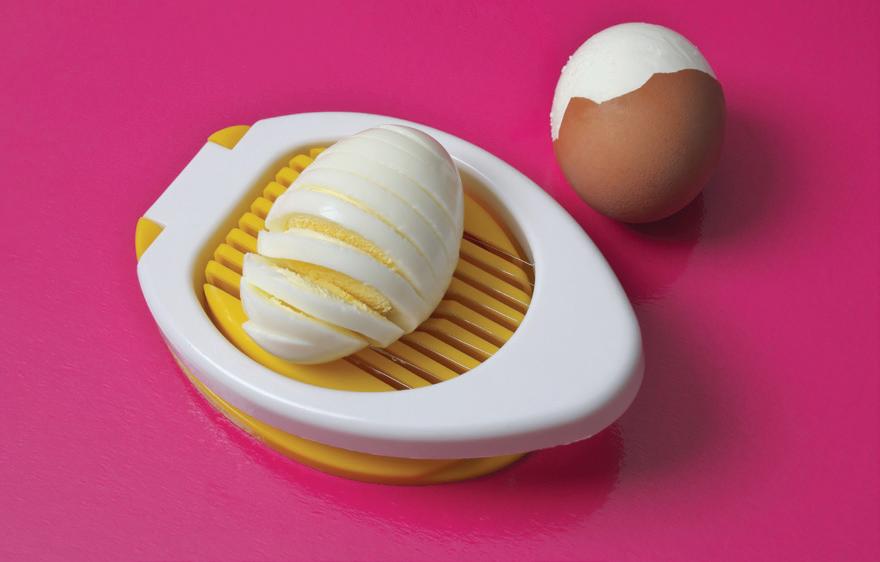
Transform your ordinary boiled eggs into visually appealing slices with an egg slicer. Ideal for salads, sandwiches, or garnishes, this tool delivers uniform cuts for a professional touch. Choose a sturdy design with stainless-steel wires for durability and ease of use.
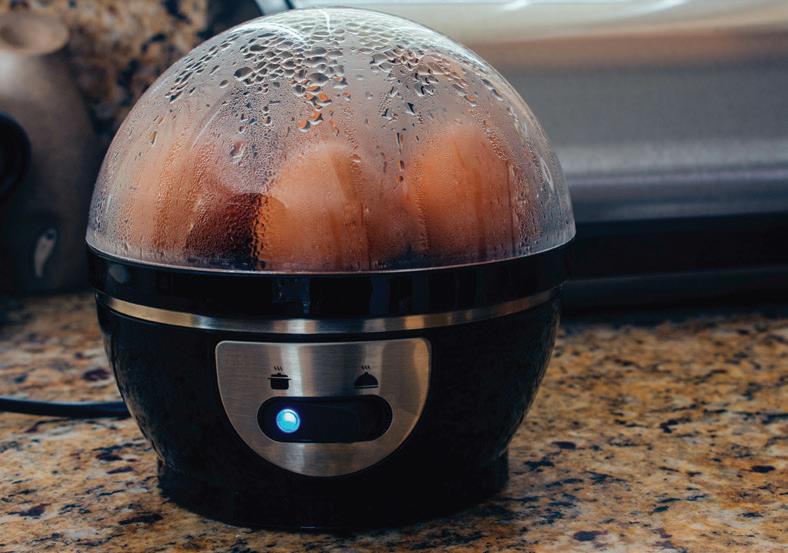
Take the guesswork out of boiling eggs and elevate your egg game with an electric (or rapid) egg cooker. This compact gadget takes the hassle out of achieving the perfect boil, o ering di erent settings for soft, medium, or hard-boiled eggs. Enjoy consistently cooked eggs without the fuss.
A probiotic path can lead to digestive harmony and well-being, while nurturing your gut and revitalizing your overall health
by alesha taylorIn the dynamic landscape of wellness, the spotlight is increasingly turning to gut health. Believe it or not, the symbiotic relationship between the microorganisms residing in our digestive system and the foods we consume is essential to our overall well-being.
The human gut is a bustling ecosystem teeming with trillions of microorganisms, collectively known as the gut microbiome—an intricate community of bacteria, viruses, and fungi. Help your gut function at its best by incorporating probiotics into your diet.
Probiotics, often referred to as the “good bacteria,” are live microorganisms chock-full of health benefits. They play a crucial role in maintaining the delicate balance of our gut microbiota, supporting digestion, bolstering our immune system, and might even influence mental well-being. Mayo Clinic states your gut houses up to 1,000 different species of bacterium, and nourishing these bacteria can help keep your gut in check.
The good news is that incorporating probiotics into your daily routine is both accessible and delicious. Yogurt, kefir, sauerkraut, and kimchi are just a few examples of probiotic-rich foods. Or try kombucha, a powerhouse of probiotics. Bursting with beneficial bacteria and yeast, this effervescent elixir supports digestion and boosts immunity, making it a deliciously overlooked secret to a thriving gut.
what’s all the fizz about?
Kombucha, a fermented tea beverage, is an increasingly sought-after source of probiotics. Its origin traces back to ancient China, where it was revered for its health-promoting properties. Today, kombucha has become a staple for consumers, grocery shoppers, and health enthusiasts alike.
At the heart of kombucha’s allure is the fermentation process. Beneficial bacteria and yeast mingle with sweetened tea, creating a lively dance of fermentation that results in a tangy and slightly effervescent drink. What makes kombucha truly special is its rich probiotic content, which can include strains like Lactobacillus, Bifidobacterium, and more.
Consuming kombucha is like delivering a microbial army to your gut, fortifying its defenses and promoting a thriving microbiome. When taken regularly, it may help alleviate digestive issues, enhance nutrient absorption, and even contribute to a more robust immune response. It is recommended not to consume more than 16 ounces of kombucha per day, though, which is about the amount in a bottle of store-bought kombucha.
bubbly benefits
The benefits of kombucha extend beyond probiotics. This ancient elixir is also a treasure trove of antioxidants, organic acids, and enzymes. Antioxidants combat oxidative stress, which is implicated in various diseases, while organic acids provide additional digestive support. Its detoxifying properties support liver function, while glucosamines enhance joint health. The beverage’s probiotic content may aid in mental clarity and mood regulation.
For those stepping into the world of kombucha, an array of flavors awaits, each boasting its unique blend of taste and wellness benefits. From the zing of ginger to the refreshing notes of fruit-infused varieties, there’s a flavor profile for every palate.
As you navigate the grocery aisles in search of gut-nourishing options, consider adding kombucha to your cart. Embrace this centuries-old elixir, sip on its effervescence, and unlock the power of gut health—one delicious bottle at a time. Cheers to a healthier, happier gut!
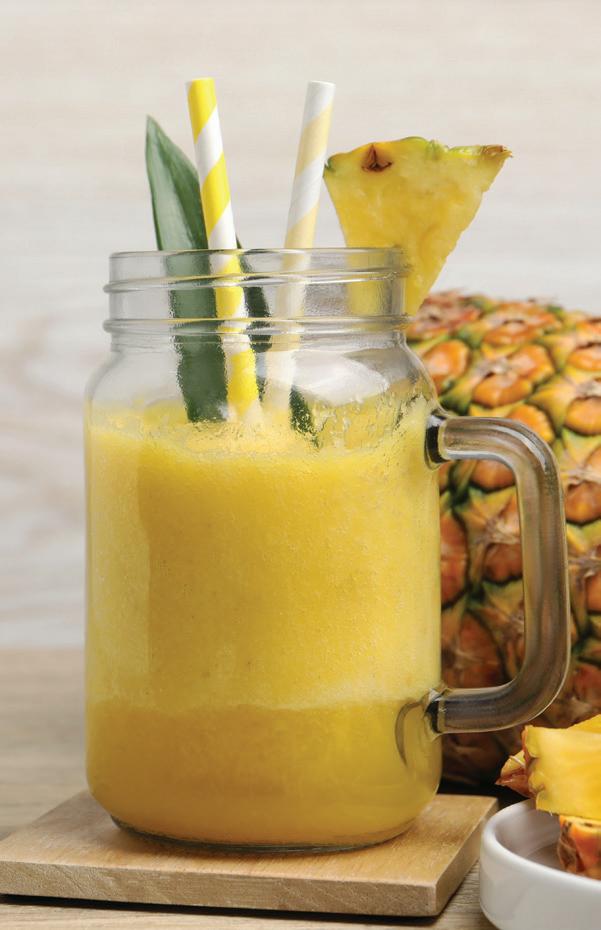
This simple smoothie is loaded with vitamins and minerals— plus, the kombucha adds an extra probiotic punch.
1 cup ginger kombucha
1 frozen banana, peeled and sliced
½ cup frozen pineapple chunks
½ cup plain Greek yogurt
1 tablespoon chia seeds
1 teaspoon honey (optional)
Ice cubes (optional)
In a blender, combine the ginger kombucha, banana, pineapple chunks, Greek yogurt, chia seeds, and honey. Blend until the mixture reaches a smooth, creamy consistency. Adjust the sweetness with more honey, if needed. Add ice cubes if you prefer an extra-chilled drink.


The combination of breakfast and lunch foods come together to make a delicious meal with something for eve one

Sometimes, two great things combine to make something even better. Think sushi burritos, cookies and ice cream—and brunch. When breakfast seems too early, blend in some lunch fare, start later, and serve until 2 p.m. so everyone can make it.
The portmanteau word “brunch” was first seen in print in 1895 when Guy Beringer wrote about the virtues of a midday meal for revelers who preferred to stay out late drinking, and it was probably a slang term before that. His ideal brunch included alcoholic drinks, and we still see the Mimosa and Bloody Mary as part of the menu. Brunch was also quickly adopted by churchgoers looking for a post-service meal, and by anyone who wanted to sleep in on the weekend.


Since the timing straddles breakfast and lunch, the meal combines your favorite breakfast foods with an eye toward making a midday meal of it by also including lunch items. Of course there are eggs, lots of eggs, but now that you’ve had a cup of coffee, you can make a more ambitious family-sized soufflé. Feeling playful? Make Tater Tot Waffles for a delicious, fun serving of potatoes, or Hasselback New Potatoes in Cast Iron. The Breakfast Strata is a crowd-pleaser, and the Berry and Brie Puff Pastry Squares and Blueberry Ricotta Coffeecake deliver for the sweet tooth. Welcome your friends and family to a spread of breakfast-y treats, with a sweet and tangy Maple Dijon Pork Tenderloin that anchors the meal squarely in the daytime. Don’t forget to have a side of fruit—or even a veggie. It is brunch, after all.


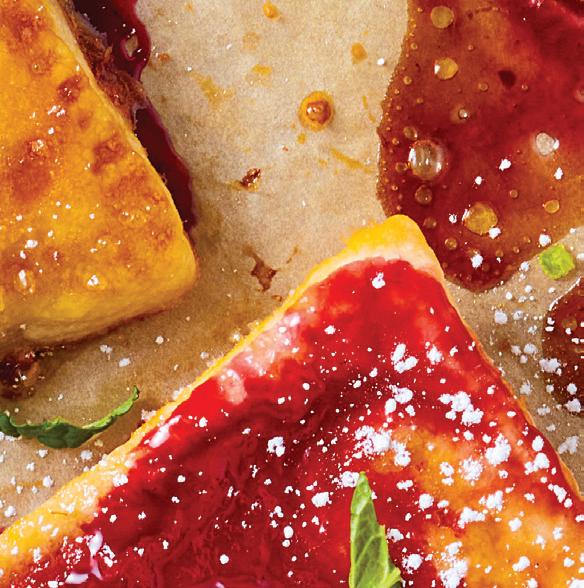
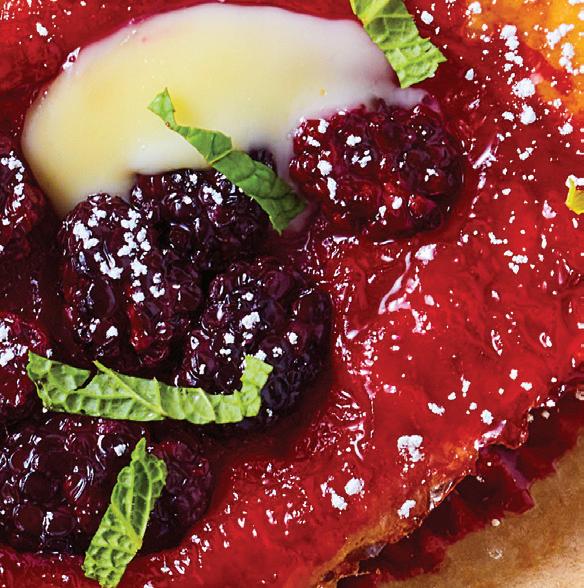
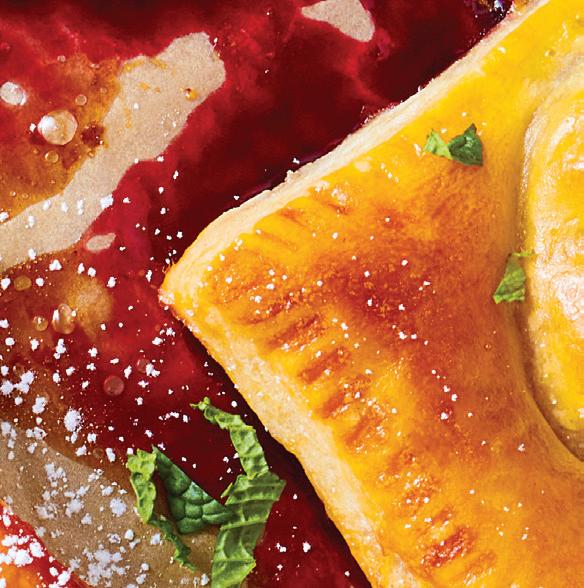


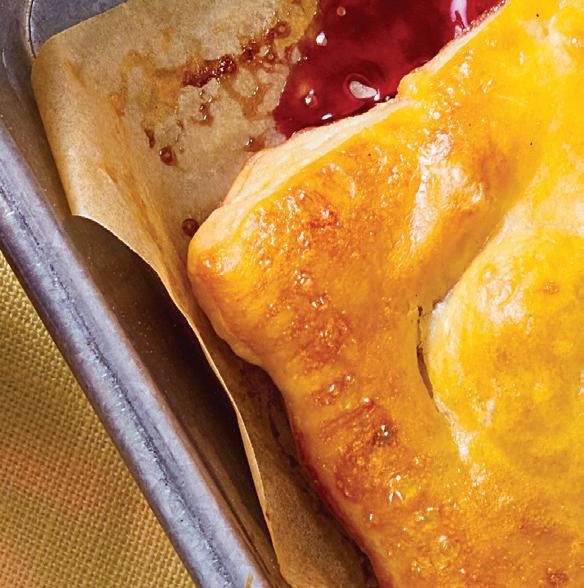
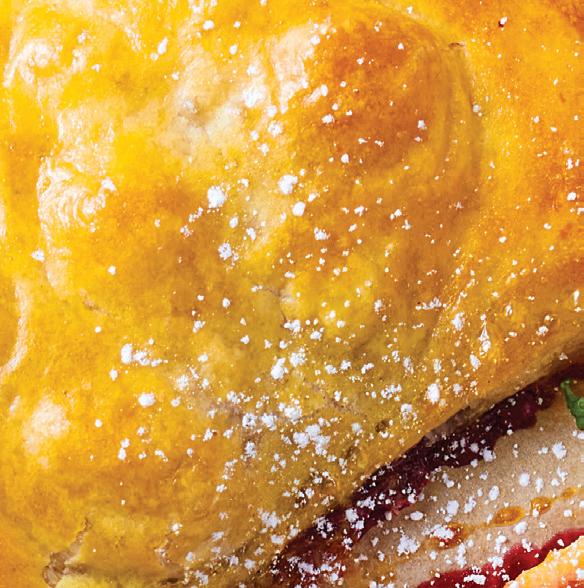
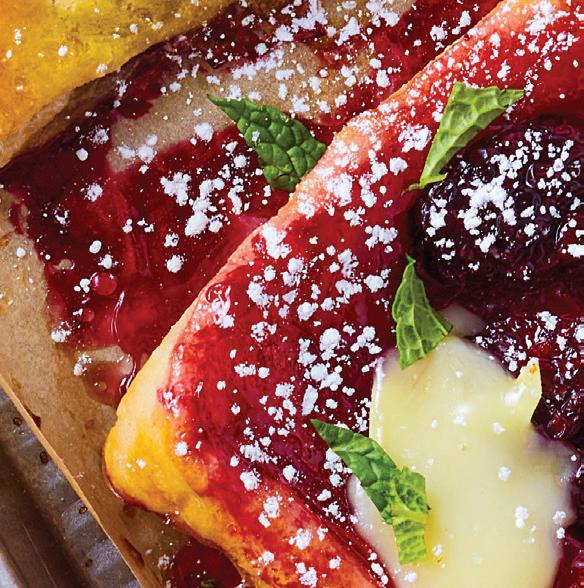
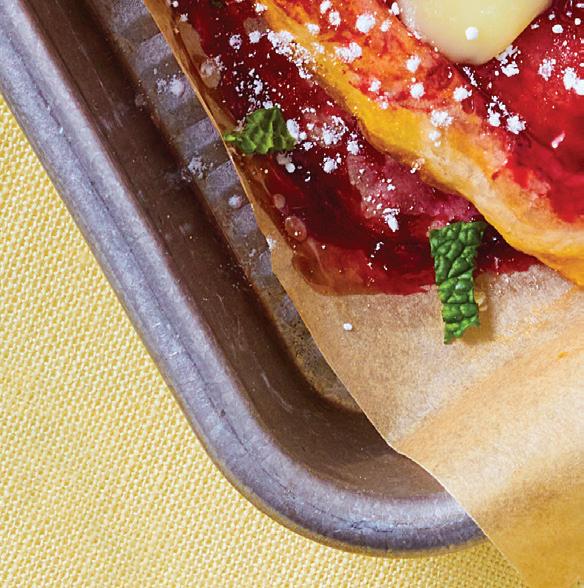
These upside-down pu pastries have been popular with TikTok and Instagram bakers, taking the world by storm. By placing the fillings for your pastry on the pan first, then topping them with pastry, you allow the fillings to cook and brown while the pastry pu s, unimpeded by the weight of the fillings. In this version, you will top the berries with creamy brie cheese and let it melt for a sweet and savory sensation that can’t be beat.
1 sheet pu pastry, thawed Flour, for rolling 1 large egg, plus 1 teaspoon water 8 teaspoons honey, divided 8 small blackberries, divided 16 raspberries, divided 1 teaspoon fresh rosemary, minced, divided 2 ounces brie, rind removed, thinly sliced, divided

1. Heat oven to 400°F. Line a sheet pan with parchment paper. Have a pastry brush and a fork on hand.
2. Lightly flour the counter and unfold the pu pastry, place on the flour, and sprinkle the top with a bit more flour. Roll the pastry just to smooth the fold marks, making a 10-inch square. Cut into 4 squares.
3. Whisk the egg with 1 teaspoon of water in a medium bowl, and get a pastry brush.

4. On the prepared pan, place 2 teaspoons honey on each quadrant of the pan. Top with 2 blackberries, 4 raspberries, and a pinch of minced rosemary.


5. Place the pu squares on top of the fillings and lightly press the sides to fit around the fillings. Use a fork to press the borders of each piece of pastry, then brush with the egg mixture.
6. Bake for 15 to 17 minutes, until the pu pastry is golden brown. Let the pastries cool on a rack for 2 minutes before using a metal spatula to lift them up and flip onto a serving plate. Top with slivers of brie while hot and return to the oven for 1 minute to melt. Remove from oven and serve warm.
Nutrition (per serving):
Calories: 350, Fat: 20g (Sat: 10g), Cholesterol: 55mg, Sodium: 320mg, Carb: 35g, Fiber: 3g, Sugar: 14g, Protein: 8g


No brunch is complete without cut-up fruit for a light, juicy bite in between savory proteins and sweet co eecake. You can keep it simple with a bowl of pineapple cubes or melon wedges. Go with what’s best in the season, and spring is when the berries are bursting with just-picked flavor. Always toss the cut fruit, especially apples, pears, or bananas, with orange or lemon juice to prevent browning.


For a fruit salad, a simple mix of lemon juice and honey helps sweeten any fruit that is a little tart, as well as keeping the fruit from browning. Just stir 1 or 2 tablespoons of each in a cup and pour over the fruit, then toss gently. For a heartier salad, stir in yogurt, mayo, or sour cream sweetened with honey. Fresh herbs like mint, tarragon, or parsley add sparkle. For more heft, sprinkle in chopped walnuts.


This tender cake has a velvety, moist interior thanks to creamy ricotta cheese. Juicy blueberries dapple the cake with bursts of purple, and the crunchy streusel topping is irresistible.
for the streusel
½ cup flour
½ cup whole almonds
1 teaspoon cinnamon
½ cup light brown sugar
¼ cup unsalted butter, melted for the cake
1½ cups all-purpose flour
1 teaspoon baking powder
¼ teaspoon baking soda
½ teaspoon salt
1½ cups sugar
2 tablespoons fresh lemon zest
3 large eggs
1 cup ricotta cheese
½ cup canola oil
1 tablespoon lemon juice
1 cup blueberries
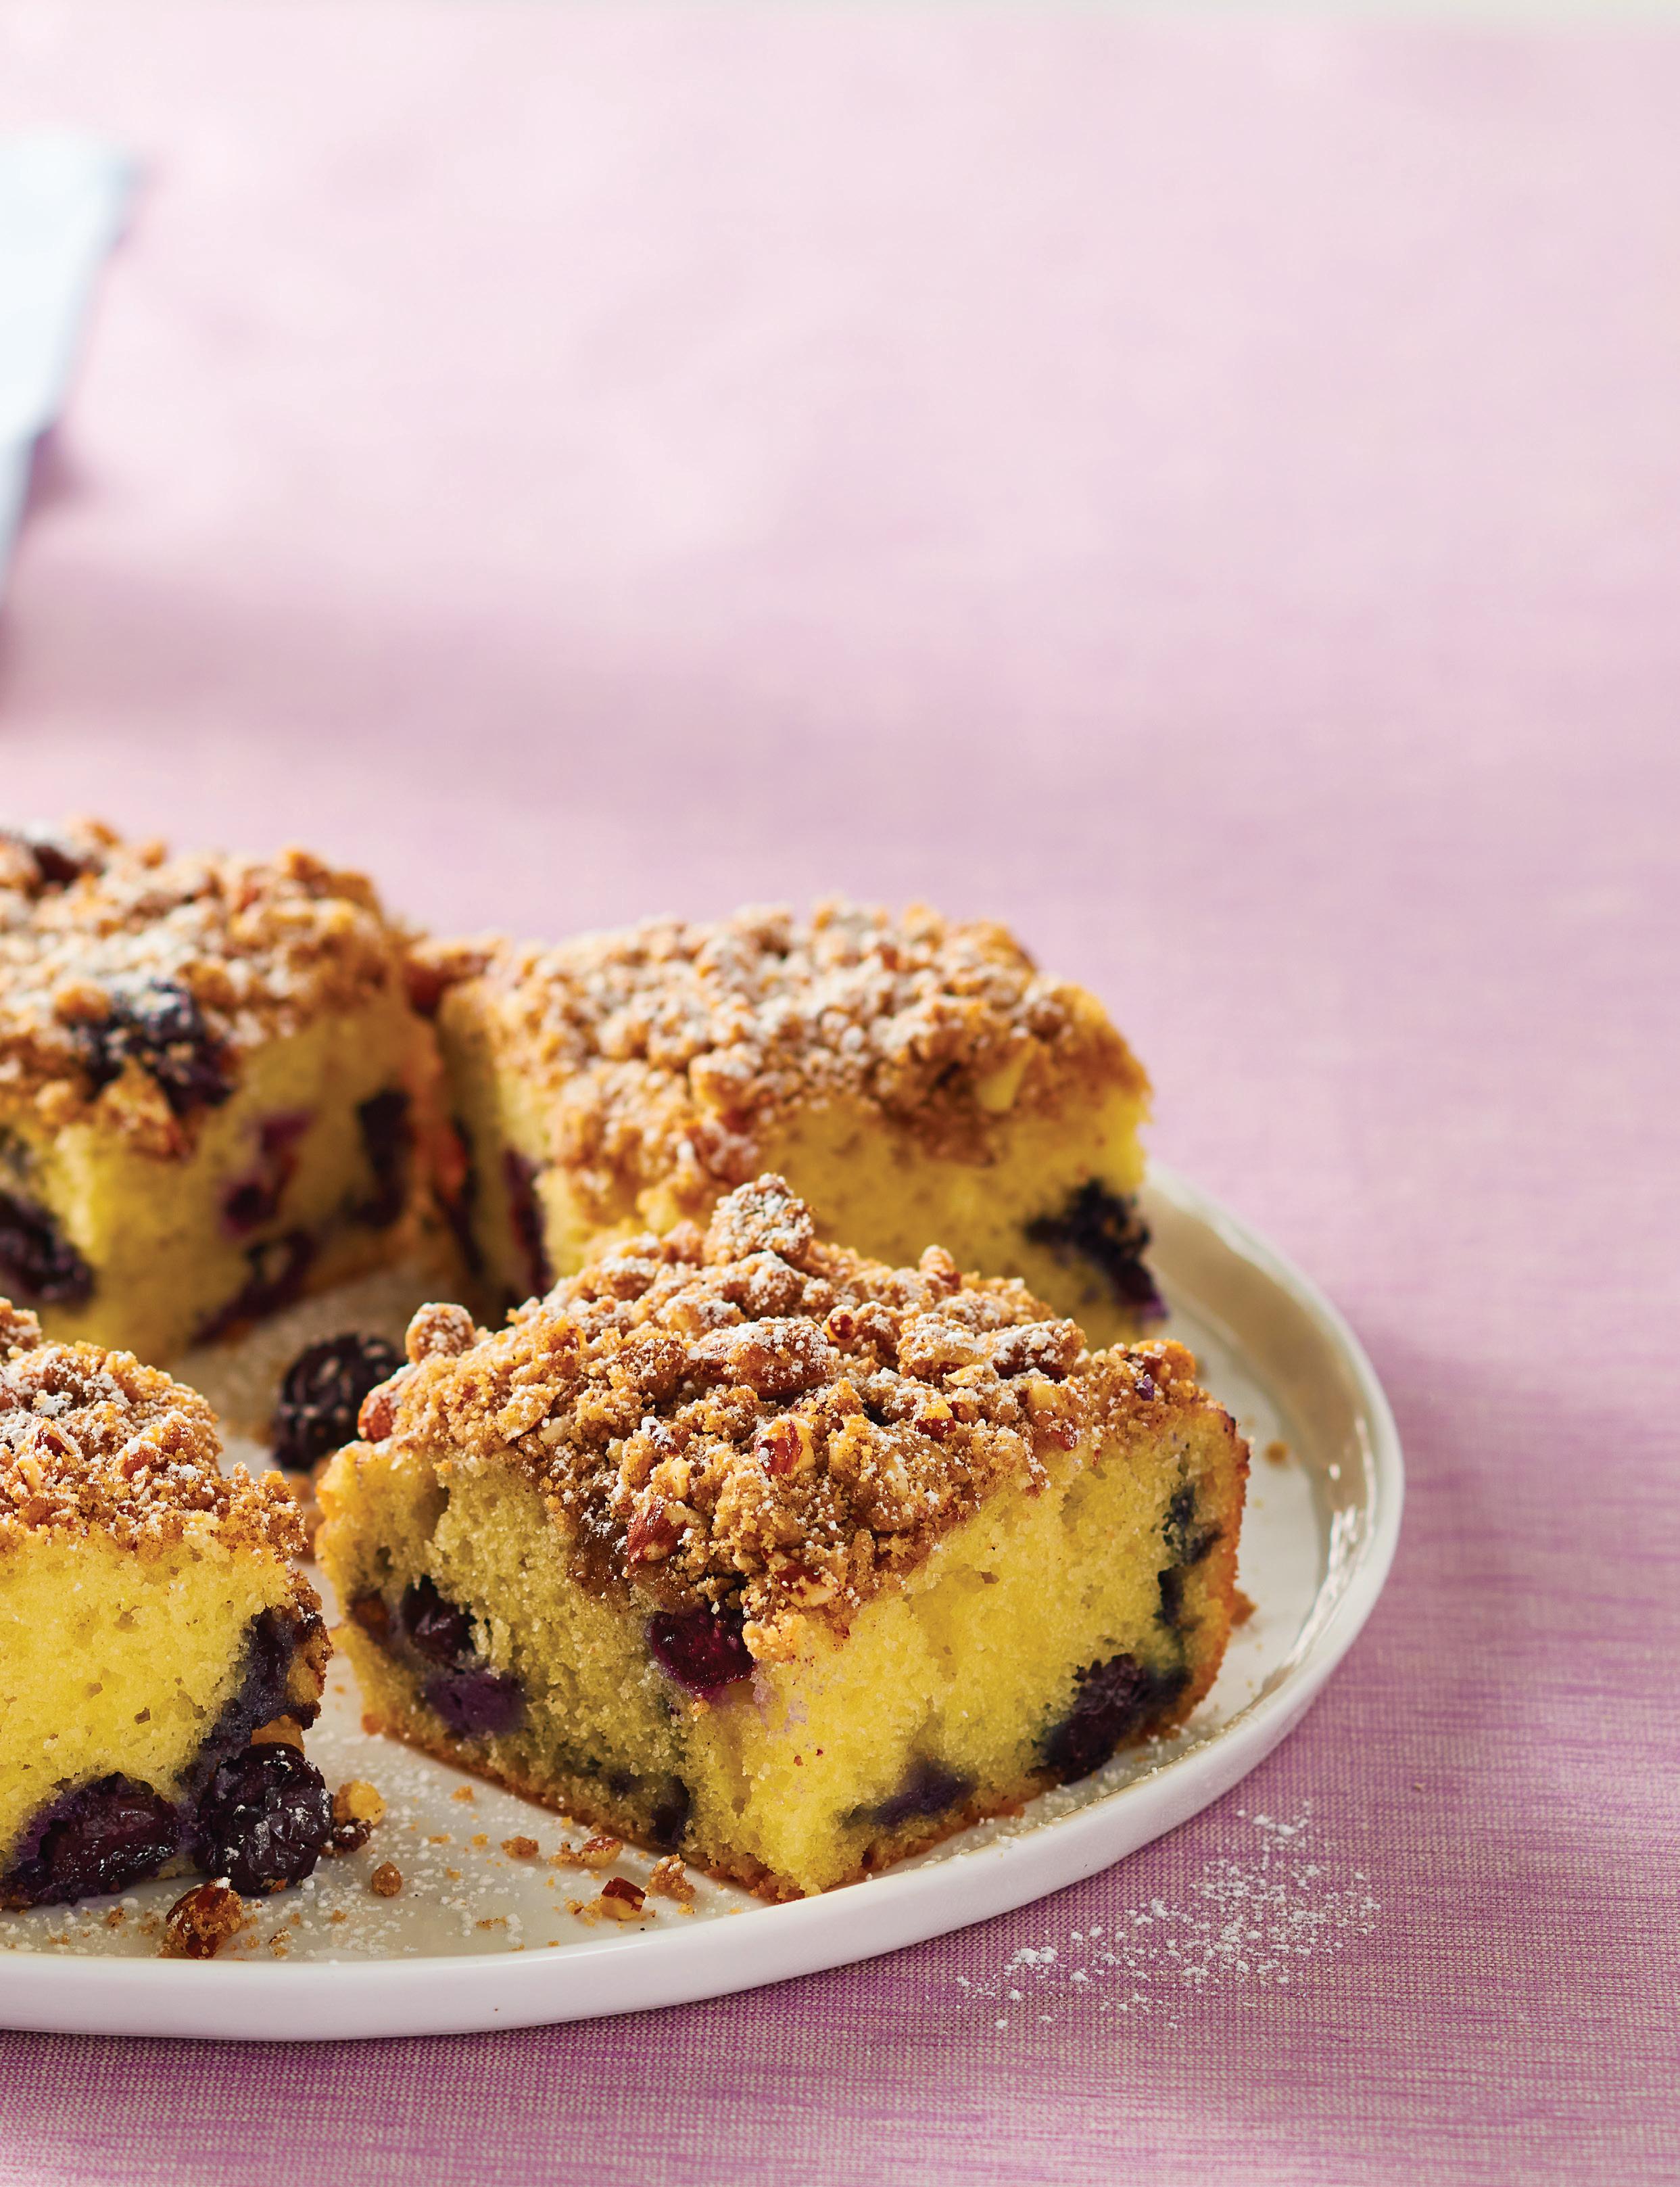
1. Heat the oven to 350°F. Grease a 9-inch square pan.
2. Make the Streusel: In a food processor, combine the flour, almonds, cinnamon, brown sugar, and melted butter. Pulse until the almonds are coarsely chopped and the mixture is crumbly. Transfer to a medium bowl, squeeze to form large crumbles, and refrigerate. (Alternatively, chop the almonds by hand, combine the ingredients in a medium bowl, and mix well.)
3. For the cake: In a bowl, mix flour, baking powder, baking soda, and salt, and reserve.
4. In a mixer, combine sugar and lemon zest and use the batter
paddle to mix for 1 minute to distribute the lemony flavor. Beat in the eggs, one at a time, then add the ricotta, oil, and the lemon juice. Add the flour mixture to the mixer gradually, with the mixer on low. Beat just until mixed, fold in the berries, then spread in the prepared pan. Sprinkle streusel evenly over the batter.
5. Bake for 40 to 45 minutes, until a toothpick inserted in the center of the pan comes out with no wet batter attached. Cool on a rack. This keeps for 1 week, tightly covered, in the refrigerator.
Nutrition (per serving when
12 pieces): Calories: 400, Fat: 19g (Sat: 4.5g), Cholesterol: 60mg, Sodium: 260mg, Carb: 51g, Fiber: 2g, Sugar: 33g, Protein: 7g


The strata, egg bake, quiche, frittata, and sou é are all made with eggs—but what is the di erence?
Strata usually contains bread, and can be a thrifty way to use up stale bread since it is soaked in an egg and milk custard before baking with assorted breakfast foods.
Egg bake or egg casserole is almost the same as a strata, but may or may not include bread in it.


Quiche is made in a pastry crust, can contain a variety of vegetables, meats, or cheeses, and usually the eggs are beaten with a generous amount of half-andhalf or cream.
Frittata, which is similar to a Spanish tortilla, is more like a crustless quiche that is baked in a pie pan or prepared in a skillet over low heat, then either flipped in the pan or finished under the broiler.

Sou é is the show-o of the egg dishes, employing lofty beaten egg whites to carry a rich béchamel high above the baking dish.


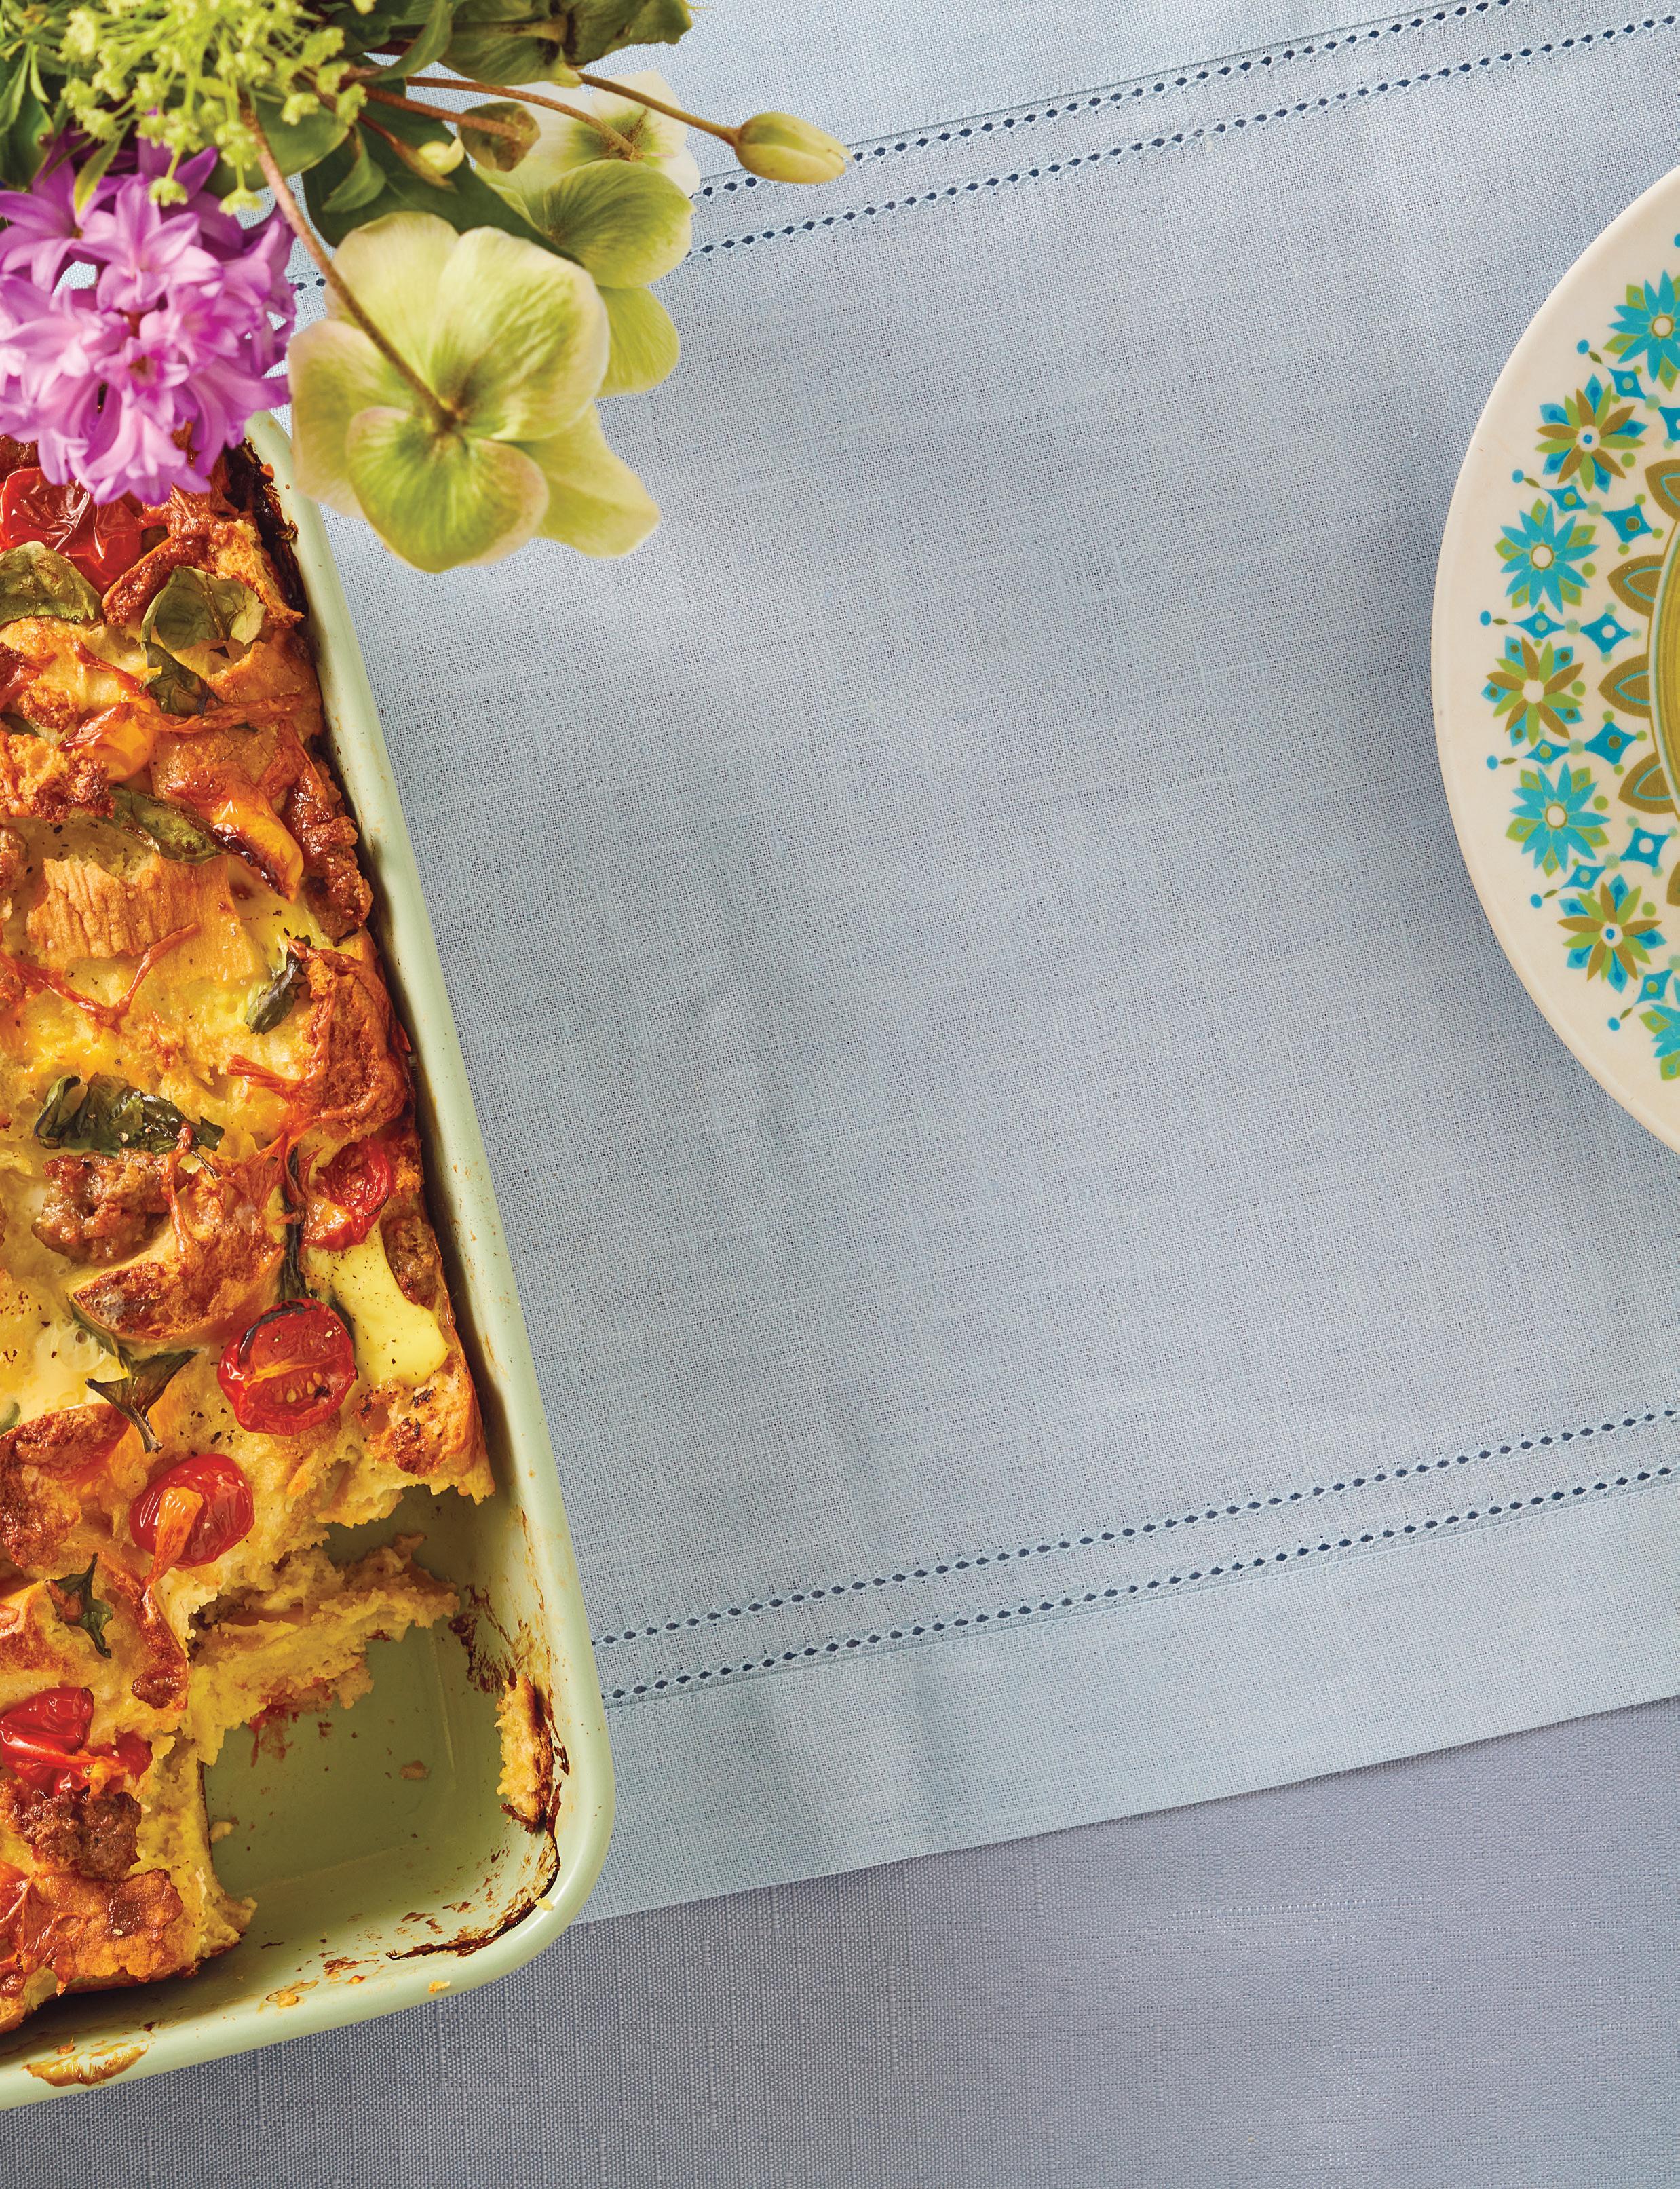


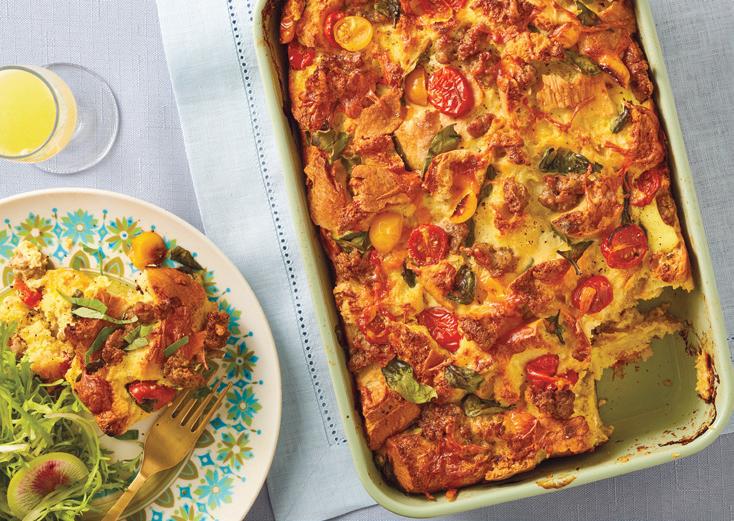
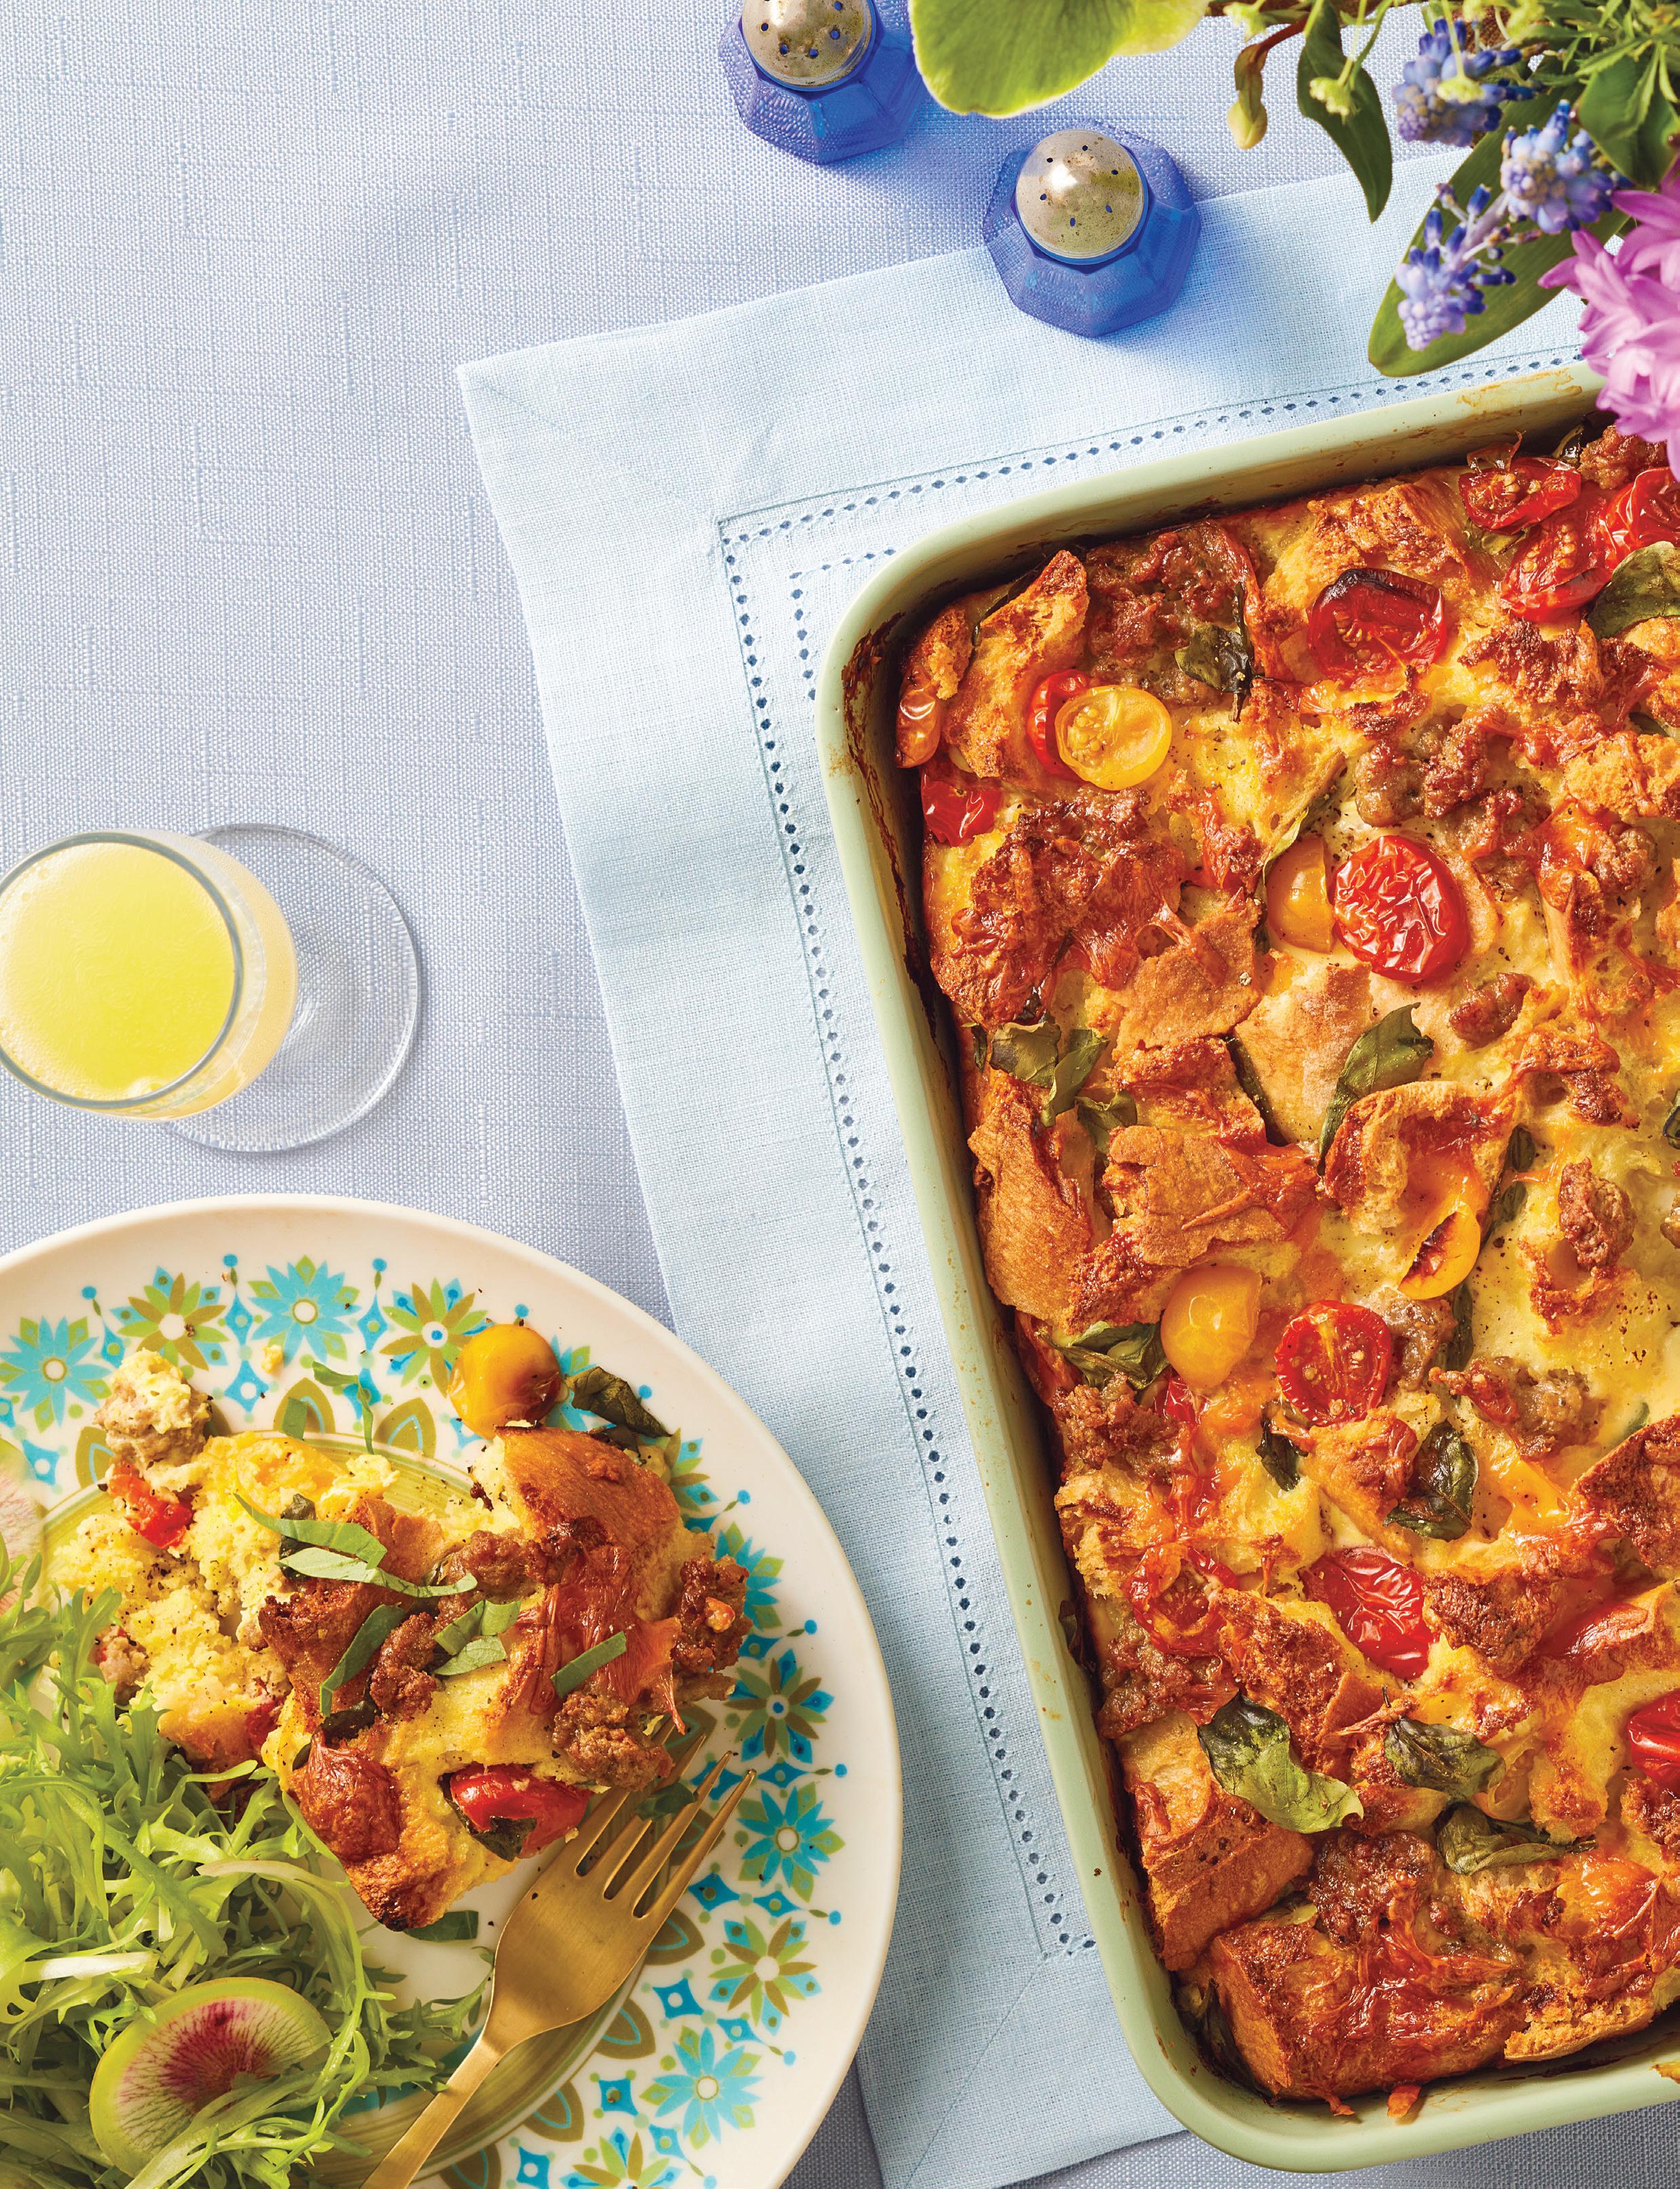
The easiest and tastiest way to feed a crowd at brunch is the strata. Call it an egg bake or a casserole, it’s a pan full of breakfast foods, all bound with savory eggs and cheese to make a sliceable meal. This one is a template, so you can use the vegetables your family prefers, or even make it vegan or gluten-free.
4 cups cubed bread or 12 ounces thawed hash browns (or gluten-free bread or hash browns)

1 tablespoon extra virgin olive oil
1 cup chopped onion
1 pound sausage, or 6 ounces cooked and crumbled bacon (can use plantbased sausage)
3 cups chopped vegetables, such as broccoli and peppers
12 large eggs, or 36 ounces Just Egg or make a plantbased egg substitute (see Cook’s Notes)
¾ cup milk, or nondairy milk (see Cook’s Notes)
1 teaspoon salt
milk (or nondairy milk) salt, and dried herb. Whisk well.
4. Distribute the sausage mixture over the bread or potatoes, then pour the egg mixture over that, using your spatula to lift the ingredients in the pan so eggs can flow around them. Sprinkle with shredded cheese.

5. Cover and refrigerate for at least 30 minutes or overnight.

1 teaspoon dried thyme or sage
1½ cups shredded cheese, or vegan cheese
1. Grease a 9x13-inch baking pan or a 3 or 4 quart casserole. Sprinkle the bread or hash browns in the pan and reserve.
6. Heat the oven to 375°F. Bake for 45 minutes until the top is golden brown and the casserole is firm when pressed with a fingertip. Cool slightly on a rack and slice while still warm.
Cook’s Notes:
■ To make a plant-based egg substitute for 12 eggs, whisk 3 cups garbanzo (chickpea) flour with 3 cups water and 1⁄2 teaspoon turmeric.

2. In a large sauté pan, warm the oil over medium-high heat for a few seconds, then add the onion. Sauté until it starts to sizzle, then add the crumbled or chopped sausage. Stir and cook for about 5 minutes, until cooked. Add the vegetables and cook until they are softened. (To use bacon, cook separately and add when the vegetables are done.)
3. In a large bowl, combine the eggs (or egg substitute) with the

■ Leave out the milk if using the make-your-own plant-based garbanzo flour egg substitute option. (Include the milk if using the Just Egg.)
Nutrition (per serving):
Calories: 270, Fat: 18g (Sat: 7g), Cholesterol: 205mg, Sodium: 640mg, Carb: 11g, Fiber: 2g, Sugar: 3g, Protein: 17g

Nutrition (with vegan/nondairy per serving): Calories: 250, Fat: 6g (Sat: 1.5g), Cholesterol: 0mg, Sodium: 540mg, Carb: 37g, Fiber: 9g, Sugar: 3g, Protein: 12g

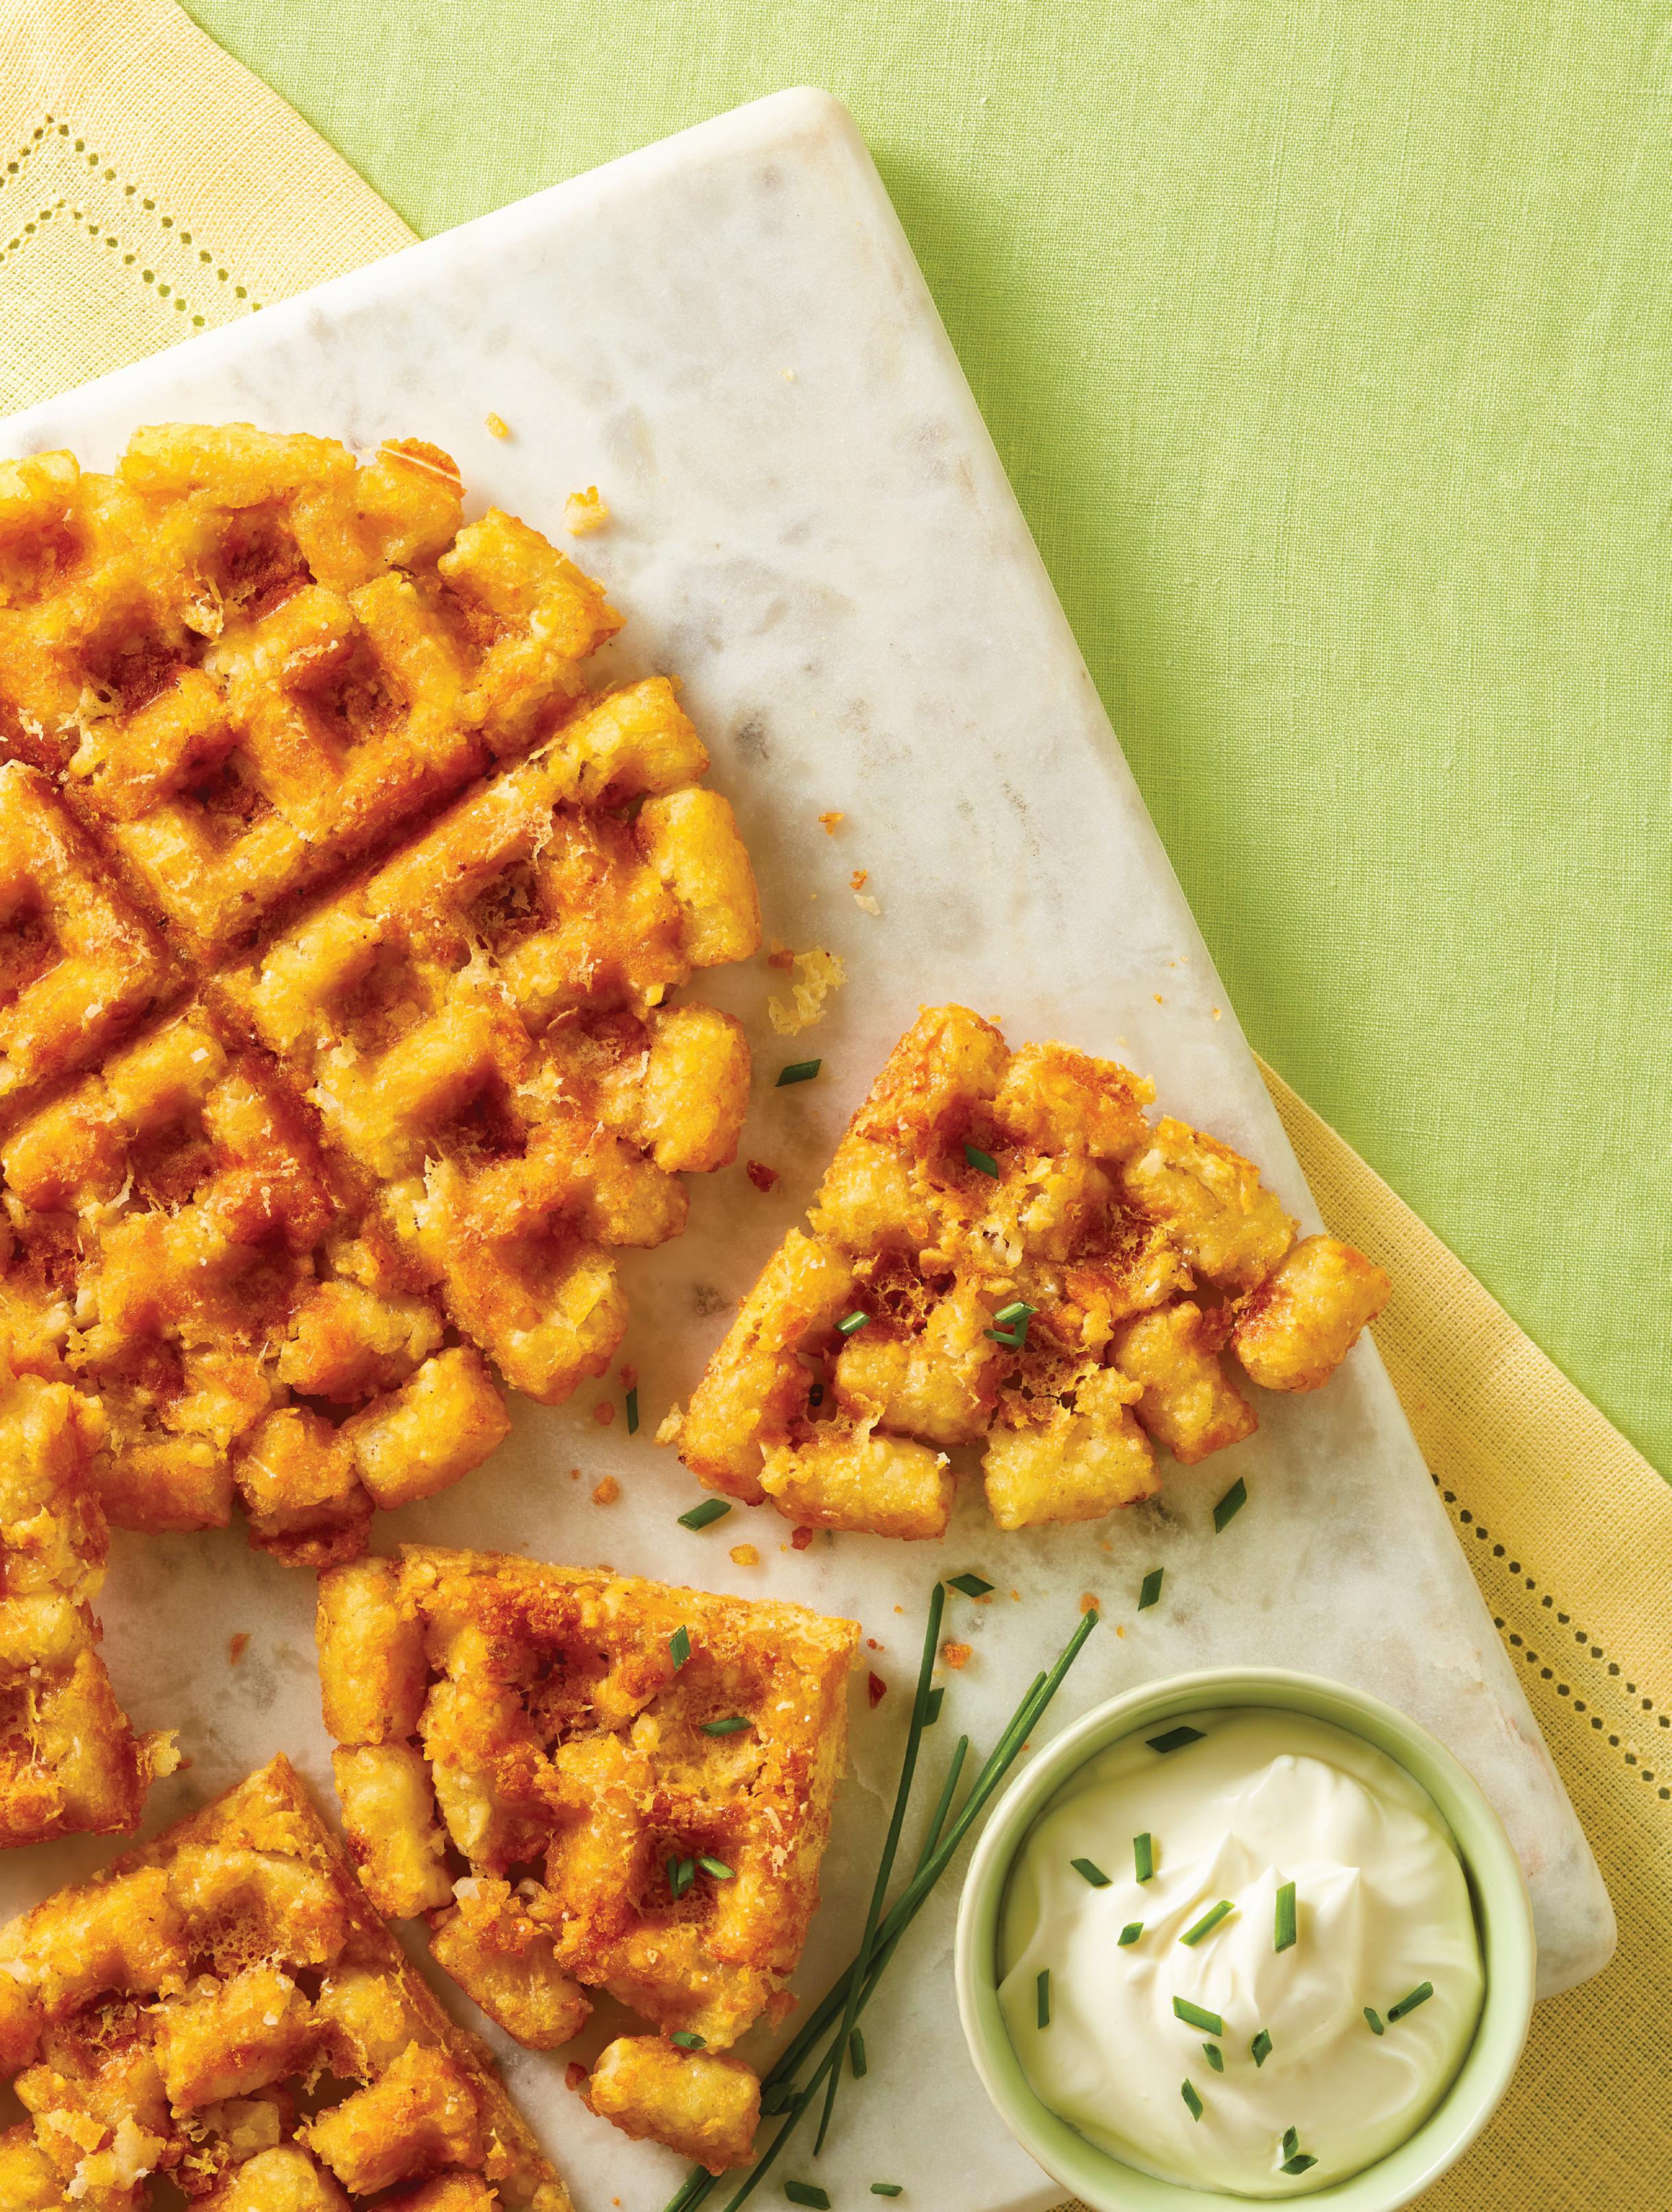

What could be more fun than Tater Tots? Crispy Tater Tot wa es! Use your wa e iron to turn tots into golden brown rounds, with all the indentations and crevices of a wa e to add crunch. Top with savory cheese or go sweet and savory with a drizzle of maple syrup.


1 (28-ounce) package mini Tater Tots, thawed ½ cup shredded Parmesan or cheddar (optional) Oil, for wa e iron
1. Thaw the Tater Tots overnight in the refrigerator or 2 hours at room temperature. Have a plate ready for the finished wa es, and if desired, preheat the oven to 200°F to hold the finished wa es.


the plate. Brush the top plate and close the wa e iron, leaning on it to really compress and flatten the Tater Tots.
4. Cook for about 5 minutes, until golden brown and crisp. If using cheese, sprinkle the top of the wa e with 2 tablespoons of cheese and close the iron, cook for about 1 minute until melted and golden, and the iron releases when opened. Serve immediately.

2. Set the wa e iron on darkest setting—if yours has settings.
3. Turn on the wa e iron and brush the bottom plate with oil. Quickly arrange about 2½ cups of the tots very close to each other on

Nutrition (per serving):
Calories: 400, Fat: 25g (Sat: 6g), Cholesterol: 15mg, Sodium: 1070mg, Carb: 32g, Fiber: 2g, Sugar: 1g, Protein: 8g

MAKES 6 SERVINGS
The lofty, airy soufflé is often seen as the domain of chefs and kitchen magicians. But, it’s really not as hard as it seems, thanks to the electric mixer. Beaten egg whites hold bubbles of air, and when baked, they expand, creating a fluffy, show-stopper of a dish. Just make sure that everyone is seated and ready to eat when you take it out of the oven, because it will fall pretty quickly, but it will still be a delicious, eggy dish.
¾ cup Gruyere cheese, finely shredded
1 bag frozen spinach, thawed and squeezed
2½ cups milk
¼ large onion
1 large bay leaf
2 whole cloves
7 tablespoons unsalted butter, divided
6 tablespoons flour
½ teaspoon salt
½ teaspoon black pepper
1/8 teaspoon ground nutmeg
6 large eggs
1. Butter a 6-cup soufflé dish and sprinkle with Gruyere to cover the sides. Chill for at least 10 minutes.
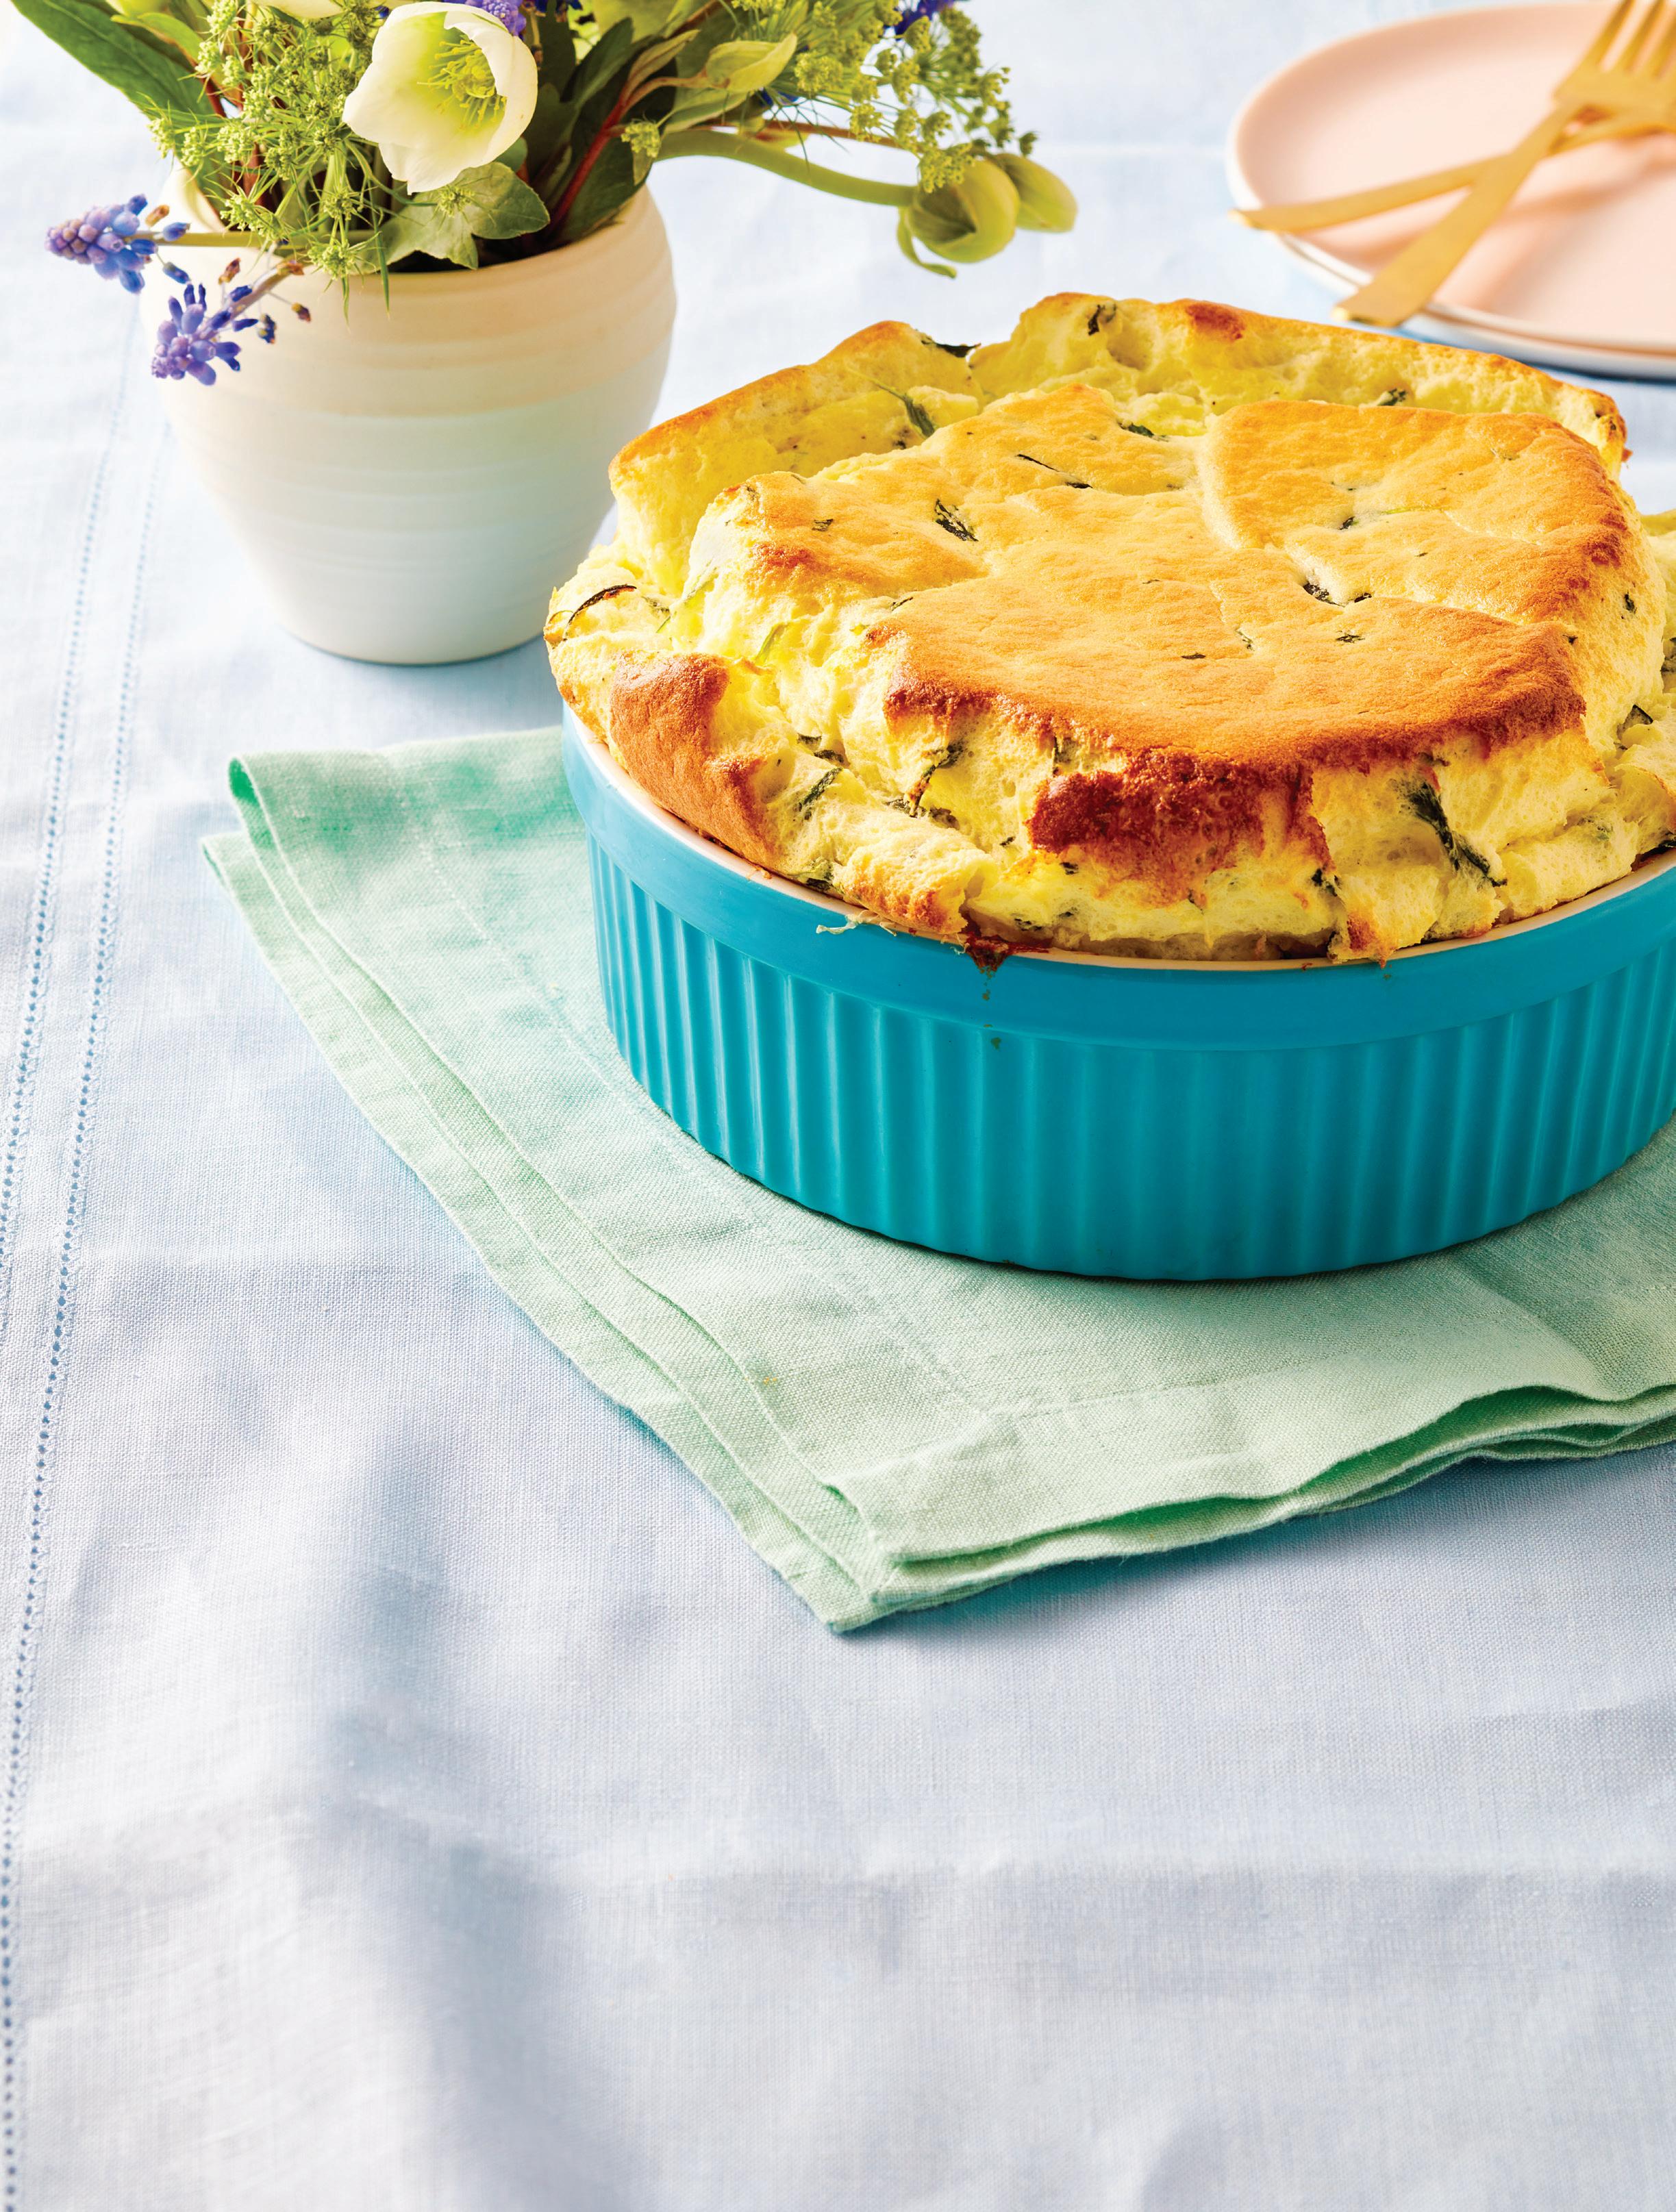
2. Wring out thawed spinach and wrap in a clean kitchen towel to dry thoroughly, then put on a cutting board and mince.
3. Heat milk with onion, bay leaf, and cloves and simmer gently for 10 minutes, then remove seasonings. Heat oven to 425°F.
4. Make the bechamel: Melt butter in a heavy bottomed saucepan and beat in the flour with a wooden spoon until smooth. Cook, whisking, over low heat for about 3 minutes, then take off the flame for 1 minute. Bring the milk to a boil and whisk 2 tablespoons of the hot milk into the roux, return to the heat,
then whisk in the remaining milk. Cook, whisking, until smooth and bubbling. Let cool, season with salt, pepper, and nutmeg.
5. Separate the eggs, putting the whites into a bowl for beating, and beating each yolk into the bechamel. Stir in spinach.
6. Beat the egg whites to stiff peaks. Fold a dollop of whites into the bechamel mixture, then fold in the rest of the whites thoroughly.
7. Scrape the egg mixture into the prepared dish. Run your finger
around the edge to make an indentation. Place on a sheet pan and bake the soufflé for 10 minutes, then lower heat to 375°F and bake for 35 to 40 minutes. When the soufflé is puffed and golden brown, serve immediately.
Nutrition (per serving):
Calories: 340, Fat: 25g (Sat: 14g), Cholesterol: 230mg, Sodium: 360mg, Carb: 13g, Fiber: 2g, Sugar: 6g, Protein: 17g


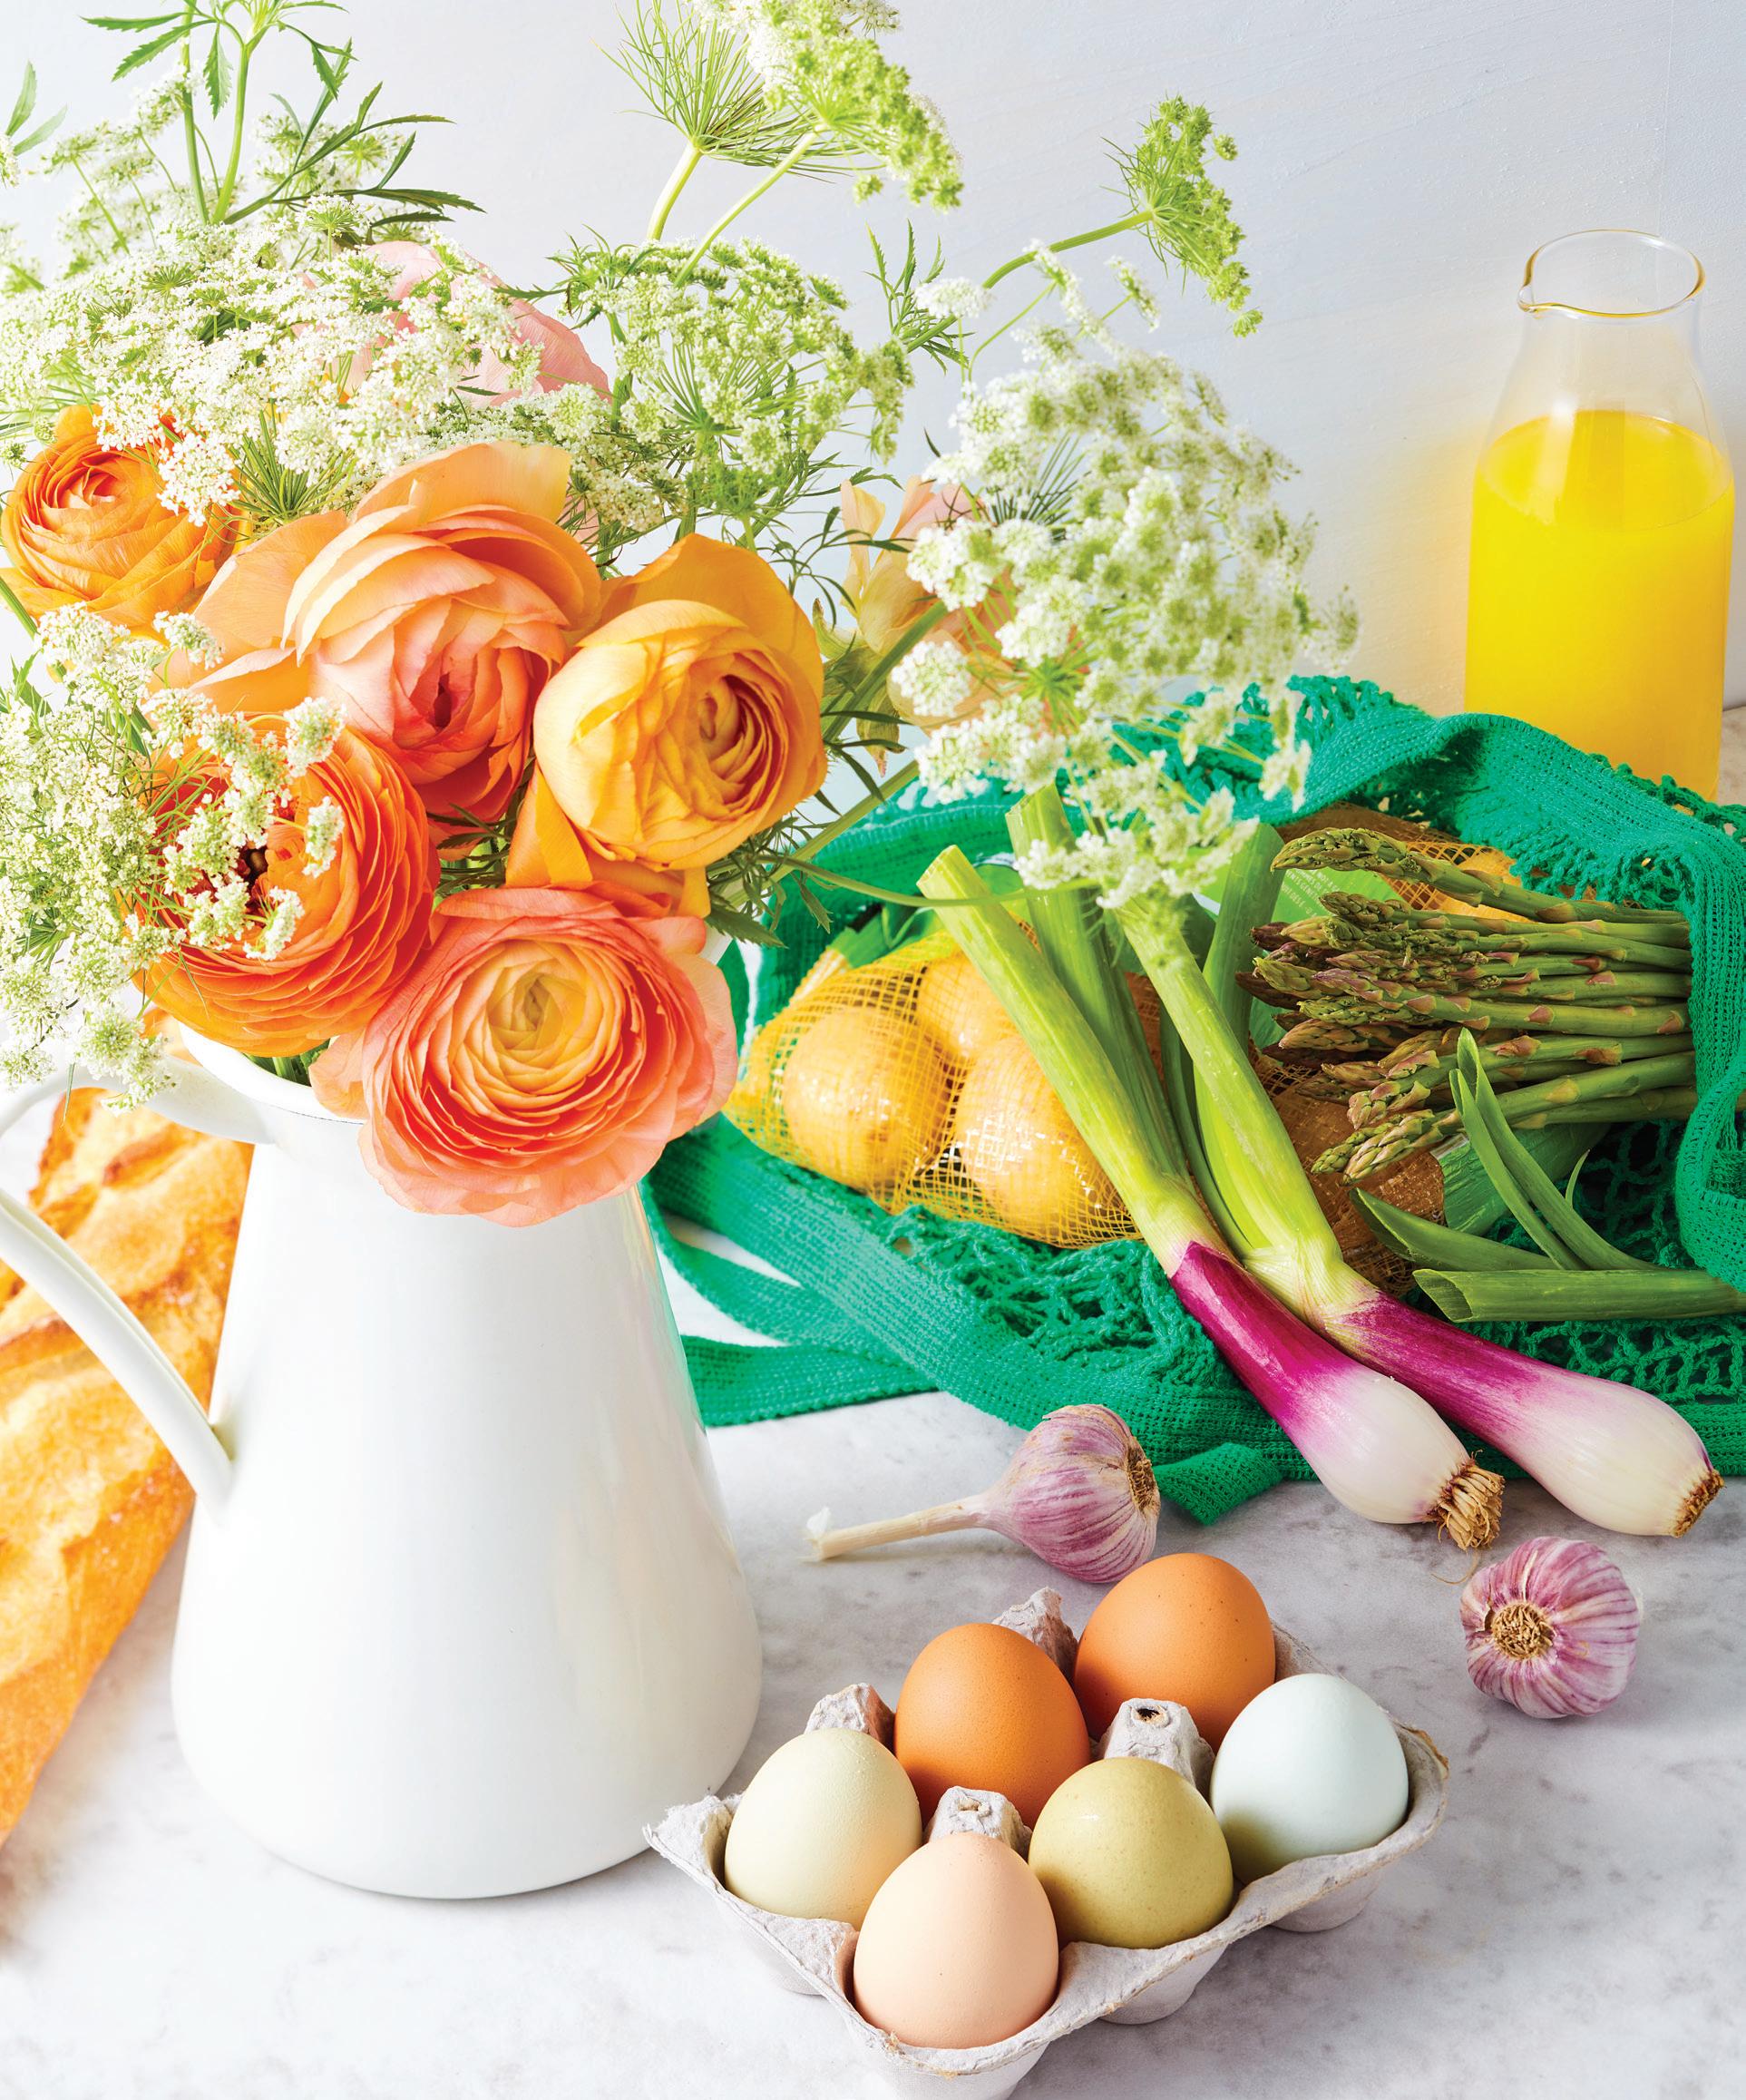
Breakfast isn’t known for veggie sides, but lunch is. Keep brunch light and colorful with more veggies, whether in salads or sides. A big bowl of green salad, topped with spring berries, asparagus, scallions, or whatever strikes you will tuck beautifully alongside a slice of egg bake and Parmesan potatoes. Cooked veggies, like roasted asparagus, broccolini, or sautéed mushrooms will please most everyone.


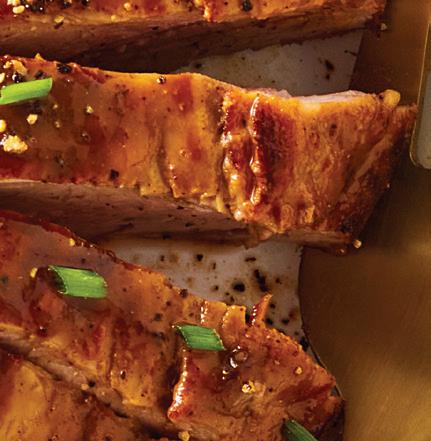
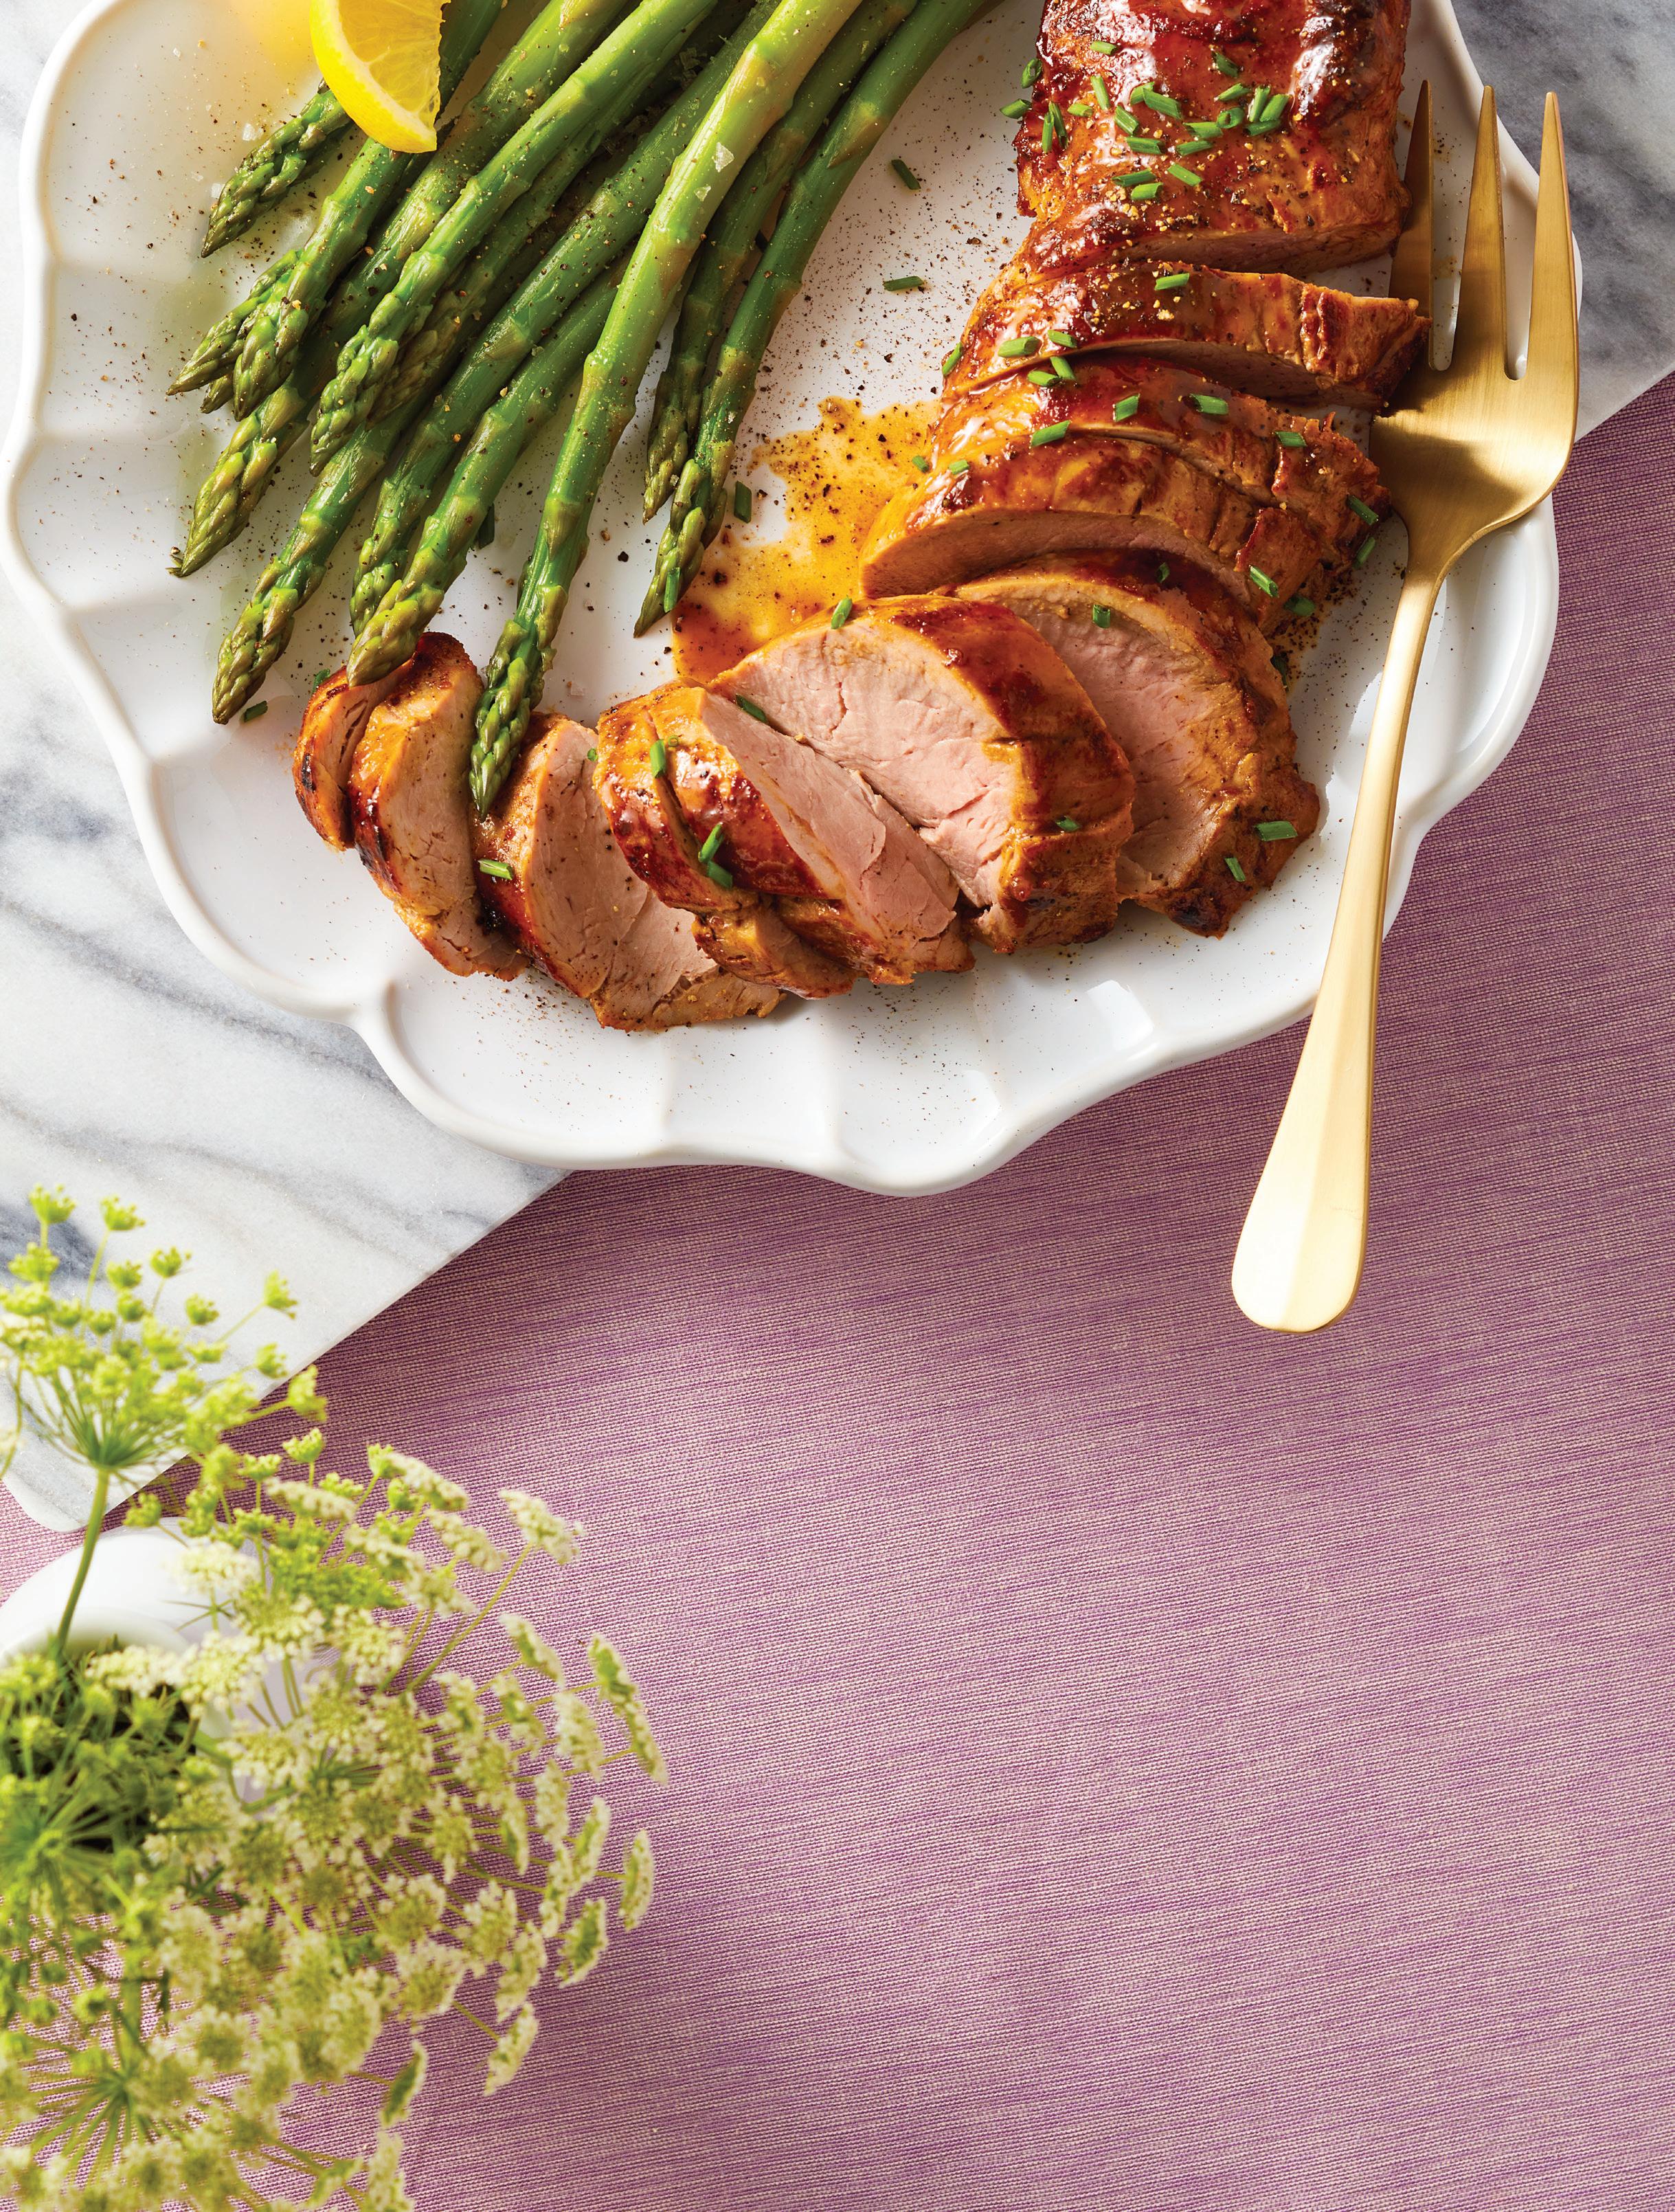
MAKES 6 SERVINGS


1⁄4 cup Dijon mustard
2 tablespoons maple syrup
½ teaspoon salt
1½ pounds pork tenderloin (1 large) trimmed
1 tablespoon canola oil
½ cup white wine
¼ cup minced chives


1. Heat the oven to 400°F. Lightly oil a baking sheet and reserve.
2. In a cup, mix the Dijon mustard and maple syrup. Sprinkle the tenderloin with salt, then brush with the Dijon mixture.
3. Heat the canola oil in a large sauté pan. Place the tenderloin in the hot pan (fold the thin “tail” under to make a more even thickness). Sear on both sides, turning with tongs, about 3 minutes per side. Transfer to the baking sheet.


Pork tenderloins are so easy to cook and present well, too.
This one is glazed with a tangy-sweet Dijon and maple sauce, which complements the mild pork perfectly. Any leftovers can be sliced for sandwiches or cubed to toss in a salad.


Bring to a boil and cook until very thick, about 5 minutes. Reserve.
5. Bake for 25 to 30 minutes, until an instant read thermometer inserted in the thickest part reads 160°F.

6. Brush the hot tenderloin with the thickened pan sauce, sprinkle with chives, and serve.

4. Add the white wine to the sauté pan, stirring to deglaze the browned bits.
Cook's Note: If you would like a little more sauce than a glaze, you can easily double the ingredients.
Nutrition (per serving): Calories: 150, Fat: 4g (Sat: 1g), Cholesterol: 55mg, Sodium: 470mg, Carb: 5g, Fiber: 0g, Sugar: 4g, Protein: 18g

Nutrition (per serving, with sauce doubled): Calories: 180, Fat: 4g (Sat: 1g), Cholesterol: 55mg, Sodium: 700mg, Carb: 10g, Fiber: 0g, Sugar: 8g, Protein: 18g


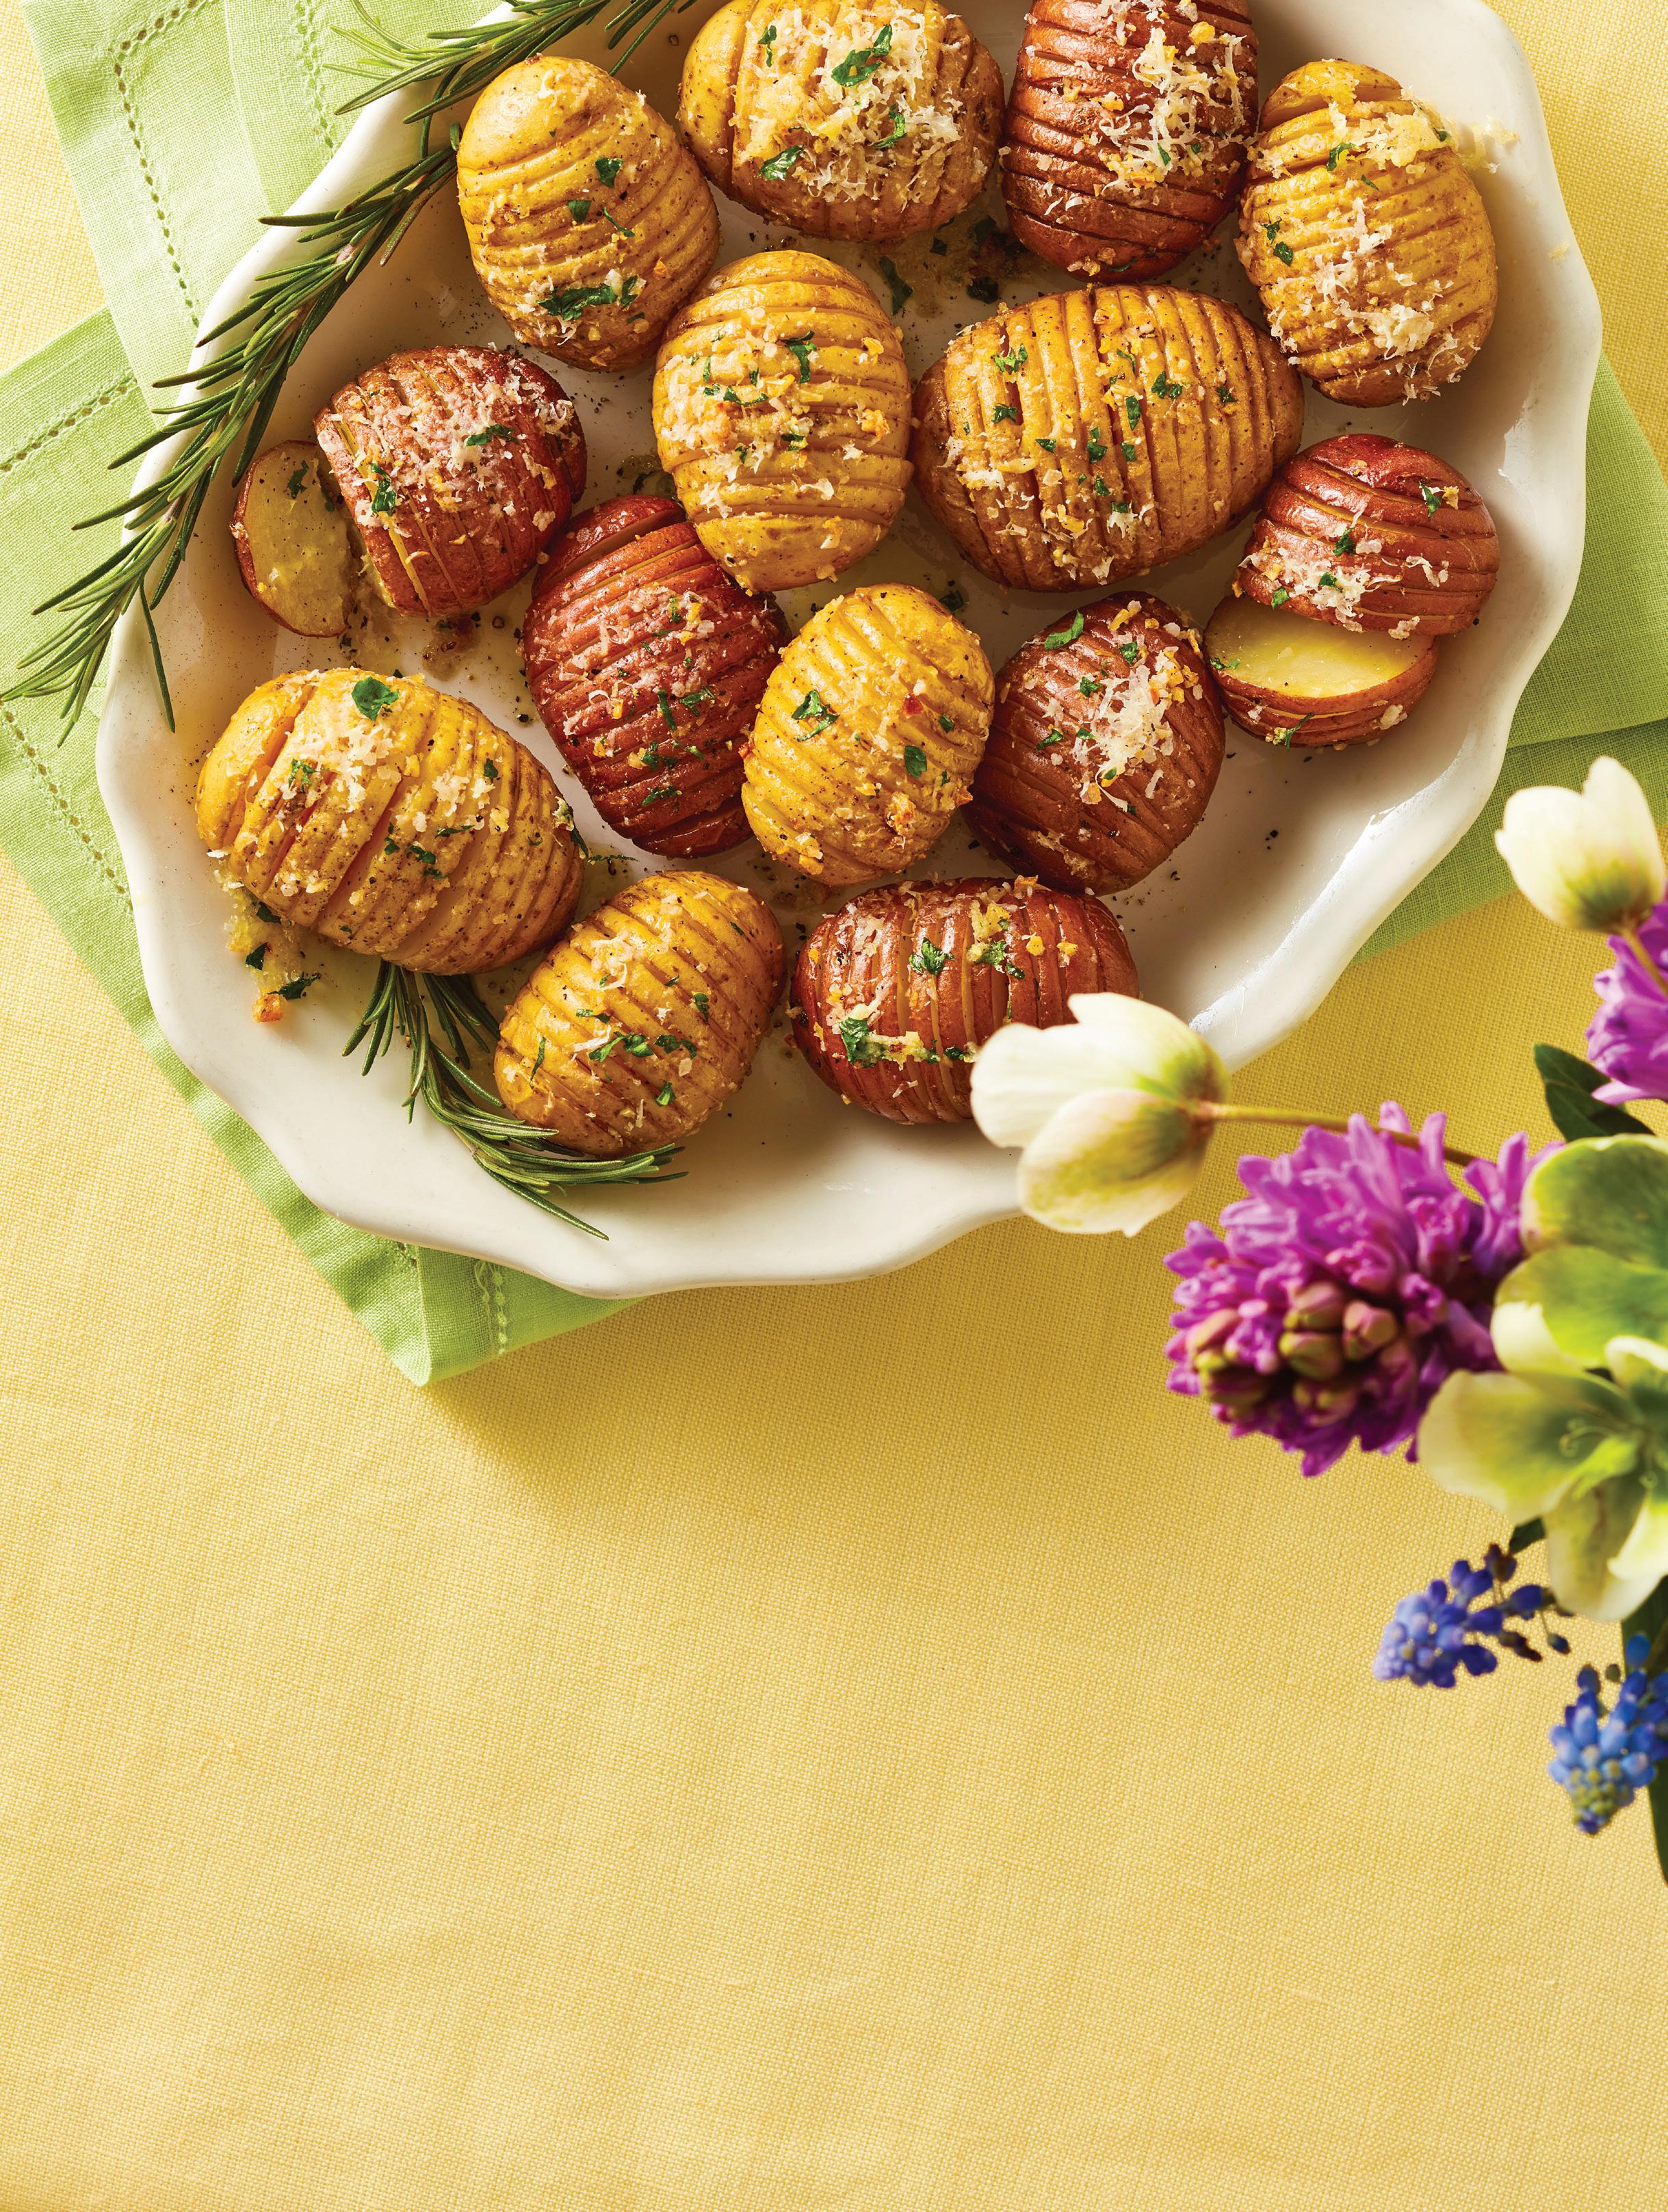
MAKES 4 TO 6 SERVINGS
Hasselback potatoes originated in a restaurant in Stockholm, but now “hasselbacking” has moved from just potatoes to other vegetables and meats. The technique of slicing almost all the way through a piece of food so that you can fill the gaps with seasonings creates more flavor and texture. These little potatoes, sliced and basted with garlic and herb oil, are tender throughout and topped with savory Parmesan for a special take on potatoes your guests will love.
¼ cup extra virgin olive oil, divided 2 tablespoons fresh rosemary, plus sprigs for garnish
2 large garlic cloves, chopped
1 teaspoon coarse salt
1 teaspoon freshly ground black pepper
1½ pounds new potatoes
½ cup parsley, chopped
½ cup shredded Parmesan cheese
1. Heat the oven to 400°F. Get a 12-inch pan and foil to cover it.
2. In a small pot, warm the olive oil, rosemary, garlic, salt, and pepper.
3. Fit the potatoes snugly in the pan, then take each one out and do the cuts as follows: Place each potato on the cutting board and place two chopsticks on either side of the potato, to use as a knife-stop. Carefully grip the chopsticks and use a sharp paring knife to slice down, but not through, at 1⁄4-inch intervals. Use a pastry
brush to baste in between the slices of each potato, opening the slices as much as possible without breaking. Place the potato back in the pan and continue until all are done. Reserve a couple of tablespoons of the seasoned oil.
4. When all the potatoes are seasoned and in the pan, cover with foil and bake for about 25 minutes. The potatoes should be tender in the center of a thick slice when pierced with a knife.
5. Uncover, baste again with the reserved oil, and sprinkle with parsley and Parmesan. Return to the oven for 20 minutes, until the cheese is melted and golden. Garnish with rosemary sprigs. Serve hot.
Nutrition (per serving): Calories: 190, Fat: 11g (Sat: 2.5g), Cholesterol: 40mg, Sodium: 520mg, Carb: 1g, Fiber: 0g, Sugar: 2g, Protein: 5g
Enjoy the world-famous flavors of Mexican cuisine from your own “cocina”RECIPES BY ADRIANA CAVITA
There are few flavors as uniquely delicious as those of authentic Mexican cuisine. Bold spices, sweet, acidic veggies, and tangy salsas and sauces create a harmonious convergence that nearly every foodie can appreciate. Yet, the vibrant traditions of Mexican cooking are often misunderstood, as seen through the eyes of Mexican chef and restaurant owner Adriana Cavita. Through her years as a chef, Cavita has been witness to many misconceptions surrounding her home country’s cuisine, whether it be that all Mexican dishes are spicy, or that everything is wrapped in a tortilla. Paying homage to her roots, much of Cavita’s career has been centered around showcasing the full complexity and diversity of Mexico’s world-famous flavors and sharing them with others. Her eponymous restaurant in London has even recently been awarded a Michelin star for its authentic representation of these flavors.
But it is just as important to Cavita that people have the chance to experience authentic Mexican meals at home. In her 2023 cookbook “Cocina Mexicana,” Cavita gives readers this chance. With fresh, vibrant recipes, simple tips and tricks, and an exploration of traditional ingredients, the book offers a crash course in Mexican home cooking—a pursuit that Cavita considers to be an art form. And once you’ve tried your hand at a few of the selected recipes here—from Chicken Stew (which is super easy with rotisserie chicken from the deli) to Northern-Style Stuffed Peppers—you’re likely to agree. –emma enebak
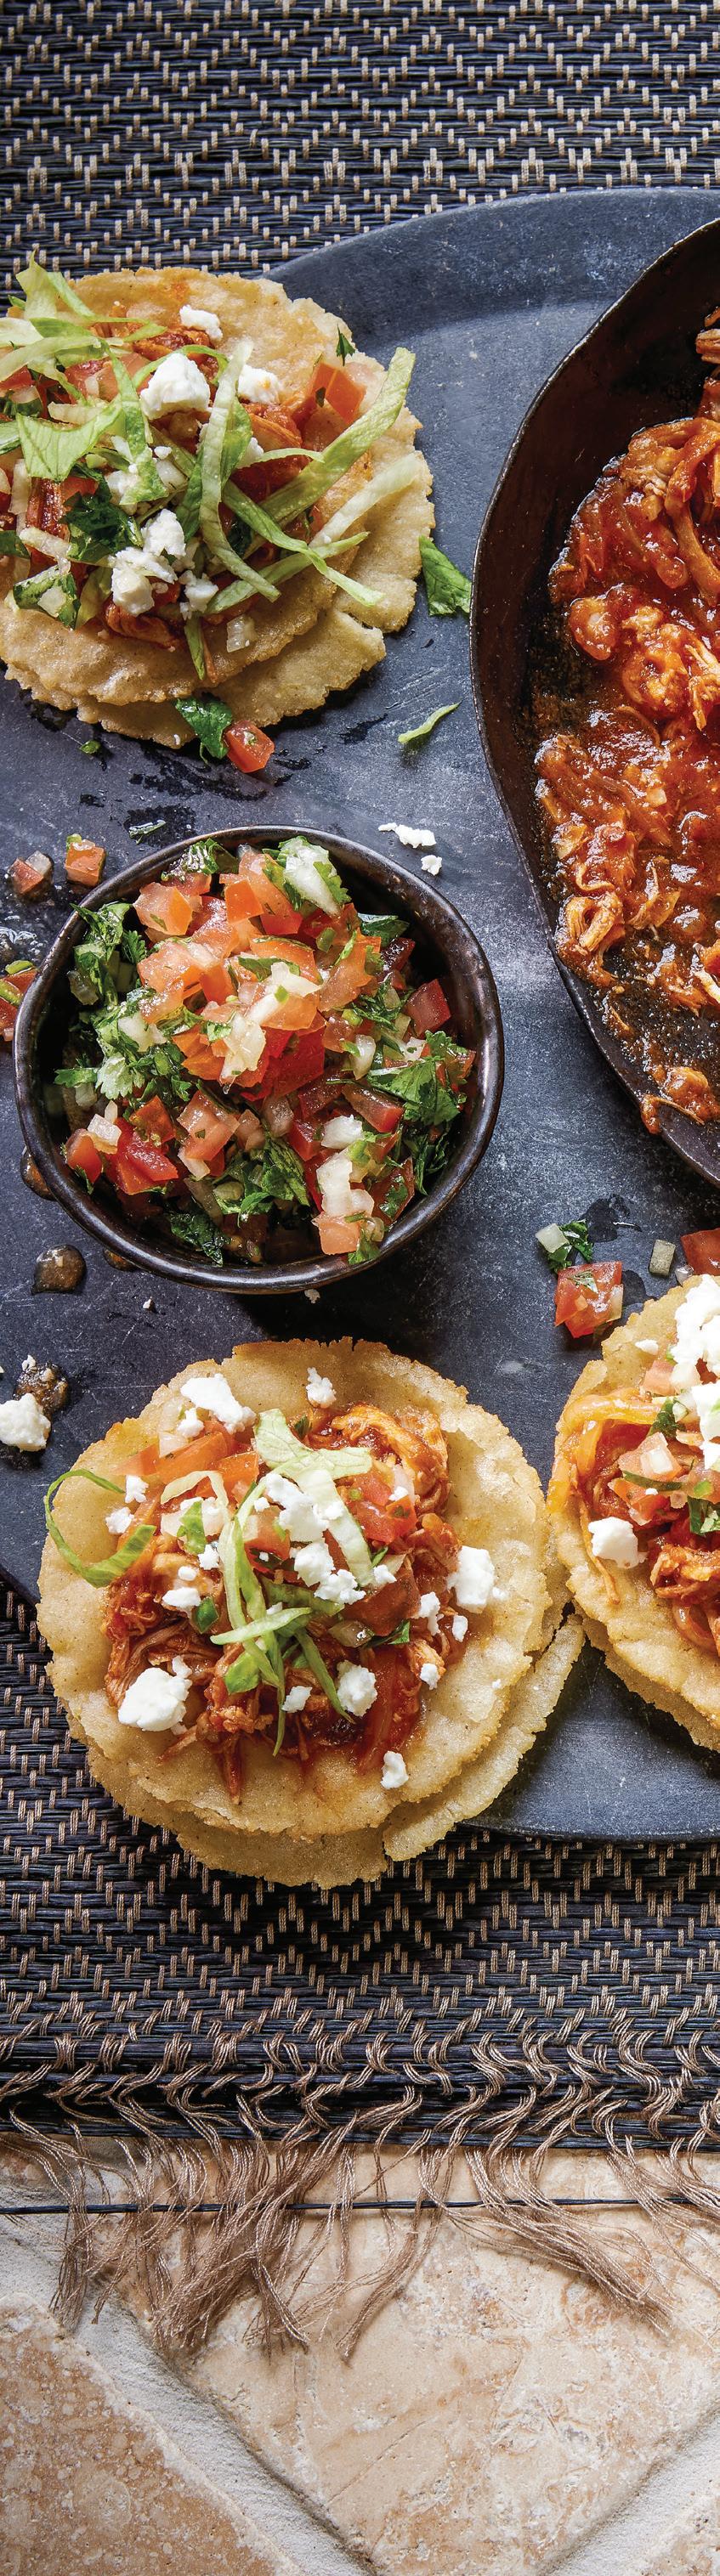
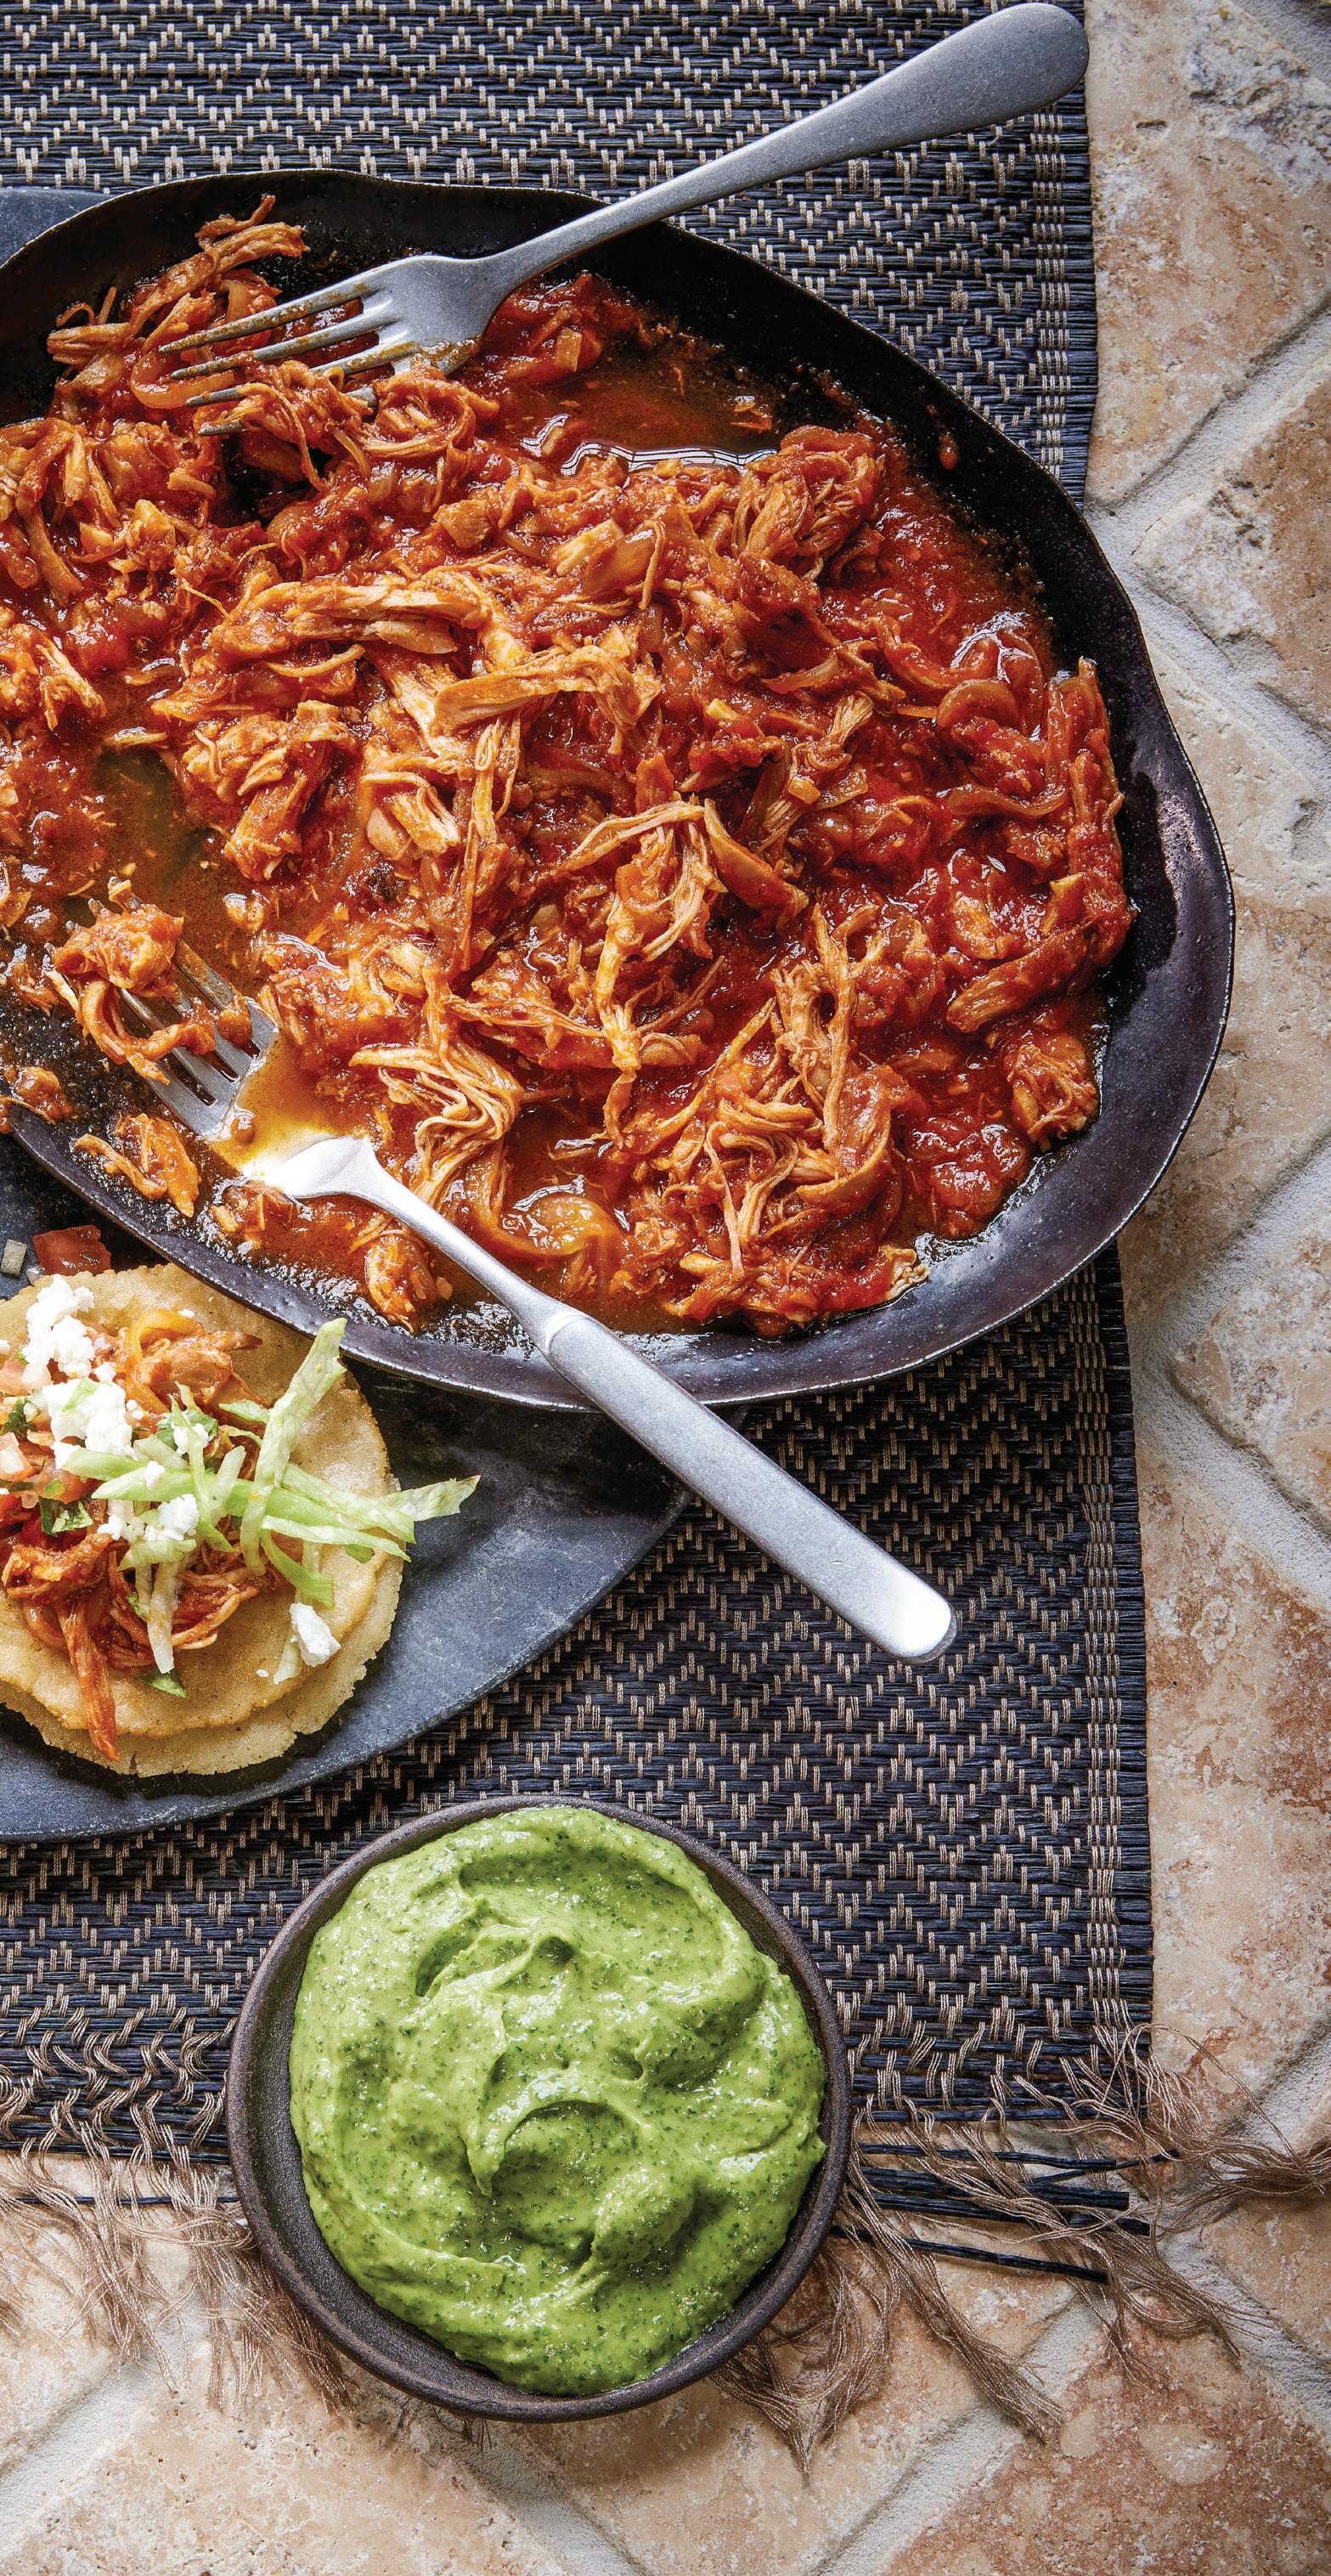
This recipe is typically served each year on Sept. 16 as part of the Mexican Independence Day celebrations, but it is also enjoyed as a daily meal. Some people use canned chilies, however I prefer to use dried chilies for their smoky flavor. –adriana cavita
¼ cup vegetable oil
2 white onions, thinly sliced
3 garlic cloves, finely chopped
2¾ pounds tomatoes, blended and strained
2 tablespoons salt
¼ cup chipotle paste
6 whole allspice berries
1 teaspoon freshly ground black pepper
6 fresh bay leaves
1¾ pounds cooked and shredded chicken breast
1 cup chicken stock or water
To Serve Tostadas
Fresh cheese
Sour cream
Finely chopped iceberg lettuce
Any of your favorite spicy salsas and sauces
1. Heat the oil in a saucepan over mediumhigh heat. Add the onions and cook for 5 minutes or until translucent. Add the garlic and cook for about 2 minutes or until they start to take on some color.
2. Add the strained tomatoes, salt, chipotle paste, allspice berries, black pepper, and bay leaves. Cook for about 5 minutes, stirring every couple of minutes, then lower the heat and add the shredded chicken and stock or water.
3. Cook for another 10 minutes. Taste and add more salt if needed. Simmer for another 10 minutes.
4. Serve the stewed chicken on top of tostadas with fresh cheese, sour cream, lettuce, and one or two spicy salsas and sauces.
Cook’s Notes:
n To make your own chipotle paste, blend a 7-ounce can of chipotles in adobo in a food processor or blender. Just be careful when adding it to the stew if you don´t like too much spice.
n You can also use the chicken stew as the filling for quesadillas.
Nutrition (per serving without toppings):
Calories: 230, Fat: 10g (Sat: 1.5g), Cholesterol: 70mg, Sodium: 2220mg, Carb: 10g, Fiber: 3g, Sugar: 6g, Protein: 25g
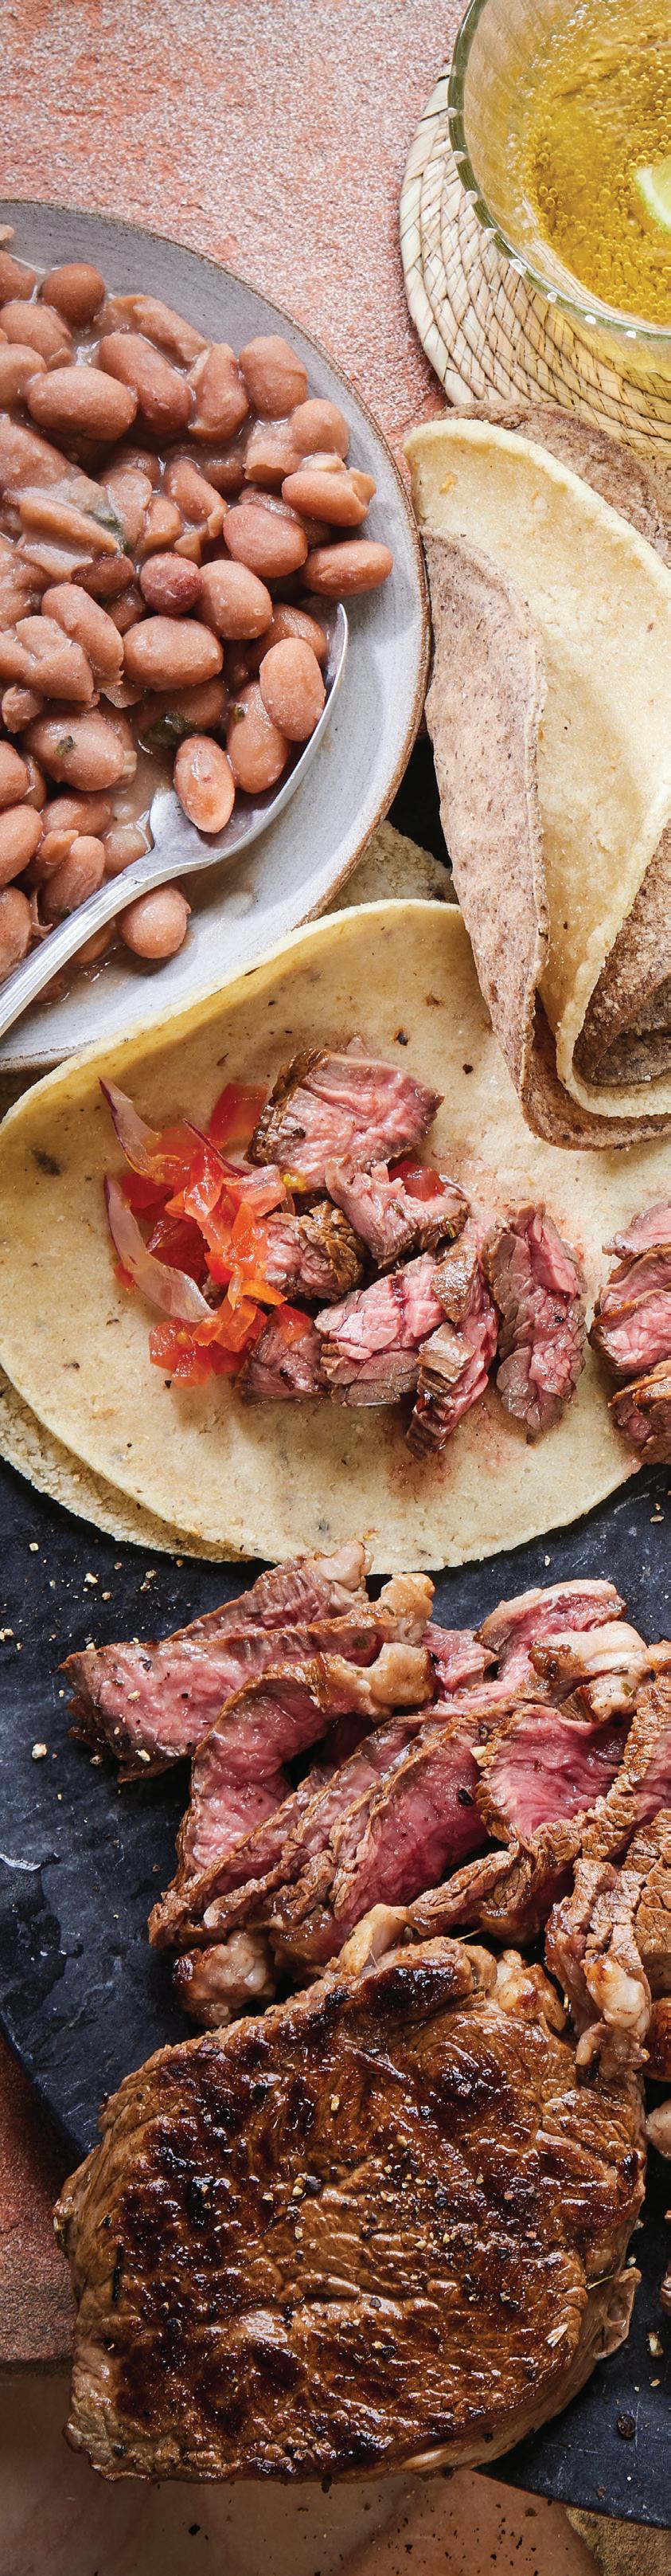
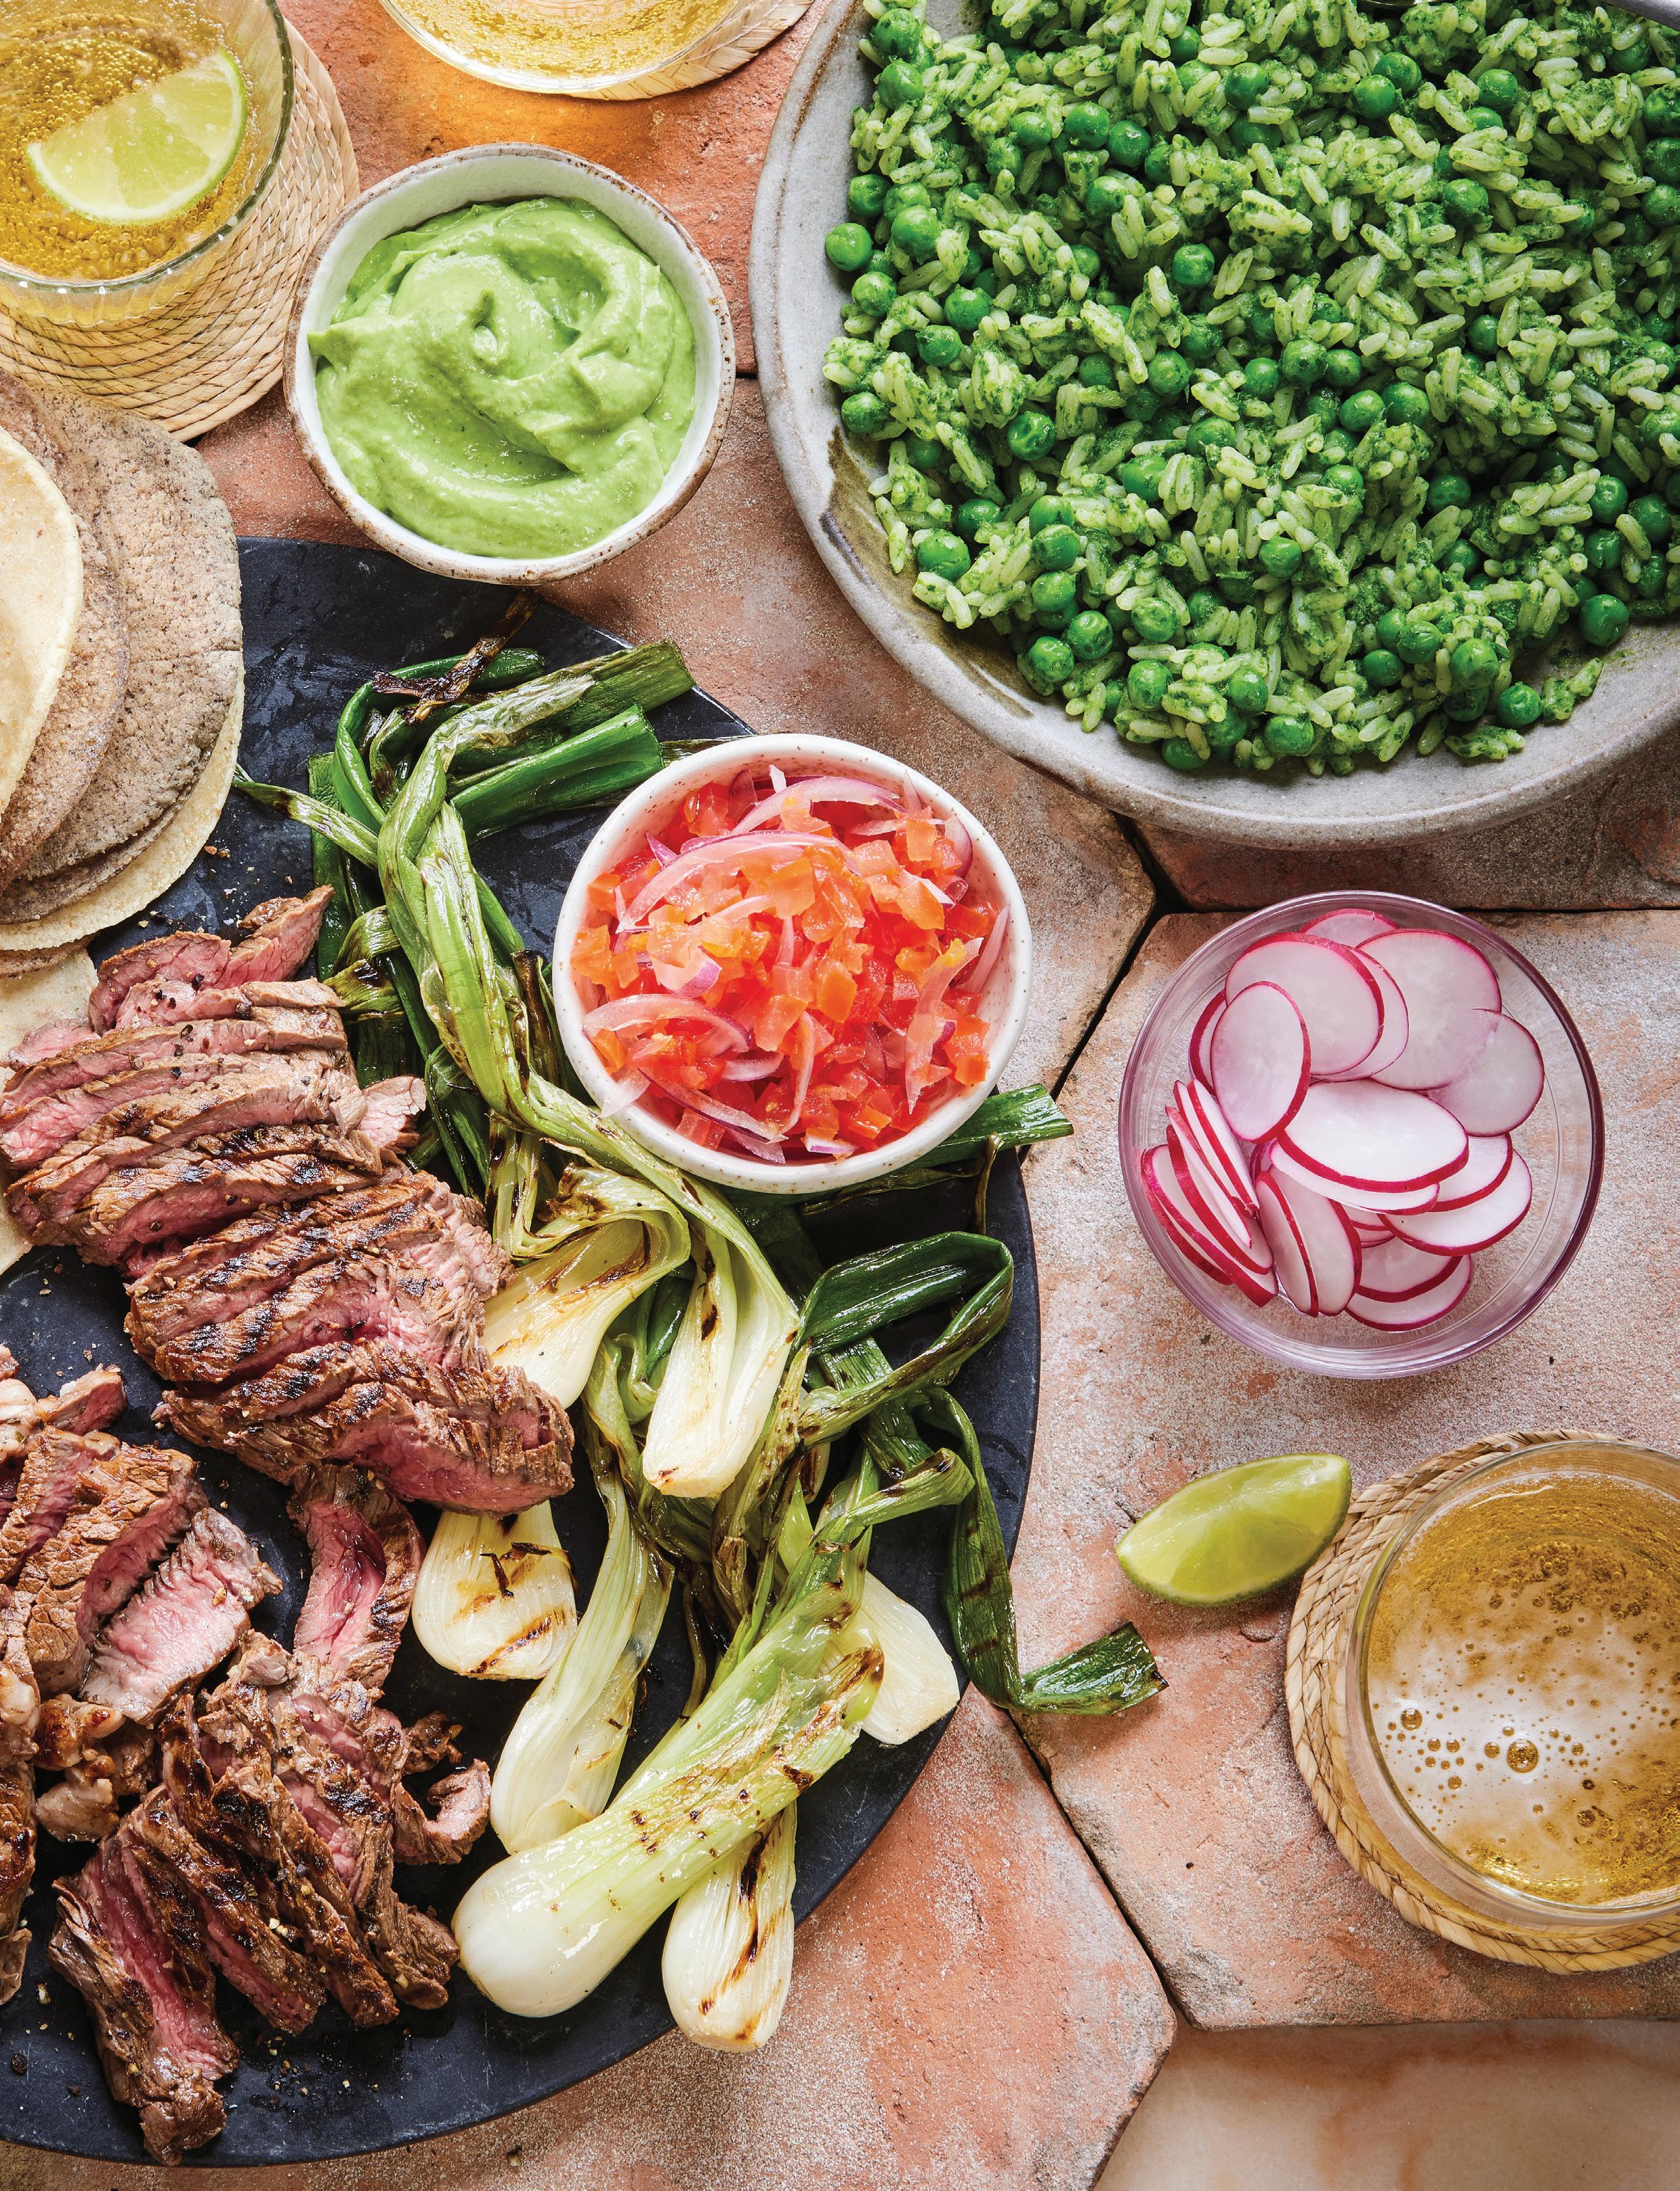
Tacos De Asada
MAKES 6 SERVINGS
This is the perfect dish for celebrating birthdays or special occasions, especially if the meal can be cooked and enjoyed outdoors, cooking on a hot grill in the garden with friends and family while drinking beers. These tacos can be cooked on a hot charcoal grill—which is my favorite method—or in a large pan in the kitchen. Traditionally, the grilled meat is served with guacamole, beans, one or two spicy sauces (fresh or cooked), sometimes slices of radish or cucumber, and tortillas, of course. There is no specific cut of meat for these tacos, so choose your favorite kind. –a.c.
1 pound rib-eye, skirt, or flank steak
1 pound rump steak
2 ¼ pounds scallions
Sea salt, to taste
For the Marinade
1 tablespoon freshly ground black pepper
½ teaspoon ground cloves
6 garlic cloves, finely chopped
½ tablespoon Mexican dried oregano
3 tablespoons apple cider vinegar
1 teaspoon ground cinnamon
2 tablespoons salt
½ cup freshly squeezed orange juice
To Serve
Warm tortillas
Avocado Salsa (see recipe on page 36)
Oaxaca-style Beans (see recipe at right)
Any of your favorite rice dishes
Any of your favorite spicy salsas and sauces
1. Place all the ingredients for the marinade in a bowl and mix together.
2. Place the meat in a large tray and pour over the marinade, making sure all the meat is well coated. Leave in the fridge to marinate overnight. Take the meat out of the fridge 30 minutes before cooking to bring to room temperature.
3. When you are ready to cook, light the grill. Cook the scallions for about 10 minutes, until they soften and start to take on some color. Cook the meat on the hot grill to medium-rare for about 4 minutes on each side, or cook to your liking. Alternatively, you can cook the meat in a hot pan over a high heat for the same timing.
4. Once the meat is ready, leave it to rest for about 2 to 3 minutes, then slice, season with salt, and serve immediately with warm tortillas, avocado salsa, beans, rice, and your favorite spicy salsas and sauces.
Cook’s Notes:
n For the best results, ensure the meat is at room temperature before you start cooking it on the hot grill. You can also check if the meat is cooked using a meat thermometer: for rare, around 125°F; for medium-rare, around 130°F; for medium-well, around 160°F; and for well done, around 165°F.
n You can also cook other vegetables you would like at the same time as the scallions— corn, broccoli, and asparagus all work well.
Nutrition (per serving meat and marinade only): Calories: 240, Fat: 7g (Sat: 3g), Cholesterol: 60mg, Sodium: 2420mg, Carb: 17g, Fiber: 5g, Sugar: 6g, Protein: 28g
MAKES 4 SERVINGS
2 cups pinto beans, rinsed and soaked in water overnight
1 white onion, cut in half
½ garlic bulb
1½ teaspoons hoja santa powder (see Cook’s Note)
1½ teaspoons avocado leaf powder (see Cook’s Note)
½ cup olive oil
1. Place the soaked beans in a saucepan with the onion, garlic, and some salt and cover with water. Cook for 1 to 2 hours or until they are cooked and soft.
2. Remove and discard the onion and garlic, then transfer the cooked beans to a food processor and blend with the hoja santa and avocado powders or other seasonings of choice until smooth. Pass through a fine-mesh strainer to make it even smoother.
3. Heat the oil in a saucepan over a medium heat. Add the blended beans and cook for about 15 minutes. Taste and adjust the seasoning if needed.
Cook’s Note: The hoja santa and avocado leaf powders may be substituted with fresh herbs like parsley and cilantro or dry oregano and finely chopped parsley.
Nutrition (per serving): Calories: 580, Fat: 28g (Sat: 4g), Cholesterol: 0mg, Sodium: 300mg, Carb: 61g, Fiber: 15g, Sugar: 3g, Protein: 20g
Chiles Relleno Norteño
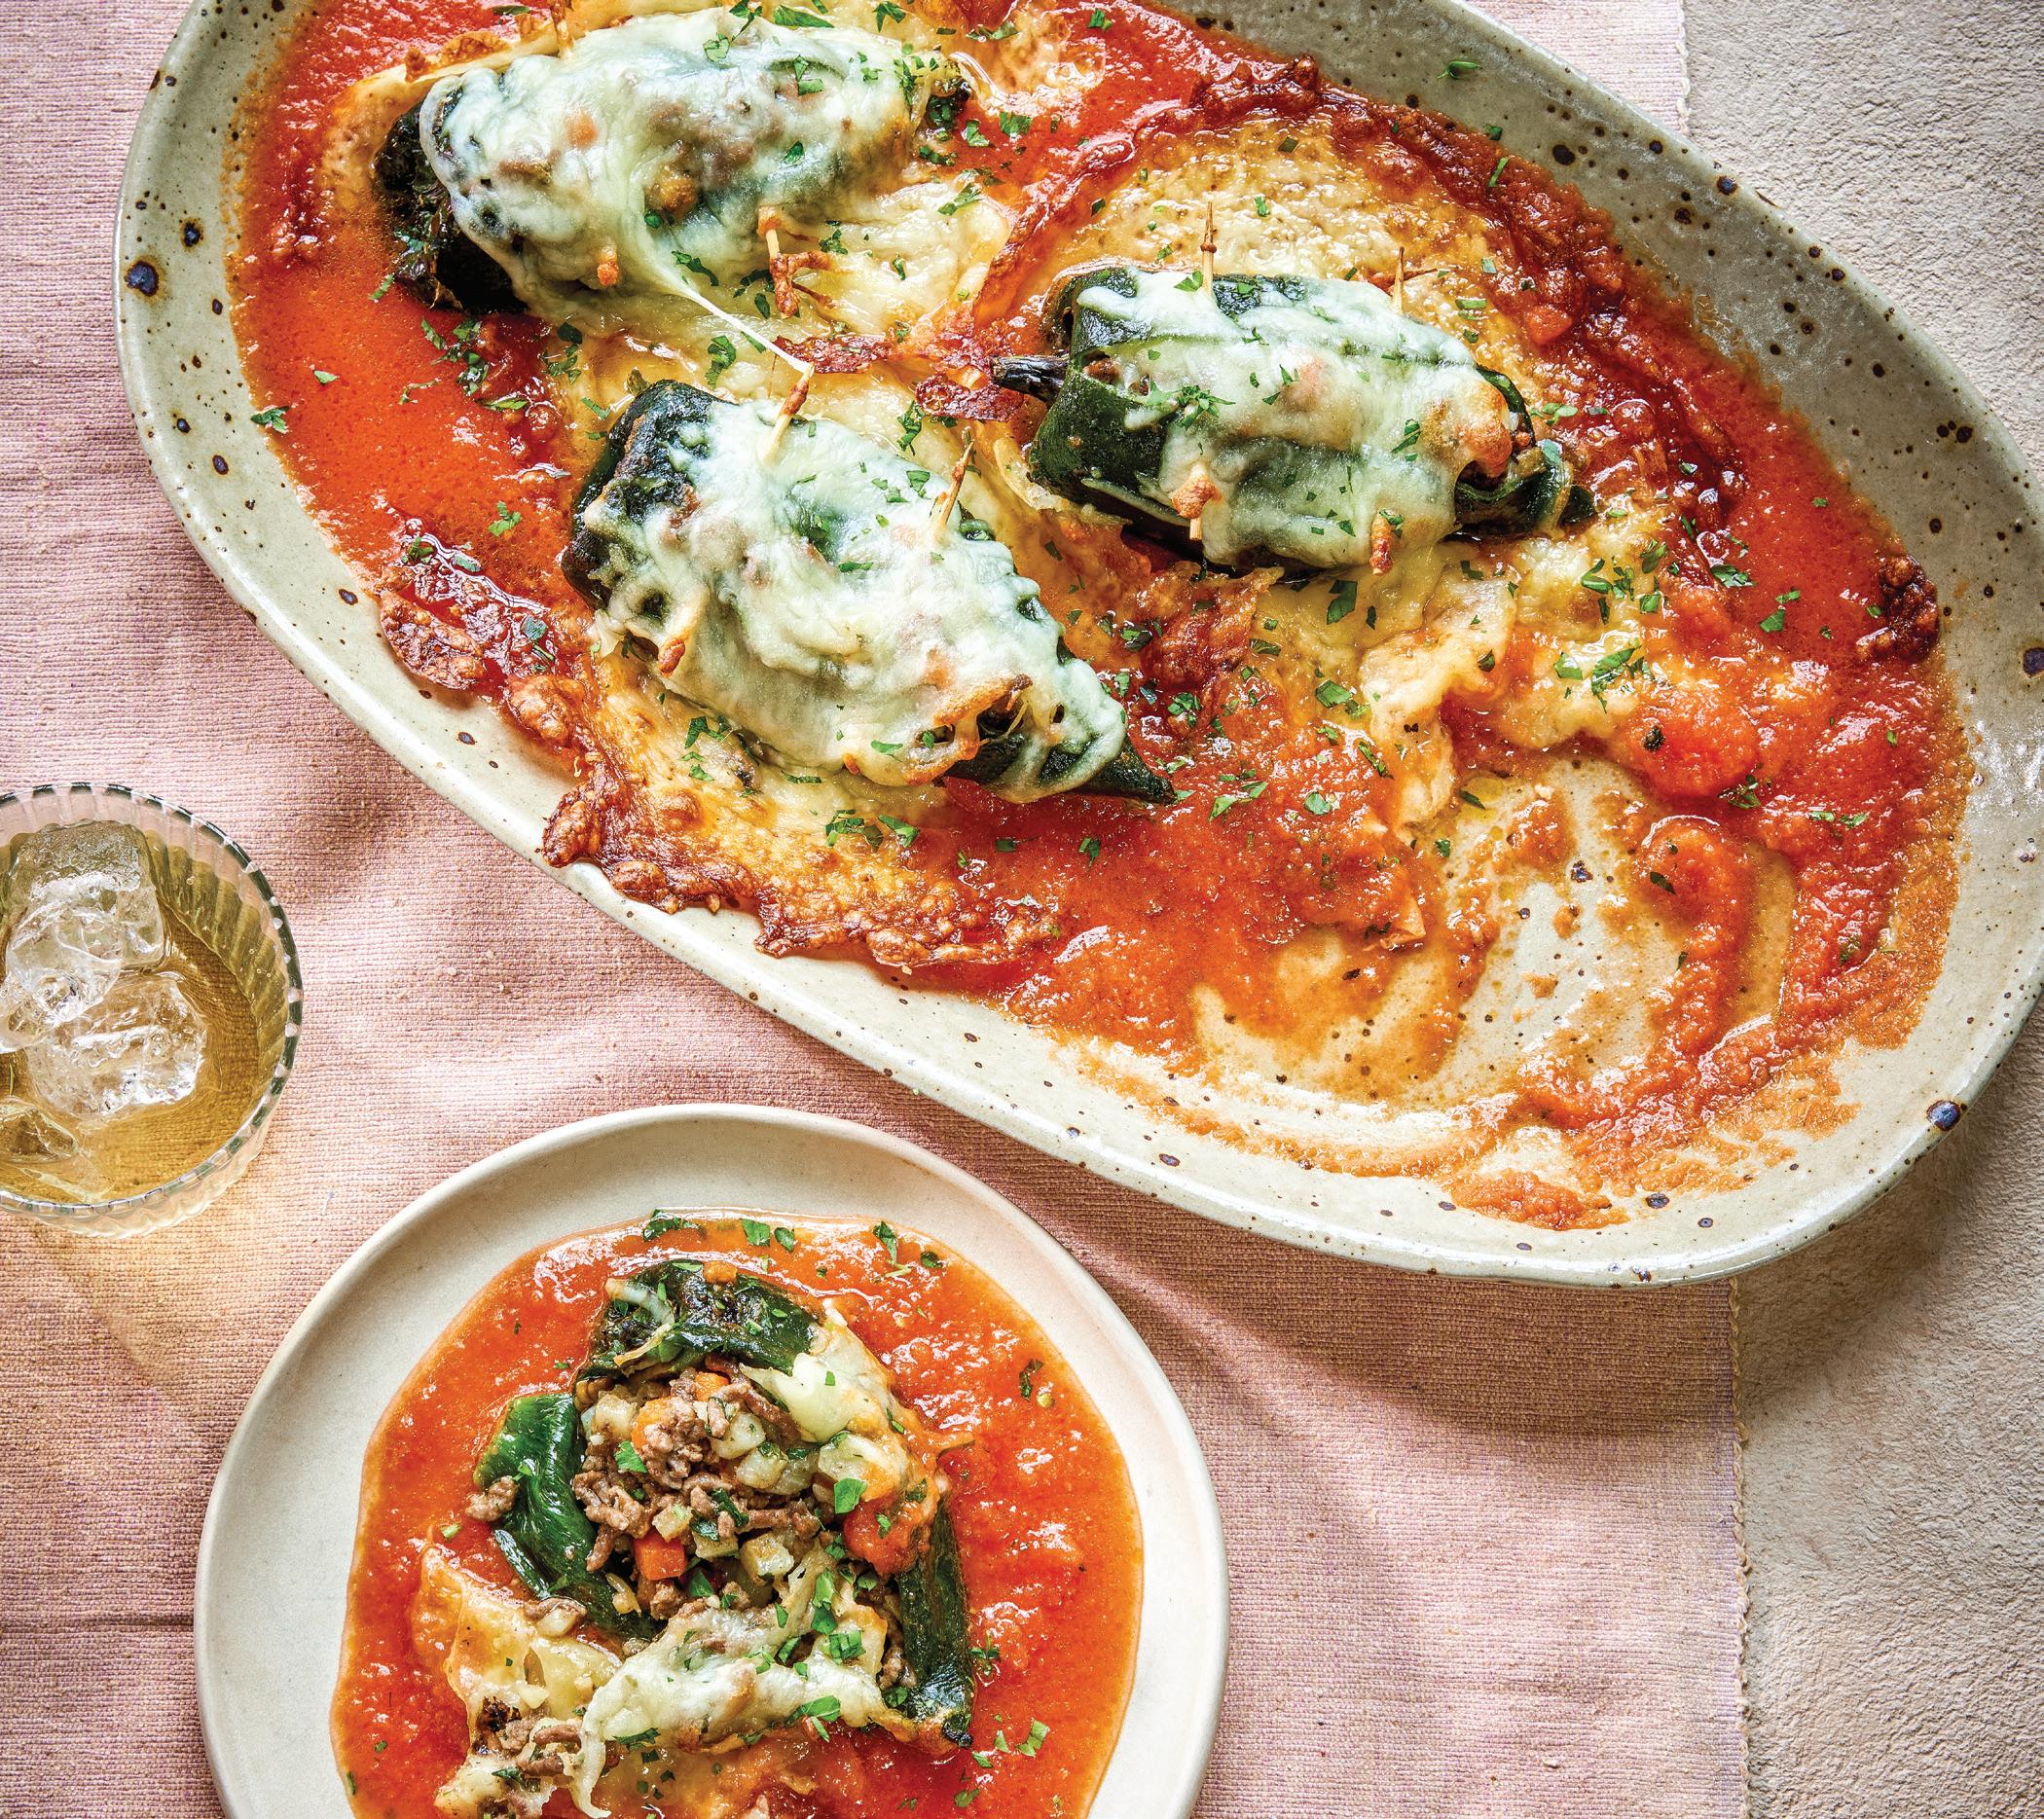
MAKES 4 SERVINGS
This is one of the most representative dishes from the northern regions in Mexico. Poblano chilies are stuffed with ground beef or pork, baked, and served with a delicious sauce. –a.c.
4 poblano chilies (or a similar variety— Anaheim or even bell peppers work)
2 cups shredded cheese
½ cup chopped fresh parsley, to serve
For the Filling
Scant ½ cup vegetable oil
1 onion, finely chopped
6 garlic cloves, finely chopped
1 potato, peeled and diced
1 carrot, peeled and diced
1 pound ground beef or pork
Pinch of ground cumin
2 teaspoons salt, or to taste
1 tablespoon ground black pepper
1 cup chopped fresh parsley
For the Tomato Sauce 8–9 tomatoes, quartered ¼ onion, cut into 3 pieces 2 teaspoons salt, or to taste 3½ tablespoons vegetable oil
1. First, make the filling. Heat the oil in a saucepan over high heat. Add the onion and cook for about 1 minute, stirring continuously. Add the garlic, and after another minute, add the potatoes and carrots. Cook for about 3 minutes. Add the minced meat and cook while moving it constantly to break up the meat and ensure that it cooks evenly. Lower the heat to avoid burning the meat, then add the cumin, salt, pepper, and parsley and cook for another 15 minutes until the meat has browned. Continue to cook until the meat juices have reduced by half. Set aside until needed.
2. Char the chilies over a direct flame or with a blowtorch until the skins have blackened all over. When the chilies are cool enough to handle, remove the skins. Make a slit in each chile lengthways, just long enough to be able to stuff them. Carefully clean the insides, keeping
the shape of the chilies as well as possible. Stuff the chilies with the filling mixture and seal them closed with a toothpick. Place the stuffed chilies on a baking sheet lined with nonstick parchment paper.
3. To make the sauce, blend the tomatoes, onion, and salt together in a food processor or blender and then strain through a fine-mesh strainer. Heat the oil in a saucepan over high heat, then add the tomato mixture. Let it boil for about 5 minutes, then add 2 cups water and bring back to a boil. Taste and add more salt if needed. Keep simmering on a low heat.
4. Heat the oven to 350°F. Sprinkle the stuffed chilies with the cheese and place in the oven for 15 minutes or until the chilies have warmed through and the cheese has melted.
5. Spoon the warm tomato sauce into a deep serving plate and nestle the stuffed chilies in the sauce. Scatter chopped parsley over the before serving.
Nutrition (per serving): Calories: 900, Fat: 74g (Sat: 23g), Cholesterol: 115mg, Sodium: 2800mg, Carb: 32g, Fiber: 8g, Sugar: 12g, Protein: 35g
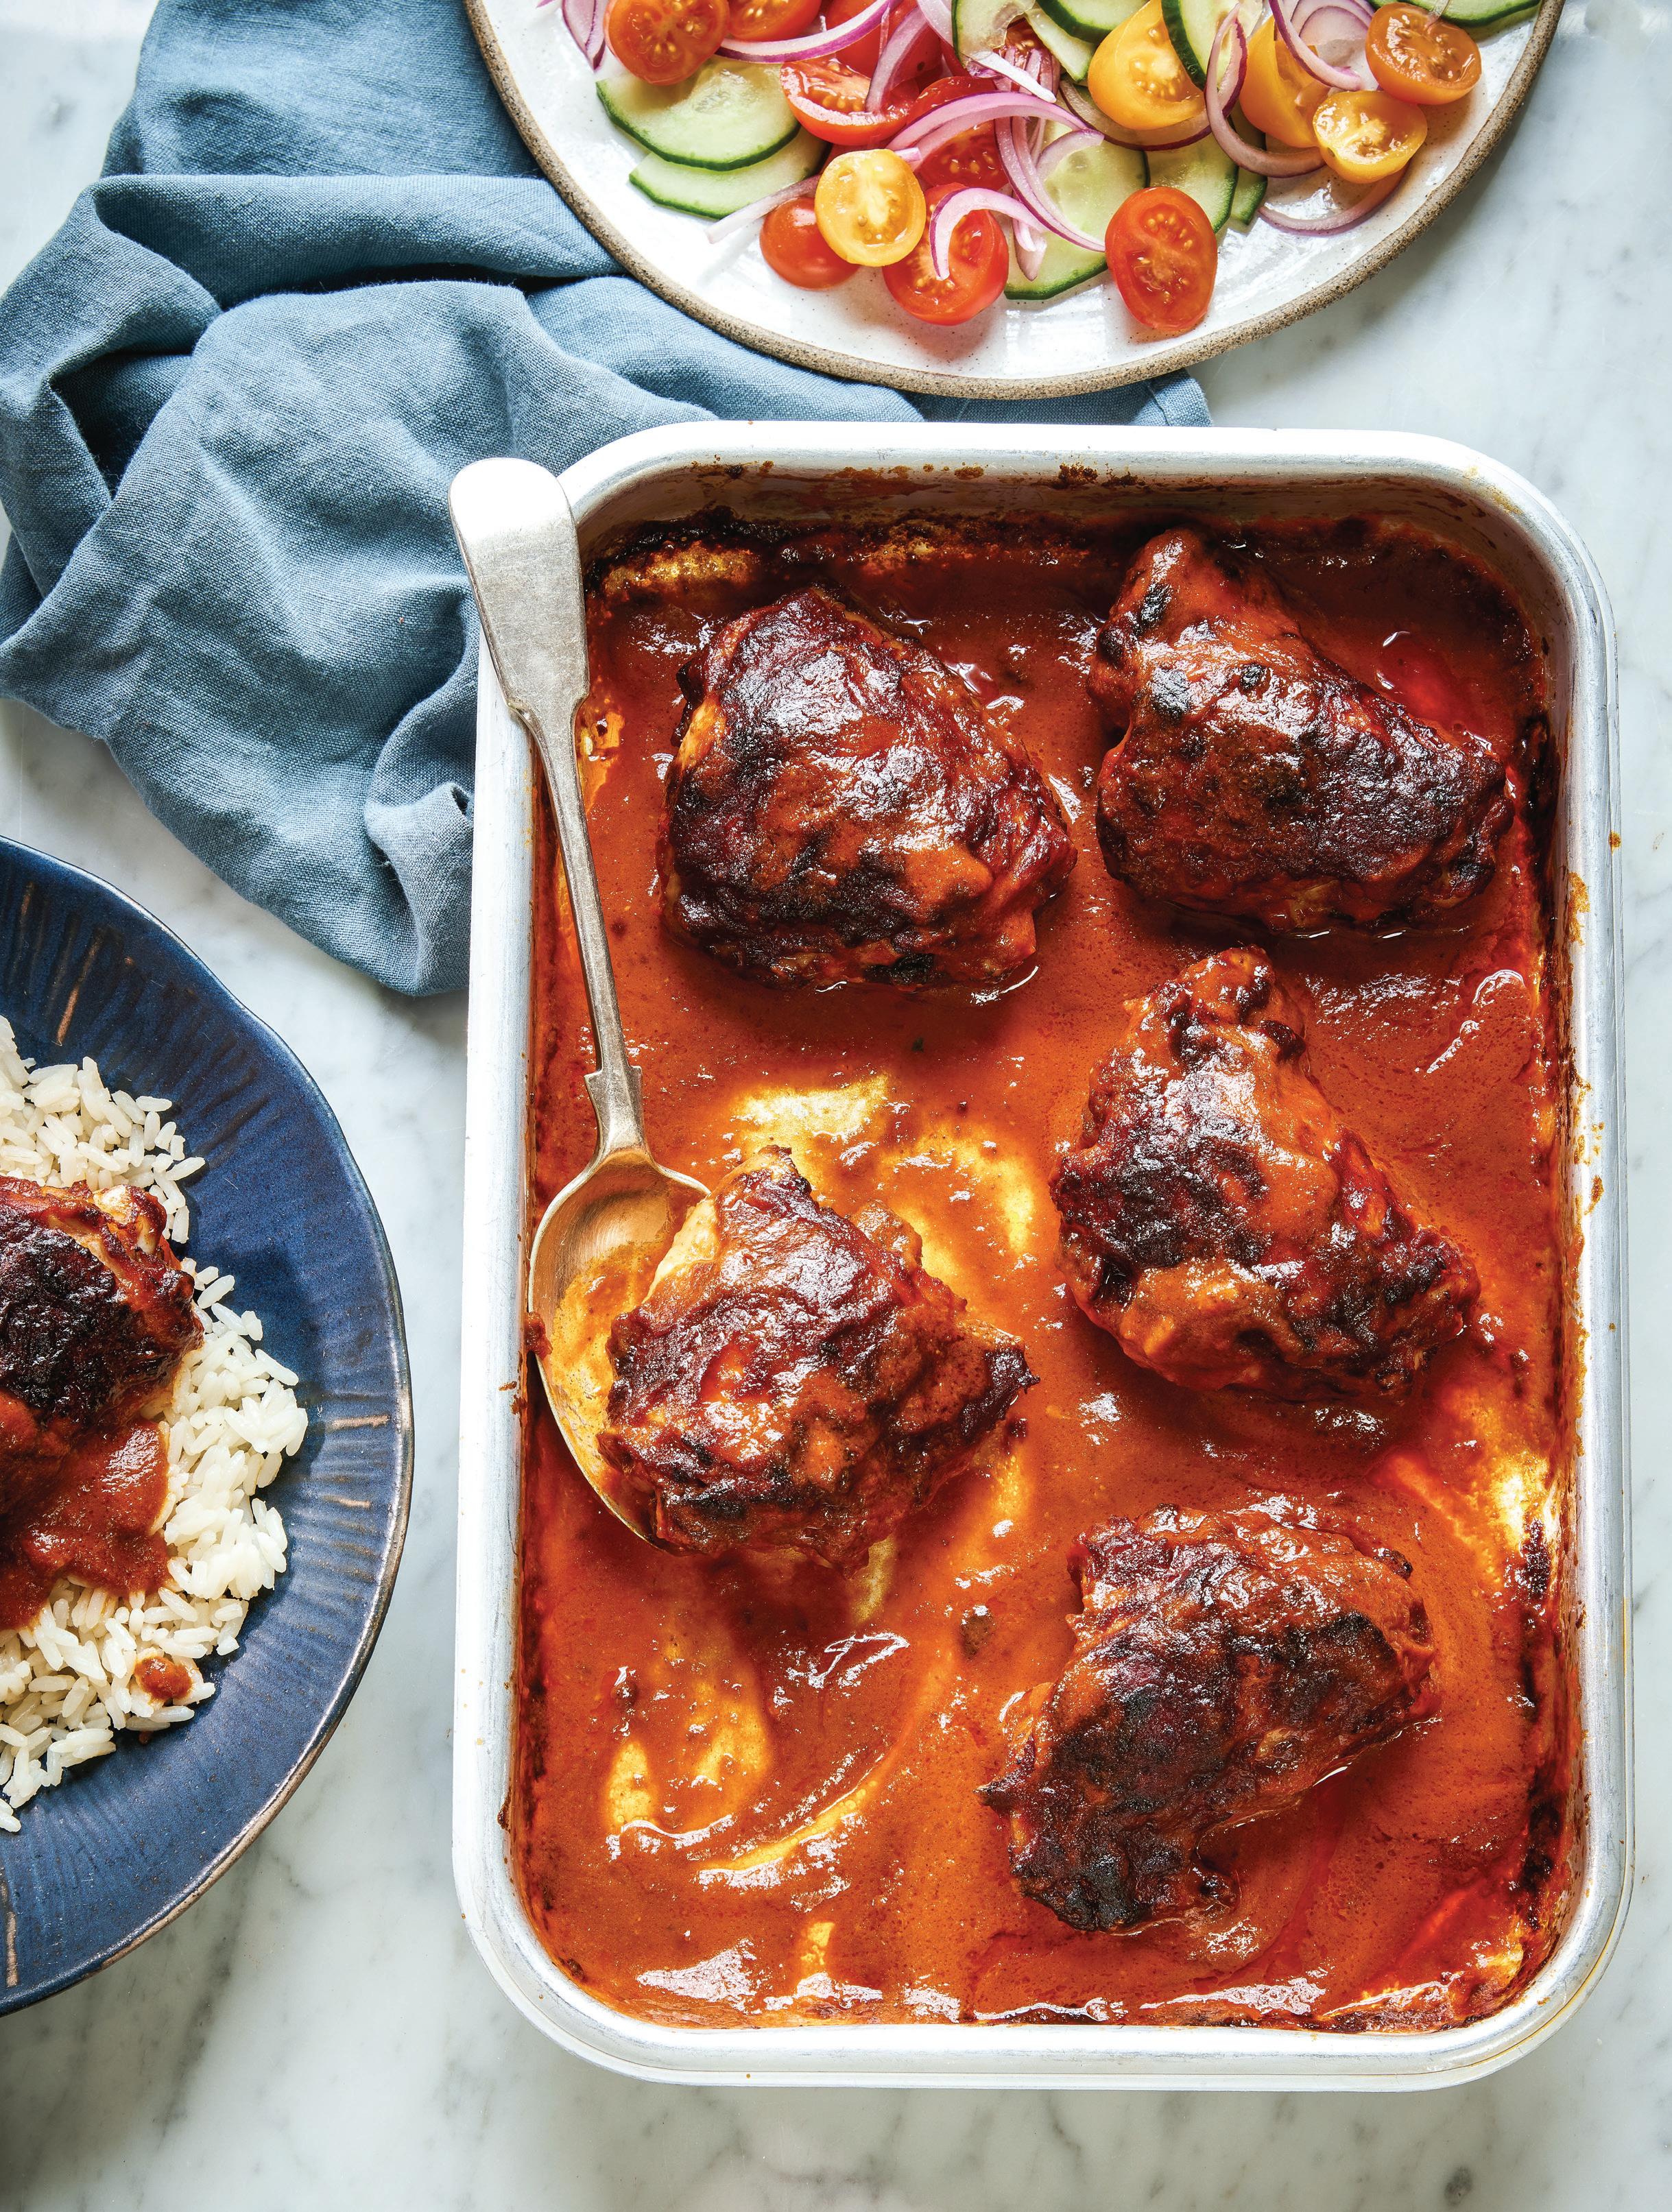
Pollo En Adobo
MAKES 4 TO 6 SERVINGS


This is a very common dish served at birthday celebrations and is usually accompanied with nopales (cactus) that has also been cooked on the grill. I really enjoy cooking this type of recipe as the chicken carries lots of flavor. It is sometimes nice to prepare it on the weekend for a family gathering. –a.c.
2 tablespoons vegetable oil
½ white onion, cut into chunks
3 garlic cloves, cut in half
6 tomatoes, quartered
8 guajillo chilies, seeds and veins removed
1 teaspoon ground cinnamon
2 bay leaves


1 teaspoon freshly ground black pepper
1½ tablespoons salt
1½ cups chicken stock or water
2 tablespoons apple cider vinegar
6 chicken thighs, with or without bones
1. Heat the vegetable oil in a saucepan over a medium-high heat. Add the onion and garlic and cook, stirring continuously. Once they start to take on some color, add the tomatoes, chilies, and spices, still stirring continuously. Continue to cook for 5 minutes, then add the stock or water and cook for another 15 minutes. Lower the temperature slightly if needed and stir every 2 to 3 minutes. Allow to cool.
2. Place the cooled sauce in a food processor or blender with the vinegar and blend until smooth. Pass through a fine-mesh strainer for an even smoother adobo.

3. Marinate the chicken thighs in the blended adobo and leave in the fridge overnight. Take the meat out of the fridge 30 minutes before cooking to bring to room temperature.
4. Cook the chicken on a hot grill, but you can also cook it in an oven preheated to 400°F for about 40 to 50 minutes. Serve the chicken with rice, tortillas, your favorite sauce, and a salad.
Cook’s Note: You may not need all of the adobo for marinating. You can keep the rest in a clean jar in the fridge for 4 to 5 days or freeze for future use.

Nutrition (per serving): Calories: 360, Fat: 19g (Sat: 4.5g), Cholesterol: 120mg, Sodium: 2240mg, Carb: 21g, Fiber: 2g, Sugar: 4g, Protein: 30g

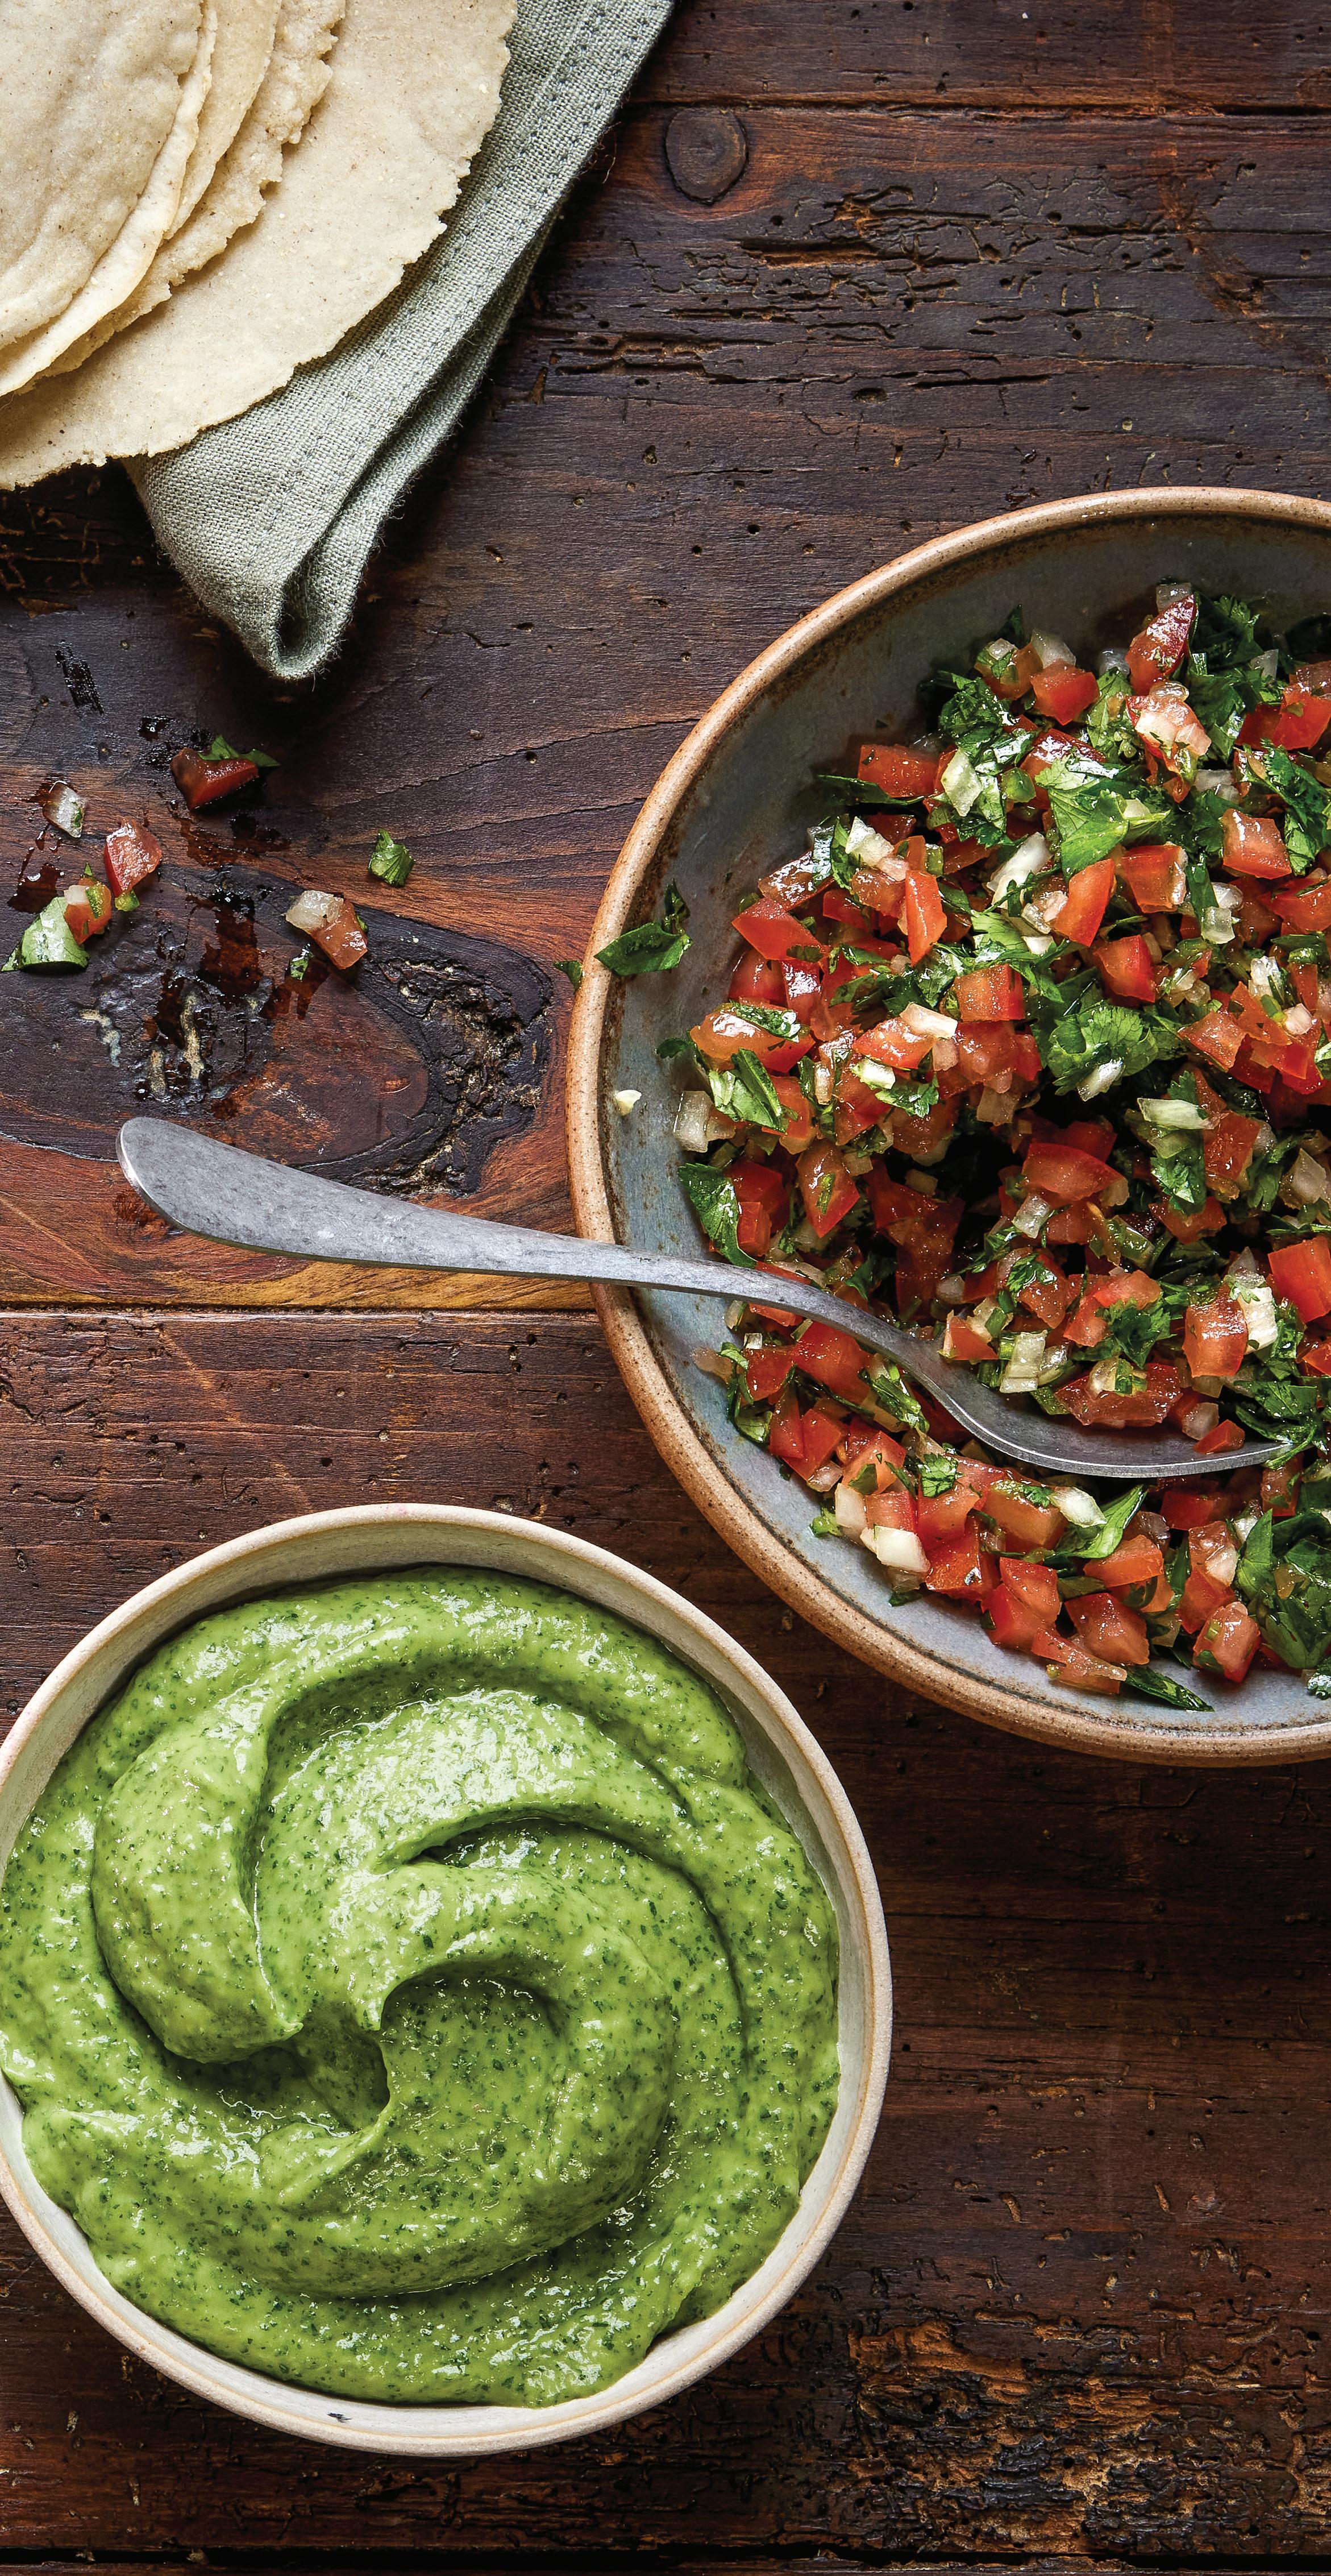
Salsa Mexicana
MAKES ABOUT 2 CUPS
A common salsa used all over Mexico enjoyed as a snack with ortotopos (crunchy fried tortillas). –A.C.
4 tomatoes, seeds removed and flesh finely diced
½ small onion, finely diced
1 or 2 fresh jalapeños
2 green Thai chilies, or any fresh green chile you can find, finely diced
½ cup roughly chopped fresh cilantro
1 tablespoon salt
Juice of 1½ limes
2 tablespoons olive oil
1. Put all the ingredients in a bowl and stir to combine. Taste and add more salt if needed. Store in an airtight container in the fridge and use within 3 days.
Cook’s Note: This makes a very good dip and can also be used as the base for guacamole— just add the smashed flesh of 2 avocados and some more lime juice and salt to taste.
Nutrition (each per 6 servings): Calories: 70, Fat: 4.5g (Sat: 0g), Cholesterol: 0mg, Sodium: 1170mg, Carb: 6g, Fiber: 1g, Sugar: 4g, Protein: 1g
Guacasalsa
MAKES ABOUT 3 CUPS
This is one of the creamiest and tastiest salsas. It is so versatile and speedy to prepare, making it a perfect companion for most dishes. –A.C.
5 avocados, pitted and peeled Bunch of fresh cilantro, roughly chopped
5 jalapeños, stems removed and cut into 3 pieces
½ cup lime juice
1 tablespoon salt
½ cup olive oil
1. Put all the ingredients in a blender with ½ cup water and mix to a smooth texture. Alternatively, use a handheld stick/immersion blender. Taste and add more salt if needed. Store in an airtight container in the fridge and use within 3 days.
Cook’s Note: You can also pass the salsa through a fine-mesh strainer for an even smoother finish.
Nutrition (each per 6 servings): Calories: 350, Fat: 35g (Sat: 5g), Cholesterol: 0mg, Sodium: 1170mg, Carb: 12g, Fiber: 8g, Sugar: 1g, Protein: 2g
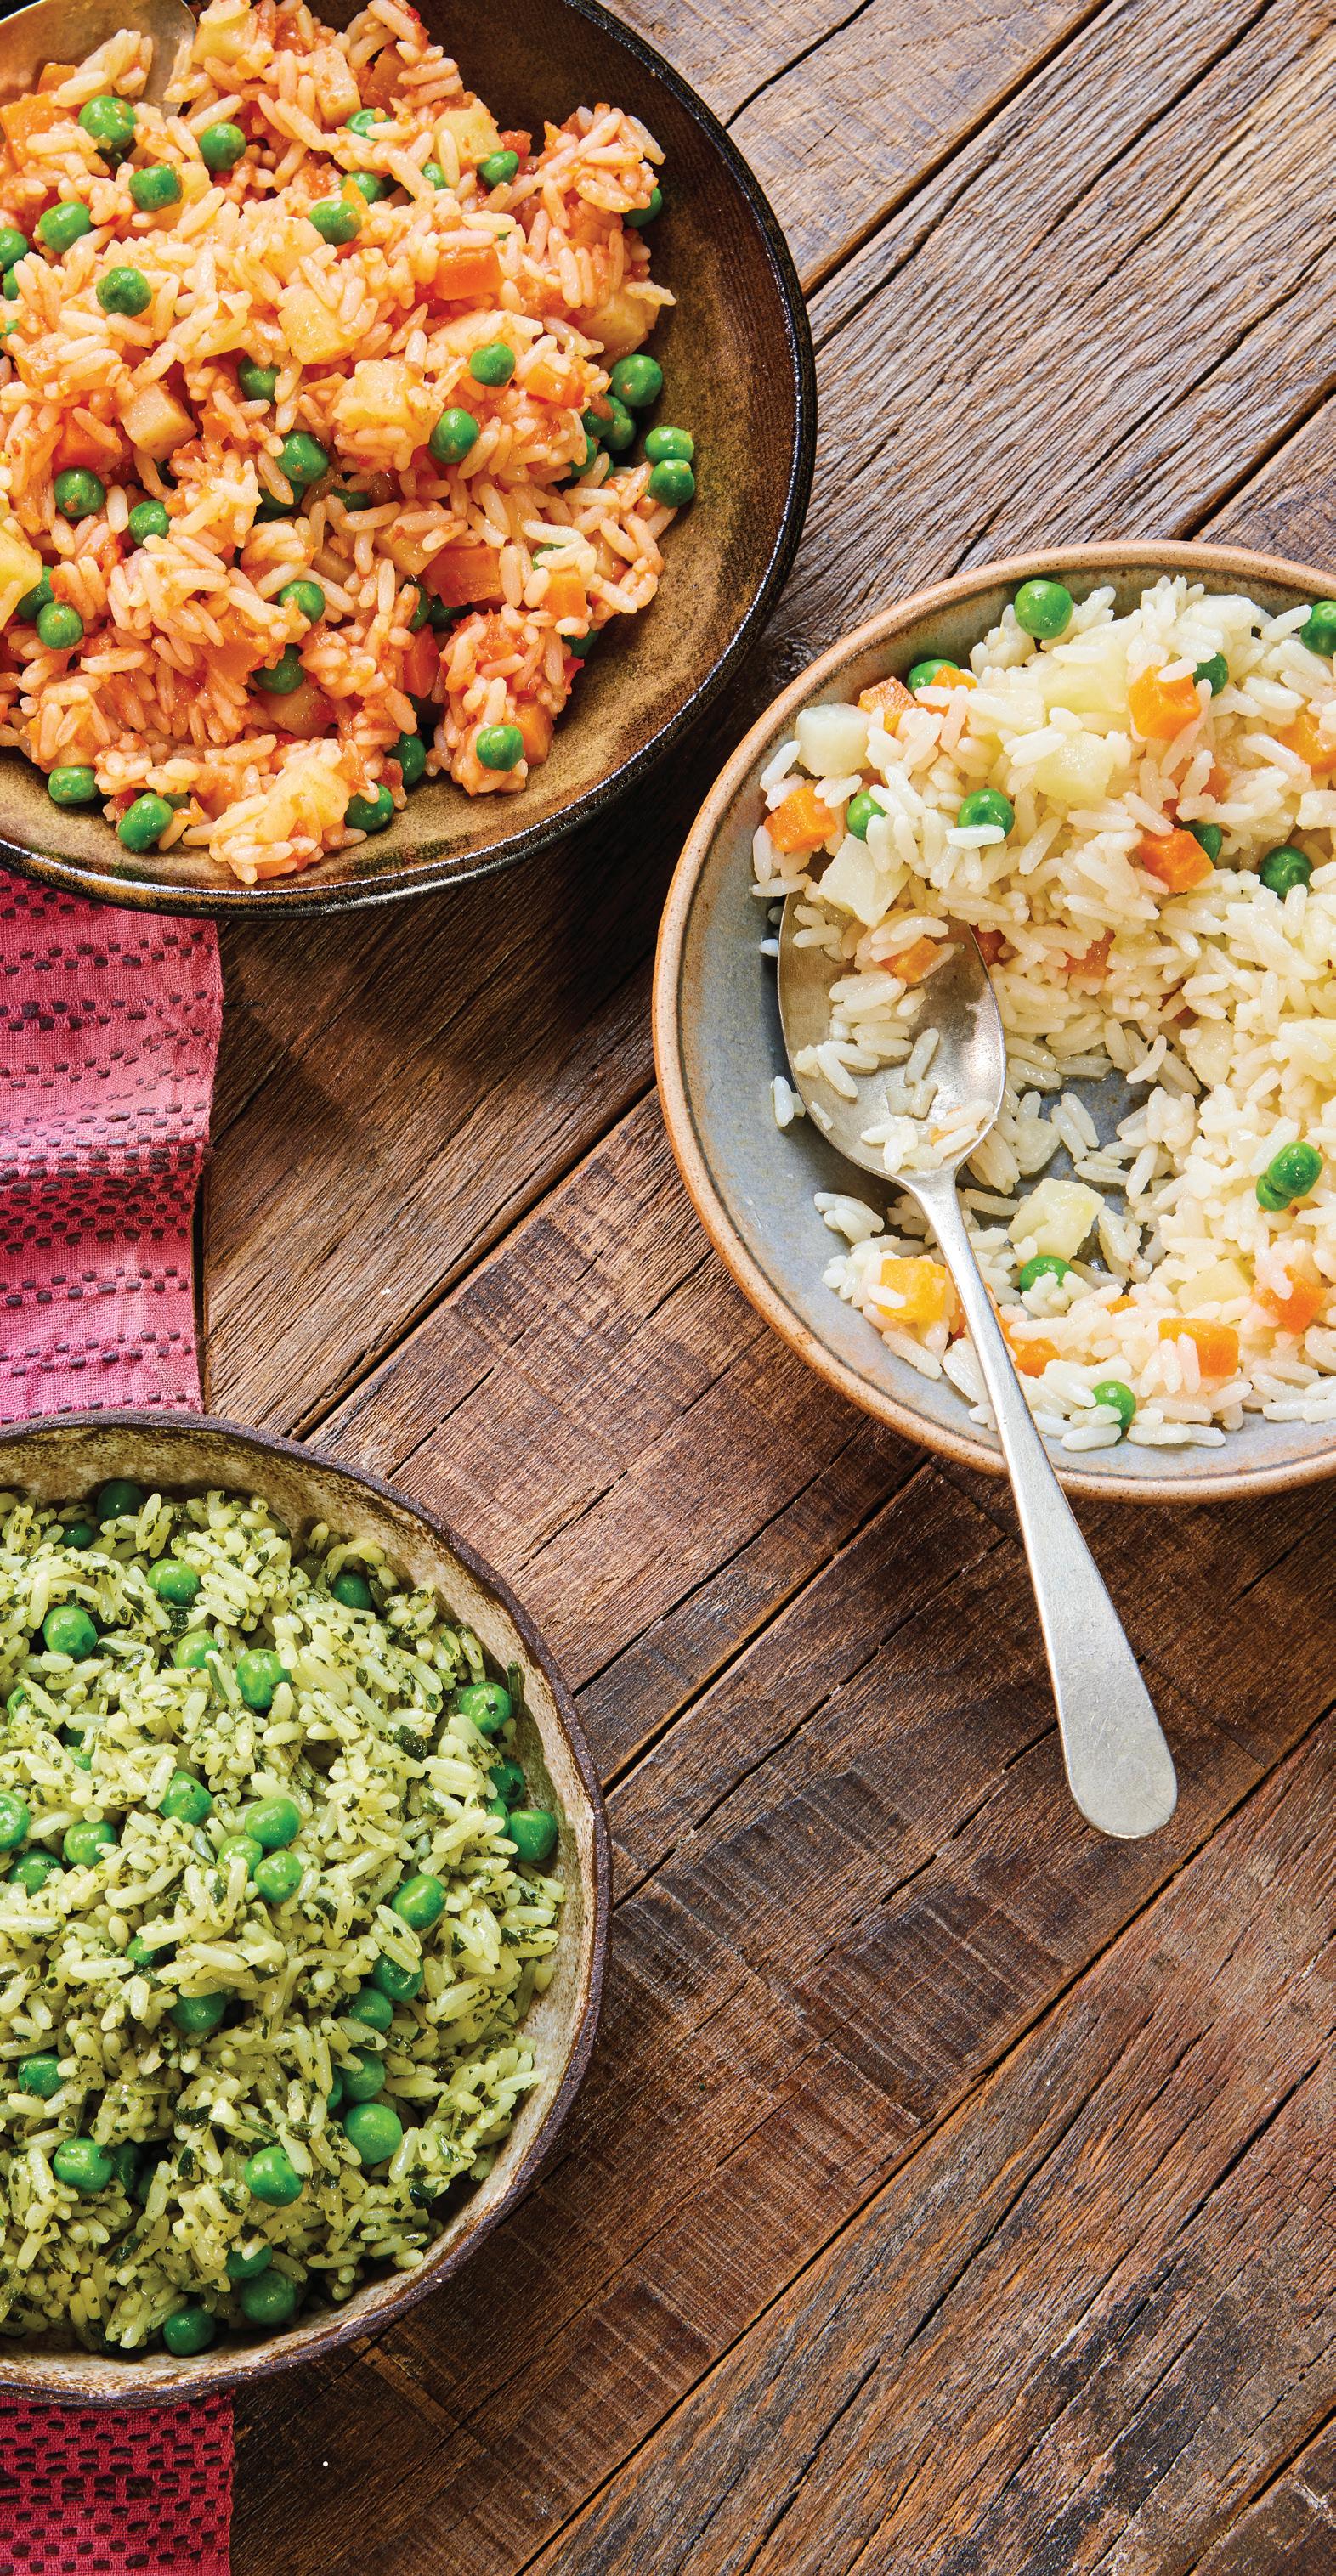
Arroz Blanco
MAKES 4 SERVINGS
¼ cup vegetable oil
1 cup basmati rice, rinsed and dried as well as possible
¼ onion, finely chopped
2 garlic cloves, finely chopped
½ cup peeled and cubed potatoes
½ cup peeled and cubed carrots
½ cup peas
1 tablespoon salt
1. Place the oil and rice in a saucepan over medium heat and cook, stirring continuously to prevent the rice from sticking, for about 5 minutes. Add the onion and garlic and stir through.
2. Once the rice starts to make some noise—when the rice starts to “sing”—add the potatoes and carrots and cook for 2 minutes. Finally, add 2 cups water and the peas and salt. Cover with a lid and simmer for 15 to 20 minutes.
Nutrition (per serving): Calories: 320, Fat: 15g (Sat: 2g), Cholesterol: 0mg, Sodium: 1780mg, Carb: 44g, Fiber: 3g, Sugar: 2g, Protein: 5g
Arroz Verde
MAKES 4 SERVINGS
¼ cup vegetable oil
1 cup basmati rice, rinsed and dried as well as possible
½ cup fresh parsley
½ cup fresh cilantro
¼ onion, roughly chopped
2 garlic cloves
1½ cups chicken or vegetable stock or water
1 cup peas (optional)
1 tablespoon salt
1. Place the oil and rice in a saucepan over a medium heat and cook, stirring continuously to prevent the rice from sticking, for about 5 minutes.
2. Meanwhile, blend the herbs, onion, and garlic in a food processor. Measure out 2 cups of this mixture, adding some of the stock or water to make up the difference if needed.
3. Once the rice starts to make some noise— when the rice starts to “sing”—add the herb mixture, remaining stock or water, peas, if using, and salt. Bring to a boil, taste, and adjust the seasoning if needed. Cover with a lid and simmer for 15 to 20 minutes.
Nutrition (per serving): Calories: 300, Fat: 15g (Sat: 2g), Cholesterol: 0mg, Sodium: 1790mg, Carb: 38g, Fiber: 1g, Sugar: 0g, Protein: 5g
Make the most of approachable everyday meals to bring the family together
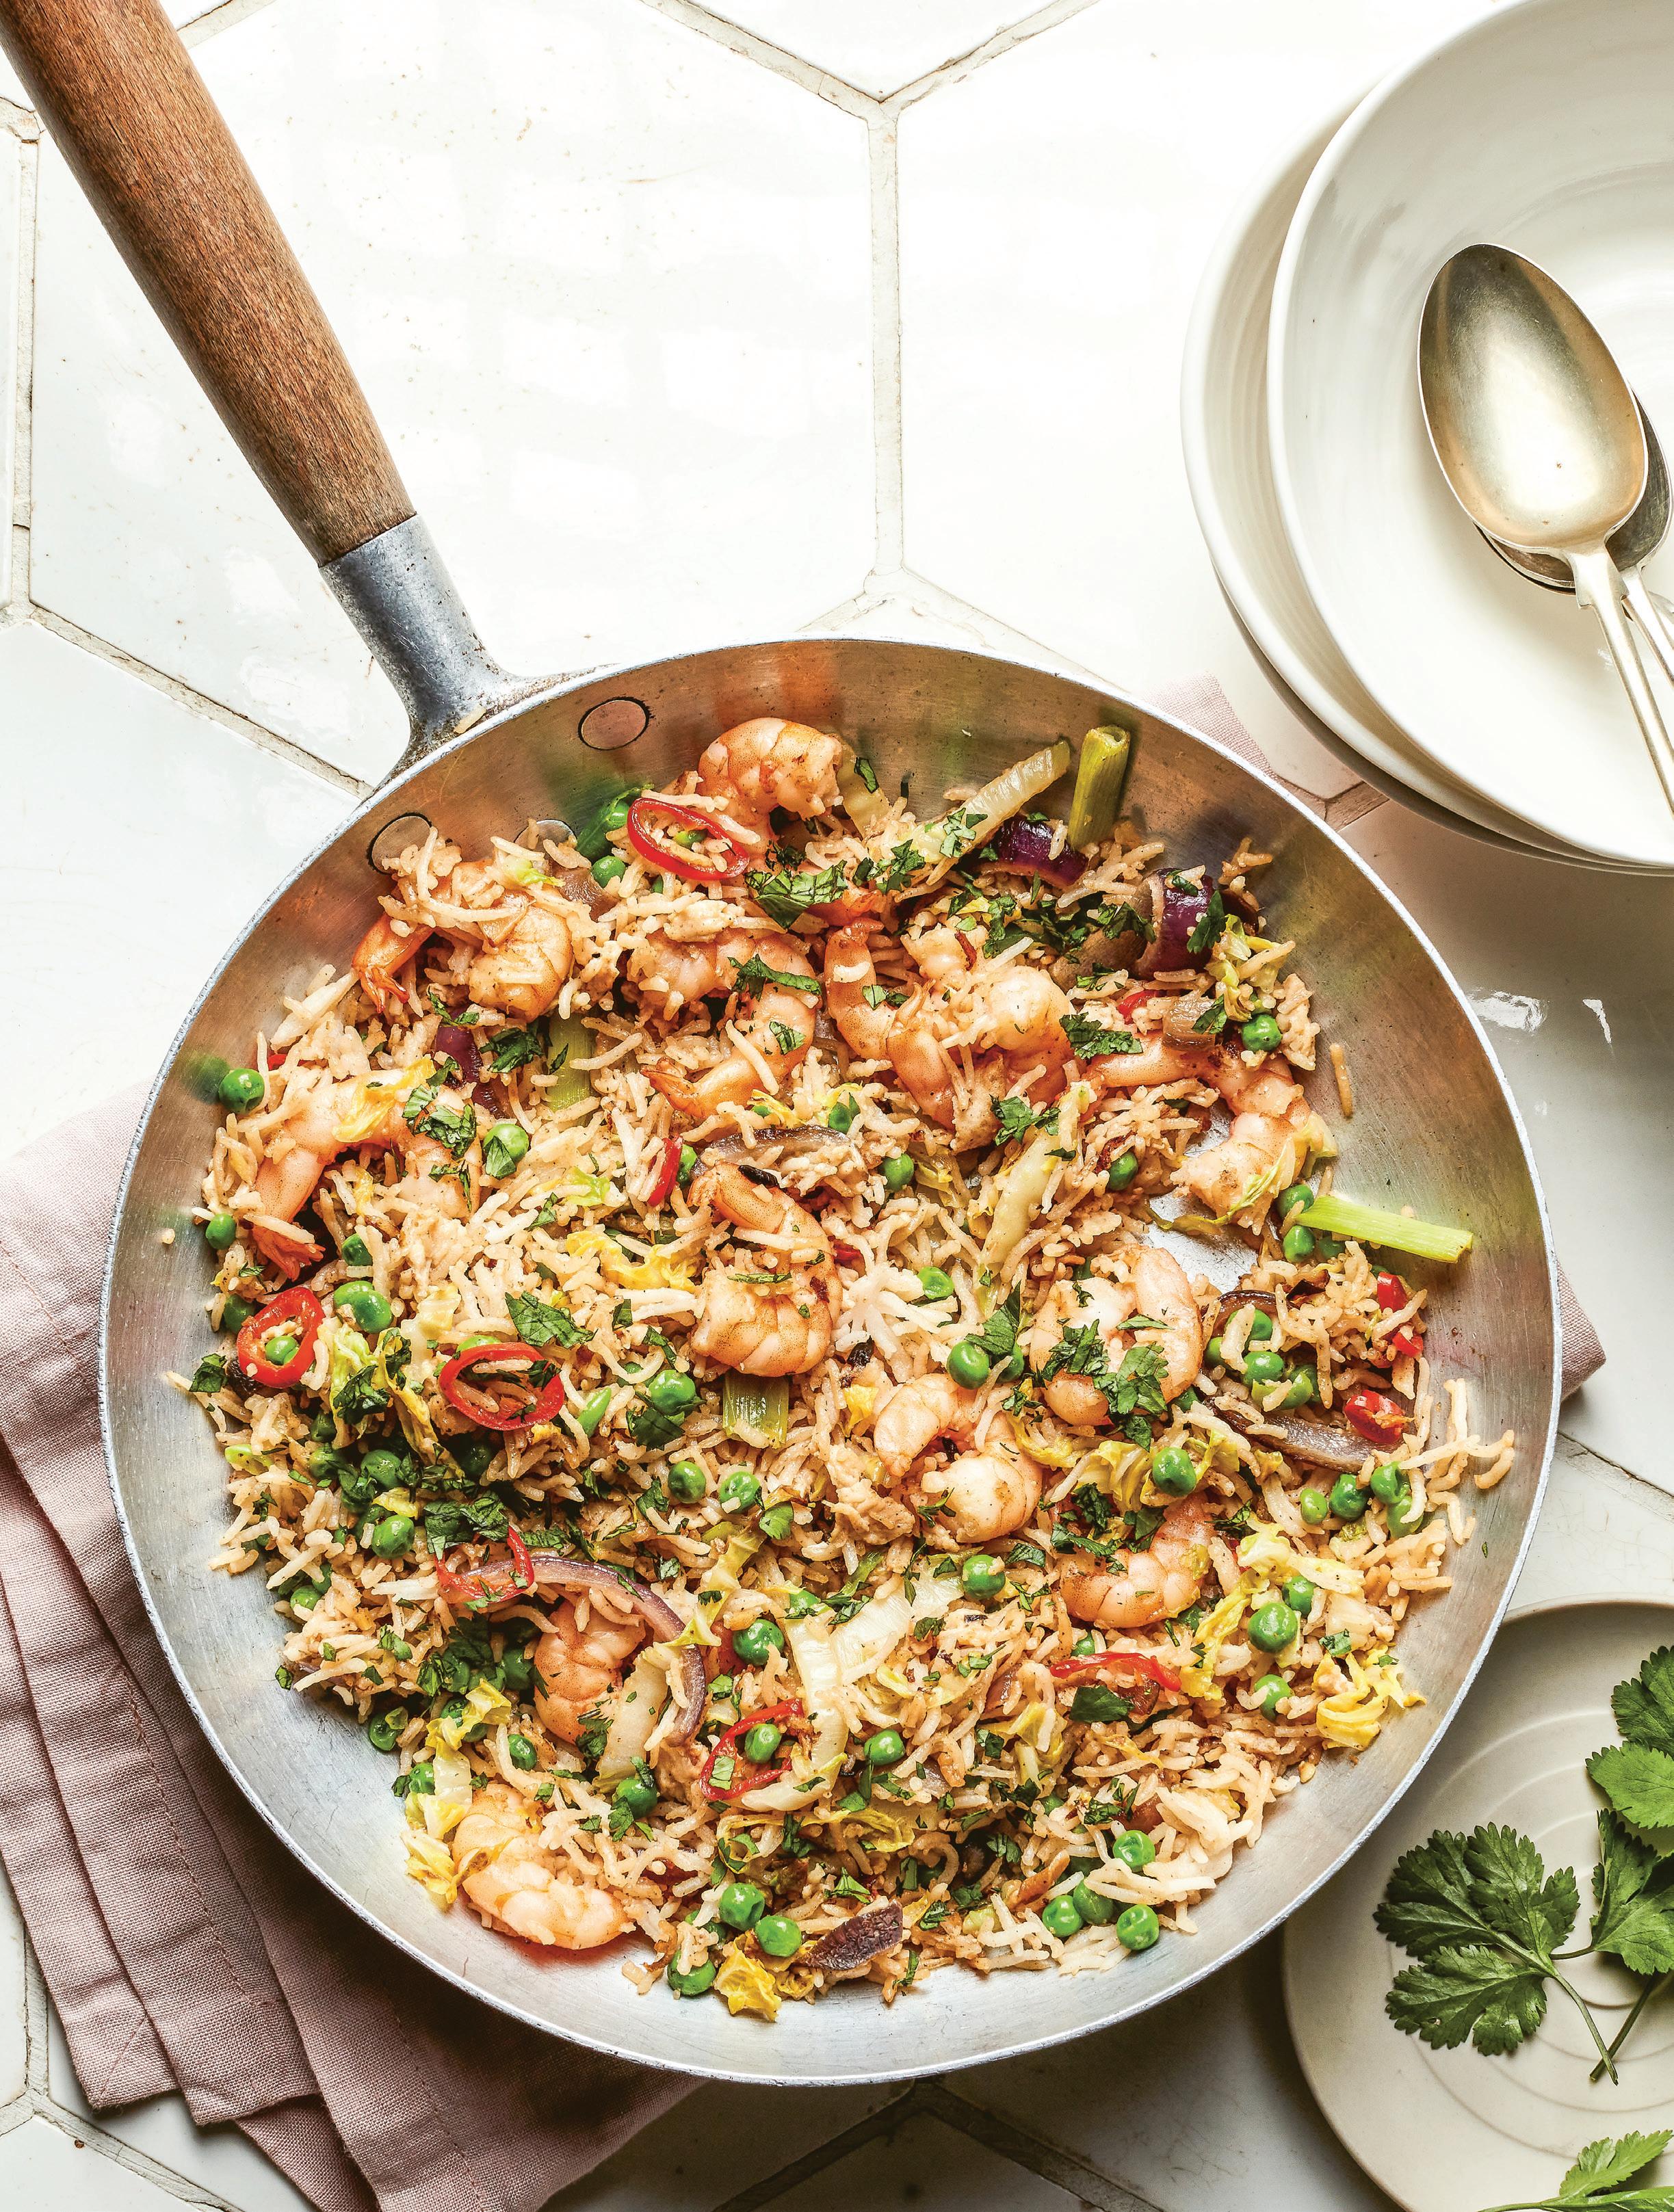
RECIPES BY THEO A. MICHAELSFood is one of the most important things that brings people together. But it’s not just special occasions and big holiday dinners that “count,” it’s the everyday meal that can have a lasting impact. When we share a meal, we’re not just eating; we’re also creating memories, building relationships, and celebrating life, notes chef and author Theo A. Michaels in the introduction to his latest book, “Theo’s Family Kitchen: 75 Recipes for Fast, Feel Good Food at Home.” That’s why he says he is so passionate about the book and sharing the recipes, as well as providing a blueprint for learning some basic cooking skills. The father of three young children, who hosted live online cook-alongs for kids during the pandemic lockdown, includes tips for such things as making rice, eggs, potatoes, tomato sauce, and more in the first section of the book, and tasty and reliable recipes throughout, such as those highlighted here. Try the Sausage Meat and Fennel Seed Pasta, Easy Egg-Fried Rice, GiftWrapped Dinner Parcels, or the Red Lentil Tarka Dhal with Honey Roasted Cauliflower, which are from the Weeknight Heroes chapter, to easily jazz up evening mealtime. And re-create a homemade twist on a takeout favorite with the Chicken Gyros and fries from the Family Fakeaways chapter. Michaels hopes the recipes from his book will become a part of your family’s weekly routine as you gather around the table with your loved ones, make some noise, have a heated debate, and enjoy the meals together, creating your own memories and traditions.
–mary subialkaMAKES 4 SERVINGS
This ridiculously easy recipe is one I hesitated to include in my book as it is so simple! However, it is also one of my go-to dishes when we need to feed the family quickly—and I mean in minutes! It’s also brilliant for using up any leftovers such as cooked vegetables and cooked meat: In short, it’s a dish I think everyone should have in their repertoire, so here it is. Oh, but there is one rule—you do need to use cold, cooked rice, either leftovers or store-bought cooked pouches of it. –theo a. michaels
3 tablespoons olive oil, divided
2 red onions, thickly sliced
3 garlic cloves, peeled and sliced
1 (2-inch) piece of fresh ginger, chopped
1 red chile, sliced
3 scallions, cut into 1-inch slices
14 ounces shrimp or any leftover vegetables or meat (optional)
1 cup frozen baby sweet peas (no need to defrost)
½ teaspoon Chinese five spice
6 ⅔ cups cooked rice (or 3 9-ounce pouches of cooked rice)
3 eggs, beaten
1 tablespoon sesame oil
2 tablespoons dark soy sauce
2 tablespoons honey
1 tablespoon cider vinegar
½ teaspoon salt
A handful of cilantro leaves, chopped, for serving
Fill a large saucepan or pot with water, salt generously and bring to a boil. Add your rice (ensuring there is at least 3 times the volume of water to rice), reduce the heat to a simmer, and cover with a lid. Cook until the rice is al dente (soft on the outside with a little chew left on the inside); cooking times vary between 12 to 20 minutes depending on the rice. Once cooked, remove the pan from the heat, drain the rice in a strainer, then drop the rice back into the empty pan and cover with the lid until you are ready to use. (If you are making for the Easy Egg-Fried Rice make a day ahead or refrigerate until cool.)
1. Heat a splash of oil in a skillet over high heat and sauté the onions for 1 minute (don’t move them around in the pan—you want the onion charred but not cooked through). After 1 minute, add the garlic, ginger, chile, and scallions and cook for a further 30 seconds.
2. At this stage you can add any leftover vegetables, shrimp or meat— keep stir-frying until everything is cooked or warmed through. Stir in the peas, Chinese five spice, and the cooked rice. Continue stir-frying for another minute until the rice is piping hot. And I mean piping...
3. Push the contents of the pan to one side, drizzle a little more oil into the empty space you have created, and pour in the beaten eggs. Stir the eggs until fully cooked—do not be tempted to mix the eggs into the rice until they are fully cooked (that’s important; it will make everything mushy if you do!).
4. Once the eggs are cooked and everything is mixed together, add the sesame oil, soy sauce, honey, vinegar, and a good pinch of salt and stir everything together. Spoon onto serving plates and add a sprinkle of chopped cilantro to serve.
Nutrition (per serving): Calories: 640, Fat: 18g (Sat: 3g), Cholesterol: 215mg, Sodium: 1360mg, Carb: 90g, Fiber: 7g, Sugar: 14g, Protein: 25g


MAKES 4 SERVINGS
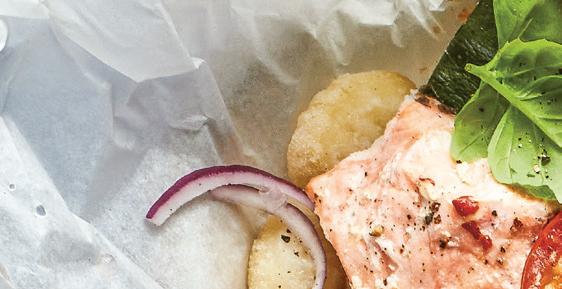
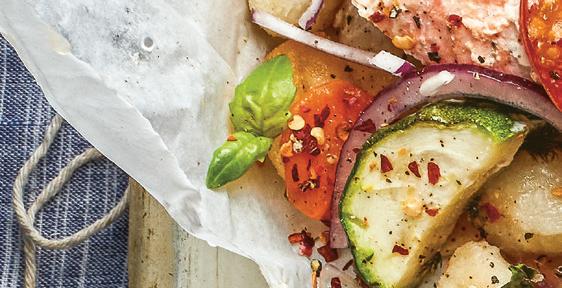
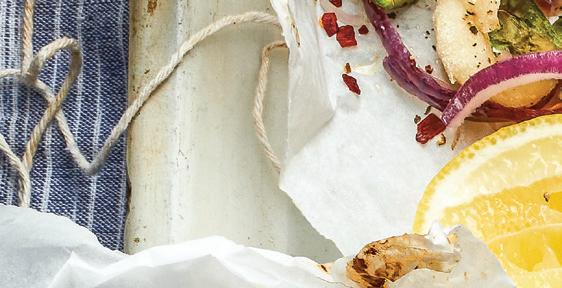
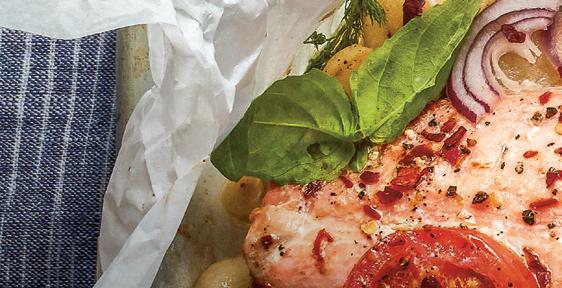
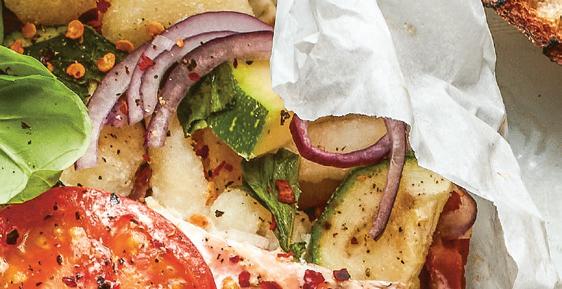
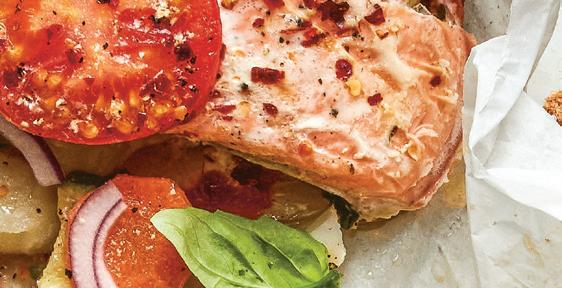
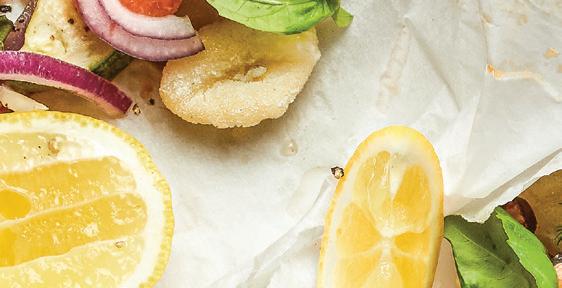
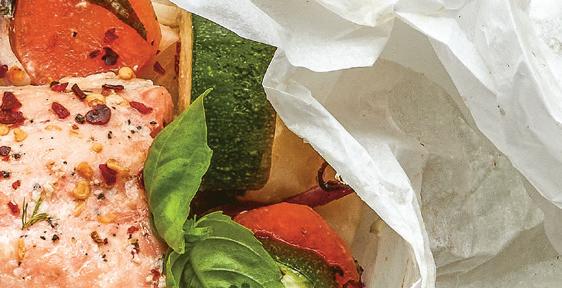
I used to make hundreds of these while working in the south of France and they never fail to impress! Ridiculously easy, these are great to make with kids. The bit I love is including ready-made gnocchi (in place of baby potatoes) so you literally have a meal for one ready to go. You can prep all the ingredients in advance but only assemble when you are ready to cook. Feel free to swap the fish for sliced chicken breast and leave the parcels in the oven for an extra 10 minutes. –t.m
12 sun-dried tomatoes in oil, sliced (reserve the oil)
1 red onion, thinly sliced
2 garlic cloves, thinly sliced
1 fennel bulb, finely sliced 18 ounces ready-made gnocchi
1 small zucchini, halved lengthways and cut into wedges
1 small carrot, peeled and thinly sliced
2 vine tomatoes, thinly sliced Leaves from a few sprigs of basil
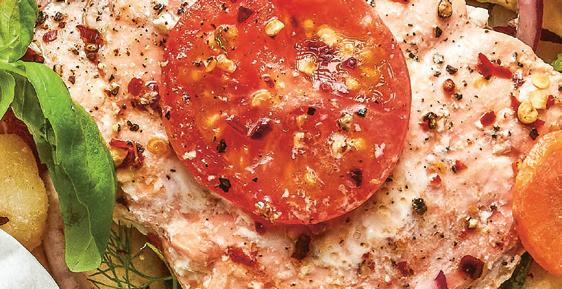
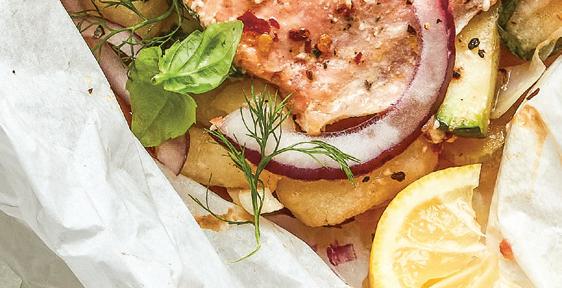


1. Heat the oven to 400°F. Cut baking parchment into 4 sheets, each about 18 inches square, and gather kitchen twine.
2. Prepare all the ingredients and lay the sheets of baking parchment out on a flat surface, ready for assembly.
Pinch of hot red pepper flakes
4 (5½-ounce) skinless, boneless cod loins or fillets
1 cup white wine, divided 4 tablespoons butter, divided Salt and freshly ground black pepper, to season 4 lemon wedges Rustic bread, to serve
3. Imagine there is a small saucer placed in the center of each piece of baking parchment—this is the area to fill with ingredients. Drizzle a little of the olive oil from the sun-dried tomatoes in this space, then divide the red onion, garlic, sun-dried tomatoes, fennel, gnocchi, zucchini, and carrots among the 4 sheets. Finish with the tomato slices and top each one with a few torn basil leaves. Add a pinch of red pepper flakes and season generously with salt and pepper. Perch a cod fillet on top of each pile of assembled ingredients. Add a splash of white wine (about 3 tablespoons) and 1 tablespoon of butter to each stack. Season with more salt and pepper and lay a small single basil leaf on top of the fish.
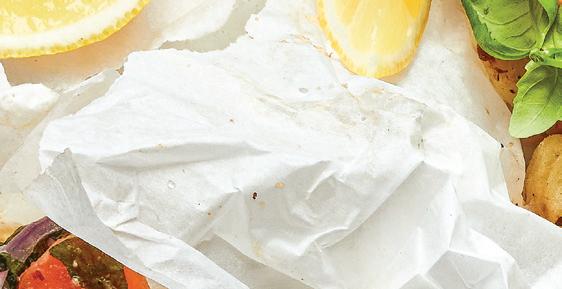
4. Now to tie it up: Bring the corners of the paper together, squeezing the excess to create a tight parcel around the ingredients. Try to ensure there are no gaps and secure the neck with the string (tying it like a shoelace).
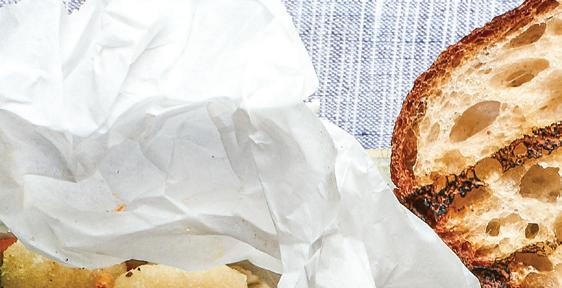
5. Place the parcels on a baking sheet and bake in the preheated oven for 20 minutes. Once cooked (you should see it bubbling inside through the parchment), place each parcel in a serving bowl with a slice of charred or toasted rustic bread and a wedge of lemon. Carefully untie the parcels and dinner is served!
Nutrition (per serving): Calories: 490, Fat: 22g (Sat: 13g), Cholesterol: 100mg, Sodium: 510mg, Carb: 38g, Fiber: 6g, Sugar: 9g, Protein: 26g

This delicious bowl of goodness has just enough spice to tantalize your taste buds. The roasted cauliflower has a nice crunch to it so adds a bit of “bite” to the smooth and creamy lentil dhal it is nestled on. I use red split lentils as they can be cooked from dried in 10 minutes without any soaking time. –t.m
For the Roasted Cauliflower
1 large cauliflower, broken into small florets (tender leaves cut in half)
2 tablespoons olive oil
1 tablespoon curry powder
1 tablespoon mustard seeds
Pinch of chili powder or hot smoked paprika
Pinch of salt
2 tablespoons honey
For the Tarka Dhal
1¼ cups red split lentils
1 tablespoon olive oil
3½ tablespoons butter
1 onion, finely sliced
3 garlic cloves, chopped
1 (2-inch) piece of fresh ginger, grated
1. Heat the oven to 465°F.
1 teaspoon ground turmeric
½ tablespoon ground cumin
½ tablespoon cumin seeds
½ tablespoon garam masala
½ tablespoon fennel seeds
1 teaspoon salt
6 baby plum tomatoes, halved
1 green Thai chili pepper, chopped (see Editor’s Note)
For Serving
2 tablespoons toasted peanuts, crushed
Handful of cilantro leaves, chopped
1 cup plain Greek-style yogurt
4 lime wedges
2. Place the cauliflower florets and leaves in a large mixing bowl, pour in the 2 tablespoons of olive oil, and sprinkle over the curry powder, mustard seeds, chili powder, and salt. Toss to coat the florets in the oil and spices. Place them and their leaves on a large baking sheet, drizzle with the honey, and pop into the oven for about 20 minutes, or until they start to crisp and brown.
3. While the cauliflower is cooking, make the dhal. Give the lentils a quick rinse, then put them in a saucepan with double their volume of water. Bring to a boil, then reduce to a simmer and cook uncovered for 10 minutes, skimming off any impurities as they cook. Once cooked they should have some texture but no crunch—if they are still too watery, spoon some of the liquid off. Leave to rest while you make the tarka.
4. To make the tarka, heat the 1 tablespoon olive oil and butter in a separate skillet over medium heat and sauté the onion for a few minutes until it softens. Stir in the garlic and ginger, quickly followed by all the spices and the salt. The butter will start to foam, at which point stir in the tomatoes and green chile. Cook for 1 minute, then remove from the heat.
5. Finally, stir a third of the tarka into the cooked lentils, then divide into serving bowls. Spoon the remaining tarka over the top of the bowls. Pile the roasted cauliflower in the center, scatter over some peanuts and chopped cilantro. Serve with Greek yogurt for spooning and lime wedges for squeezing.
Editor’s Note: If you can’t find Thai chili peppers, you can use a jalapeño, serrano, or habanero pepper.
Nutrition (per serving): Calories: 620, Fat: 27g (Sat: 9g), Cholesterol: 30mg, Sodium: 670mg, Carb: 71g, Fiber: 15g, Sugar: 18g, Protein: 28g
A proper gyro can be made with chicken, pork, or lamb; this one has chicken thighs wrapped in a soft pillowy Greek-style pita bread and is served with tzatziki, plus tomato and cucumber. –t.m.
6 chicken thighs, skin-on and deboned
8 soft Greek-style pita breads
For the Marinade
½ cup plain Greek-style yogurt
Juice and grated zest of ½ a lemon
2 tablespoons olive oil
1 tablespoon smoked paprika
1 tablespoon ground cumin
½ teaspoon cayenne pepper
2 garlic cloves, crushed
1 tablespoon dried oregano
For the Tzatziki
1 cup plain Greek-style yogurt
1 garlic clove, crushed
Leaves from 6 mint sprigs, finely chopped
1 tablespoon olive oil
½ teaspoon salt
Juice of ½ lemon
¼ cucumber, grated, juice squeezed out
For Serving
2 vine tomatoes, diced
½ cucumber, diced
1 red onion, finely diced
Handful of freshly chopped flat-leaf parsley leaves
Lemon wedges, for squeezing
Great Fries dusted with dried oregano (recipe below, optional)
1. Mix all the marinade ingredients together in a large bowl. Score the chicken thighs through the skin with three cuts made into the flesh, then add them to the marinade. Cover and leave to marinate in the fridge for at least 1 hour, or preferably overnight.
2. For the tzatziki, simply mix all the ingredients together in a bowl. Taste, adding more mint or salt as needed. Cover and chill until needed. For the garnish, prepare the tomatoes, cucumber, red onion, and parsley, place in separate bowls, and set aside.
3. Take the chicken out of the fridge 30 minutes before you want to cook it to bring to room temperature.
4. Heat the grill/broiler to as hot as possible.
5. Wipe away any excess marinade from the chicken thighs and place them skin side up under the grill/broiler. Cook for about 12 minutes, or until the skin is crisp and charred in places, checking it frequently. Once they look done, turn them over and cook the other side for 5 minutes, or until cooked through. Transfer to a dish to rest while you get everything else together.
6. When you are ready to serve, thinly slice the chicken widthways, pop into a warm dish, and pour over any collected juices.
7. Splash the pita breads with a little water and toast under the grill/ broiler for a minute just to warm them through.
8. Swipe a spoonful of tzatziki across the warmed pita bread, top with slices of chicken, tomatoes, cucumber, red onion, chopped parsley, a good squeeze of lemon juice, and a pinch of salt. Roll the gyro as tightly as you can and take a humungous bite! Serve with some hot oregano-dusted fries on the side if you fancy them, or you can even stu them inside the pita bread, too.
• The best potatoes for fries are floury varieties; anything you would use to bake will make great chips, such as Yukon Gold.
• You need to cook fries in an oil with a high smoke point such as vegetable, sunflower, or canola oil. Do not use olive oil, especially extra virgin olive oil, as it has a low smoke point.
MAKES 4 SERVINGS
Twice-cook your fries! Trust me, the results are well worth the extra steps. –t.m.
2¼ pounds white potatoes, unpeeled and cut into batons about ½ inch thick
2 cups vegetable oil
Salt, to taste
Dried oregano, for dusting (optional)
1. Add the vegetable oil to a large heavy-based skillet set over a medium heat. Once the oil is shimmering, add the potato batons and fry for 10 minutes, until cooked through and golden, moving them around to avoid sticking together. Remove from the pan with a slotted spoon onto a paper towel, then turn the heat up to high until the oil is shimmering (about 356°F).
2. Reintroduce the fries to the pan (in batches if you have to) and cook for a couple more minutes until they are extra crisp and warmed through; transfer to a clean paper towel, season with salt and dust with oregano, if desired, and serve.
Nutrition (gyro per serving): Calories: 840, Fat: 37g (Sat: 8g),
Cholesterol: 145mg, Sodium: 1090mg, Carb: 82g, Fiber: 6g, Sugar: 7g, Protein: 45g
Nutrition (fries per serving): Calories: 1050, Fat: 99g (Sat: 14g),
Cholesterol: 0mg, Sodium: 310mg, Carb: 45g, Fiber: 5g, Sugar: 2g, Protein: 5g
A classic weeknight hero with a twist—the fennel seeds elevate this easy pasta dish, complementing the sausage meat with a subtle flavor that I personally find rather addictive! –t.m.
1 chicken bouillon cube
12 ounces dried ribbon pasta, such as pappardelle or tagliatelle
1 tablespoon fennel seeds
Light olive oil, for frying
6 pork sausages (about 18 ounces)
⅔ cup white wine or water
2 garlic cloves, sliced
2 vine tomatoes, diced
Pinch of hot red pepper flakes
Leaves from a handful of flat-leaf parsley, chopped
Salt and freshly ground black pepper, to season
Finely grated Parmesan, to serve
1. Bring a large saucepan of water to boil, crumble in the chicken bouillon cube, and add the pasta. Cook for 8 minutes or a few minutes short of the package instructions. Once cooked, drain the pasta, reserving about a generous ¾ cup of the cooking water.
2. Meanwhile, toast the fennel seeds in a dry skillet over a medium heat, shaking the pan as you do. After 1 minute, pour the seeds into a bowl and lightly crush with the back of a spoon (or the end of a rolling pin or in a mortar with a pestle; they only need be broken, not powdered).
3. In the same pan, add a splash of oil and squeeze out the sausage meat from their skins into little bite-size pieces; fry over a high heat for 4 minutes until a deep golden caramel color. Pour in the white wine and
scrape the pan and cook until the wine is reduced to just a drizzle. Add another little splash of olive oil, followed by the garlic, tomatoes, fennel seeds, red pepper flakes, and season generously with salt and pepper. Cook for a few more minutes (you can at this stage press down on the tomatoes with the back of a fork to help them break down). Pour in the reserved cooking liquid and simmer over a high heat until reduced by half, giving the pan a shake every now and then.
4. Fold the pasta into the pan and cook for another minute, then remove from the heat.
5. Serve in pasta bowls with a drizzle of olive oil, a few turns of freshly grated black pepper, some grated Parmesan, and a scattering of chopped parsley. If you have any toasted fennel seeds left over, you can sprinkle them on top, too.
Nutrition
(per serving):
Calories: 640, Fat: 24g (Sat: 8g), Cholesterol: 65mg, Sodium: 770mg, Carb: 70g, Fiber: 3g, Sugar: 6g, Protein: 26g
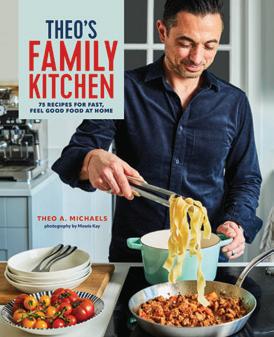
RECIPES AND PHOTOS FROM “THEO’S FAMILY KITCHEN: 75 RECIPES FOR FAST, FEEL GOOD FOOD AT HOME” BY THEO A. MICHAELS, © 2023 REPRINTED WITH PERMISSION FROM RYLAND PETERS & SMALL. PHOTOS BY MOWIE KAY © 2023 RYLAND PETERS & SMALL.
Attention to detail and quality ingredients can make your meal between slices of bread a masterpiece
Why is it that sandwiches often seem better at a restaurant than those you make at home? Apart from having someone prepare it for you, it can be the attention to detail, such as sauces beyond mayo, additional and different toppings, delicious bread, and special cooking techniques used to make them. Some ideas might fall under the simple but “why didn’t I think of that?” category and others are a little more involved. In this roundup of sandwich recipes from a cool chicken salad to a warm Italian beef and delicious delights in between, we serve up ideas to elevate your everyday sandwiches into an art form. – m ary s ubialka
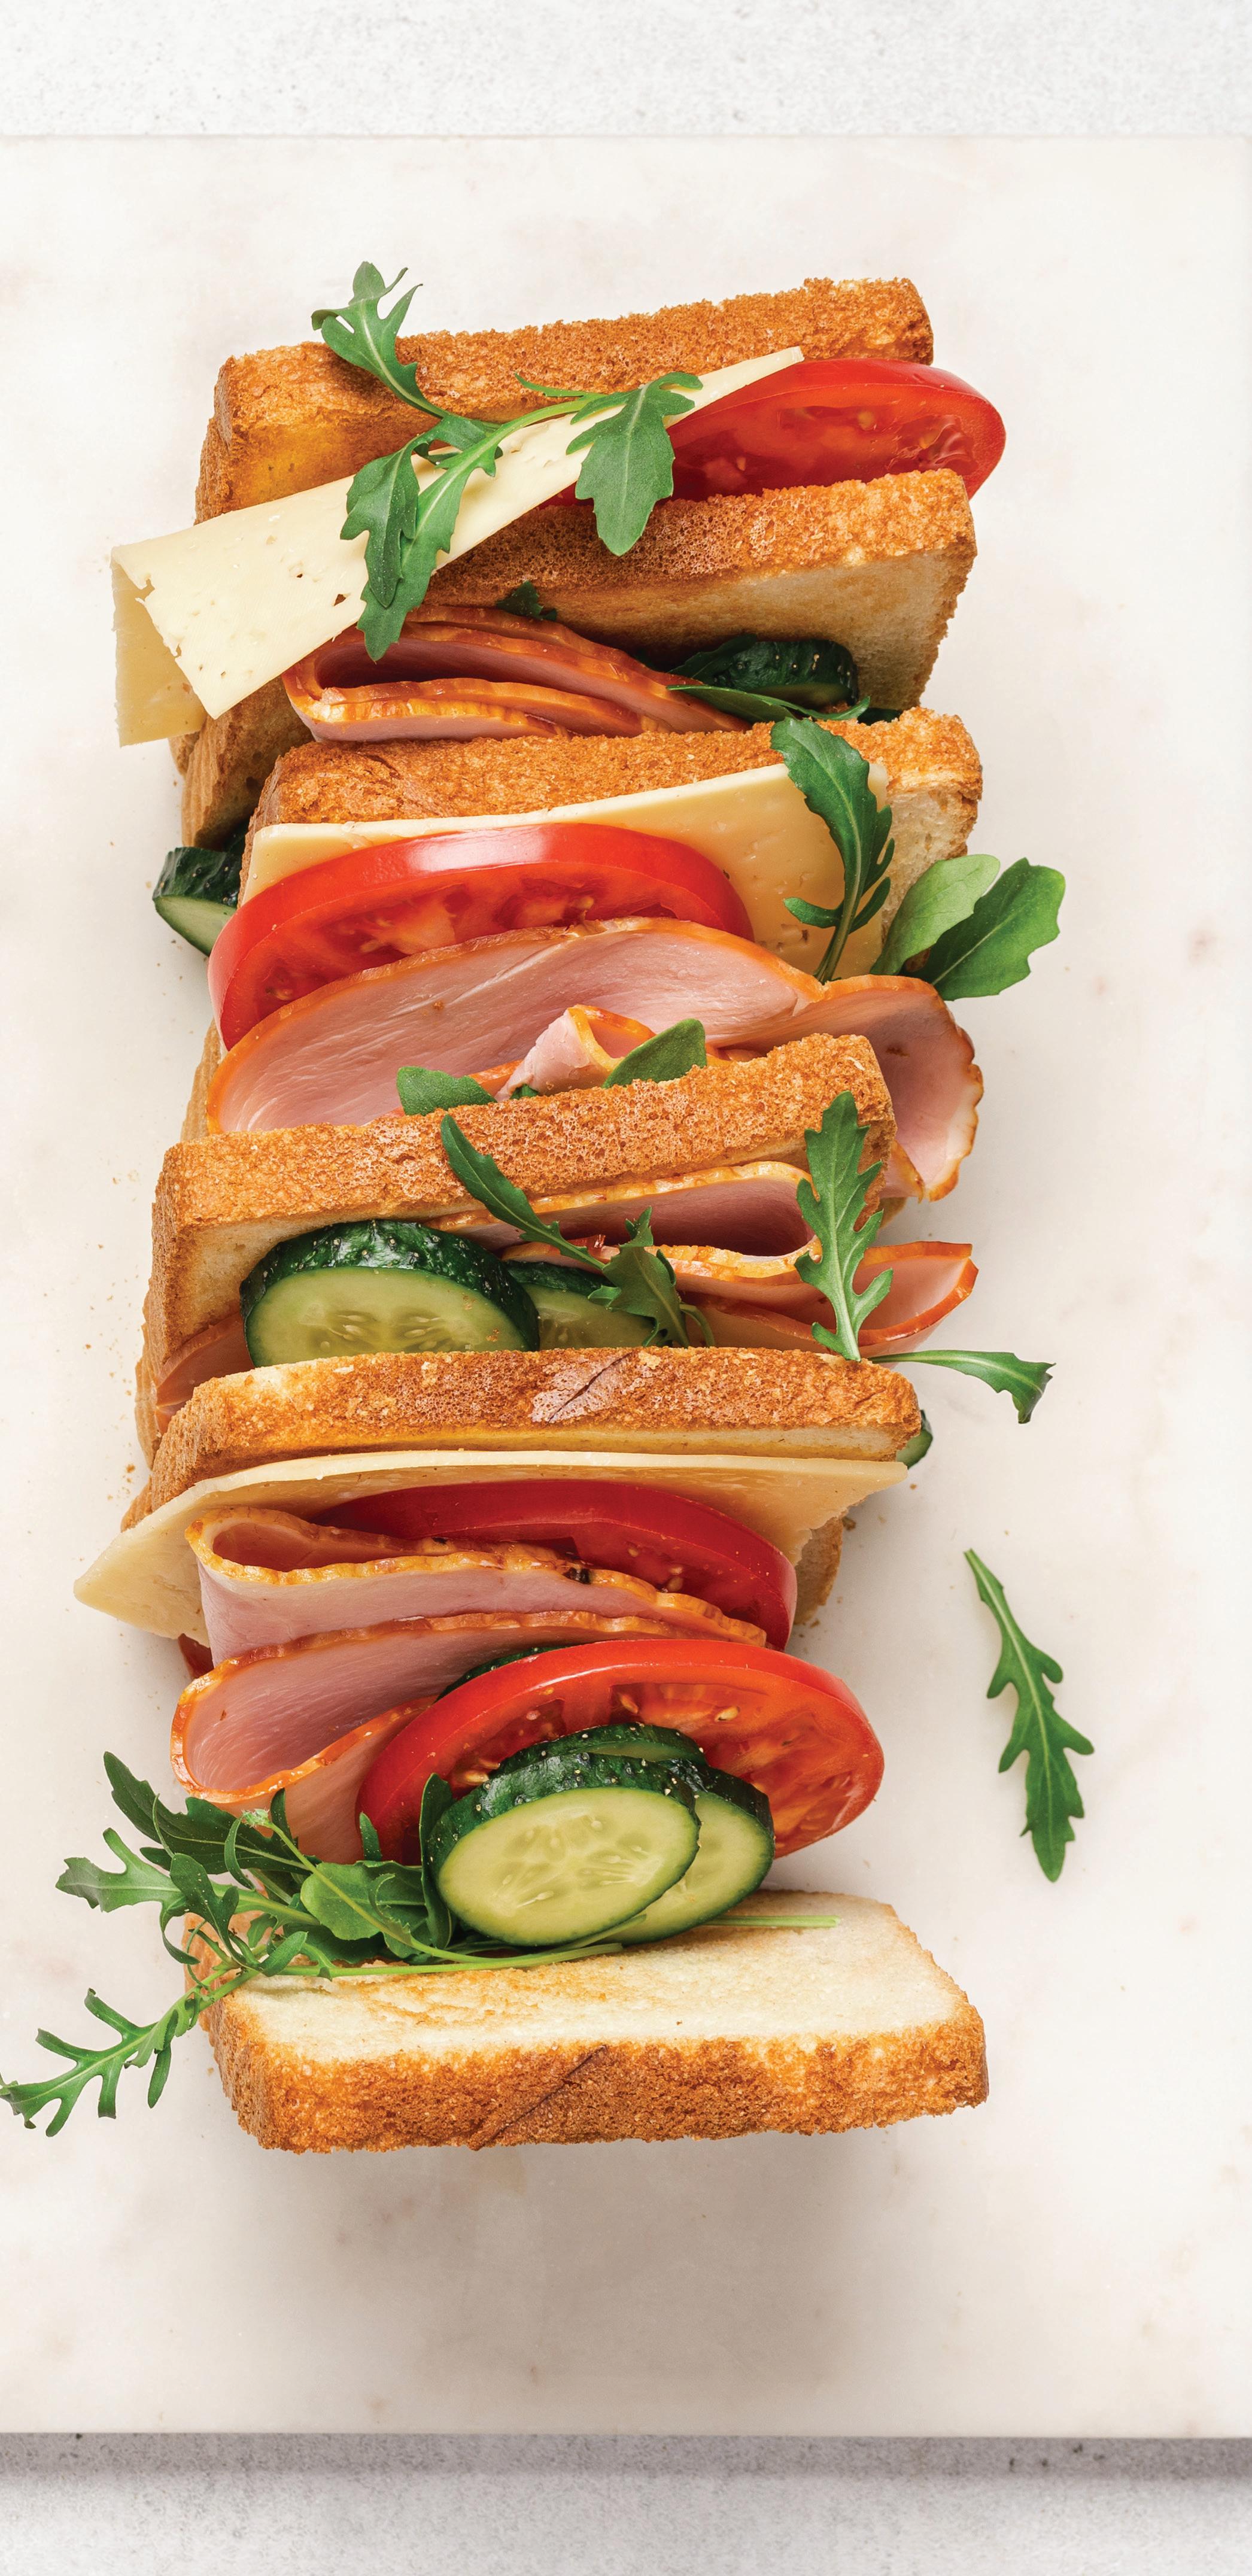
The multilevel Dagwood sandwich gets its name from cartoon character Dagwood Bumstead in the 1950s comic strip “Blondie.” He would often whip up very tall sandwiches using many different meats, cheeses, breads, and toppings.
Tasty spreads beyond mayonnaise and toppings are key components in stepping up your sandwiches. Here are ideas to keep in mind:
Aioli: This seasoned mayonnaise spread and dip features seasonings such as roasted garlic, lemon and herbs, or a kick of Sriracha.
Fruit: A thin slice of apple adds a fresh crunch to a sandwich. Also try cantaloupe, honeydew, or watermelon.
Giardiniera: Pickled vegetables including sport peppers, carrots, celery, red bell peppers, olives, and banana peppers make a great topping for your favorite sandwiches plus hot dogs and sausages.
Herbs: Fresh basil, oregano, or rosemary can add a punch of flavor to sandwiches. If you don’t have fresh, try a sprinkle of the dried herbs.
Muffuletta Olive Salad: This topping is the key component in making a Muffuletta sandwich. You can buy this briny Greek olive and veggie salad ready-made and add to the classic New Orleans sandwich that features layers of cheese, ham, salami, mustard, and mayo topped with the signature olive salad sandwich or jazz up any sandwich.
Spreads: Try smearing on some hummus, pesto, or garlic and herb cheese spread for a flavor punch.
Veggies: Lettuce, tomato, and onion are common sandwich toppers, but also add avocado, cucumber, thinly sliced radishes, and sprouts for more fresh and healthy bites.
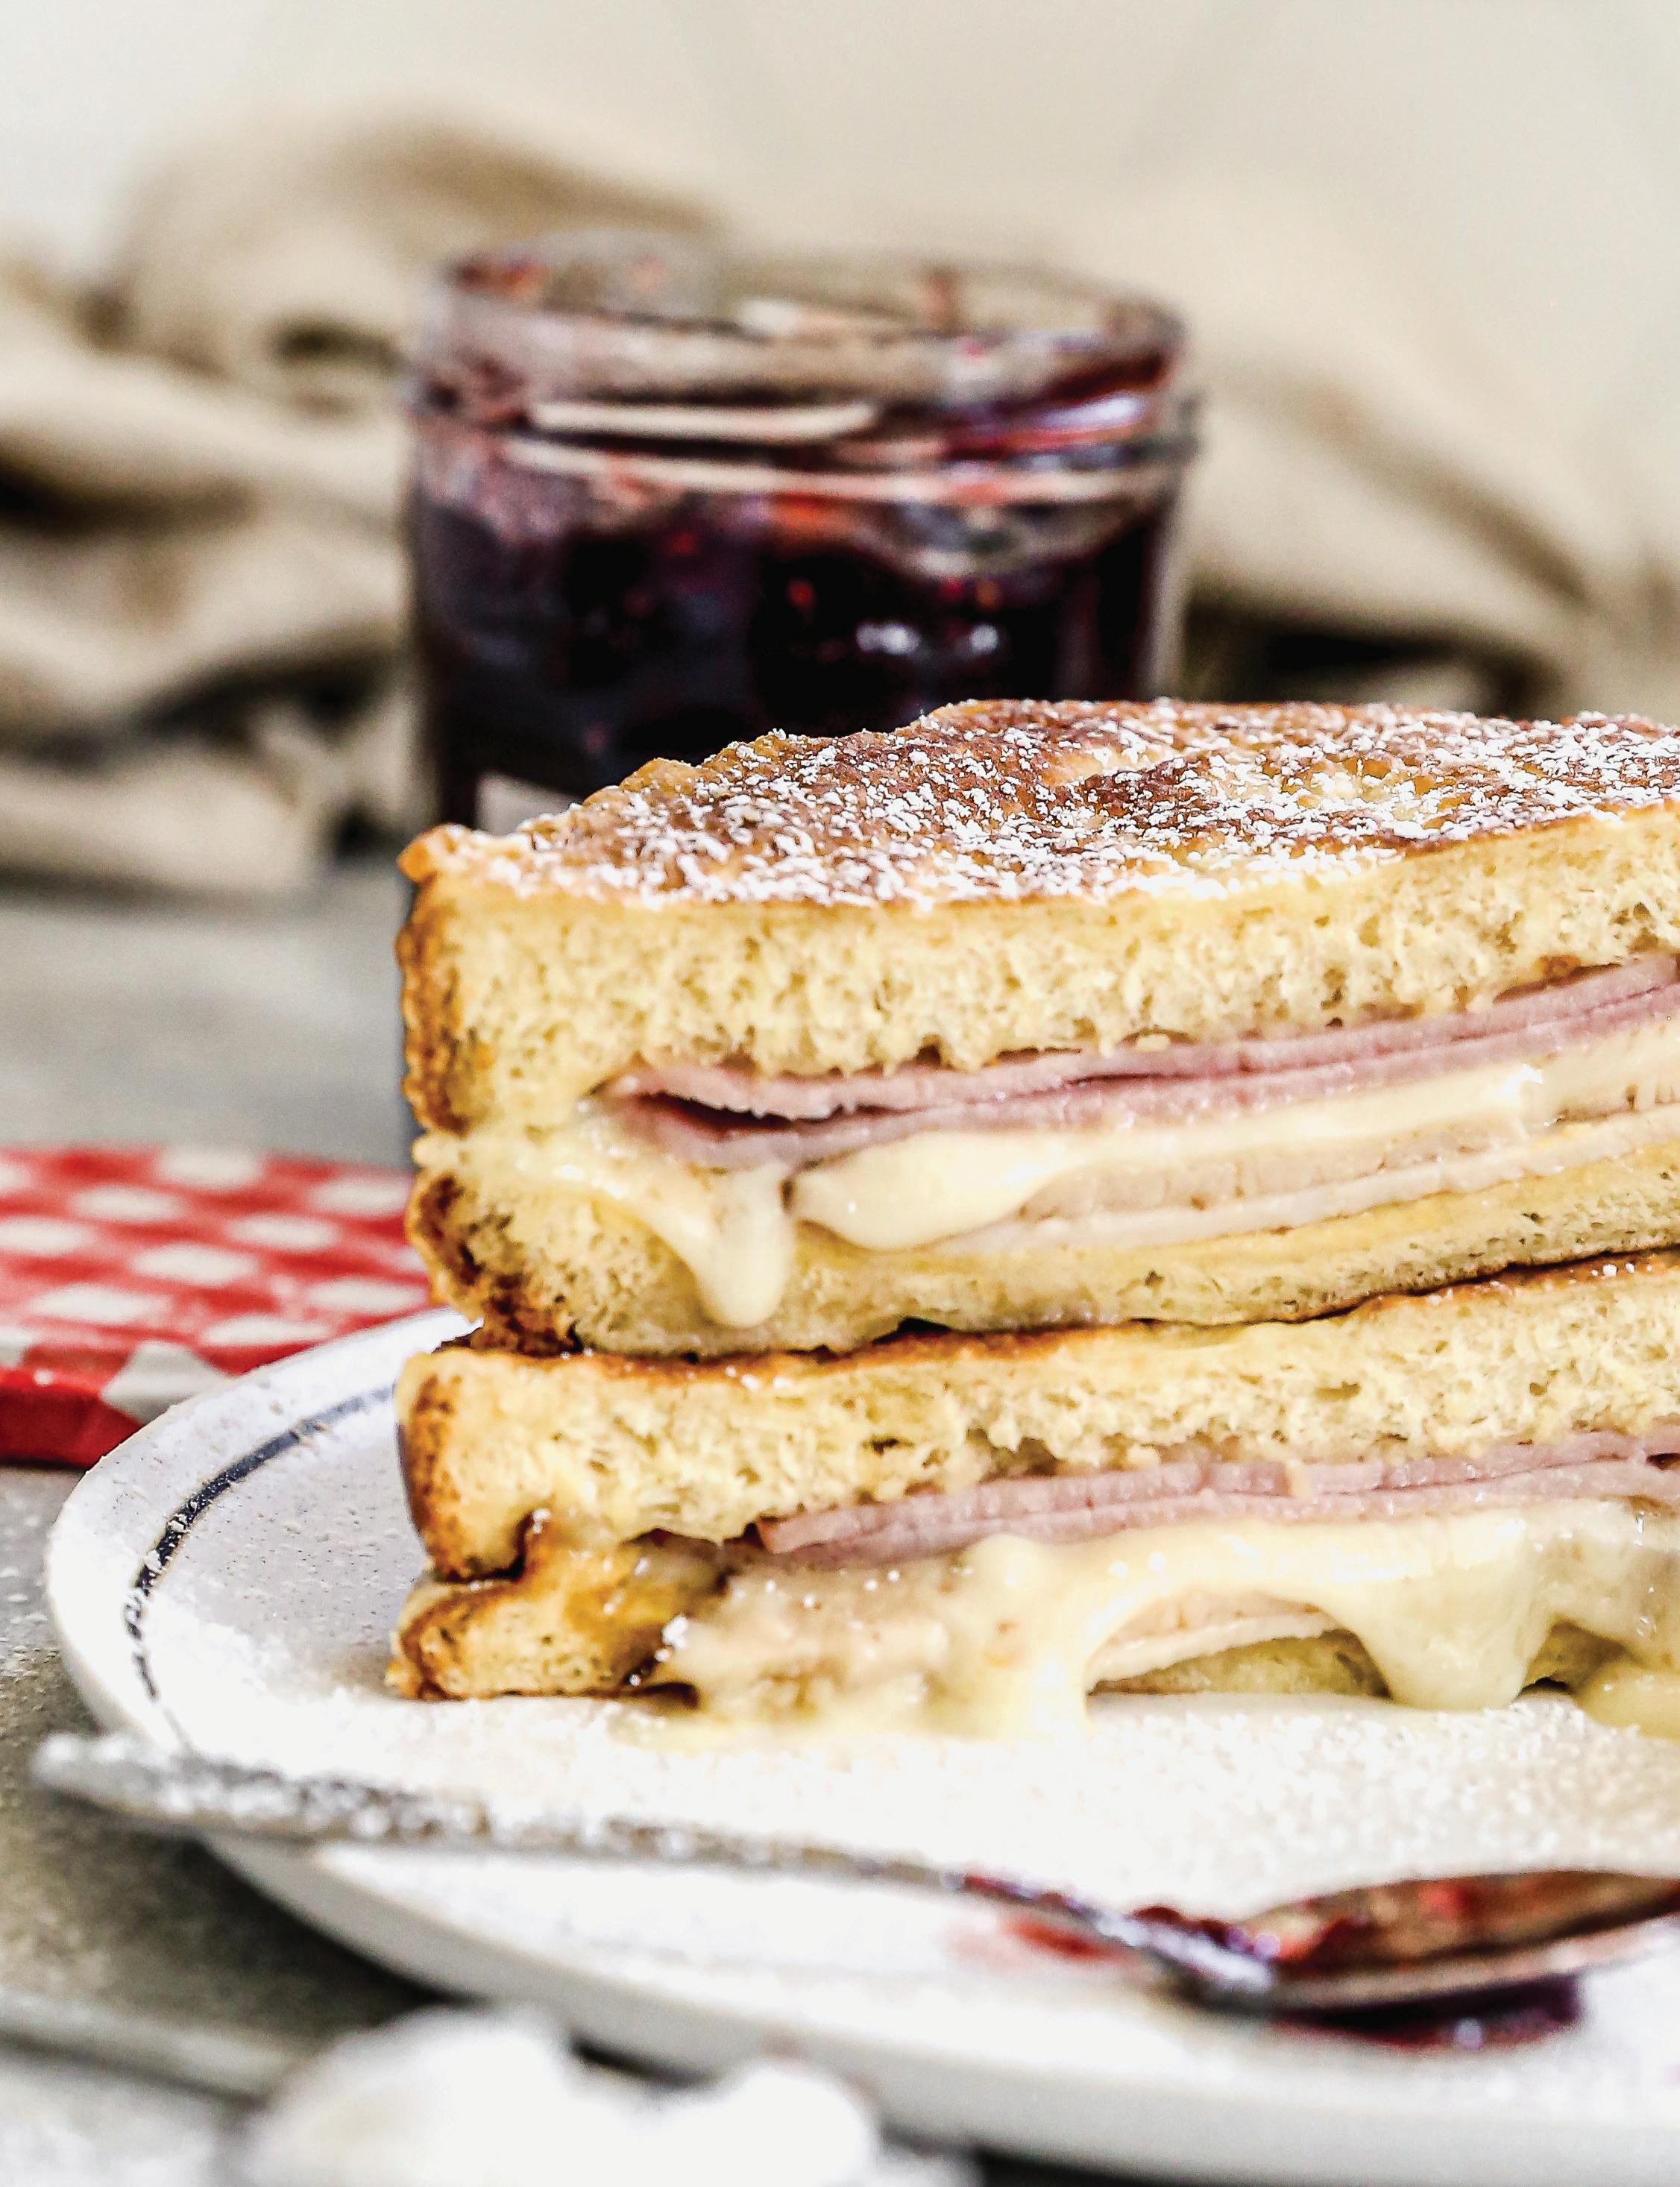
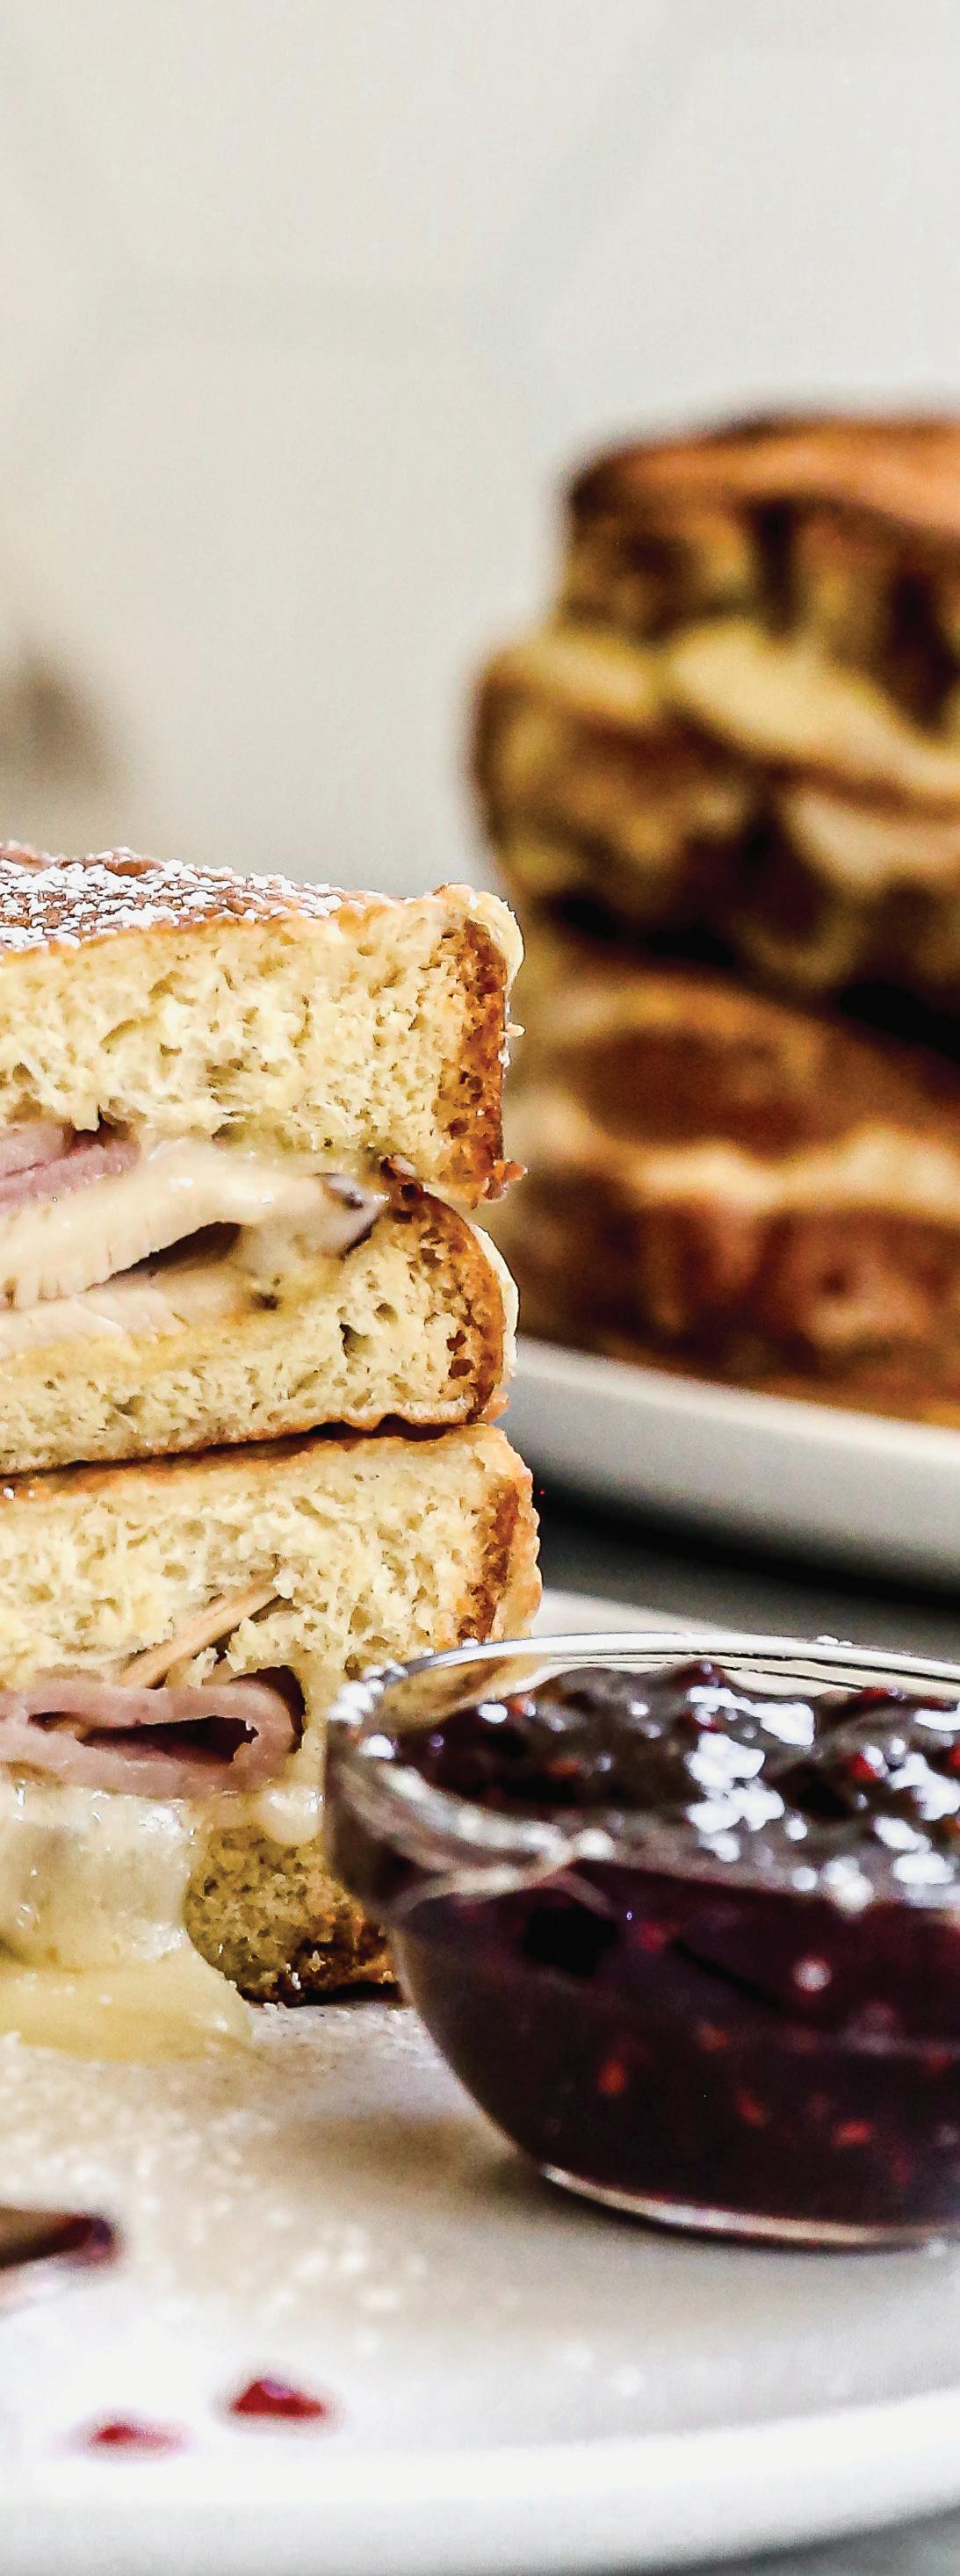
We all love a comforting ham and cheese sandwich, but this takes it to the next level! This delicious sandwich combines sweet and savory, with ham, turkey, and Swiss cheese sandwiched with a touch of Dijon, battered, and cooked until crispy. Serve it with a dusting of powdered sugar and a side of raspberry jam. It’s perfect for brunch, a quick lunch, or dinner the whole family will enjoy. –L.A.
For the Batter
2/3 cup all-purpose flour
1 teaspoon baking powder
½ teaspoon kosher salt
¼ teaspoon ground cinnamon
2 eggs
¾ cup milk
¼ cup vegetable oil , for frying
For the Sandwiches
1 tablespoon Dijon mustard
8 slices white bread, challah, or brioche
8 slices ham
8 slices turkey
8 slices Swiss cheese
Powdered sugar, for sprinkling, as needed Raspberry or blackberry jam, for serving
1. Lay 2 slices of bread side by side. Spread with a very thin layer of Dijon mustard. Top with turkey, Swiss cheese, ham, and a second bread slice.
2. Secure with toothpicks on two opposite corners, from the top, at an angle, to help keep the sandwich together while battering.
3. Make Batter: Add flour, baking powder, salt, and cinnamon to a mixing bowl and stir together. Whisk in eggs and milk until smooth.
4. Add oil to a skillet over medium heat.
5. Use tongs to dip each sandwich into the batter, flipping to coat on both sides. Lift up and allow excess batter to drip off and set aside on a plate. Repeat with remaining sandwiches.
6. Once oil in pan is hot, add 1 sandwich at a time, cooking for about 3 minutes (reduce heat if it starts to brown too much on the bottom) until golden and crisp. Flip and cook on the other side until golden. Remove to a paper towel lined plate.
7. Cut into halves or quarters before serving and dust with powdered sugar. Serve with a side of raspberry jam.
Cook’s Notes:
n Gruyere, Gouda, or Emmental cheese would all be delicious options.
n To baked the Monte Cristo: Batter and place on a lined and greased baking sheet. Bake at 400°F for 10 to 15 minutes until golden, then flip and repeat on the other side.
n To Make Ahead: The batter can be made ahead of time and kept in the refrigerator.
Nutrition (per serving): Calories: 581, Fat: 27g (Sat: 12g), Cholesterol: 174mg, Sodium: 1386mg, Carb: 44g, Fiber: 2g, Sugar: 5g, Protein: 39g
The Monte Cristo is a take on the French sandwiches Croque Monsieur and Croque Madame. What is the difference between the two? Both are very similar ham and cheese sandwiches with a bechamel sauce, but a Croque Madame is topped with a fried egg. The French word “croque” is based on the verb “croquer,” which means to bite or to crunch. The names Croque Monsieur and Croque Madame translate to “mister” and “mistress” crunch. A Croque Mademoiselle is a vegetarian version, which replaces the egg and ham with cucumber or zucchini and herbs.
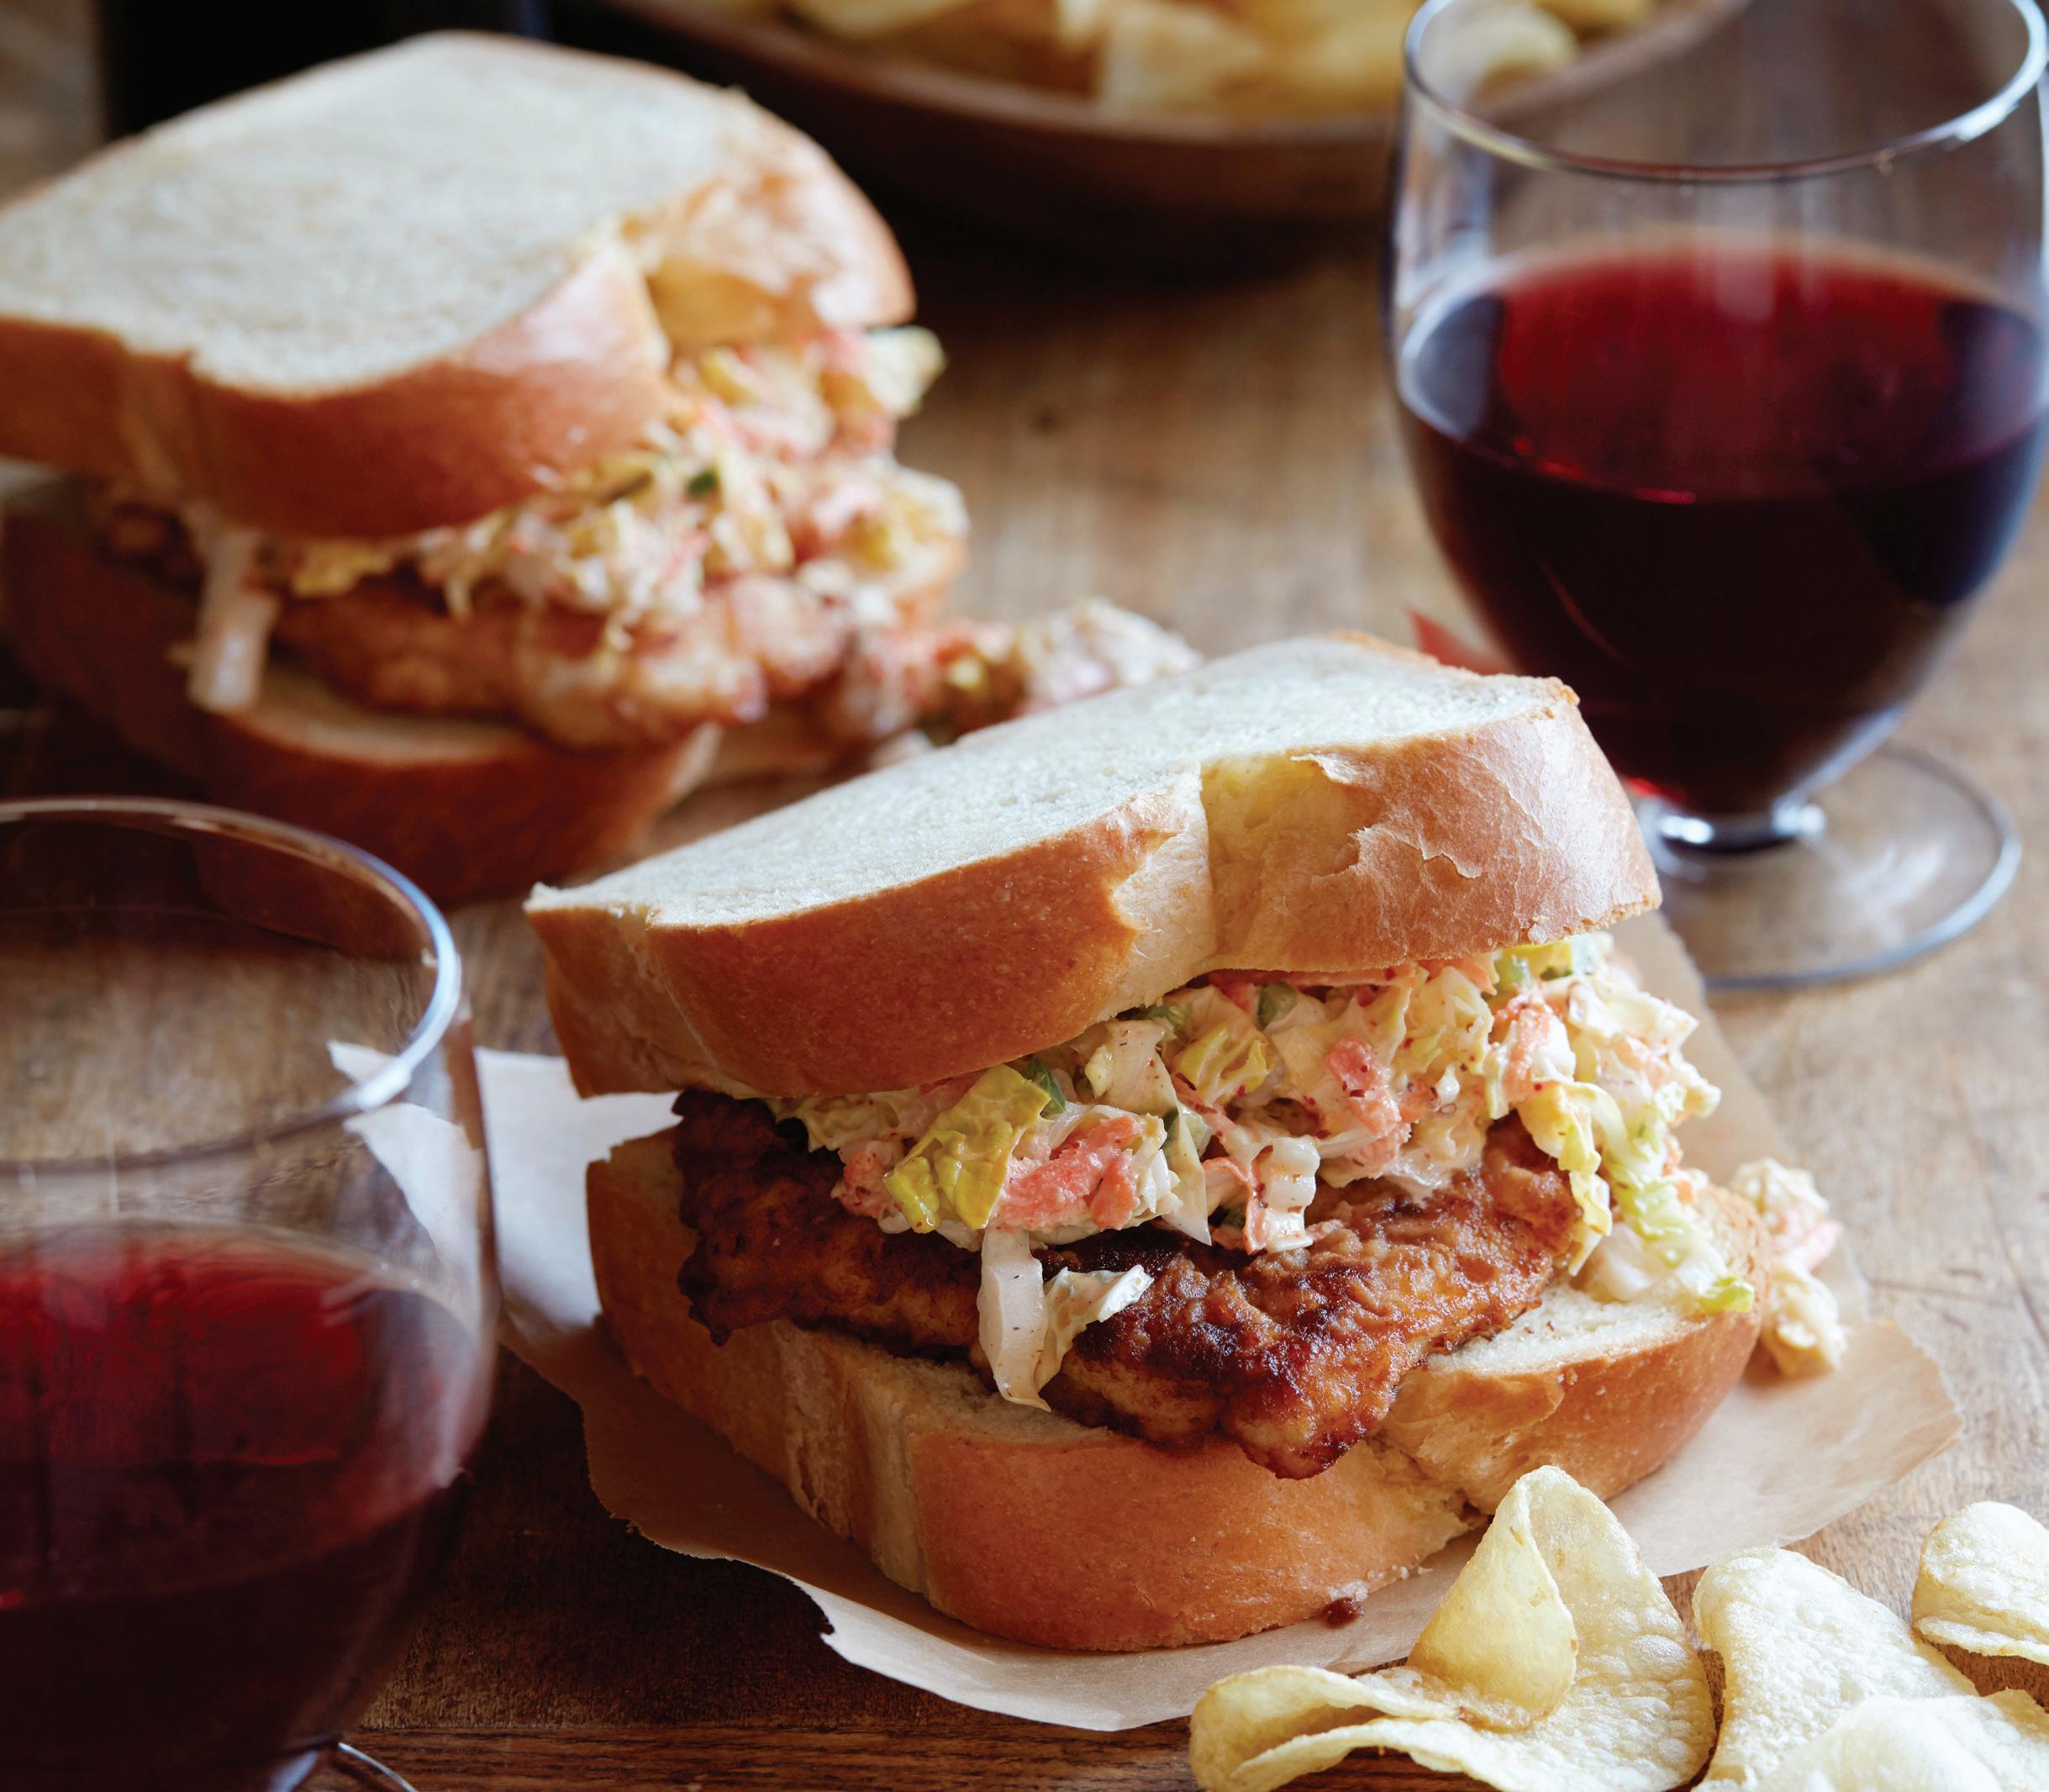
Tender lightly fried chicken, fresh slaw, and spicy mayo team up to produce a winning sandwich. Pair with California Sauvignon Blanc or Merlot.
½ cup mayonnaise
1 tablespoon fresh lime juice
1 tablespoon minced jalapeño pepper
1 tablespoon brown mustard
½ teaspoon ground cayenne pepper
3 cups thinly sliced napa cabbage
¼ cup grated carrot
1 egg
¼ cup whole milk
1/3 cup all-purpose flour
½ teaspoon sea salt
½ teaspoon freshly ground black pepper
3 tablespoons vegetable oil
2 large boneless, skinless half chicken breasts (about 1¼ pounds), pounded to a thickness of ¼ inch
8 slices soft rustic sandwich bread
1. Mix the mayonnaise, lime juice, jalapeño, mustard, and cayenne in a large bowl. Mix in the cabbage and carrot. Set aside.
2. Mix the egg and milk in a shallow medium bowl.
3. In another shallow medium bowl, mix the flour, salt, and pepper.
4. Heat the vegetable oil over medium-high heat in a large, heavybottomed skillet until hot but not smoking.
5. While the oil is heating, coat the chicken pieces with the egg mixture and then coat them on both sides with seasoned flour.
6. Cook the chicken in the hot skillet for 3 minutes on each side or until cooked through. Transfer chicken to a cutting board and cut each piece in half to make a total of 4 pieces.
7. Place 1 piece of chicken on a slice of bread. Top with the some of the cabbage and another slice of bread. Repeat with the remaining chicken, cabbage, and bread to create 4 sandwiches.
Nutrition (per serving): Calories: 600, Fat: 19g (Sat: 19g), Cholesterol: 125mg, Sodium: 940mg, Carb: 68g, Fiber: 3g, Sugar: 4g, Protein: 38g

We have an 18th-century noble to thank for popularizing this beloved food item. As the story goes, in 1762, John Montagu, the 4th Earl of Sandwich, was playing cards when he asked for a serving of roast beef to be placed between two slices of bread so he could eat with his hands and didn’t have to interrupt his game to eat. He is probably not the first to do this as various forms of this food item have existed for thousands of years, but what we call the sandwich is credited to him and the world has been relishing this delight ever since.

Savor shredded slow-cooked Italian beef served on a hoagie roll and topped with zesty giardiniera.
1 boneless beef chuck arm roast (arm, shoulder, or blade), about 2½ pounds
1 packet Italian dressing mix
1 teaspoon Italian seasoning ¼ cup banana peppers, plus more for topping
1 teaspoon granulated garlic
1 cup low sodium beef broth
4 hoagie rolls
Giardiniera, for garnish
1. Press dressing mix and Italian seasoning evenly onto all surfaces of beef chuck arm roast. Place ¼ cup banana peppers and garlic in a 4½-5½ quart slow cooker and top with roast and beef broth. Cover and cook on high 6 hours or low for 8 hours or until pot roast is fork tender.
2. Remove roast and shred with two forks into a medium sized bowl. Cut rolls lengthwise and fill with beef. Top with giardiniera and extra banana peppers, if desired.
Cook's Note: Before filling rolls with beef, dip them into the leftover broth from cooking for a more authentic flavor.
Nutrition (per 3-ounce serving):
Calories: 512, Fat: 25g (Sat: 9.3g), Cholesterol: 117mg, Sodium: 685mg, Carb: 37g, Fiber: 0.2g, Sugar: 0g, Protein: 30g
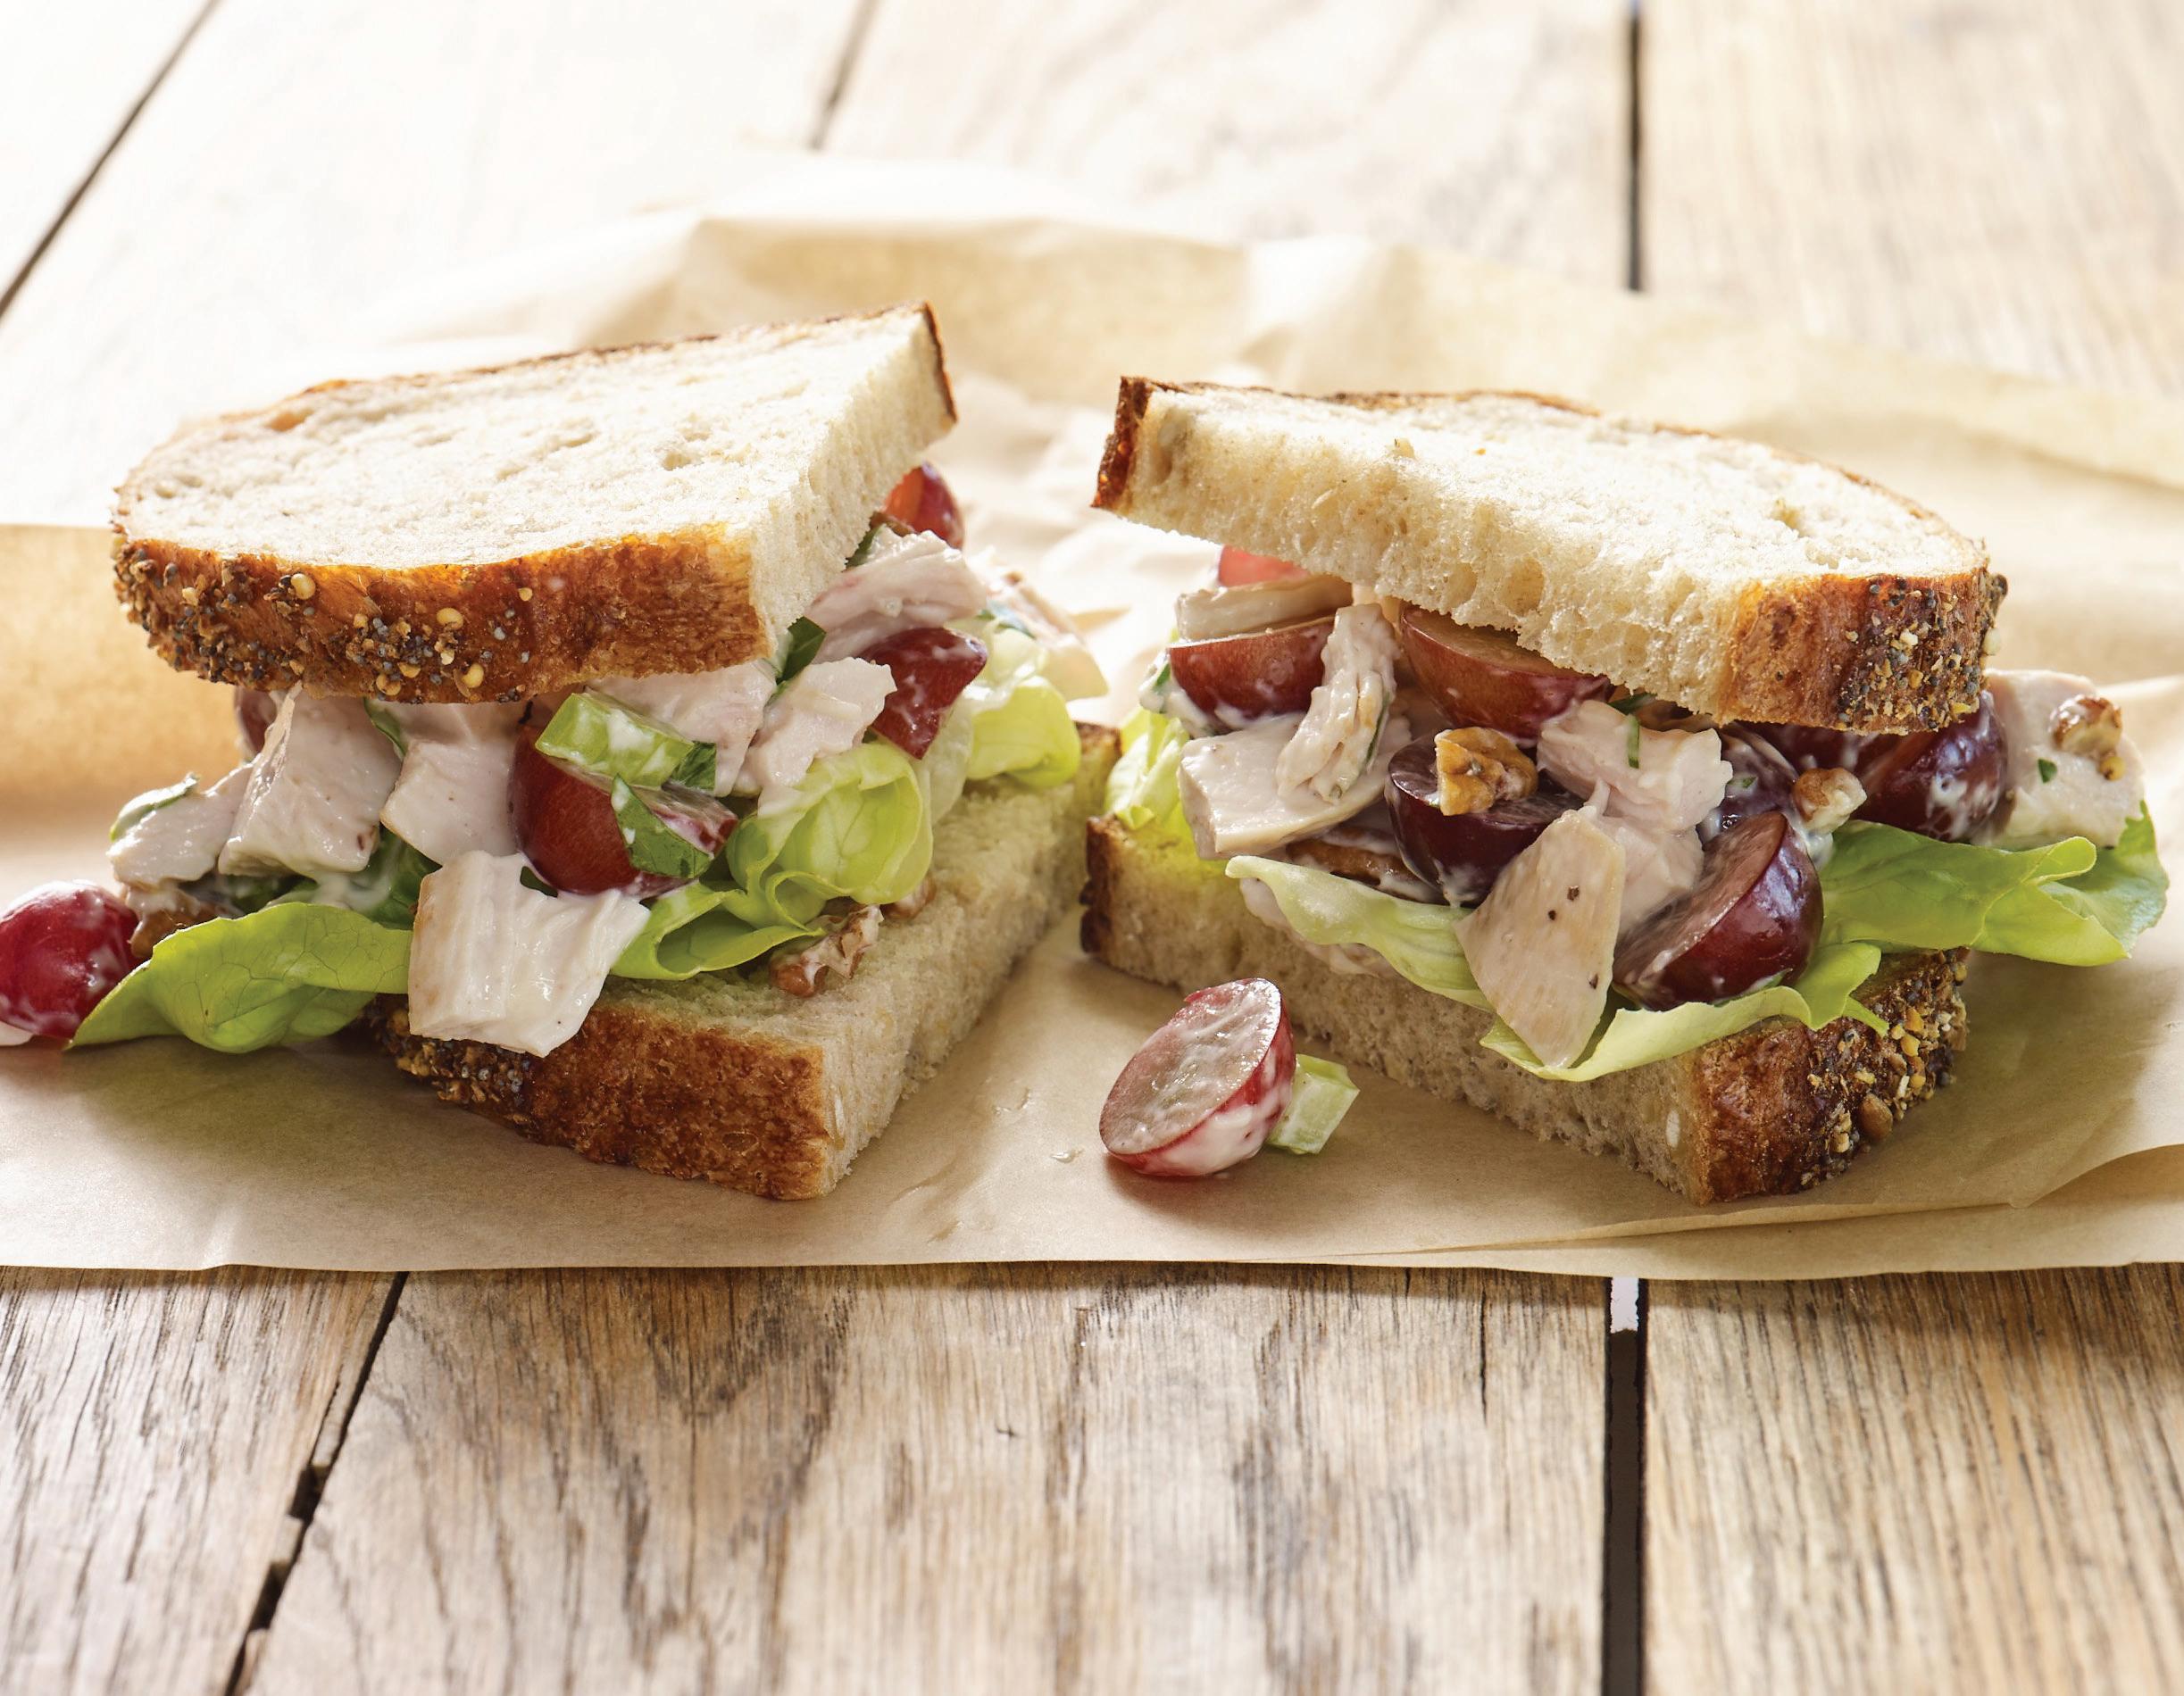
MAKES 6 SERVINGS | RECIPE COURTESY GRAPES FROM CALIFORNIA
This recipe is super easy and works great with rotisserie chicken from the deli counter.
2 cups chicken breast meat, cooked and chopped
1½ cups halved California grapes
¼ cup pecans, toasted and coarsely chopped
½ cup green onions, thinly sliced
¼ cup celery, chopped
2 tablespoons chopped fresh basil
1/2 cup light mayonnaise
1 tablespoon fresh lemon juice
1/4 teaspoon salt
1/4 teaspoon ground pepper
Combine all salad ingredients in a bowl and mix well. Serve on bread, toast, or a toasted roll.
Nutrition (per serving): Calories: 187, Fat: 9g (Sat: 1g), Cholesterol: 43mg, Sodium: 401mg, Carb: 13g, Fiber: 1g, Protein: 15g
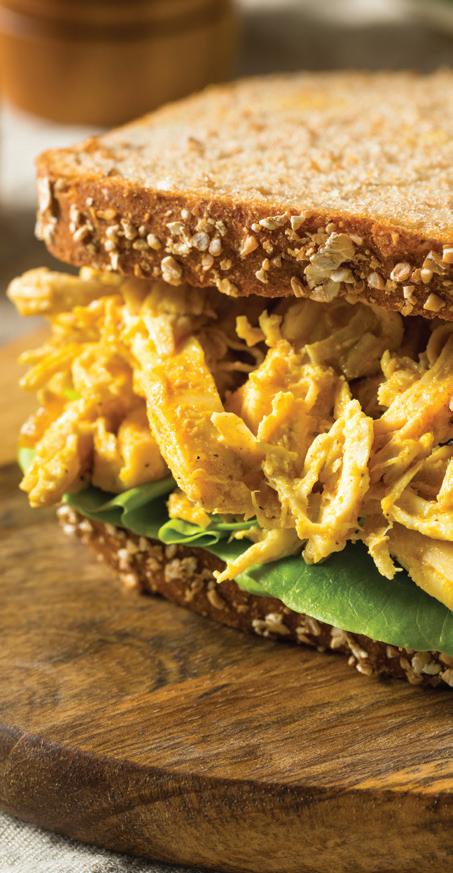
Eat like royalty—the Coronation
Chicken Sandwich was served at the coronation luncheon for Queen Elizabeth II in 1953. Makes 2 Servings.
To Make: Mix 3 tablespoons mayonnaise, 1 tablespoon mango chutney, 1½ teaspoons curry powder, and 1 tablespoon diced dried apricots or golden raisins with 9 ounces cooked, shredded chicken. Season with pepper to taste and stir. Butter 2 slices of bread. Add some baby spinach and then divide the chicken mixture between the slices. Top with the other 2 bread slices and cut in half or quarters to serve. Pinkies up!

Crisp, creamy, and peppery, these sandwiches make a spectacular simple supper or decadent late-night snack. Pair with California Zinfandel or Sauvignon Blanc.
1 cup (4 ounces) shredded Fontina cheese


½ cup (2 ounces) shredded Jack cheese
½ cup (2 ounces) shredded Gruyere cheese
8 rustic-style sandwich bread slices
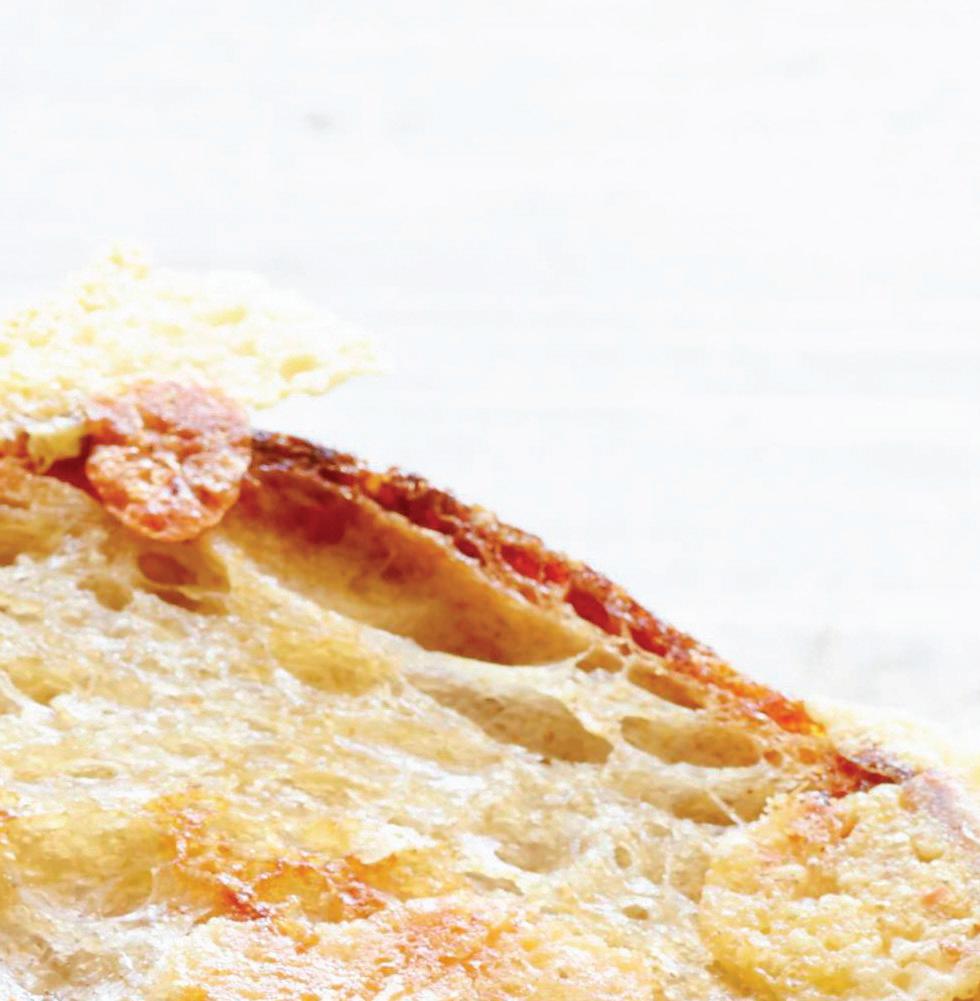
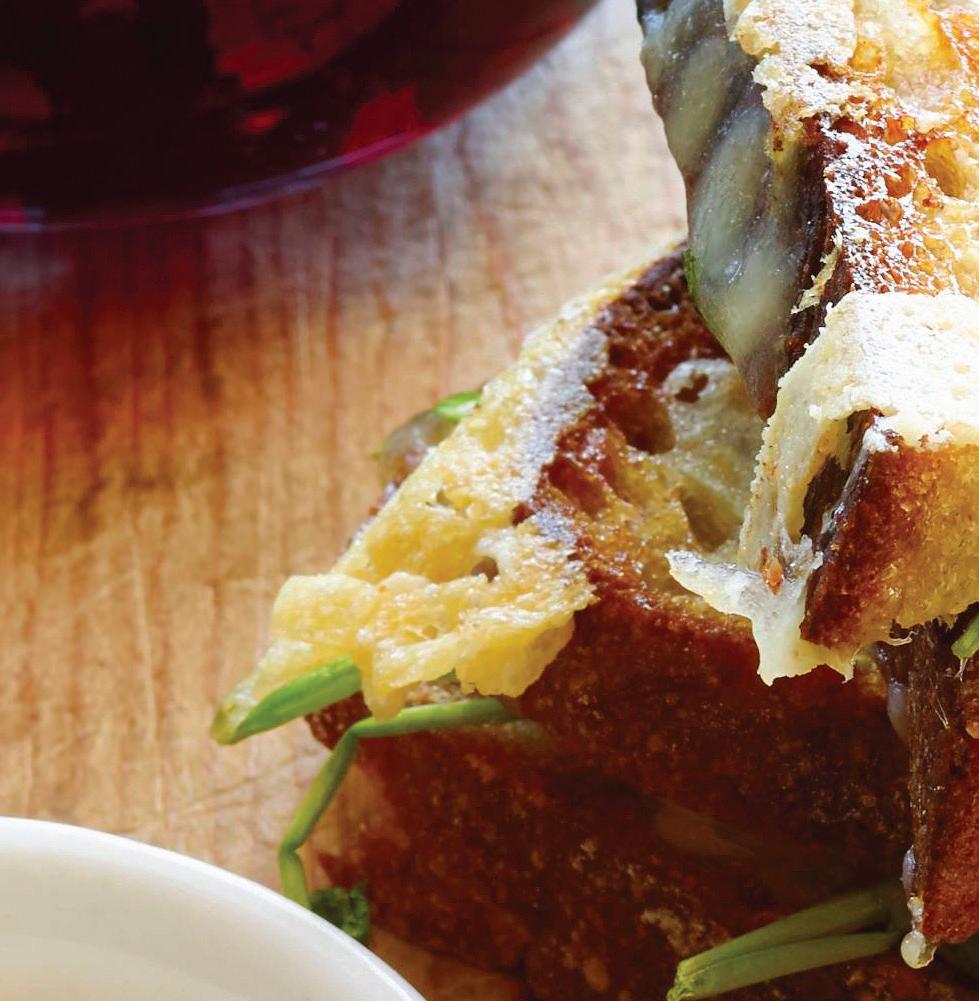
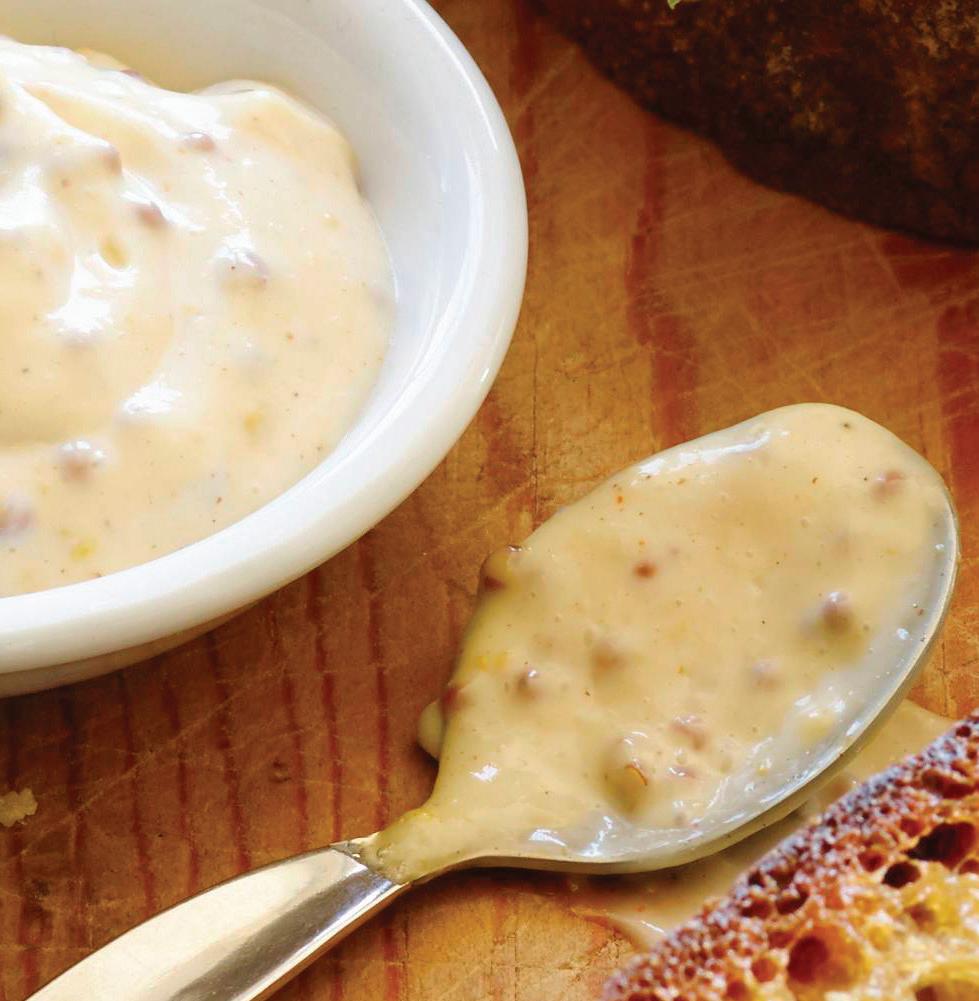

Unsalted butter, softened, for cooking
1 cup (1 ounce) watercress, with stems
3 tablespoons mayonnaise
1 tablespoon brown, stone ground, or Dijon mustard
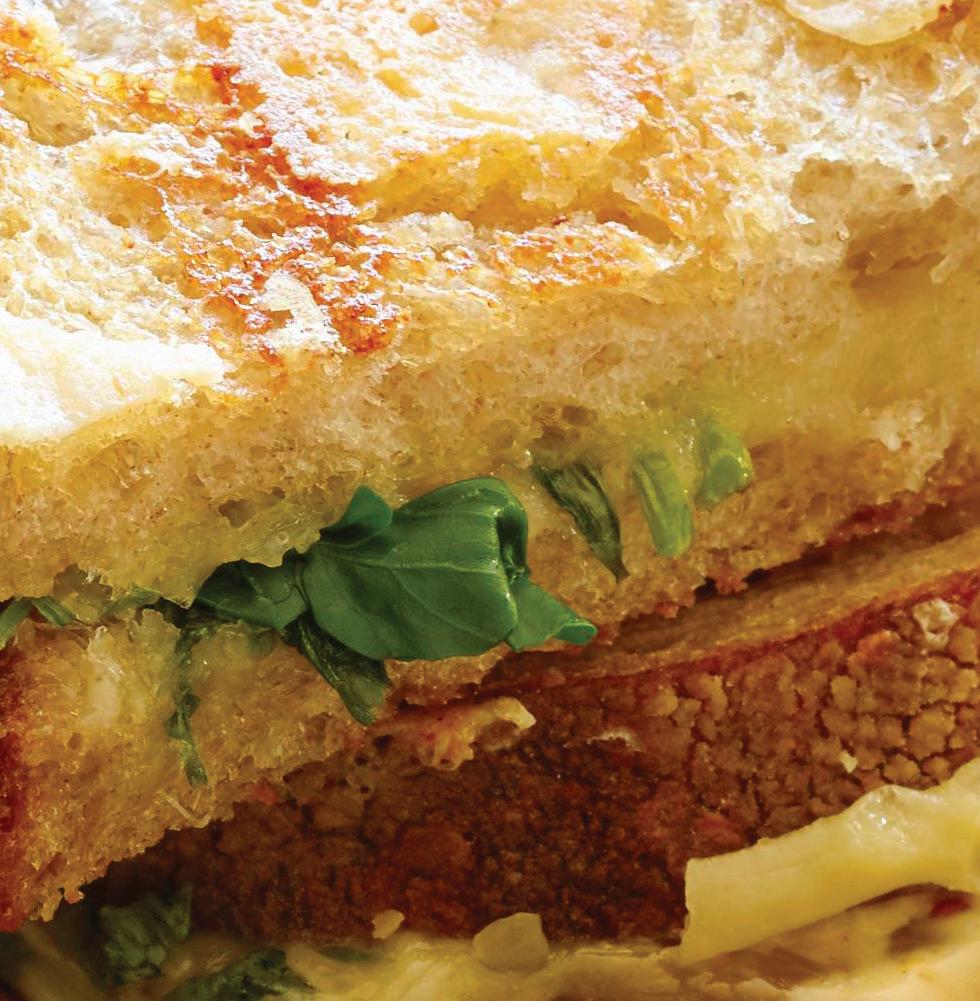
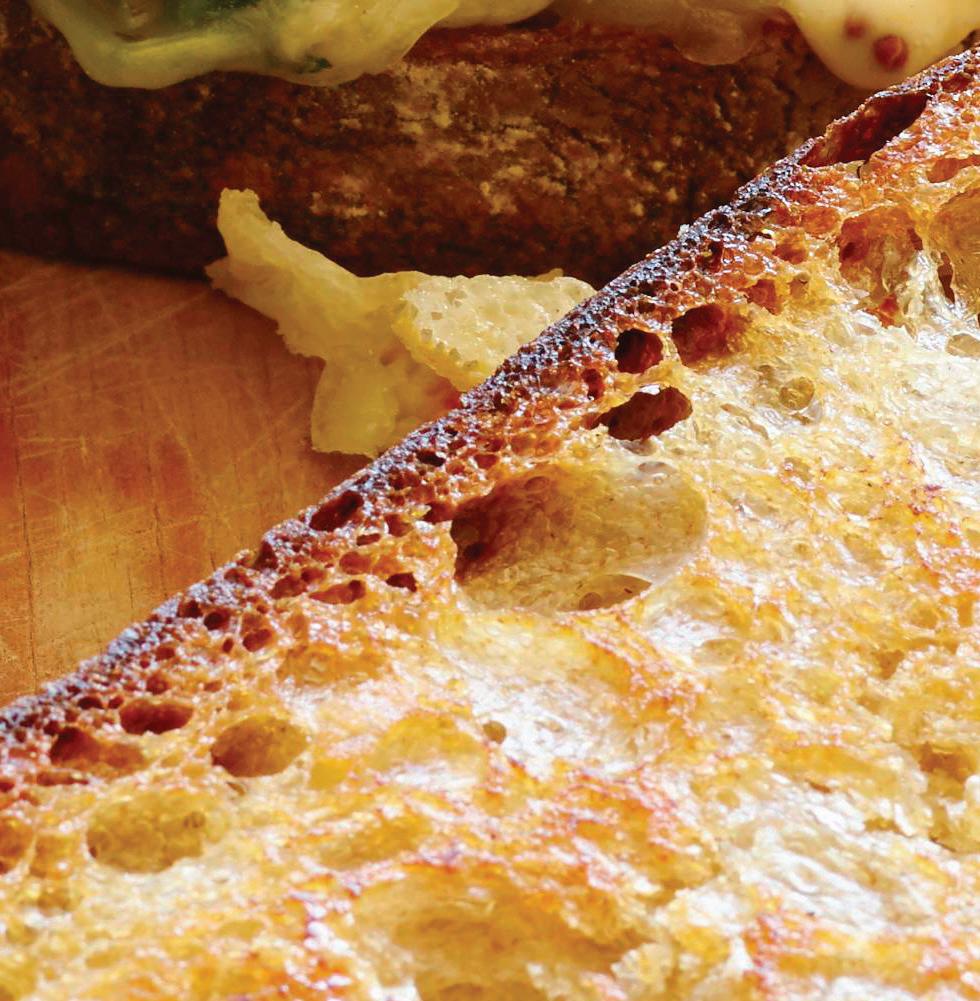
1. Toss to mix the Fontina, Jack, and Gruyere cheeses in a medium bowl.
2. Use your fingers to pinch 2 small holes, 2 inches apart, in each slice of bread (to allow a little cheese to ooze out and make the bread extra crispy). Spread a thin layer of butter on one side of each slice.

3. Arrange 4 of the slices, butter-side down, in a large skillet.
4. Cover each slice evenly with a quarter of the cheese mixture.
5. Cover the cheese with a quarter of the watercress. Top the watercress with the remaining slices of bread, butter-side up.
6. Place the skillet over medium-low heat and cook the sandwiches for 8 minutes, or until golden brown on the bottom. Turn the sandwiches and brown the other side.
7. Transfer the sandwiches to a cutting board, turning them so that the watercress is on top of the cheese.
8. Mix the mayonnaise with the mustard to make the aioli. Remove the top slices of bread and spread the unbrowned sides with the desired amount of aioli. Replace the bread, brown-side up, on the sandwich. Serve immediately.
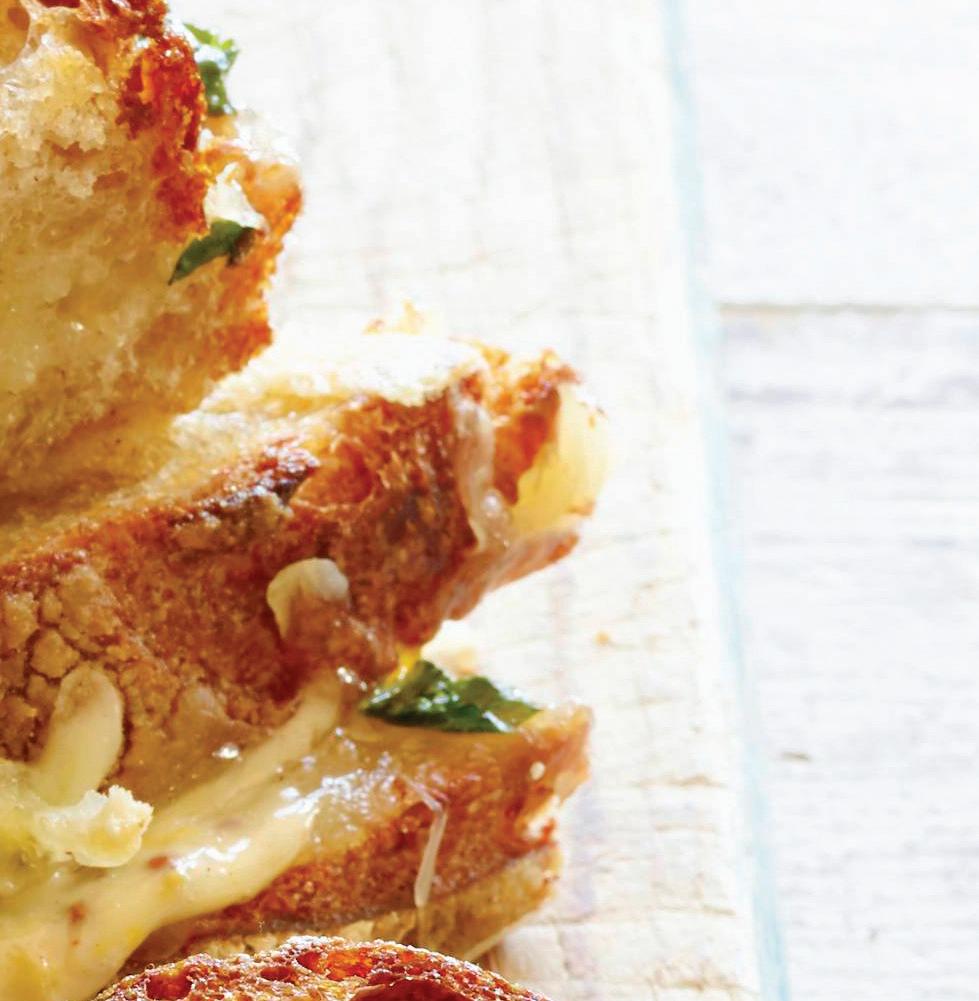
Nutrition (per serving):
Calories: 670, Fat: 38g (Sat: 19g), Cholesterol: 95mg, Sodium: 1090mg, Carb: 57g, Fiber: 2g, Sugar: 3g, Protein: 25g

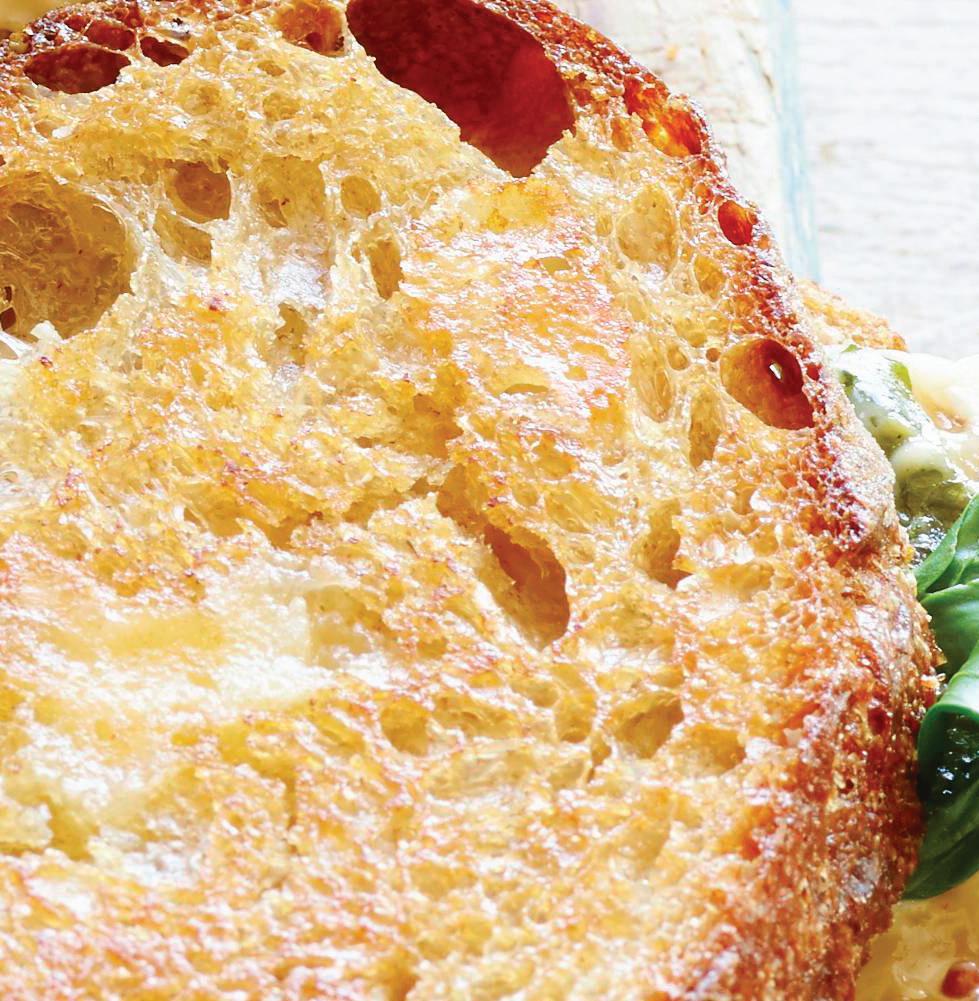

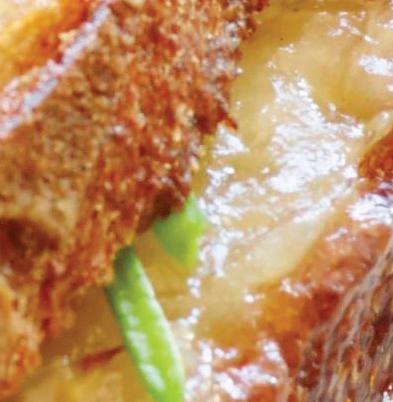

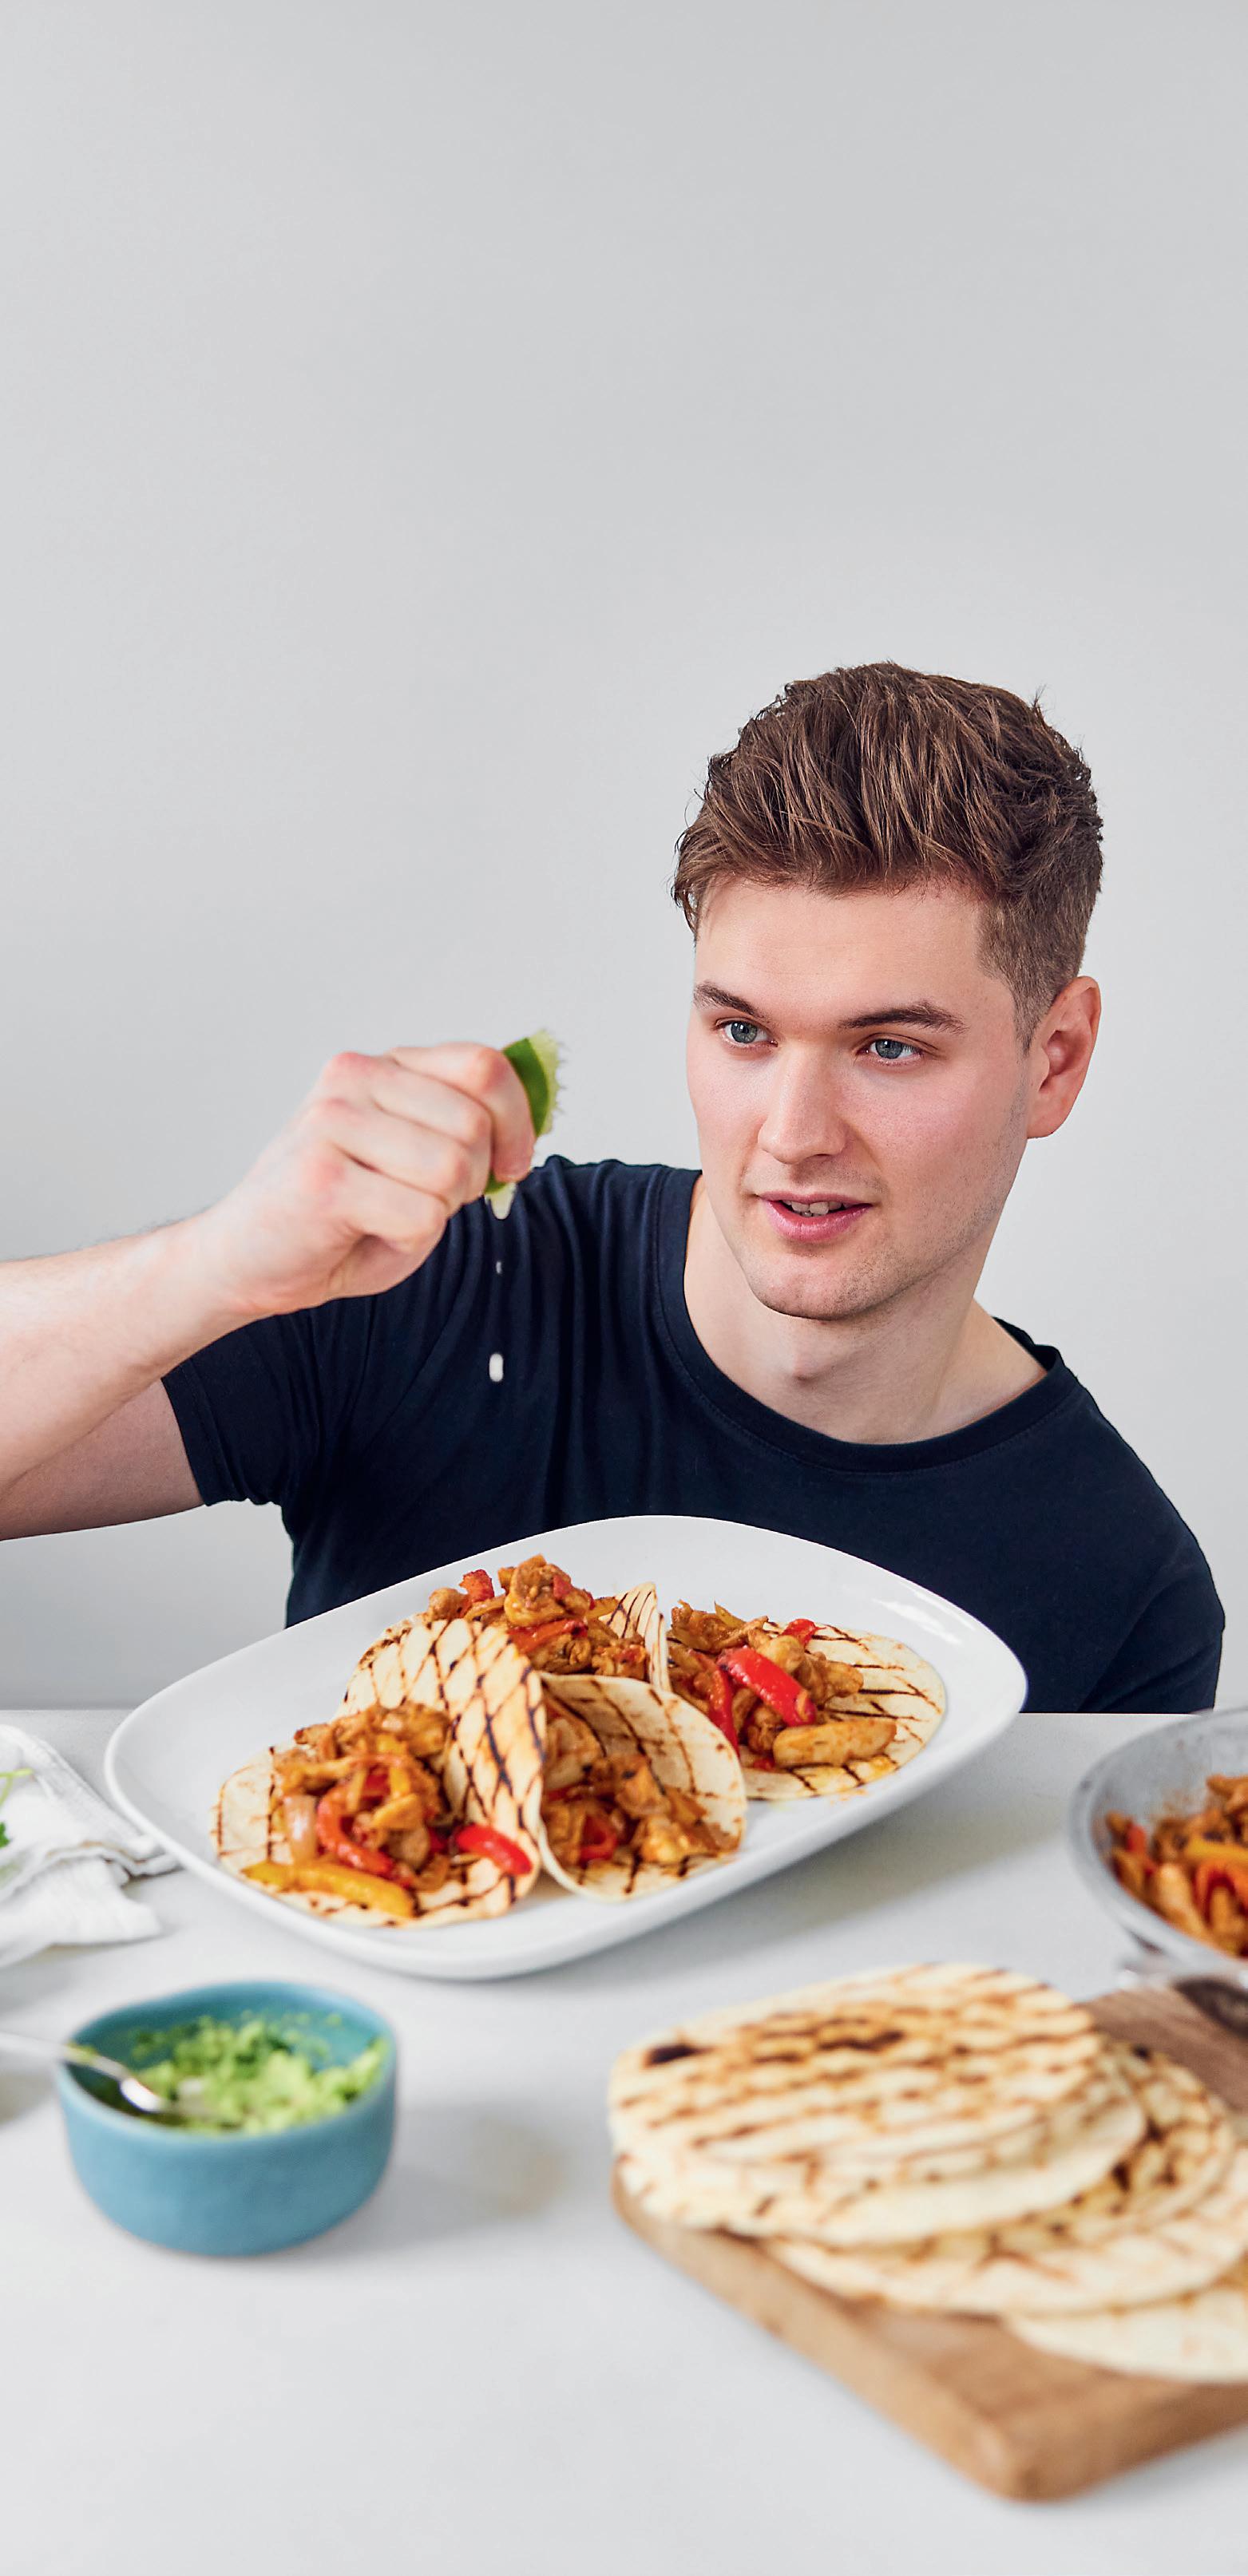


Imagine it is 2020, and the COVID-19 lockdown has just ensued. Doors are shut, blinds are drawn, and nearly everyone seems to be passing their days on a new social video platform called TikTok. Somewhere amid these mindless scrolls of dance trends, workout recommendations, and viral challenges, there emerges a flurry of creators busy in the kitchen, mesmerizing users with their step-by-step homecooked recipes. The foodie scene had officially taken up residence on TikTok, and the culinary industry would be forever changed.
Sam Way is one of these early creators. The U.K.-based chef was amid a major career path change when he created his TikTok account, @samseats, in 2020 and began posting recipes in hopes of getting hired by a restaurant or food startup. He never anticipated garnering millions of views within his first few months, acquiring brand deals, and becoming one the earliest foodie influencers to grace the generation-defining platform. Way’s mesmerizing, fast-cut videos and his impressive, from-scratch recipes have come to define the TikTok food scene and influence new waves of food creators across the platform. Way no longer needed to search for work in the restaurant industry—rather unintentionally, his career as a chef had been fully launched.
Way now posts for an audience of 10 million followers, who naturally have been asking for more content that extends beyond the confines of TikTok. In 2023, Way answered these wishes with his first cookbook, which shares a name with the TikTok account that started it all. “Sam’s Eats” is a multifaceted cookbook, introducing readers to recipes that span various mealtimes, course styles, occasions, experience levels, and cultures. But above all, the book uplifts the sacred art of home cooking and encourages home cooks— both beginner and advanced—to find solace in the kitchen. We caught up with Way about his unexpected rise to social media fame, his new cookbook, and his best tips for beginners in the kitchen. (Interview edited for clarity and length.)
Tell me a bit about your background in cooking. Does this love/talent for cooking run in your family? What are some of your earliest memories in the kitchen?
I grew up in a family of good home cooks. I was never really having takeaway meals, my mom and my dad always made sure to have really nice, hearty home-cooked meals for us. So, I think naturally I was always surrounded by that kind of cooking, and I was curious to jump in and try it as well. When I was younger, obviously being at school during the week you’re not really going to be cooking. But then came the weekend and traditions like, in the U.K. we have the Sunday roast, which is huge. So being around the Sunday roast, getting involved in certain steps of the cooking or baking, I feel like it just came about out of curiosity and then just getting in there. I think baking is one of the things that I remember doing first, even though it’s not my forte now. But I would say it’s the first thing I actually tried in the kitchen.
Can you explain the Sunday roast a bit more? What does that tradition entail?
So, Sunday roast is probably like when you have Thanksgiving, you know you have your turkey and your sides. [In the U.K.] we have the Sunday roast, which is similar. You usually have roast beef and then you have all the trimmings or sides, like roast potatoes. There are so many variations. But basically, it’s just an excuse to have a load of good food and cook a masterpiece every Sunday.
You have 10 million followers on TikTok. How did you come to amass such a community on the platform? Was it a steady climb or did your account blow up overnight?
I actually started my TikTok and other social media accounts as a portfolio. I didn’t intend on becoming a content creator. I actually wanted to work in a kitchen or at a food or drink startup. I didn’t have any qualifications. This was during lockdown, and everyone was losing their jobs in hospitality, so I was
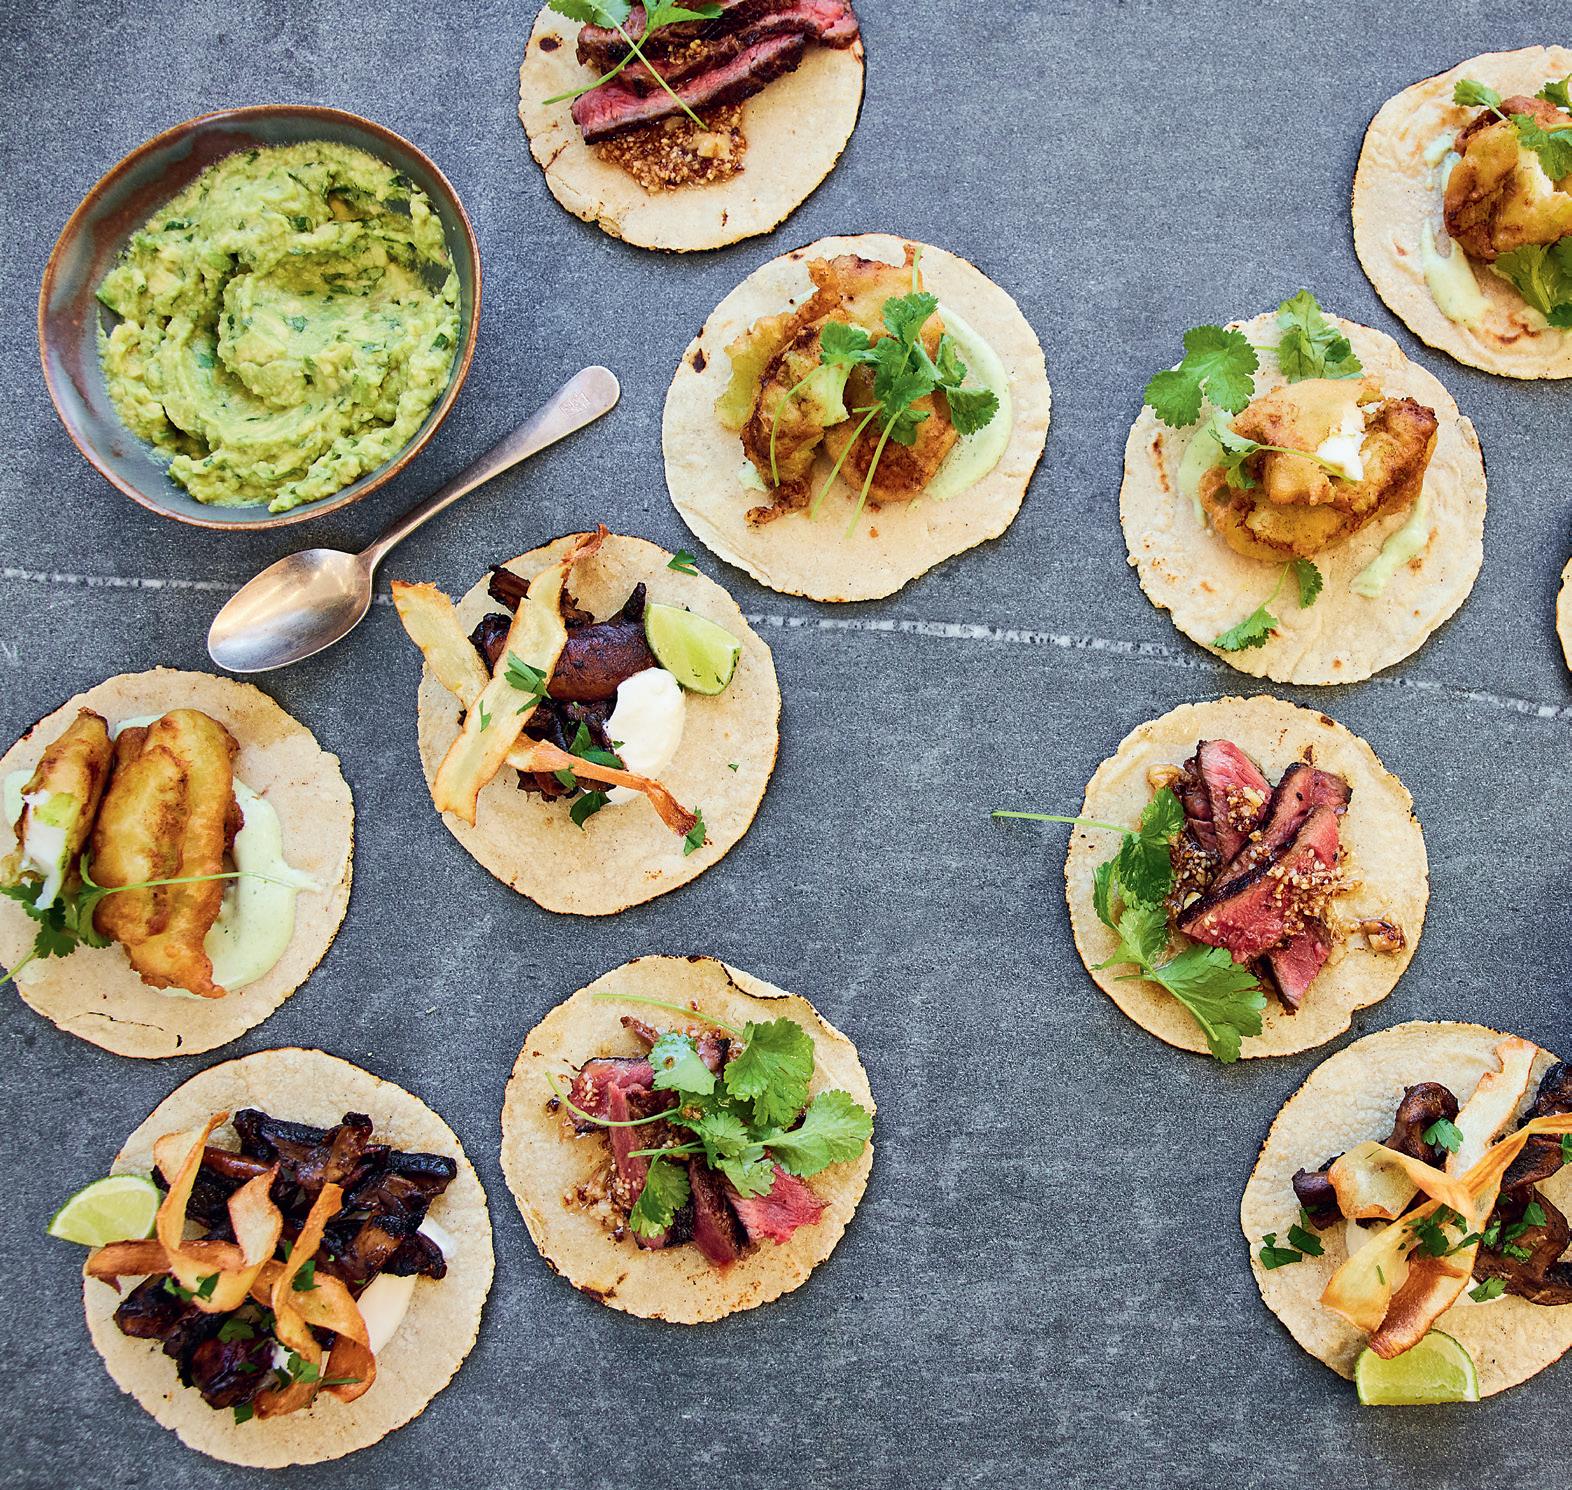
thinking ‘How am I going to actually stand out?’ I decided to build an online portfolio to show what I cook. So, I didn’t really expect this to happen. Within a few weeks of me posting videos, I was getting tens of thousands of views. And from there it just started building and kept going up and up and up. It hit a point where my videos were starting to get millions of views. It was a good time [to start] because everyone was at home, on their phones, and wanting to make the most of that moment of engaging with the food community.
Did your life sort of change overnight?
I don’t really feel any different now. I’m very much the same. But it definitely opened up new opportunities. I mean, I was in a job I didn’t really like before this. And I was desperate to get into something that just brought me happiness, ultimately. And that was cooking. So ever since I was approached by my first brand [via TikTok] I started to think, ‘OK, I might be able to make this work as an actual job.’
Are there any other creators on the platform that inspired your content style, or did you just start from scratch? I think naturally, you see other styles and stuff on TikTok. If you’ve seen my videos, they’re very fast and they’re
snappy, and I think the reason I got into that style or that niche is because I was wanting to do dishes that were completely all out. And at that time, you could only do one-minute videos on the platform. Now, you can do like 10-minute TikToks, but at that time it was only one minute. And I wanted to do huge meals, so I had to cram it all in. So, it really just kind of fell into place. And, actually, I did a lot of music growing up, and that was always a big part of my childhood and teenagerhood. So, having the rhythmic side to it was quite fun as well, and that just made it a bit more engaging for me to do. I kind of saw it as a slightly different approach from the classic, top-over cooking videos, which were very popular at the time. Now, I feel like that’s less so and more people are doing faster, engaging videos.
As you mentioned, your TikTok videos are extremely fast-paced. How long does each one take you to edit?
When I first started, each one probably took me about 12 hours because I would have to take four hours’ worth of footage and get it into one minute. It’s quite a tricky process. But now, it probably varies. It can take anywhere from five hours to edit a video or still 10 hours. It’s a sliding scale, but it’s much longer than people might think it takes.
“Cooking for me is fun, it brings a lot of enjoyment, and it’s a slight form of mindfulness. It's quite a nice thing for people to realize.”–SAM WAY
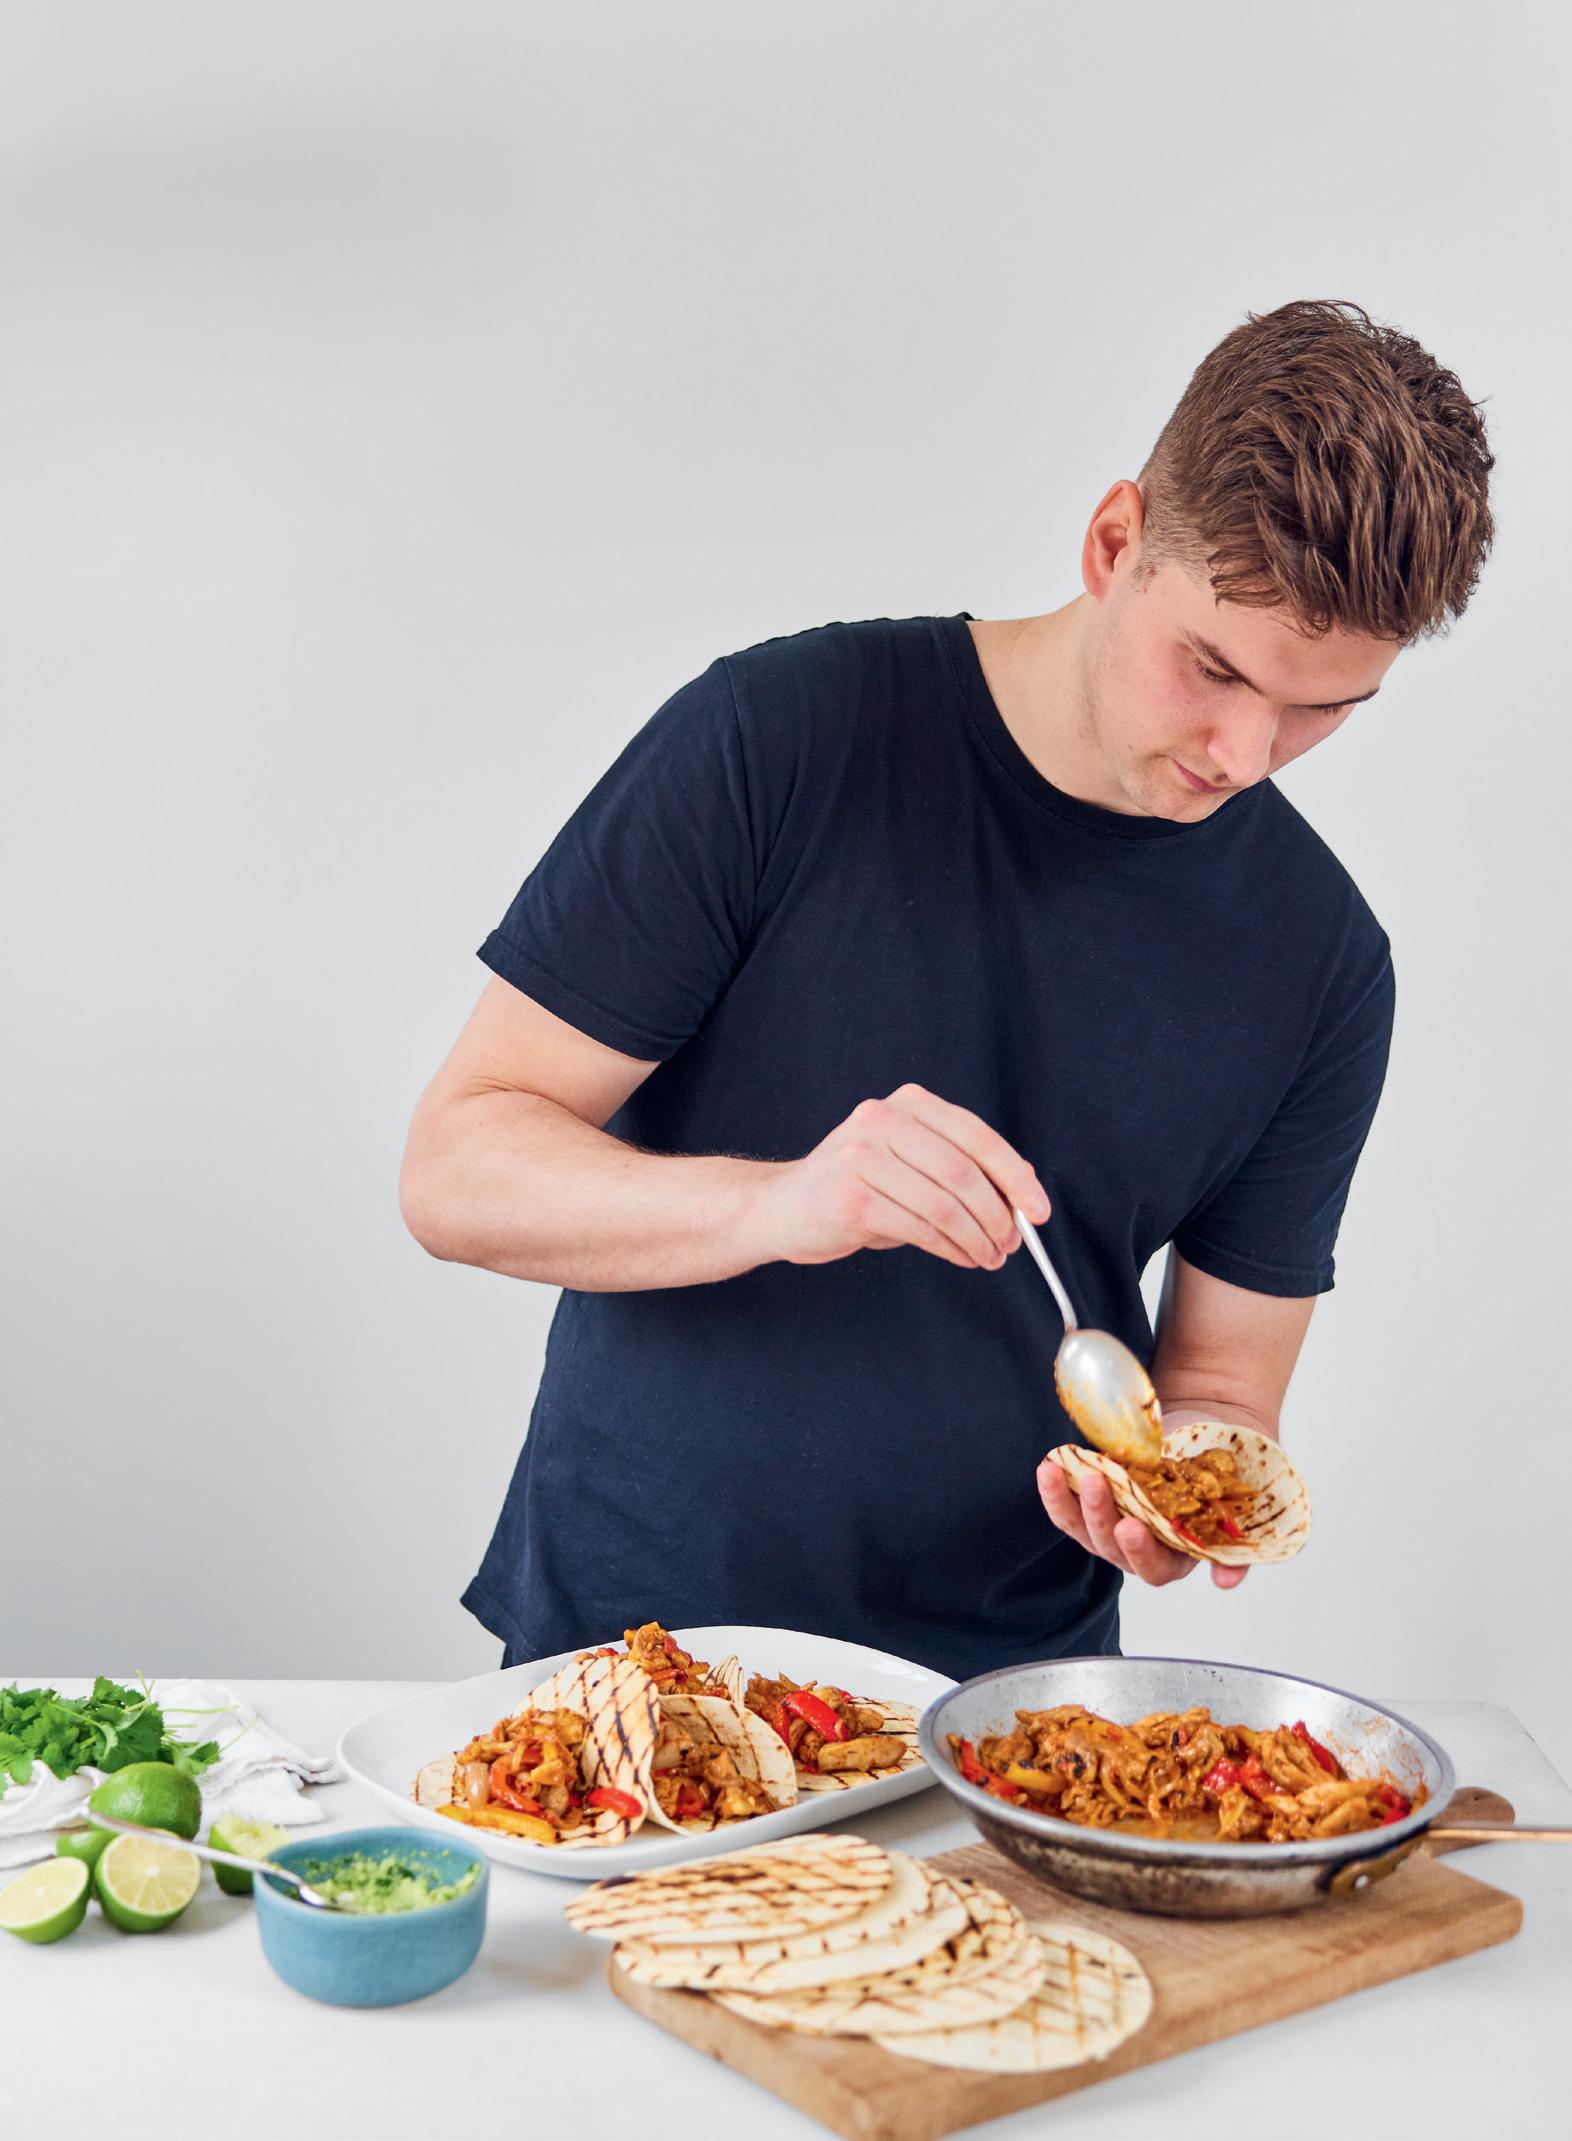
How do you feel social media, specifically TikTok, is influencing the culinary industry and the next generation of chefs?
I think it’s really allowing everyone to become a cook. I feel like you used to be limited to TV and cookbooks. But anyone can go on social media now, and anyone can post a cooking video. And it doesn’t have to be perfect. You can have someone who’s maybe not a great cook, but they’re doing stuff that’s really engaging and really accessible. And then you might have the complete other end, where you’ve got Michelin-star chefs showing how to prepare fine dining. I think it just creates opportunities for everyone. I also think anyone can see a cooking video and be inspired by it. You’re not limited
to a certain type of cookbook, kind of like the old-school way. I think social media has its own place for recipes now.
Speaking of that, let’s talk about your cookbook, “Sam’s Eats.” What first inspired you to translate your online presence into a cookbook?
I think a cookbook for me was the natural next step. I had this online presence and I wanted to do something that kind of solidified my real-world presence. I think being online completely is a world of its own and I wanted to branch out a bit. I also wanted to challenge myself. I didn’t manage to get through high school because I got an injury from sport. And so, for me, not being able to do that meant that I wanted to find something
else I could challenge myself with and complete successfully. So, the cookbook for me, it was like, ‘OK, I’m gonna give this a go. If I can do it, then I can give myself a pat on the back.’ And also, people had been requesting a cookbook, so it was a combination of wanting to challenge myself and wanting to deliver on those requests.
What do you hope readers take away from this book?
The main thing that I wrote it for was every level of home cooking. I want people to read the book, to make some recipes from the book, and feel like it’s not actually that daunting, cooking. It’s not hard. You can do as little as you want, as much as you want. And also, I think, to find enjoyment in it. That’s the big thing about my story. Cooking for me is fun, it brings a lot of enjoyment, and it’s a slight form of mindfulness. It’s quite a nice thing for people to realize. I think when people realize that, they want to get really into it. It’s an all-inclusive book that hopefully just inspires everyone of all skill levels to get in the kitchen and just enjoy it.
What did your experimentation process look like with these recipes? How did you test them, and how did you know when they were really ready?
So, I tend to find recipes, basically through what people request, or what’s popular at the time. With that, if it’s something quite traditional, I might stick to the tradition and research the recipe, test it a few different ways, and then kind of do it in my own way with my own twist. If it is something that’s not as traditional, I will just think of the foods I like and then go off on a tangent and try different variations, and just be creative in that sense. That’s the really nice thing about doing what I do, I can experiment. Some recipes take two or three times to test, some recipes I don’t need to test at all. It varies. I’ve had some recipes where I’ve had to bake a piece of bread about five, six times because I couldn’t get it right. Again, it’s a sliding scale.
Favorite recipe in the book?
My favorite recipe in the book is definitely the chicken gyros. I have spent a lot of time in Greece, so for me it was kind of a comfort, and a home comfort, I could say because I make it so much here. It starts with marinated chicken on skewers. You grill it until it’s nice and charred on the outside, and really juicy on the inside, and

you have some homemade pitas, tzatziki, fries, and toppings. The recipe in the book shows you how to do all of that from scratch. You can pick parts that you want to do yourself, but there is also the option to do everything yourself.
Which recipe do you feel is the most approachable for beginners? In other words, if they’re going to start anywhere, where should they start?
Yeah, I’ve got a few recipes in there. Actually, there’s a chapter called ‘weeknight meals.’ That’s the chapter for when you get back from work or school, you’re tired, and you don’t want to cook much. But you can still cook a delicious meal that’s really tasty and doesn’t take much time or effort. There’s some pasta dishes for example, like a nice sausage pasta dish [Creamy Sausage & Mushroom Pasta] and a tomato-based pasta [Roasted Cherry Tomato Cavatappi; see recipe at right], which is actually quite good because you basically chuck everything into a pan and roast it for half an hour. And then you just blend that all up and you’ve got the most amazing sauce. It’s basically a one-pot pasta dish. It’s really through those techniques that you might not think about, like roasting, charring, all those kinds of things, that you can do something very simple, but make it taste really good.
You mention in the book’s introduction your love for traveling. How has this
influenced your cooking, as well the recipes readers will find in your book?
Yeah, I have included a lot of different countries in my book. I think you can’t just limit yourself to one country, there’s so much flavor around the world. I’ve taken inspiration from Mexico, India, Vietnam, and all the European countries. I think a big one for me is Mexican cuisine. That’s one of my go-to’s because you can visit a few simple techniques, like I said, the charring, making sauces, all that kind of stuff, that can make things taste really nice. But, I wouldn’t say that there’s a single overriding country represented in my book. It kind of just gives readers a taste of where I’ve traveled, the people I know, all those things that have inspired me to cook dishes from around the world.
Of all the places you’ve traveled, where had the best food?
I recently went to India and that was awesome. It was really nice to see so many amazing avors. It’s very di erent to British Indian cuisine, which is kind of its own thing here [in the U.K.]. So, actually having proper, authentic Indian cuisine was really refreshing. But it’s up there with French, Italian, Mexican, and Greek.
What are some tips you have for those who are new to the kitchen?
I would say just get stuck in it. Don’t be afraid to mess something up. Don’t be afraid to make something that doesn’t
This is a wonderful recipe to have up your sleeve. With a mixture of sweet and sour flavors from the tomatoes, lemon, and garlic, it is a delicious and fuss-free weeknight meal. The key to a silky smooth tomato sauce is to make sure that the butter is cold when you add it to the blender. –sam way
18 ounces cherry tomatoes
1 red onion, quartered
Grated zest of 1 lemon
2 tablespoons olive oil, plus 1 teaspoon Sea salt, to taste
1 small bulb of garlic
14 ounces dried cavatappi pasta
2 tablespoons cold butter
Freshly ground black pepper, to taste Grated Parmesan, to serve
1. Heat the oven to 400°F.
2. Place the tomatoes, onion, lemon zest, and the 2 tablespoons of olive oil in a roasting pan, season with sea salt, and mix it all together.
3. Cut the top o the bulb of garlic (not the root end), rub with the teaspoon of olive oil, then wrap tightly in foil. Place the garlic in the corner of the roasting pan
4. Cook in the oven for about 30 minutes, until the tomatoes are slightly charred and blistered, and the garlic has softened.
5. Cook the pasta in a large pan of salted, boiling water for about 10 minutes, or until al dente. Drain, saving some of the cooking water, and place it back in the pan.
6. Tip the tomatoes and onion into a blender. Remove the bulb of garlic from the foil, and squeeze the cloves into the blender as well. Add 2 tablespoons of the reserved pasta cooking water and blitz on high until smooth. Add the cold butter and continue to blitz until it has melted and emulsified. The sauce should now be thick and glossy. Test it for seasoning and add sea salt and freshly ground black pepper to taste.
7. Tip the tomato sauce into the pan of cooked pasta, mix it all together, and serve with a good grating of Parmesan on top.
taste good. Because you only learn to know which flavors work and how to do things when they don’t work. Yes, you can have training, but you don’t need training to be able to cook well at home. I think just give it a go. Don’t be afraid to fail, and nine times out of 10, it will at least end up tasting really good.
Want to step up the festive factor at brunch? Include Mimosas! This popular orange juice and sparkling wine drink that is named after the tropical flowering shrub was created in 1925 at the Ritz Hotel in Paris—some fun facts to sip on while enjoying a glass. Classic Mimosas are an easy brunchtime favorite since they pair well with the savory egg dishes and meats at the table as well as the meal’s sweeter side including waffles, pancakes, French toast, beignets, coffeecake, and doughnuts.
There are also variations on the theme: If this drink is made with mandarin juice, it becomes a Puccini, which is named after the Madame Butterfly composer, made popular in Venice and other areas of northern Italy. And peach puree and Prosecco, Italy’s signature sparkler, makes a Bellini. It’s said the first Bellini was created in 1948 at Harry’s Bar in Venice, Italy, which was a hot spot for celebrities of the day such as Truman Capote, Ernest Hemingway, and Humphrey Bogart. Here’s looking at you!
Mimosa
MAKES 1
½ ounce Grand Marnier or other orange liqueur
1¾ ounces orange juice
Brut Champagne or sparkling wine, to top
Pour orange liqueur and orange juice into a flute or wine glass and top with Champagne or other sparkling wine. Stir gently.
Variation: To make a Bellini, pour 2 ounces (¼ cup) fresh peach puree into a chilled flute, add 4 ounces Prosecco, and stir gently.
Note: If you want to make your own peach puree, frozen peaches will work anytime of year. Defrost 1½ pounds sliced and peeled peaches, either at room temperature 3 to 4 hours or in the refrigerator overnight. Blend the defrosted peaches until completely smooth in a blender or food processor. (Makes 2 cups puree, which will keep in the refrigerator up to 5 days.)