Everyday Delicious Meals
Game-Day Buffet

Sweet and Simple Desserts

chef spotlight: Jocelyn Delk Adams

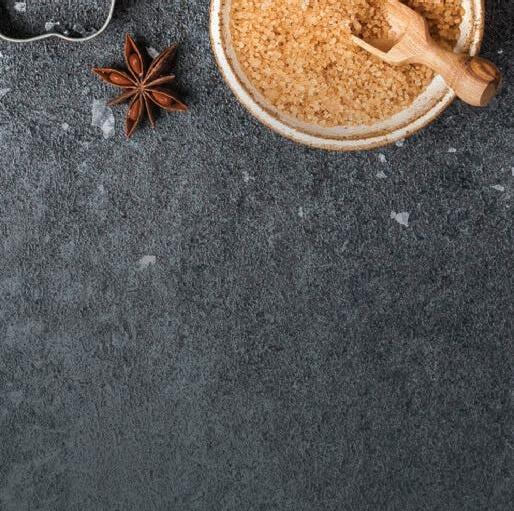
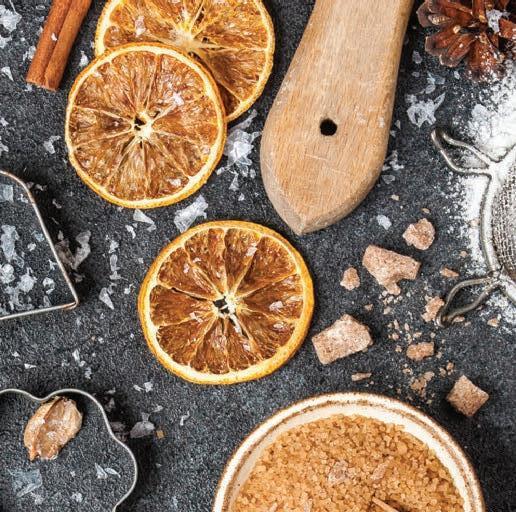
Fall 2023 complimentary Lunds & Byerlys SEASONAL Ramp up flavor at your celebrations
Twists

Everyday Delicious Meals
Game-Day Buffet
Sweet and Simple Desserts
chef spotlight: Jocelyn Delk Adams


Celebrate fall and friendship with live music from renowned, local artists while sipping on the latest craft beers, seltzers and ready-to-drink beverages.


SATURDAY, SEPTE MBER 30 • 1 - 5 PM


CHS Field–Home of the St. Paul Saints $40 per person (plus taxes and fees) 21+ event


Tickets on sale at MinnesotaMonthly.com/Brews


Turn to a avorful ri on this traditional garnish and serve with sweet potatoes, roasted vegetables, and more (page 27).

Chef Jocelyn Delk Adams
celebrates life and great food in “Everyday Grand.”
BY EMMA ENEBAKThese approachable yet impressive recipes ramp up avor throughout the season.
 BY KRISTIN DONNELLY
Explore a world of celebratory food traditions.
BY ALESHA TAYLORWhich spud’s for you? Try di erent varieties in a quartet of recipes.
BY MARY SUBIALKA17
Make life easier with these kitchen gadgets for meal prep and entertaining.
BY ALESHA TAYLORWhip up quick
desserts for deliciously sweet get-togethers.

RECIPES BY MOLLY
Follow these tips for a happy and healthy holiday season.
BY EMMA CONWAYWhether your team is on TV or it’s board game night, impress guests with a spread of winning bites.
GILBERTStaples and creativity get dinner on the table any night of the week.
RECIPES BY NAGI MAEHASHI AND KEVIN TATAR
A bo le of wine is o en welcome at holiday feasts: Grab these go-to reds and whites.
BY MARY SUBIALKAHOW DO YOU STAY HEALTHY DURING THE HOLIDAYS? MINDFUL EATING AND FUN ACTIVITIES. See page 18
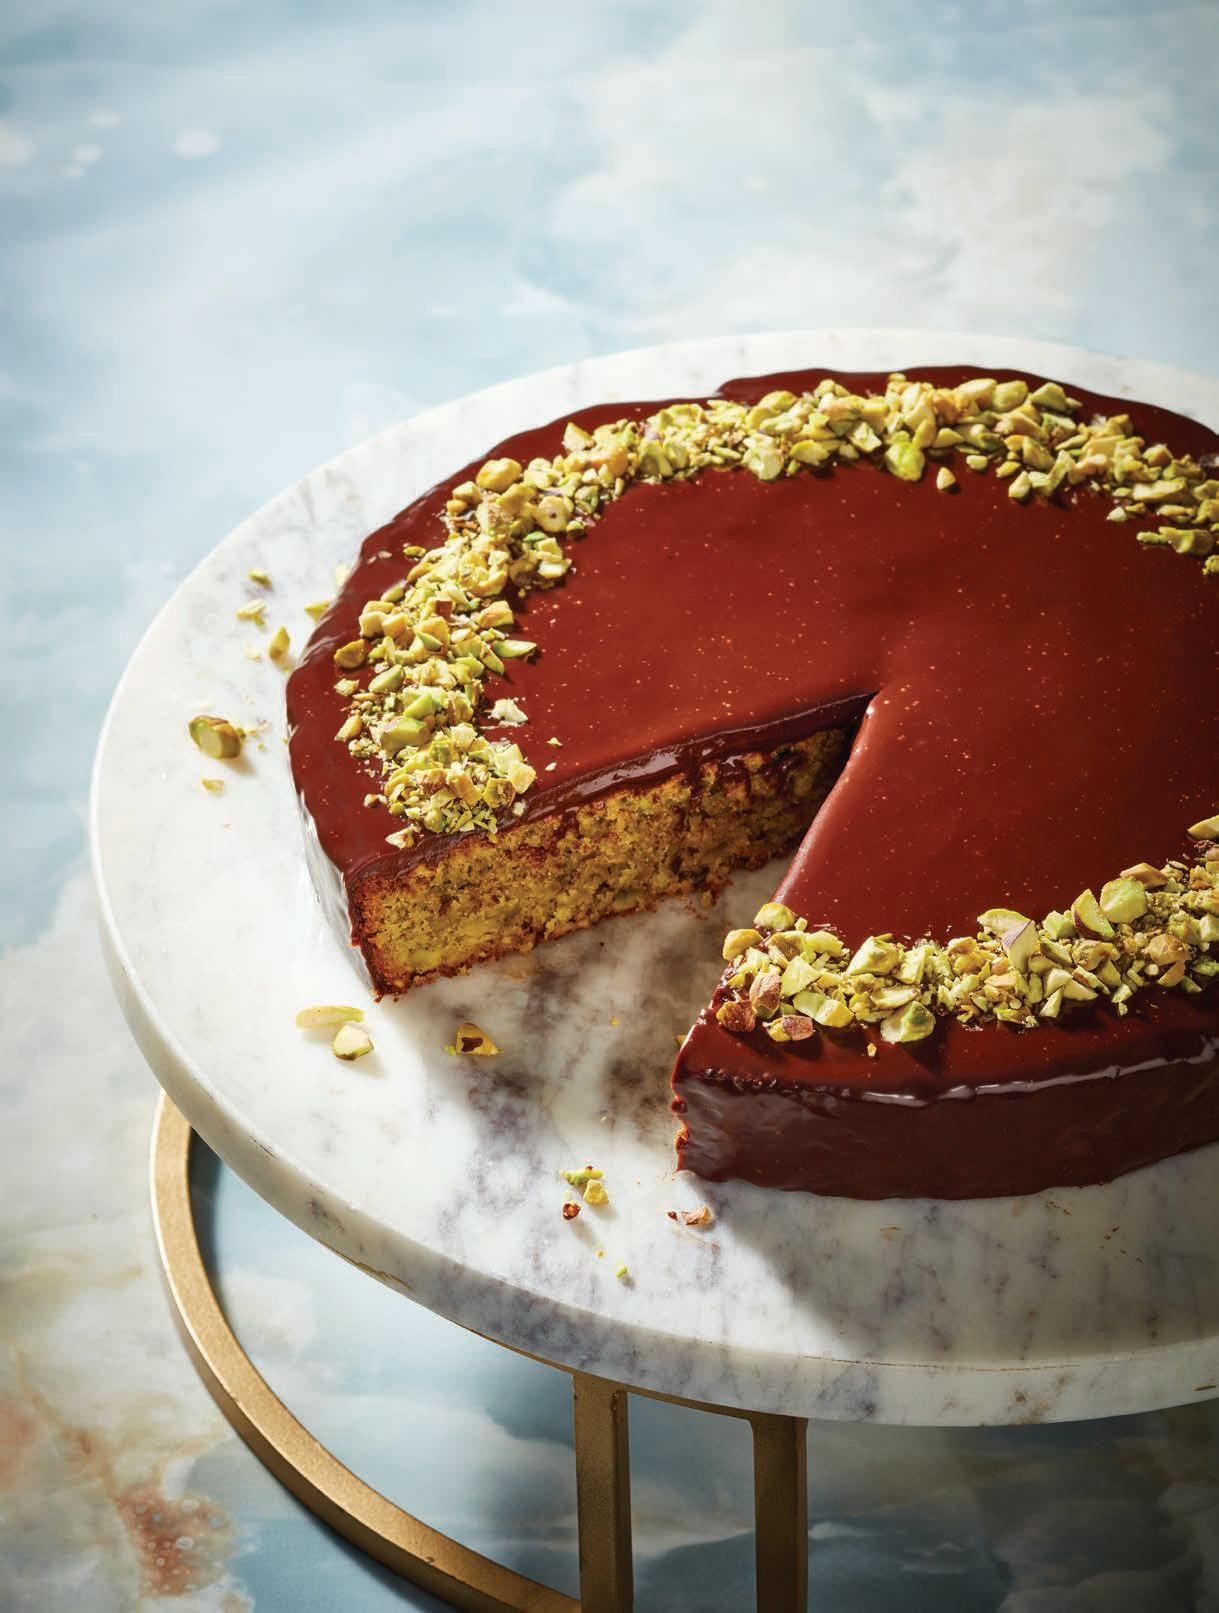
ON THE COVER
Pistachio Torte with Chocolate

Ganache, page 28
PHOTOGRAPHER
Terry Brennan
FOOD STYLIST
Lara Miklasevics
PUBLISHER
Tammy Galvin
EDITORIAL DIRECTOR
Alesha Taylor
CONTENT DIRECTOR
Mary Subialka
ASSOCIATE EDITORS
Emma Enebak, Macy Harder
EDITORIAL ASSISTANT
Emma Conway
CREATIVE DIRECTOR
Tonya Sutfin
SENIOR ART DIRECTOR
Ted Rossiter
PRODUCTION DIRECTOR
Deidra Anderson
SENIOR ADVERTISING COORDINATOR
Mikayla Snyder
SALES & MARKETING SPECIALIST
Tausha Martinson-Bright
VOLUME 19, NUMBER 3
Real Food magazine is published quarterly by Greenspring Media, LLC, 9401 James Ave. S, Suite 152, Bloomington, MN 55431, 612.371.5800, Fax 612.371.5801. All rights reserved. No part of this publication may be reprinted or otherwise reproduced without written permission from the publisher.
Real Food is exclusively operated and owned by Greenspring Media, LLC. Printed in the USA. realfoodmag.com
The pages between the covers of this magazine (except for any inserted material) are printed on paper made from wood fiber that was procured from forests that are sustainably managed to remain healthy, productive and biologically diverse.
“Small cheer and great welcome makes a mer feast.”
–WILLIAM SHAKESPEARE


From fall festivals and Thanksgiving and Christmas to Hannukah and Holi, food is an essential element of any holiday celebration. Around the world, food is o en used as a means to come together—and to celebrate important milestones while creating lasting memories.


These are just a few examples of the many traditional food celebrations heard ’round the world. Though flavors and festivities vary, each one in its own right is an opportunity to come together with loved ones, share delicious food, and celebrate the joys of life.

The Mid-Autumn Festival in China and Vietnam is a harvest festival that celebrates the full moon. Traditional foods include mooncakes, which are filled with sweet or savory fillings, and pomelo, a type of citrus fruit.

Christmas! Joyeux メリークリスマス!
Merry Buon Natale! חֲנוּכָּה שַׂמֵחַ 聖誕快樂
Feliz
Frohe


In Mexico, the Day of the Dead on November 1, is a holiday that’s all about celebrating the lives of loved ones who have passed away. One of the most important elements of the celebration is the food. Families often prepare an altar, or ofrenda, which includes traditional foods such as pan de muerto, a sweet bread that’s decorated with bones made of dough. Tamales are also a popular food for the Day of the Dead, and they’re often filled with chicken or pork and served with a spicy sauce.

Chinese Lunar New Year, which is celebrated in late January or into February, is a time for family gatherings and festive meals. One of the most important dishes is dumplings, which are believed to bring good luck and prosperity. They are usually filled with meat or vegetables and often shaped like gold ingots, which symbolize wealth. Another important dish is Nian Gao, a sweet rice cake that’s meant to bring good luck and success in the new year.
Thanksgiving in the United States is a feast (literally!) of a holiday. O cially celebrated on the fourth Thursday of November, the centerpiece of the Thanksgiving meal is usually a roasted turkey, which is accompanied by stu ng, mashed potatoes, gravy, and cranberry sauce. Another popular dish is green bean casserole, made with canned green beans, cream of mushroom soup, and crispy fried onions. Pumpkin pie is the traditional dessert, and it’s often served with whipped cream.

In Italy, Christmas Eve is known as La Vigilia, and it’s a day that’s all about seafood. The traditional meal is called the Feast of the Seven Fishes, and as the name suggests, it includes seven di erent types of seafood dishes. The dishes can include everything from fried calamari or baked clams to seafood pasta. The meal is usually finished o with a dessert, such as panettone, a sweet bread filled with dried fruit.
Hanukkah is normally celebrated worldwide between late November and late December, depending on the Hebrew calendar. This Jewish festival celebrates the miracle of the oil that burned for eight days, and traditional foods include latkes, potato pancakes fried in oil, and sufganiyot (jelly-filled doughnuts).


Diwali is India’s Festival of Lights in early November—and it is one of the most important holidays in Indian religions. Aptly so, Diwali is celebrated with plenty of sweet treats such as gulab jamun, a fried dough ball soaked in a sweet syrup. Another traditional sweet is barfi, which is made with condensed milk and flavored with nuts or fruits. The festival is also a time for family gatherings and feasting, and savory dishes such as samosas and biryani are often served.
In Japan, Osechi Ryori is a traditional New Year’s meal full of symbolism. The meal includes a variety of dishes, each of which has a special meaning. For example, black beans symbolize good health, while shrimp symbolizes longevity. The traditional New Year’s soup, Ozoni, is also an important part of the meal. Ozoni is made with mochi, a type of rice cake, and it’s considered good luck to eat it on New Year’s Day.
The holiday season is all about indulgence in France. The traditional Christmas meal, called le réveillon, is a long and luxurious a air that includes multiple courses and plenty of wine. The meal usually starts with oysters or foie gras, followed by roasted meat or fish, and finishes with a variety of desserts, including the traditional bûche de Noël, a cake that’s shaped like a Yule log.

“Laughter is brightest where food is best.”
–IRISH PROVERB
why is a potato called a “spud”?


A SHARP, NARROW SPADE KNOWN AS A SPUD WAS USED TO DIG UP LARGE ROOTED PLANTS, ESPECIALLY POTATOES, AND AROUND THE MID19TH CENTURY, IT’S SAID THAT THE WORD CAUGHT ON AS A SLANG TERM FOR POTATOES.


Potatoes are a highlight of many meals, and certainly a big player at the holiday table. Not only are they comforting and delicious, but they are also naturally free of gluten, fat, and cholesterol and a good source of complex carbohydrates, while loaded with nutrients including vitamins B6 and C, and more potassium than the average banana.
But not all spuds are the same. Choosing the right one for your needs will make a difference, whether you’re looking for fluffy baked potatoes or those that will hold their shape in a casserole.
potato varieties
Potatoes vary in starch level and moisture content, and those two factors are the key to selecting the right spud to work best for different prep and cooking methods.

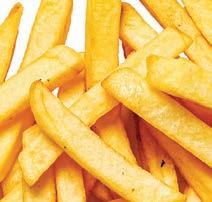
High starch/low moisture: These have a dry, mealy texture but become light and fluffy when cooked. The russet (often called Idaho) potato is in this category. These brown-skinned spuds are great for baking, mashing, and making french fries. The specialty blue potatoes (which are really more purple) have similar texture to the russet and can also work well baked or mashed while adding a splash of color to a meal.
potato fun facts

13 billion pounds of Idaho potatoes are harvested every year. The average American eats approximately 111 pounds of potatoes each year!

There is no harm in eating potatoes raw, however, you might find them a little harder to digest


than when cooked.
POTATO COMMISSION
Low to medium starch/medium to high moisture: Often referred to as waxy, these are best when you want potato pieces to keep their shape after cooking. Use in casseroles, stews, salads, soups, and for scalloped or au gratin potatoes. You can mash these, but they will tend to be thick and slightly lumpy rather than smooth and creamy. This includes long white, round white, round red, fingerling, Russian banana, and new potatoes (which are small potatoes of any variety that are harvested young so have a crisp, waxy texture and thin skin).
Medium-starch and moisture all-purpose golden-skinned and fleshed: These were not widely available in the U.S. until the 1980s, when Canada introduced the Yukon gold. Excellent for baking, boiling, or roasting, and its moist, creamy texture and slight buttery flavor makes it a favorite for mashing.
Here are tips and recipes from the Idaho Potato Commission made with different potatoes and cooking methods. Which spud’s for you?
be gentle
Potatoes can bruise as easily as a banana or apple. If it develops black spots, just trim them away before cooking.

Store potatoes in a cool, dark, and wellventilated place. They’ll keep about a week at room temperature and several weeks at 45 to 50°F. Refrigerator temperatures are too cold, which converts the starch into sugar, resulting in a sweet taste. Extra sugar also causes them to darken prematurely while frying. Dampness can cause decay, so do not wash before storing.
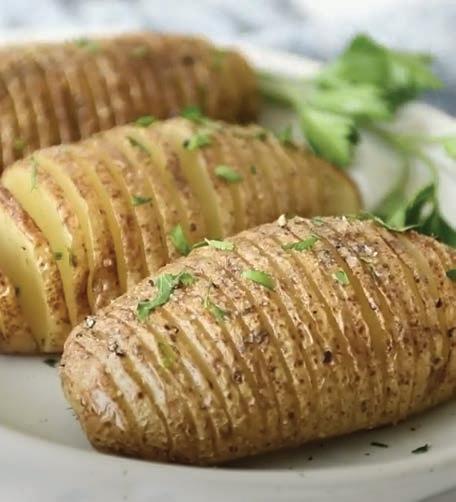
For just a little more e ort than a plain baked potato, you can make these showy potatoes. They are easy to make and encompass two favorite textures—crispy edges like your favorite french fries with a creamy center reminiscent of mashed.
Homestyle Mashed Potatoes
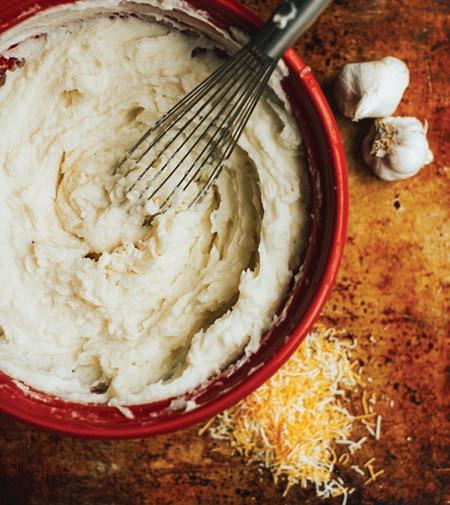
These creamy cheesy mashed potatoes are quick to make and amazing when served fresh and hot; the perfect base for supper.
Cut these out and use the recipes on the reverse side to make creative dishes with potatoes.
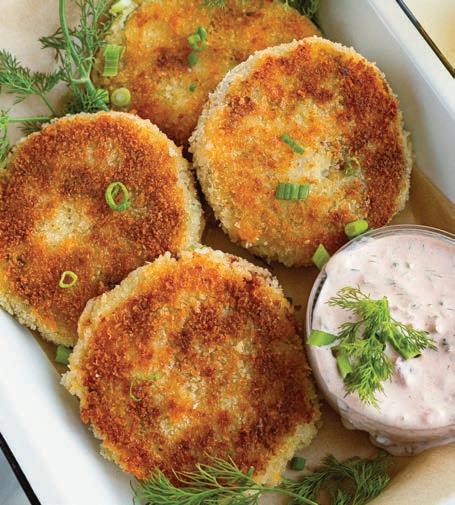
Do something fun with leftover potatoes—or make a fresh batch. This recipe for a crispy, cheesy, potato cake that includes bacon serves as a great side dish, snack, or main course. The sauce is delicious, too.
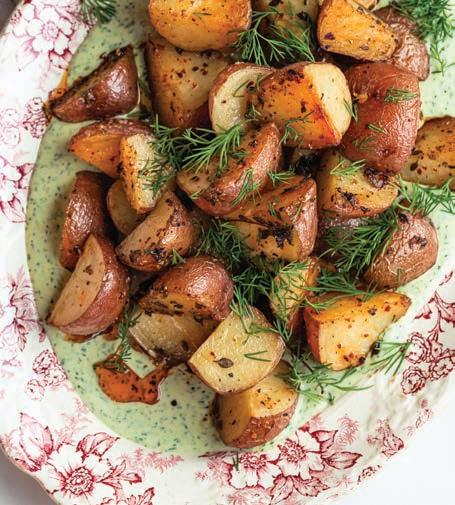
Roasted potatoes are the perfect, simple side dish. Here, they are dressed up with an herby yogurt sauce, and can be served for breakfast, lunch, or dinner.
MAKES 10 SERVINGS | RECIPE BY KITA ROBERTS
5pounds russet Idaho potatoes, washed, peeled, and cubed into even 1-inch portions
¾ cup cream
¼ cup sour cream
4 tablespoons butter
8 ounces cheddar cheese, shredded
6 garlic cloves, minced Salt and pepper, to taste
1. Place the cubed potatoes in a large pot and cover with water.
2. Bring to a boil and cook 12 to 17 minutes, until potatoes are fork-tender.
3. Drain the potatoes and transfer to a large bowl.
4. Mash the potatoes by hand, or with a ricer, and whisk in the cream, sour cream, butter, grated cheese, and garlic.
5. Mix to combine. Season with salt and pepper to taste and serve hot.
6. Store leftovers in an airtight container in the refrigerator for up to 3 days.
MAKES 4 SERVINGS | RECIPE BY LISA LIN
4 large Idaho russet potatoes
Lemon juice
4 tablespoons oil or butter
1. Heat oven to 400°F.
MAKES 8 SERVINGS | RECIPE BY DANIELLE KARTES
8 medium Idaho red potatoes
2 tablespoons olive oil
Salt and pepper, to taste
½ teaspoon aleppo pepper (or mix paprika with cayenne, to taste)
for the herby yogurt
1½ cups Greek yogurt
1 clove garlic
2 tablespoons olive oil
½ cup fresh dill
1 bunch scallions
½ cup cilantro
Pinch of chili flakes
1 tablespoon lemon juice
Salt and pepper, to taste
1. Heat oven to 375°F. Line a baking sheet with parchment paper. Slice the potatoes into quarters, then place in a bowl. Toss with olive oil, salt and pepper, and aleppo pepper.
2. Pour the potatoes out onto the lined baking sheet and roast 30 to 40 minutes, or until the potatoes are tender.
3. Halfway through cooking, flip the potatoes for even browning and place back in the oven to finish.
4. While the potatoes roast, make the yogurt sauce by placing all the ingredients into the work bowl of a food processor and pulse until you reach your desired consistency. It should be smooth.
5. When the potatoes are tender, spoon the yogurt into a serving platter, then pour the hot potatoes over top. Garnish with extra dill and cilantro.
Fresh rosemary
1 large garlic clove, sliced Salt and pepper
Fresh parsley, chopped, for garnish
2. Prepare a bowl of cold water with a squeeze of lemon juice in it.
3. Slice o the bottom of the potatoes to make them steadier for cutting.
4. Place potato between two chopsticks. Cut slits ¼-inch apart using the chopsticks as a guide to keep from cutting all the way through. The slices should stay connected at the bottom.
5. Carefully fan out the sliced pieces without breaking them apart. Place the cut potato in the prepared bowl of water while you cut the remaining potatoes.
6. Melt butter in a saucepan over medium heat. Add a couple of sprigs of rosemary, the sliced garlic, and a sprinkle of salt and pepper. Let sit a few minutes to season the butter.
7. Remove potatoes from water and dry thoroughly. Place on a baking sheet.
8. Brush potatoes with some of the melted butter.
9. Bake for 1 hour. Halfway through cooking, the potatoes will start to fan out. When this happens, brush with some more of the melted butter.
10. Remove from the oven. Brush with remaining butter, sprinkle with salt and garnish with chopped parsley. Serve immediately.
MAKES 8 LARGE OR 16 MEDIUM POTATO CAKES | RECIPE BY DANIELLE KARTES
3 cups leftover mashed Idaho potatoes
3-4 slices bacon, diced and cooked
¼ cup sliced green onions
1½ cups shredded cheddar cheese
¼ cup chopped fresh dill Salt and pepper to taste
2eggs, beaten
2cups panko breadcrumbs
2-3 tablespoons oil
for the dipping sauce
1 cup salsa
1 cup sour cream
¼ cup green onions, chopped
¼ cup fresh dill, chopped
1. Mix the mashed potatoes, bacon, green onions, cheese, dill, and salt and pepper together.
2. Form into 8 equal portions, then pat each into a round disc.
3. One at a time, set each cake gently into the beaten egg wash, then press firmly into the panko breadcrumbs, and set on a plate.
4. Heat the oil in a large skillet over medium-high heat. Once the oil is hot, fry 4 cakes at a time. Flip once, and fry until golden. Repeat with each cake.
5. To make the dipping sauce, mix the salsa ingredients. Dip the hot potato cakes into the sauce and serve.
Apple Valley: 612-255-5500
Bloomington: 952-896-0092
Burnsville: 952-892-5600
Chanhassen: 952-474-1298
Eagan: 651-686-9669
Eden Prairie: 952-525-8000
Edina
50th Street: 952-926-6833
France Avenue: 952-831-3601


Golden Valley: 763-544-8846
Maple Grove: 763-416-1611
Minneapolis
Downtown: 612-379-5040


Nokomis: 612-729-4000
Northeast: 612-548-3820
Uptown: 612-825-2440

Minnetonka
Glen Lake: 952-512-7700
Highway 7: 952-935-0198
Ridgedale: 952-541-1414
Navarre: 952-471-8473
Plymouth: 763-268-1624
Prior Lake: 952-440-3900
Richfield: 612-861-1881


Roseville: 651-633-6949
St. Cloud: 320-252-4112
St. Louis Park: 952-929-2100

St. Paul
Downtown: 651-999-1600
Highland Bridge: 651-698-5845
Wayzata: 952-476-2222
White Bear Lake: 651-653-0000
Woodbury: 651-999-1200
SHOP ONLINE Shop.LundsandByerlys.com
CATERING
LundsandByerlys.com/Catering 952-897-9800
L&B EXTRAS Get extra o ers and tools to make shopping easier.
LundsandByerlys.com/Extras
DOWNLOAD OUR APP
LundsandByerlys.com/Mobile
STAY CONNECTED
Follow us on social media and sign up for our e-newsletter.
LundsandByerlys.com/StayConnected
FOOD QUESTIONS?
Call our FoodE experts: 952-548-1400

REAL FOOD COMMENTS

Aaron Sorenson: 952-927-3663


As fall settles in, we know the holiday season is just around the corner. And during this season of “thanks” and “giving,” here at Lunds & Byerlys, there are so many reasons to do both as we continue to be blessed to have the opportunity to serve you.
My thanks begins with the nearly 4,000 members of our Lunds & Byerlys family and their remarkable merchant talent that brings our stores to life each day through extraordinary food, exceptional service, and passionate expertise.

I’m also thankful to all of you for not only choosing to shop with us, but also for the deep and meaningful connections we are fortunate to build with you through our common bonds of food, life, and community.
Being a strong community partner is important to us, and one way that comes to life is through a commitment to helping those in need. We are fortunate to support the tremendous work of organizations such as Open Arms of Minnesota, Second Harvest Heartland, and many other community-based food shelves so they can continue providing meals to those in need throughout the Twin Cities.
Another highlight of our giving each year happens during the holiday season when all of our stores and facilities choose an organization right in their local community to surprise and delight with financial support. It’s an idea that was shared with me nearly a decade ago as I was having lunch with Burt Cohen, who is the founding publisher of Mpls.St.Paul Magazine and Twin Cities Business. Over the years, we have been fortunate to meet for lunch on many occasions. The conversations are always long and that’s because Burt is never short on great ideas. On this occasion, he shared his admiration for our community involvement, but didn’t hesitate to let me know it could be even more impactful if we empowered each of our locations to make a surprise donation to a local nonprofit during the holiday season. We jumped on that idea in 2015, and it continues today with our teams building even stronger bonds with neighborhood organizations who share a passion for serving the community.
“Here at our Maple Grove store, our team is passionate about community outreach, and we’re honored to have the opportunity to support Cross Services,” says Tom Gordon, general manager at our Maple Grove store. “In addition to monetary donations, we’ve now also had the pleasure of expanding our relationship to include serving food at their Empty Bowls event and volunteering at their facility.”
We wish you and your loved ones a joyous holiday season that is filled with lots of “thanks” and “giving.”
Sincerely,
Tres Lund president and ceo


Add spice to your life and magic to your favorite meals! Here’s how our culinary experts use some of our exclusive L&B Seasoning Blends.

Our L&B Apple Pie Spice contains some warming spices, which makes it perfect for nearly all baked goods—think apple pie, apple bars, fruit crumbles, and mu ns. Another sweet secret trick? Add it to heavy whipping cream before whipping to create a spiced whipped topping. We love it for breakfast, too! Mix it into wa e or pancake batter and dust it over oatmeal, sliced apples, or a latte. And if happy hour is calling, try it on the rim of your cocktail glass.
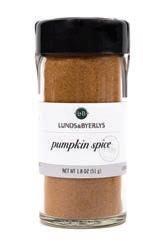
This classic blend combines cinnamon, ginger, nutmeg, cloves, cardamom, and vanilla to create the ultimate pumpkin spice treat! The warming spices are begging to be added to co ee cakes, fruit breads, pancakes, wa es, or mu ns. Plus, just 2½ teaspoons is all you need to add the perfect pumpkin flavor to your 9-inch pumpkin pie. Another clever use? Blend it into a stick of softened butter to create a luscious pumpkin butter you can spread on wa es, rolls, or biscuits. It’s also outstanding mixed into homemade whipped cream or dusted on a latte.
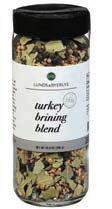
Our L&B Turkey Brining Blend is a proprietary blend of sea salt, black peppercorns, coriander, fennel seeds, juniper berries, bay leaves, and mustard seeds. The fresh, aromatic blend should be mixed with water and then used to brine up to a 20-pound turkey to ensure the juiciest bird!
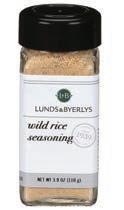
Have you tried our L&B Wild Rice Seasoning yet? This blend is rich, earthy, and a little bit bright thanks to hickory smoked salt, raspberry, mushroom, onion, ginger, garlic, and orange peel. Sure, we love it with wild rice (it is the namesake after all!), but it’s also outstanding mixed with softened butter and rubbed on chicken or turkey before roasting. It also adds the right amount of fresh flavor to meatloaf or meatball recipes. And herbivores love to toss it with mushrooms before roasting or mix it into wild rice soup.
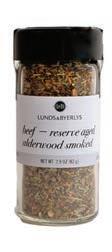
This savory blend combines alderwoodsmoked salt, toasted onion, rosemary, marjoram, thyme, basil, sage, roasted garlic, pepper, fennel, and lavender. Yes, we love it on our patented L&B Reserve Aged Beef, but it can do so much more! The alderwood-smoked salt imparts a hint of bacon flavor, so our culinary experts love it sprinkled on salmon, vegetables, and potatoes before roasting.
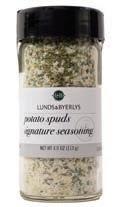
Our Signature Potato Spuds Seasoning was created to dress up your potatoes any way you like them—baked, hash browns, boiled, grilled, you name it. But this garlic, onion, and herb blend is super versatile and also lends itself well to fish, chicken, roasted veggies, and popcorn! Or, fold into a potato soup, mix into a bechamel base for your mac and cheese sauce, or whisk into a vinaigrette. Snacking more your speed? Blend it with mayonnaise and Greek yogurt to create the ultimate chip dip.
Store spices in a cabinet or drawer away from heat—not above the stove, near the dishwasher, or on the counter exposed to sunlight. Oils in spices dry out when exposed to heat, leading to flavor loss. But don’t store them in the fridge or freezer: Temp changes can cause condensation, shortening their use.
Our Manhattan Strip Roast is cut from a tender section of Choice New York Strip and lightly marinated with an exclusive combination of olive oil, French sea salt, and spices developed by our Executive Chef Michael Selby. It cooks in less than an hour and is boneless, so it’s easy to slice and serve. Available November and December.

Glazed Bone-In Ham
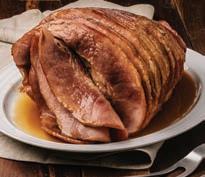
This is ham the way it should be—made using an oldfashioned smoking process perfected by a fourthgeneration family-owned smokehouse. The hams have a subtle smoky-sweet flavor that’s not too salty and a firm texture that’s never dry. Spiral sliced for easy serving. Available November-April.


Go local this holiday season with turkey from family farm Ferndale Market in Cannon Falls. Succulent all-natural turkey breasts are brined in fresh-pressed apple cider made from Minnesotagrown apples and seasoned with herbs, shallots, and sea salt, resulting in a rich, clean flavor. Available in November and December.
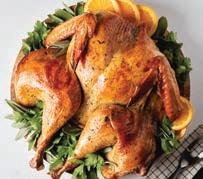
A new take on a Thanksgiving classic! Our Free Range Spatchcock Turkey is butterflied so it cooks faster and is easier to carve. Plus, the spatchcock method creates a crisp skin and moist, tender turkey. The all-natural antibiotic-free turkey is brined with maple sugar, sea salt, and savory herbs. It’s sure to be the star of your Thanksgiving feast. Available in November.
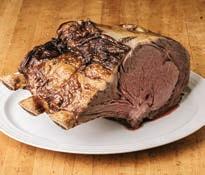
Our patented Reserve Aged Choice Beef is aged for a minimum of 28 days to achieve optimal flavor and tenderness. Much as an oak barrel promotes the aging of wine, untreated cedar is used to provide a depth of flavor while accentuating subtle aromas and providing tenderness that is unmatched. Available daily.
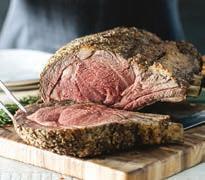
Our bone-in Royal Rib Roasts are the ideal pairing of premium choice beef and high-quality local herbs and spices. The marinade is savory, not salty, and very aromatic. Plus, these royal roasts are incredibly easy to cook! Each cut—king, queen, or princess—is right-sized by the number of servings Available in December.
Our Imperial Beef Tenderloin roasts are made using only premium white beef tenderloin that are hand trimmed and freshly marinated in a rich rosemary and thyme herb blend. Each tenderloin has been carefully netted and rightsized for ease of preparation. Available in December.


Our Alderwood Beef Sirloin Roast starts with a tender sirloin roast that’s rubbed with a proprietary seasoning and then tossed in a rich, smoky co ee marinade. The result is a succulent roast that’s perfect for family gatherings. Plus, the leftovers are delicious in sandwiches the next day. Available October-March.

Let Lunds & Byerlys take care of the mouthwatering main course for your holiday dinner
Bake your way through the holiday season with these festive recipes!

MAKES 8 SERVINGS | TIME: PREPARATION 90 MINUTES–2 HOURS; COOKING 45 MINUTES-1 HOUR
for the caramel apple layer
Pie dough (for two 8-inch pies or one 10-inch pie; see Cook’s Notes)
5 apples, peeled, cored, and cut into ½-inch chunks (see Cook’s Notes)
3 tablespoons butter
½ cup brown sugar
1½ teaspoons L&B
Apple Pie Spice
Pinch salt
1 tablespoon cornstarch
2-4 tablespoons water
1. Heat oven to 350°F.
2. Layer one pie crust in the bottom of your pie pan and parbake it by lining it with foil and pie weights. Bake for about 20 minutes.
3. Remove the foil and bake until the crust is set but not browned.
4. In a skillet, heat the apples, butter, brown sugar, apple pie spice, and salt until the apples are tender, about 10 to 12 minutes.
5. In a small bowl, combine the cornstarch and 2-4 tablespoons of water, depending on how juicy your apples are. Add to the skillet.
6. Stir over medium heat to combine, until
for the pumpkin layer
1 (15-ounce) can pumpkin purée (not pie filling)
1 cup brown sugar
Pinch salt
1½ teaspoons L&B
Pumpkin Pie Spice
2 large eggs
½ cup sour cream
1 teaspoon vanilla
apple juices thicken and the cornstarch no longer looks cloudy. Allow apples to cool.
7. Turn oven down to 325°F.
8. Whisk together the pumpkin purée, brown sugar, salt, pumpkin pie spice, eggs, sour cream, and vanilla.
9. Put the apples into the parbaked pie shell.
10. Pour the pumpkin mixture over the apples, making sure to pop any large bubbles with a fork.
11. Bake for about 1 hour, but check after 45 minutes to make sure it’s not cracking in the middle. The pie will be done when the pumpkin is set and pu ed up slightly. Set the pie on a rack to cool.
12. Once the pie is at room temperature, place it in the refrigerator to chill for at least 1 hour for easier slicing.
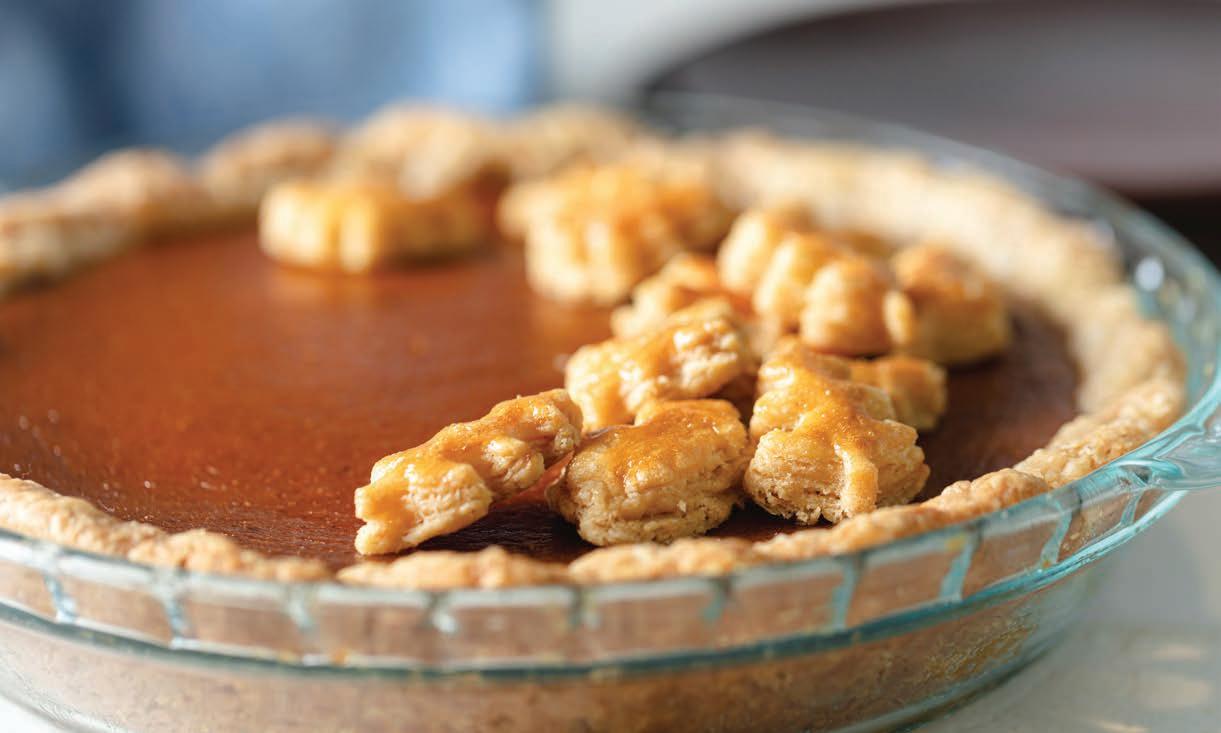
For decorations on top of pie:
1. Heat your oven to 350°F.
2. Roll out 1 (8-inch) pie crust dough or leftovers from a 10-inch pie crust dough and cut with cookie cutters of your choice.
3. Beat 1 egg and brush over the cutouts.
4. Bake for 12 to 15 minutes, until golden brown.
5. Arrange on top of the cooked, cooled pie.
Cook’s Notes:
Use refrigerated pie crust dough or frozen pie crusts, thawed—enough dough for two 8-inch pie crusts or one 10-inch pie crust (the 10-inch size includes enough for the pie and the decorations). Or, you can make your own pie crust using your favorite recipe that makes these amounts.
For the decorations, you’ll use one of the 8-inch crusts or the leftovers from one 10-inch crust after lining the pie plate will be enough dough for the decorations.
Sweet-tart apples, including Honeycrisp, Pink Lady, Granny Smith, or a mix of two to three of the varieties, work well in this recipe.

MAKES 16 SERVINGS | TIME: PREPARATION 35 MINUTES; COOKING 20 MINUTES
¾ cup unsalted butter, melted
1 cup packed organic brown sugar
2 L&B Large Organic Brown Eggs, room temperature
¾ teaspoon vanilla extract
2¼ cups all-purpose flour
1½ teaspoons baking powder
¼ teaspoon kosher salt
⅛ teaspoon L&B Organic Ground Cinnamon
1 cup frozen cranberries
¾ cup coarsely chopped white chocolate
Organic powdered sugar, for finishing
1. Heat oven to 350°F. Grease a 9×13-inch baking pan with cooking spray and line it with parchment paper, allowing 2 long sides to hang over the edges of the pan.
2. In a large bowl, whisk together the butter and brown sugar until light and flu y, about 3 minutes. Add the eggs, one at a time, whisking to incorporate between each addition. Whisk in the vanilla extract.
3. In a second large bowl, mix together the flour, baking powder, salt, and ground cinnamon.
4. Using a rubber spatula, mix the dry ingredients into the wet ingredients in two additions, making sure there are no streaks of flour and the batter is smooth.
5. Stir in the cranberries and white chocolate until evenly distributed.
6. Pour the batter into the prepared pan and use a rubber spatula to smooth the top. Bake for about 25 minutes until golden brown and a toothpick inserted in the center comes out clean. Let cool on a wire rack for 2 hours.
7. Use the long sides of the parchment paper to lift the blondies from the pan. Cut the bars into 8 equal squares, then slice the squares in half diagonally to create 16 triangles.
8. Fill a small fine-mesh sieve with powdered sugar and lightly dust the blondies. Leftover blondies can be stored in an airtight container for up to 5 days.
MAKES 20 COOKIES | TIME: PREPARATION 10 MINUTES (PLUS 2 HOURS REFRIGERATION); COOKING 20 MINUTES
1 cup all-purpose flour, plus more for dusting
¼ cup granulated sugar, plus more for sprinkling
½ teaspoon kosher salt
½ cup shelled, salted, and roasted pistachios, plus extra crushed pistachios for sprinkling
1. In the bowl of a food processor, combine the flour, sugar, salt, pistachios, and vanilla, and pulse 10 to 15 times until the pistachios are finely ground.
2. Scatter the butter pieces in the food processor and pulse until the dough forms a ball, 1 to 2 minutes. Be careful to not overmix the dough.
3. Turn the dough out onto a lightly floured work surface and shape into a log about 10 inches long and 2 inches in diameter. Tightly cover the log in plastic wrap. Refrigerate for at least 2 hours or up to 5 days. You can also freeze the dough for up to 3 weeks (see Cook’s Note).
4. Heat the oven to 325°F. Line 2 rimmed baking sheets with parchment paper.
5. Cut the chilled cookie dough into ½-inch thick coins and place them about 2 inches apart on the prepared baking sheets.
6. Lightly brush the top of each shortbread cookie with water and sprinkle with sugar. Bake for 15 to 18
½ teaspoon vanilla extract
1 stick cold unsalted butter, cut into ¼-inch pieces
10 ounces bittersweet chocolate chips (60% cacao), divided
minutes, until the cookies are light golden brown on the top and bottom.
7. Cool the cookies on the baking sheet for 5 minutes, then transfer to a wire rack to cool completely.
8. Meanwhile, heat 1 inch of water in a saucepan over medium heat and cover with a glass bowl, setting up a double boiler. Add ⅔ of the chocolate chips to the glass bowl and heat until completely melted, stirring constantly. Take the chocolate o the heat and stir in the remaining chocolate chips until fully melted.
9. Dip half of each cookie into the chocolate and place them on a sheet of parchment paper. Sprinkle with crushed pistachios and cool completely. Store the cookies in an airtight container at room temperature for up to 1 week.

You can bake the cookies from frozen dough, if desired—just add 1 to 2 minutes baking time.
FOR EVEN MORE HOLIDAY BAKING INSPIRATION, VISIT


Lunds & Byerlys experts share favorite finds and L&B products you’ll want to check out


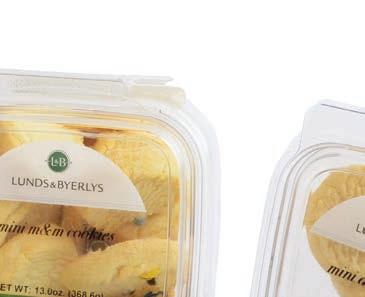

Dessert is simple, sweet, and oh-so-tasty with our new line of L&B Mini Shortbread Cookies. These delectable cookies are made with exclusive recipes by our bakers. Each flavor starts with a light, crisp, and buttery shortbread base that we combine with delicious mix-ins. Varieties include almond, lemon, to ee pecan, M&M’s, chocolate chip, and double chocolate. The mini size makes them perfect for snacking, enjoying on the go, or as a sweet addition to a cookie tray. Each container holds 18 cookies.


Brothers Tomas and Francisco Pergola started Cheddies Crackers with a mission to combine today’s most innovative trends with the timeless classics we grew up with—cheese crackers! After many test runs in the kitchen, the brothers landed on the perfect cheese cracker recipe made with regeneratively farmed cheddar cheese from happy, healthy cows. The healthy, fun-to-eat crackers are super crunchy and snackable and come in three flavors—white cheddar, classic sea salt, and spicy cheddar.

This is a spicy-sweet creation from two Minnesota makers—Bolton Bees and Cry Baby Craig’s. Bolton Bees focuses on raising bees that have undergone a rigorous selection process, creating queens that are hardy, hygienic, and pleasantly tempered, which results in happy bees and delicious, healthy honey. This honey is the perfect sweet-heat pal for Cry Baby Craig’s signature habanero peppers and spices. One taste and you’ll be drizzling this hot honey on everything from pizzas and fried chicken to charcuterie and ice cream. The options are endless!


The Kristian Regále story began with a countryside bike ride through Sweden when the company’s founder and her husband tasted a refreshingly delicious and crisp sparkling apple drink. And the rest is history. Now Kristian Regále is a Midwest tradition crafted from traditional Swedish recipes using only the finest all-natural ingredients. All the sparkling juices are free of ca eine and alcohol, which makes them perfect for celebrating with the entire family. The light, crisp sparkling juice comes in five flavors—apple, pear, lingonberryapple, pomegranate-apple, and apple-mango-passionfruit.


Q Mixers began with a question: “Shouldn’t my tonic be as good as my gin?” The answer was a resounding “Yes!” and led founder Jordan Silbert to create a line of superior cocktail mixers with high-quality ingredients and nothing artificial. The festive additions to the Q Mixers lineup are Q Spectacular Bloody Mary Mix and Q Spectacular Margarita Mix. The Bloody Mary mix is made with vine-ripened Roma tomatoes and a blend of seven herbs and spices to create a bright, savory mix with the perfect amount of spice. The margarita mix combines tart Key lime juice with a drizzle of agave nectar to create a refreshing margarita that’s not syrupy. Simply combine the mixer with your spirit of choice and enjoy over ice.


Our new collection of L&B Gelatos and Sorbets is an Italian delight! Each batch is handcrafted on Italian-made specialty gelato equipment with authentic recipes. The gelatos have a dense, creamier texture than ice cream and come in four delectable flavors—cold brew co ee, amaretto cherry, chocolate fudge brownie, and vanilla caramel. The sorbets are made using fresh fruit and are naturally dairy free and vegan. Flavors include mango, strawberry, and lemon. Plus, they’re now in 30-ounce containers, which means they’re perfect for entertaining!


 by alesha taylor


A pie bird (also referred to as a pie vent, pie chimney, pie whistle, or pie funnel) is a small ceramic or metal figurine that is placed in the center of a double-crusted pie before baking. Using a pie bird during baking helps prevent the crust from getting soggy and ensures that the filling is evenly cooked. How does it work? The pie bird allows steam to escape from the pie as it bakes, which helps prevent the filling from becoming too watery. It also helps the crust bake more evenly by allowing hot air to circulate around the pie. Whether you’re baking fruity apple or a savory meat pie, using a pie bird is a simple yet e ective way to ensure your pies turn out perfectly every time.


With a portable ice maker, you can rest assured knowing you’ll never run out of ice for drinks and cocktails. It can quickly produce enough ice to keep up with the demand—some models can produce ice in as little as 6 minutes, and some can make up to 50 pounds of ice per day. Unlike traditional ice makers that are built into refrigerators, portable ice makers are compact and easy to move around, making them perfect for holiday gatherings and events.


gadgets can save both time and energy during an already busy time of year. Equipment worth purchasing or upgrading? A food processor and an immersion blender (pictured here). Work smarter (not harder) with a food processor that can be used to chop, slice, and shred vegetables and fruits for salads and side dishes, as well as make dips, sauces, and spreads. An immersion blender is perfect for making soups and sauces and allows you to blend ingredients right in the pot, making it easy to puree hot ingredients without the fuss and mess of transferring to a blender.


Just in time for holiday entertaining and gift-giving season, these two food and drink deck sets will inspire home chefs and entertainers to new levels of creativity. Plus, the decks are perfect for those with limited kitchen counter space, as the individual cards take up far less space than a full cookbook. Priced at $24.99 each, the “Cheese Boards to Share” or “Cocktails at Home” sets consist of a 50-card deck of cards and 64-page paperback book, featuring recipes, shopping and preparations tips, and more. Available wherever books are sold and on


bookshop.org


A slow cooker is a great tool to keep food warm and ready to serve throughout the festivities. Up the ante with removable slow cooker inserts to make it even easier. From soups and appetizers to veggies and dips, these silicone liners help keep food separated and warm for hours after cooking—all while saving precious counter space, too. Cleanup is also a piece of cake, as most inserts are dishwasher safe.

Follow these 10 tips to keep you happy and healthy this holiday season
by emma conway
For many people, the holiday season adds an extra layer of stress and temptation, with highcalorie dishes, fatty sides, and pushy friends and family members at the get-togethers throughout the season.

Thanksgiving dinners, Christmas feasts, Hanukkah, and New Year’s Eve parties can be the most wonderful time of the year—until you take your health into consideration. Nevertheless, the holidays don’t need to sabotage your healthy habits. Here are 10 tips that will leave you feeling fit and fine this holiday season.


2 Don’t skip meals.
Attempting to reduce your calorie count by skipping a meal is not the answer. Come mealtime, your hunger will become all-consuming, leading to overeating and discomfort. Instead, listen to your body. Mayo Clinic recommends eating a balanced breakfast and nourishing your needs throughout the day with nutritious snacks, such as yogurt, string cheese, or nuts.
3 Bring your own dish to pass.
1 Communicate your fitness goals.


Tell your loved ones what your fitness goals are long before the tables are set and the desserts are passed. Whether you have started a new diet, discovered a new food allergy, or mended an unhealthy relationship with food, informing those around you—even if you only see them once a year—will help you stay on track and avoid awkward exchanges, according to Rachel MacPherson with Verywell Fit.
If you’re a picky eater, a potluck-style function is your worst nightmare. One simple solution to ensure that there’s at least one healthy dish at the party, according to Registered Dietitian Nutritionist Allyn Wergin from the Mayo Clinic, is by bringing a fruit or vegetable tray arranged in festive designs.
4 Stay active. There are plenty of fun ways to burn some calories throughout the holiday season. The Mayo Clinic suggests getting everyone involved in aerobic activities, like ice skating, sledding, or a family-style football game.
7
5 Visit the people, not the food. Wergin says people should move conversations away from the table. By doing so, you’ll be less focused on the food and more focused on the company.
Fit in favorites.
6
Eat until you are satisfied, not stu ed. Nobody likes that overstu ed, foodcoma feeling after eating too much. As you eat, Wergin suggests taking small bites and checking your fullness level. This strategy allows you to savor your favorite once-a-year delights. And remember—there are always leftovers.
When it’s time to build your plate, the Centers for Disease Control (CDC) recommends starting with the fruits and vegetables and then add on some of your favorites. You know your Aunt Mary Beth’s sweet potato casserole with brown sugar, cinnamon, and marshmallows on top? Or a fresh bakery bun with your mom’s famous garlic butter? Or a slice of grandma’s homemade apple pie? That deserves a space on your plate, too.
8 Avoid an all-or-nothing mentality. To achieve fitness goals, many people believe you must do everything perfectly all the time. This is far from the truth. You are human. MacPherson says, “Do not fall into the trap of believing you have failed if you didn’t stick to your game plan.” One day does not define your health and fitness journey. It is all the decisions you make along the way.
According to Mayo Clinic, another way to make your holidays healthier is by switching these simple ingredients in your recipes:
REPLACE HALF THE FAT: Use half the butter, shortening, or oil in a recipe and replace the other half with unsweetened applesauce, mashed banana, or prune puree.
EGG WHITES INSTEAD OF EGGS: Swap high fat and cholesterol with pure protein in your favorite brownies and cookies. Each whole egg is equivalent to two egg whites.
WHOLE-WHEAT FLOUR FOR ALL-PURPOSE FLOUR: Use whole-wheat flour for half the amount of flour called for in a recipe. Unlike all-purpose flour, it is not stripped of nutrients, making it a great source of protein and fiber.
REDUCE SUGAR: Reduce the amount of sugar by one-third to one-half. Instead, add spices such as cinnamon, cloves, allspice, and nutmeg, or flavorings such as vanilla or almond extract, to boost sweetness.
9 Say “no” to food pushers. Wergin says, “You are in control of what you eat.” When people try to push another helping on your plate, stay confident, decisive, and polite. Do not feel ashamed for sticking to your goals.
10
Prioritize rest. The holiday season can be filling, but it can also be draining. Make sure you are prioritizing sleep, preferably getting between seven and eight hours a night, according to the CDC. This will help you manage your blood sugar and stop you from mindless eating.
CACAO NIBS INSTEAD OF CHOCOLATE CHIPS: Even better for you than dark chocolate, cacao nibs are high in antioxidants and include fiber, iron, phenylethylamine (PEA), and oxalic acid. This works great in any recipe that calls for chocolate chips. Simply use a one-to-one ratio.


At the holidays, people tend to enjoy the classics. So, the recipes here take inspiration from stalwart holiday dishes and add a little twist. A turkey breast gets seasoned with a smoked paprika butter and a barbecue-inspired rub. Pork tenderloin (great hot or cold) has a ginger-spiced pear chutney served alongside. And those beloved mashed potatoes no one wants you to mess with?
People will make an exception when you blend them with garlic and cheese and lift them with egg whites to create a golden, puffy potato soufflé. You can turn to these recipes throughout the holiday season to have delicious options for a number of meals at your fingertips—and we didn’t forget dessert.


 by kristin donnelly


 photos by terry brennan food styling by lara miklasevics


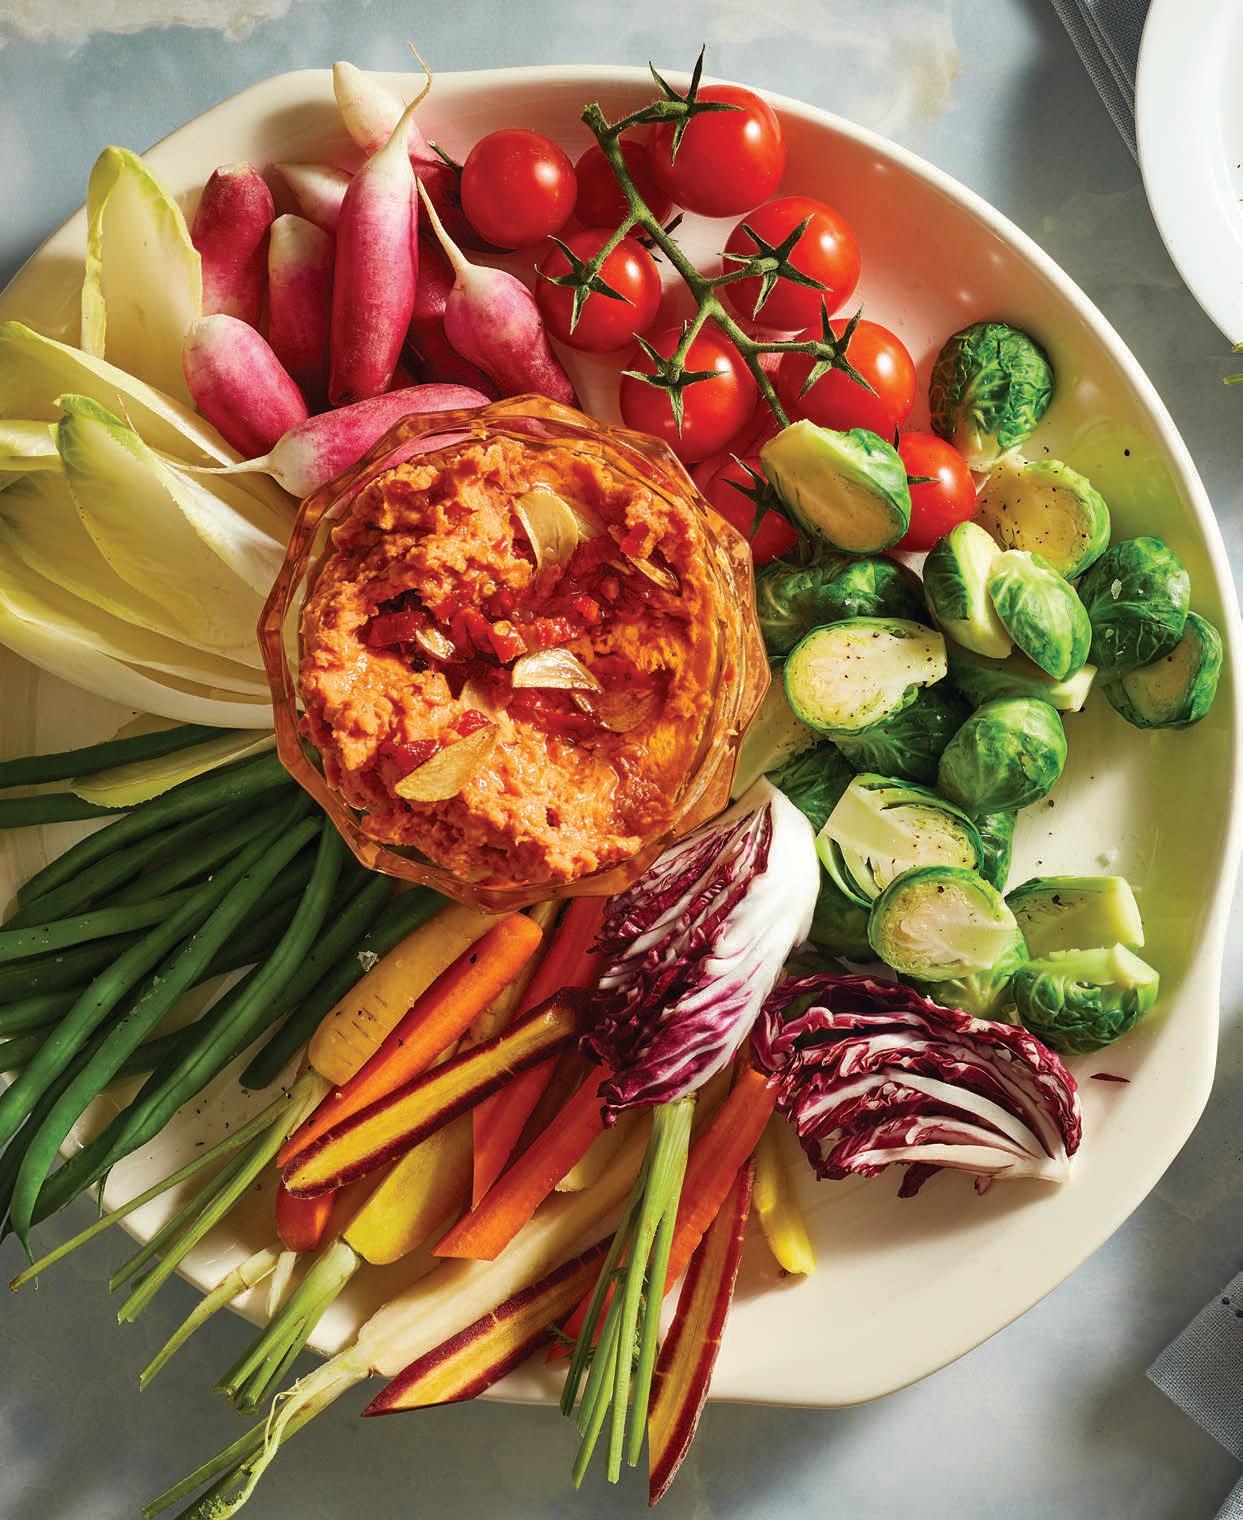
MAKES 8 TO 10 SERVINGS (ABOUT 3 CUPS)
White beans create a creamy base for a dip that gets its bright but deep flavors from sun-dried tomatoes, toasted garlic, and cumin. To make it nice and smooth, be sure to puree the dip for at least 2 minutes and possibly longer.
1 (10-ounce) jar sun-dried tomatoes in oil
4 garlic cloves, thinly sliced, divided
1 teaspoon ground cumin, divided

1 (15-ounce) can cannellini beans
½ lemon
¼ teaspoon salt, plus more as needed
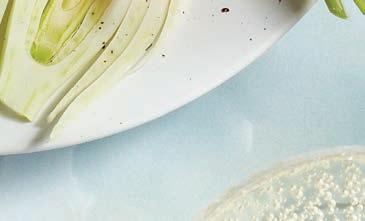
Sliced fennel, Belgian endive leaves, or other raw vegetables, for serving
1. Scoop out 1½ tablespoons oil from the jar of sun-dried tomatoes, and place in a skillet. Heat over medium heat. Add half the garlic and cook until softened, about 2 minutes. Add ½ teaspoon cumin and cook until just fragrant, about 10 seconds. Scrape the garlic and cumin into a food processor.
2. Add the white beans along with ¼ cup plus 1 tablespoon of the canning liquid or water to the food processor. Add all but 4 of the sundried tomatoes to the food processor, leaving any remaining oil behind in the jar. Add the juice from the lemon and ¼ teaspoon salt and puree until smooth, about 2 minutes. Taste and season with more salt if desired.
3. Finely chop the 4 reserved sun-dried tomatoes. In the same skillet, heat another 1½ tablespoons oil from the jar. Add the remaining garlic and cook until just starting to turn golden. Add the remaining cumin and cook until fragrant, about 10 seconds. Turn o the heat and stir in the chopped sun-dried tomatoes.
4. Scrape the white bean dip into a bowl. Use a spoon to create a well on the top of the dip and pour the garlicky oil in it. Serve with the vegetables.
Nutrition (per serving): Calories: 190, Fat: 5g (Sat: .5g), Cholesterol: 0mg, Sodium: 150mg, Carb: 29g, Fiber: 10g, Sugar: 4g, Protein: 10g
Create a beautiful platter of vegetables for dipping. Instead of vegetables being an afterthought, make them an integral part of your dip presentation. Choose two or three in-season vegetables and prep them with care.
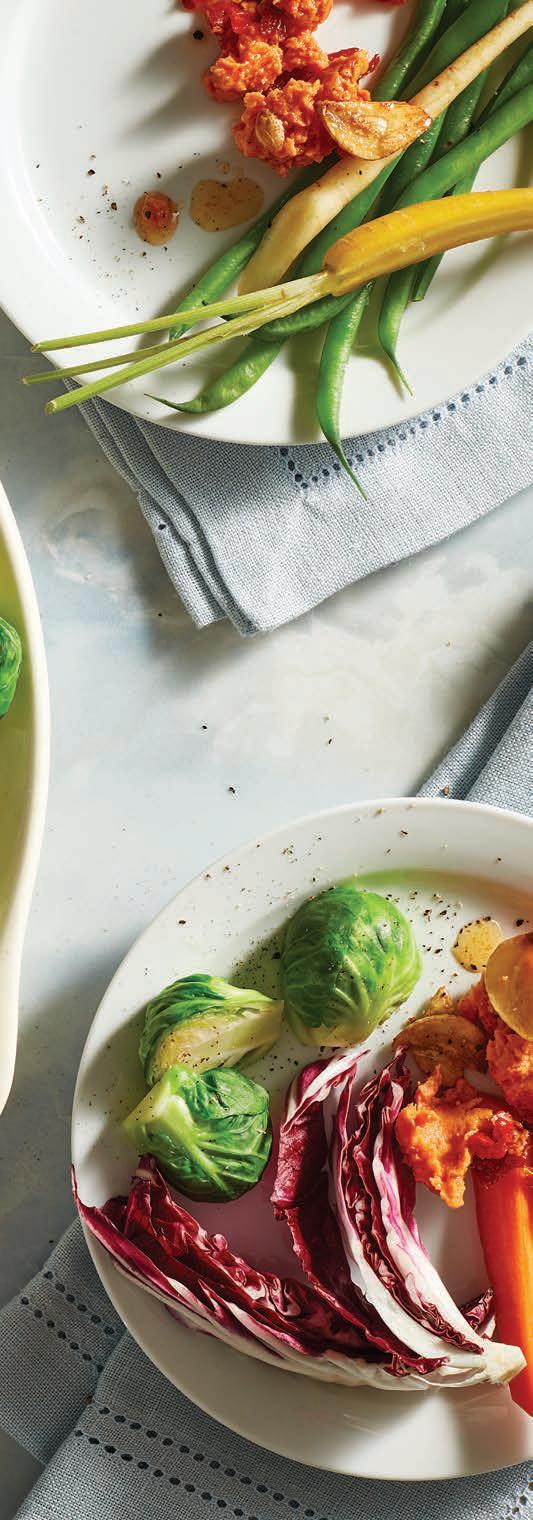
Cut all vegetables so the pieces are still firm enough that they don’t bend in a dip and can be eaten within two bites.
If your typically crisp vegetables like fennel, radishes, carrots, and celery, feel a little limp, slice them how you like, then soak them in a bowl of ice water for 15 minutes.
Sturdy vegetables, like broccoli and cauliflower, taste best and are easiest to digest when they’re lightly cooked. To do so, set a bowl of ice water next to the stove. Bring a pot of water to a boil and season the water with salt. Add the vegetables and cook until crisptender. Drain, then plunge into the ice water to cool.
MAKE 6 TO 8 SERVINGS
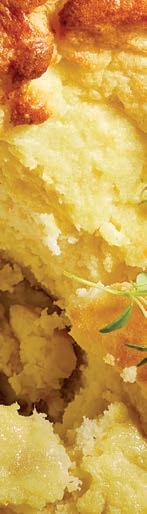
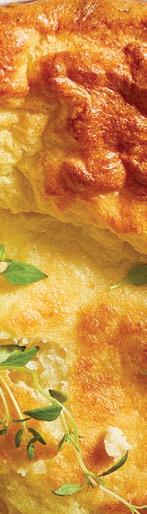
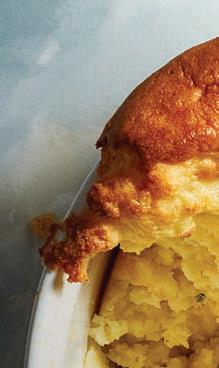
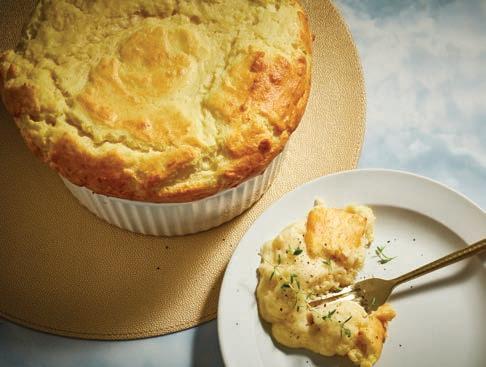
Mashed potatoes, meet cheese sou é. You can make this sou é with leftover mashed potatoes (use 1½ to 2 cups) if you prefer. Here, the potatoes get cooked and mashed with garlic before being blended with Parmesan and fontina cheese for extra creaminess.
2 tablespoons unsalted butter, plus more for the pan
4 ounces fresh Parmesan cheese, finely grated (about 1 cup), divided
2 large russet potatoes (about 1¾ pounds total), peeled and cut into 2-inch pieces
4 garlic cloves, peeled
¾ cup heavy cream
MAKES 8 SERVINGS
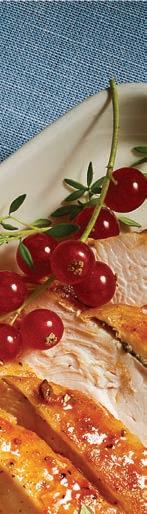
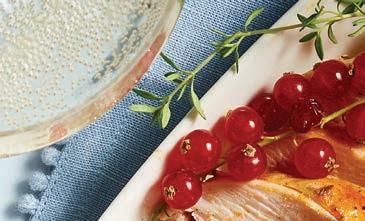
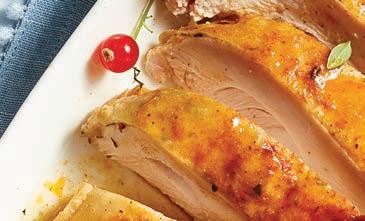
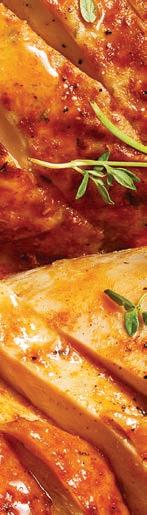
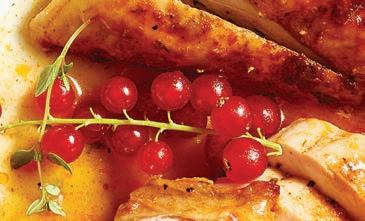
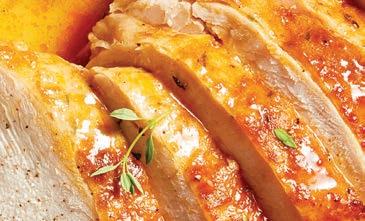
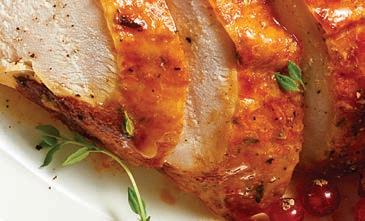
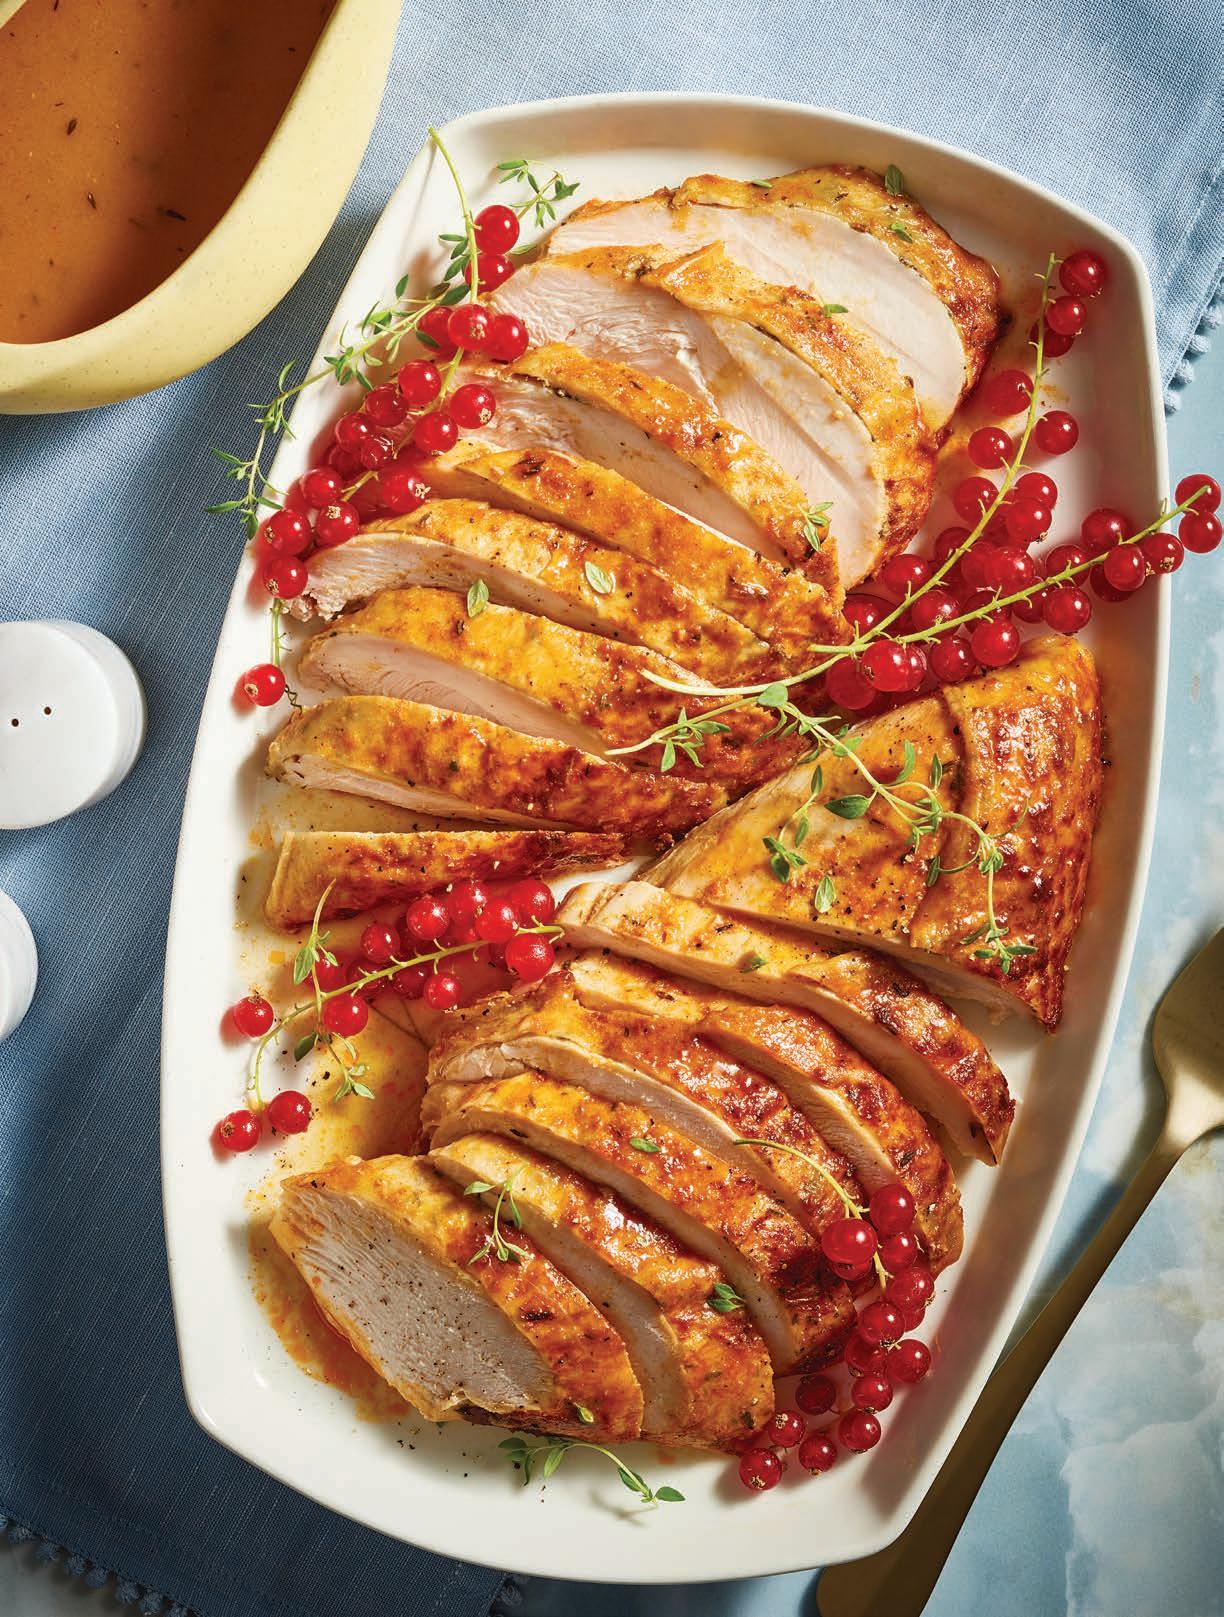
After seasoning turkey with a barbecue-inspired rub, it gets slathered with a smoked paprika butter to add color and more flavor. If you have the time, you can season the turkey up to 2 days in advance, which will allow it to penetrate further into the meat.
for the turkey
2 tablespoons coarse salt
2teaspoons sugar
2 teaspoons garlic powder
1 teaspoon onion powder
1 teaspoon dried thyme
¼ teaspoon freshly ground black pepper
1 (8- to 9-pound) bone-in turkey breast
6 tablespoons unsalted butter, softened
2 teaspoons smoked paprika
1 onion, quartered
1 head garlic, cut in half crosswise
for the gravy
2-3 cups turkey or chicken stock or low-sodium broth
4 tablespoons butter
¼ cup flour
1 teaspoon soy sauce
½ teaspoon smoked paprika
½ teaspoon dried thyme
2 teaspoons sherry vinegar
Salt and freshly ground pepper, to taste
4 ounces fontina cheese, coarsely grated (about 1 cup)
1¼ teaspoons fine salt
¼ teaspoon freshly ground white or black pepper
5 large eggs, separated
2 large egg whites (set aside yolks for another use)
Pinch cream of tartar
1. Heat the oven to 375°F. Butter a 2-quart sou é dish and dust the dish with ¼ cup of the Parmesan cheese.
2. In a large saucepan, cover the potatoes and garlic cloves with water and bring to a boil. Simmer until the potatoes are tender, about 20 minutes. Drain and return to the saucepan. Shake the pan over high heat to dry out the potatoes. Stir in the butter. Using a ricer or a masher, mash the potatoes with the garlic. Stir in the heavy cream, followed by the fontina cheese and remaining Parmesan. Add the salt and pepper. When the potatoes are cooled to warm, stir in the 5 egg yolks.
3. In the bowl of a stand mixer or in a large bowl, using a handheld electric mixer, beat the 7 egg whites until foamy. Add the cream of tartar and beat the egg whites to sti peaks. Add about one-third of the egg whites to the sou é mixture and stir to incorporate and lighten the potato mixture. Fold in the remaining egg whites until no streaks remain, being sure to incorporate the potato mixture from the bottom of the saucepan.
4. Scrape the sou é mixture into the prepared dish and bake in the bottom third of the oven for about 45 minutes, until the sou é is pu ed, firm, and nicely browned. Serve hot.
Nutrition (per serving): Calories: 390, Fat: 25g (Sat: 15g), Cholesterol: 195mg, Sodium: 900mg, Carb: 24g, Fiber: 2g, Sugar: 2g, Protein: 18g
1. For the turkey: In a small bowl, stir together the salt, sugar, garlic powder, onion powder, thyme, and black pepper. Rub it all over the turkey breast, including under the skin and inside the cavity. Let stand for 2 hours at room temperature or refrigerate uncovered or lightly covered for up to 48 hours. If you refrigerate the turkey, let it stand at room temperature for 1 to 2 hours before cooking. Heat the oven to 350°F.
2. In a small bowl, blend together the butter with the smoked paprika. Rub the butter all over the turkey, including under the skin and inside the cavity. Set the turkey breast in a roasting pan. Add the onion and the head of garlic cut side down. Add 2 cups water into the pan. Transfer the turkey to the oven and roast for 1 hour. Baste the turkey with some of the pan juices, and continue roasting, basting once or twice, until an instant-read thermometer inserted into the thickest part of the breast (but away from the bone) registers 160°F, about 1 hour longer.
3. Transfer the turkey to a carving board, leaving behind all the juices and let rest while you make the gravy.
4. For the gravy: Strain the juices from the roasting pan into a fat separator or a bowl. (If they’re in a bowl, spoon o as much of the fat from the top of the pan as possible). Measure out the pan juices (without the fat) and add enough stock to make 4 cups of liquid.
5. In a medium saucepan, melt the butter over medium heat. Whisk in the flour until fully coated with the butter to make a roux. Whisk in the liquid and cook, whisking, until incorporated with the roux. Whisk in the soy sauce, smoked paprika, and thyme and increase the heat to medium high to bring to a simmer. Simmer the gravy until it’s thick enough to coat a spoon, 5 to 8 minutes. Whisk in the vinegar. Taste the gravy and season with salt, if desired. Carve the turkey and serve with the gravy.
Cook’s Note: If you prefer, swap in 6 turkey legs for the breast and follow the recipe as written. (Or you can add 2 turkey legs to the pan with the turkey breast.) Cook the turkey legs until the internal temperature reaches 165°F.
Turkey (with skin): Calories: 510, Fat: 32g (Sat: 10g), Cholesterol: 205mg, Sodium: 1940mg, Carb: 2g, Fiber: 0g, Sugar: <1g, Protein: 54g Gravy: Calories: 70, Fat: 6g (Sat: 3.5g), Cholesterol: 15mg, Sodium: 60mg, Carb: 3g, Fiber: 0g, Sugar: 0g, Protein: <1g
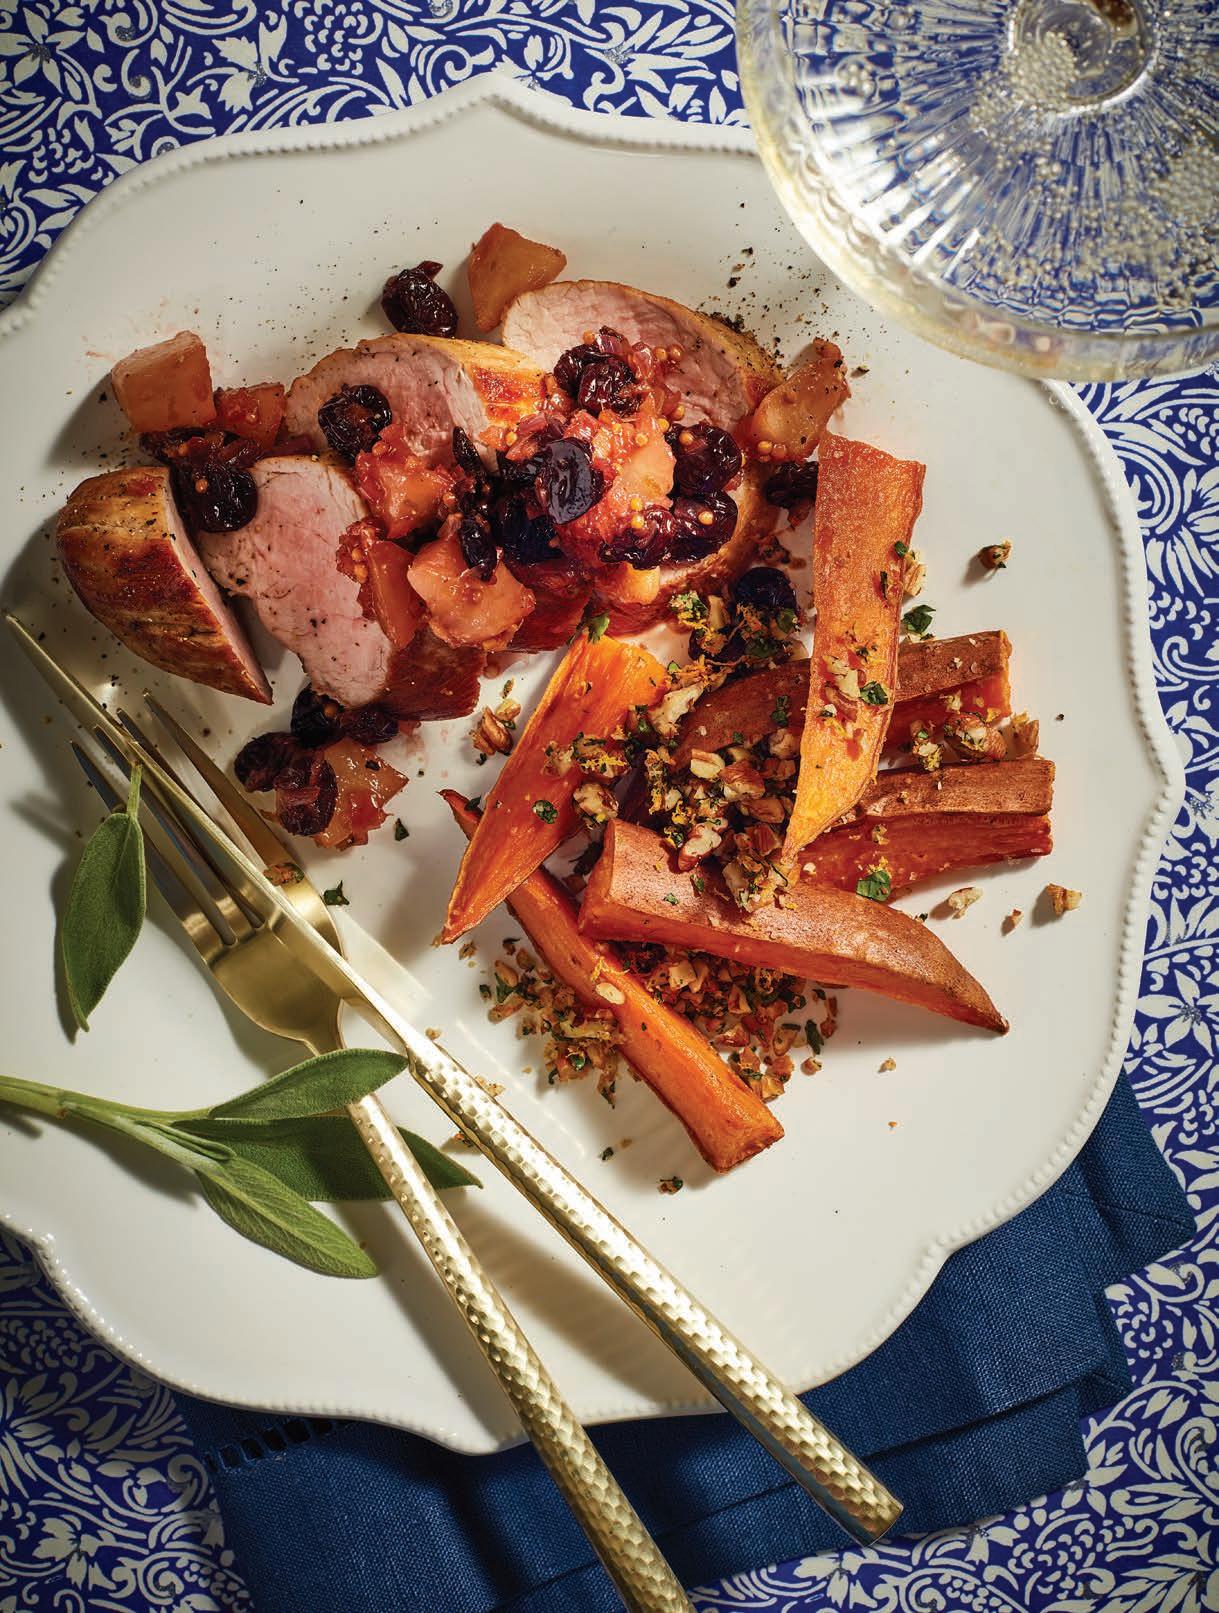
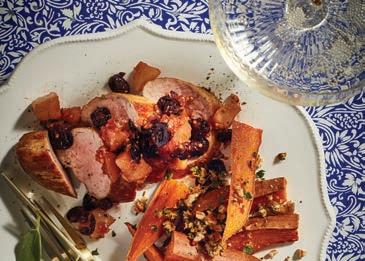
 PORK TENDERLOIN WITH GINGERY PEAR CHUTNEY AND SWEET POTATOES WITH PECANCILANTRO GREMOLATA
MAKES


Bosc pears hold their shape beautifully in this maple-sweetened chutney, which gets studded with dried cherries and yellow mustard seeds. While you can serve the pork and chutney warm, both are also delicious chilled, so if you like, you can make the entire dish ahead.
for the chutney
2 tablespoons neutral oil, such as canola
1 large shallot, halved and finely chopped (about ½ cup)
3 inches fresh ginger, peeled and finely chopped (about ¼ cup)
1 teaspoon yellow mustard seeds
2 whole cloves

4 Bosc pears, peeled and chopped into bite-size pieces
½ cup dried cherries
¼ cup apple cider vinegar
3 tablespoons maple syrup
Zest of 1 lime, plus 2 tablespoons fresh juice
3 tablespoons water
1 teaspoon fine salt

⅛ teaspoon freshly ground black pepper


for the pork
2 (2-pound) pork tenderloins
1¼ teaspoons fine salt

¼ teaspoon freshly ground pepper
2 tablespoons neutral oil, such as canola, divided
1. Make the chutney: In a large saucepan, heat the oil over medium heat. Add the shallot and ginger and cook, stirring, until softened but not browned, 2 to 3 minutes. Add the mustard seeds and cloves and cook until fragrant, about 30 seconds. Add the pears, cherries, vinegar, syrup, lime zest and juice, water, salt, and pepper and bring to a bare simmer. Cook, stirring frequently, until the pears are tender and infused with the flavors, about 20 minutes. Turn o the heat and let cool to warm.
2. Heat the oven to 350°F. Season the pork all over with the salt and pepper.
3. In a large, heavy skillet, heat 1 tablespoon of the oil over mediumhigh heat until shimmering. Add one of the pork tenderloins and cook until well browned on the bottom, about 4 minutes. Flip and cook until browned on the other side, about 4 minutes longer. Transfer to a baking sheet or a roasting pan, and brown the remaining pork tenderloin.
4. Transfer the pan to the oven and bake the pork until the thickest part of each tenderloin registers 145°F, 15 to 20 minutes. Transfer the pork to a carving board and let rest.
5. Slice the pork and serve with the chutney.
Cook’s Note:
To make ahead, you can refrigerate the whole cooked pork tenderloins overnight. Slice before serving. You can refrigerate the pear chutney for up to 3 days.
Nutrition (per serving): Calories: 370, Fat: 11g (Sat: 1.5g), Cholesterol: 110mg, Sodium: 750mg, Carb: 29g, Fiber: 3g, Sugar: 20g, Protein: 36g


MAKES 8 SERVINGS
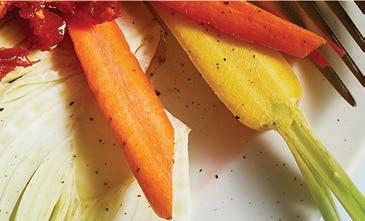
Gremolata is traditionally an Italian garnish of parsley, garlic, and lemon zest. This ri swaps in cilantro and orange zest and adds toasted pecans for crunch. You can sprinkle the gremolata over the sweet potatoes here or many types of roasted vegetables. (See box at right for more ideas.)

1 cup pecans
4 large sweet potatoes, halved crosswise, then cut into ½-inch wedges
3 tablespoons extra-virgin olive oil


1 teaspoon salt, plus more for the gremolata


½ cup packed chopped cilantro
Zest of 1 orange
1 small garlic clove, minced
1. Heat the oven to 350°F. Spread out the pecans on a small baking sheet and toast until lightly browned and fragrant, 3 to 4 minutes. Transfer to a work surface and let cool.
2. Increase the oven temperature to 425°F.
3. In a large bowl, toss the sweet potatoes with the olive oil and 1 teaspoon salt. Line 2 rimmed baking sheets with parchment paper, if desired. Spread out the sweet potatoes on the sheets, changing the position of the pans halfway through, until tender and browned in spots, about 30 minutes.
4. While the sweet potatoes roast, chop the pecans. In a bowl, toss the pecans with the cilantro, garlic, orange zest, and a small pinch of salt.

5. When the sweet potatoes are done, transfer them to a platter. Sprinkle them with half the gremolata and serve the rest alongside.
Nutrition (per serving): Calories: 210, Fat: 16g (Sat: 1.5g), Cholesterol: 0mg, Sodium: 330mg, Carb: 15g, Fiber: 4g, Sugar: 3g, Protein: 3g
Try serving the gremolata with these other roasted vegetables.


Broccoli: Cut into 2-inch florets and roast until browned on the edges and just tender, 15 to 20 minutes.
Brussels sprouts: Cut in half lengthwise (or quarter them with large). Roast until browned and crisp at the edges, about 30 minutes.
Carrots: Keep small carrots whole or cut large carrots in half crosswise and lengthwise. Roast until tender and browned in spots, 20 to 30 minutes.
Cauliflower: Cut into 1-inch pieces and roast until browned on the bottom and tender, about 30 minutes.
Winter squash: Cut into wedges, chunks, or slabs and roast until browned on the outside and tender within. Roasting time will depend on the size of the pieces.


1. You can roast multiple types of vegetables together (at 425°F), but make sure you cut them so they’re the same size.
2. A light coating of oil on the vegetables helps them cook faster but also prevents them from drying out.
3. Season the vegetables with salt to help bring out their sweet flavors.
4. Vegetables roasted on the bottom of the oven will brown faster. When roasting multiple pans, make sure you switch their position halfway through.
5. Stir or flip the vegetables once or twice as they roast to help them brown more evenly.

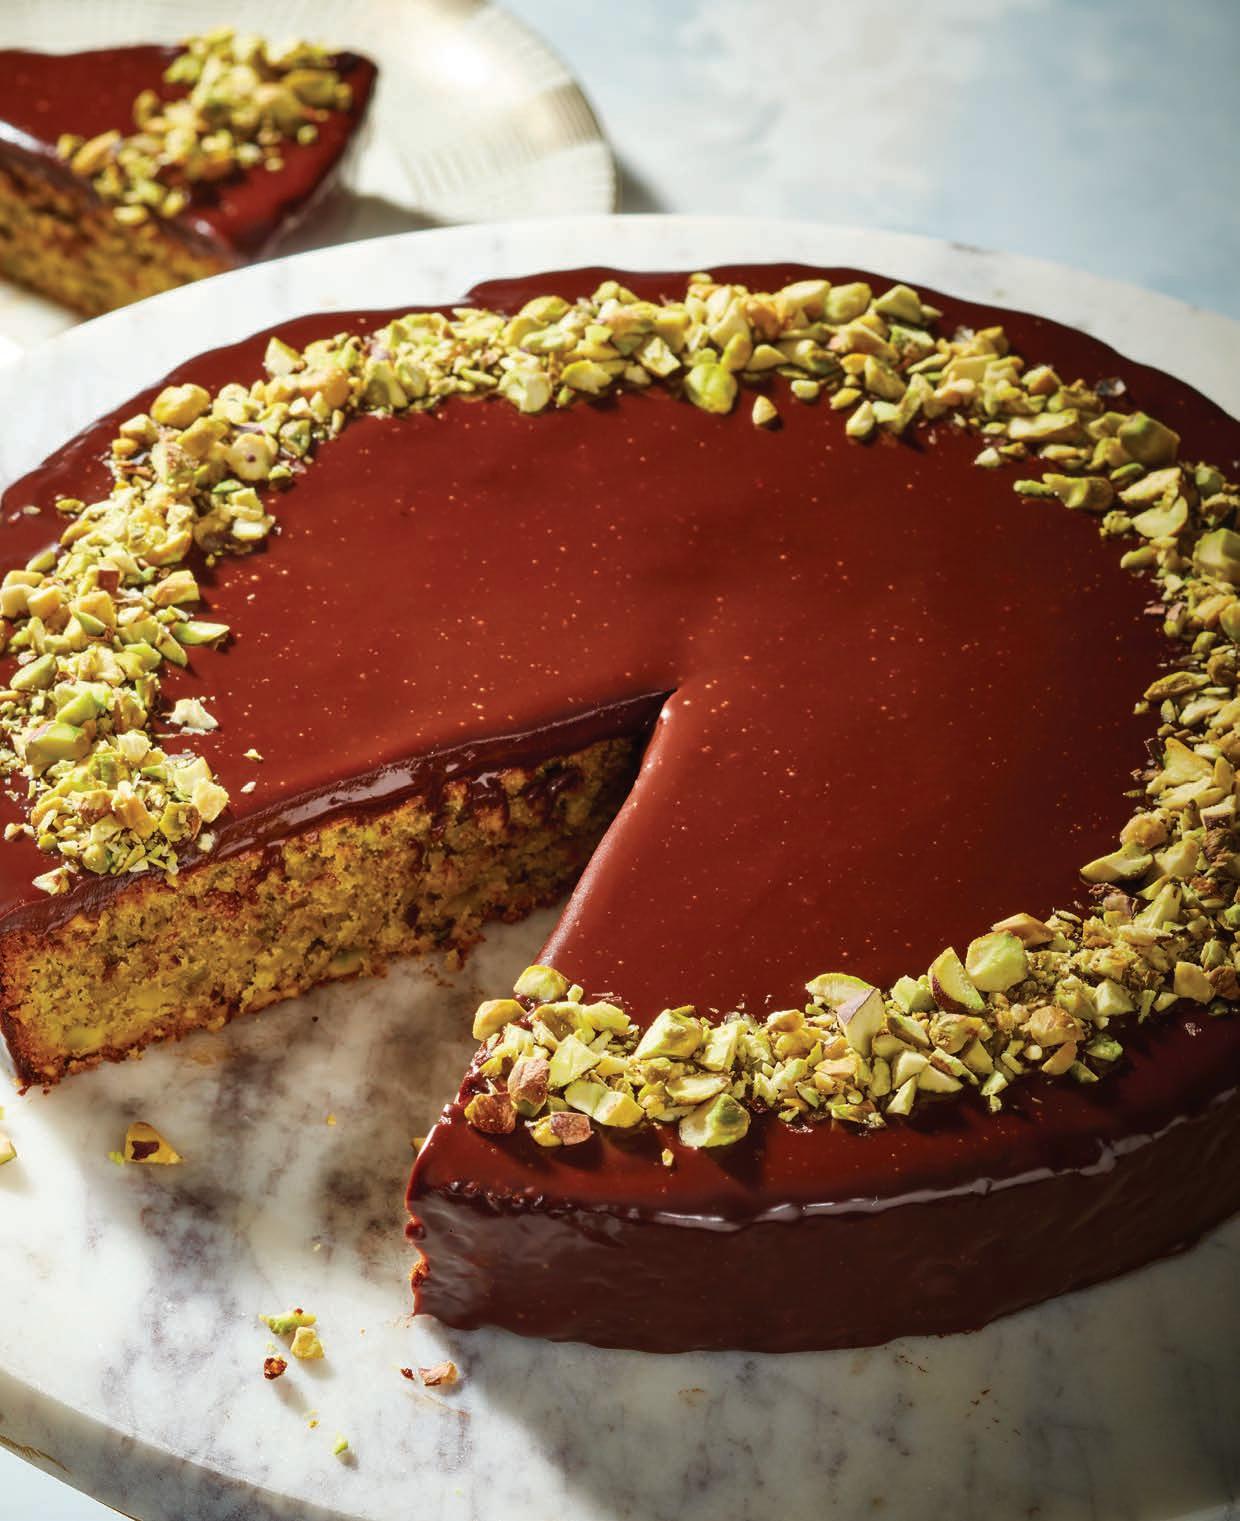
MAKES 1 (9-INCH) TORTE, 10 SERVINGS

This elegant torte is richly nutty. A layer of ganache on top transforms it from a simple dessert to enjoy with tea to something more festive and fit for a party. While the torte is excellent the day it’s made, it’s just as delicious the day after.
½ cup (1 stick) unsalted butter, cut into small pieces and softened, plus more for the pan
8 ounces shelled (preferably unsalted) pistachios (about 1½ cups), plus more for garnish (optional)
1 cup sugar
3 large eggs, at room temperature
1⁄3 cup all-purpose flour
¼ teaspoon baking powder
4 ounces semisweet chocolate, chopped
½ cup heavy cream
1. Heat the oven to 350°F. Butter a 9-inch cake pan and line the bottom with parchment paper. Butter the paper.
2. In a food processor, pulse the pistachios with the sugar until the mixture resembles wet sand. Add ½ cup butter and the eggs and pulse until smooth. Add the flour and baking powder and pulse just until incorporated. Scrape the batter into the prepared pan and smooth the top.
3. Bake, rotating the pan halfway through, for 45 to 50 minutes, until a toothpick inserted in the center of the cake comes out clean. Let cool in the pan for 10 minutes. Invert the cake onto a cooling rack and peel o the parchment paper. Let cool, then transfer to a serving plate.
4. When the cake is cool, put the chopped chocolate into a heatproof bowl. In a small saucepan, heat the cream until it’s just starting to simmer at the edges. Pour the cream over the chocolate and whisk until smooth. Let cool for 3 minutes, then pour the chocolate ganache over the cooled torte, spreading it to the edge. Garnish with pistachios, if desired. Let the ganache set for at least 1 hour before slicing and serving.
Cook’s Note:
If you want to make ahead, you can keep the cake covered at room temperature for up to 3 days.
Nutrition (per serving): Calories: 420, Fat: 30g (Sat: 13g), Cholesterol: 90mg, Sodium: 160mg, Carb: 36g, Fiber: 3g, Sugar: 26g, Protein: 8g
Consider color. While a rainbow of veggies is always nice, choosing vegetables with di erent shades of the same hue is also stunning. And you can arrange them in an ombre pattern.
Garnish just before serving. Even if you make food ahead, wait to garnish so it looks extra fresh, especially if you’re using herbs. If you’re traveling with your dish, pack the garnish separately so you can add just before the food hits the table. Think about serving vessel. If your dish can go from oven to table, consider baking in ceramic dishes. When serving carved meats or crudités, you could serve them on a wooden board with the accompanying sauce in a bowl set on the board.


 recipes by molly gilbert


If there is one thing dessert shouldn’t be, it’s a hassle—especially amid the chaotic holiday season. Sweet and tasty post-dinner treats might be the most important part of a meal for some folks, so you don’t want to leave them off holiday menus for lack of spare time and energy. There is a way to make dessert just as simple as it is sweet. Luckily, self-proclai m ed “soccer mom” of three, and New York City French Culinary Institute graduate, Molly Gilbert, has discovered the secret. Author of both “Sheet Pan Suppers” and “One Pan & Done,” Gilbert’s sweetest cookbook yet, “Sheet Pan Sweets,” is the ultimate guide for busy people with a relentless sweet tooth. The collection of more than 80 simple, streamlined dessert recipes all have one thing in common—they can be made in a sheet pan (which in this case is an 18x13-inch half sheet pan with a 1-inch rim, otherwise known as a rimmed baking sheet).

Using widely accessible ingredients, and consistent, easy-to-follow processes, Gilbert’s sheet pan dessert recipes are foolproof and sure to bring a li le extra sweetness to your holiday season. From a decedent chocolate chip fudge cake, (dubbed “Jack’s Cake,” a er Gilbert’s youngest son) to a rich and creamy pumpkin tiramisu roll, Gilbert has a sheet pan dessert for any season, celebration, and taste palate.
Here, you’ll find a sampling from “Sheet Pan Sweets,” with a few standout recipes to try. Just in time for the holiday season, treat family and friends from fall apple season to Christmas with an Apple Fritter Cake, Pumpkin Pie Bars, Pecan Caramel Shortbread Cookies, a Cinnamon Nut Wreath, and Christmas Gingerbread. Or, make all five… Because, why not? –emma enebak

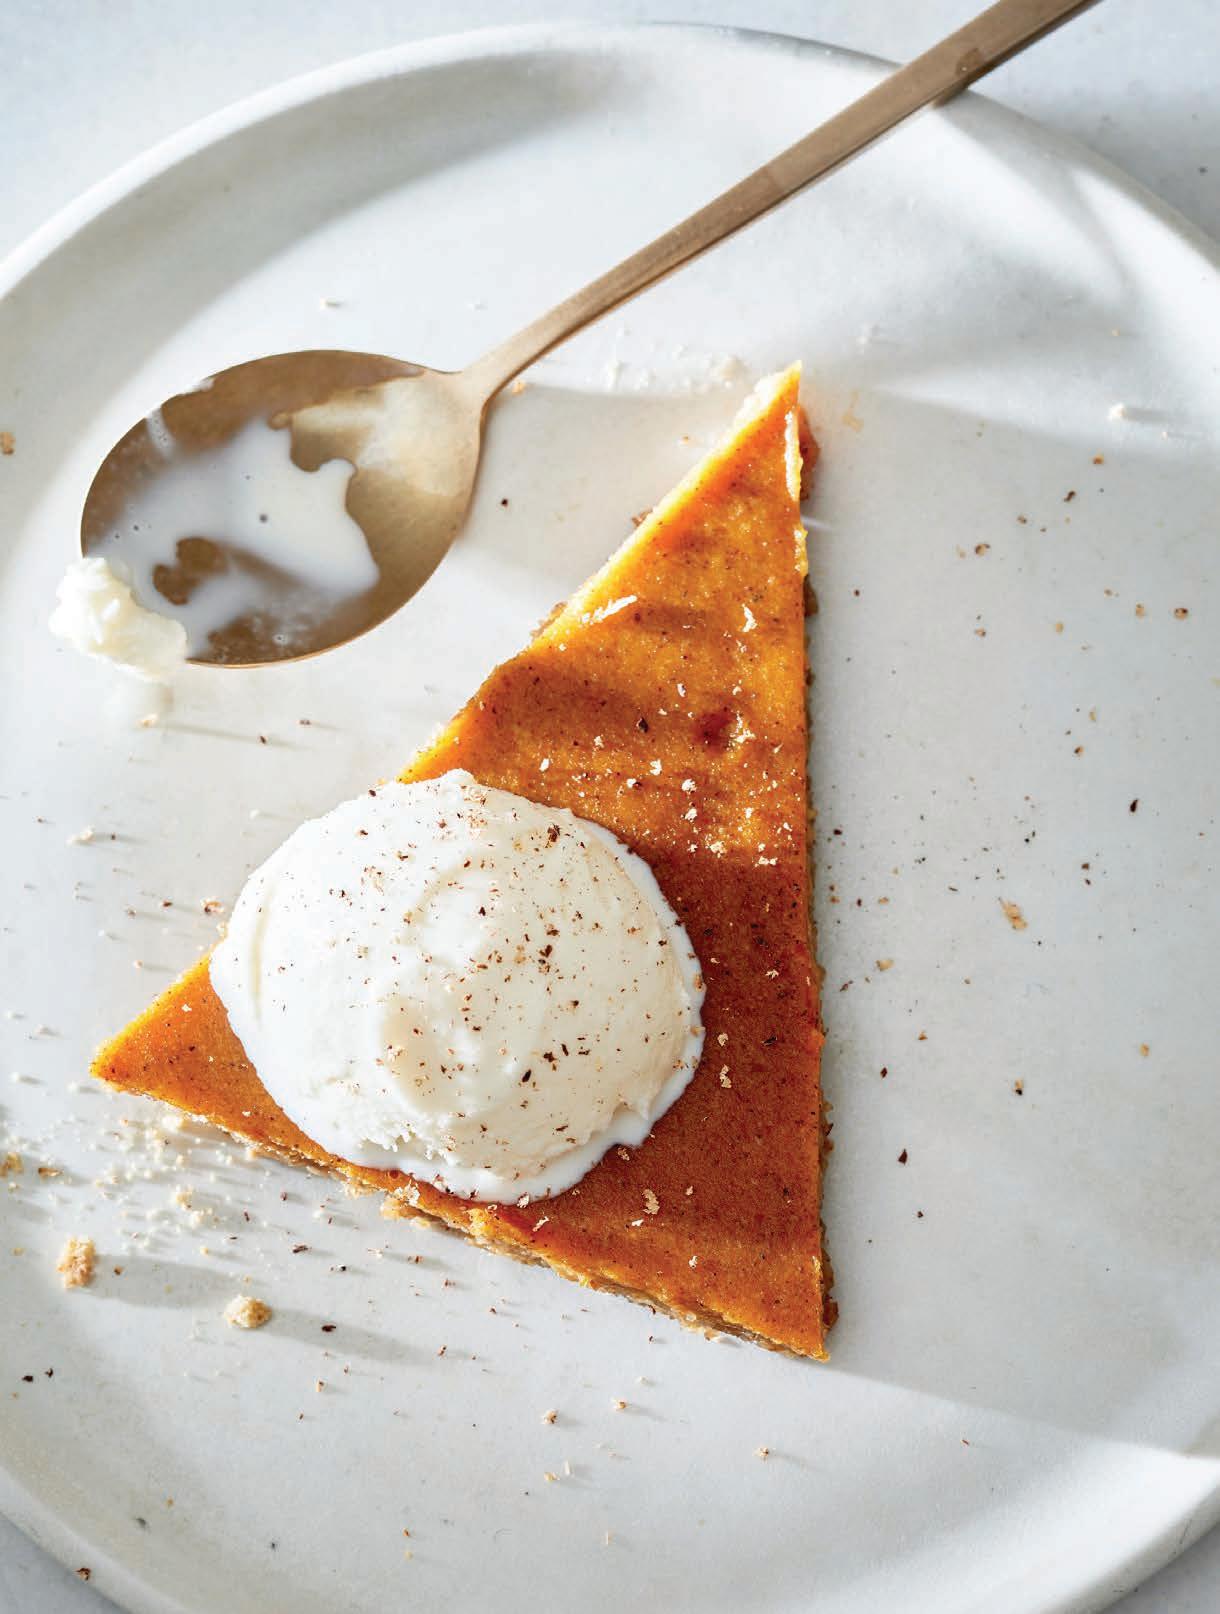
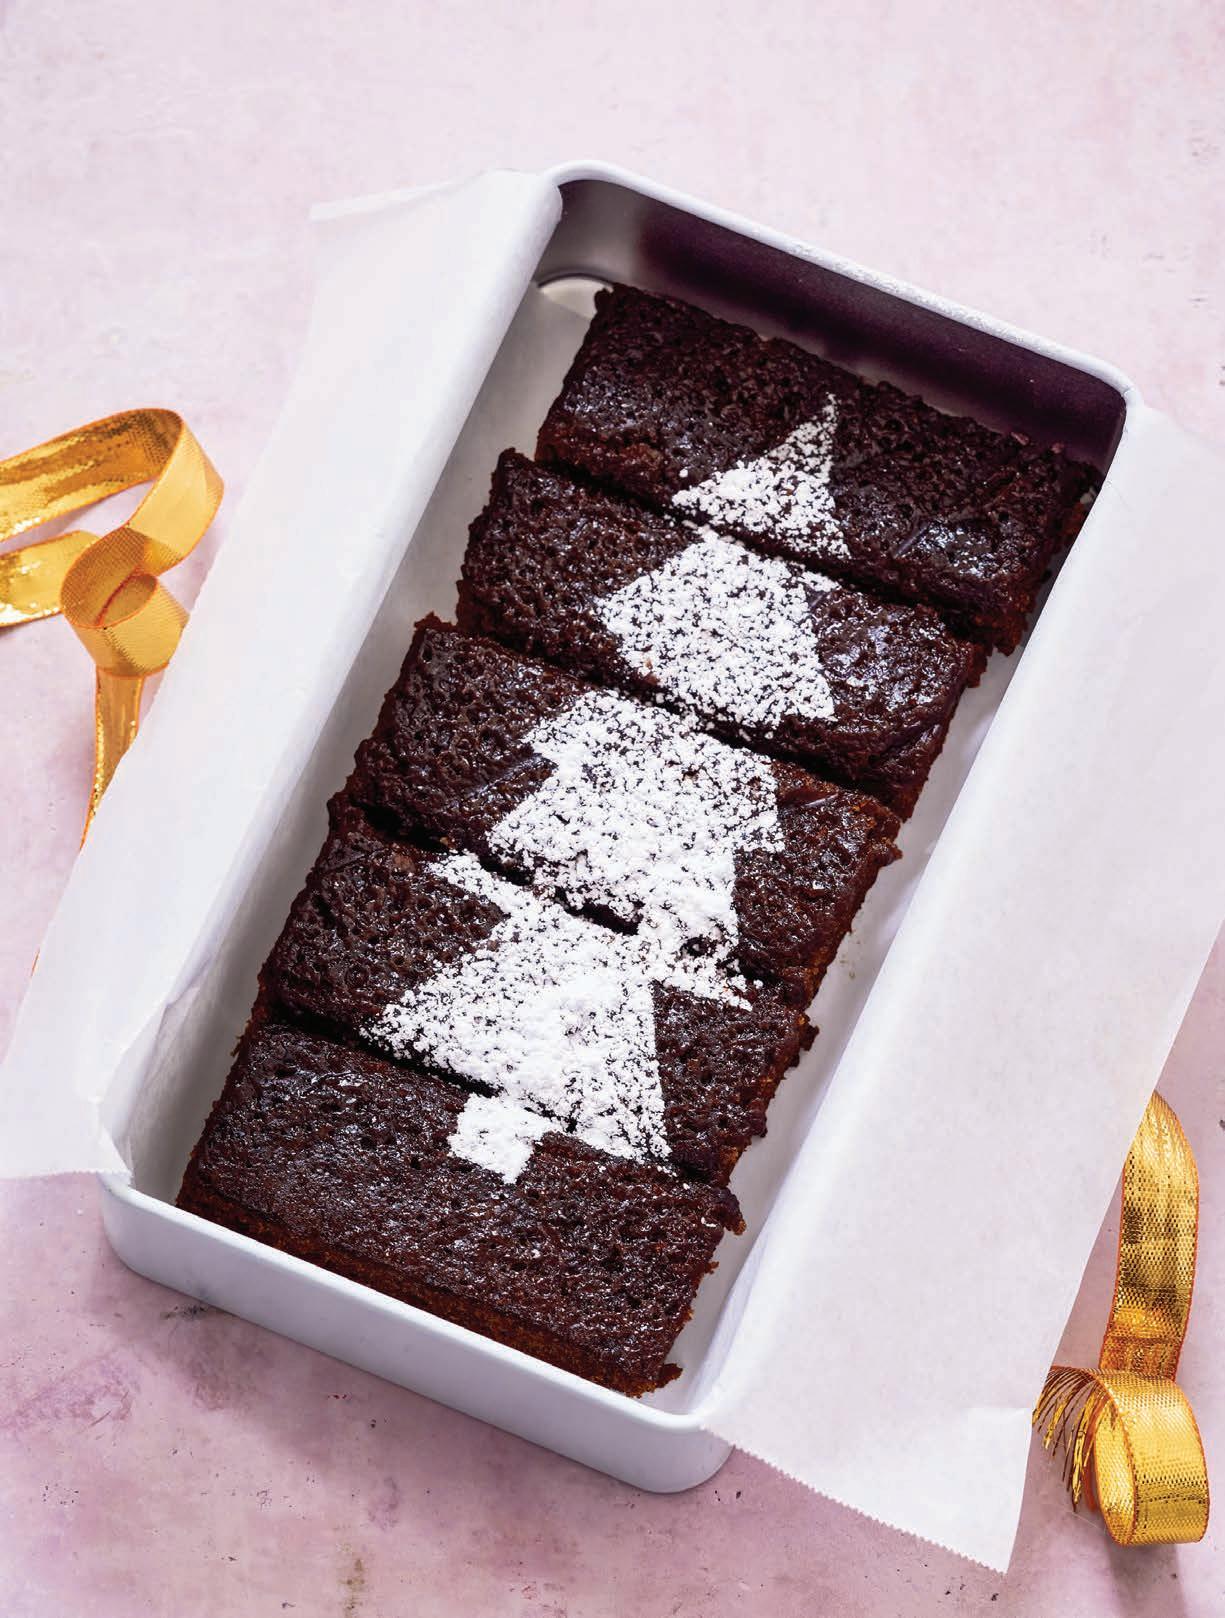
MAKES 24 BARS | PHOTO ON PAGE 30
Thanksgiving is one of my favorite holidays. We usually spend it with my large, loud family in Philadelphia, and it’s always a large, loud, wine-forward a air. In our house, no Thanksgiving feast is complete without pumpkin pie. This version, in bar form, boasts a perfectly smooth and creamy pumpkin custard, anchored by a simple graham cracker and pecan press-in crust. Topped with a spoonful of freshly whipped cream, these pumpkin pie bars are fun to make and eat, and are guaranteed to feed a (large, loud, potentially overserved) crowd. One note: I do strongly recommend using Libby’s pumpkin puree here. While there are lots of brands on the market, sometimes the classic gets the job done best. –molly gilbert
for the graham cracker crust
Nonstick cooking spray
3 cups graham cracker crumbs (about 24 whole crackers)
1 heaping cup whole pecans or skinned hazelnuts
½ cup packed brown sugar
½ cup granulated sugar
½ cup (1 stick) unsalted butter, melted and cooled
½ teaspoon kosher salt
for the pumpkin filling
2 (15-ounce) cans pure pumpkin puree, preferably Libby’s
1¼ cups granulated sugar
1 teaspoon kosher salt
2 heaping teaspoons ground cinnamon
1 teaspoon ground ginger
½ teaspoon ground cloves
½ teaspoon ground nutmeg
6 large eggs
1 cup whole milk
1½ cups heavy cream
for the whipped cream (optional)
1½ cups heavy cream
2 tablespoons powdered sugar
1. Heat the oven to 400°F with a rack in the center position. Grease a sheet pan with nonstick spray.
2. Make the graham cracker crust: In a food processor, grind together the graham cracker crumbs and nuts until coarsely ground and well combined. Add the brown sugar, granulated sugar, melted butter, and salt and pulse to combine until the mixture resembles wet sand.
3. Pour the graham mixture evenly into the prepared pan and use your hands or a flat-bottomed measuring cup to press the crumbs firmly against the bottom and up the sides of the pan, making sure there are no holes or extra-thin spots anywhere.
I met [my husband’s] Nana Peggy in the last year of her life, when she was 92 years old. A true Southern lady and generous in every way, Nana’s recipes weren’t complete without sticks (plural) of butter, shortening, and cream. She made a habit of tall and creamy pies, fried chicken, cheese biscuits, lush layer cakes, and cornbread. Her recipe journals are rich and full of whimsy—reading them now helps fill in the gaps for me, a friend who came late into her life. This gingerbread recipe is one of several of Nana’s that I make every year. It’s sweet and spicy and utterly lovely, its texture akin to the flu est, springiest layer cake. I love that this gingerbread is heavy enough with spice to evoke the season, yet light enough in texture to follow a rich holiday meal. It needs nothing more than a generous dusting of powdered sugar on top before serving, but in the spirit of Peggy (more is more), feel free to dollop it with some lightly sweetened whipped cream or even a scoop of ice cream, if you like. –molly gilbert
Nonstick cooking spray
2⅔ cups all-purpose flour
2 tablespoons ground cinnamon
2 tablespoons ground ginger
1½ teaspoons ground allspice
¾ teaspoon ground nutmeg
¾ teaspoon kosher salt
4 large eggs
1⅓ cups granulated sugar
1. Heat the oven to 325°F with a rack in the center position. Grease a sheet pan with nonstick spray.
2. In a medium bowl, whisk together the flour, cinnamon, ginger, allspice, nutmeg, and salt.
3. In a large bowl, whisk together the eggs and granulated sugar until smooth. Whisk in the molasses to combine, then slowly add the oil, whisking continuously to incorporate. Whisk in the dissolved baking soda.
4. Add the dry ingredients to the wet ingredients and whisk well to combine. Pour in the boiling water and beat lightly and quickly until incorporated. (The batter will be very wet—that’s okay!)
4. Make the pumpkin filling: In a large bowl, whisk together the pumpkin puree, granulated sugar, salt, cinnamon, ginger, cloves, and nutmeg until smooth. Whisk in the eggs until smooth, then add the milk and cream and whisk until homogeneous.
5. Pour the pumpkin custard over the prepared crust and very carefully transfer the pan to the oven. Bake the bars for 15 minutes, then reduce the oven temperature to 350°F and bake for 10 to 15 minutes more, until the custard is mostly set—the center should just barely jiggle. Allow the pumpkin bars to cool in the pan for 20 minutes before transferring to the refrigerator, uncovered, to cool completely, at least 30 minutes and up to overnight.
1⅓ cups unsulfured molasses
1⅓ cups canola oil
2teaspoons baking soda, dissolved in 3 tablespoons hot water
1 cup boiling water
Powdered sugar, for dusting
Vanilla ice cream, for serving (optional)
5. Pour the batter into the prepared pan and spread it evenly to the corners with a large o set spatula. Bake for about 28 minutes, until the cake starts to pull away from the sides of the pan and a tester inserted into the center comes out clean. Allow the cake to cool completely in the pan, about 25 minutes.
6. Before serving, dust with powdered sugar and slice into pieces. The cake will keep tightly covered in the refrigerator for up to a week.
Nutrition (per serving):
Calories: 270, Fat: 18g (Sat: 1g),
Cholesterol: 30mg, Sodium: 210mg, Carb: 36g, Fiber: <1g, Sugar: 22g, Protein: 3g
6. Meanwhile, make the whipped cream, if desired: In the bowl of a stand mixer fitted with the whisk attachment or in a large bowl with a handheld mixer, whip the cream and powdered sugar on medium-high speed until soft peaks form, about 5 minutes.
7. Slice the pumpkin bars into squares or triangles and serve topped with a generous dollop of whipped cream. The bars will keep tightly covered in the refrigerator for up to a week.
Nutrition (per bar, without whipped cream): Calories: 280, Fat: 15g (Sat: 6g), Cholesterol: 70mg, Sodium: 250mg, Carb: 34g, Fiber: 2g, Sugar: 25g, Protein: 4g
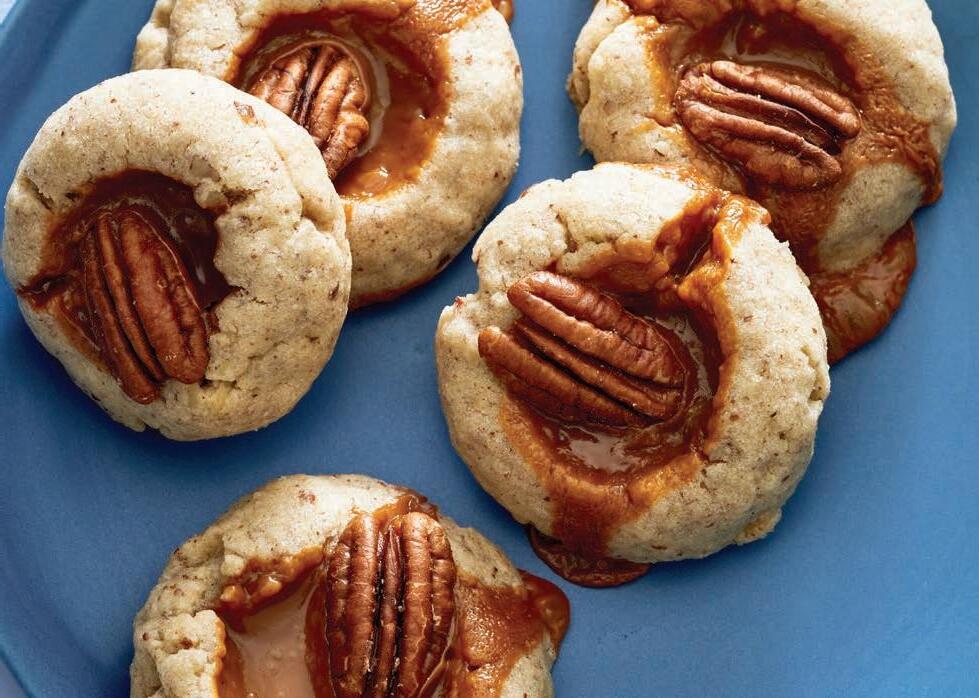
MAKES ABOUT 25 COOKIES
These nutty shortbread thumbprints are melt-in-your-mouth delicious, held together with a dollop of store-bought dulce de leche, a Latin American caramelized milk jam. If you can’t find dulce de leche at the store, it’s simple to make your own with a can of sweetened condensed milk or use a good-quality thick caramel sauce instead. I like to toast the pecans on (you guessed it) a sheet pan—just pop them into the oven at 350°F until brown and fragrant, about 10 minutes.
–molly gilbert
2 cups pecan halves, toasted (see headnote)
2 cups all-purpose flour
1 cup (2 sticks) unsalted butter, at room temperature
⅓ cup powdered sugar
1. Heat the oven to 350°F with a rack in the center position. Line two sheet pans, or as many as you have, with parchment paper.
2. In a food processor, combine 1½ cups of the pecans with ½ cup of the flour and pulse 10 to 15 times, until well combined and the nuts are no bigger than the size of lentils.
3. In the bowl of a stand mixer fitted with the paddle attachment or in a large bowl with a handheld mixer, cream together
⅓ cup packed dark brown sugar
1 large egg yolk
1 teaspoon kosher salt
2 teaspoons pure vanilla extract
½ teaspoon ground nutmeg
1 (13-ounce) jar dulce de leche
the butter, powdered sugar, and brown sugar on medium-high speed until flu y and light, about 3 minutes. Add the egg yolk, salt, and vanilla and beat until smooth, about 1 minute. Add the remaining 1½ cups flour, the nutmeg, and the pecan and flour mixture and mix on low speed just until the dough comes together.
4. Use a 1½-tablespoon scoop to portion the dough into balls. Place on the prepared pans, spacing them 2 inches apart, 8 to
10 per pan. Use a large wooden spoon handle to gently create an indentation on top of each cookie, about ½-inch deep. Bake the cookies for 5 minutes (they’ll still look a bit wet), then remove from the oven. Press into the indentations with the spoon handle again to better define the divots, then fill each indentation with ½ teaspoon dulce de leche. Place one of the remaining pecan halves on top of each cookie, right over the dulce de leche. Return the pans to the oven and bake for another 5 minutes, until the cookies are set around the edges and the dulce de leche is just starting to bubble. Set the sheet pans on a wire rack and let the cookies cool completely on the pans, about 15 minutes. Repeat with any remaining dough.
5. Store the cookies in an airtight container at room temperature for up to 4 days.
Nutrition (per cookie):
Calories: 230, Fat: 15g (Sat: 6g), Cholesterol: 30mg, Sodium: 115mg, Carb: 22g, Fiber: 1g, Sugar: 13g, Protein: 3g
MAKES 24 SERVINGS
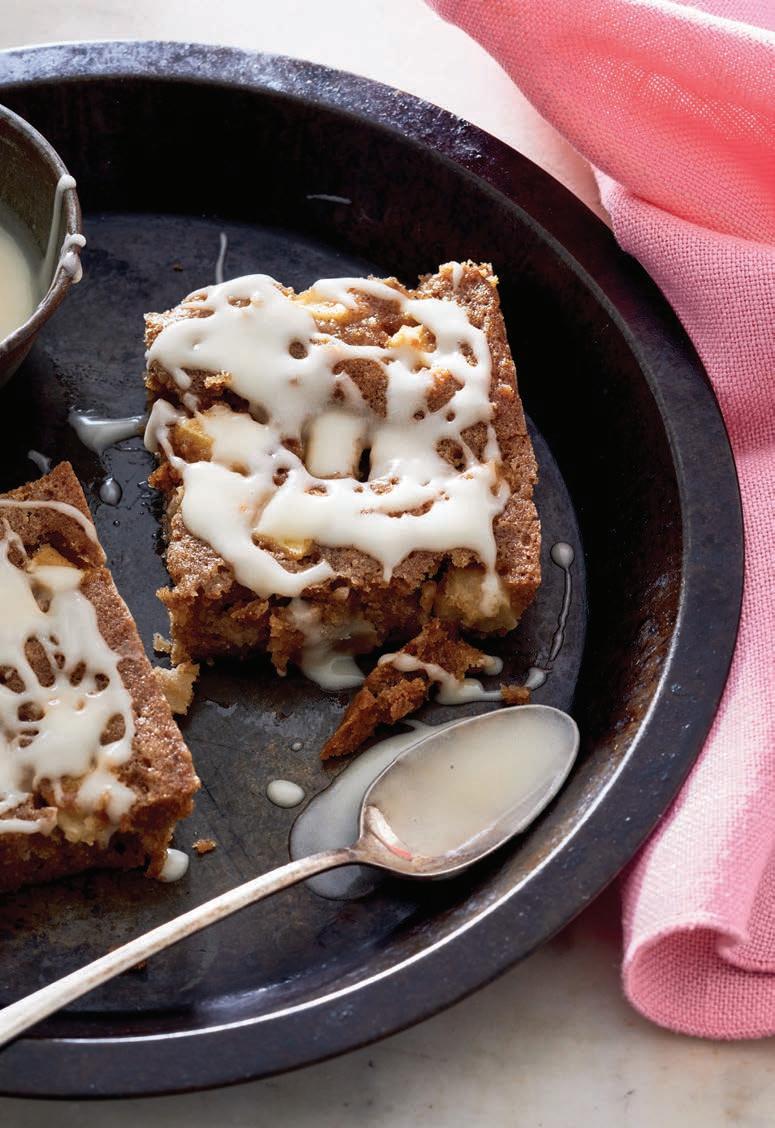
To me, the apple fritter is always the best choice at the doughnut shop. Every time. I mean, I’ll never say no to a maple old-fashioned or a plain raised glazed, and there’s a time and place for fancy shapes, fillings, and toppings, but if it’s in the case, the apple fritter has my vote. You can’t beat the dense-yet-airy dough, studded with pockets of apple and cinnamon, and bathed in a milky glaze. This cake is an homage to my favorite doughnut—it’s got the same dense crumb, baked apple pockets, and sweet maple glaze. And the best part? No frying necessary. –molly gilbert
for the cake
Unsalted butter or nonstick cooking spray
2½ cups all-purpose flour
½teaspoon baking soda
1 teaspoon kosher salt
1 teaspoon ground cinnamon
¼ teaspoon ground nutmeg
2 cups packed dark brown sugar
½ cup (1 stick) unsalted butter, melted and cooled
1 cup canola oil
4 large eggs
1 teaspoon pure vanilla extract
1 teaspoon pure almond extract
4 cups chopped peeled apples (about 3 large; such as a mix of Granny Smith and Golden Delicious)
for the glaze
4 tablespoons (½ stick) unsalted butter
¾ cup powdered sugar
2 tablespoons maple syrup
¼ teaspoon ground cinnamon
¼ teaspoon kosher salt
1 tablespoon whole milk
1. Make the cake: Heat the oven to 325°F with a rack in the center position. Grease a sheet pan with butter or nonstick spray.
2. In a medium bowl, whisk together the flour, baking soda, salt, cinnamon, and nutmeg.
3. In a large bowl, whisk together the brown sugar, melted butter, and oil until smooth. Add the eggs, vanilla, and almond extract and whisk well to combine.
4. Add the dry ingredients to the wet ingredients and stir with a rubber spatula until the dough just comes together. Fold in the apples until evenly distributed.
5. Pour the batter into the prepared pan and spread it evenly to the corners with a large o set spatula. Bake for 20 to 25 minutes, until the cake is deeply golden and the edges just start to pull away from the sides of the pan. Set the sheet pan on a wire rack and
let the cake cool for 20 to 25 minutes.
6. Make the glaze: Melt the butter in a small pot over medium heat. Cook, stirring often with a rubber spatula, until the butter turns a toasted, amber color (it will bubble and spit; when it quiets down, check for browning). Whisk in the powdered sugar, maple syrup, cinnamon, salt, and milk until smooth.
7. Drizzle the glaze evenly over the cooled cake. Let set for 5 minutes.
8. Slice the cake into pieces and serve. The cake is best the day it’s made, but will keep tightly covered in the refrigerator for 3 to 4 days.
Nutrition (per serving):
Calories: 290, Fat: 16g (Sat: 4.5g), Cholesterol: 45mg, Sodium: 170mg, Carb: 34g, Fiber: 1g, Sugar: 23g, Protein: 3g
MAKES ABOUT 10 SERVINGS
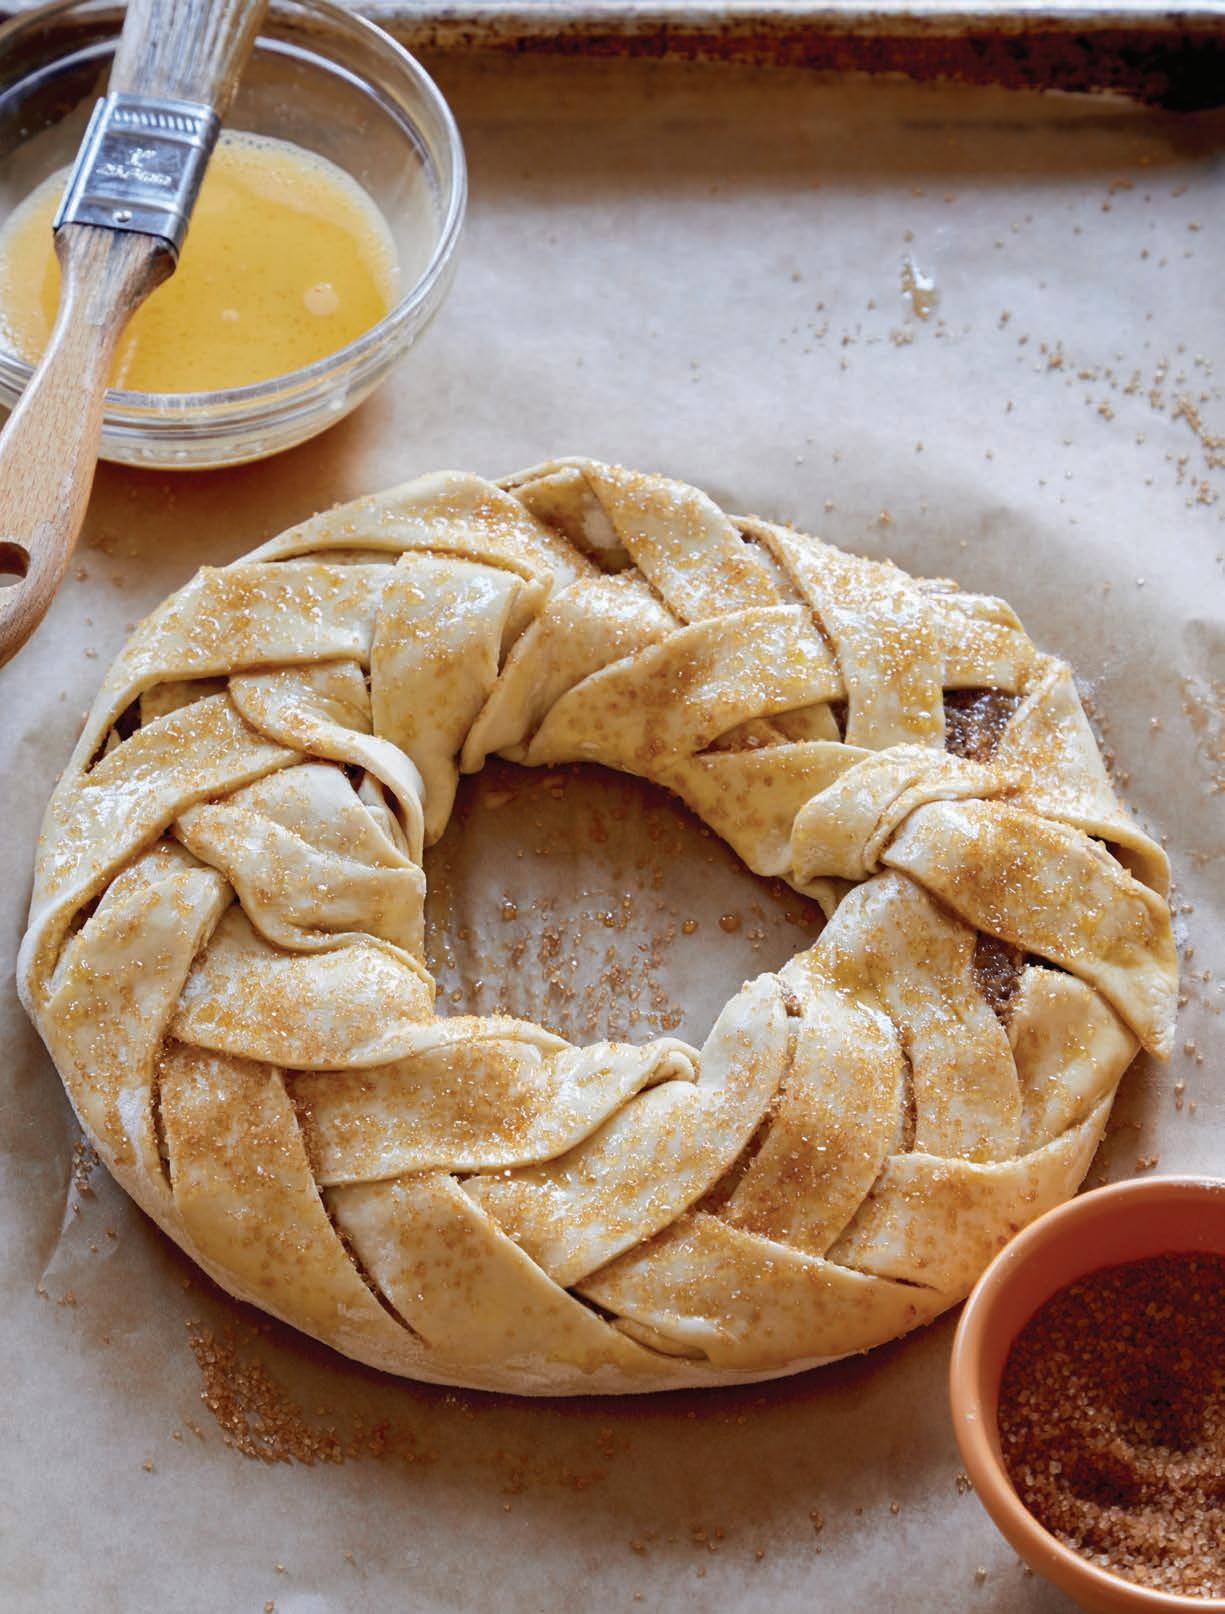
Fun fact: The state of Wisconsin has an o cial state pastry called a kringle, a wreath-shaped flaky Danish pastry with a tender, buttery crust and sweet filling. Do more states have o cial representative pastries? Why not?! Someone should do something about this. In the meantime, here’s my (very streamlined) version of the kringle—a braided pu pastry wreath stu ed with a sweet, nutty filling and drizzled with a buttery vanilla glaze. It’s a real stunner on the brunch table for the holidays and is highly snackable as the day wears on. If you’re hosting a house full of relatives, beware—you might see little slivers disappearing here and there, a subtle licking of fingers, and then, like magic, the whole thing has vanished. –molly gilbert
for the pastry wreath
7 ounces almond paste
½ cup chopped walnuts
½ cup chopped pecans

1 tablespoon ground cinnamon
½ cup (1 stick) unsalted butter, at room temperature
½ cup packed brown sugar
½ teaspoon kosher salt
2 large eggs, divided
All-purpose flour, for dusting
1. Heat the oven to 400°F with a rack in the center position.
2. Make the pastry wreath: Add the almond paste, walnuts, pecans, cinnamon, butter, brown sugar, salt, and 1 egg to a food processor. Pulse for 1 minute, until combined into a thick, chunky paste.
3. Set a large piece of parchment paper on a work surface and lightly flour the parchment and a rolling pin. Roll out both sheets of pu pastry into 10x15inch rectangles, about ¼-inch thick.

4. In a small bowl, whisk together the remaining egg and water.
5. Set the pu pastry sheets next to each other with the short sides touching. Brush the short side of one of the sheets with egg wash, then gently press the short side of the other one on top, overlapping the sheets by about ¾-inch, to create one long, rectangular piece of dough with a long side of the rectangle nearest to you.
6. Use a sharp knife to cut o the top left and bottom left corners of the rectangle at a 45-degree angle away from the left side of the pastry, leaving a 4-inch-long edge of dough between them. Next, move to the top right and bottom right corners and cut out two triangular notches, again leaving a 4-inchlong edge of dough along the right side of the pastry between. (The whole thing will look like a sideways, short-stumped Christmas tree missing its pointy top.) Finally, make diagonal slits, about 1 inch apart and parallel to the notches, along the top and bottom of the pastry, leaving a 4-inch-wide strip in the center intact. (The narrow flaps will get folded over to make the braid, with the filling in the center.)
7. Spread the nutty filling over the center strip of pastry (not on the side flaps), leaving

2 sheets frozen pu pastry, thawed

1 teaspoon water
Turbinado sugar, for sprinkling
for the glaze
1 cup powdered sugar
2 tablespoons unsalted butter, at room temperature
1 teaspoon pure vanilla extract
2 tablespoons whole milk or heavy cream
a ¾-inch border at the left and right edges.


8. Fold the left and right edges of the pastry over the filling. Then, starting from the left side and alternating top and bottom flaps, fold the diagonal flaps of pastry tightly over the filling, crisscrossing them on top of one another until all of the strips are interwoven and the filling is completely covered. Trim away any loose pieces of pastry, then bring the ends of the braid together to form a wreath and pinch the seams to seal.
9. Carefully transfer the parchment with the wreath to a sheet pan. Lightly brush the top and sides of the braid with the egg wash and sprinkle with turbinado sugar. Bake the wreath until the pastry is deeply browned, 30 to 40 minutes. Allow to cool on the pan for about 20 minutes.
10. Meanwhile, make the glaze: In a medium bowl, whisk together the powdered sugar, butter, vanilla, and milk until smooth.
11. Drizzle the glaze generously over the wreath. Slice into thin wedges and serve. The wreath is best the day it’s made, although it can be baked ahead and stored, unglazed and tightly covered, at room temperature for 1 day. Reheat it in a 350°F oven for 10 to 15 minutes, until crisp, then glaze before serving. Any leftovers will keep tightly covered at room temperature for up to 3 days.
Nutrition (per serving):
Calories: 550, Fat: 38g (Sat: 15g), Cholesterol: 65mg, Sodium: 310mg, Carb: 48g, Fiber: 3g, Sugar: 29g, Protein: 7g
Remove only as many pu pastry sheets as you need and wrap unused sheets in plastic wrap or foil and return to the freezer.
The quickest way to thaw pu pastry is to separate the sheets, cover each with plastic wrap, and leave on the counter (away from the oven) at room temperature for about 30 minutes. You can thaw it in the refrigerator. Separate and place each sheet on a plate, cover with plastic wrap, and defrost in the fridge for about 4 hours. Do not try to manipulate pu pastry that has not thawed completely; it could tear if you unfold it while it's still frozen.
Once pu pasty is thawed, work quickly while it is still cold. It works best when cold and your hands should be cold, too. Run them under cold water or squeeze a plastic ziptop bag full of ice to cool them o . Try using only your fingertips—the coolest part of your hands—when working with it. You can cut it into desired shapes, then store in the fridge until you are ready for the next step.
SOURCE: PEPPERIDGE FARM
REPRINTED WITH PERMISSION FROM UNION SQUARE & CO.
PHOTOGRAPHY BY DANA GALLAGHER.


Whether you’re watching your favorite team on TV or ba ling over your favorite board game, impress guests with a spread of winning bites. Plus, share these recipes and have guests bring one of their favorites.
–mary subialka

MAKES 4 SERVINGS | RECIPE COURTESY BEEF, IT’S WHAT’S FOR DINNER
If you are looking for tasty new ways to serve Sloppy Joes, we have the answers.
traditional
1 pound ground beef (93% lean or leaner)
1 cup finely chopped yellow onion
1 cup finely chopped green, red, or yellow bell pepper
1 (15-ounce) can no-salt added
tomato sauce
2 tablespoons brown sugar
2 tablespoons Worcestershire sauce


4 hamburger buns, split, warmed
Dill pickle slices, coleslaw, American or cheddar cheese slices, for serving
1. Heat large nonstick skillet over medium heat until hot. Add ground beef, onion, and bell pepper. Cook 8 to 10 minutes, breaking beef into small crumbles and stirring occasionally. Pour o drippings, as necessary.
2. Stir in tomato sauce, brown sugar, and Worcestershire sauce. Bring to a boil and cook 5 to 7 minutes or until sauce is thickened, stirring occasionally. Season with salt, as desired.
3. Divide beef mixture evenly onto rolls. Garnish with toppings, if desired.

Cook’s Note:
Cooking times are for fresh or thoroughly thawed ground beef. Ground beef should be cooked to an internal temperature of 160°F. Color is not a reliable indicator of ground beef doneness.
Nutrition (per serving, traditional):
Calories: 393, Fat: 9.9g (Sat: 3.7g), Cholesterol: 84mg, Sodium: 429mg, Carb: 45g, Fiber: 3.1g, Sugars: 19.1g, Protein: 32g

2
Southwest Variation
Prepare recipe as directed, substituting 2 cups salsa for tomato sauce and omitting Worcestershire sauce and brown sugar. Add 1⁄2 cup drained canned black beans and 1⁄2 cup frozen corn with ingredients in Step 2. Serve in warmed taco shells. Garnish with shredded lettuce, chopped tomato, shredded pepper Jack cheese, chopped avocado, pickled or fresh jalapeño slices, and chopped cilantro, if desired.
3
Hawaiian Variation
Prepare recipe as directed, substituting 1⁄2 cup sweet barbecue sauce for tomato sauce and omitting Worcestershire sauce. Add 1 can (8 ounces) crushed pineapple in juice, undrained, with ingredients in Step 2. Serve in small sweet Hawaiian honey wheat dinners rolls. Garnish with dill or sweet pickle slices or pickled jalapeño slices, if desired.
4
Moroccan Variation
Prepare recipe as directed, omitting Worcestershire sauce. Add 1⁄2 cup raisins, 2 teaspoons pumpkin pie spice, and 1 teaspoon ground cumin with ingredients in Step 2. Remove from heat and stir in 1 tablespoon nonfat Greek yogurt. Serve in naan or pita pocket breads. Garnish with cucumber slices, nonfat Greek yogurt, and chopped pistachios, if desired.
5
Asian Variation
Prepare recipe as directed, adding 1 tablespoon ground ginger with ingredients in Step 1. Substitute 2 tablespoons hoisin for Worcestershire sauce. Serve in warm crusty rolls. Garnish with cucumber slices, shredded carrot, and chopped cilantro or chopped green onion, if desired.
MAKES 30 | RECIPE COURTESY BEEF, IT’S WHAT’S FOR DINNER
An easy-to-prepare Mexican-style appetizer, this recipe will win over any crowd.
12 ounces ground beef (93% lean or leaner)
½ cup chopped onion
1 teaspoon minced garlic
½ cup prepared mild or medium taco sauce
½ teaspoon ground cumin
¼ teaspoon salt
⅛ teaspoon pepper
2 packages (2.1 ounces each) frozen mini phyllo shells (30 shells total)
½ cup shredded reduced fat Mexican cheese blend
Shredded lettuce, sliced grape or cherry tomatoes, guacamole, lowfat dairy sour cream, and sliced ripe olives, for topping (optional)
1. Heat oven to 350°F.
2 Add ground beef, onion, and garlic to a large nonstick skillet over medium heat and cook 8 to 10 minutes, breaking up beef into small crumbles and stirring occasionally (see Cook’s Note on page 38). Add taco sauce, cumin, salt, and pepper. Cook and stir 1 to 2 minutes or until mixture is heated through.
3. Place phyllo shells on rimmed baking sheet. Spoon beef mixture evenly into shells. Top evenly with cheese. Bake 9 to 10 minutes or until shells are crisp and cheese is melted.
4. Top tarts with lettuce, tomatoes, guacamole, sour cream, and olives, as desired.
Nutrition (per serving): Calories: 43, Fat: 1.7g (Sat: 0.7g), Cholesterol: 12mg, Sodium: 92mg, Carb: 2.7g, Fiber: 0.1g, Protein: 4.2g
MAKES 24 SERVINGS | RECIPE COURTESY BEEF, IT’S WHAT’S FOR DINNER
Bump up your meatball mojo. Gently form this tried-and-true blend into bite-size balls, then broil and slather in a spicy, sweet and too-good-to-be-so-simple sauce.
1 pound ground beef (96% lean)
¼ cup seasoned dry bread crumbs
2 egg whites or 1 egg, beaten
2 tablespoons water
¼ teaspoon salt
⅛ teaspoon pepper
1. Heat oven to 400°F. Combine ground beef, bread crumbs, egg whites, water, salt and pepper in large bowl, mixing lightly but thoroughly. Shape into 24 (1-inch) meatballs. Place on rack in broiler pan that has been sprayed with cooking spray. Bake in 400°F oven 18 to 20 minutes.
2. Meanwhile, heat preserves, barbecue sauce, and mustard in medium saucepan over medium heat. Bring to a boil; reduce heat; simmer, uncovered, 3 to 5 minutes, stirring occasionally or until sauce thickens slightly.
3. Add cooked meatballs and continue to cook 2 to 3 minutes or until meatballs are heated through, stirring occasionally. Serve warm.
for the apricot dipping sauce
¾ cup apricot preserves
3⁄4 cup barbecue sauce
2 tablespoons Dijon-style mustard
Cook’s Notes:
Cooking times are for fresh or thoroughly thawed ground beef. Ground beef should be cooked to an internal temperature of 160°F. Color is not a reliable indicator of ground beef doneness.
Red or black raspberry, fig, peach, currant, or pineapple preserves or orange marmalade may be substituted for apricot preserves.
To keep meatballs warm, place in a 21⁄2-quart slow cooker set on low. Keep covered to maintain heat. Meatballs can be held up to 21⁄2 hours, stirring occasionally.
Nutrition (per serving): Calories:
74, Fat: 1.3g (Sat 0.5g), Cholesterol: 20mg, Sodium: 177mg, Carb: 11g, Fiber: 0g, Sugars: 7g; Protein: 5g
Your friends will rave for this beef chili that’s packed with layers of flavors including beer, smoky chipotle peppers, and black beans.
21⁄2 pounds boneless beef shoulder roast, cut into 1⁄2-inch pieces
2 tablespoons vegetable oil, divided
1 teaspoon salt
3 teaspoons minced garlic
2 cans (141⁄2 ounces each) diced tomatoes with green peppers and onions, undrained
1 (12-ounce) bottle light beer
2 tablespoons adobo sauce from chipotle peppers
1 tablespoon minced chipotle peppers in adobo sauce
1 (15-ounce) can black beans, rinsed and drained
3 tablespoons masa harina Sour cream (optional)
1. Cut beef shoulder roast into 1⁄2-inch pieces. Heat 1 tablespoon oil in stockpot over medium heat until hot; brown beef in batches and remove from stockpot. Season with salt.
2. Heat remaining 1 tablespoon oil in same stockpot over medium heat. Add garlic; cook and stir 1 minute. Add beef, tomatoes, beer, adobo sauce, and chipotle peppers and bring to a boil. Reduce heat; cover tightly and simmer 11⁄2 to 13⁄4 hours or until beef is fork-tender.
3. Stir in beans and masa harina; return to a boil. Reduce heat; simmer 1 to 2 minutes or until slightly thickened, stirring constantly. Serve with sour cream, as desired.
Nutrition (per serving): Calories: 329, Fat: 11.6g (Sat: 3.3g); Cholesterol: 84mg, Sodium: 738mg, Carb: 21g, Fiber: 6.3g, Sugars: 3.6g, Protein: 33g
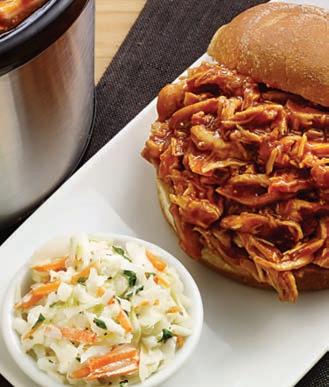
MAKES 8 SERVINGS |
RECIPE COURTESY BELL & EVANS
Take your slow cooker pulled chicken to the next level with homemade barbecue sauce and pullapart Bell & Evans chicken breasts.
for the bbq sauce
4 tablespoons unsalted butter
1 small sweet onion, peeled and finely diced
4 cloves garlic, minced
¼ cup dark brown sugar
½ cup apple cider vinegar
3 tablespoons Dijon mustard
3 tablespoons soy sauce
½cup molasses
1 (6-ounce) can tomato paste
¾ cup chicken broth
Salt and pepper, to taste
Crushed red pepper flakes, to taste
8 Bell & Evans Boneless, Skinless Chicken Breasts
8 Kaiser rolls, or buns of your choice
1. In a medium sauté pan, melt butter over low heat. Add onion and garlic. Season with salt, pepper, and red pepper flakes. Sauté until translucent. Add remaining ingredients, whisking to incorporate. Simmer 10 minutes until slightly thickened.
2. Place chicken in slow cooker and top with barbecue sauce. Cook 3 to 4 hours on high or 6 to 8 hours on low.
3. Shred chicken with two forks. It will be fall-apart tender. After shredding, stir chicken with excess sauce. Season with salt and pepper if needed and keep warm until ready to serve. Serve on buns with your favorite coleslaw or salad.
Nutrition (per serving): Calories: 440, Fat: 10g (Sat: 5g), Cholesterol: 70mg, Sodium: 840mg, Carb: 60g, Fiber: 3g, Sugar: 29g, Protein: 26g
MAKES 8 SERVINGS |
RECIPE COURTESY BELL & EVANS
Need a last-minute appetizer idea? These meatballs are so simple, made with just three ingredients, including Bell & Evans Traditional Chicken Meatballs, plus some parsley for garnish, this is not only easy but a ordable, too.
1 (18-ounce) jar grape jelly
1 (12-ounce) jar Thai sweet chili sauce
1 (30-ounce) bag Bell & Evans
Traditional Chicken Meatballs Chopped parsley, for garnish
1. Combine the jelly and chili sauce in a large pan and simmer over medium heat until the jelly is melted. Add the meatballs, stir, cover the pan, and cook over medium low for 30 minutes or until the meatballs register 170°F on an instant-read thermometer.
2. Transfer the meatballs with a slotted spoon to a mixing bowl, turn up the heat to high, and cook the liquid until it thickens and reduces by two thirds, 10 to 12 minutes, stirring frequently. Add the meatballs back to the liquid, stir gently, and keep warm until serving. Garnish with parsley.
Nutrition (per serving): Calories: 390, Fat: 7g (Sat: 2g), Cholesterol: 90mg, Sodium: 700mg, Carb: 71g, Fiber: 1g, Sugar: 61g, Protein: 16g
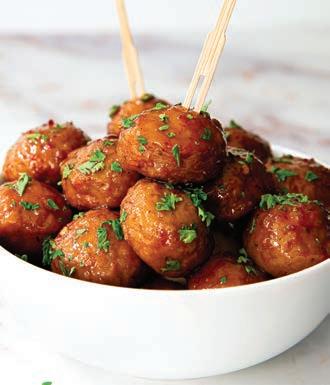

MAKES 6 SERVINGS | RECIPE COURTESY BELL & EVANS
These steamy buns are so easy! Guests will never know it took under 30 minutes to make these delectable gourmet tiny sandwiches. The homemade sauces really make a di erence!
2 boxes Bell & Evans Organic Chicken Nuggets
1 tablespoon toasted sesame seeds (black or white)
1 box Lotus Leaf steam buns
2 scallions, sliced thinly on the bias, soaked in cold water and then patted dry
for the spicy mayo
1⁄2 cup mayonnaise
2 tablespoons Sriracha sauce
1. Cook chicken nuggets in oven or air fryer according to package instructions.
2. Meanwhile, make the sauces. In two separate bowls, combine ingredients for each sauce.
3. Heat steam buns according to package directions (steamer insert, steamer basket, or microwave).
4. Spread a desired amount of sauces inside bun and place a chicken nugget inside.
5. Top with sliced scallions, toasted sesame seeds, and a drizzle of additional sauce.
1 ounce soy sauce
1⁄2 teaspoon sesame oil
1⁄2 teaspoon lime juice
for the teriyaki sauce
4 ounces soy sauce (naturally brewed)
3 ounces mirin
3 ounces sake (cooking quality is fine)
5 tablespoons sugar
1 teaspoon chopped garlic
1⁄2 teaspoon minced ginger
1 tablespoon sesame seeds
Nutrition (per serving, without sauces):
Calories: 500, Fat: 5g (Sat: 5g), Cholesterol: 55mg, Sodium: 410mg, Carb: 86g, Fiber: 4g, Sugar: 10g, Protein: 26g
Nutrition, Spicy Mayo (per 2 tablespoons):
Calories: 140, Fat: 14g (Sat: 2g), Cholesterol: 10mg, Sodium: 610mg, Carb: 2g, Fiber: 0g, Sugar: 1g, Protein: <1g
Nutrition, Teriyaki Sauce (per 2¾ tablespoons):
Calories: 110, Fat: 0.5g (Sat: 0g), Cholesterol: 0mg, Sodium: 1330mg, Carb: 18g, Fiber: 5g, Sugar: 14g, Protein: <1g

MAKES 6 SERVINGS | RECIPE BY NATALIE RIZZO COURTESY OF THE ALMOND BOARD OF CALIFORNIA
1½ cups (about 6 ounces) raw unsalted whole almonds
4 tablespoons grated Parmesan cheese (vegetarian, if desired), divided
1 tablespoon extra-virgin olive oil
½ teaspoon garlic powder
1 teaspoon chopped fresh parsley
Dash of salt
1. Heat oven to 325°F. Line a baking sheet with parchment paper and set aside.
2. In a large bowl, combine the almonds, 3 tablespoons of grated Parmesan, olive oil, garlic powder, parsley, and salt. Stir well to combine.
3. Spread almond mixture on the prepared baking sheet. Bake for 10 minutes.
4. Once out of the oven, let the almonds cool for 10 minutes and sprinkle remaining 1 tablespoon of Parmesan cheese on top.
Nutrition (per serving): Calories: 200, Fat: 17g (Sat: 2g), Cholesterol: <5mg, Sodium: 110mg, Carb: 7g, Fiber: 4g, Sugar: 1g, Protein: 7g
MAKES 10 TO 12 SERVINGS | RECIPE COURTESY WISCONSIN CHEESE
This dish is sure to be a favorite—it’s creamy, sharp, bold, and decadent all in one!
4 medium leeks (white and light green portions only), thinly sliced (about 4 cups)
2 tablespoons butter, cubed
4 garlic cloves, minced
2 cups fresh baby arugula or baby spinach
Salt and pepper, to taste
1 package (8 ounces) Crystal Farms
Original Cream Cheese, softened
1⁄2 cup mayonnaise
1⁄2 cup sour cream
1 teaspoon crushed red pepper flakes
12 ounces Henning’s 3 Year Extra Sharp Cheddar cheese, shredded and divided (3 cups)
Toasted French bread baguette slices or crostini
1. Heat oven to 350°F.
2. Sauté leeks in butter in a large skillet over medium heat for 3 to 4 minutes or until leeks are crisp-tender. Add garlic and arugula; cook and stir for 1 minute longer. Season with salt and pepper to taste. Remove from the heat. Cool completely.
3. Beat the cream cheese, mayonnaise, sour cream, and red pepper flakes in a large bowl until blended. Stir in 21⁄2 cups cheddar and leek mixture. Season with salt and pepper to taste.
4. Spoon into a greased 11⁄2-quart baking dish or 10-inch pie plate. Sprinkle with remaining cheddar. Bake for 25 to 30 minutes or until bubbly. Serve with toasts.
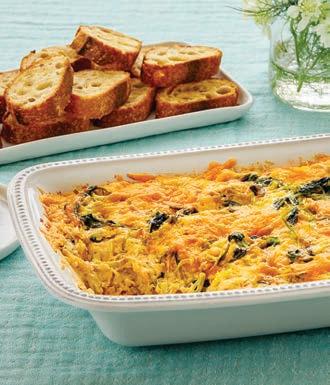
Nutrition (per serving, dip only):
Calories: 330, Fat: 29g (Sat: 14g),
Cholesterol: 70mg, Sodium: 350mg, Carb: 8g, Fiber: <1g, Sugar: 2g, Protein: 10g
MAKES 4 SERVINGS | RECIPE COURTESY BELL & EVANS
If you love takeout Thai food, try making this chicken satay at home!
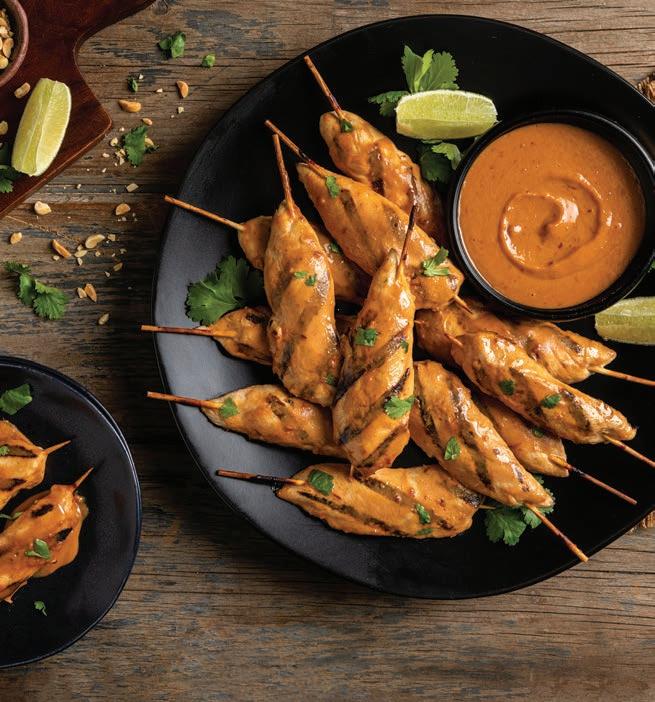
for the chicken
1 package Bell & Evans Boneless Skinless Raised without Antibiotics or Organic Chicken Tenders
2 tablespoons soy sauce
1 lime, juiced
1 tablespoon honey
1 tablespoon Sriracha sauce
2 teaspoons ground ginger
2 cloves garlic, minced Vegetable oil, for brushing grates
1. Soak 8 wooden skewers in water for at least 30 minutes.
2. Place chicken in a resealable plastic bag. Add soy sauce, lime juice, honey, Sriracha, ginger, and garlic. Massage the mixture into chicken to cover completely. Marinate at room temperature for 30 minutes, or refrigerate several hours or overnight.
3. For the peanut sauce: Whisk peanut butter, water, soy sauce, maple syrup, lime juice, and chili garlic sauce together until smooth. Set aside for serving with chicken.
4. When ready to cook, brush excess marinade o chicken, reserving marinade. Thread 1 piece of chicken onto each skewer.
for the peanut sauce and assembly
1⁄2 cup salted creamy peanut butter
1⁄4 cup water
2 tablespoons soy sauce
2 tablespoons maple syrup
2 limes; 1 juiced and 1 cut into wedges
2 teaspoons chili garlic sauce
2 tablespoons chopped salted peanuts, for garnish Chopped fresh cilantro, for garnish
5. Heat grill or grill pan over medium heat and brush grates with oil. Grill chicken, brushing with reserved sauce, and turning occasionally, until golden-brown, or until internal temperature reaches 165°F as measured by a meat thermometer, about 6 to 10 minutes. Garnish chicken with peanuts and cilantro. Serve with peanut sauce and lime wedges.
Nutrition (per serving): Calories: 370, Fat: 20g (Sat: 3g), Cholesterol: 55mg, Sodium: 1310mg, Carb: 24g, Fiber: 3g, Sugar: 15g, Protein: 30g
It’s possible to make tasty and fresh meals even if you’re short on time and keeping an eye on your budget. All it takes is a little planning and some easy recipes to try, and we can help keep you from swinging by the drive-thru and on your way to enjoying more homecooked meals.
You can make great food with everyday ingredients—you just need to cook clever and get creative, says Nagi Maehashi. She has been helping home cooks do just that with her popular Recipe Tin Eats website and her recently released cookbook “Recipe Tin Eats Dinner.” This finance executive-turned blogger who was born in Japan, raised in Sydney, Australia, and has traveled throughout Europe, the Middle East, Asia, and America, incorporates a world of different flavors into her recipes. In the following recipes from her book, you can enjoy a one-pot pasta with a timesaving meatball hack, her popular one-pan fried rice—here with chicken—and give shrimp a flavorful garlic Thai boost.
Self-taught cook Kevin Tatar can also help you save money and build confidence in the kitchen. After he moved from his home country of Romania to the Netherlands to attend college, he was faced with a realization of many college students that it is hard to feed yourself all the time. He honed his cooking skills and shared tips as KWOOK on Tik Tik, YouTube, and Instagram to help other college students and young adults on their way to healthy, affordable, and approachable home cooking. Now, in his first cookbook, “Tasty. Healthy. Cheap: Budget-Friendly Recipes with Exciting Flavors” everyone can benefit from his easy recipes, such as a chickpea wrap, a version of butter chicken, and a creative mashup of two favorite Italian pasta dishes. As Tatar says, “Listen to your intuition and trust your senses! You got this!” –mary
subialkaJust put it all in a pan—even the uncooked rice—and bake!

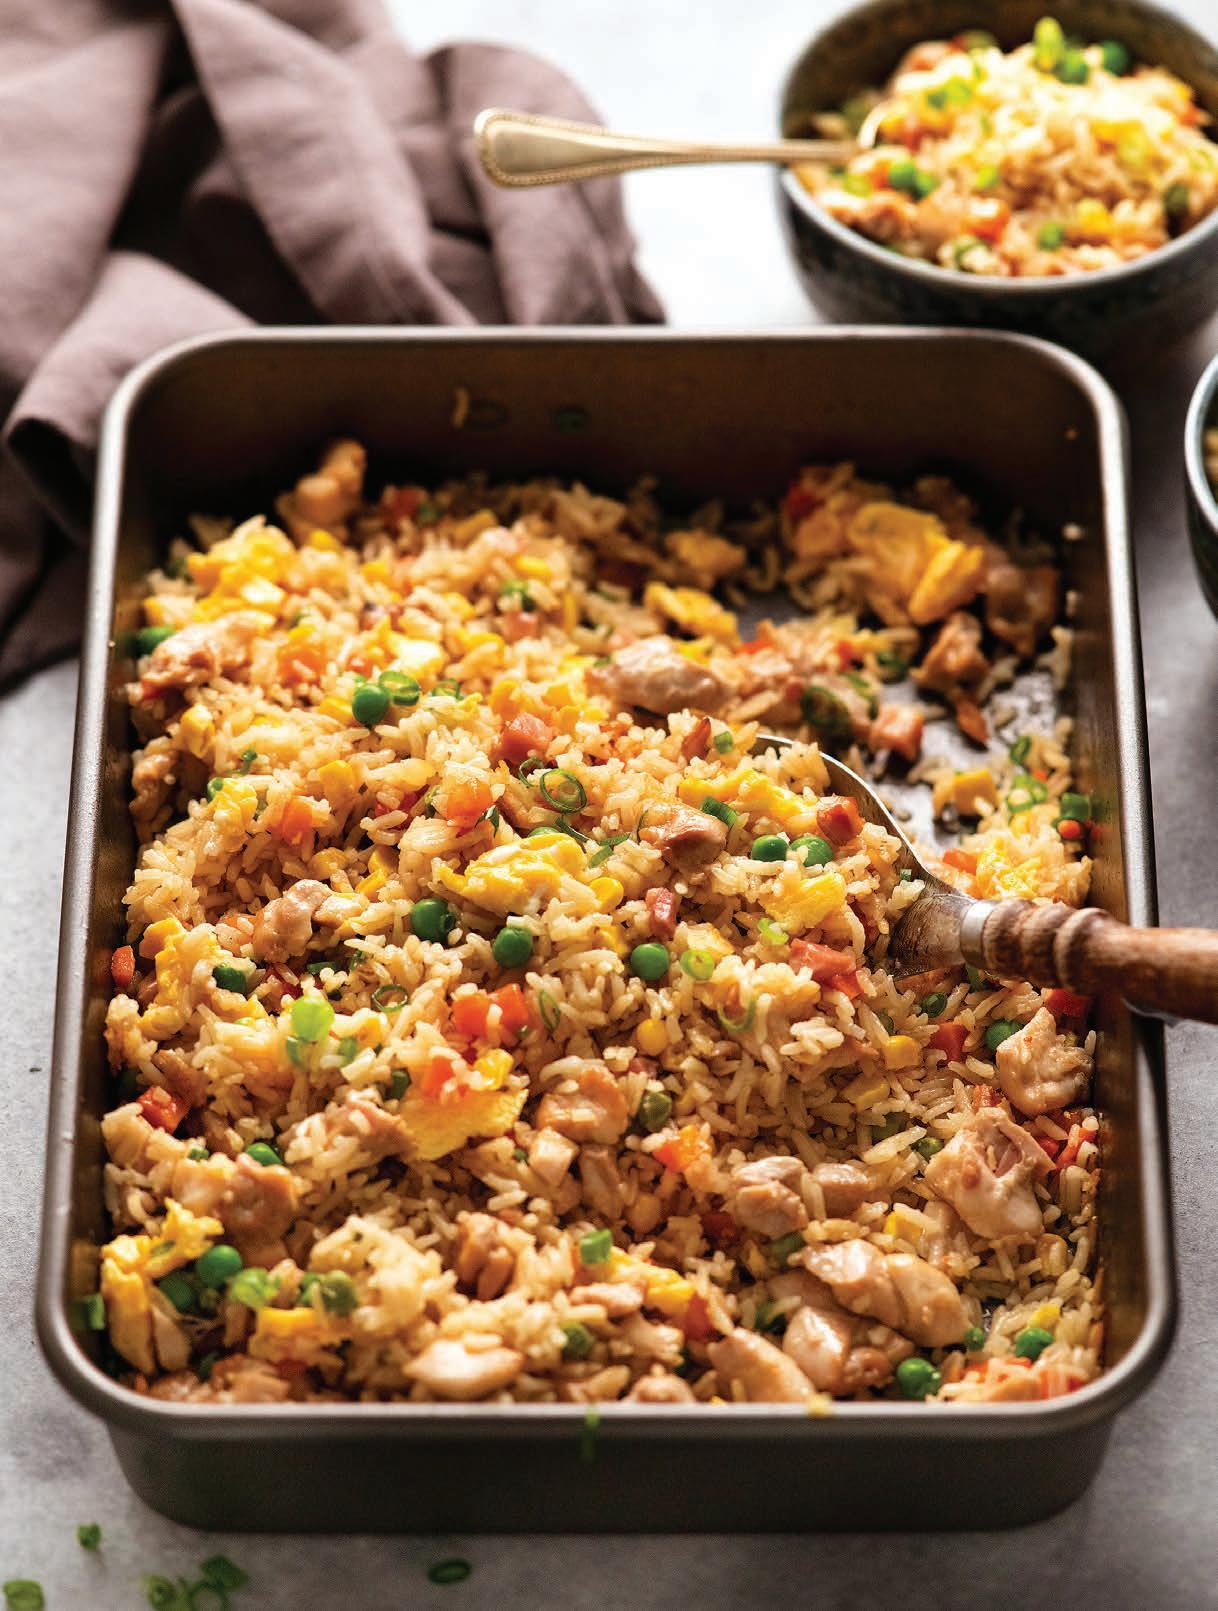


MAKES 4 SERVINGS
Tastes like Thai chili jam, but so much easier to make! I just love the sweet, fragrant, and deeply savory taste of Thai chili jam. The idea for this recipe comes from the stir-fries tossed through with chili jam that you often see at modern Thai restaurants. This is a faster version, but still has the same big, gutsy flavors with a chili tickle—just perfect with sweet, plump shrimp.
nagi maehashi1½ tablespoons canola oil
1 pound peeled and deveined raw shrimp, tails intact (or 2 pounds unpeeled shrimp)
1 teaspoon sesame oil
3 garlic cloves, finely minced
2 teaspoons finely minced ginger
1 teaspoon dried red pepper flakes (see Cook’s Notes)
½ cup water
3 tablespoons Sriracha sauce
MAKES 4 SERVINGS (AS A MAIN) | PHOTO ON PAGE 45
Sometimes after a long day, even I don’t have the energy to deal with chopping vegetables … let alone remembering to cook rice the day before! So, I published a “dump and bake” fried rice on my website … To my total surprise, the recipe was a smash hit and had 100,000 views in 24 hours! It’s delicious—the flavor is fantastic, the rice is flu y and moist. The most asked question: “How can I add chicken to this?” Well, here’s how! –nagi maehashi
2 teaspoons light soy sauce (or all-purpose soy sauce; do not substitute with dark soy sauce)
3 tablespoons packed brown sugar (or granulated sugar)
Garnishes (Optional): White sesame seeds Red chili pepper, deseeded and finely sliced Green onion, finely sliced
1. Sear shrimp—heat the oil in a large nonstick skillet over high heat. Add half the shrimp and sear each side for 45 seconds until light golden, then transfer to a bowl—they will still be raw inside. Repeat with the remaining shrimp.
2. Cool pan—remove the pan from the stove to cool down slightly. Turn the heat down to medium.
3. Make sauce—return the pan to the stove and heat the sesame oil. Add the garlic, ginger, and red pepper flakes and cook for 20 seconds or until the garlic turns golden. Add the water, then the Sriracha, soy sauce, and sugar. Stir, increase the heat to medium high, then let the sauce simmer for 3 minutes or until it starts to thicken to a thin, syrupy consistency.
4. Coat shrimp—Return the shrimp to the pan and toss to coat in the sauce. Cook for 1 minute more until the shrimp are cooked and the sauce has thickened and is coating the shrimp.
5. Serve—transfer the shrimp and all the sauce to a serving plate. Sprinkle with sesame seeds, red chili pepper, and green onion (if using). Serve with rice or Chinese fried rice to soak up the awesome sauce! Team with your favorite garden salad, given an Asian spin by tossing with Asian sesame dressing.
Cook’s Notes:
This dish has a decent amount of spiciness. Reduce the red pepper flakes and Sriracha for less spice. You can always add a bit extra at the end if you think you can handle more!
Store any leftovers in the fridge up to 2 days, though best made fresh. Not suitable for freezing.
Nutrition (per serving):
Calories: 160, Fat: 7g (Sat: 1g), Cholesterol: 105mg, Sodium: 960mg, Carb: 11g, Fiber: <1g, Sugar: 9g, Protein: 12g
for the baked fried rice
1½ cups long-grain white rice, uncooked (see Cook’s Notes)
1½ cups low-sodium chicken broth
1½ tablespoons light soy sauce (or all-purpose soy sauce)
1 tablespoon Shaoxing cooking wine (see Cook’s Notes)
2 garlic cloves, finely minced
¼ teaspoon white pepper
2 cups frozen diced vegetables (carrots, peas, and corn mix), still frozen
¾ cup chopped cooked bacon or ham (can use storebought chopped bacon)
1. Heat the oven to 400°F.
for the marinated chicken
1pound boneless, skinless chicken thighs, cut into ½-inch pieces
1 tablespoon oyster sauce
1 tablespoon Shaoxing
cooking wine
1 tablespoon light soy sauce (or all-purpose soy sauce; do not substitute with dark soy sauce)
2 teaspoons sesame oil
1 garlic clove, finely minced
to finish
2 eggs, scrambled (optional; see Cook’s Notes)
2 teaspoons sesame oil
1 green onion, finely sliced
2. Bake covered—place all the baked fried rice ingredients, except the vegetables and bacon, in a 13x9-inch metal pan (not ceramic or glass). Shake to spread the rice evenly, ensuring all the rice is submerged under the broth. Sprinkle the vegetables evenly across the surface, then sprinkle the bacon on top. Cover with aluminum foil and bake for 25 minutes.
3. Marinate chicken—meanwhile, place the marinated chicken ingredients in a bowl and mix well to combine. Set aside to marinate while the rice cooks.
4. Bake uncovered—remove the aluminum foil (reserve the foil), then spread the chicken in a single layer across the surface of the rice. Bake, uncovered, for 20 minutes.
5. Rest and serve—remove from the oven, cover with the reserved aluminum foil, and rest for 10 minutes. Use a rubber paddle to turn the rice over and gently break it up. Add the scrambled egg (if using). Drizzle with sesame oil and sprinkle with the green onion. Gently toss the fried rice to mix it together, then serve!
Cook’s Notes:
Basmati and medium-grain white rice can also be used. Not suitable for risotto rice, paella rice, brown rice, or sushi rice.
If you don’t have Shaoxing cooking wine, you can use mirin or dry sherry. If you want alcohol-free, omit and add ¼ cup low-sodium chicken broth and cook for 1 minute longer.
I tried all sorts of ways to bake the egg in the oven along with the rice, but it just didn’t work … it’s just easiest to cook it on the stove. Whisk the eggs, then scramble them in a nonstick skillet over medium–high heat with a teaspoon of oil until just cooked. Transfer to a bowl, then add to the rice as directed.
Nutrition (per serving):
Calories: 550, Fat: 15g (Sat: 4g), Cholesterol: 170mg, Sodium: 1200mg, Carb: 67g, Fiber: 5g, Sugar: 0g, Protein: 31g
1. Brown meatballs—heat the oil over high heat in a large heavy-based pot. Add the sausage “meatballs” and cook for 4 to 5 minutes, stirring regularly, until golden brown. Transfer to a bowl.
2. Sauté aromatics—turn the heat down to medium high. Discard all but 2 tablespoons of the fat in the pot, then return to the stove. Cook the onion, garlic, carrot, celery, bay leaf, and rosemary for 3 minutes or until the onion is translucent.
3. Make sauce—add the tomato paste and cook for 1 minute. Add the crushed tomatoes, broth, water, salt, pepper, sausage meatballs, and the rigatoni. Stir, let it come up to a simmer, then place the lid on and turn the heat down to medium low so it is simmering gently.
4. Cook for 20 minutes, stirring every now and then so the base doesn’t catch. Take the pot o the stove, remove the lid, and check to ensure the pasta is just about cooked. It should still be soupier than you want. Stir well for 10 seconds—the sauce will reduce quickly. It should still be quite saucy—more gets absorbed in the next step.
5. Cheese it—working quickly, smooth the surface, then sprinkle with the cheese. Put the lid back on, then leave the pot on the turned-o stove for 3 minutes or until the cheese melts. Serve immediately, sprinkled with parsley, if desired. Try serving this with a handful of arugula drizzled with balsamic dressing, if you wish.
Cook’s Notes:

MAKES 4 TO 5 SERVINGS
You will love the meatball hack! Anyone who knows me knows I hate rolling meatballs—hence why I love these sausage meatballs. Just cut sausages up into pieces and voila, instant meatballs! Here I cook them in a bright tomato sauce with rigatoni. Think a big, bubbly pasta bake—only you’ve done it all on the stove in one pot in less time than it’d take to roll up proper meatballs! –nagi
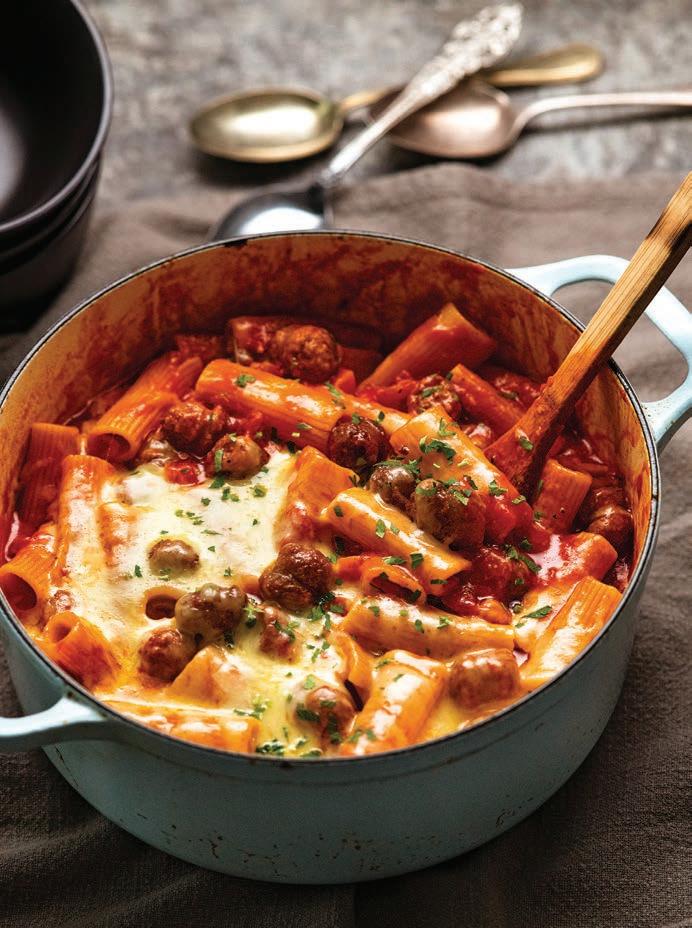
1½ tablespoons extra-virgin olive oil
1 pound good-quality thin beef or pork sausages, cut into ¾-inch pieces (mini meatballs; see Cook’s Notes)

1 yellow onion, finely chopped
2 garlic cloves, minced
1 carrot, peeled and finely diced
1 celery stalk, finely diced
1 bay leaf
1 teaspoon dried rosemary
3 tablespoons tomato paste
maehashi
1 (28-ounce) can crushed tomatoes
2 cups low-sodium chicken broth
1½ cups water
¾ teaspoon kosher salt
½ teaspoon black pepper
10 ounces rigatoni (or penne, ziti, or macaroni)
1½ cups (5 ounces) shredded colby cheese (or any favorite melting cheese)
1 teaspoon finely chopped parsley, to serve (optional)
Any sausages will work well in this recipe as long as they are the thin ones, around ¾-inch wide. The really fat sausages work too, but you get fewer meatballs. Be sure to choose good-quality sausages as they are part of the flavor base in this dish. Beef sausages brown more than pork and chicken, but any of these are fine. Just get your favorite!
Store leftovers in the fridge up to 4 days or freezer 3 months. Fully thaw, then microwave to reheat.
Nutrition (per serving):
Calories: 690, Fat: 32g (Sat: 14g),

Cholesterol: 90mg, Sodium: 1650mg, Carb: 69g, Fiber: 7g, Sugar: 14g, Protein: 34g

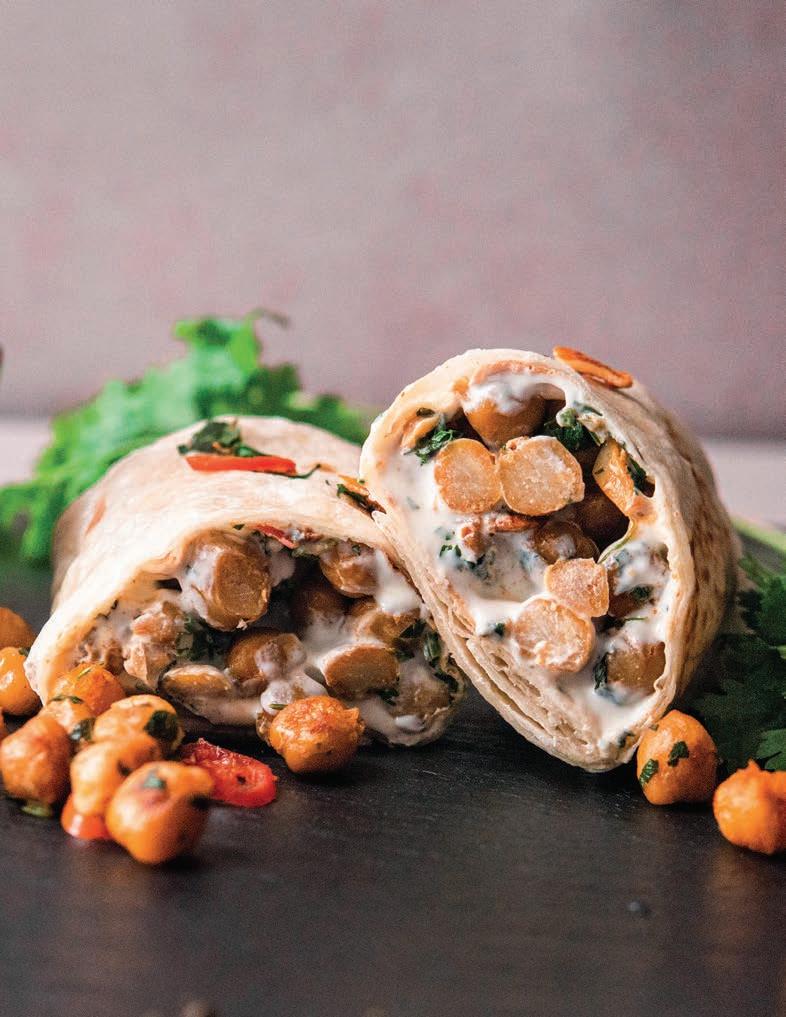
MAKES 1 SERVING
These herbed-up chickpeas are my go-to chickpea meal and they’re so versatile you can use them in anything. Lately, I’ve been reworking this chickpea wrap that cuts through the herby, garlicky intensity of the chickpeas with some yogurt. Plus, it’s handheld and mess-free. What’s not to love? –kevin tatar
1 tablespoon olive oil
½ (15-ounce) can chickpeas, drained and rinsed (to prevent too much of the starchy coating from sticking to the pan; save the remainder for another use)
2-3 garlic cloves, sliced
1 teaspoon ground cumin
1 teaspoon smoked paprika
1 teaspoon dried thyme
1 teaspoon garlic powder
Kosher salt and ground black pepper
1 bunch fresh herbs (such as cilantro and parsley)
1 fresh red chile, sliced, seeded for less heat
Juice of ½ lemon
1 (12-inch) tortilla wrap


1 tablespoon full-fat plain Greek yogurt
1. Pour the oil into a 12-inch skillet, place the skillet over medium heat, and heat the oil until it shimmers. Add the chickpeas and give them a toss in the hot oil. Add the garlic, all the dried herbs and spices, and season with salt and pepper to taste, ensuring the seasonings coat the chickpeas completely. Cook for 10 to 12 minutes, stirring and tossing occasionally, until the chickpeas develop a crispy outside and a soft inside (careful, they’re hot; try one to see).
2. Turn o the heat and add the fresh herbs. This recipe is herb heavy, so don’t be afraid to add a good amount—it’s hard to overdo it, in my opinion. As long as the stars of the show are still the chickpeas, and not the herbs, you’re good. Add the red chile and lemon juice and stir until everything is incorporated.
3. Place a clean, dry skillet over medium heat. Add the tortilla wrap and warm carefully for just a few seconds. We’re not toasting here, just warming: This will help the pliability. Transfer to a work surface. Spread the yogurt over the tortilla with a spoon. Top with the chickpeas and wrap it up (see box at right).
Nutrition (per serving):
Calories: 810, Fat: 33g (Sat: 7g), Cholesterol: <5mg, Sodium: 330mg, Carb: 108g, Fiber: 13g, Sugar: 10g, Protein: 22g
Practice a couple of times and you’ll be a burrito-folding pro in no time.
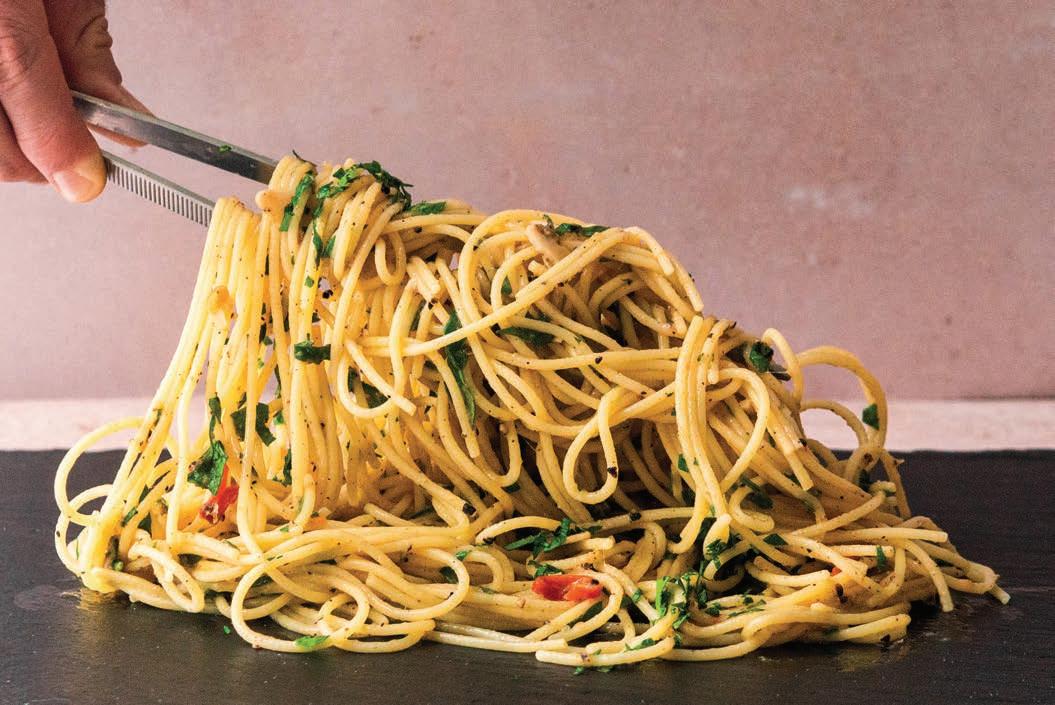
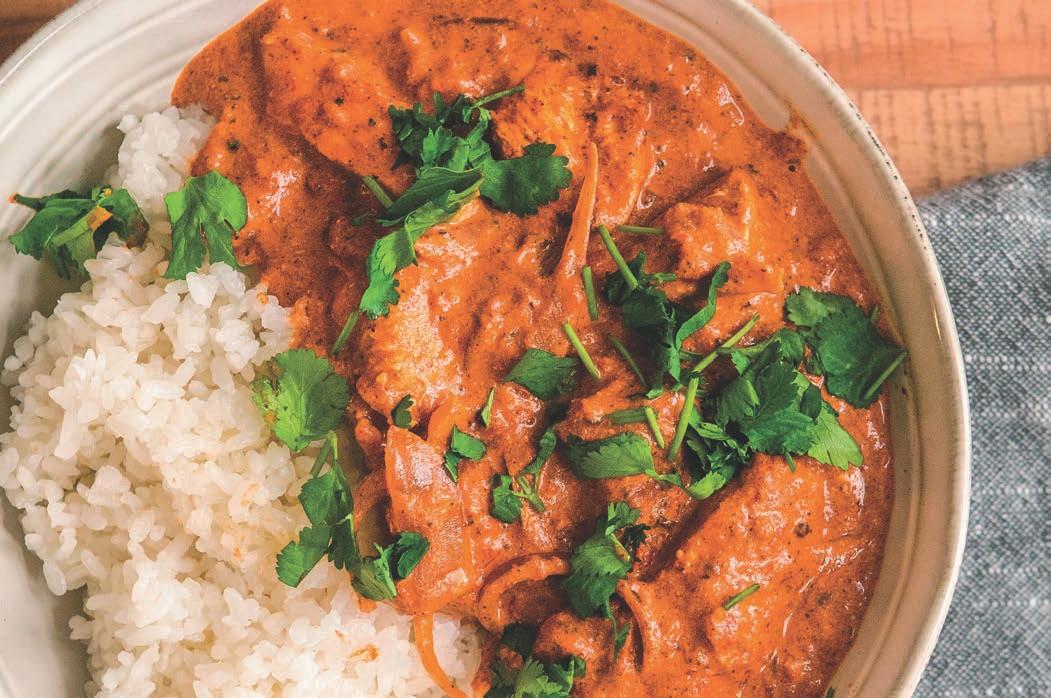


MAKES 2 SERVINGS
In my exploration of dishes from around the world, every once in a while, I stumble upon a gem that I can implement in my day-to-day student life, and it completely changes how I view college meals. This is one of those life-altering food discoveries that I’ve recently made. This is originally an Indian dish, but this is my very nontraditional way of making it that I can rely on for a pretty quick and immensely satisfying meal. The original recipe requires a ton of butter and cream, but I managed to take out most of the fat and still create an amazing dish, which means I can eat more of it and not worry too much about my arteries clogging up. This is delicious served with rice or naan bread, or eaten by itself. Either way, it’s going to be one of the best culinary experiences you will create in your home kitchen.
–kevin tatarfor the marinade
8 ounces boneless, skinless chicken breast, cut into bite-size pieces
2-3 garlic cloves, minced
1½ tablespoons full-fat plain Greek yogurt
2 teaspoons garam masala
1 teaspoon smoked paprika
1 teaspoon garlic powder
1 teaspoon grated peeled fresh ginger
Kosher salt, to taste
MAKES 2 SERVINGS
I am stepping into dangerous territory, messing with two traditional Italian dishes like Aglio E Olio (pasta with garlic and olive oil) and Cacio E Pepe (pasta with cheese and pepper)—hide your Italian grandmas! But honestly, I don’t really care, because I like it this way, and it also makes a funsounding name. We will, essentially, take the simple core ingredients that make up these two famously simple pasta dishes and mash them together in a cheesy, garlicky, peppery, tasty way. I do suggest, however, that you invest a bit in a higher-quality pasta, as it makes a pretty big di erence in the results. This dish does take a bit of technique and requires a sense of timing, but I believe anyone can master it with practice. –kevin tatar
6 ounces high-quality dried spaghetti
1 cup freshly grated pecorino Romano cheese
for finishing
Olive oil for coating the pan
1½ teaspoons butter

1 yellow onion, sliced
Kosher salt, to taste
1 (14-ounce) can crushed tomatoes

1 teaspoon garam masala
1 teaspoon smoked paprika
½ cup low-fat cream
Fresh cilantro, for topping
1. To make the marinade: In a large bowl, combine the chicken and all the other marinade ingredients. Season with salt to taste. Using your clean hands, mix everything thoroughly until the marinade evenly coats every piece of chicken. (Don’t forget to wash your hands after handling raw poultry!) Cover the bowl with plastic wrap and marinate in the refrigerator until use, ideally overnight. (Most of the time, I just let it sit for 10 minutes or so because I don’t have that level of patience.)
2. To finish the dish: In a large skillet over medium-high heat, heat enough olive oil to coat the pan until it shimmers. Add the marinated chicken. It should make a satisfying sizzling noise when hitting the pan. Cook the chicken on all sides without burning the yogurt too much, about 3 minutes. Focus on browning the chicken, not cooking it through, since we’ll do that later. Remove the chicken from the skillet once browned; you should be left with some nice fond (the tasty stuck-on browned bits) on the bottom of the pan.
3. Turn the heat to medium and add the butter to the hot pan to melt. Add the onion. Sprinkle the onion with salt and let it cook for 2 to 3 minutes, stirring occasionally, until the onion softens.
4. Stir in the crushed tomatoes and simmer the sauce for about 5 minutes until it thickens. Stir in the garam masala and smoked paprika. Taste the sauce and add more salt, if needed.
5. Stir in the cream, turn the heat to low, and simmer the sauce for 2 minutes.
6. Add the chicken to the sauce and gently simmer for 1 to 2 minutes, or until warmed and cooked through. Top the dish with fresh cilantro and serve.
Nutrition (per serving):


Calories: 290, Fat: 6g (Sat: 2.5g), Cholesterol: 70mg, Sodium: 530mg, Carb: 29g, Fiber: 6g, Sugar: 16g, Protein: 27g
3 tablespoons extra-virgin olive oil
1 tablespoon whole peppercorns
2 garlic cloves, finely sliced
1 fresh red chile, sliced, seeded for less heat
1 big bunch fresh parsley, roughly chopped
Freshly ground black pepper (optional)
1. First, bring a medium-size pot or skillet of generously salted water to a boil over high heat. Drop in the spaghetti and cook for about 8 minutes, checking after 5, until just below al dente. Tip: We want to use just enough water to cover the pasta. By minimizing the amount of water, we maximize the amount of starch, which helps create a glossy, thick sauce.

2. At the same time you drop in the pasta, in another skillet over medium heat, heat the olive oil. Grind the peppercorns to a coarse powder using a mortar and pestle or a peppermill and add them to the hot oil. Add the garlic and chile as well, and gently cook them in the oil for 3 to 4 minutes. We don’t want an aggressive fry, so if it gets too bubbly around the garlic and you’re afraid it might burn, immediately turn the heat to low. Keep this mixture moving, adjusting the heat to low, if needed, until the pasta has cooked to just below al dente (it will finish in the skillet).
3. Once the pasta is ready, turn the heat under the skillet with the oil to medium. Carefully add a ladleful of pasta cooking water to the oil. Using tongs, pull the almost-cooked spaghetti from the water and add it to the oil. Sprinkle the cheese on top and begin tossing and stirring vigorously. The goal here is to get a thickened, emulsified sauce, without any lumps of cheese. Add a few more ladlefuls of pasta water and cook, reducing the sauce, until the pasta is al dente, 2 to 3 minutes total.
4. At this point, assess the thickness of your sauce. Is it too dry? Add a bit more pasta water and toss until thickened. Is it too thin? Simply cook it for a bit longer, tossing and stirring constantly. Tip: Always go for a bit of a thinner sauce because by the time you plate it and it sits for a couple of minutes, the sauce will be the perfect consistency.
5. Add the fresh parsley and toss it with the pasta. Now, you’re ready to plate. Finish with some freshly ground black pepper, just to get an extra kick, but you do you. Sorry, Italians!
Nutrition (per serving): Calories: 670, Fat: 33g (Sat: 10g), Cholesterol: 40mg, Sodium: 600mg, Carb: 70g, Fiber: 4g, Sugar: 4g, Protein: 25g
Jocelyn Delk Adams makes cooking fun in her latest book “Everyday Grand,” with ridiculously good soul food recipes and tips for celebrating everyday life
BY EMMA ENEBAKThe earliest memories Jocelyn Delk Adams has in the kitchen are from childhood trips to visit her late grandmother Maggie (or “Big Mama” as she refers to her) in Mississippi. Together, they would whip up a peach cobbler so good it had neighbors lining up around the block just for a taste. Nowadays, Delk Adams is likely transported back to that soulfulsmelling Mississippi kitchen when she cooks with her own young daughter, guiding her through the methodical process much like her grandmother used to do for her. The pancakes she and her daughter like to make together have been referred to by lucky taste-testers as “the best in the world.” It’s no coincidence that the world’s best peach cobbler and the world’s best pancakes were both the result of careful mentorship, deep connection, and, of course, love. This is exactly what Delk Adams hopes to pass on to the rest of the world through her latest book, “Everyday Grand,” a half cookbook, half self-help book that teaches readers how to celebrate life’s little moments through delicious food.
“I want this book to feel like you’re in the kitchen with your BFF,” says Delk Adams. “And we’re just chatting. Everything feels relaxed because that’s how it should feel when you’re in the kitchen.”
And relaxed in the kitchen Delk Adams certainly is. Although she didn’t realize she had “the baking gene,” as she put it, until she was in her 20s, and didn’t receive any formal training save what she has learned from family, Delk Adams has been able to launch her career from casual baker to popular food blogger to successful author, all the way to everpresent television personality in just a decade. You might recognize her from the slew of appearances on popular TV programs including “Good Morning America,” “The TODAY Show,” “The Rachael Ray Show,” and “Beat Bobby Flay,” among others. Her food blog and website—grandbaby-cakes.com—has garnered a loyal cult following, with which she trades recipes back and forth, both sharing her unique creations and collecting beloved recipes from her fans’ repertoires, which she’ll usually give an inventive twist before resharing.
While certainly no stranger to the media spotlight, Delk Adams’ personality shines through just as much in her two cookbooks as it does in her TV and internet chatter. Her first book, “Grandbaby Cakes,” which was published in 2015, focuses on modern dessert recipes with vintage charm as she invites readers into the southern kitchen of her childhood and allows them to understand her passion on a deeper level. Her latest book, “Everyday Grand,” follows suit with a focus on savory recipes, along with some favorite sweets, and personal insights. Peppered with self-help, encouragement, and positivity, Delk Adams aims to not only uplift her readers, but to also offer a glimpse into her own
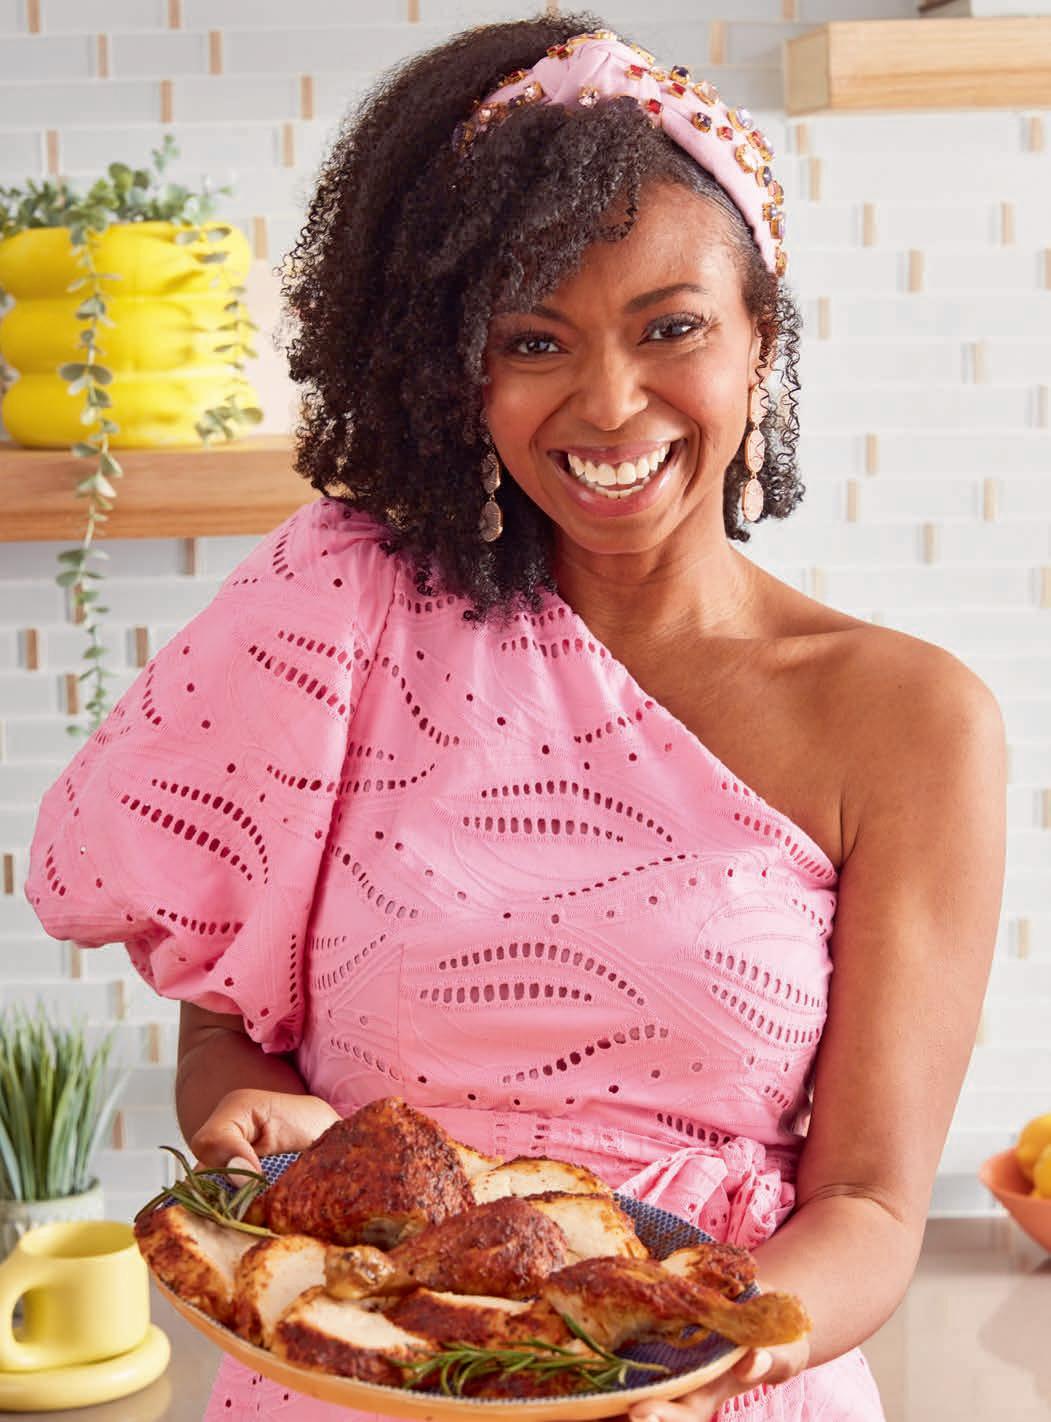


MAKES 6 SERVINGS
Rest is as essential to joy as any other ingredient, and I learned that the hard way. Until I started therapy, I didn’t realize that I was aiming to be busy for busyness’s sake. Sometimes the most productive thing is to stop what you’re doing and recharge—you will be more productive in the long run. This recipe can be on the table in about half an hour, letting you spend less time in the kitchen and more time just being. The best part is, it tastes so spectacular, you won’t even believe in took mere minutes to prep.
2 tablespoons unsalted butter
1 tablespoon extra-virgin olive oil
1 pound medium shrimp, peeled and deveined, patted dry
2½ teaspoons No-Salt Cajun Seasoning (see recipe at right) or store-bought, divided, plus more for garnish
Kosher salt
8 ounces penne
1½ tablespoons minced or finely grated garlic
½ cup heavy cream
spiritual journey and the ways in which cooking has been a solace to her through moments both good and bad.
“It’s a very intimate, personal book,” shares Delk Adams. “I talk a lot about my life experiences, and how I think they could potentially help others. I feel like we’re all searching for some sort of spiritual peace and connection, and I want to give people a little bit of that through this book.”
Although made with just as much soul, “Everyday Grand” is starkly different from Delk Adams’ first writing venture, one of the main ways being, it gives savory flavors a whole lot more love. Whether it be her mom’s comforting homemade chicken soup recipe, a creamy Louisiana Cajun Shrimp Alfredo (see the recipe above), or a done-in-30minutes lasagna stew (which Kelly and Ryan themselves “flipped out for” when she made the dish on “Kelly and Ryan Live,” says Delk Adams), she makes sure to pay proper homage to what is, in her opinion, the best kind of food—soul food. With her brand established upon the success of her dessert recipes, she was overjoyed to showcase her savory side—especially as she was raised on soulful flavors—recipes that feel like home to her, even after adding her trademark twists.
How does Delk Adams know when these recipes are really ready? When her “very vocal and very opinionated family,” as she describes them, says they’re ready. At holidays, she likes to play a li le
⅓ cup seafood stock, chicken stock, or vegetable stock
2 tablespoons fresh lemon juice, plus more to taste
⅓ cup finely chopped fresh flat-leaf parsley, plus more for garnish
¼ cup grated Parmesan cheese, plus more for garnish
1 tablespoon fresh basil, chi onade
½ teaspoon onion powder
Freshly ground black pepper
game with them. She will prepare two versions of a dish, maybe “Mac and Cheese A” and “Mac and Cheese B,” and then run a blind test, asking each family member to write down their favorite version and drop it in a hat. Whichever one emerges victorious is the recipe Delk Adams will likely run with.
“If they can all agree on something, then I know it’s good,” she laughs. “If it’s a hit with them, it’ll be a universal hit.”
These new and exciting flavor profiles are further bolstered by the book’s all-encompassing theme. Delk Adams’ first book, as well as her brand as a whole, have been heavily inspired by her loved ones, detailing the ways in which they shaped and inspired her career. “Everyday Grand” expands on this theme, showcasing not just how love can nourish one’s cooking, but how cooking can nourish one’s life. She achieves this by calling attention to life’s multitude of celebratory moments, some of them so small, they often go uncelebrated.
“Every single day there is something there that we just overlook,” she explains. “And in a moment, we let it pass us by. But maybe we shouldn’t.”
In Delk Adams’ eyes, a good hair day calls for a batch of fresh cookies (Salted Caramel Chocolate Chip, to be exact). A successful Tuesday at work should be celebrated with a delicious bowl of pasta. And to commemorate a sunny summer day? A slice of Tipsy Bu ered Bailey’s Peach Cobbler, of course, Delk Adams’ twist on her grandmother’s neighborhood-
“Most people tend to focus on major events and holidays … But what else deserves to be celebrated? In my world, anything and everything. In between those big events are life’s little moments, and they, too, are bursting with joy.”
–JOCELYN DELK ADAMS, “EVERYDAY GRAND”
1. In a large nonstick skillet, combine the butter and olive oil over medium-high heat to melt the butter. In a bowl, toss the shrimp with 2 teaspoons of the Cajun seasoning until coated. Bring a large pot of salted water to a boil. Add the pasta and cook until al dente according to the package instructions, then drain and set aside.
2. Add the shrimp to the skillet and season with a generous pinch of salt. Cook until pink and opaque, about 2 minutes on each side. Transfer the shrimp to a bowl. Reduce the heat to medium, add the garlic, and cook until fragrant, about 30 seconds.
3. Add the cream, stock, and lemon juice and stir to combine. Stir in the parsley, Parmesan, basil, onion powder, the remaining ½ teaspoon Cajun seasoning, and black pepper to taste. Bring to a lively simmer and let the sauce thicken slightly, about 2 minutes. Return the shrimp to the skillet and stir to coat it in the sauce.
4. Reduce the heat to medium-low, then toss in the pasta, until evenly coated.
5. Divide the shrimp Alfredo among six bowls, garnish with additional Parmesan, Cajun seasoning, and parsley, and serve it up, boos.
MAKES ABOUT ⅓ CUP
You can certainly buy Cajun seasoning at the store, but most of it comes with too much salt. Not to worry—I’ve got your no-salt solution right here, with a recipe that will allow you to control exactly how much (or little) salt you want in your dish, without sacrificing flavor.
1 tablespoon garlic powder
2½ teaspoons smoked paprika

2 teaspoons cayenne pepper
2 teaspoons freshly ground black pepper
2 teaspoons freshly ground white pepper
2 teaspoons dried oregano

2 teaspoons dried thyme
1 teaspoon onion powder
In a small bowl, whisk together the garlic powder, paprika, cayenne, black pepper, white pepper, oregano, thyme, and onion powder until combined. Store in a lidded jar in a cool, dark place for up to 4 months.
famous dessert. If life is but a giant compilation of these li le moments, then “Everyday Grand” believes that each one deserves to be fully embraced.


And in case there are a few who find the task of cooking daunting, Delk Adams deliberately includes recipes that are simplified and easy to follow, calling even those who are new to the kitchen to find peace in the process. In her opinion, the mixing and measuring are just as big a celebration as eating the resulting gooey-fresh cookies.
One of the simplest, yet most delicious recipes Delk Adams has in her repertoire is for The Best Classic Pancakes, which she says are so easy, her daughter was able to pull them off as early as four years old. In terms of enjoying both the process and the end result, Delk Adams believes these unbelievably fluffy pancakes hit the nail on the head.
“It’s not like we’re performing brain surgery,” Delk Adams jokes, “we’re literally just making pancakes. It’s no big deal. Let’s just go in and have a blast.” And yes, she said “let’s,” because as she made it clear, she will be there with readers every step of the way.
Slipping so much personality and careful guidance into a book of recipes is no easy feat, but Delk Adams revealed that the collaborative process involved in creating “Everyday Grand” allowed her to personalize her content in a way she was never able to before. Unlike her first book, she was able to pair up with a coauthor, as well as work with various collaborators on photography and design

elements. It was a breath of fresh air for Delk Adams, who says she never realized the sheer amount of work she had been doing solo until she enlisted this assistance. The extra pairs of hands gave her the time and freedom to focus on refining details and personalizing content on a new level, weaving her heart and soul into each page. In many ways, she was finally free to create the cookbook of her dreams.
This made it all the more rewarding when she began to see the reactions of fans. Each day, she receives more photos from people trying recipes from the book, is alerted of new cookbook clubs using “Everyday Grand” as their next read, and is tagged in more social posts gushing about fan favorites. Just as she hoped it would, it appears her book is proving to people how fun cooking can really be, should they simply let loose, relax, and of course, celebrate.
But even amidst all the success, Delk Adams keeps herself grounded by mentally revisiting the heavenlysmelling Mississippi kitchen of her childhood. It is evident that even as her brand’s popularity grows in scale, she still a ributes her success to her roots, with odes to her grandmother sprinkled throughout her work. Upon the release of “Grandbaby Cakes” in 2015, “Big Mama,” who passed away just a few years later, understood the signi cance of what her granddaughter was creating. And although she will never get the chance to read “Everyday Grand,” she is undeniably still a proud, peach-cobbler-coded contributing author in spirit.


Can I bring some wine?” It’s a common question that comes up throughout the holiday season, and whether you’re hosting the festive feast or are the guest posing the query, the answer is almost always, “Yes, please.” But another question of what wines pair well with dinner might come up again as a year has passed and memory fades since giving thanks and celebrating other holidays. If turkey or pork roast will be served at your fete, some go-to red wines to pick up that will also balance with the other fare at the table include Pinot Noir, Merlot, and Beaujolais— especially Nouveau. Domestic bottlings of Pinot Noir from Oregon are especially tasty as are some from California’s coast. French wines to look for that have Pinot Noir as the base include those from Burgundy or “Bourgogne” in French. But you won’t usually see the grape on the labels as the French wines are all about the location. Some most sought-after wines are from the Côte d’Or region, which could set you back a bit. There are also regional “Bourgogne Rouge” wines, which might now list the grape varieties included, so check the back label. Merlot grapes are the base for France’s Bordeaux wines, and Gamay goes into making the young and fresh fruit-forward Beaujolais Nouveau, which is always released with fanfare on the third Thursday in November.


If you or your group prefer white wine, or you want to bring one of each, the slight sweetness of a Riesling pairs well with both turkey and pork, as does Gewürztraminer—plus it’s fun to say: “guh-VURTStrah-mee-ner.” The usual favorites of Chardonnay or Chablis (which is made from Chardonnay grapes) or Sauvignon Blanc will always be welcomed. And a festive fete often includes sparkling wine or Champagne to start the occasion, but the food-friendly bubbly also pairs well at the table, so keep it flowing as a dinner companion, too.


 PHOTO TERRY BRENNAN FOOD STYLING LARA MIKLASEVICS
A bottle of wine is often welcome at holiday feasts—but which ones are better “guests”?
by mary subialka