
Christmas Faith Based eBook 2021 www.cleverpatch.com.au Customer Service 1300 836 522

4 Christmas craft ideas for the festive season! Contents Shining Christmas Star ............................................................................ 3 Nativity Jar .............................................................................................. 4-5 Tealight Angel ............................................................................................ 6 Joyous Candle ............................................................................................ 7 Templates ..................................................................................................... 8 We’ve supplied FREE templates just for you! Print as many times as you like. Our Christmas catalogue is out now! KEY: Adult supervision is recommended when using scissors Adult supervision is recommended when using a hot glue gun Keep an eye out for these icons throughout the eBook and be sure to consult an adult if needed. 2 © CleverPatch 2021 - www.cleverpatch.com.au GLUE GUN
Shining Christmas Star
Materials:
• Wooden Star Frames – Pack of 20 – 11689


• CleverPatch Acrylic Paint Tube – Gold – 75ml – 16888
• Cellophane – Clear – 1 Sheet – 17116
• CleverPatch™ Fine Glitter – Gold – 145g Shaker Tub – 15148
• CleverPatch™ Glue Stick – 40g – 13974

• CleverPatch™ Tacky Glue – 250ml – 16494
• Satin Ribbon – White – 25 Metres – 11151
• EverZart Permanent Pens – Black – Pack of 20 – 19810
• Other materials required: Scissors and paint brush.
1. Paint one side of two wooden stars with gold paint. Make sure you paint the edges too. Allow to dry.
2. Place a piece of cellophane over the back of the star frame and mark the outer edge of the inside circle using a black permanent marker. Cut out 2 cellophane circles based on the template you have created.
3. Use a glue stick to apply glue to the back of both wooden star frames around the edge of the circle.

4. Stick a cellophane circle on top of the glued edges from Step 3.
5. On the cellophane of one star, place fine glitter in the centre. Apply tacky glue to one wooden star, then use a brush to make sure the glue goes right to the edges.


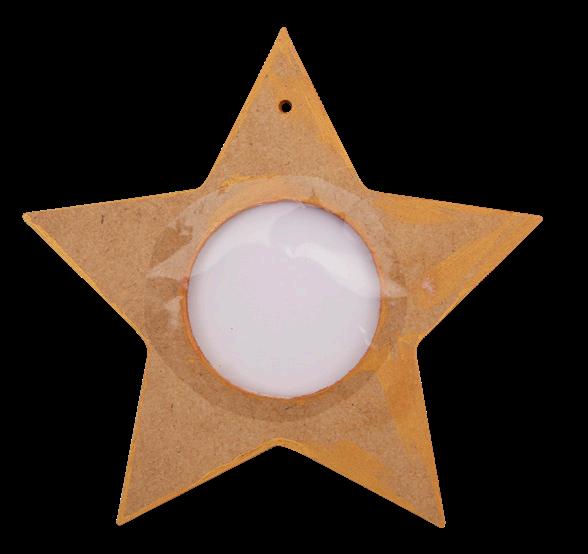

6. Align and place the second star on top of the glued surface. Apply pressure to each edge to secure it. Allow to dry. Thread white ribbon through the top hole and tie the ends together. Your Shining Christmas Star is now ready to hang!

3 © CleverPatch ™ 2021 - www.cleverpatch.com.au
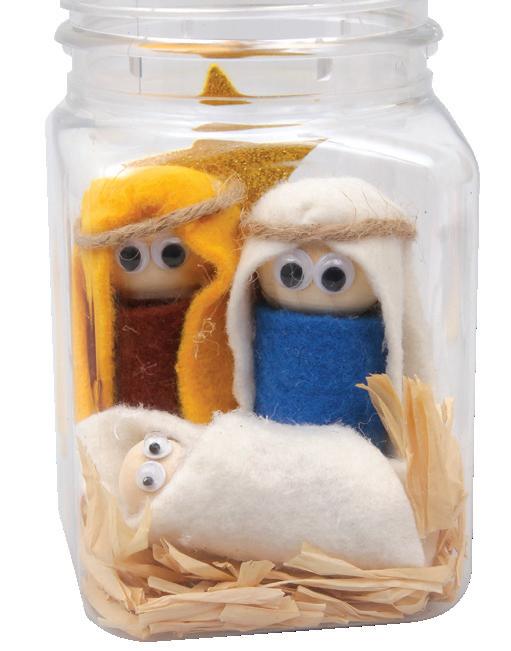
Nativity Jar
Materials:
• Wooden Beads – Natural – 340g Pack – 10841
• Clear Plastic Jar – Square – 400ml – 16947
• Felt Squares – Pack of 100 – 10785
• CleverPatch™ Glue Gun Starter Set – 12505

• Wiggle Eyes Black – 0.7cm – Pack of 100 – 16477
• Wiggle Eyes Black – 0.5cm – Pack of 100 – 16476
• Foam Glitter Star Stickers – Pack of 168 – 16842
• Paper Raffia – Natural – 50 Metres – 12386

• Hessian Sheets – Natural – Pack of 10 – 12406
• Jute Twine – Thick – 140 Metres – 14275
• Rubber Bands – Size 18 – 100g Pack – 10653
• Other materials required: Scissors, pencil, ruler, pin and template (page 8).
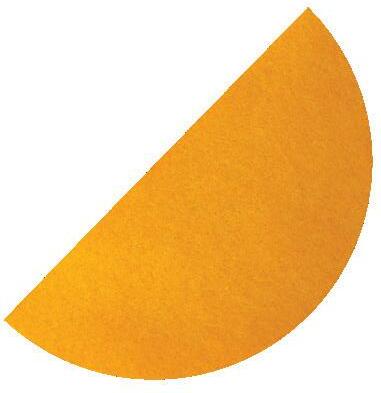
1. Cut a blue and brown piece of felt measuring 4 x 23cm.
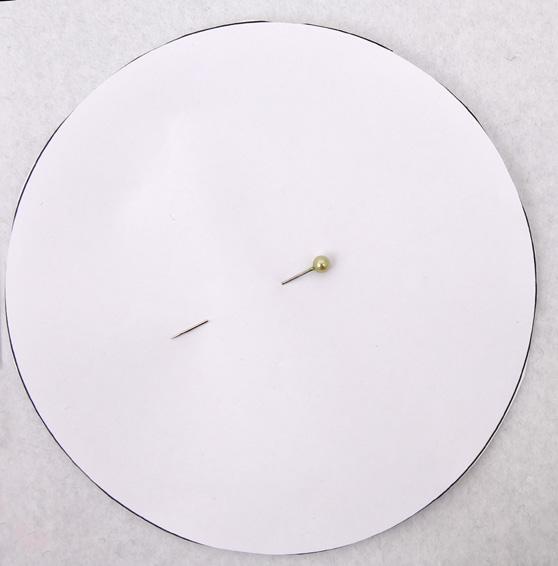
2. Print and cut out the template on page 8. Attach it to a piece of white felt with a pin. Cut out the felt using the template as a guide.
3. Fold over the white felt circle and cut it in half. Repeat Step 2 and 3 with a piece of yellow felt.
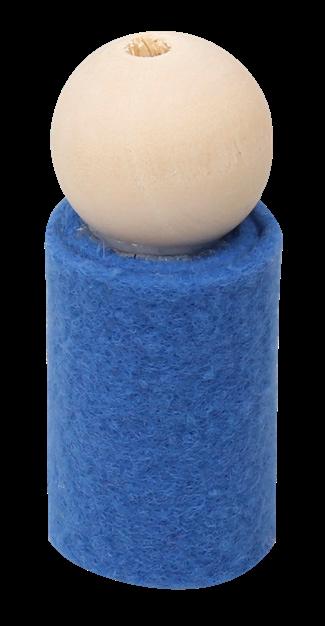
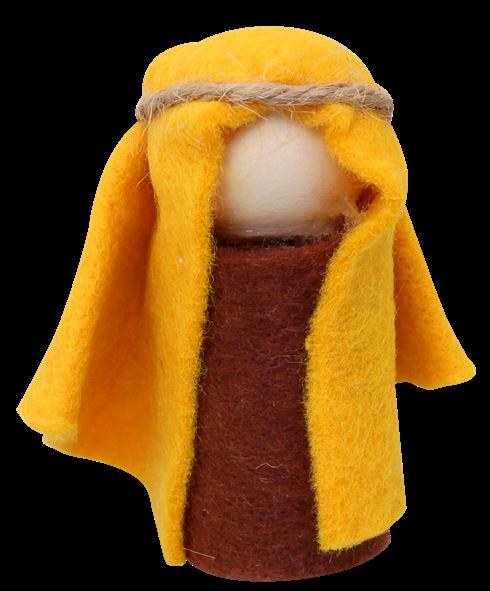
4. To create Mary, tightly roll the blue felt into a coil, pausing halfway to apply glue with a glue gun. Continue to roll the felt and apply a generous amount of glue to the end section. Allow to dry.
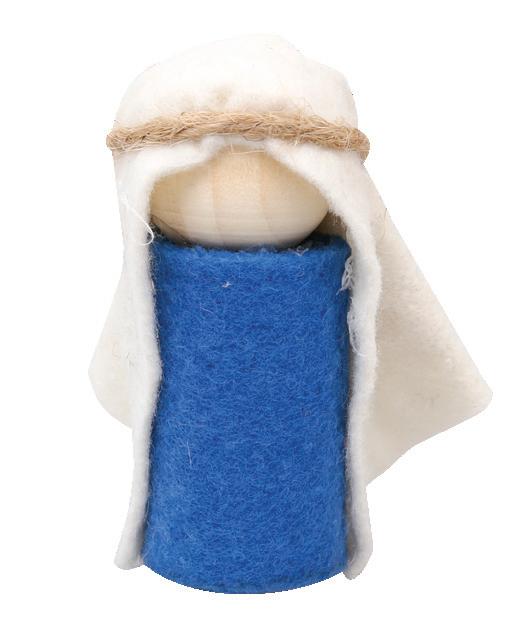
5. Apply glue to the top of the rolled felt, then attach a large wooden bead making sure the hole is facing up. Allow to dry.
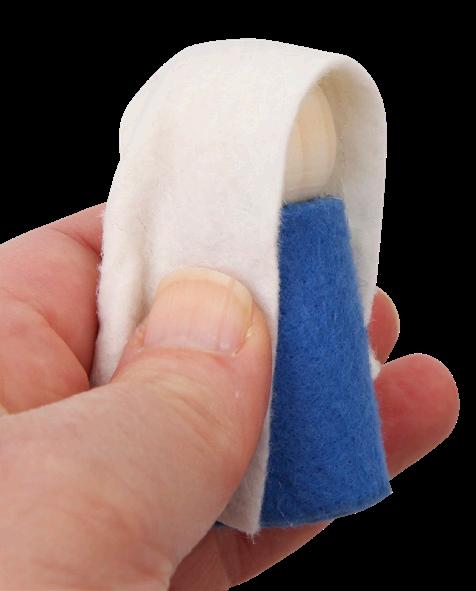
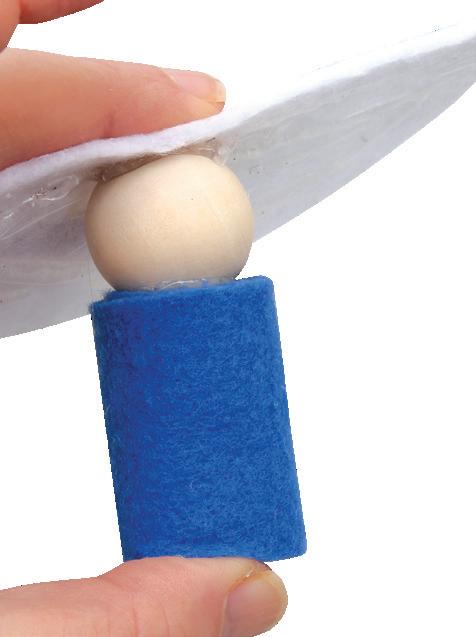
6. Apply a generous amount of glue to one of the white felt semicircles.


7. Place the white felt glue side down on top of the wooden bead. Press the sides down as shown so it adheres to the wooden bead and blue felt. Allow to dry.
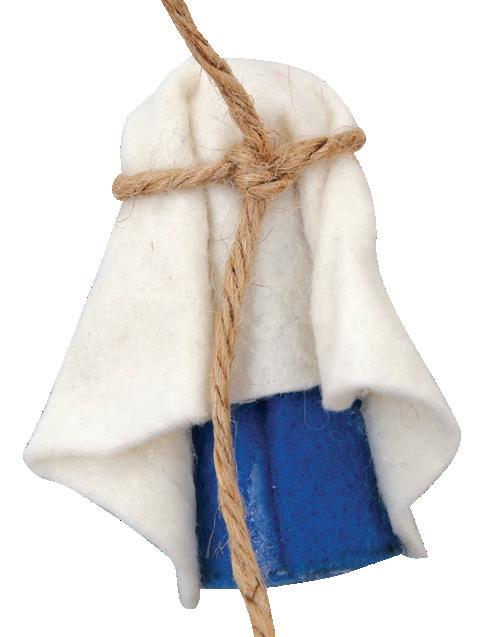
8. Cut a 15cm length of jute twine. Wrap it around the front of Mary’s head then secure it with a knot at the back. Trim any excess twine.
9. Repeat Steps 4 to 8 using the yellow and brown felt pieces to create Joseph.
4 © CleverPatch ™ 2021 - www.cleverpatch.com.au
GLUE GUN
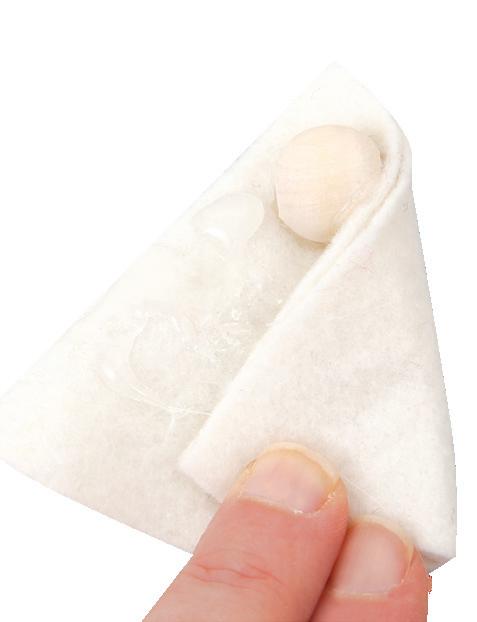
10. To create Baby Jesus, fold the remaining white felt semicircle from Step 3 in half. Secure it together with glue. Allow to dry.
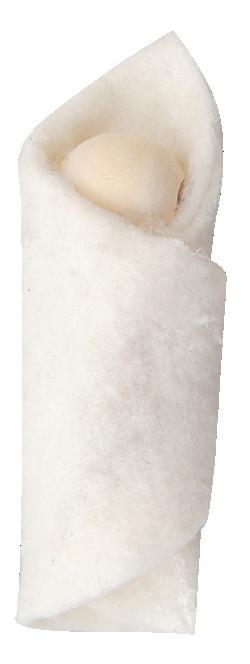


11. Apply a generous amount of glue to the surface and place a medium bead close to the top point as shown.


12. Fold the right side of the felt piece over the bottom of the bead, then overlap the left side. Firmly press to secure the felt in place. Allow to dry.
13. Glue wiggle eyes onto Baby Jesus, Joseph and Mary.

14. Cut 2cm strands of raffia and place them into the jar. Secure a star sticker inside at the top side of the rear wall of the jar.

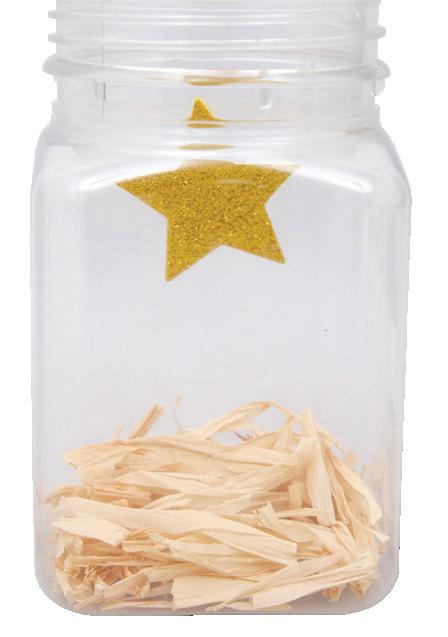
15. Place Joseph, Mary and Baby Jesus into the jar in front of the star. Screw the lid onto the jar.
16. Cut a square piece of hessian that measures 15 x 15cm.

17. Place the piece of hessian over the lid and secure it in place with a rubber band.


18. Wrap raffia around the top of the jar to conceal the rubber band. Tie to secure and trim any excess. Your Nativity Jar is now ready to display!


5 © CleverPatch ™ 2021 - www.cleverpatch.com.au
I’m a perfect reminder of the reason for the season!
Tealight Angel
Materials:
• Battery LED Tealight Candles – Pack of 12 – 18915
• CleverPatch™ Glitter Glue – 35g – Pack of 24 – 11541
• CleverPatch™ Cover Paper – White – A4 Pack of 250 – 16142

• Chenille Stems – Tinsel – Pack of 100 – 10826
• CleverPatch™ Acrylic Paint Tube – White – 75ml – 16886
• CleverPatch™ Acrylic Paint Tube – Red – 75ml – 16877
• CleverPatch™ Acrylic Paint Tube Yellow – 75ml – 16879
• CleverPatch™ Acrylic Paint Tube Light Blue – 75ml – 16881
• EverZart Permanent Pens – Black Pack of 20 – 19810
• Other materials required: pencil, scissors, tape, paint brushes and template (page 8).
1. Print the template on page 8 onto cover paper for best results for decorating. Cut out the template making sure you also cut along the lines in each side of the template.

2. Use a pencil to draw hair and a face onto your Angel’s head. Paint the bottom of your Angel using a mixture of light blue and white acrylic paint. Allow to dry.


3. Add further details to your Angel using glitter glue, paint and a permanent marker. Allow to dry.
4. Bend the wings towards the back of the Angel. Slot the wings together using the two slits.

5. Push the wings together so they sit evenly and the bottom of the Angel creates a cone shape.
6. Decorate the front of your Angel’s wings to match the design you created on the back. Allow to dry if needed.
7. Create a halo using a tinsel chenille stem. Bend one end into a circle and twist the end around the long part of the stem to secure. Cut the stem so it has a 3-4cm tail.

8. Place the chenille stem tail into the hole behind your Angel’s head. Position the halo so it sits close to the top of your Angel’s head. Use tape to secure in place.
9. Place your Angel over an LED tealight to see her glow! Your Tealight Angel is now ready to display!


Please note: This must be used with an LED tealight only. Not for use with a burning candle.
© CleverPatch ™ 2021 - www.cleverpatch.com.au
6
Joyous Candles
Materials:
• Heavy Duty Cardboard Rolls – Assorted Sizes Pack of 75 – 10770
• Chenille Stems – Bright – Pack of 100 – 10825
• Chenille Stems – Tinsel – Pack of 100 – 10826
• Cardboard – White – A4 – Pack of 100 – 16288
• CleverPatch™ Glue Gun Starter Set – 12505
• CleverPatch™ Fine Glitter – Gold 145g Shaker Tub – 15148
• CleverPatch™ Acrylic Paint Tube – White – 75ml – 16886
• CleverPatch™ Acrylic Paint Tube Red – 75ml – 16877
• CleverPatch™ Acrylic Paint Tube Yellow – 75ml – 16879
• CleverPatch™ Acrylic Paint Tube Light Blue – 75ml – 16881
• Other materials required: pencil, scissors, tape and paint brushes.
1. Choose a size of cardboard roll to create your candle. Trace around one end of the cardboard roll onto white cardboard. Cut out the circle.


2. Use a sharp pencil to poke a hole through the centre of the circle. Adult supervision is recommended.

3. Cut a bright chenille stem in half. Twist the ends of one piece of chenille stem together. Pinch the top into a point and bend to form a flame. Repeat this process so you have two flames.


4. Decorate your cardboard roll using paint. To create a lighter tone, add white to your chosen colour. Allow to dry.

5. Cut two tinsel chenille stems into different lengths: 1 x 20cm and 1 x 25cm. Tape each end to opposite sides of the cardboard roll on the inside. Bend the stem over the edges slightly.
6. Push the two chenille stem flames through the hole in your cardboard circle from Step 2. Tape the bottom to hold the flames in place.
7. Use a glue gun to add glitter to the circle underneath the flames. Attach the cardboard circle to the top of the roll by applying more glue to the edges. Allow to dry.

8. Add glue to the sides of the cardboard roll candle so it looks like it is melting. Sprinkle glitter over the top and allow to dry.
9. Add any extra decorations or patterns to your candle if you wish. Your Joyous Candle is now ready to display!
7 © CleverPatch ™ 2021 - www.cleverpatch.com.au
GUN
GLUE
Nativity Jar Template
Use this template to help you complete the activity on pages 4-5.
© cleverpatch™ | cleverpatch com.au
Tealight Angel Template
Use this template to help you complete the activity on page 6.
© cleverpatch™ | cleverpatch com.au
© CleverPatch ™ 2021. Subject to terms of use at www.cleverpatch.com.au
8
