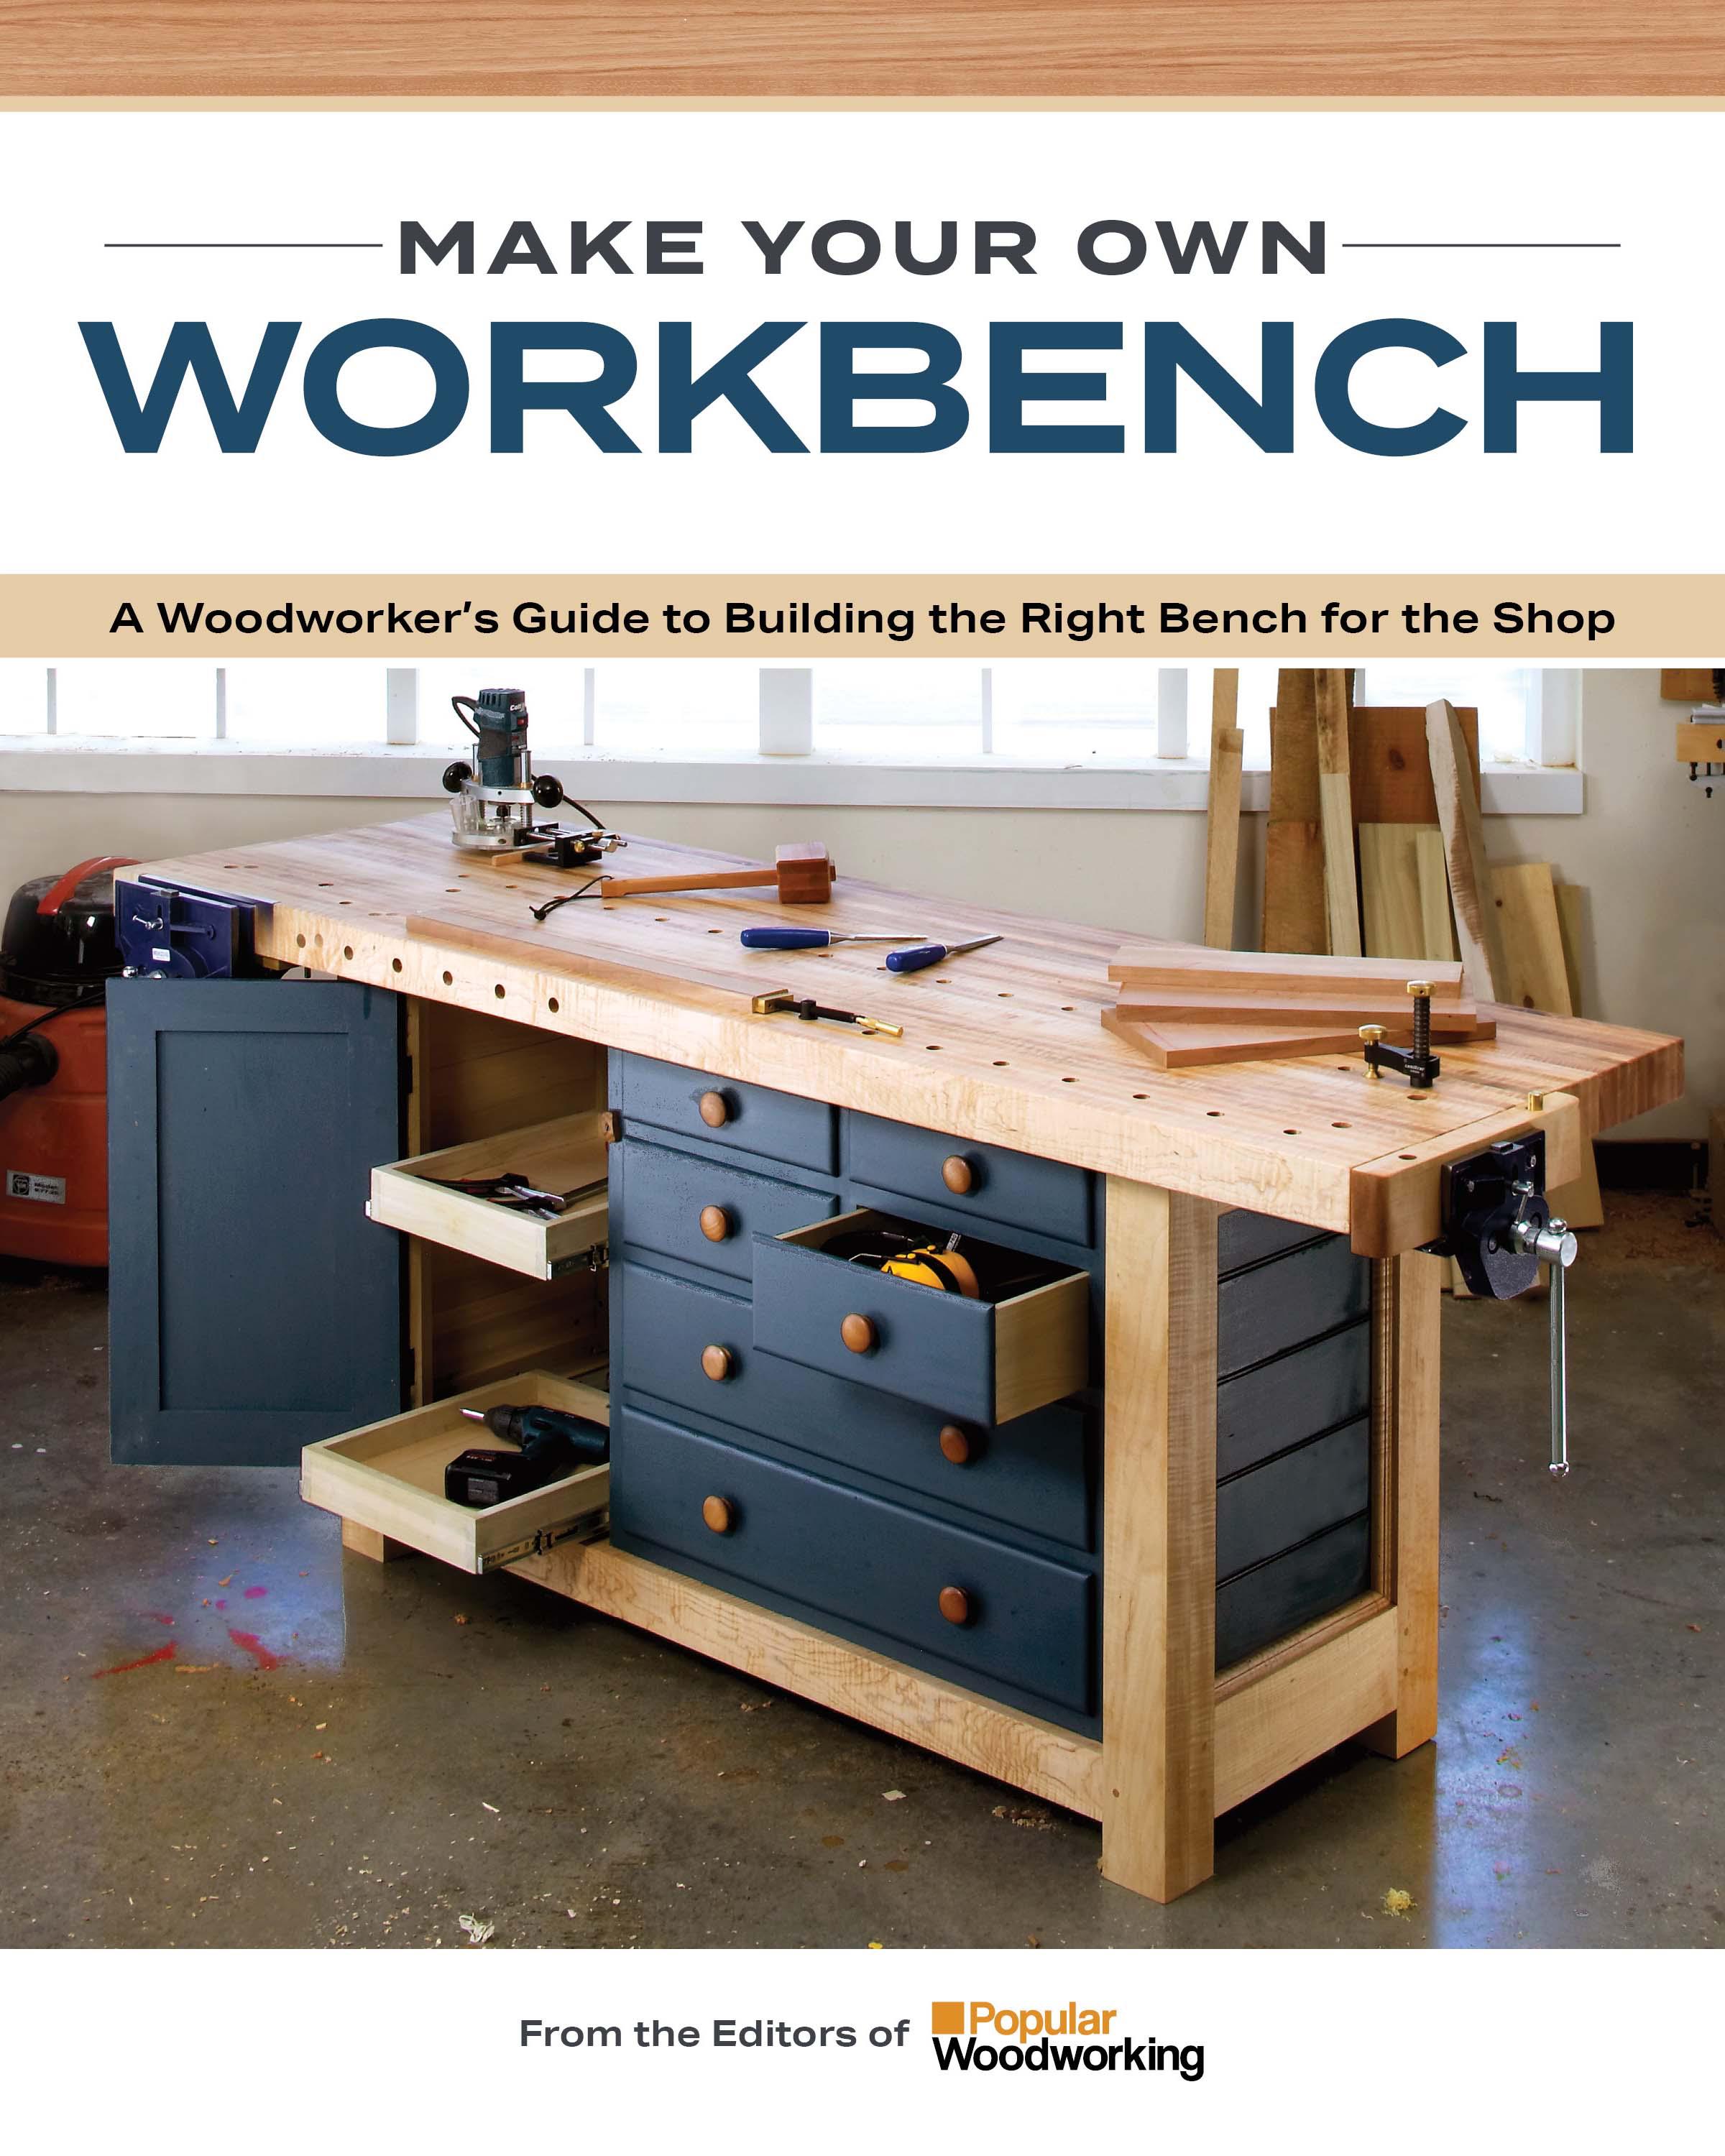
1. WORKBENCHES
Rules for Workbenches
The 24-Hour Workbench
21st-Century Workbench
Master Cabinetmaker’s Bench
Shaker Workbench
Knockdown English Workbench
Scandinavian Workbench
The Return of Roubo
Power Tool Workbench
I-Beam Work Island
Mobile Assembly Table
The Milkman’s Workbench
Bench for Kids
2. ACCESSORIES
Upgrade Your Workbench
Everything
Shop-Made Tail Vise
Foot
a Raamtang
Hook
TOOLS, SUPPLIES & RESOURCES
CONTENTS
6
18
26
38
48
62
72
86
100
112
116
124 A
131
142 Workbench Enrichment 148 Hold
158
166 Doe’s
172 Make
174 Bench
178 CONTRIBUTORS 184
184 INDEX 182
4
WORKBENCHES
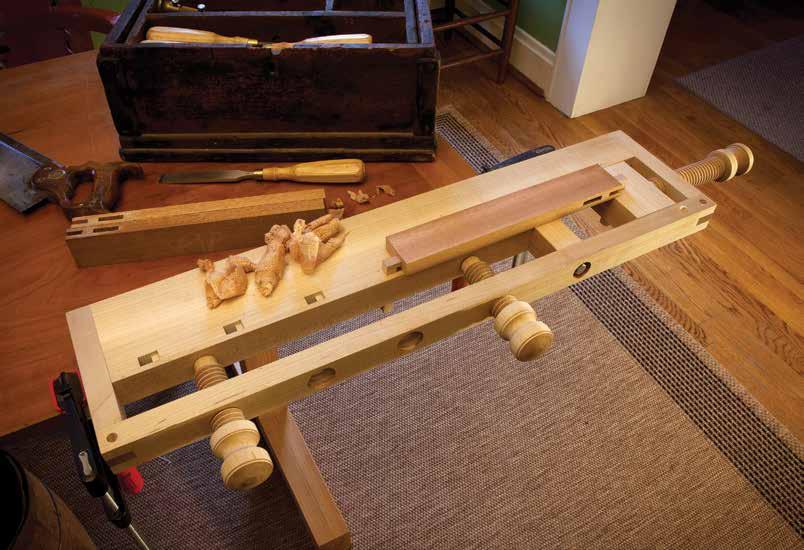
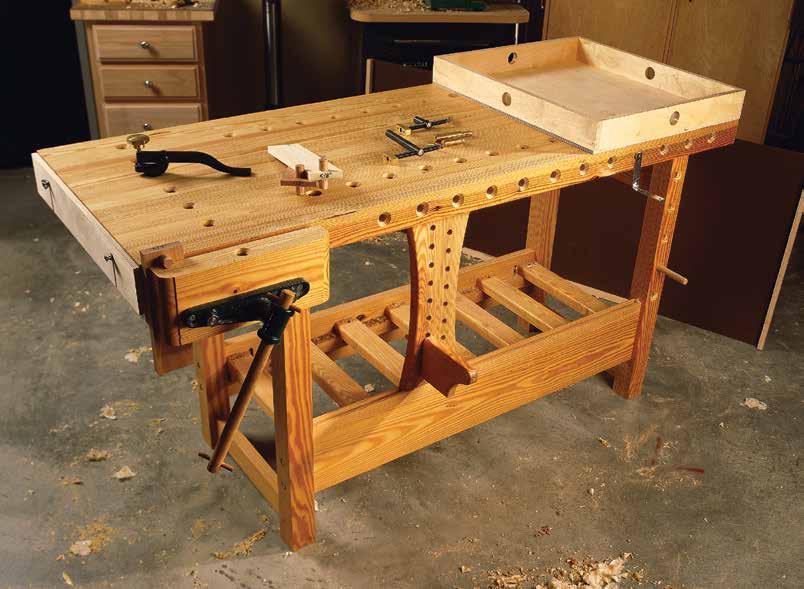
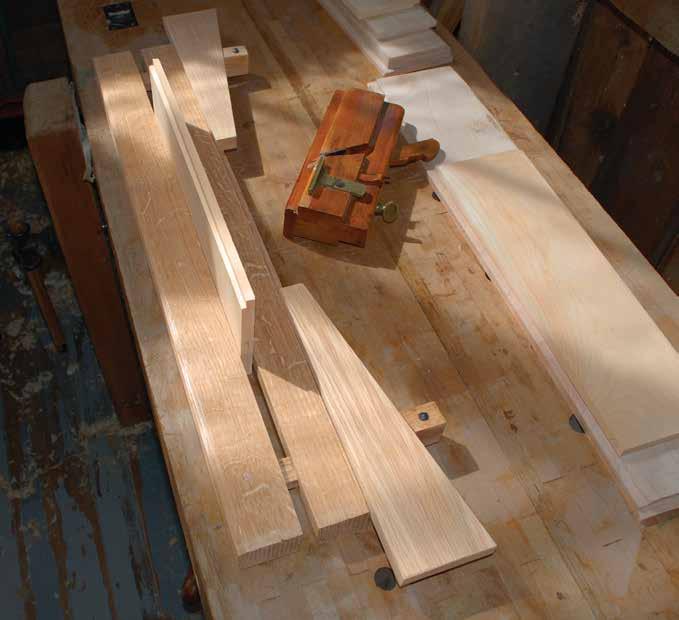
A bevy of benches to choose from. After familiarizing yourself with the basics (p. 6), take a look through the plans in this section to identify what style of bench will suit you best. There are classic designs, such as the Roubo and Scandinavian benches, as well as more modern choices meant for power tool work. Whether you seek a sturdy-but-frugal solution, a quick build, a knockdown option, a full-size heavy-duty bench, or maybe even something to pique your resident junior woodworker’s interest, you’ll find what you’re looking for.

5 1
RULES FOR WORKBENCHES
These guidelines will help you make the most of your bench.
BY CHRISTOPHER SCHWARZ
When it comes to building or buying a bench, most wood workers get wrapped up in what form it should take. Should it be a Continental bench popularized by Frank Klausz? A Shaker bench like the one at the Hancock community? How about a British version like Ian Kirby’s?

Copying a well-known form is a natural tack to take. After all, when
woodworkers buy or build their first workbench, they are in the early stages of learning the craft. They don’t know what sort of bench or vises they need, or why one bench looks different than another. So they pick a form that looks good to them— occasionally mixing and match ing bits and pieces from different forms—and get busy.
6 | MAKE YOUR OWN WORKBENCH
Face of bench
Holes for dogs to pinch work with end vise
End vise
Holes for holdfasts to support long work
Face vise
Simple long edge work. This primitive bench still allows you to work on long edges of boards. The crochet (or hook) grips the board. Holdfasts and a scrap support from below. Simple and brilliant.
tail vise comes to mind) but the tail vise can be a challenge to install, set, and use.
You can try to cheat (as I have) and install the drawer bank so there is a substantial space underneath the benchtop for holdfasts and clamps. Or you can give your bench a large overhang to allow clamping (as some Shaker-style workbenches did), but then you have to start engineering a way to hold long boards and assem blies on edge.
Rule No. 8: Vise Placement on Your Bench Is Important
Place your vises so they work with your tools. Vises confuse many work bench builders. They’re bewildering if you’ve never spent much time working at a bench to develop a taste for the peccadilloes of all the idiosyn cratic forms. There are a lot of weird configurations in the world, from a table with no vises to the bench with a vise on every corner.
Classic workbenches have some sort of vise at the front left corner of
VISELESS WORKHOLDING
You have probably used benches with vises your entire wood working career. A face vise and tail vise are pretty much the way to go, right? Maybe. Maybe not.
Once you get the hang of it, viseless workholding becomes very fast and can be liberating and fun. Many of these tech niques are quite useful, even if you have a vise on your bench.
I find them useful for the entry-level person on a budget as well as for the seasoned woodworker seeking to expand his or her options.
Let’s look at how to accomplish some of the more common tasks at a bench: planing faces, edges and ends of boards; crosscutting and ripping; and sawing a couple of joints.
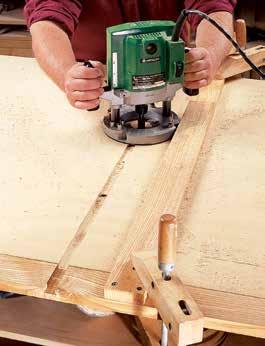
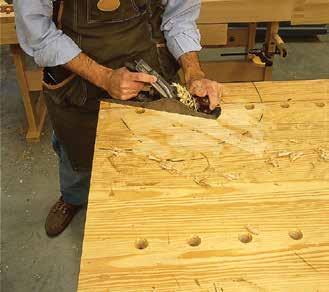
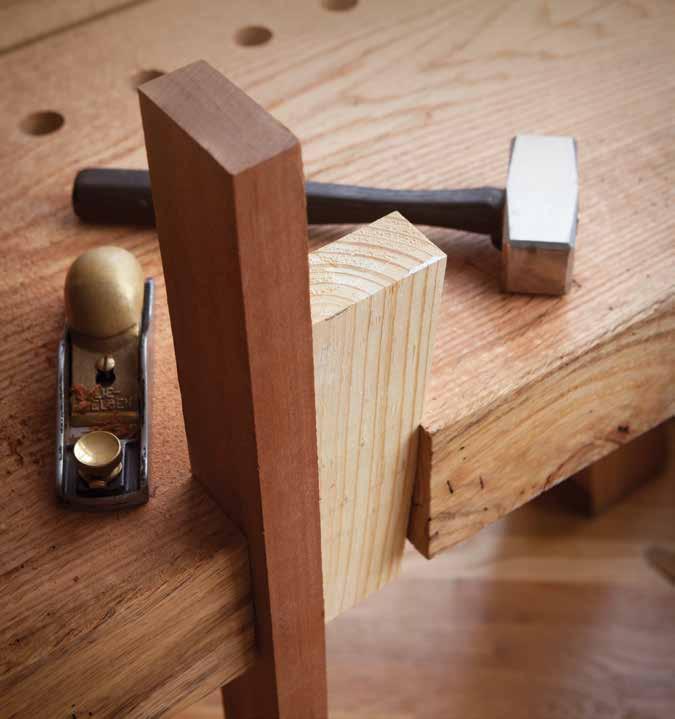
Face planing. Face planing is accomplished by using a planing stop in combination with either battens or a doe’s foot (see p. 172). A holdfast keeps the doe’s foot in place at the corner of the workpiece to push it against a toothed planing stop. The wedge under the workpiece corner keeps a high corner from rocking. Plane toward your stop and the battens, and don’t drag your plane on the return stroke, or the board will pull away from the stop. Flip the doe’s foot over if the angle is wrong for a holdfast hole.
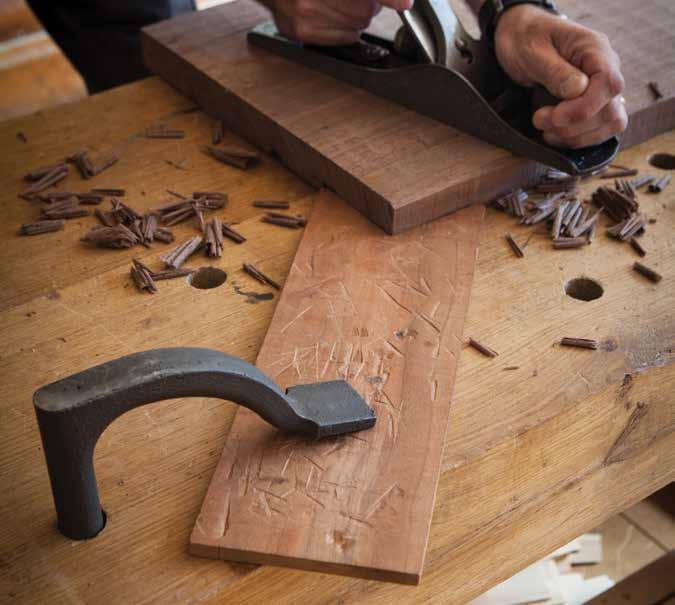
Edge planing. Here are two positions for edge planing: One board is in the crochet and supported by pegs (in holes in the apron) and a batten; the other is supported by the benchtop and held against the planing stop. If the pegs are too far apart, place a batten on the pegs and place the edge of your stock upon that. If the workpiece is narrow and flexes under the plane, or doesn’t reach above the benchtop with the pegs in their highest position, plane the board against the planing stop on the benchtop. If there are hollows under the board, place wedges in them to keep the board from flexing away from the plane. If the board tips over, you are not planing with even pressure. End grain can be planed in the same manner, but to avoid splintering, plane almost to the corner, then flip the workpiece and finish planing.
14 | MAKE YOUR OWN WORKBENCH ■ WORKBENCHES | Rules for Workbenches
THE 24-HOUR WORKBENCH
This workbench is sturdy, inexpensive, and doesn’t take a month of Sundays to build.
 BY CHRISTOPHER SCHWARZ & KARA GEBHART
Whenever we leave begin ning woodworkers to work alone in the shop, it’s a fair bet that when we return to check on them, they’re working on the shop’s floor.
We have at least five workbenches in our shop—not counting the assembly tables—but the new people always seem to prefer the wide expanse of the concrete floor
18 | MAKE YOUR OWN WORKBENCH
You can just use a chamfer bit in your plunge router to make this cut. Or you can simply ease the rims using some coarse sandpaper.
We sanded the top by using 120grit sandpaper in a random-orbit sander and called it a day. Break all the sharp edges using 120-grit sand paper. You don’t need a fancy finish on this bench—just something to protect it from spills and scrapes. We took some off-the-shelf satin poly
PLAN
urethane, thinned it down to three parts poly and one part mineral spir its, and ragged on two coats. Allow the finish to dry at least four hours between coats. (No, the four hours of drying time isn’t included in our total time.)
Then we turned the stopwatch off and checked our time: 23 hours and 2 minutes. We had just enough time left to sweep the floor. ■
MAKE YOUR OWN WORKBENCH | 25 The 24-Hour Workbench | WORKBENCHES ■ 38 1⁄2" 1 3⁄8" 2 3⁄4" 15" 3" 3" 31" 5" 6" 19 1⁄2" 1" 19" 5" 3" 3" 3" 3" 3" 3"Bench bolt 6" 27" 61" 10" 10" 3⁄4"-dia. bench dog holes 7" 4"
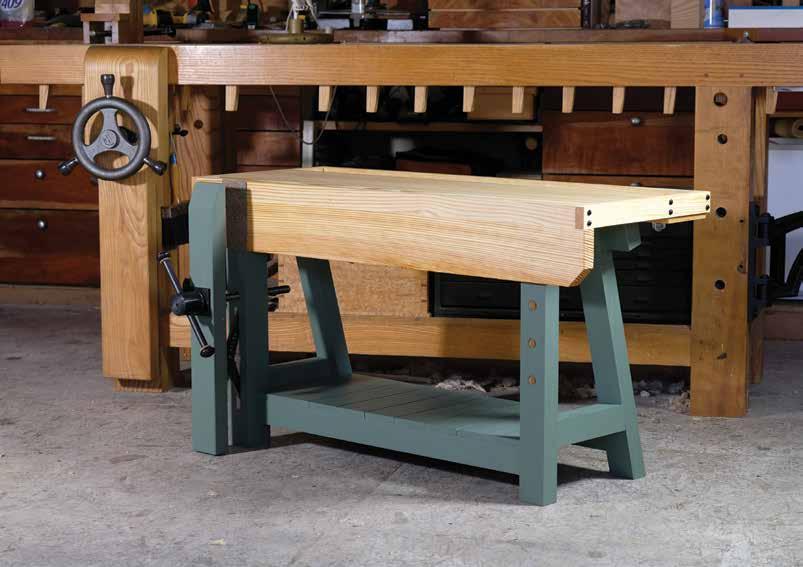
21ST-CENTURY WORKBENCH
This hybrid design holds work any which way you want to.
BY ROBERT W. LANG
Good design is little more than selective thievery. This workbench is a good example of that. A combination of features from several historic forms, ranging from the Roubo to the Workmate, becomes a new form, suited to being the center of a modern woodworking shop. I’ve never seen a workbench that I was entirely happy with. I have love/hate relationships with many common features. I like tool trays, but hate the way shavings and other detritus collects in them. I want to be able to
26 | MAKE YOUR OWN WORKBENCH
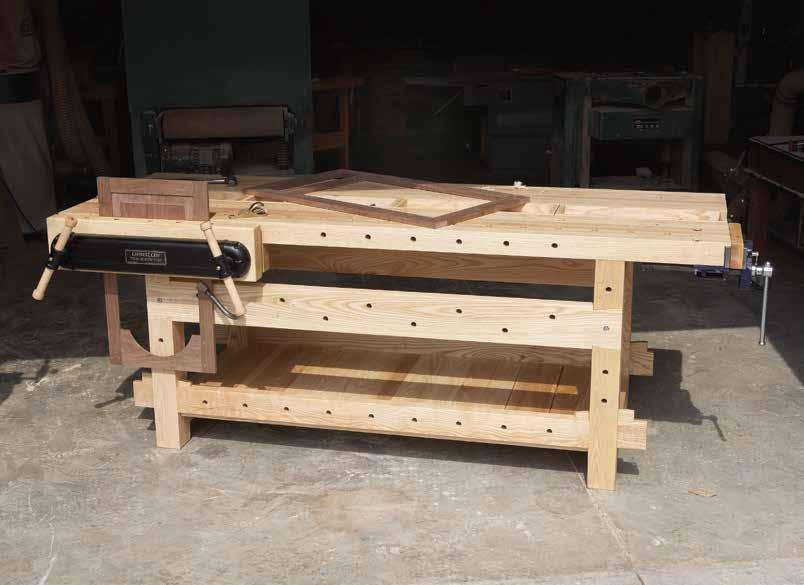
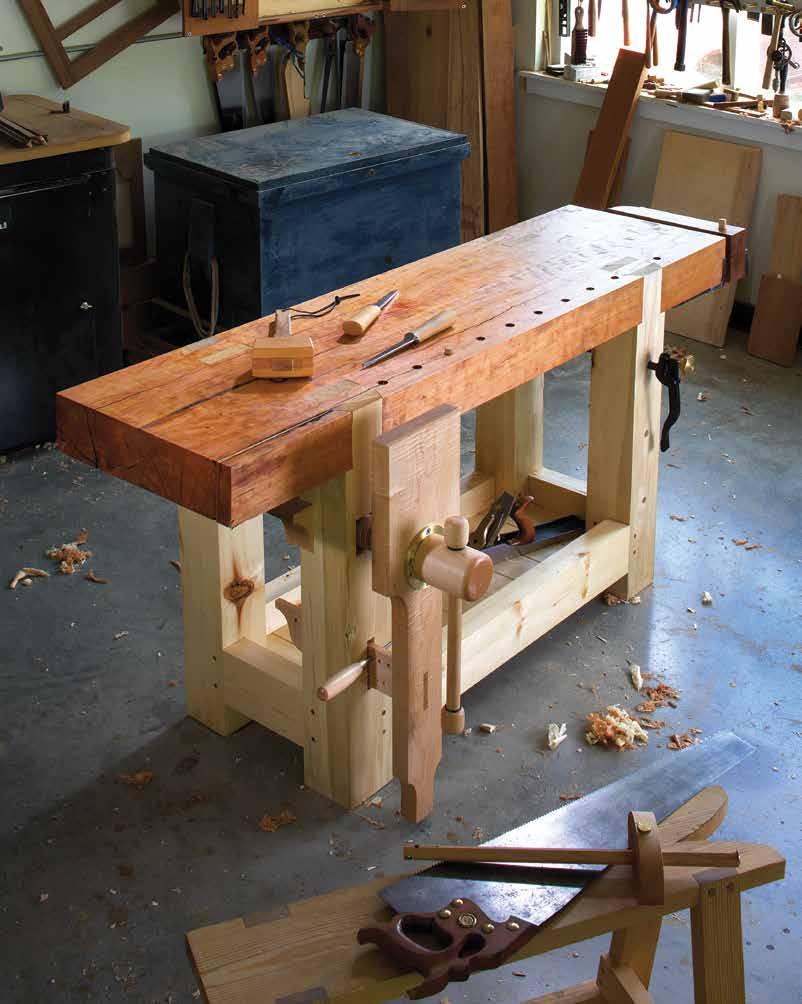
MASTER CABINETMAKER’S BENCH
This proven design will last a lifetime.
BY ALAN TURNER
Ihave many fine tools in my shop, but the most important one is my bench. It has a classic design, favored by cabinetmakers for gener ations.
I’ve spent a long time refining the details of this bench. I’ve built 15 of them over the years, simplifying and improving the design each time. At
38 | MAKE YOUR OWN WORKBENCH
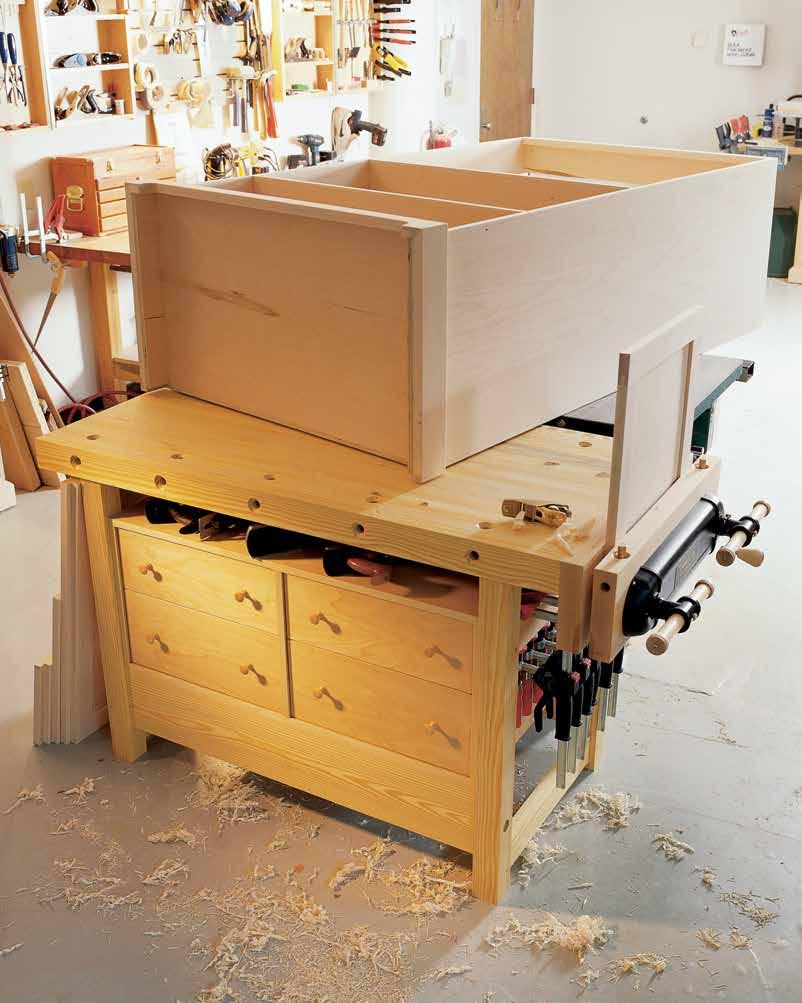
SHAKER WORKBENCH
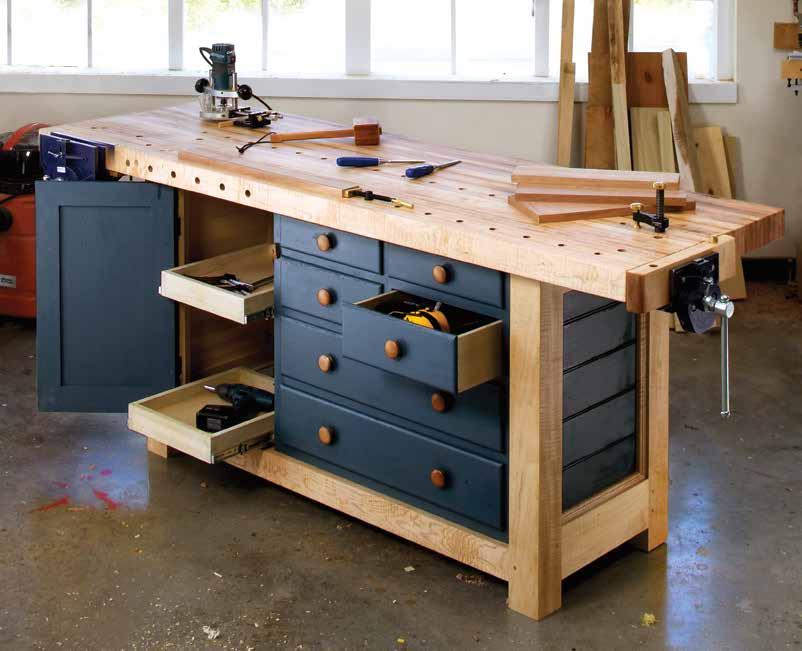
This stack of drawers and storage under a workbench has Shaker written all over it.
BY GLEN D. HUEY
When I started work at Pop ular Woodworking maga zine, my workbench was a couple storage cabinets on wheels and a cut-off slab of solid-core door. The assembled bench design worked, but then again, it wasn’t sturdy, solid, or anywhere near going to be the bench that I used for an extended period of time. So, it was decided that I should build a workbench. A Shak er-style workbench jumped to the
48 | MAKE YOUR OWN WORKBENCH
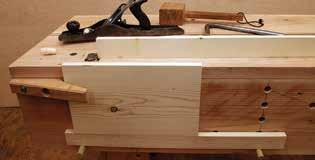
KNOCKDOWN ENGLISH WORKBENCH
In two days, you can build this sturdy stowaway bench.
BY CHRISTOPHER SCHWARZ
Many knockdown work benches suffer from unfor tunate compromises. Inexpensive commercial benches that can be knocked down for ship ping use skimpy hardware and thin components to reduce shipping weight. The result is that the bench never feels sturdy. Plus, assembly usually takes a good hour.
Custom knockdown benches, on the other hand, are generally stur dier, but they are usually too com plex and take considerable time to set up. In other words, most knock-
62 | MAKE YOUR OWN WORKBENCH
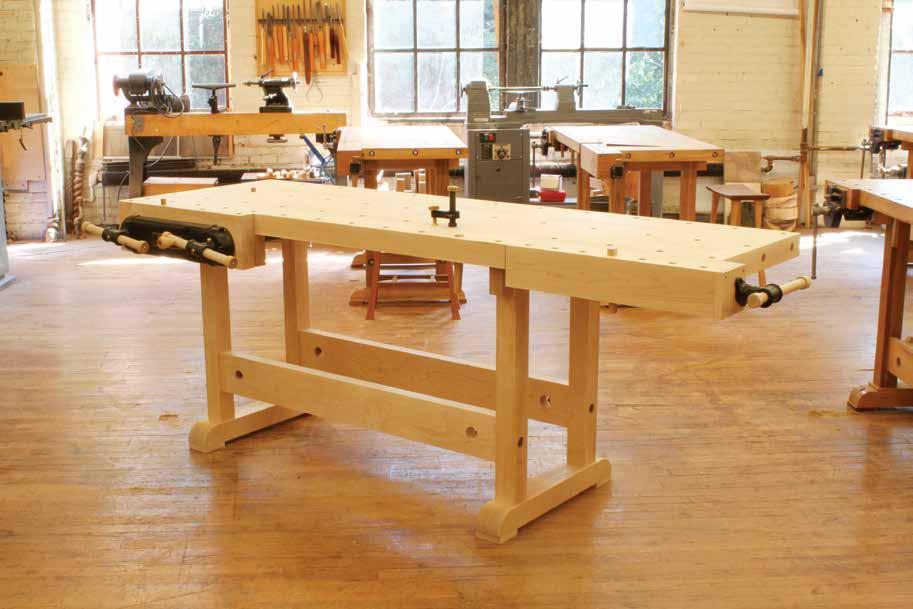
SCANDINAVIAN WORKBENCH
Modern hardware and techniques update this Tage Frid–inspired bench.
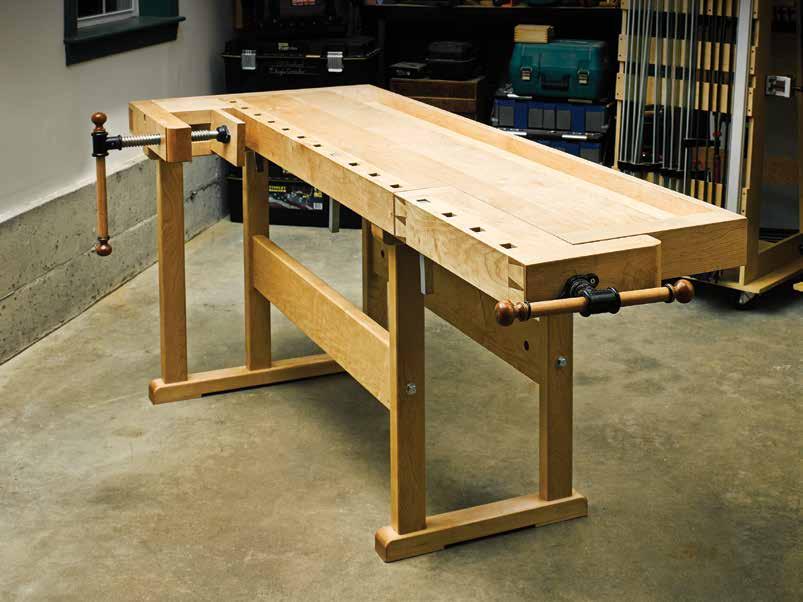 BY BILL RAINFORD
Scandinavian- or Continen tal-style workbenches are the vinyl LP records of the woodworking world. These iconic benches have never left the scene. A few are classics and others are the flavor of the month. Some benches in this style are masterworks and some are poor approximations of an archetypal form. The trick is finding the workbench that hits all the right notes for how you work so you can go on to create your own opus.
72 | MAKE YOUR OWN WORKBENCH
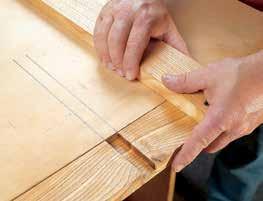
Keep it square.
As you glue on the dog-hole assembly, be sure to attach it square and level to the benchtop.
Slice it clean. Make sure to engage the nicker on your rabbet plane when starting this joint and retract it before the joint reaches its full depth (so as not to cut the fibers in the tenon and weaken the joint).
and try to pick clean, clear grain— this will show in the finished bench.
I’ve worked on benches with square dogs, round dogs, or a mixture of both. I prefer square bench dogs because, in my opinion, they’re stron ger, taller, have more surface area on the face to engage the wood you’re holding, and are less finicky than round ones. (If you prefer round dogs, you can always add a few well-placed 3⁄4" round holes to your bench for them and the holdfasts.) I chose 8/4 stock and used a shopmade template and plunge router to rout the square holes, which are angled 4° to the right off vertical. Note: The slots in the tail
vise lean 4° to the left—the opposite direction to those on the benchtop. Cut these two runs from the same board (with plenty of waste between) and simply flip the jig for the tail-vise portion.
For the 5/4 cap piece that is glued on over the dog holes, choose a clean piece and be careful during your glue-up to avoid getting glue into the slots. I used a pneumatic nailer to shoot a couple of nails into the waste on each of these blanks to ensure things did not move around during clamping. Once the glue is dry, cut the waste off the end of the blank that will be affixed to the benchtop and glue and clamp it to the benchtop. (Here again, I used biscuits to help line everything up.) Make sure to remove any mill marks from the cap.
Once the glue is dry, rip the assem bly, at the back edge, to final width (15 1⁄4" for me) and clean up that edge with a handplane.
BENCHTOP JOINERY
I used a router bit in a router table to cut the grooves on the end caps. But I turned to my skew rabbet plane to cut the rabbets that form the tenons on the ends of the benchtop blank; that was easier than trying to muscle this large assembly onto machinery. The result was a nice, crisp joint with no tear out. Work carefully and testfit as you go to make sure the end caps fit nicely. At the front of the bench is a spacer block—what Frid called the “left vise filler”—that supports the shoulder vise. To cut the groove for it in the front of the benchtop, after laying out the location with a cutting gauge and knife, I removed the mate rial with a mortising chisel, then
■ WORKBENCHES | Scandinavian Workbench 76 | MAKE YOUR OWN WORKBENCH
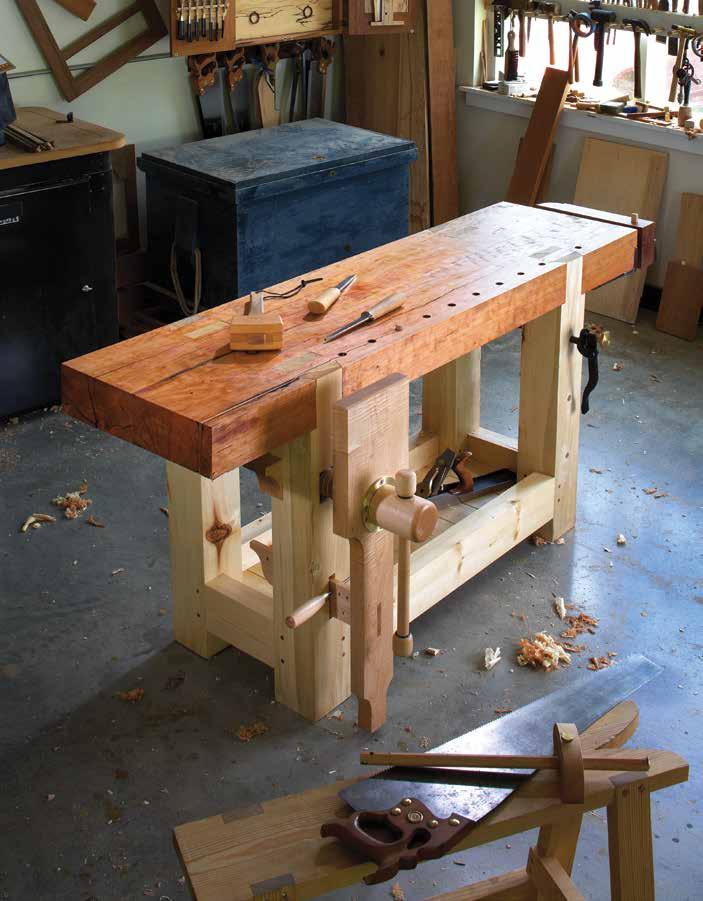
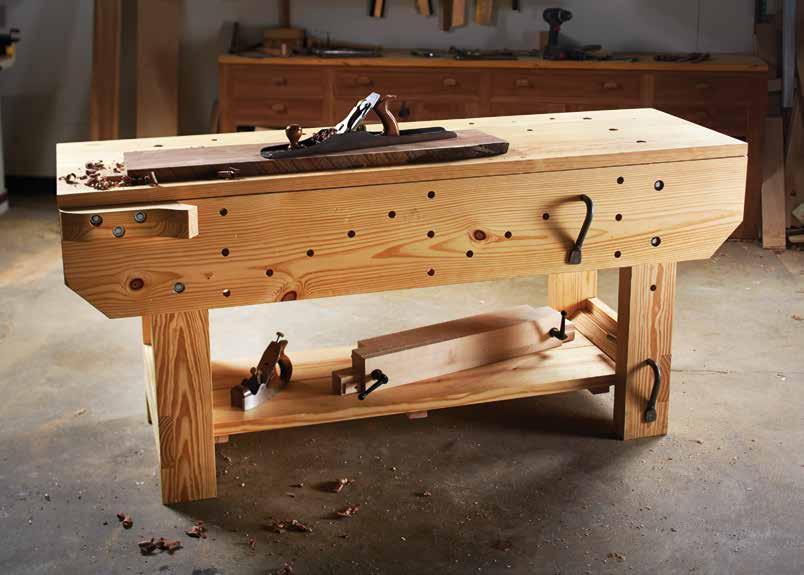
THE RETURN OF ROUBO
An 18th-century French workbench is quite possibly the most perfect bench design ever put to paper.
BY CHRISTOPHER SCHWARZ
In the 18th century it was common for the workrooms and living areas of a home to share the same space. A workbench, for example, would not be out of place in the front room of the house.
This small historical fact has me concocting a plan, which I haven’t yet shared with my family.
My workshop at home is in a walk out basement. I’ve done what I can to make it pleasant, but it’s isolated from the rest of the house. This is on purpose: My planer and jointer sound like air-raid sirens.
During the brutal stock-preparation phase of a project, my shop is perfect. I can run machinery all day and bother no one. But when I get into the joinery of a project, I long for a shop with beams of natural light, wooden floors, and a close connection to the day-to-day of my household.
In other words, I want to claim some space upstairs as a bench room.
Hold tight: This story isn’t just about me. It’s about you, too. A furni ture-grade workbench is a great idea for apartment dwellers, or people who need to set up a shop in a spare bedroom of their house. It’s also a fine idea for people like me who plan
(read: plan to grovel for permission) to do some woodworking in a living area of their home.
Lucky for all of us, one of the best-looking workbench designs is also the simplest to build and most useful, no matter if you have a love affair with your plunge router or your router plane.
THANK YOU, MONSIEUR ROUBO
I’ve built (or helped build) more than a dozen workbenches based on the 18th-century designs of André J. Roubo, a French cabinetmaker and writer. And after years of working on Roubo’s bench, I think it is an ideal bench with almost none of the down sides or limitations I’ve found on other forms.
Its advantages are numerous. Here are a few.
■ Its simple design makes it easy and quick to build, even for beginners.
■ The thick slab top has no aprons around it, making it easy to clamp anything anywhere on it (this feature cannot be overstated).
■ The front legs and stretchers are flush to the front edge of the benchtop, making it easy to work on
the edges of long boards or assem blies, such as doors.
■ Its massive parts make it heavy and stout. This bench will not rack or move as you work.
But what about its looks? The first Roubo-style workbench I built was out of southern yellow pine. I think it looks great, but an 8'-long pine behemoth might be best suited to the workbench underworld. And it is probably too big for most living areas.
So I decided to go back to the orig inal text for inspiration. You see, the original bench published in plate 11 of L’Art du Menuisier shows a bench that has beautiful exposed joinery— through-dovetails and through-ten ons in the top. And it has a single piece of wood for its top—something that George Nakashima would love (if it had a bit of bark on it).
In other words, the original Roubo bench has a lot in common with furniture of the Arts & Crafts movement (thanks to its exposed joints), Shaker (with its lack of ornamentation), and even contemporary styles (thanks to the clean lines and use of a sin gle-board top). This bench looks like a lot of furniture that contemporary woodworkers enjoy building and will
MAKE YOUR OWN WORKBENCH | 87
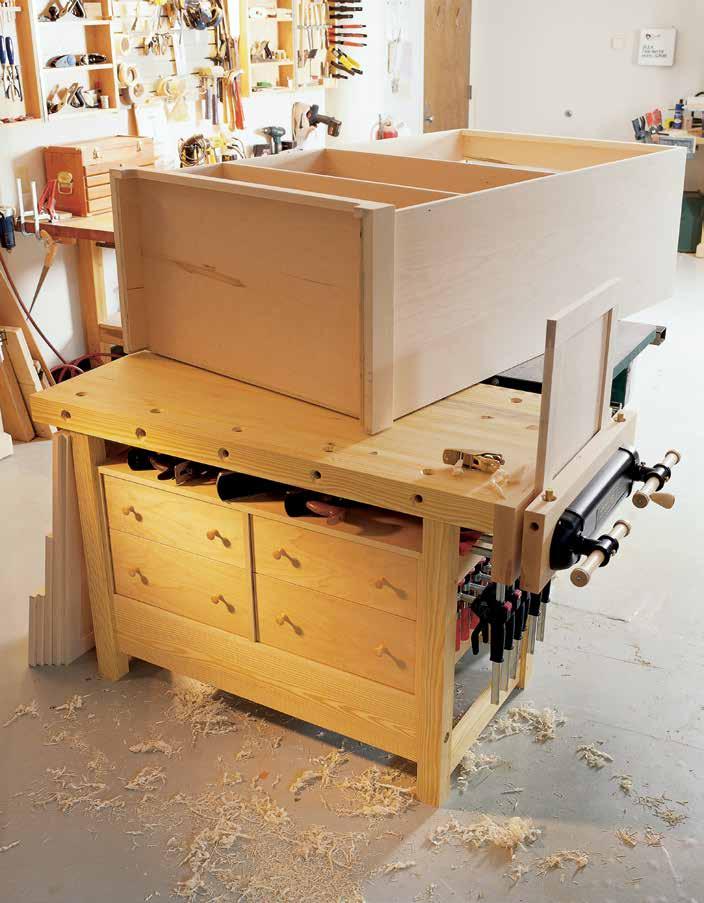
POWER TOOL WORKBENCH
This unique project is a traditional workbench, an outfeed table, and an assembly bench—all in one.
BY CHRISTOPHER SCHWARZ
In a world dominated by power tools, it’s a wonder that commercial workbenches are still designed mostly for handwork. These Europe an-style monsters are set up more for planing, mortising, and dovetailing, rather than routing, biscuiting, and nailing.
What’s worse, most traditional benches are too big (most are 6' long) for the handwork necessary in a modern garage shop; and they are too small (usually 24" deep) to assemble sizable projects on. Plus, there’s the high cost.
One of our contributing editors, Glen Huey, found a solution to this problem when he set up his professional cabinet shop years ago. Glen does some handwork, but for the most part, his motto is: “If you can’t do it on a table saw, it isn’t worth doing.”
So Glen set up his bench as part of his table saw. It attached to the outfeed side of his saw and served as:
■ a smaller, traditional work bench for handwork;
■ a spacious and solid outfeed table;
■ an enormous assembly bench (when you take into account the table saw and its platform);
■ and a cavernous place for tool storage in the drawers and on the large shelf underneath the top.
I’ve watched Glen build dozens of projects with this rig—everything from corner cabinets to a drop-lid secretary—and it has never disappointed him.
I took Glen’s great idea and tuned it up a bit with an enormous tail vise, bench dogs, and an extra shelf. I built this bench using southern yellow pine for the top, legs, and stretchers, and I used birch plywood for the tool box. (If you can’t locate yellow pine, substitute fir.) The total cost of the wood, hardware, and vise was less than half the price of an entry-level commercial workbench (at that time). If that’s still too rich, see the story
“Build a Bench—Keep the Change” (p. 110) for more ideas to cut the cost.
As shown, this bench is designed for a Delta Unisaw equipped with the short 30" fence rails. By lengthen ing the bench’s legs up to 3", you can accommodate any table saw on the
Dog holes first. Drill the 3⁄4"-diameter dog holes into the front edge of your bench before you put the top together. This will save you from making a jig later or having dog holes that wander if you cut them freehand.
MAKE YOUR OWN WORKBENCH | 101
I-BEAM WORK ISLAND
This bit of plywood engineering can serve as a stout base for almost any kind of workbench or shop table.
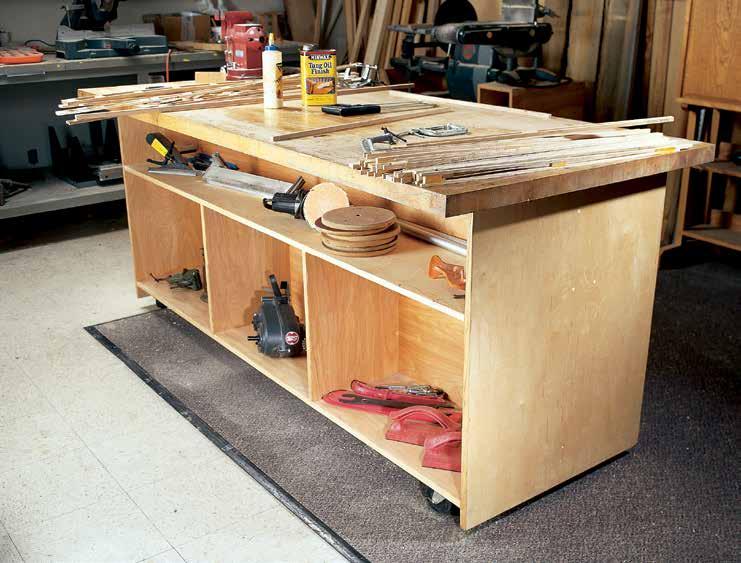 BY NICK ENGLER
Iseem to be setting up a lot of work shops lately. So far, our little band of pioneer aviators have set up two shops in Dayton, Ohio, where we are manufacturing the parts of Wright airplanes and assembling them, and a third shop in Kitty Hawk, N.C., which serves as a repair station to take care
112 | MAKE YOUR OWN WORKBENCH
BY AL PARRISH
of the inevitable wing-dings these primitive aircraft suffer when you fly them. And because the heart of any good shop is its workbench, I seem to be building a lot of benches as well.
With time and materials at a pre mium, I’ve developed a simple and economical design for a bench that we use in these shops. It’s strong, true, offers loads of storage, and with the addition of a few casters, can serve as a movable work island. We find this last feature especially important, because we must constantly reconfig ure the shops as the Wright airplanes grow during construction.
A SANDWICH OF I-BEAMS
The base of the bench is made entirely of 3⁄4" plywood. The plywood parts form three “I-beams,” each beam consisting of two caps and a center beam. The shelves and dividers in the bench make up two small I-beams— the shelves become the caps and the dividers are the beams. These are sandwiched together inside a large I-beam that consists of the two work bench ends (the caps) and a center divider (the beam). The resulting structure is very strong.
It’s also very true; another import ant characteristic of a good bench. The benchtop should be flat if you are going to use it for precision work. I cut up the plywood sheets so the factory edge—the outside edge of the plywood as it comes from the fac tory—is the top of the center divider and the top of the two ends. As a rule, factory edges are pretty straight even if they appear a bit rough. When I attach the benchtop to the base and draw it down tight, the factory edges brace the top perfectly flat.
Rout the dados. Use a T-square jig. The one shown here is designed to cut 3⁄4"-wide dados. First mark on your work the location of the dados (above). Line up the dado that’s plowed in the T-square jig with your lines. Clamp the jig in place, set the depth of the cut on your router, and make the dado (right).
MAKING THE SANDWICH
The bench can be made almost any size—it’s only limited by the size of the sheet materials you use. The dimensions shown in the plans are just suggestions—make the bench whatever size you need. Most craftsmen, I know, will immediately want to make the top a bit higher—34" is somewhat low for a work surface for most people. But it works for me because I’m a short guy.
Once you’ve decided on the over all dimensions of the bench, cut the plywood parts and rout a few dados
to help you assemble and align the parts. Cut the bench ends with three intersecting dados in each—one vertical dado to hold the center divider and two horizontal dadoes to hold the shelves. Make each of these dadoes 3⁄4" wide and 1⁄4" deep. Also make 1⁄4"deep dados in the shelves to hold the shelving dividers. Then rout hori zontal dadoes in the center divider, 3⁄4" wide and 1⁄8" deep. You must make these dados on both sides of the cen ter divider—that’s why they’re only 1⁄8" deep.
I-Beam Work Island | WORKBENCHES ■ MAKE YOUR OWN WORKBENCH | 113
PHOTOS
MOBILE ASSEMBLY TABLE
Storage and utility that is just the right size.
 BY WILLIE SANDRY
116 | MAKE YOUR OWN WORKBENCH
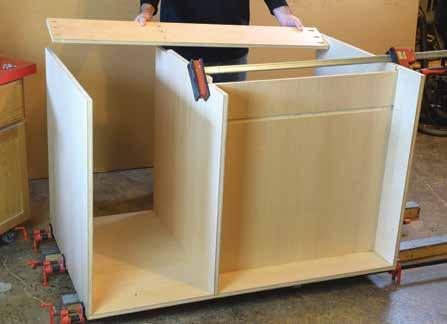
It’s often said that a shop layout is never truly complete. While that may be true, I have discovered a valuable asset in my shop that can move and adapt to changing layouts. I’ve been testing a mobile shop cart over the last several years to make sure it holds up to the rigors of woodworking. The key is middle dividers that act like the webbing of an I-beam. With this tested construc tion technique, the entire cart forms a rigid base to support the top. The work surface is a double-layer of thick MDF, forming a flat top that can han dle daily use and abuse in a shop envi ronment. Special features include pass-through doors, slide-proof adjustable shelves, and a built-in clamp rack for even greater utility.
CONSTRUCT THE BASE
Cut plywood parts to size, and com plete the basic joinery shown in the detail rendering (p. 121). Start with the bottom panel, which has a dado to receive the middle divider. Cut 6" wide x 3 ⁄4" notches at the top corners of the middle divider. These notches will eventually receive long cleat strips, which function to lock the dividers square. Install the end pan els, which are rabbeted to fit over the bottom panel.
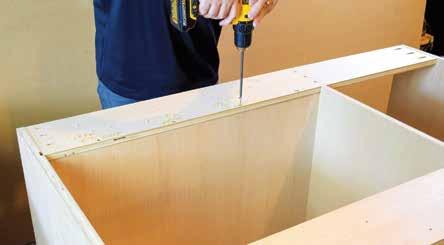
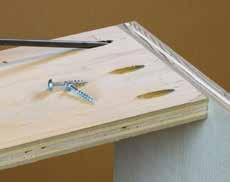
As you install the first end panel, you’ll capture the clamp rack wall in vertical grooves. Add a bead of glue to the bottom of the clamp rack wall component and reinforce this butt joint with screws from the bottom. Now add the other end panel, and glue and nail it in place with 18-gauge brad nails. Finally, add the cleat strips to lock everything in place. The cleats are screwed into the middle divider
The main case. The end panels are rabbeted to fit over the bottom panel, and the middle divider sits in a shallow dado. The clamp rack wall is also housed in grooves on both sides. Glue the main case together, and add the cleat strips to lock it square.
Pocket holes. Secure these long strips flush to the end panels with three pocket hole screws. Add glue to reinforce this butt joint.
Clamp rack wall is key. The clamp rack wall, designed like the webbing of an I-beam, is key to the cart’s design, and functions to prevent both racking and sagging. Reinforce the connec tion to prevent both racking and sagging. Reinforce the connection to the cleat strip with glue and 1 1 ⁄ 2"-long #8 screws.
Mobile Assembly Table | WORKBENCHES ■ MAKE YOUR OWN WORKBENCH | 117
THE MILKMAN’S WORKBENCH
This full-featured benchtop clamps to any solid surface.
BY CHRISTOPHER SCHWARZ
One of the best things about working with hand tools is you don’t need much shop space—often a corner of a bedroom provides enough space. And a complete tool kit fits in a box the size of blanket chest.
As a result, many apartmentdwellers work with hand tools because they are compact, relatively quiet, and fairly easy to clean up after. But there is one huge thing missing from the above—a good workbench.
124 | MAKE YOUR OWN WORKBENCH
Woodworking is much easier with a solid workbench that is equipped with vises and bench dogs. Good workbenches are usually massive and enormous, and they might not fit in tight quarters. A big bench can also be intimidating to build for a beginning woodworker. And small commercial benches are generally too spindly for real woodwork.
Enter the Milkman’s Work bench—a small, full-featured benchtop that clamps to any solid surface—a dining table, dresser, or kitchen island. And it’s not just for the apartment-dweller. This is a great bench for traveling, demonstrating at woodworking clubs, or even for work ing in the living space of your home if you have a shop without HVAC.
It offers a lot of features for such a small thing. You can dovetail boards more than 19" wide in its twin-screw vise area. You can pinch boards almost 24" long between dogs, and you have a decent work surface for chopping. Best of all, you can attach it to something sturdy using only two F-style clamps, do your business, then put the bench away in a closet or under a bed.
I first saw a commercial version of this bench on an Australian auction site. At that time, I had a student, Jonas Jensen, whose father owned one. He had bought it from the town’s milkman. I purchased the original from Jonas’ father, studied its con struction, and worked with it for months. I concluded it was nearly perfect.
This version is almost identical to the original, with only slight changes to make it easier to clamp to your work surface.
Essential grooves. Before you do any assembly, cut the grooves for the wagon vise.
Digging for dogs. Cutting the dog holes using a dado stack makes for crisp work.
Snouts for dogs. These notches allow the dogs to rest below the benchtop when not in use.
The Milkman’s Workbench | WORKBENCHES ■ MAKE YOUR OWN WORKBENCH | 125
PHOTOS BY JAMEEL ABRAHAM
A BENCH FOR KIDS
Build a small workbench with full-sized features for a budding woodworker.
 BY JAMEEL ABRAHAM
The bench is probably the most important item in the workshop.
Those are Charles H. Hayward’s first words in his article “Fitting Up the Workshop: The Bench.” As a woodworking vise manufacturer and bench maker, I couldn’t agree more. Tons of ink has been spilled about workbenches, and I’m one of the guilty parties, so I won’t bore you with design philosophy on this one. OK, maybe a little.
MAKE YOUR OWN WORKBENCH | 131
First off, a little background on why I decided to make a kid’s work bench in the first place—perhaps a bit ironic for a bachelor. I’ve lived next door to my brother for a number of years and have probably spent more time in the shop with my nieces and nephews than if I’d had my own kids. Relationships between parents and children aren’t always conducive to teaching (I’m reminded of why the “Car Talk” guys recommend that parents not teach their own kids to drive). But trying to be the fun uncle placed me in a position to not only teach without the typical parent/ child dynamics, but to make the workshop a fun environment instead of a stuffy classroom. In my experi ence, fun is the key element in teach ing kids woodworking.
A few years ago, I decided to build a kid’s workbench as a prize for a tool event. The idea was simple. Build the bench, have kids write their name on
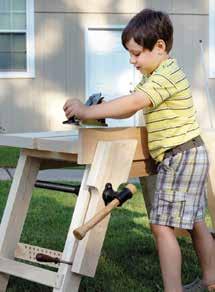
the edge of a piece of basswood held in the bench’s leg vise, then plane off the shaving (along with their name) and place it in a box for a drawing the next day. The winner would take the bench home with them.
Dozens of kids participated, and it was great fun watching half of them completely ignore the piece in the vise and start planing the top of the bench itself! One young boy spent a long time at the bench and made many shavings (but only one with his name on it). I watched him several times, and it was apparent that he’d spent time in the shop. I was extremely busy both days of the event, and only found one moment to take some video of the kids plan ing away. It was this boy who I ended up recording and posting to social media. The next afternoon we had a young girl reach into the box of names and pull out one winner. Incredibly, out of dozens of names,
■ WORKBENCHES | A Bench for Kids 132 | MAKE YOUR OWN WORKBENCH
Like a pro. Building a bench for a kid gives them a huge boost of self-confidence.
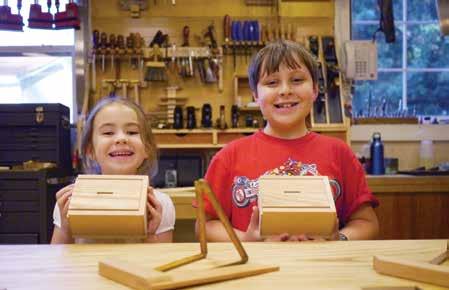
Cash cache. A sliding-lid bank is a great first project for your kid. Especially when you drop $20 in the slot before they take it home.
140
ACCESSORIES
Now it’s time to accessorize your workbench. Regardless of the design you choose, workbenches are only as useful as their ability to hold the piece you’re working on. These creative work-holding solutions are simple enough to craft yourself. Dive in for instructions to create a bench hook, deadman, doe’s foot, raamtang, and more. Combined with pegs, bench dogs, holdfasts, and face vises, you’ll be able to securely hold any shape and size of workpiece on your new bench.
141 2
WORKBENCH ENRICHMENT
Here are ten ways to make your bench indispensable.
BY ROB PORCARO
Ihate to say it, but no matter how much time and money you spent building or buying your work bench, it’s probably not as useful as it should be. Like adjustments to a new table saw or handplane, there are a number of things everyone should do to tune up their bench. Also, there are several simple improvements that will make your bench perform feats you didn’t think were possible. Most of these upgrades are quick and inexpensive. All of them will make your woodworking easier, more accurate, or just plain tidier. Note that most don’t require specific materials.
148 | THE ESSENTIAL WORKBENCH BOOK
6 7 4 8 9 3 2 1 10
BY AL PARRISH
1. IMPROVE YOUR TOPOGRAPHY
Flattening your benchtop regularly is like changing the oil in your car. It’s a routine step that will save you headaches down the road. A flat top is essential to accurate work for three reasons:
■ When planing, sanding, or rout ing a board, you want your work to rest firmly against your bench; a flat benchtop helps keep your work in place.
■ A flat top will divine whether your workpieces are cupped or bowed. If you ever want to remove the cup or twist from a door panel—a common malady—you must have a flat benchtop to know when your panel is finally flat.
■ A flat top guides you as you assemble your projects. If you want your latest table, chair, or cabinet to not rock, you have to make the legs or base all in the same plane. A flat bench will quickly point out your problems and the best solution.
So—how do you flatten a benchtop? The simplest way is to run it through a big drum sander, which you can find in mid-sized cabinet shops. The only downside is that you’ll have some sanding grit embed ded in your bench when it’s all over, which can scratch your work in the future.
There is a way to flatten your bench at home by planing it with a router—once you build a somewhat complex carriage system that guides and holds the tool.

My way is faster. I flatten my benches with a No. 5 jack plane, an old No. 7 jointer plane, and a couple of sticks. The sticks are two pieces of plywood that measure 3⁄4" x 2" x 36".
Traditionally called “winding sticks,” these will quickly determine if your bench is flat and where it’s out of whack.
First, place one of the winding sticks across one end of the bench. Lay the other stick across the bench at various places along the length of the top. Crouch down so your eye is level with the sticks to see if their top edges are parallel. If they are, that
Unwind. Winding sticks are the key to making sure a benchtop or tabletop is indeed flat. Check the top by moving the light-colored stick to different posi tions across the length of the bench and comparing the top edge of each stick.
Start on the sides. Most of the hard work when flat tening your top is handled by the No. 5 jack plane, which can take down high spots quickly. My bench always seems to dish in the middle (similar to a waterstone), so I begin by taking down the sides.
THE ESSENTIAL WORKBENCH BOOK | 149 Workbench Enrichment | ACCESSORIES ■ PHOTOS
Painted winding stick
Unpainted winding stick
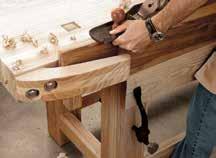
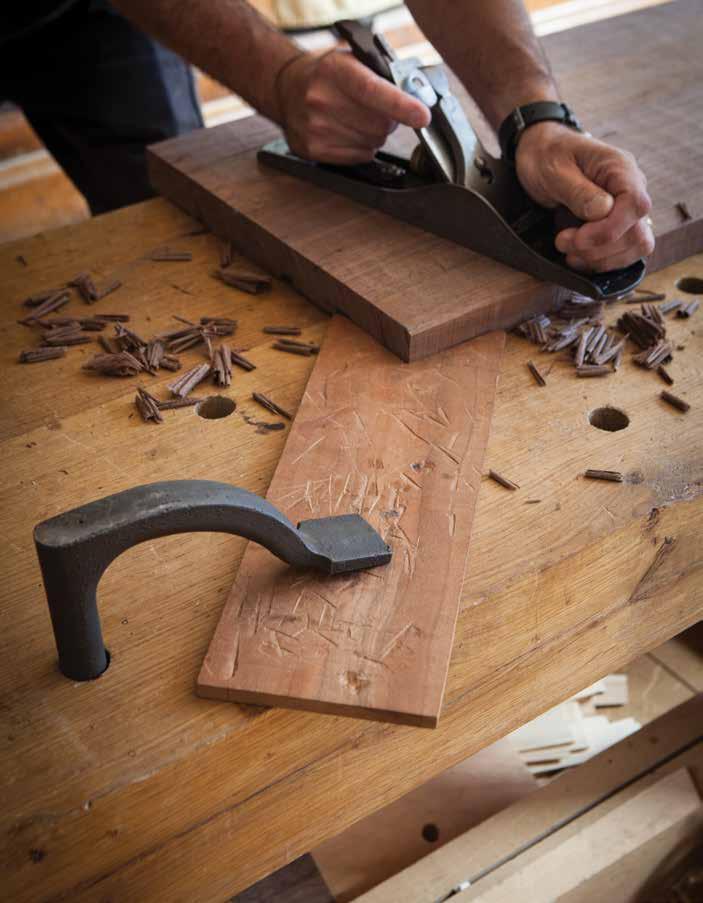
HOLD EVERYTHING (WITH ALMOST NOTHING)
You can hold anything on your workbench with just pegs, wedges, and notches—no fancy vises required.
 BY CHRISTOPHER SCHWARZ
158 | THE ESSENTIAL WORKBENCH BOOK
DOE’S FOOT
These notched sticks simplify your workholding at the bench.
 BY CHRISTOPHER SCHWARZ
Ifirst became fascinated by the doe’s foot after seeing U.K. wood worker Richard Maguire use one in lieu of a tail vise. And after sev eral years of research and trials at my own bench, the doe’s foot has become an indispensable part of my workholding.
It’s a fiendishly clever and simple appliance. Even if you have a work-
bench with all the bells and whistles, you’ll find a doe’s foot useful in a pinch. Plus, if you ever work on-site without a workbench—or on a picnic table on vacation—the doe’s foot is a lifesaver.
HOW DOES IT WORK?
The doe’s foot is simply a piece of wood of almost any size with a 90°
172 | MAKE YOUR OWN WORKBENCH
MAKE A RAAMTANG
This Dutch joiner’s tool leverages simple design into a cheap and effective workholding device.
BY ZACHARY DILLINGER
While studying Gerrit van der Sterre’s Four Centuries of Dutch Planes and Planemakers , I ran across what the author calls a “raamtang”—Dutch for “win dow pliers.” As you might guess, it is a joiner’s tool used originally to hold narrow window sash bars for molding.
The similarities between this entirely shop-made wedge-powered vise and the screw-powered Moxon vise led me to make and try a raamtang with great success for other work.
174 | MAKE YOUR OWN WORKBENCH
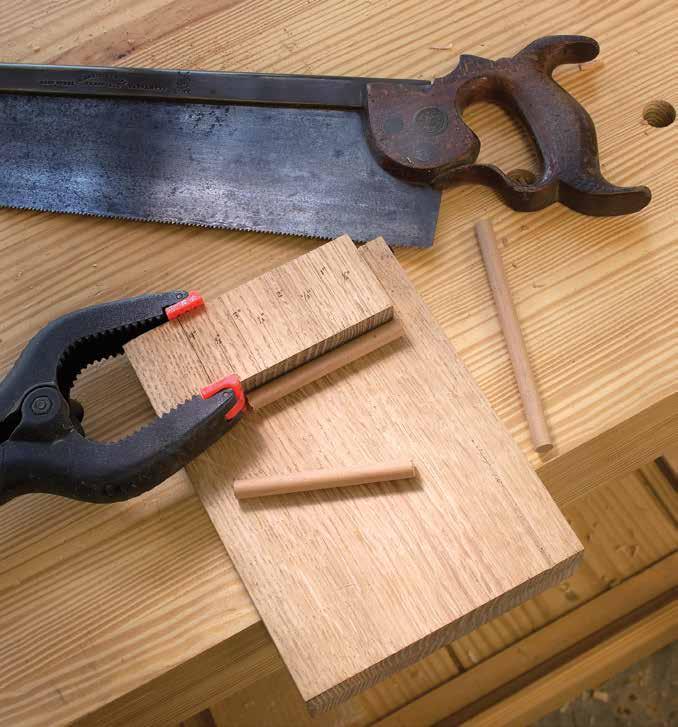
BENCH HOOK
The single most important hand-tool appliance is three sticks of wood.
BY CHRISTOPHER SCHWARZ
Owning a backsaw without owning a bench hook is like riding a bicycle without han dlebars. This simple hand-tool appli ance (three pieces of wood) uses the force of the tool and gravity to hold your work as you saw. And it helps guide your tool so your cuts are right on the line.
178 | MAKE YOUR OWN WORKBENCH
ISBN: 9781950934638
PRICE: $24.95
PAGES: 144
FORMAT: Paperback / 8 x 10
MORE GREAT BOOKS
From the Editors of
The Essential Handsaw Book
Everything you need to unleash the simple power of the humble handsaw.
A handsaw is woodworking in its most pure and minimal form. If you can see and follow a line—any line—you can cut the line. There’s no need for crazy setups or jigs; just grab the right saw and start cutting—any angle, any shape. Complex joinery becomes no more than a series of lines to cut on your stock.
The Essential Handsaw Book provides all the information a woodworker needs to choose the right saw, use it successful ly, and keep it razor sharp for years to come. In the end, using a handsaw to stay on the straight and narrow when tracking any line will become a successful and satisfying endeavor.
Boxes to Build
Hardworking boxes to get organized in style.
When it’s time to start a new project, boxes are a popular choice for woodworkers of all skill levels. Compiled from the pages of Popular Woodworking, Boxes to Build features twenty-two hardworking, useful projects that you’ll want to build. Featuring designs and how-to from some of today’s top woodworkers, including Marc Spagnuolo, Gary Rogows ki, Chris Schwarz, and more, Boxes to Build is a woodworking book that’s fueled by function, but doesn’t skimp on form. Ideal for all skill levels, the collection of projects in Boxes to Build will quickly and proudly be put to use making your life more organized, less complicated, and very stylish.
ISBN: 9781950934737
PRICE: $24.95
PAGES: 152
FORMAT: Paperback / 8 x 10
Look for
these titles
and more at
PopularWoodworking.com/Store
MORE GREAT BOOKS
for this
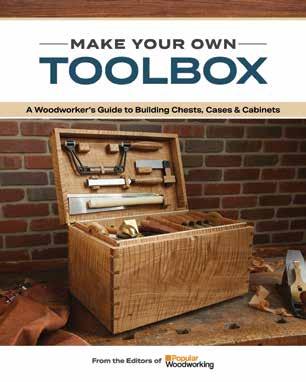
Make Your Own Toolbox
A Woodworker’s Guide to Building Chests, Cases & Cabinets
ISBN: 9781950934867
PRICE: $27.95
PAGES: 192
FORMAT: Paperback / 8 x 10
Custom built storage for your woodworking tools.
Toolboxes are a classic woodworking project. Of ten, it’s a beginner’s first effort at the workbench, a functional and confidence-building project meant to house the very tools used to make it.. As time passes, and a woodworker accumulates the many tools that reflect evolving skills, a toolbox project can morph into chests, racks, caddies, and cabinets to better organize a shop—while that first toolbox, banged-up and still useful, resides somewhere close at hand on the bench.
Make Your Own Toolbox is a collection of classic and practical projects that offer a wide range of tool storage ideas. Compiled from the pages of Popular Woodworking, these 21 projects from ex pert woodworkers such as Tommy MacDonald, Tom Fidgen, Robert W. Lang, and Christopher Schwartz, deliver the plans and woodworking know-how to craft a handmade toolbox. Whether you’re looking for a compact caddy, a rugged-but-still-portable chest, or a handsomely crafted, many-drawered cabinet to crown your workbench, has a project that you’ll proudly use for years to come.
Look
title and more at PopularWoodworking.com/Store
From the Editors of


