
23ISSUE The secrets to 3HalfaccurateSquareTrianglescriticaltipsforfusing PFAFF Patchwork Program: makes chain sewing fast and easy Cut (andcirclecirclesperfectwithOLFAcutterCreatingtexturedfabricwithpleatsandtucksThemagichowto)ofFloatingStitchesforyourquiltprojectsPFAFFPatchworkProgram:makeschainsewingfastandeasy QSTsmadebabyCUTESTThequiltwith&HSTs OUILT Visit QUILTsocial.com to download a PDF version of this issue.

mySewnet™ CONNECTED LARGE COLOUR TOUCH SCREEN 10.1" (217x136mm) JoyOS ADVISOR™ deLuxe™ STITCH SYSTEM sewing and embroidery machine SEW TO DESTINATIONSNEW VIKING, MYSEWNET, DESIGNER RUBY, JOYOS ADVISOR, DELUXE, SEWING ADVISOR, and TRIBUTE are trademarks of KSIN Luxembourg II, S.a.r.l. HUSQVARNA and the “H” Crown Device are trademarks of Husqvarna AB and are used under license. ©2022 KSIN Luxembourg II, S.a.r.l. All rights reserved. full-projectDownloadinstructionsforthe IMPROV COZY QUILT HusqvarnaViking.com/aten-CA/Be-Inspired/Blog 150 TH HUSQVARNAANNIVERSARY®VIKING® Exclusive SEWING ADVISOR™ See the stitches in real size on the Graphic Display Large sewing surface 200mm 3 Programmable built-in fonts special edition sewing machine 150CTribute™ 5 Bonus Presser Feet Included!


And to add to your sewing skills arsenal, Jean Boyd offers an excellent tutorial on how to make a cushion cover with pleats! Pleats and tucks in the fabric have been around for several centuries, and most recently, not so much in clothes as much as in home decor. You'll find these on blankets and shams, small cushions too. The fabric used is more neutral and plain letting the pleats and tucks do all the talking.
I consider half-square triangles (hst) a child's play with an exciting abundance of quilt block combinations. When using them in a quilt design, there's almost no right or wrong and colour can make or break the pinwheel effect to create a more modern hst quilt design. I remember a few years back I was making an hst quilt with my mom with fabric we didn't like, but it was given to us a long time before that and so we wanted to put the fabric to good use. I considered it more as a practice quilt, quilting it using decorative stitches. As I laid out the hsts, it occurred to me more and more that the fabric was unattractive to me, so I changed up the combination, and then again twice over. So far, nothing was enticing me forward to piece the quilt together. I let it sit for about a year, begrudgingly folding it away at some point until I came across (you know, on Pinterest…) a quilt with hsts forming spirals. That was the spark I needed to pull the pieces out again and try it in that setup. I noticed the colour values in the collection which were not obvious to me at first and like magic, the spirals came alive, and the 'ugly fabric' became - attractive! It was most exciting to play with the hst combinations.Inthisissue,is your chance to play with hsts making Paul Léger's adorable baby quilt. But perhaps with all the tips he has to share in this issue about the many ways to make hsts, you might come up with your version!
3OUILTsocial | issue 23
Here's your chance to learn how easy it is to make your one-of-a-kind cushion with the Brother BQ3100. Check out Sarah Vanderburgh's quilt in this issue, she plays with the fun array of decorative stitches on the PFAFF performance icon, with tips for adding something extra to your quilt. Finishing touches like floating stitches always make for a unique quilt! Take the time to Enjoyplay!the issue,
Paul also has the perfect tutorial to show you how to work with the OLFA circle cutter for perfect circles every time. One quilt design idea I have in the back of my mind (way back) is making the solar system. I can see the OLFA circle cutter coming in handy for it!
Cheerfully, 3| issue 21 Editor's Letter


4 | issue 23OUILTsocial Advertiser Index 50 A Needle Pulling Thread Magazine 27 Brother Luminaire 2 48 Business Directory 02 Husqvarna Viking 37 Oliso Irons 48 PFAFF 0 4 QUILTsocial.com 07 The Quilted Stash 26 #TheSewGoesOn PUBLISHER, EDITOR-IN-CHIEF, ART DIRECTOR Carla A. Canonico carla@QUILTsocial.com PUBLISHER, ADVERTISING SALES John De Fusco john@QUILTsocial.com PHOTOGRAPHERS Carla A. Canonico, John De Fusco BLOGGERS/CONTRIBUTORS Paul Lé ger paullegerquilts.com Sarah Vanderburgh sewjoycreations.com Jean Boyd patternsbyjeanboyd.com GRAPHIC & WEB DESIGN Carla A. Canonico carla@QUILTsocial.com GRAPHIC ASSISTANT and SOCIAL MEDIA Sondra Armas Maria Corina Guillen WEB and IT SUPPORT Alejandro Araujo WEBSITE / BLOG : https://QUILTsocial.com Like us on Facebook : QUILTsocial Follow us on Pinterest : quiltsocial Follow us on Instagram : quiltsocial Follow us on Twitter : @QUILTsocial WHERE TO GET YOUR COPY QUILTsocial is a quarterly eMagazine published by A Needle Pulling Thread. It is available free for personal use online at https://QUILTsocial.com A limited number of printed copies of QUILTsocial are available for purchase at select quilt shops and specialty stores. Ask for it at your local shop. QUILTsocial is not available by subscription. QUILT SHOPS If you are interested in carrying QUILTsocial in your store, please email john@QUILTsocial.com EDITORIAL Designers and other contributors who would like to be considered for future issues please email carla@QUILTsocial.com with a brief description of your work and your proposed project for the magazine. ©2022 QUILTsocial. All rights reserved. Issue 23. ISSN 2368-5913 No part of this publication may be reproduced without written permission from the publisher. All designs, patterns, and information in this magazine are for private, non-commercial use only, and are copyrighted material owned by their respective creators or owners. FREE! ALL Visit QUILTsocial.com and download our free ebook Elaine’s Quilting Tech Tips! { daily blog { week ly Facebook Live { week ly newsletter { quarterly magazine { fun Facebook page { yummy Pinterest page { app on iTunes/Google Play { ALL of the above! producttechniquesprojectsreviews* * * OUILT


08 Make perfect cuts with OLFA rulers 10 Cut perfect circles with OLFA circle cutter | how to use it 12 Three critical tips for fusing (ask me how I know!) 14 Finish off those windmill blocks with beautiful machine applique stitching 16 Use your quilt rulers for quilt marking! 18 Creating textured fabric with pleats and tucks 20 How to pleat woven cotton fabrics using a sewing machine 22 Making a one-of-a-kind cushion with the Brother BQ3100 23 Use My Custom Stitch to make your own custom stitch 25 Doodling with My Custom Stitch on the Brother BQ3100 28 The secrets to accurate Half Square Triangles 30 5 easy steps for making multiple Half Square Triangles at once! 31 Make multiple Half Square Triangles from fat quar ters? Absolutely! 33 THE tool you need for fast and easy chain piecing 35 Sewing the pieces together it’s quilt assembly day! 38 Quilt a modern blooms wall quilt: Here’s what you need to get star ted 39 PFAFF Patchwork Program: makes chain sewing fast and easy 41 The magic (and how to) of Floating Stitches for your quilt projects 43 Adding a little something extra to your quilt: Here’s why you should! 44 Quilt and bind with the PFAFF per formance icon: What features make it easy 49 Pam Voth's QAL 2020 Spectrum Blocks 10 through 12 51 PAUL LÉGER'S TIPS 5OUILTsocial | issue 23 issue 23OUILT CONTENTS


6 | issue 23OUILTsocial don't miss these projects & tutorials online! and there's so much more! READ NOW Easy 6-point stars without Y seams: What you need to get started READ NOW Applique fish with Odif and HeatnBond: A great summer catch! Pieced borders for panels: QUICK and EASY for any size! Brother BQ3100 READ NOW READ NOW Unboxing and setting up the Husqvarna VIKING PLATINUM™ Q160 .comOUILT


Arnprior Shopping Centre 375 Daniel St S, Arnprior, ON K7S 3K6 www.sewinspired.ca6136230500 info@sewinspired.ca Sewing, Knitting & Having a Good Time Ottawa Valley Authorized Dealer 1390 Clyde Ave, #107, Ottawa, ON K2G 3H9 Sales & Service of Baby Lock, Brother, and Elna sewing machines, and Q'nique longarm quilting machines 613-695-1386 www.ottawasewing.comYourAuthorizedDealerfor: SewingOttawa Centre Specializewww.kellyscreativesewing.ca902-435-7380inSewing,Embroiderymachines,SergersandLongarmQuiltingSystems804MainStreetDartmouth,NovaScotiaB2W3V1kellyscreativesewing@gmail.com Phone: www.kaquiltstudio.cominfo@kaquiltstudio.com519-425-4141 K&A Quilt Studio Where Friends and Creativity Meet! Authorized distributors 90 Samnah Crescent Ingersoll, ON N5C 3J7 Your Authorized Dealer for: BRAMPTON SEW N SERGE 7-289 Rutherford Rd S, Brampton, ON L6W 3R9 905-874-1564 www.BRAMPTONSEWNSERGE.com The Quilted Stash is a colorful collection of twelve Newfoundland & Labrador inspired quilting projects. These 12 original projects b y The Quilt ed Stash use a var iety of techniques, including appliqu é , piecing , and collage. Patterns include detailed instructions and are designed for a variety of skill levels. Rooted in tradition but drawing on the shapes and forms of modern quilting, these quilts will do more than keep you warm. They can tell a story, compel you to remember an experience, and take you home. IBSN 9781989417300 Quilted the stash 7OUILTsocial | issue 23


use to make my windmill quilt: • OLFA Rotary Circle Cutter • OLFA 45mm Splash™ Handle Rotary Cutter • OLFA 45mm Tungsten Tool Steel Rotary Blade • OLFA 12½” Square Frosted Acrylic Ruler • OLFA 6” x 12” Frosted Acrylic Ruler • OLFA 6” x 24” Frosted Acrylic Ruler • OLFA 24” x 36” Double Sided Rotary Mat • 3pkg HeatnBond Non-Woven Lightweight Fusible Interfacing (20” x 1 yd/50cm x 0.9m) • or 2¾ yds [2½m] HeatnBond NonWoven Lightweight Fusible Interfacing (20”/50.8cm wide) • Oliso PROTM TG1600 Pro Plus Smart Iron Contrasting windmill blocks made with half square triangles and half-circles. OLFA and HeatnBond products are all that are needed to make this windmill quilt.
tools
To make
to assemble,
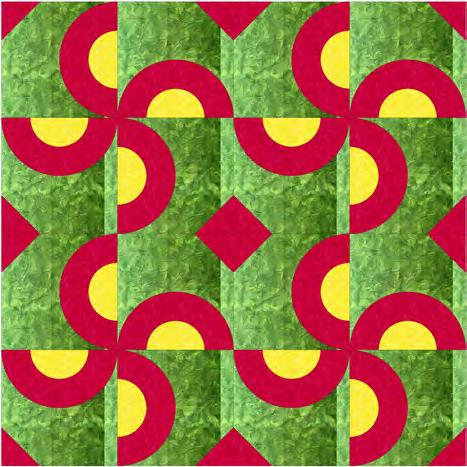
Paul Léger I always have, and no doubt always will, loved creating quilts with half-square triangles (HSTs). Why? Because I love to play with the huge variety of possible patterns when HSTs are laid out in different sizes, directions, and color combinations. HSTs can be arranged and combined to create infinite and beautiful forms and shapes. When asked to write this feature, I started musing about HSTs and creating something new and original. Then, an idea came to me when I glanced at my OLFA Rotary Circle Cutter. I would make a traditional windmill block pattern using half-circles instead of HSTs! this quilt easier here’s a list all the great I’ll
Make perfect cuts with OLFA rulers
of


the tools listed
Fusecenter.HeatnBond
Fuse the marked HeatnBond squares to the fabric squares.
squares Red fabric: •
Note: Before fusing the HeatnBond, it’s very important to read the product instructions, which can differ from one product to the next, even within the same brand.
• 16 – 4” x 4” squares Yellow fabric: • 8 – 5¼” x 5¼” squares Heat HeatnBond fusible interfacing: • 8 – 103⁄8” x 103⁄8” squares; and • 8 – 51⁄8” x 51⁄8” squares On
Center and fuse the (8) 103⁄8” x 103⁄8” HeatnBond squares to the wrong sides of the 8 red 10½” x 10½” squares. Repeat the fusing process with the (8) 51⁄8” x 51⁄8” HeatnBond squares and the 8 yellow 5¼” x 5¼” squares.
x
and
We’ve now taken our first steps in making a windmill quilt using half-circles instead of HSTs. The results will be similar, but oh, so different at the same time.
x
TIP
Now, why make only one windmill when four can be made just as easily? While I’m at it, why not add a little extra visual interest to the block design by adding a triangle in one corner? I want to make this quilt fun, so adding a little corner piece adds the spark of visual interest I look for. with above, needed: 12” 12½” 12½” – 10½” 10½” 8 – 10½” x 10½” and the paper side of each cut square of HeatnBond interfacing, find the center and mark it with a large X. I find the center easily by using the edges of either the OLFA 6” x12” or 6” x 24” ruler. Place the edge of the ruler diagonally on the paper from corner to corner and draw a diagonal line. Repeat this process for the opposite corners to create an X. The X marking on the paper side of all cut pieces of HeatnBond will come in handy when cutting circles. cut and ready for piecing the quilt blocks. Mark an X across each piece of HeatnBond to find the to the wrong sides of the fabric squares.
Along
the following fabrics are
• 11⁄3yds [1.2m] green for background • 1 yd [0.95m] red for large circles and corner triangles • 1⁄3yd [0.35m] yellow for small circles • 1⁄3yd [0.35m] for binding • 1¼ yds [1.20] for backing • 44” x 44” [112 x 112cm] batting I used the OLFA 6” x
Photos by Paul Léger
rulers to cut the following pieces from the fabrics and the HeatnBond fusible Greeninterfacing:background fabric: • 16
Windmill quilt measuring 40” x 40”. Fabric selection for a lively windmill quilt Fabrics
squares;


To make perfect circles, I’ll use the OLFA Rotary Circle Cutter
Changing the pivot spike position on the OLFA Rotary Circle Cutter. Cut red and yellow circles. Center the rotary circle cutter and cut a 4” circle from the center of a 10” red circle.
OLFA Rotary Circle Cutter
To cut 5” yellow circles, adjust the cutter to the 2½” mark. Place the pivot spike at the intersection of the X drawn on the paper side of each fused HeatnBond square. Press down into position, firmly grip the ratchet holder and rotate the cutter to cut out the circle. Note: If this is your first time using a circle cutter, I suggest making a few test circles using scrap fabrics first. This is an easy way to get a feel for how the circle cutter works. Cut (8) 5” circles; repeat the above steps above to cut (8) 10” circles from the red fabric squares. Adjusting the circle cutter to 5” will cut a 10” circle.
Cut perfect circles with OLFA circle cutter | how to use it
The OLFA Rotary Circle Cutter comes out of the package pre-set to cut a circle no larger than 8¾” in diameter. This quilt block uses circles with diameters measuring 4”, 5” and 10”. The cutter settings need to be adjusted for each different circle size. It’s simple and safe to make the size Startadjustments.byremoving the brass pin found above the pivot spike and rotate the spike unit 180º. Rotating the pivot spike enables to cutter to make circles up to 10¼” in diameter.


To reduce bulk when fusing multiple fabrics to each other, I decided to cut a smaller circle from the middle of the 10” red circles. This will be helpful when the yellow half-circles are fused to the red half-circles. Stay tuned.
On each of the yellow circles, line up the edge of the OLFA 6” x 12” ruler on one of the lines drawn to mark the X on the paper. Cut the circle into two half-circles.
I’ve adjusted my rotary circle cutter to 2” between the blade and the pivot spike. This will make a circle 4” in diameter.
TIP Ensure at least one of the marked lines extends beyond the diameter of the circle.
OLFA Rotary Circle Cutter to make circles was easy and fun. This is the one and only time when going around in circles doesn’t give me a headache!
Repeat the above steps on the eight red circles to create halfUsingcircles.the
Cutting a circle using the OLFA Rotary Circle Cutter. Line up the edge of a ruler along one of the marked lines and cut the circle in half. Cut a circle into two half-circles.


3 critical tips for fusing (ask me how I know!)
First, mark the center point of one side of each of the (16) 10½” x 10½” green background fabric squares.
• only remove the interfacing paper at the point of fusing, and not before • do not keep the pieces to be fused close to the hot iron
I’m using the OLFA 6” x 12” Frosted Acrylic Ruler to measure and mark 5¼” from one of the block’s edges. The white mark itself is less than ¼” in length, perpendicular to the edge of each square.Beforefusing the yellow and red half circles to the background fabric, preheat the Oliso PRO™ TG1600 Pro Plus Smart Iron to the silk setting as recommended in the HeatnBond Non-Woven Light Weight Fusible Interfacing instructions.
OLFA Rotary Circle Cutter
Note: I can’t stress this enough! Read all the instructions included with the interfacing. Even within the same brand, fusing instructions can change depending on the individual product.
Mark the center point at 5¼” with a small line on one edge of each of the background fabric squares. Center and fuse the red half-circle to the background fabric square.
Now, on to the fusing! On the edge of the background square where the mark was drawn, center the large red half-circle and fuse it to the background fabric. Repeat this step on all 16 background squares.
• when preparing to fuse another fabric piece, do not lay it on the warm ironing board where another piece was just fused
Now, on to fusing those red and yellow half-circles to the green background fabric to make windmill blocks.
Here are three fusing tips and tricks I’ve learned by experience:


Theseyou’reWiththedownpiecetomeetedgeofthebackgroundfabricandfuseitintoplace.theyellowandredhalf-circlesfusedtothegreenbackgroundfabricsquares,today’sworkisdone.RememberthethreetipsImentionedearlieraboutwhenandwheretoremovetheHeatnBondinterfacingbackingpaperasworking!cuttingweremadeeasywiththe
OLFA Rotary Circle Cutter, the Oliso PRO™ TG1600 Pro Plus Smart Iron and FusibleLightweightNon-WovenHeatnBondInterfacing
Fuse small half-circles over top of the large half-circles.
Slide the halfcircle
The Oliso Pro TG1600 iron and HeatnBond Fusible Interfacing.
Be sure to have these time-saving (and yoursewingsaving)trouble-toolsandproductsinyourroomtomakecompletingprojectsabreeze. Before fusing the smaller yellow halfcircle, hold it up to a light or window to see the line of the X previously drawn on the interfacing’s paper backing. Using the X as a guide to find the center point, draw a small mark on the straight edge of the yellow half-circle. Remove the interfacing backing paper and line up the mark on the yellow halfcircle with the mark on the edge of the background fabric. Place a small mark in the center of the half-circle’s straight edge. Line up the markings of the small yellow halfcircle and the background fabric square.


With my sewing machine, I’ll use my OLFA 45mm Splash™ Handle Rotary Cutter and OLFA 6” x 12” Frosted Acrylic Ruler With the large and small half-circles fused to the green background fabric squares, the next step in completing the block is to add a decorative stitch along the curved edges.
There are many decorative stitches you could use here, but I like to use a double blanket stitch when doing raw edge applique by machine.
Once I’ve selected the double blanket stitch, I also: • move the needle as far to the right as possible • reduce the stitch length to a two (2) setting • reduce the stitch width to a two (2) Thesettingreason I move the needle far to the right is I find it easier to stitch along the curve by following the edge of the foot, rather than trying to keep the curve centered in the middle of the foot.
OLFA 45mm rotary cutter and OLFA 6” x 12” acrylic
Finish off those windmill blocks with beautiful machine applique stitching
Half-circlerulerwindmill block with edges of the half circles stitched with a double blanket stitches. Sew a decorative stitch along the outer edge of the half-circle. Sew the half-circle edges with a double blanket stitch. Draw a diagonal line on the wrong side of each of the 4” x 4” fabric squares. The next step in completing the blocks is to add the triangle corner piece. Draw a diagonal line from corner to corner on the wrong sides of the (16) 4” x 4” red fabric squares we cut.
Before I start sewing a decorative edge stitch, I put a clear presser foot, such as a satin stitch or applique foot (also referred to as an open toe foot) on my machine.
As to why I prefer a smaller stitch length and width, it’s because I like the way a smaller stitch length and width make a nicer edge finish. Using a coordinating-colored thread, sew along the edges of both the inner and outer half-circles.


Next, with right sides together, place a 4” x 4” fabric square on the corner of each background fabric square, matching edges. Sew along the diagonal line on the 4” x 4” square.
Open the fabric and press the corner triangle towards the outer edge of the
Sew a straight seam along the diagonal line on each 4” x 4” square. Cut excess fabric away ¼” from seam towards the outer corner of the block.
the pressing completed, so are the blocks!
Withblock.all
The OLFA 45mm Splash™ Handle Rotary Cutter and OLFA 6” x 12” Frosted Acrylic Ruler definitely came in handy to finish these blocks. Having the right tools makes creating so much faster and easier.
Press the corner triangle towards the outer edge of the block.
A completed block.
Using your OLFA rotary cutter and OLFA 6” x 12” ruler, cut away the excess fabric ¼” from the seam line towards the outer corner of the block.


Use rulers for quilt marking!
Here are just four of many possible Puttinglayouts. this quilt top together is easy. Most of the layout examples I’ve shown above are all constructed from the same rows. Make four rows using four blocks each, flipping every other row. All seam allowances are ¼”.
• following the edge of a walking foot
your quilt
Note: If the chosen layout does not have alternating rows, I suggest each row should be sewn one at a time to reduce the chances of making a mistake. Next, sew the four rows of blocks together, ensuring each successive row is oriented in the opposite direction from the previous.
Four alternative quilt top block placement settings Make four rows of four blocks each. Completed quilt top
There is no right or wrong choice when it comes to quilting a quilt. We can quilt it ourselves or have it quilted by a professional with a long arm machine. In my case, whenever possible, I prefer to do my own quilting. I may not have the skills of a professional long arm quilter but, with each quilt I quilt, my abilities Asimprove.Iwasworking on this quilt, I thought of all the possible quilting designs I could use to enhance this project. Ultimately, I decided on curved, straight, and diagonal lines. Before quilting, draw lines in the halfcircles. There are many ways to mark curving lines. Curved lines can be made by:
• using plastic circle templates
The blocks are complete and it’s time to assemble the quilt top using my OLFA 6” x 12” Frosted Acrylic Ruler. I still plan to make this quilt according to the original layout, but before I start, I want to play with some other possible layouts for these blocks. Often, we quilters don’t give ourselves permission to play with and change quilt top layouts. We tend to go with what the pattern tells us. I want to give everyone the opportunity to play!
OLFA acrylic rulers and Oliso PRO™ TG1600 Pro Plus Smart Iron A preview of the windmill quilt top layout.
• using a drawing instrument such as a compass • any one of many other possible methods


This quilt proved to be an innovative and eye-pleasing way to create a windmill quilt using half-circles. The blocks were easy to assemble, and the quilt top block layout was fun to play with and sew together!It’snosecret that to make this or any other quilt, the tools used make all the difference.
quilting completed, so is the quilt Finally,top!add the binding to the edges of the quilt. I covered this topic in this postthe-perfect-quilt-binding-by-hand-or-by-https://quiltsocial.com/how-to-sew-machine/
Withapart.the
In the large green background section, with the help of the OLFA 6” x 24” ruler, I drew straight lines going up and down and across at 2½” intervals. The effect of these lines crossing each other creates a grid on the background fabric.
The only sections remaining to quilt are the red triangles. In the triangles, using my OLFA 6” x 12” ruler I drew lines spaced 1”
Quilt along drawn curved lines and outer circle’s Markingedges. straight lines. Drawing quilting lines in the red triangle sections. The blockhalf-circlefinishedwindmillquilt
There are no right or wrong tools; it’s a matter of personal preference. For this quilt, I used a compass to pre-mark my curving quilting lines in the center and the outer edge of the half circles. Once lines are drawn, quilt over the lines
Paul Léger paullegerquilts.com


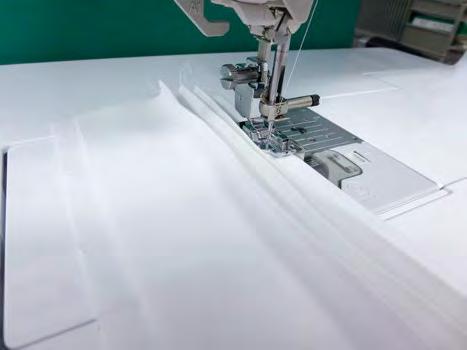
Last month I introduced you to the new Brother Innov-ís BQ3100 machine, also known as “The Achiever Sewing and Quilting Machine”. This machine is one of the Quilt Club series of machines for sewing and quilting. You can check out all the features of the BQ3100 machine by clicking on the Specifications tab on the Brother website. I love creating “new” fabric, so in this feature I’ll show you how to make tucks and pleats to create textured fabric. I had lots of fun experimenting with different methods of making tucks and pleats and made many samples which I then used for this decorative cushion. I’ll share with you all the steps needed so you can make your own custom designed Herecushion.are the basic steps for creating Usepleats.apiece of fabric that is about 12” square.
Jean Boyd Brother Innov-ís BQ3100 machine Finished textured cushion
Creating textured fabric with pleats and tucks
18 | issue 23OUILTsocial


Continue sewing on each line, moving the pleats in the opposite direction on each Here’srow.my finished sample.
Photos by Jean Boyd
Basic pleating technique to create texture Using a fabric marking tool, draw lines that are 1” apart. Press on the lines so you have a series of Usingridges.the quarter inch foot with guide on the Brother Innov-is BQ3100 machine, stitch along the edge of each fold. Then press all the folds flat. Draw lines about 3” apart on the folds. Stitch along the first line, using a straight stitch. Stitch along the second line, this time placing the folds in the opposite direction. The fabric can get quite bulky at this stage, but because I have the automatic fabric sensor key activated on the Brother Innov-is BQ3100 machine, it's no problem to sew through the bulky fabric. The machine automatically detects the thickness of the fabric and adjusts the stitching accordingly.
| issue 23 19OUILTsocial
Draw lines about 1” apart Press on the lines so you have a series of ridges. Stitch on the edge of each fold Stitch across the folds to create the texture. LCD screen showing the activated fabric sensor key


When I started this cushion project, I wasn’t sure how it was going to end up. I just knew I wanted to try several different techniques for creating interesting texture on fabric. Then I was going to sew everything together to make a cushion top. So, there are no exact measurements for the pieces – just work with whatever you have! Now, let’s get started making pleats and tucks using wovens. I started with a 12” square of fabric. I didn’t have to draw lines on the fabric to set up my pleats as I did before on the plain cotton. I just used the design lines on the fabric and pressed on those. Once the pleats were pressed in place, I used a couple of the many decorative stitches on the Brother Innov-is BQ3100 along the edge of each fold. I used the quarter inch foot with guide to help keep my lines of stitching straight. Then I stitched one diagonal line across the pleats, folding them in the opposite direction. What a simple way to create texture on fabric! Here’s another variation on this theme. Again, I used design lines on the fabric to make folds. This time, I folded the pleats toward each other. I used Wonder Clips to hold the edges together.
How to pleat woven cotton fabrics using a sewing machine
20 | issue 23OUILTsocial
Another piece of “new” fabric for my cushion top. And of course my Brother Innov-is BQ3100 machine had no trouble stitching over all the layers, because I had the automatic fabric sensor key activated!Here’sanother way to make pleats and tucks in fabric. This is called an “Eze Pleater” or “Perfect Pleater” I’ve had mine for years and haven’t used it in a very long time but thought it might work for this project.
Wovens are fabrics that have the design made by weaving the threads rather than printing on top of the fabric. Homespuns are a great example of woven fabric. They have the design on both the front and back of the fabric and they add a nice texture to your project. They do fray a little more than “regular” quilting cottons but using Mary Ellen’s Best Press starch alternative will help to stabilize them.
Finished stitched and pleated fabric
Fabric is folded and pressed on the design lines of the fabric Stitch along the folds using a decorative stitch. Stitch a diagonal line across the folds.
I drew guidelines about 2” apart and stitched one row of pleats down.
And here’s what I ended up with!
On the next row, I stitched the pleats in the opposite direction.
Eze Pleater (also known as Perfect Pleater)
Hold folds in place with Wonder Clips


| issue 23 21OUILTsocial Next, I made a piece of pleated fabric that had equal size pleats.
The pleats were stitched down close to the fold. I used the MuVit foot quarter inch foot with guide on my Brother Innov-is BQ3100 machine and stitched along the fold lines.
And here’s the finished piece!
This time, I placed my fabric on the diagonal. This means everything will be on the bias, and you’ll need to handle carefully. The EZE Pleater lets you make pleats of different sizes. You just tuck the fabric in whichever groove you want and then press everything in place. Here’s what my fabric looked like when I took it out of the pleater. I drew some lines on the fabric as stitching guides, and then stitched the pleats in place. Place fabric on the pleater. Draw stitching guidelines on the fabric and then stitch. Tuck the fabric into the grooves of the pleater. Stitch the pleats in place.
Finished pleated fabric Equal sized pleats


Overlap the 2 pieces so you end up with a 21½" x 11½" rectangle (the same size as the cushion front). Layer cushion front and back, right sides together. Stitch along outside edges using a ¼" seam to join all the layers together. Turn the cushion right side out and top stitch along the seam between the border and the pieced cushion sections. For this step, I used the newly-designed MuVit walking foot with the Stitch-inthe-ditch foot on my Brother Innov-is BQ3100 machine so I could stitch precisely on the seam line.
To stabilize the border, I used iron-on interfacing on the back of the border fabric before cutting the border strips.
22 | issue 23OUILTsocial
Four sections sewn together
The border strips were originally cut at 3" wide, but I realized they would be too wide, so I trimmed them to 1½" wide.
My cushion top ended up being 21½" x 11½". The back of the cushion was made using 2 – 11½" x 14" pieces of fabric. I sewed a narrow double-fold hem on one 11½" edge of each back piece.
Border strips backed with iron–on interfacing Sew a double–fold hem along the edge. Stitch in the ditch along the border seams.
Now with everything squared up, I can sew the four sections together. I wanted to add a border all around and I decided to cut the fabric on the bias because I liked the look of the diagonal squares. Pleated fabric Pleated fabric has been trimmed
This project started out by just making samples of various types of pleats and tucks so I could try some new techniques on my Brother Innov-is BQ3100 machine. But now that I had four different samples, I decided to make a cushion. The next step was to figure out how to join everything together. I trimmed each sample piece, so the edges were straight. The green pieces were too small to match the dark blue ones, so I added some plain fabric on the ends to make them larger.
Making cushionone-of-a-kindawiththe Brother BQ3100


Have a look at the MuVit Digital Dual Feed | Brother V-Series Feature Showcase video to see the MuVit foot in action. This is an older video, but it's an excellent guide for using the MuVit foot. The Brother MuVit Compact Dual Feed Foot video shows how well the newly designed foot works. Next, I made a cushion form, stuffed it, and inserted it into the cushion. And here’s my finished cushion!
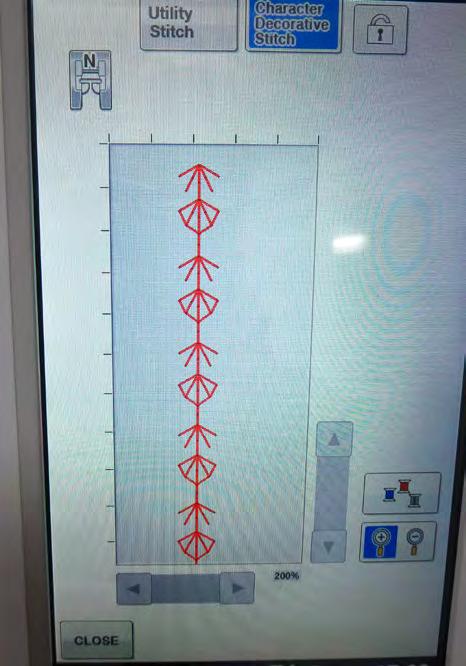
There are several ways to create your own custom stitch. I decided to draw my design free hand rather than use the grid sheets. Here's how to get started: Press the Character Decorative Stitch key at the top of the LCD screen. Then press the key with the little pencil in it. That’s your drawing tool! My Custom Stitch is explained in the manual
I used a few decorative stitches on my cushion, and although there are hundreds of decorative stitches on the Brother Innov-ís BQ3100, sometimes you just need something different. Now, using the exclusive My Custom Stitch feature on this machine, you can do just that!
Finished cushion Use My Custom Stitch to make your own custom stitch
| issue 23 23OUILTsocial
The video, How to Design Your Own Custom Stitch with My Custom Stitch by Angela Wolf for Brother, shows one way to do this. Angela uses the Brother Dreamweaver machine, but the method is exactly the same for the Brother Innov-ís BQ3100. My Custom Stitch is also well explained in the manual included with the machine. There are even some grid sheets supplied if you want to draw your design before entering it in the machine.


Using your finger or a stylus, move the pencil to your starting point and press Set. Move the pencil or use the arrow keys to move to another spot and press Set. Just keep drawing until you have a design that you like.
24 | issue 23OUILTsocial
View of the finished stitch
You can press the magnifying glass at the top of the screen to enlarge the stitch on the LCD screen. Now you can adjust the width and length of your stitch if you wish. You can also edit the stitch by removing some of the points, or you can keep adding to the design.
Close-up of the finished stitch Save the stitch in one of three locations. Custom stitch on fabric
And here’s how my new custom stitch looks on fabric. The design possibilities are endless. Have fun!
Drawing space for creating stitches Draw lines to create stitches.
Now you can see your drawing space. You can draw with the screen in a vertical or horizontal position.
When you press the Test key, you can see a close-up look of how your stitch will look on fabric.
When you're satisfied with your design, press the Memory key to save it in the machine, on a USB stick or in your computer
The key with the pencil is your drawing tool


You can see a preview of how the stitch will look on fabric. And here’s how my new stitch looks when I stitched it on fabric. I also experimented with changing the width and length of the stitches. My custom designed stitch on fabric
Let's have a look at how to use the custom stitches on the CD included with the machine, so you can create even more unique stitches. There are 30 additional stitches on the My Custom Stitch CD included with the machine. These stitches are another way to help you create your own stitch Retrievedesigns. one of the stitches from a USB stick or your computer (wherever you saved them from the CD). When you see the stitch on the LCD screen, you can edit it. Here’s the stitch I started with.
| issue 23 25OUILTsocial
Doodling with My Custom Stitch on the Brother BQ3100
The CD has 30 editable stitches Custom stitch ready to be edited
One part of the stitch has been erased
Lines have been added to the existing stitch Custom stitch preview Use the Point Delete key to erase lines on the design. I erased one of the design elements here. I added some lines to the existing stitch to create another design.


The Brother Innov-is BQ3100 machine sews straight and zigzag stitches not only forward and backward but sideways. In addition to sideways sewing, this machine also has the capability to stitch diagonally when using a straight stitch. This stitch group is perfect for trendy decorative mending, sewing patches on clothing, and for appliqueing small shapes without having to turn your fabric. But it can also be used for decorative stitching.
26 | issue 23OUILTsocial
First, I drew some house shapes on fabric using a fabric marking pen.
Be#TheSewGoesOnpartofapassionatesewingcommunity.ShareyoursewingandquiltingprojectsonInstagramusing #TheSewGoesOn Share your love of sewing Look for giveaways, supplies and special offers!
This sample was done just by choosing different angles of stitching lines. I never had to move or rotate the fabric. It's like doodling on fabric!
The Brother Innov-ís BQ3100 machine gives you so many ways to be creative with your sewing and quilting. I hope you’ll take some time to try some of these unique features. You'll be surprised
Sideways and Directional Sewing group of stitches Finished stitched houses Jean Boyd patternsbyjeanboyd.com
Another way to create your own decorative stitch patterns is to use the Sideways and Directional Sewing group of stitches.
Here's how I made my small sample.


27 Photos are for illustration purposes only. Brother and its logo are trademarks of Brother Industries, Ltd., Japan. All specifications are subject to change without notice. All registered trademarks referenced herein are the property of their respective companies. ©2020 Brother International Corporation (Canada) Ltd. 1, rue Hôtel de Ville, Dollard-des-Ormeaux, Québec, H9B 3H6. 09/2020-2020-1065 Light Years Beyond Presenting the Luminaire 2 Innov-ís XP2. Brilliant new quilting innovations and app-based features available from your mobile devices let you find perfection in every stitch. Visit an authorized Brother dealer today to find out more! brother.ca/en/XP2 10 decorative Disney stitches. Enjoy 2-colour quilting sash designs, built-in hexagon shapes for auto split sash, single or triple stitching, and more. 13.1"


Paul Léger
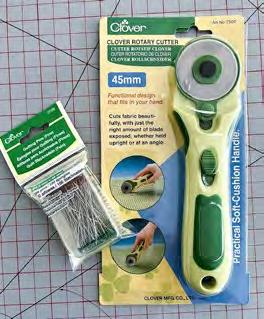
Clover quilting notions and tools
When posting on social media, one never knows what kind of reactions the post will get. Case in point, a few weeks ago I posted a photo of my construction process for multiple half-square triangles (HSTs) using single strips of fabric. That post produced many questions on the technique I used. Coincidentally, at the same time, I was asked to write this feature and what topic I would choose to write about. Well, without missing a beat, I replied that I’d like to write about the various techniques to use when making HSTs.
• CLOVER Chaco Liners
Marvel Avengers Kids in Action quilt project measures 48” x 60” when complete. Marvel Avengers Kids in Action with complementary solid color fabrics.
• GÜTERMANN 26 pc Cotton Thread Set with Storage Box Here’s a look at the quilt I’ll be working on in this feature. It measures 48” x 60” - the perfect size for my neighbor’s newborn son. The accent fabric I selected is called Marvel Avengers Kids in Action, available at your local quilt store. I matched this accent fabric with solid colors I already had in my stash.
Half Square Triangles
To make this quilt, I’ll use some of my favorite Clover notion and tools.
•
The secrets to accurate
CLOVER Quilting Pins - 48mm (17⁄8”)
• CLOVER Thread Cutter Pendant
• CLOVER Rotary Cutter - 45mm (13⁄4”)
• CLOVER Wonder Clips


Note: Although I’ve never had issues with Chaco Liners, all fabric marking tools should be tested on the fabrics to ensure the marks left will brush or wash off.
Now, onwards! For the next step, pair red and blue fabric squares, right sides together. Using a Chaco Liner, draw a diagonal line on the wrong side of one of the paired fabric squares. With lines drawn, sew a ¼” seam on each side of the diagonal line for each pair.
Before going on to the next step, I’ll show you the marking tools I find very useful. I often use Clover Chaco Liners Why? Because I love the fine line they make, and the line easily rubs off the fabric with no effort. They come in regular and pen styles in white, silver, blue, yellow, or pink. Once empty, there are refills available for both liner styles.
• 5⁄8 yard [0.6m] each of two different fabrics for Quarter Square Triangles (yellow and green)
Chaco Liners by Clover. Draw a diagonal line from corner to corner on the wrong side of the fabric and sew a ¼” seam on both sides of the line. Cut sewn squares along the diagonal line, press seams open and trim to 3½” x 3½”.
There are two HSTs on each side of the accent fabric and quarter squares in all four corners of the block. 20 blocks are required to make this quilt.
Note: Unless otherwise mentioned, all seams are ¼”.
Here are the fabric requirements for this quilt:
After sewing all seams, cut along the diagonal line, press open and trim the result to measure 3½” x3½”.
• ¾ yard [0.7m] Marvel Avengers Kids in Action accent fabric
• ½ yard [0.5m] for binding • 3 yards [2.75m] for backing I’ll demonstrate one of the three methods I use to make HSTs. This method takes us back to the basics.
Each block measures 12” x 12” finished. Each HST measures 3” x 3” when finished. When cutting the fabrics for the HSTs, always add 7⁄8” to the finished size. In other words, cut the fabrics into squares measuring 3 7⁄8” x 3 7⁄8” each. If everything is perfect (the cutting, the marking, and the sewing), these measurements result in 3½” x 3½” unfinished HSTs. In my case, while I strive for it, the result is never perfect. So, I prefer to err on the side of caution and cut 4” x 4” squares and trim after sewing. Yes, the trimming means taking an extra step but the resulting HSTs are perfect! From the two fabrics I’m using for the HSTs, I cut 4” wide x width of fabric (WOF) strip. Then, I sub-cut each strip into 4” x 4” squares. I get 10 squares measuring 4” x 4”.
Clover Chaco Liners come in five colors, so there’s always a color that will be visible on any fabric. They are easily applied and equally easily removed after the seams are sewn.
• 7⁄8 yard [0.8m] each of two different fabrics for HSTs (blue and red)
Photos by Paul Léger Completed blocks Cut 4” x 4” squares from a 4” x WOF strip of the blue and red fabrics.


TIP I alongpinningrecommendstronglyoftenthestrip to keep the layers from shifting before and while sewing. I like using fine 1 7⁄8” long Clover Quilting Pins I know not everyone likes using long pins like I do, so, for those who prefer shorter pins, consider using Clover 13⁄8” Patchwork Pins Step 3 By pre-marking the lines, you can simply start sewing ¼” from the diagonal line at one end of the strip, pivoting where the lines meet and keep sewing along each diagonal line until you get to the other end of the paired strips! Step 4 Next, using the Clover 45mm Rotary Cutter, cut along all the drawn lines. Step 5 Press each HST open and trim so the unfinished squares measure 3½” x 3½”. That’s it! Another easy technique to make HSTs using fabric strips. Think of all the HSTs you can make using all the 2½” strip sets you’ve purchased over the years. Two 2½” strips would make 16 HSTs! It’s a great way to use them up.
We’ll work with 4” strips again.
Step 1 Pair one strip of the blue and one strip of the red fabrics, right sides together. Step 2 This time, I won’t cut the strip as I did previously. Instead, I’ll start by drawing horizontal and diagonal lines on the wrong side of one of the paired fabric strips. When I used the 4” x 4” square method to construct HSTs, I cut the squares first, then drew diagonal lines on the wrong side of each fabric square from corner to corner. Draw a horizontal line on the wrong side of the fabric at 4” intervals across the width of the strip. Next, draw a diagonal line from the end of one horizontal line to the beginning of the next. In the next photo, note I drew the lines in a sawtooth design down the length of the strip.
Clover Chaco Liners and refills Quilting pins and 45mm rotary cutter by Clover Draw a horizontal line every 4” along the length of the strip and a diagonal line between each horizontal line. Sew a seam ¼” on each side of the diagonal lines. Cut along all drawn lines to separate the HSTs. Press open and trim each HST to measure 3½” x 3½”.
5 easy steps for making multiple Half Square Triangles at once!
By strips!sewingsewingthepre-markinglines,youcansimplystart¼”fromthediagonallineatoneendofthestrip,pivotingwherethelinesmeet,andcontinuealongeachdiagonallineuntilyougettotheotherendofthepaired
We’ll make multiple HSTs at once using a different technique involving two strips of fabric.
I’ll use Clover Quilting Pins - 48mm (17⁄8”) and the Clover Rotary Cutter - 45mm (13⁄4”)


Gütermann 26-piece 100% Cotton 100m Thread Set with Storage Box
Make multiple Half Square Triangles from fat quarters? Absolutely!
Remember, a FQ normally measures approximately 18” x 21”. Working with 4” x 4” squares, I can get a grid of four rows of five squares (20 - 4” x 4” squares) from one FQ measuring 16” x 20”. Working with yardage gives me some flexibility; I get to choose the dimensions of the piece of fabric I’ll cut for my HST grid. Although my fabric pieces only need to measure 16” x 20”, I like to cut them a bit bigger. I’ll cut a piece measuring 17” x 21” from each of the red and blue fabrics.
Once again, I’ll use Clover Chaco Liners along with my trusty Clover Quilting Pins - 48mm (17⁄8”) and the Clover Rotary Cutter45mm (13⁄4”) Good quality thread is another important notion to have when sewing and quilting. With time, I’ve learned that if I buy good fabric, I should also buy quality threads.
Though it’s true I have a tiny obsession with thread in multiple weights and colors, I most often use 50-weight thread in either grey or cream for piecing mixed-colored fabrics. I’ve found these basics blend well with most colors. That said, I also love to match thread colors to my chosen fabrics whenever I can. Sometimes, while in the midst of working on a quilt, I’ll change the threads to match!
When at home, this is easy. I just open my thread drawer and pick out the color I need. When I’m at a workshop or a retreat and not too sure of the color threads I’ll need while I’m there, I bring my Gütermann 26-piece 100% Cotton 100m Thread Set with Storage Box. With 26 colors, I’m sure to find the color I need.
I’ll illustrate how to make multiple HSTs at once using two wider strips of fabric. I’ll create HSTs using fabric pieces approximately the size of a Fat Quarter (FQ).
Gütermann 26-piece 100% Cotton 100m Thread Set with Storage Box
Let’s get started with today’s HST technique. I won’t begin by cutting 4” strips. Instead, I’ll make HSTs using larger pieces of fabric. With this method, I find it easiest to work with pieces of fabric roughly the size of a Fat Quarter (FQ) fabric. The quantity of HSTs I can create from one FQ depends on the size of the squares needed to make each HST unit. For this project, the squares need to measure 4” x 4”.


Step 1 After cutting the red and blue fabric pieces, draw lines on the wrong side of one of fabric piece with your Chaco liner at 4” intervals both horizontally (across) and vertically (from top to bottom) as shown.
Cut along all drawn lines to separate the HSTs. Press open and trim each HST to measure 3½” x 3½”.
Step 2 The next step is to draw diagonal lines.
Draw lines every 4” across and up and down the cut fabric piece. Draw diagonal lines through each 4” x 4” square. Pin the two layers of fabric together. Sew a ¼” seam on each side of the diagonal lines.
Step 3 With right sides together, pin both layers of fabric using Clover quilting pins. Step 4 Sew a ¼” seam on each side of the diagonal lines. I like using this quick method when drawing the diagonal lines as it allows me to sew one continuous line without having to stop.
Step 5
For efficiency, rather than drawing a diagonal line in each individual square, I start in one corner of the larger fabric piece and draw a diagonal line to the opposite side. Then, I pivot the ruler where the first diagonal line ended and draw the next line. I repeat this step until all the 4” x 4” squares in the grid are marked with a diagonal line.
Cut along all drawn lines to separate the HSTs. Press open and trim each to measure 3½” x 3½” unfinished square. That’s it! Another easy technique for making HSTs. This Marvel Avengers Kids in Action quilt project requires 160 HSTs. Using your preferred HST technique, construct the remaining HSTs. Of the three HST methods I’ve demonstrated, none is better than another, and all are easy to do. It’s up to you to choose one you like best.
Now, I need to count how many HSTs I’ve made so far, so I know how many more to create for this quilt!


THE tool you need for fast and easy chain piecing
Which tools will I use? I’ll rely on Clover Chaco Liners and Clover Quilting Pins48mm (17⁄8”)to mark and pin my fabrics.
Previously, I explained that to make a finished HST measuring 3” x 3”, you need to add 7⁄8” to the total size when cutting the fabric squares to achieve the desired finished size. In other words, the squares need to be cut to measure 3 7⁄8” x 3 7⁄8”. To make a QST measuring 3” x 3” when finished, 1¼” must be added to the total size when cutting the squares. Therefore, cut fabric squares to measure 4¼” x 4¼”. To construct this Marvel Avengers Kids in Action quilt top, 80 QSTs are needed. Therefore, I’ll cut (40) 4¼” x 4¼” squares from each of the yellow and green fabrics. Remember, two QSTs are made from each pair of fabric squares. Cut out squares and, with right sides together, pair each yellow fabric square with a green one. Draw two diagonal lines on the wrong side of one of the fabrics in each pair. After marking, pin the pairs together so they don’t shift. Sew a partial ¼” seam to one side of a diagonal line. Stop sewing when the other diagonal line is reached. Raise the needle and presser foot and shift the fabric and complete the seam ¼” to the opposite side of the same diagonal line. Repeat the same seaming technique on the intersecting diagonal line on each set of paired squares.
Clover Thread Cutter Pendants Draw two diagonal lines on the wrong side of one of the fabrics in each pair. Sew a ¼” half seam on one side of a diagonal line and complete the other ¼” half seam on the opposite side of the same diagonal line.
Note: If QSTs are made from three or four fabrics, it’s very important to be consistent and always sew the seams in the same manner. If the first seam is sewn to the right of the diagonal line, all first seams need to be sewn to the right. For efficiency, my habit is to chain piece when I sew multiple units. When chain piecing five units or less, I don’t mind using scissors to separate them after sewing. When I sew a longer chain of several units, would much rather use the Clover Thread Cutter Pendant!
I was introduced to this handy gadget a few years ago at a quilting retreat. I noticed another attendee was using the pendant and I fell in love with it. As the name says, it’s a pendant and can be worn around the neck. However, I prefer to set mine in a small block of wood. A spool of thread can also serve as a handle for the thread cutter. Sew the second ¼” seam along the other diagonal in the same manner as the first. Set the pendant peg into a block of wood or a spool of thread to create a handle for easier use.
And I’ll also use a Clover Thread Cutter Pendant to cut the linking threads from chain pieced units.


Use the Clover Thread Cutting pendant to cut threads when chain piecing to separate the linked pieces after sewing. Cut along both marked diagonal lines to separate each paired square into four triangles.
Press open and pair two sections to make QSTs. Sew two sections together to create a QST.
To use, simply push the thread down across the pendant. The thread finds its way into the grooves and the recessed blade cuts the thread. After cutting the chain-pieced squares apart, cut the sewn squares into four separate pieces along their marked diagonal lines.
Press of each of the four triangular sections open with all the seams pressed to the same side. Sew two paired triangular sections together to create a QST unit.
QSTs are easy to make and can add interest to any quilt. Using the Clover Thread Cutter Pendant after chain piecing makes QST construction fast and fun. A pendant is a good timesaving investment.


Sewing the pieces together it’s quilt assembly day!
In this segment, here's how I use Clover Wonder Clips when binding a quilt.
The first thing I’ll do today is pair all 160 Half-Square Triangles (HSTs) and sew into rectangular units. Sew a red and blue HST rectangular unit to opposite sides of each of the 20 Marvel Avengers Kids in Action 6½” x 6½” accent squares. Next, sew one of the 80 yellow and green QST units constructed, to opposite ends of the remaining 40 red and blue HST rectangular units.
Note: Take note of which color of the QST is sewn to the ends of the rectangular HST units. Each end has a different color sewn to the HST unit. Next, take the 40 newly constructed sets of QST/HST units and sew them to opposite sides of the accent fabric units. This step creates the 20 blocks needed to complete the quilt top.
Wonder Clips by Clover Pair the HSTs into rectangular units. HST units sewn to opposite sides of the accent fabric. Sew a QST unit to each short end of an HST rectangular unit. Completed blocks


The next technique I’d like to talk about is binding. There’s too much to share, so I invite you instead to check out a series of posts on this topic by Elaine Theriault, starting with THE formula for calculating the necessary yardage for binding your quilt
•
I always enjoy demonstrating easy techniques as I did here. Having the right tools and notions at hand makes creating and demonstrating fun and efficient. I used some of my favorite Clover products. I look forward to highlighting many more in future features.
CLOVER Quilting Pins - 48mm (17⁄8”)
• CLOVER Wonder Clips
I now use Clover’s Wonder Clips. They open easily and have enough strength to secure the binding to the quilt’s edge before it’s sewn to the quilt. These handy clips come in packages of 10, 20, 26, 50 or 100. They also come in jumbo and mini sizes. I suggest you get the package of 50, and you’ll have enough clips for most project needs. With the binding sewn in place, the quilt is finished. I look forward to giving baby Nathaniel his very first quilt!
To complete the quilt top, sew four completed blocks together to create a row. Make five rows. Sew the five rows together to complete the quilt Justtop. like that, the quilt top is complete! Now to get it quilted.
Head out to your local quilt shop to get the Clover notions and tools demonstrated to make your quilting journey smooth and easy.
• CLOVER Chaco Liners
• CLOVER Rotary Cutter - 45mm (13⁄4”) Sew the completed blocks into rows of four and sew the rows together.
One part of the binding process I’d like to quickly cover is the final part – how to finish attaching the binding to the quilt. Once the binding is cut and sewn to the quilt top, it must be turned over the quilt’s edge for the final seam, which can be sewn either by hand or by machine. Over the years, I’ve tried many methods to secure the binding once it’s folded over the quilt’s edge and before I stitch it down. I’ve tried pinning the binding, holding it down with my fingers, and once I even tried using a special glue! Well, some of these methods worked, others not so much.
Use Clover’s Wonder Clips to secure the binding to the quilt before sewing.
Baby loves his new Marvel Avengers Kids in Action Quilt! Photo by Katie Ochin Paul Léger paullegerquilts.com
• CLOVER Thread Cutter Pendant


37


38 | issue 23OUILTsocial Quilt a Modern Blooms wall quilt: Here’s what you need to get started It’s time to sew for home decor! I'm pairing my enthusiasm for my garden with the precision of the PFAFF performance icon to make a wall quilt. A nice, bold, bright one with lots of stitches to make me feel all Whatevergroovy!colors you choose, enjoy the process of adding layers of texture with the built-in stitches of the performance icon. The materials list is organized into a cutting chart to make the best use of your time. I used 2½” strips from a package of fabrics - you might choose to use leftover strips in your stash to make your wall quilt uniquely yours. Use the chart below to get your pieces ready. color purple 8 blocks pink 3 blocksorange 3 blocksred 2 blocks middle fabric8 - 2 ½” squares 3 - 2½” squares 3 - 2½” squares2 - 2½” squares light 8 - 2½” x 4½” strips (36) 16 - 1½” x 2½” strips (40) 3 - 2½” x 4½” strips 6 - 1½” x 2½” strips 3 - 2½” x 4½” strips 6 - 1½” x 2½” strips 2 - 2½” x 4½” strips 4 - 1½” x 2½” strips dark 8 - 2½” x 4½” strips (36) 8 - 2½” x 6½” strips (52) 3 - 2½” x 4½” strips 3 - 2½” x 6½” strips 3 - 2½” x 4½” strips 3 - 2½” x 6½” strips 2 - 2½” x 4½” strips 2 - 2½” x 6½” strips materials fabric • 28” x 32” [71 x 81cm] batting • 28” x 32” [71 x 81cm] backing fabric • 2 - 8” x 6” [20 x 15cm] fabric for hanging sleeves • 104” [264cm] of 2½” strips of fabric for binding thread • piecing thread • quilting thread to blend in or contrast with fabrics (I used green, purple, pink, yellow, orange) notions • INSPIRA Fast & Easy Tear-A-Way Light Stabilizer • UNIQUE Rick Rack • cutting mat • quilting ruler • rotary cutter equipment • iron • ironing board PFAFF performance icon Modern Blooms wall quilt Fabric choices for Modern Blooms wall quilt Sarah Vanderburgh Photos by Sarah Vanderburgh


Simple patchwork is enjoyable and calming. My project has no curves or triangles. Perfect for stress free quilting.
:
White
2. Continue with the same Patchwork Program stitch. Sew a second light fabric 1½” x 2½” strip to the opposite edge of the middle square. Press the seam from each step to the strips. When I’m chain piecing, I like to use the Needle Up/Down button so the needle always goes down when I stop. This makes me confident my pieces won’t move as I set the next block in position. I also use the ¼” Quilting Foot for IDT System to keep an eye on the edge of my pieces and my seams accurate. This foot engages with the IDT System which feeds the fabric layers evenly under the needle.
| issue 23 39OUILTsocial
To make one block, you need the following fabric pieces: center 1 - 2½” square Light purple 1 - 2½” x 4½” strip and 21½” x 2½” strips purple 1 - 2½” x 4½” strip and 12½” x 6½” strip Patchwork Program
Dark
PFAFF Patchwork Program
makes chain sewing fast and easy
Clear instructions, diagrams and even videos are part of the built-in User’s Guide on the performance icon. After reading through the instructions, I was ready to set up the machine to start my chain piecing, programmed stitching.
To chain sew pieces, repeat each step 8 times before moving to the next one.
It’s been a while since I last used the Patchwork Program, but I remembered that you can access the user guide instructions by touching the question mark then selecting the item you want more information on. In this case, I can easily press and open up the User’s Guide right to the Patchwork Program for a refresher.
The PFAFF performance icon built-in Patchwork Program lets you set a length of sewing as a programmed stitch. Then, using the Start/Stop sewing button, you can have the machine do all the work, sewing accurate seams and stopping for you to put the next set of fabrics in place.
3. Reset the Patchwork Program by pressing the Patchwork Program on the Stitch Repeat menu again. Program the new seam length with your first set. Sew the light 2½” x 4½” strip to the right side of the unit - see photo. Press the seam to the strip.
1. Sew 1 light fabric 1½” x 2½” strip to one side of the middle fabric 2½” square.
I’ll share with you a built-in program on the PFAFF performance icon that makes sewing seams of similar lengths even easier - and fun!
I used this program to sew the purple blocks together. Make the purple blocks
Patchwork Program popup on the Multi-Touch screen User’s Guide open to Patchwork Program on the Multi-Touch Screen Chain piecing the second light fabric strip to the opposite side of center fabric Sew the light 2½” x 4½” strip to the right side of the unit.


4. Continue with the same Patchwork Program stitch. Sew the dark 2½” x 4½” strip to the top edge of the unit - see photo below. Press the seam to the strip.
5. Reset the Patchwork Program for the new seam length with your first set. Sew the 2½” x 6½” dark strip to the right edge of the unit - see photo. Press the seam to the strip. The block should measure a 6½” square. The purple blocks are completed quickly thanks to the Patchwork Program. So quickly, in fact, that I decided to keep using the program to start the bright Repeatblocks. steps 1 and 2 to start sewing the bright blocks together too! There’ll be 2 red, 3 pink, and 2 orange fabric blocks. Use pairs of the same 1½” x 2½” fabric strips to complete the steps.
Completed purple blocks
The Patchwork Program on the PFAFF performance icon makes piecing a dream. These blocks are quick to make and you may want to make more to make a bigger project - the piecing takes less time than cutting the fabric thanks to the performance icon’s Patchwork Program.
Yellow centers and fabric strips for bright blocks
40 | issue 23OUILTsocial Shorter dark fabric strip to sew to the top edge of the unit.


You can easily remove the needle plate after lifting the front right edge with the small screwdriver included with the machine.
Modern Blooms wall quilt as couch topper
The magic how to) of Floating Stitches for your quilt projects
| issue 23 41OUILTsocial
Pink, orange and red block units with light fabrics Machine pop up when a non-straight stitch is Liftingselectedthe front right corner of the needle plate with a small screwdriver to remove it
Needle plate storage in base of accessory tray
I’ll add extra details to the purple blocks when I quilt the top. But for the rest of the colorful blocks, I want to add decorative details while I piece the block units together. How? It’s easy with the hundreds of built-in stitches on the PFAFF performance icon I decided quite early in this project that the delight would be in the details. Keeping all the block construction the same meant I could spend more time playing with the performance icon’s menus of stitches. To take a peek, check out the stitch chart: PFAFF performance icon stitch chart (opens as a pdf) With the first two strips of light fabric added to the remaining blocks, there’s only one more strip of light fabric to add. Sew the final light strip Sew the light fabric 2½” x 4½” strip to the right side of the unit. Press the seam to the Repeatstrip.with each of the 8 bright blocks. Now to the decorating! With my white thread ready, I started my search through the decorative stitch menus to find something that would work in a playful garden. When a non-straight stitch is selected, a pop up shows up on the Multi-Touch screen to prevent damage to the machine; the standard needle plate needs to be on the machine for these stitches.
The extra needle plate is stored in the base of the performance icon so it’s always with the machine. I love this feature!
(and
The standard needle plate has a wider opening for the needle to accommodate stitches that move the needle across the fabric. Now we’re ready to start scrolling and choosing stitches to use on the wall quilt. Some of my favorites to include while sewing block units together are the floating stitches. I decided to select floating stitches to complement the pattern designs in my fabrics.
Standard needle plate Floating stitches menu on the Multi-Touch screen


I put a piece of stabilizer under the center of the block as recommended on the Multi-Touch screen. I used the green thread because I used the green thread on the orange blocks already. Using the Start/Stop button, the machine stitched while I kept the block straight, and the performance icon accurately stitched out the frog stitch.
Floatingstitching stitches on the right side of the fabric Various creature stitches in the Sequence Creator on the Multi-Touch screen
Floating stitches on the wrong side of fabric after
Completed bright blocks for wall quilt
Frog stitch with commands on the Multi-Touch Orangescreen blocks with a decorative stitch in the center
42 | issue 23OUILTsocial
Gently tear away the excess stabilizer from the back around the stitches. Repeat this step using the same floating stitch with the 2½” x 4½” strips on the remaining pink units. Then sew the dark pink 2½” x 6½” strips to the right side of each unit with the same floating stitch to complete these units. Press the seam to the strip and remove the excess stabilizer.
I chose a different floating stitch for the orange and another one for the red blocks and changed thread colors for each too. I used green thread on the orange and yellow on the red. Sew each set of blocks with the selected floating stitch, first adding the 2½” x 4½” strips to the top and then the 2½” x 6½” strips to the right. Add a stitched surprise. I added a fun stitched surprise to the center of the orange blocks. There are just too many cute stitches to not include a few on this project. Continuing with the garden theme, I went through and selected a few different stitches to compare their sizes. To do this, I opened the Sequence Creator to compare the stitches with each other right on the Multi-Touch screen.
I selected and stitched a different critter for each of the orange blocks.
Sew the dark fabric 2½” x 4½” strip to the top edge of the unit. Before opening the seam, all of the floating stitches are on the wrong side of the fabric. Here’s what the floating stitches look like when you’re finished sewing. Now gently pull the fabrics apart to reveal the stitches on the right side of the block. The batik fabric made it easy to pull the stitches up fully; you can also iron this seam to get it flat.
The variety of stitches on the PFAFF performance icon means you can create a themed wall quilt for any occasion.
Use Floating Stitches to sew dark fabric strips Start with pink. For the pink batik, I picked the dots or circles, and used white thread so they would show on the fabric. The floating stitches can be sewn two different ways depending on if you’re using one fabric or two. In this case, I’m sewing two pieces together and using the 1A presser foot. The instructions are in the User’s Guide too! For best results, use a piece of INSPIRA Fast & Easy Tear-A-Way Light Stabilizer on the bottom of the fabric set.
Finish with orange and red
I had to pick the frog! Using the Sequence Creator program lets me insert commands like Stop, so only one frog stitches out. I can add commands to tie and cut the threads too.


| issue 23 43OUILTsocial Adding a little something extra to your quilt:
rick rack placement on green fabric to sew between fabrics IDT System engaged ¼” Quilting Foot for IDT System Blocks sewn into columns
Assembled quilt top
Sewing the rick rack between the green fabric strips and purple blocks Cut the green rick rack into 86¾” long pieces. Line up one piece along the top long edge of a green 6½” x 2½” strip. Put a few pins in the rick rack to secure it in place. Then lay a purple block right side down and pin in place.
Sewing the columns together The next step is to sew the columns together, again pinning and using the ¼” Quilting Foot for IDT System. This time I pressed each seam to the right. The top should measure 24½” wide x 28½” tall.
Sewing the blocks together in columns Next, sew the blocks together in columns. I pinned the blocks and used the ¼” Quilting Foot for IDT System for precise piecing. Press seams to the purple and the green fabrics to create nesting seams for joining the columns together.
Quilting preparations Before you sandwich the quilting layers, sew around the edge of the quilt top about 1⁄8” to secure the outer seams. I use the Stitch Edit menu and make my stitch length 3” for this step. Then it’s time to layer the batting and backing, ensuring they extend past the edges of the quilt top. It’s recommended to have about 2” all the way around the quilt top when you quilt on a domestic sewing machine like the performance icon. Use your preferred method for securing the three layers together - I use pins. Secure the layers at least every 2” including along the edge.
Here’s
why you should!
Modern Blooms block layoutGreen
Assembling the quilt top I laid out the completed blocks on my design wall and had second thoughts. Originally, I designed this wall quilt without the green, but it just wasn’t working for me. I needed to hint at the green leaves that support early blooming flowers by adding some green fabric. At this point I knew I wanted to add rick rack. Now, adding it to lay against the green fabric helps it be seen. Yay for having more fabric on hand! Lay out the blocks as shown on my design wall below. Notice there’s a green strip of fabric beneath each purple block. Also notice that all of the purple blocks are turned with the center fabric at the top; all of the other blocks have the center on the left.
I have no problem sewing this thick layer under the needle of the PFAFF performance icon with the IDT System that evenly feeds the fabric layers. Press the seams to the purple block. Repeat to sew the rick rack between each green fabric strip and purple block.


Modern Blooms wall quilt ready for quilting
Red guide marks on Presser Foot 2A
Quilting to secure the layers To secure the layers, I quilted in the ditch of the seams between the blocks going across the quilt. I used the Clear Stitch-inthe-Ditch foot For IDT System and white thread. I decided to quilt the vertical seams going down the quilt with green thread and a stippling stitch to look like stems. Maybe vines? I had fun! The great thing about the Multi-Touch screen is that it allows you to see the selected stitch before you sew with it; I picked the larger serpentine stipple because it has symmetry. There are more serpentine stitches to choose from in the Quilt Stippling menu.
The red guide marks on the Presser Foot 2 help with lining up the needle right at the beginning edge of the green fabric at the seam. Starting the stitch in the same spot on each green fabric is easier thanks to the guides. I also used the edge of the foot to keep a consistent distance from the edge of the green fabric. One trick I used when quilting the green fabrics
Now it’s time to start quilting the blocks. With so many quilting options on the performance icon I decided to quilt each color of block differently. For the purple blocks, I used a built-in stipple stitch and purple thread. I used the Stitch Restart button to start the stitch in the same place each time - this lets me keep the look of each block consistent. I like to use a curvy quilting motif with straight patchwork seams - here I think it suggests the flowy edges of flower petals.
Large symmetrical serpentine stitch on the MultiTouch screen
Add decorative stitch to green fabric Next, I wanted to enhance my vines with some leaves in the green fabric areas. There are again, many choices of leaf stitches. I initially chose a busier stitch with more leaves, then changed to this simpler one because it appears better as leaves from far away. The Multi-Touch screen makes it easy to see where the stitch starts; you can line up your needle on the fabric to match where you want the stitch to be sewn. In this case, the stitch starts in the center.
Chosen leaf stitch in Sewing Mode
Leaf stitch on green fabric
Mirror function activated with Stitch Edit
Quilt and bind with the PFAFF performance icon: What features make it easy
Quilt the purple blocks
44 | issue 23OUILTsocial
The green fabric on the bottom right of the wall quilt is at the edge. I used the mirror feature to change the direction of the stitch so I could put the top under the machine in an easier to hold position. I love the mirror function, and was so glad I thought of it when I got stuck figuring out how I was going to support the quilt and get a nice stitching line!


Free-motion quilt the pink blocks
I had to take advantage of all the free-motion quilting options on the performance icon. For the pink blocks, I used my go-to free-motion foot, foot 6A. The free-motion quilting menu has four different free-motion quilting foot options.
I used pink thread for the quilting and made large curves to look like large petals. It was tricky to photograph the pink thread on pink fabric, but you can see the results in the final picture. Stipple quilting stitch on purple flower blocks
Open Toe Free-motion Foot
Free-motion quilting option for Foot 6A
| issue 23 45OUILTsocial
Presser Foot 6A
Quilting on a red block with yellow thread Quilted orange block For the red blocks, I switched to yellow thread so my results would show - I learn fast. I also tried out a different foot - the Open Toe Free-Motion Foot. This time I also quilted in the yellow center and went in a spiral, then out into the red fabric to quilt petals. I added an inner loop in each petal too. I will admit that it takes a bit more practice to quilt well with the Open Toe Free-motion Foot. I ended up switching back to the Presser Foot 6A to quilt in the orange blocks. This time, I added a bit more quilting and think the added texture to this block makes it more interesting. Even though I used orange thread, the volume of quilting shows better on these blocks. You can see I did repetitive parentheses to make overlapping rows of petals. These might be my favorite blocks on the wall quilt. The orange block reminded me that I actually added even more decorative stitching to the orange blocks! When I finished stippling with the green thread, I also added decorative stitches around the centers of the orange blocks. I just couldn’t resist giving the little critters some decor.


Trim and bind
The quilting fun is over and it’s time to trim the top. Carefully trim making sure to keep the top square. I use the markings on my ruler and match them up with my seam lines as I go. Then it’s time to add binding. Before adding the binding, I make my hanging sleeve, or in this case, sleeves. I cut two shorter ones to save on fabric. I’m mentioning the sleeve now because I sewed the binding to the back and then the front with the machine so I need to pin the sleeves in place at this point. Not everyone is comfortable or wants to bind their projects with the machine, but I find it's the best way for me to get things done! Wall quilts are a great way to try out machine binding as it is a smaller project to maneuver. The performance icon can easily handle the bulk of the binding fabric and quilt top layers to make it an enjoyable task as well. I pin my sleeves in place along the top edge, then start pinning my binding along the back of one side of the wall quilt. I usually start in the middle right edge. I love using the Perfect ¼” Foot with Guide for IDT System to sew my binding on. Really, click on it to see why they called it perfect - it’s hard to not get a ¼” seam with it! Sew your binding to the back of the quilt just like you would normally when starting on the front. Then when you’re done, pull it over to the front and stitch it in place. On this quilt, I used green thread and the regular straight stitch - you can also use a blanket stitch or other decorative stitch. The key is to sew very close to the left edge of the binding so the front stitches don’t even show on the back. To do this close stitching, I use the inner metal groove on the left side of the ¼” Quilting Foot for IDT System as my seam guide. I love the precise results I get with the PFAFF performance icon ! The Modern Blooms wall quilt is complete.
46 | issue 23OUILTsocial Perfect ¼” Foot with Guide for IDT System Sewing binding to the front with the ¼” Quilting Foot for IDT System


| issue 23 47OUILTsocial Quilting a project from start to finish on the performance icon always makes me happy. Modern Blooms wall quilt Sarah Vanderburgh sewjoycreations.com

BEST WORLD’WORLD’CLASSINSFIRSTSFIRST 48


| issue 23 49OUILTsocial BLOCK 10 BLOCK 11 BLOCK 12 The instructions to all 12 Spectrum QAL Blocks in 3 different fabric lines have all been published on QUILTsocial.com. You can still access these by visiting QAL 2020 Spectrum Show us your quilt blocks with #TheSewGoesOn These blocks are linked for quick access to the instructions on QUILTsocial. All of Pam Voth's QAL quilt blocks can be found on QUILTsocial! See what she has to say about making these sparkling quilt blocks from a beginner quilter's perspective. Block 10 Block 11 Block 12 Below are Claire's original designs for her blocks 10 through 12.
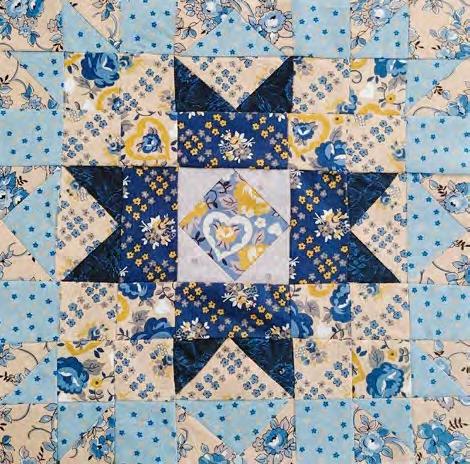


50 | issue 23OUILTsocial BUSINESS DIRECTORY To list your business in this space please call 1.866.969.2678. BramptonCANADA Sew & Serge 289 Rutherford Rd S, Unit 7, Brampton, ON L6W 3R9 905.874.1564 bra mptonsewnserge.com monique@bramptonsewnserge.com Welcome to Your One Stop Sewing Centre! We are authorized dealers of Baby Lock, Husqvarna Viking, and Singer sewing machines and sergers. We also offer a full schedule of sewing classes for everyone. Brandon Sewing Centre 821 Princess Ave, Brandon MB R7A 0P5, 204.727.2752 Bytowne Threads - Ottawa, ON 1.888.831.4095 byt ownethreads.com mlj@bytownethreads.com Featuring Aurifil thread from Italy. Long staple Egyptian cotton threads - 270 colours in 12, 28, 40 and 50 wt; 88 colours in 80 wt. Polyester Aurilux - 240 high sheen colours. Wool threads - 192 colours. Many kits available. Check our website! Canadian National Fabric - Brampton, ON https://canadiannationalfabric.com/ info@canadiannationalfabric.com We are an online fabric shoppe offering a wide variety of fabrics, patterns, books and notions for all your sewing needs. Flat rate Canada wide shipping of $5. Shop in person available by appointment! Carellan Sewing Centre 1685 Corydon Ave, Winnipeg MB R3N 0J8 20 4.488.2272, facebook.com/CarellanSewingCentre Country Concessions 35 King Street N, Cookstown, ON L0L 1L0 (new address) 705.458.4546, countryconcessions.com Gitta's 271 Lakeshore Rd E, Mississauga, ON L5G 1G8 905.274.7198 gi ttas.com questions@gittas.com Nestled in the east village of Port Credit, Gitta's is the place where stitchers meet with their stitching friends, shop for stitching supplies and see the new stitching designs from Europe and the United States. Hardanger House, designs by Betty Stokoe Oldham PO Box 1623, Penhold, AB T0M 1R0 403.742.2749 bettyoldham53@gmail.com tnplisting.com/hardanger-house Hardanger embroidery charts and kits. Designs feature contemporary adaptations of this traditional cutwork embroidery from Norway. Shop online at etsy.com/shop/ HardangerHouse. Some digital downloads available. Haus of Stitches 626 Main Street, Humboldt, SK S0 K 2A0 306.682.0772 or toll-free 1.800.344.6024 hausofstitches.ca Our one of a kind store offers everything you need for sewing, quilting, knitting, rug hooking and needlework. Authorized dealers for Janome and Elna. K & A Quilt Studio 90 Samnah Cres, Ingersoll ON N5C 3J7 (New Location!) 519.425.4141 kaquiltstudio.com Where friends and creativity meet! Authorized distributor of Husqvarna VIKING sewing machines, and a Kimberbell Certified Shop. We stock full collections of quilting fabrics, featuring Northcott and Moda, plus lots of patterns, books, and samples to inspire you! Kelly's Creative Sewing 804 Main St, Dartmouth, NS B2W 3V1 902.435.7380 ke llyscreativesewing.ca kellyscreativesewing@gmail.com We offer sales and on-site service of high-end domestic embroidery, sewing machines and sergers, as well as a variety of educational programs. Ottawa Sewing Centre 1390 Clyde Ave, #107, Ottawa, ON K2G 3H9 613.695.1386 ot tawasewing.com ottawasewing@gmail.com Authorized Dealers for Brother, BabyLock, Elna, Q'nique & Grace quilting frames. Specialize in sales, parts & servicing for all makes & models of quilting/embroidery/sewing/ serger/overlock machines & cabinets by Sylvia Design. Sew Inspired 375 Daniel St S, Arnprior, ON K7S 3K6 613.623.0500 sewinspired.ca info@sewinspired.ca Your Ottawa Valley PFAFF® Authorized Dealer. We have a large supply of quilting & sewing supplies, knitting supplies, as well as in stock PFAFF® sewing machines. We also have a listing of sewing and quilting classes. Sew With Vision 480 Parkland Dr, Halifax, NS B3S 1P9 902.479.2227, se wwithvision.net Stitch By Stitch 550 Days Rd Unit 1, Kingston ON K7M 3R7 613.389.2223, stitchbystitchkingston.com That Sewing Place 16610 Bayview Ave #10, Newmarket, ON L3X 1X3 905.715.7725, th atsewingplace.ca The Quilt Store / Evelyn's Sewing Centre 17817 Leslie St, Unit 40, Newmarket, ON L3Y 8C6 905.853.7001 or toll-free 1.888.853.7001 The Quilt Store West 695 Plains Rd E, Unit 6, Burlington, ON L7T 2E8 905.631.0894 or toll-free 1.877.367.7070 thequiltstore.ca Now with 2 locations to serve you, we are your Quilt Store Destination! The staff here at The Quilt Store is always on hand to provide Quilt Wisdom, Quilt Inspiration and most of all we pride ourselves as the place to make... All Your Quilt Dreams Come True! The Stitcher's Muse Needleart #101 - 890 Crace St, Nanaimo, BC V9R 2T3 250.591.6873 thestitchersmuse.com info@thestitchersmuse.com A divine little shop with supplies for all your hand stitching needs! Friendly, knowledgeable, helpful staff. Cross stitch, canvaswork, needlepoint, embroidery, counted thread, lace making & more. Books, patterns, fabric, threads, tools. The Yarn Guy 15 Gower St, Toronto, ON M4B 1E3 416.752.1828 or toll-free 1.800.836.6536 theyarnguy.com in fo@sewknit.ca See us on Facebook, follow us on Twitter! Knitting machines, sewing machines, repairs, parts for Passap, Studio, Singer, Silver Reed, Superba, White. Sewing notions and supplies, books, ball yarns, coned yarns, TAMM yarns, Paton's yarns, Bernat yarns, Phentex yarns, Bernat kits & crafts. Upper Canada Quiltworks – Quiltworks Studio PO Box 64, Brockville, ON K6V 5T7 613.865.7299 uppercanadaquiltworks.com uppercanadaquiltworksstudio@gmail.com Quilt patterns and books, fabric and notions, felted wool, wool kits, punchneedle patterns and supplies and Valdani embroidery floss. Workshops in quilting, punchneedle, wool applique, rug-hooking, sewing, sign painting & more! UNITED STATES A Quilter's Folly 8213 Brodie Ln #100, Austin, TX 78745 512.899.3233, aquiltersfolly.com A-1 Singer Sewing Center 1012 S Oliver St, Wichita KS 67218 316.685.0226, a-1singer.com Charlotte Sewing Studio 1109 Tamiami Trl Unit 2, Port Charlotte FL 33953 941.235.3555, charlottesewingstudio.com Close to Home Sewing Center 277 Hebron Ave, Glastonbury CT 06033 860.633.0721, closetohomestores.com Discount Fabric Warehouse 933 Kanoelehua Ave, Hilo HI 96720 808.935.1234, discountfabricwarehouse.com El Cajon Sew & Vac 1077 Broadway, El Cajon CA 92021 619.442.2585, sewezr.com Hursh's Country Store 2425 W Main St, Ephrata PA 17522 717.721.2575, hurshscountrystore.com Jessamine Quilt Shop LLC 1301 Old Cherokee Rd, Lexington SC 29072-9047 803.490.1031, jessaminequiltshop.com JS Linen and Curtain Outlet 1250 Northside Dr, Statesville NC 28625 704.871.1939, jslinenoutlet.com/js-quilt-shop Just Sew Studio 51 Third St NE, Waite Park MN 56387 320.654.1580, justsewstudiomn.com Keeping You Sewing 226 4th Ave S, Clinton IA 52732 563.242.6135, keepingyousewing.com Lone Star Quiltworks 4301 S Texas Ave, Bryan TX 77802-4360 979.595.1072, lonestarquiltworks.com Maryland Vacuum and Sewing Center 26845 Point Lookout Rd (Rt 5) Leonardtown MD 20650 240.309.4019, mdvacsew.com New England Sewing 501 Hartford Rd, Manchester CT 06040 860.647.8119, nesewing.com Options Quilt Shop 102 E Commerce St, Jacksonville TX 75766 903.586.9546, optionsquiltshop.com Paramount Sewing & Vacuum 3960 Rickey St SE, Salem OR 97317 503.990.8186, paramount-sew-vac.com Pick Your Stitch 6701 Manlius Center Rd, East Syracuse NY 13057 315.437.0962, pickyourstitch.com Quality Vac and Sew 1213 Gilmore Ave Ste E2B, Winona MN 55987-2632 507.452.2203, qualityvacandsew.com Quilter's Attic Sewing Center 118 Maple Ave, Pine Bush NY 12566 845.744.5888, quiltersattic.com Quilters' Corner @ Middlebury Sew-N-Vac 260 Court St Ste 4, Middlebury VT 05753 802.388.3559, middleburysewnvac.com Quintessential Quilts 940 East Main St, Reedsburg WI 53959 608.524.8435, qquilts.com Select Sewing 2415 East 65th St, Indianapolis IN 46220 317.255.6332, selectsewingservice.com Sew Special 688 W Main St, Uniontown PA 15401 724.438.1765, sew-special.biz Sew What? Fabric Shoppe 7 W Front St, Addison NY 14801 607.359.4308, sewwhatfabricshoppe.com Sewing Solutions 1505 S Glenburine Rd, Ste G, New Bern SC 28562-2689 252.633.1799, sewingsolutionsnc.com Sierra Sewing, Quilting, and Vacuums 8056 S Virginia St Ste 6, Reno NV 89511 775.823.9700, sierrasewing.com Singer Factory Distributor 4914 W Irving Park Rd, Chicago IL 60641 773.545.6834, singerfactorydistributor.com Suddenly Sewing 5850 Kroger Dr Ste 110, Fort Worth TX 76244 817.741.5400, suddenlysewing.com Thimbelina's Quilt Shop 118 North B St Ste B, Livingston MT 59047-2662 406.222.5904, thimbelinasquiltshop.com Wise Monkey Quilting 501 Hwy 39 N, Denison IA 51442 712.393.7979, wisemonkeyquilting.com
Store dull or nicked blades in an old blade container for the purpose of cutting non-fabric materials.
51OUILTsocial | issue 23
Take an old unused rotary cutter and write the word paper on it. As some scissors are only to be use with fabrics this rotary cutter will only be used for paper or other non-paper / nonfabric materials.
PAUL’S TIPS
upandfabricFollowingcuttingtrimmingItrycleaningthematasbestasIcan.
When packing a sewing machine for a class or retreat use an empty toilet paper roll to store the power cord. This trick will keep the power cord from tangling itself.
I also use toilet paper rolls with my irons when putting it away and even with small extension cords.
Using a lint roller to get the last of the thread and bits is so much easier than trying to pick it all up.
Paul Léger paullegerquilts.com
There’s always something left on the mat.


Visit www.ANPTmag.com to order! QUILT SEW KNIT CROCHET CROSS STITCH EMBROIDER HOOK RUGS A NEEDLE PULLING THREAD Get quilting!


