* 4 ways for weaving in ends when using chenille yarn, big or small
* substituting yarns when knitting from a pattern: How to make the switch

* wood, metal, straight or circular: Which knitting needle is best for you?
* knitting swatches for gauge, needles, color, and pattern: It’s important
cardigan · T-shirt · house coat · poncho · woven blanket · Issue 16 KNITTING with UNIVERSAL YARN BELLA CHENILLE BIG MAGNOLIA
...to K, is to KNITmuch Hello sweater weather! Knit this cozy Cabled Poncho NOW! with LION BRAND WOOL-EASE THICK AND QUICK
EDITOR-IN-CHIEF, ART DIRECTOR
Carla A. Canonico Carla@KNITmuch.com
ADVERTISING SALES
John De Fusco John@KNITmuch.com
PUBLISHER
A Needle Pulling Thread
PHOTOGRAPHERS
John De Fusco, Carla A. Canonico, Contributors
BLOGGERS/CONTRIBUTORS
Cindy O'Malley cindooknits.blogspot.com
Cynthia MacDougall ktogdesign@gmail.com
Fiona Stevenson www.fionaknits.com
GRAPHIC DESIGN
Carla A. Canonico Carla@KNITmuch.com Sondra Armas Sondra@KNITmuch.com
SOCIAL MEDIA and WEB Sondra Armas Alejandro Araujo
WEBSITE / BLOG : KNITmuch.com
Like us on Facebook : KNITmuch
Follow us on Twitter : @KNITmuchmag
WHERE TO GET YOUR COPY
KNITmuch is a quarterly eMagazine published by A Needle Pulling Thread. It is available free for personal use online at KNITmuch.com
A limited number of printed copies of KNITmuch are available for purchase at select yarn shops and specialty stores. Ask for it at your local shop. KNITmuch is not available by subscription.
YARN SHOPS

If you are interested in carrying KNITmuch in your store, please email John@KNITmuch.com


EDITORIAL Bloggers, designers, and other contributors who would like to be considered for future issues please email Carla@KNITmuch.com with a brief description of your work and your proposed project.
©2022 KNITmuch. All rights reserved. Issue 16. ISSN 2368-5913
No part of this publication may be reproduced without written permission from the publisher.
All designs, patterns, and information in this magazine are for private, non-commercial use only, and are copyrighted material owned by their respective creators or owners.
2 KNITmuch | issue 16
KNITmuch .com Visit and download our free ebook: Cynthia MacDougall's Knitting Essentials! FREE! ALL { daily blog { weekly giveaways { monthly newsletter { quarterly magazine { Facebook page { Pinterest page { ALL of the above! ...to K, is to KNITmuch
KNITmuch
6 Knit Together Motif Magic
10
13
15
Better knitting starts with the right accessories [tools of the trade]
Wood, metal, straight or circular: Which knitting needle is best for you?
Knitting essentials: Why it’s the small things that count
17 3 special little tools for smooth knitting and a professional look
19 Get that warm feeling with this knitted cable poncho [free pattern]
22 Stay on trend with Bella Chenille Big Glimmer: Why this yarn is a favorite!
23
25
27
28
30
31
Knitting large-scale samples: Why it’s an important time saver
4 ways for weaving in ends when using chenille yarn, big or small
What you need to know about knitting with ease (trendy pattern - free)
Modifying a knitting pattern to remove bulk makes this jacket a nice fit
Knitting with the NEW Universal Yarn Magnolia
Knitting swatches for gauge, needles, color, and pattern: It’s important
33 Knit this super cute T-shirt with the NEW Magnolia yarn (free pattern)
35
Substituting yarns when knitting from a pattern: How to make the switch
37 Weaving with Magnolia is as beautiful as knitting with it (It’s a wrap!)
contents
3KNITmuch | issue 16


4 KNITmuch | issue 16 Includes the Premier issue and the latest issue FREE for a limited time only! Download the FREE KNITmuch App! P.S. If you've already downloaded our app, make sure you download our latest issue for FREE, for a limited time only…
editor's letter

Hello, sweater weather!!
My knitting experience is always enhanced come autumn, like getting the call to prepare to hibernate. It's not quite cold, but cool enough that I could use a sweater or poncho right about now!

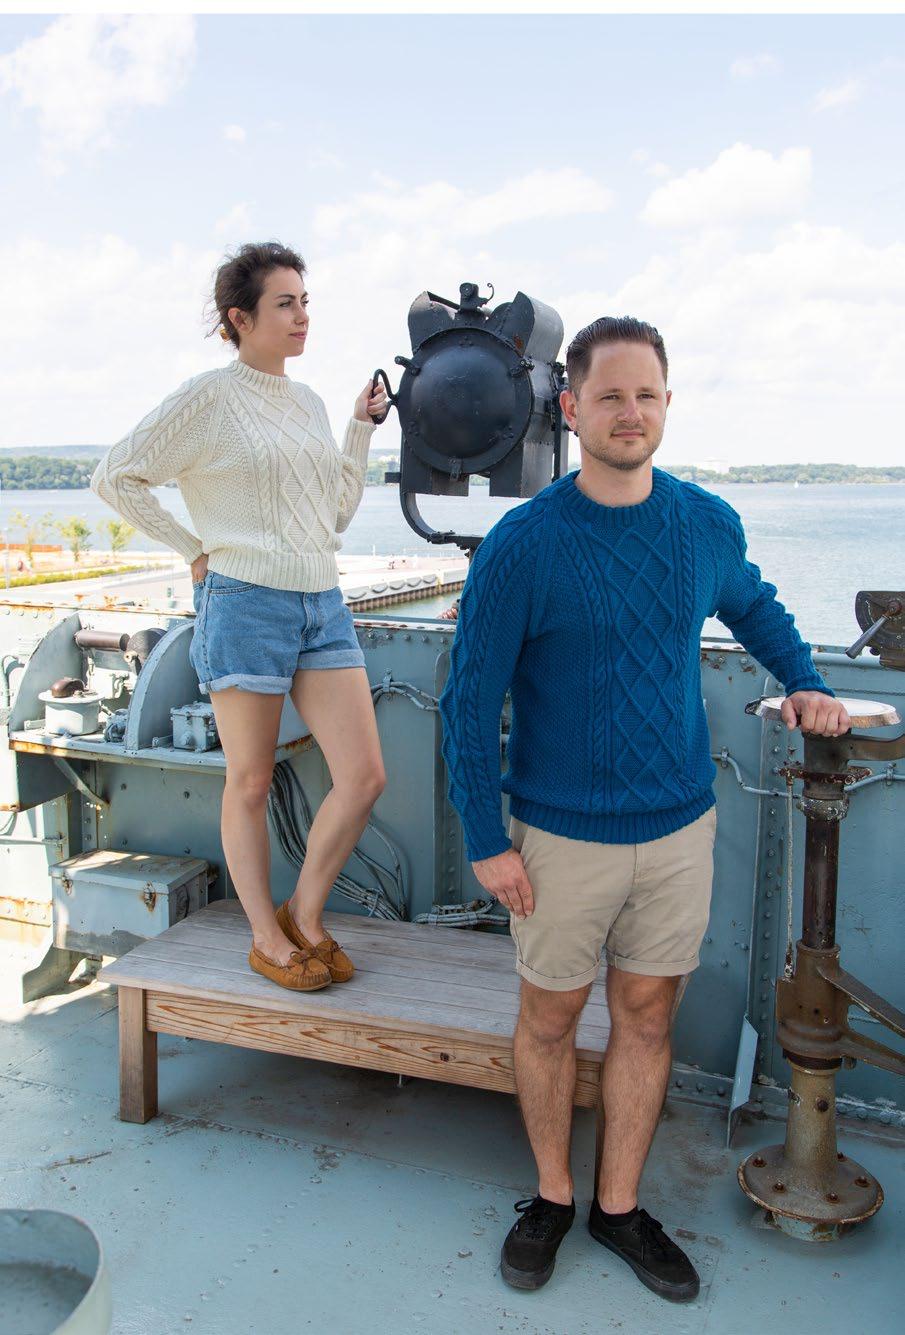
Fiona Stevenson's version of the cozy Cabled Poncho knit up with Lion Brand Yarn Wool-Ease Thick and Quick makes it possible to knit it up quickly and is the perfect knitted accessory for the season.
Also in this issue, Cindy O'Malley proposes knitting with Universal Yarn Magnolia, the Paulie Cardigan by Isabell Kraemer. The yarn is a great match for a feel-good cardi!

In my mind's eye, thoughts of holiday gift ideas are popping up left and right. Will I be able to keep up with my list? I give my head a shake. Although I want to express my love for family and friends it doesn't mean I have to go overboard with my knitting. That’s the other call I get from the fall season is to start knitting accessory items now and finish early to avoid the typical Christmas rush.
For my knitter friends, I'll make it simple: by gifting sought-after knitting tools (or should I say essentials) that they might not have bought for themselves. Keep in mind, that knitters do lose their tools, like stitch markers, interchangeable knitting needle tips, rulers, etc. You have the whole fall season to delve into their needs or wishes without giving yourself up! This is where Fiona Stevenson comes in with her proposed selection of knitting tools. She has written about tools like cable needles, snipping tools and row counters that look like jewelry, and my all-time favorite, the pattern holder!
There are so many tools to choose from, and given as a token of appreciation goes a long way without too much ado.
Enjoy this KNITmuch issue!
Cheerfully,


issue 16
follow me
Knit Together
Motif Magic
Acousin of mine learned to knit in Holland. Because of the language barrier, she never used a pattern – she just saw something she liked and copied or adapted it to suit her needs. Another knitting friend of mine has reached the point where she feels she is ready to learn to read charts. Early in my knitting life, I had a premonition that some day I would design knitwear. The three of us have approached knitting in different ways, and we all get a sense of fulfillment from it.
Motifs are a great way to learn how to read knitting charts. Some knitting charts cover many stitches and rows, but motifs tend to have fewer stitches and rows, often few enough to work into a tension swatch. By working a motif into a tension swatch, the knitter becomes familiar with chart symbols and gets to practice the pattern. From this experience, he or she can decide whether or not to make a whole garment using the motif.
Cynthia MacDougall

Knit Together Design Studio

PO Box 562 Stn Main
Orillia, ON L3V 6K2
ktogdesign@gmail.com
ravelry name: macknitnow
One of the ways I ‘grew’ into designing was to make minor changes to patterns. Later, I learned the joys of ‘doodling with yarn’ and began to make major changes to knitting patterns. Along the way I found that by taking elements from other knitting patterns, and applying them in my own creative way, I could create designs of my own. This last design method is one I like to call Motif Magic.
In knitting, a motif is a small design, often repeated, either on a plain ground or as an all-over design. Motifs can take the form of texture or colour. Colour stranding motifs, like the musical notes and sheep in Photos 4 and 5, offer numerous options. Not only do they work well in many different weights of yarn, they can be applied in numerous ways: perhaps as a border on a sweater body and sleeves, or as an all-over pattern. Traditional fishermen’s ganseys use motifs in the form of knit and purl stitches. See Photo 1. Trees and anchors are among the many motifs used in this form of knitting. Motifs might also be worked in lace, as seen in Photo 2. Alice Starmore and Elsebeth Lavold created motifs using cables in their books, Aran Knitting, and Viking Knits, re spectively. Photo 3 is a cable motif in this style.
The motif in the Victorian Flower Scarf, in this issue, is a lace motif that dates back to Victorian times. The flower is worked using double yarn overs. Decreases are worked on each side of the double yarn over to maintain the stitch count and on the return row, the double yarn over has a knit and a purl stitch worked into it to maintain the correct number of stitches.
The Victorian Flower Scarf shows how one motif can be adapted for use with several weights of yarn. When choosing a yarn for a motif, con sideration should be given to both the size of the motif and the weight of yarn. A motif with small details, such as a colour-stranded motif, can often be adapted readily to a thick yarn. A large motif, such as the lace motif (Photo 2) may be difficult to adapt to a thick yarn due to its size and would best be worked using a fine or medium weight yarn.
The pattern for the scarf was written using the motif as a ‘building block.’ In this case, the mo tif is stacked in vertical columns, but there are many other possibilities that include:
• working only one column, as given for the chunky version of the scarf, but placing it off-center
• varying the number of rows between motifs
• staggering the motifs in ‘steps’
• placing the flower motifs in a chequerboard pattern
• placing a few motifs randomly throughout or only at the ends of the scarf
with Cynthia MacDougall
Photo by Mike Guilbault
Photos courtesy of Cynthia MacDougall.
6 KNITmuch | issue 16
To work many of these options, stitch markers can be used to identify the placement of the motifs. Place a marker in front of whatever stitch will be the start of the ‘block’ of stitches represented on the motif chart.
No matter what approach a knitter takes toward knitting, motif magic is a useful concept. It can be a way for the novice knitter to learn to read charts or for a knitter of any level to enter the realm of knit wear design. Experiment with the Victorian Flower Motif, or find a motif you like in a stitch dictionary and have some fun. Before you know it, you’ll be creating your own original knitting designs! z

Photo 1: The diamonds/crosses, anchors, and hearts in this design represent Faith, Hope, and Charity. These motifs are common elements in Gansey knitting that have been made in worsted weight yarn for this example.


Photo 2: This motif is Scrolls, from A Second Treasury of Knitting Patterns by Barbara G. Walker. Because of the number of stitches and rows for this motif, it would be best worked on fine yarn.

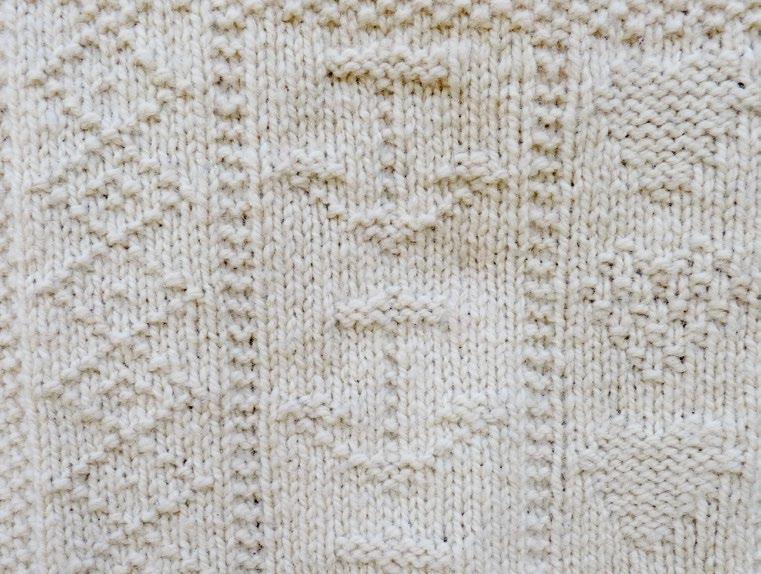 Photo 3: Cable motif.
These motifs are from sweaters designed by Barb Telford of Woodsmoke Woolworks.
Photo 4: Musical notes motif
Photo 3: Cable motif.
These motifs are from sweaters designed by Barb Telford of Woodsmoke Woolworks.
Photo 4: Musical notes motif
7KNITmuch | issue 16


8 KNITmuch | issue 16 Shop the collection at your local knitting supply store. 200+ PREMIUM PRODUCTS IN THE COLLECTION • High quality • Handcrafted from ebony • Liquid silk smooth finish • Durable design • Perfect for beginners AND experienced knitters alike! Discover the NEW knitting needles, crochet hooks, gift sets and accessories from Lantern Moon! gift sets just in t


9 Aran Inspired Scarf Seafaring CablesPullover Smooth Socks KNITmuch | issue 16 Get more knitting fun in ANPTmag.com Inspired by Oceans A NEEDLE PULLING THREAD Issue 60 Sailing
Better knitting starts with the right accessories
[tools of the trade]

Hello again! I’m making a big cozy poncho using delightfully squishy Lion Brand Wool-Ease Thick & Quick yarn in the earthy colorway ‘Kale’ using the free Cabled Poncho pattern by Lion Brand. This yarn really lives up to its name, and this project knits up very quickly! Grab your yarn and your pattern, and now you’re ready to knit...almost. First, you need the right tools for the job. Let me help you find some great accessories to make knitting your poncho a breeze!
As I started on my project, I began to gather all the accessories I need to make it. Most people think that you grab yarn and needles and just go! It’s not that simple. I have a lot of different supplies to get my knitting done right. I’ve invested a good deal of money into ensuring I have the best accessories at my fingertips, and I appreciate every one of them. I often think of a conversation I had with a man who was buying some very expensive knitting needles for his wife. When the total was rung up at the cash register, he didn’t bat an eye at the cost. He said that he was a mechanic, and he understood that he needed to pay whatever it cost to get good quality tools to make his work easier and better. I was impressed and realized I didn’t need to be ashamed of splashing out for the equipment I need to make my knitting more enjoyable, well-knit, and professionally finished.

As I knit my poncho, I’ll let you in on the secret of the tools of the trade that make knitting every project easier and better. Let’s start with the very first tools you need to make this Cabled Poncho: pattern and pattern holder, yarn, and a project bag to keep them all together.
 Making sure you have the right tools for the job gives you the advantage when you knit.
Fiona Stevenson
Photos by Fiona Stevenson
Knit this Cabled Poncho from Lion Brand with Wool-Ease Thick & Quick yarn with a free pattern and advice on what knitting tools to use to make knitting it quick, easy, and fun!
Making sure you have the right tools for the job gives you the advantage when you knit.
Fiona Stevenson
Photos by Fiona Stevenson
Knit this Cabled Poncho from Lion Brand with Wool-Ease Thick & Quick yarn with a free pattern and advice on what knitting tools to use to make knitting it quick, easy, and fun!
10 KNITmuch | issue 16
Pattern

If you haven’t already, you can download this pattern for free on the Lion Brand website by following this link: Cabled Poncho. When it comes to knitting any project, it’s important to see if any errata (pattern mistakes with corrections) are posted. I didn’t see any on the website, but as I knit this project, I did find a few. Here are the corrections to the pattern:
Row 2: *P2, 3/3 RC, p2, K1, p2, k2, p2;…
Row 4: *P2, k6, p2, K1, p2, k2, p2;…
Row 8: *P2, 3/3 LC, p2, K1, p2, k2, p2;…
If you’ve got a tablet or cell phone, a great accessory is a holder of some kind. I, however, like to print my patterns to avoid spending my whole time squinting at a screen and continually scrolling back and forth. For this pattern, I increased the size of my printed page, so it would be easy to see with a quick glance. Then I placed it in my KNITTER’S PRIDE Pattern Holder which also has a pocket for my iPad in case I need to look back to the digital pattern. With this holder, I can prop my pattern up on a table, and use the magnetic strip to move along the rows as I go, so I don’t lose my place. I can’t even tell you the amount of tinking (knitting back) and frogging (ripping back) my pattern holder has saved me from! It also protects my pattern as I carry it around from place to place. I'm always knitting on the go.
Yarn
Choose a yarn you love! I mean it! I have been selling yarn and teaching for over a decade, and one of the mistakes I see over and over again is someone choosing bad yarn. Here are my suggestions when it comes to choosing yarn:
1. The easiest way to make sure your project comes out the way it’s supposed to is to use the yarn recommended in the pattern. Unless you know what you’re doing, substituting yarn can be disastrous.
2. Use yarn that you enjoy. Working with a yarn that you don’t like means you’ll spend hours unpleasantly knitting only to end up with a project you may not like.
3. It doesn’t have to be expensive to be good. Part of choosing a yarn you enjoy is making sure you don’t go broke buying it. If you like it, and can get it cheap, that's awesome!

4. Don’t work with musty, mildewy, or moth-eaten yarn. Throw it away and start fresh.
With these ideas in mind, I chose the yarn recommended for the Cabled Poncho pattern, Lion Brand Wool-Ease Thick & Quick yarn in the color 172 ‘Kale’. I love this yarn because it’s soft, squishy, warm, and knits up quickly. Then I went on to get their recommended needles to start my poncho.
 A KNITTER’S PRIDE pattern holder holds a paper printout or tablet PDF to help your knitting stay on track
True to its name, Lion Brand’s Wool-Ease Thick & Quick knits up superfast and super squishy!
A KNITTER’S PRIDE pattern holder holds a paper printout or tablet PDF to help your knitting stay on track
True to its name, Lion Brand’s Wool-Ease Thick & Quick knits up superfast and super squishy!
11KNITmuch | issue 16
Project bags
I have a confession to make, I’m addicted to project bags. I have a lot of yarn, sure, but I have enough project bags to hold almost my entire yarn stash. I just have to have the right bag for the job. I have tiny ones for socks, two section ones for colorwork, ones that attach to belt loops for walking and knitting, long tubes, square fabric yarn bowls, plastic ones I can see into, and some huge ones for large projects. I’ve got every color, every shape, every type you can imagine (and probably some you couldn’t even imagine if you tried). Well, now you know, I’m a knitting bag hoarder.
For this project, well of course, I had to start with a new bag. Because I’m talking about ‘tools of the trade’, I thought it would be fun to have a bag that was kind of like a tool belt. This Vivace Accessories Bag was perfect. And it goes perfectly with my kale green yarn! Ok, color coordination isn’t the most important thing, but it sure is fun!
Here are the things I look for in a good project bag:
• It must be big enough to hold my yarn, the project, and all my accessories.

• No Velcro! Or anything else that can snag and damage the yarn.
• I like a safe place to store my tablet and pattern holder.
• Lots of different sized pockets.
• Waterproof is preferred. Well, that’s a good start on setting up to knit the Cabled Poncho, but there’s a few more essential accessories we need to start this project. No knitting can begin without the right knitting needles, and, because this is cabled, we need a cable needle, too. Also, the smallest needle in our tool kit will be discussed, the yarn needle.
All my knitting tools fit in this Vivace bag with room to spare.
12 KNITmuch | issue 16
Wood, metal, straight or circular:
Which knitting needle is best for you?

Knitting needles

Except for yarn, there are no more important tools for any knitting project than the needles! When I started, I only wanted to work with wooden needles. They are warm, natural, and comforting. In the beginning, wood or bamboo needles helped prevent dropped stitches, because their surface holds more securely than metal needles. Wooden needles tend to be less expensive in general which was also a bonus. However, as I became a more experienced knitter, my taste in needles changed. I started to find the courage to pay a bit more for my knitting tools, and I branched out into metal needles. There were two immediate benefits to metal. They are cooler to the touch, and I tend to run hot, so they feel nicer in my hands. Furthermore, and most importantly, the stitches move more smoothly across metal needles making my tension more even, and allowing me to knit faster. Now all my needles are metal. I don’t use acrylic needles, because I find them hard to move stitches as I work. The surface grips hard to my yarn.
The Cabled Poncho pattern calls for circular needles as opposed to straights. This is due to the width and weight of this project which is easier to manage with the weight distributed on the cord of a circular needle. I got the KNITTER’S PRIDE SmartStix US 13 [9mm] 32” circular knitting needle to knit my poncho. What’s unique about these needles are the marks at 1” increments right on the cord that allow you to measure your width as you go, to keep an eye on your gauge. Very cool! Gauge can change as you move from knitting flat to knitting in the round, and just generally as you work through a project. SmartStix are very useful for knitting fitted garments, but it can’t hurt to keep an eye on the gauge of this poncho project.
Thick & Quick Cabled Poncho is underway using all the tools of the knitting trade to make it perfect.
Which is best - wood, metal, straight, or circular?
13KNITmuch | issue 16
If you are a newer knitter you might want to get wooden circulars to help keep your stitches on the needle so you won’t have dropped stitches while you’re cabling. Acrylic needles also hold the yarn in place, but may hold it too much making it hard to shift your stitches and work quickly. However, these needles tend to be cheaper to buy, so if you need to save a bit, they may be your best bet.
It’s possible to knit on straight needles, but they need to be long to accommodate all the bulky stitches. In the photo are KNITTER’S PRIDE Ginger 9mm (US 13) 14” needles which will hold all the stitches of the poncho if you really squish them.
Cable needles

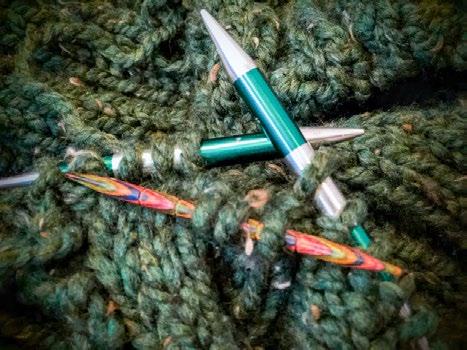
With the Cabled Poncho make sure to put a cable needle in your knitting tool kit. You won’t get past Row 2 without one! There are many kinds of cable needles. You can use a regular DPN needle as a cable needle, but there’s a danger your stitches may slide off. Double pointed needles are designed to make stitches slide easily for happy knitting, but you don’t want your cable stitches to slide too easily. You need a little bit of resistance to keep them in place until you’re ready to knit them. KNIT PICKS Rainbow Cable Knitting Needles (pictured left) have little grooves in the wood which is just enough texture to keep your stitches secure. I used these on my poncho, and didn’t drop a single stitch!
U-bend cable needles keep your stitches in place with a deep curve. This is a safe way to cable without dropped stitches. It takes a little more time to slide them back on your needles to knit your cables, but they do ensure secure cabling without scrabbling to pick up lost loops. If you’re a newbie cabler these may be the best bet for you.
Whatever kind of cable needle you choose, make sure it’s the right size for the Wool-Ease Thick & Quick. It’s a large size recommended for US 13 [9mm] needles.
What’s up next?
Well, now you’ve got your needles, yarn, and pattern all set and ready to go. There’s a few more essentials that you need to have in order to make the Cabled Poncho. I’ll share ideas on stitch markers, measuring tools, and yarn cutters to help you choose the best accessories.
 Wooden straights or metal circulars? I chose the metal SmartStix circulars (in center) to knit my Cabled Poncho.
These KNIT PICKS Rainbow cable needles are what I used to make my cabled poncho. Check out the little grooves that hold the stitches in place. Very smart!
Wooden straights or metal circulars? I chose the metal SmartStix circulars (in center) to knit my Cabled Poncho.
These KNIT PICKS Rainbow cable needles are what I used to make my cabled poncho. Check out the little grooves that hold the stitches in place. Very smart!
14 KNITmuch | issue 16
Knitting essentials: Why it’s the small things that count

It’s all about the little knitting essentials that you need to add to your knitting bag to complete this project: stitch markers, measuring tools, and yarn cutters.
Stitch Markers
Stitch markers - you can never have too many, am I right? I have so many it’s ridiculous! But there’s more to the simple stitch marker than you think. For this project, I recommend a couple of different types to help you get it done right.
The first thing you need to do is to make sure you have large stitch markers. With a 9mm (US 13) needle you’re gonna need them big! You need either locking or ring stitch markers to mark off the cable pattern repeat sections. Doing this helps you keep track of the pattern as you go, and reduces the number of mistakes which decreases the amount of swearing you do as you angrily rip back row upon row to fix them. Save yourself the stress! You can use stitch markers to successfully keep track of the repeats in the cable pattern of your poncho.
I also use stitch markers to keep track of a mistake that I need to fix later. Yes, I still make mistakes… all the time! I place a locking stitch marker at the spot that needs fixing. If I’ve dropped a stitch, a locking stitch marker can hold it in place until I return to the place where I can pick it back up.
Let’s add stitch markers, measuring tapes, and cable needles to the knitting bag for our Thick & Quick Cabled Poncho.

There’s one more main function of a stitch marker for knitters in the know. I’ll tell you more about the final use for stitch markers which are as progress keepers to keep the knitting mojo going.
Measuring tapes and gauge rulers
To make a Cabled Poncho you absolutely need a measuring tape, and I recommend a gauge ruler as well. First, make sure you have a measuring tape in your knitting bag so you’ll be able to keep track of the length of your project. Make sure it’s long enough to properly measure this oversized cabled poncho. I like retractable measuring tapes like the Mindful Tape Measure pictured left. They are tidy and easy to pack. I have as many measuring tapes as I have projects, because I like to place one in every knitting bag. The total number of them is a secret I will not share here, but imagine a huge amount of WIP’s (works in progress) and UFOs (unfinished objects), then double that number and you might be close to it. Retractable measuring tapes are essential tools for me.
This helpful KNITTER'S PRIDE Mindful Stitch Marker kit offers a variety of options to help your knitting along.
Mindful measuring tapes are pretty and practical!
15KNITmuch | issue 16
I also use a small straight ruler for measuring gauge swatches. The flexibility of a measuring tape is less accurate than a clean edge of a straight ruler. Although the Cabled Poncho gauge isn’t essential as it’s not fitted, it’s still recommended you gauge your work to get the best results. You want a straight hard plastic or wood ruler to make sure you’ve got the right numbers.

The UNIQUE Ruler does double duty as it allows you to check the gauge of your needles too. I’m forever ending up with a pile of needles in my knitting bag, and most of them have illegible size numbers. Putting the tip of your needle through the matching hole quickly solves the mystery of ‘what size is this needle?’.
Yarn Cutters
Ok, ok, I mostly mean scissors, but there are other options for cutting your yarn than just a regular pair of scissors. Even scissors themselves come in a wide variety of options. There are folding scissors and pen snips that fit neatly into any small knitting kit. Fancy embroidery scissors that look fabulous, but aren’t merely pretty. These small scissors help you get precise cuts for your steeking projects. There are scissors with clips that are guaranteed to keep closed to keep everything safe in your knitting bag, and snips with guard tips that do the same.
I have many, many scissors, but my favorite cutting tool is my Clover Yarn Cutter Pendant, and I’ll tell you why. This convenient cutter has been designed specially to have all the sharp edges covered which is great for protecting all your yarn and accessories from damage, but that’s not the best part. Because the blades are tucked away under metal tips, it’s impossible for them to accidentally cut yourself or hurt anyone. They’re safe for airplane travel or anywhere else that bringing a sharp pair of scissors would be unwise: toddler play groups, indoor playgrounds, public transit, driving with your crazy brother-in-law through a bumpy back road shortcut. You can safely cut your yarn wherever you like. Since it’s a pendant it can also be worn around your neck, very convenient! Eliminate all the wasted time searching for where you last put down your scissors. If I had a top ten list for knitting tools, my yarn cutter pendant would be on it.

What’s up next?
Is your knitting kit starting to fill up with useful tools for your Cabled Poncho project? Good! Now that we’ve put together the necessities to get you started, let’s add a few more very helpful tools to your knitting bag to help you knit faster and better.
Use this handy UNIQUE Ruler to figure out your gauge and check your needle size.
You can take this Clover yarn cutter anywhere!
16 KNITmuch | issue 16
3 special little tools for smooth knitting and a professional look

then try to figure out where I’d left off, I was lost. I went out and bought two different colored row counters and keeping track became a lot easier.
These are the items that I could knit without, but I don’t wanna! When I start a knitting project, I want a progress keeper to keep me motivated. While I knit, I love having a row counter, sometimes two or three for a really complicated one, to help me keep track. And finally, when the knitting is all done, I want to have a simple, easy blocking system to make my hand knits neat and professional looking.
Row counters
Although some knitters don’t consider row counters essential, I consider them absolutely necessary in my knitting tool kits. I used to track my knitting in the old school way of pencil scratches on the printed pattern. Then I had a few troubles with my note-taking, and I found myself turning to row counters for the solution. The first problem was when a sweater I was knitting had several different decreases and increases happening at the same time, and my little scratches kept on getting messed up. When I’d put the project down for a while,
It also solved the problem of finding a pen or pencil which always seem to disappear into the ether when I need them. And, I was always losing the paper on which I was keeping track. I have a busy life with many, many details to manage. Papers are so easily lost in the shuffle. Row counters are used only for knitting, so they don’t stray far from my knitting bag like a pen would. They’re often brightly colored and unique in shape whereas one paper looks an awful lot like another.
row counters was too much temptation for a little one to resist. The kacha-kacha has a little locking mechanism that stops tiny fingers from playing havoc with my row count. It also means you can throw it in your knitting bag without accidental clicks.
Lately, I’ve been in love with the Row Counter App on my phone. It allows me to download my pattern right into it, and has settings to run multiple row counters simultaneously on a project. I always have my phone with me, so I always have my row counter.
I have row counters that I wear as a ring or bracelet, that sit on my needles, and that are voice activated. There are so many row counters to try, you’ll find one that works best for your knitting. I suggest you simplify your knitting life, and use a row counter to keep track of the cables on your Cabled Poncho project.
I love the simplicity of a quick click to move the counter forward. Anything that speeds up my knitting is welcome. One of my favorite row counters is a Mini Kacha-Kacha which has a locking mechanism on it. I started using row counters when I had twin toddlers in my life, and the fun of clicking my

This helpful and colorful row counter is worn as a ring, so it never gets lost.
 This Cabled Poncho is knitting up Thick & Quick!
A row counter like this Mindful Row Counter makes keeping track of your pattern easy.
This Cabled Poncho is knitting up Thick & Quick!
A row counter like this Mindful Row Counter makes keeping track of your pattern easy.
17KNITmuch | issue 16
Progress keepers
What’s a progress keeper? Well, it’s a special kind of stitch marker that creates a bit of a psychological boost for knitters. Sometimes knitting can seem to take forever! I call this the Black Hole of Knitting. You knit and knit and knit for hours, but when you look at your project, it seems to have hardly grown at all. A special stitch marker attached to a stitch at the beginning of your knitting session allows you to see just exactly how much you’ve accomplished. It's a morale booster that keeps you going through the long hours to the project’s completion. A progress keeper can be as basic as using a spare locking stitch marker or a safety pin. If you wanna get fancy, you can buy a precious handmade progress keeper at your local yarn store (LYS), online, or at a fiber festival booth. Any charm with a clasp will do. I have a pile of them from really pretty, to pretty silly. No matter what type of progress keeper you use, make sure you use a unique marker that you won’t confuse for a regular stitch marker. Other than that, go wild and have fun with this friendly little knitter’s helper.
Blockers
To make the cables of your poncho really come to life, you need to block them. There are all kinds of blocking tools out there. I found, through trial and error, the blocking equipment that works best for my knitting projects.


I recommend having blocking mats on hand. I use blocking mats for pinning down my knits without putting holes in my furniture. The blocking mats I use are interlocking floor or play mats that I bought at my local hardware store. I love that I can make any sized blocking area that I need!
The other thing you need are blocking pins. The pins need to be wide enough at the top that your stitches can’t slide off them. You can use simple T-Pins which are nice and inexpensive. I found, however, that on a big project like this poncho, it was time consuming and more than just a little annoying to put all the pins in and pull them out after drying. Discovering KNITTER’S PRIDE Knit Blockers made my life so much easier! Each blocker has a plastic handle with multiple pins in it. This saves me a lot of time pinning down my projects and taking them off. They make the blocked edges more even as well. They come in a bunch of different colors which just adds fun to the whole process. I have three sets of knit blockers which means I can handle blocking any sized project. I have a white set, rainbow ones, and just got these really pretty blue KNITTER’S PRIDE Mindful Knit Blockers
.
When it comes to my knitting, I always make sure I have the best tools for the job. Sure, I spend a bit more, but anything that adds ease, calm, and speed when I knit is worth it. A builder needs the right tools. And I am a builder of amazing knits. Get what you need to do the job right the first time.
Enjoy the encouragement of a progress keeper! See how quickly your cable knits up with chunky Thick & Quick yarn and big needles.
These beautiful blue Mindful Blockers make blocking so much easier, and that makes me happy.
My finished Cabled Poncho is made with these needles and super squishy Wool-Ease Thick & Quick yarn.
18 KNITmuch | issue 16
Get that warm feeling with this knitted cable poncho [free pattern]

So now we have everything we need, including the special little extra knitting tools to make knitting a pleasant experience. And here we are at last! It's the reveal of my Wool-Ease Thick & Quick Lion Brand Cabled Poncho. It all started with an online search for an oversized poncho to keep me warm, which ended when I found the Cabled Poncho pattern. I loved the look of the oversized, but understated poncho. I kept to the pattern’s recommended yarn, Lion Brand Wool-Ease Thick & Quick, and chose the color ‘Kale’. Trying to expand the colors in my wardrobe, which tend towards blue and black, I chose this earthy green color for a change. When I got the yarn, I was really happy with how soft and squishy it was, but I was worried it would be too dark to show the cables. I shouldn’t have been concerned, because they look beautiful!!
Once I had the yarn, I printed up the pattern, put it in my holder, and started gathering all the tools I needed to make my poncho. I was eyeing the KNITTER’S PRIDE Mindful Collection for a while, because I loved the color and I’m always in need of more knitting accessories. I have startitis, which is a condition where one pathologically starts new projects without finishing the current one. Starting a new project is one of my greatest joys, so I do… frequently.
This means I have a lot of unfinished projects. With most of my tools in different knitting bags, I needed a few new ones to fill my project bag for this poncho. I got the entire collection except the measuring tape which I already had on hand. The tools in the Mindful collection included stitch markers (with a free accessory bag), measuring tape, row counter, and knit blockers. The rest of the knitting tools I found around my studio, and I was ready to start.
Next, I chose my needles and cable needles, checked my gauge, and cast on! As I said, the cast on is always my favorite part. It’s so exciting; the possibility of a perfect cabled poncho before me.
The rest of this poncho was mostly easy and quick, but there was one small hiccup at the beginning. As I began to knit through the rows of the cable repeat, I noticed a few small errors, and I corrected them on my printed pattern.
After I corrected those few little mistakes in the pattern, I breezed through the project. With big needles and big yarn, it knit up very fast. I’ll admit that I made a few small mistakes especially when I knit tired or with too many distractions around, but I was happy they were all simple fixes.
The cables look beautiful! Whyever did I worry?
19KNITmuch | issue 16
Fiona Stevenson www.fionaknits.com


It was just the occasional purl when I was supposed to knit or knit stitch instead of a purl. All I had to do was mark them with a stitch marker, then drop down when I got back to the right spot and change the mistake. Surprisingly, this was the very first cabled knit project in which I didn’t at all make a booboo in the cable. Having my row counter close at hand helped, but it was the pattern holder with a large print copy of the cable repeat instructions that really kept me on track. I could just glance up, and double check the stitches of any row. I was thrilled to get to the end of my project without having to fix a single cabling mistake. YAY!
Once I was done knitting, I was very happy to have the extra set of knit blockers from my Mindful collection, because it took that and my other two sets of blockers to pin down this huge poncho. The blocking really brought the cables to life! The poncho did take an annoyingly long time to dry, but I really soaked it good so I could block it right. I really wanted the cables to pop!
After it dried, the only thing I had left to do was sew up the shoulder seam to create my poncho which was made simple with the graphic in the pattern showing where to do it. I made sure to make a strong seam, because the poncho has a heavy fabric that will pull on it. I like to knit things that last, don’t you? After seaming the shoulder, my poncho was complete. I was so excited, that I threw it on and went for a walk in my neighborhood to show it off. Unfortunately, I didn’t see another person on my walk, so no compliments, but I was blissfully cozy and warm in my beautiful new Cabled Poncho. And here it is for you to see! What do you think?
I had a lot of fun sharing with you the knitting accessories that made knitting this poncho with Lion Brand Wool-Ease Thick & Quick yarn so much easier. I hope you found some new tools of the trade to put to work in your next knitting project. If you’re working on your own Cabled Poncho, share your photos with me, tag me, fiona. knits, in your Instagram posts.
 The Knitter’s Pride Mindful Collection: Stitch markers with free project bag, measuring tape, row counter, and knit blockers
Tada! I’m ready to face the cool, crisp winds of fall in my new Cabled Poncho.
The Knitter’s Pride Mindful Collection: Stitch markers with free project bag, measuring tape, row counter, and knit blockers
Tada! I’m ready to face the cool, crisp winds of fall in my new Cabled Poncho.
20 KNITmuch | issue 16
NOW
Knit a NO-COUNT cables chemo cap (It’s so soft!)

and there's so much more!
Double strands of yarn keep your feet warm and cozy [FREE knitting pattern]

NOW
Mosaic knitting: Using two colors of yarn to knit a comfy sit-upon (EASY)


21KNITmuch | issue 16
READ
READ NOW
READ
don't miss these FREE projects & tutorials online! KNITmuch
Stay on trend with Bella Chenille Big Glimmer: Why this yarn is a favorite!
We’re kicking off 2022 in a BIG way with Bella Chenille Big by Universal Yarn! Bella Chenille has been around for a while, but in this series, I’m looking at the new Glimmer line

Bella Chenille Big is a 100% polyester chenille yarn, and in each ball of Glimmer, 6% of the polyester fibers are metallized, giving each of the 12 colors a soft shimmer that children and adults alike are bound to love.

It’s really challenging to get a photo to show off a shimmer or metallic fleck in yarn. You can see white flecks in the purple ball. That’s the light catching the metallized fibers!
A super bulky yarn, the recommended gauge for Bella Chenille Big Glimmer is about 6 stitches to 4” [10cm]! The recommended needles are, well, huge, at size 13 or 15 [9 or 10mm], so, if you want a quick scarf, 12-15 stitches ought to do it! It also makes the biggest i-cord ever!

Bella Chenille Big Glimmer comes in 12 sumptuous shades Drift (white), Believe (pale pink), Dewdrop (pale gray), and Reflection (pale blue) would all make great baby play mats. If you prefer jewel tones for babies, Thorn, Dreams, Thistle, Primrose, and Starlight (rich shades of green, navy, teal, red, and purple respectively) fill the bill, and if neutrals rock your world, the aforementioned Drift
and Dewdrop can be paired with Whispers (medium gray), Hourglass (sandy beige), and Magic (shimmery black).
Each ball of this big yarn has 200g (about 7oz), with 87 yds [80m], which minimizes the frequency of yarn joins.
One ball of Bella Chenille Big will make a hat, two will make a cowl, and a whole bunch will make one of those hooded-blanket-withsleeves that are all the rage this winter (and perfect for my chilly basement!). There’s no better yarn for trapping air and making one stylishly cozy than Bella Chenille Big Glimmer!
Other cool (well, warm) ideas for this yarn include a top-down capelet using – or adapting – a chunky knit, round yoke sweater pattern; a bed or TV watching jacket; a cozy tuck-in for around a baby’s car seat; some truly fuzzy slippers; a hot water bottle cover; bed scarf; even a festive Christmas wreath! If I had a supply of Thorn or Primrose, I might be tempted to adapt this wreath pattern I did two years ago! I wonder if I have a cable needle that’s big enough!
This wreath was originally knit in double knitting weight yarn, but I could use Thorn or Primrose to adapt it on a large scale for Bella Chenille Big Glimmer.
 Bella Chenille Big Glimmer yarn
You can use Bella Chenille Big Glimmer to make this wreath.
Cynthia MacDougall
Bella Chenille Big Glimmer yarn
You can use Bella Chenille Big Glimmer to make this wreath.
Cynthia MacDougall
I couldn’t resist! This i-cord is 7 8” [2cm] wide! I laid it over a ruler so you can see!
KNITmuch | issue 1622
23KNITmuch | issue 16
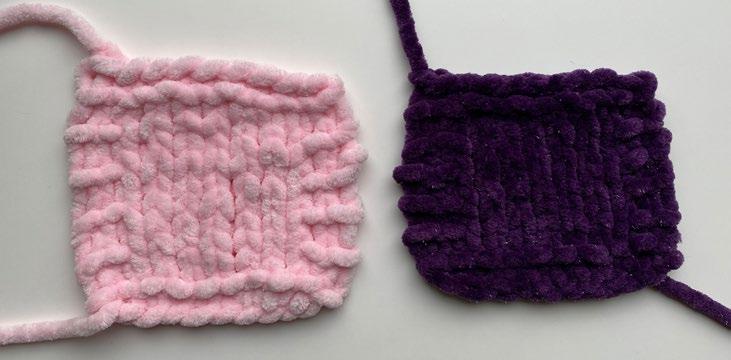
In this photo, even though the pink sample is further away, the openness of its fabric compared with the gray one at the front is visible
As the photo shows, there’s a big difference between the size 13 and size 17 samples. If only you could feel them! I took them to my local guild meeting and we had a hearty discussion about them.
The samples worked on the smallest needles (gray) had a lot of integrity, and were almost stiff. The garter stitch would make a sturdy play mat, but would be too stiff to tuck in around a car seat, for example. More flexibility is desired for a garment.
In this photo, once again, the gray sample worked on the smaller size 13 [9mm] needles is quite a bit tighter than the pink sample at the back, which was done on size 17 [12mm] needles.
The pink samples, worked on the largest needles (size 17 [12mm]) were a bit ‘squishy’. They have good drape and would make a decent lap robe, but might not hold up well enough for a large afghan. They’re also a bit loose to put around really small children - little fingers might get caught in the loosely knit fabric.
The purple squares, to quote Goldilocks, are ‘just right’ - not too tight and not too loose - so, for my knitting, size 15 [10mm] works nicely. The ball band gives a range of 5 to 7 sts to 4” [10cm], and my tension with 10mm was right in the middle, at 6 sts to 4”. Some knitters find sampling to be a waste of precious knitting time. In my experience, sampling is often a time saver as it helps me decide if I like the fabric the yarn will produce, and I can keep the samples for future reference. (Yes, I have bins of knitted samples. I still come across an odd one where I look at it and instantly remember what I liked or disliked about the yarn or the stitch pattern I made with it!)

If you’ve never worked with Bella Chenille Big or Bella Chenille Big Glimmer, I encourage you to knit a sample or two before tucking into a large project. The samples work up quickly, and you’ll know soon enough what kind of project your yarn wants to be ‘when it grows up’.
 Garter stitch samples
Stocking stitch samples
Garter stitch samples
Stocking stitch samples
KNITmuch | issue 1624
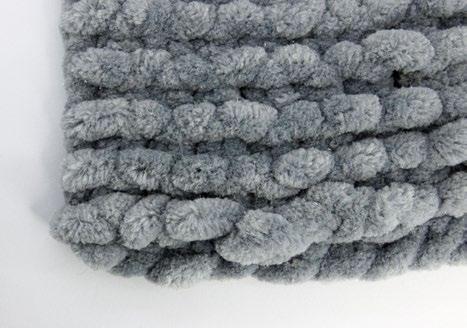
4 ways for weaving in ends when using chenille yarn, big or small


Because a single strand of Bella Chenille Big Glimmer is so big, in this picture it’s easy to see where I’ve woven the yarn end on the back of the gray garter stitch sample.

One of the biggest challenges with chenille yarns (any chenille yarn, not just this big one), is how to handle weaving in ends, both at the cast on and cast off and when joining in a new yarn. Below are four ways of doing it. You can decide which you like the best. Method 1 works for weaving in ends at the cast on and cast off. Methods 2 and 3 work for both weaving in ends and joining in a new yarn, and method 4 makes a continuous strand of yarn, so it is good for joining yarn.
Method 1 - Weaving in as you would other yarns
Thread a large tapestry needle (size 16 is probably the smallest you can pull off, but I’ve found a size 13 works best - you could even use a bodkin) with a full strand of yarn. Leave a good length of yarn tail - this bulky yarn uses up more yarn than you think! Weave in the ends as you would with any other yarn. The chenille strands will mesh together somewhat, but this will still leave a fairly bulky, noticeable result.
Method 2 - Sew in with a matching sewing thread

I like this method. Thread a sewing needle with a strand of sewing thread in the same color as the Bella Chenille Big Glimmer. Fold the thread through the eye and knot the ends together. Lay the strand of yarn across the back of the work. Put the needle through the work and bring it back to the front, being sure to catch a strand of yarn. Loop the needle through the two strands of thread (at the knot) to anchor it. Taking care to catch both the yarn tail and a loop of yarn in the knitted fabric, sew the yarn end down along the back of the fabric. Draw the sewing thread snugly so it’s hidden between the fuzzy chenille strands. Sew down for a minimum of 2” [5cm], then, for added assurance, turn the yarn end back and stitch it down for a ½” to 1” [1-2cm] in
 PURPLE! You can see white flecks in this photo where the camera picks up the glimmer in its own way.
The yarn tail woven in on the bottom left corner adds thickness
Look closely at the top left corner to see where I folded the yarn end back on itself when I sewed it down.
The fuzzy strands of purple are pulled back to show the white core threads, which I’ve already laid out to begin Method 4.
PURPLE! You can see white flecks in this photo where the camera picks up the glimmer in its own way.
The yarn tail woven in on the bottom left corner adds thickness
Look closely at the top left corner to see where I folded the yarn end back on itself when I sewed it down.
The fuzzy strands of purple are pulled back to show the white core threads, which I’ve already laid out to begin Method 4.
25KNITmuch | issue 16
For this method, choose a thin tapestry needle (size 20 or maybe 22 will work) and trim the yarn end to 4-6” [10-15cm]. Pull out the chenille fibers until there is about ½” [1cm] of fibers remaining at the base of the yarn tail. Thread the tapestry needle with the two white core threads. Weave the core threads around the back of the stitches in the knitted fabric. As with the sewing thread method, pull the core threads snugly so they hide in between the chenille fibers. Secure the ends well and trim away the excess.
Method 4 - Tie the core threads together
I discovered this method when I found a knot in the yarn. Pull out the chenille fibers on both the old and new strands of yarn for about 2” to 2½” [56cm] - just enough to knot the core threads together. Take one core thread from each ball, and double knot them, bringing the chenille fibers from both strands together. Repeat with the other core thread from each ball. I use square (aka reef) knots.
A less noticeable and less bulky way of weaving in yarn ends is to strip the chenille fibers back and weave in the core threads.
The strands from the first knot show at the top of the purple strand and the strands from the second knot are below it.

If you look very closely, you’ll see a small white dot (that isn’t part of the glimmer) where I’ve cut the core threads away.

KNITmuch | issue 1626
What you need to know about knitting with ease (trendy pattern - free)
The project I chose for Bella Chenille Big Glimmer is Snug as a Bug. I fell in love with it when I first saw it in the product literature. It couldn’t have a more appropriate name!
This project makes a great fashion statement, belted as it is in this photo. Unbelted, it turns into a cozy reading or tv-watching jacket. It is welland-truly oversized - the bust measurement on this one-size garment measures 68¾” [175cm]! The kick pleat at the back of the neck brings that in a bit, (the pattern says the finished bust is 65½” [166cm]), but it’s still plenty big enough for most people! The difference between the wearer’s bust and the garment’s finished bust is called ease. Ease is necessary for garments to fit well while offering enough room for the wearer to move freely.
Generally speaking, 2-3” [57.5cm] of ease makes a standard-fitting garment, 3-4” [7.5- 10cm] of ease makes a loose-fitting garment, and 5” or more [12.5cm] makes an oversize garment. Some garments, such as socks, camisoles, and gloves even have negative ease where the garments are knit smaller than the wearer’s measurement, so they cling to the body more.
There are other factors to consider, including the type of garment and the thickness of the fabric. A vest or cardigan, for example, will be worn over other layers of clothing so more ease is desired.
When you knit with a fine yarn, you create a thin fabric. A garment knit with just a couple of inches of ease can fit well, in part because the fabric itself is quite thin.
When you knit with a super bulky yarn like Bella Chenille Big Glimmer, you have to allow for more ease - not only to account for the thickness of the fabric (my stocking stitch sample measures about 7/16” [1cm] thick), but also to have it fit over other layers of clothing. With Snug as a Bug, the drop-shoulder styling and oversized sleeves create bulk at the underarms too, resulting in the need for even more ease.
I loved this pattern on sight, as I said, but the knitter in me feels that those sleeves are impractical to wear as a knitting jacket. I also suspect that straight needles will get hung up in the excess fabric of the sleeves. In my next and final article of this series, I do a slight modification for the sleeves and the body to try and get those sleeves tamed down a bit - for my knitting pleasure, and perhaps yours - and reduce some of the bulk at the underarms.
Here’s the Snug as a Bug knitting pattern so you can get started. Let's see next my modifications, made with Bella Chenille Big Glimmer. I’m doing mine in purple!
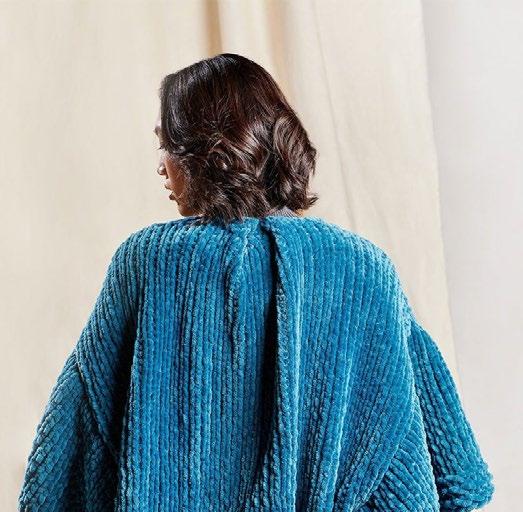

How cozy is this? Left open or stylishly belted, the Snug as a Bug jacket will keep you warm!
The kick pleat at the back of the jacket adds character, but doesn’t change the bust measurement much at all.
27KNITmuch | issue 16
Modifying a knitting pattern to remove bulk makes this jacket a nice fit
In this article, I share my experience and adaptations for Snug as a Bug. My goals are to remove some of the bulk under the arms and shape the sleeves to make them more practical to wear when knitting.
I cast on the stitches for the back. About 6” [15cm] in, I discovered that my tension was not quite what it was in my sample! According to the schematic, the back should measure 35¼” across, and mine was barely making 29”! What the?
I noted that when working with larger size needles, it can be a challenge to get the exact tension because of the increments between needle sizes. Here’s another example of how sampling can save you time - because I made my samples, I already knew that going up to size 17 [12mm] needles would leave me with a more open fabric, which might sag more than I want.
A jacket with a 58” [148cm] total circumference still gives me plenty of ease, so I forged on. Before I leave this subject, though, I want to remind you that even in a ridiculously oversized garment, tension is important! Also, gauge swatches save time.
To reduce some of the bulk at the underarm, I notched out the back and front pieces to make a square armhole. The sleeves themselves were very large at almost 37½” [95cm] wide – almost 19” [48cm] deep once attached to the garment, so I made them narrower – 32” [80cm] wide, giving an armhole depth of 16” [40cm]. This is still a lot as the armhole depth on my loosest-fitting winter coat is only 13” [33cm].
I decided to add strength to the shoulders by picking up the stitches at the top and knitting the sleeves down. To add to my future knitting comfort, I also decided to taper the sleeves. This was done by decreasing at both ends of every 4th row. I even incorporated a decrease row into the 6 garter stitch rows at the bottom of the sleeves. If you want to make bottom-up sleeves, I will share that I ended with 37 stitches on my cast-off edge.
I adjusted my copy of the pattern to look much like the red lines in the schematic.
Because of my gauge discovery, I had to re-jig my numbers, but only a little.
Another small adjustment I made was to the pleat at the back of the neck. Rather than sewing it after the fact, I decided to knit that pleat in, knowing that this would make the pleat very sturdy. To do this, all I had to do was rearrange the stitches at the center back.
I took the 8 center stitches and numbered them as they appeared in knitting order on the left needle: 8, 7, 6, 5, 4, 3, 2, 1.
For the first half of the pleat, I put the first stitch (1) onto a stitch holder and held it at the front, did an ssk with stitches 2 and 3, then an ssk with stitches 1 and 4. For the other half, I put stitch 5 on a stitch holder and held it at the back of the work, did a k2tog with stitches 7 and 6, then did a k2tog with stitches 8 and 5.
To finish the garment, I used mattress stitch for the seams, which, given the thickness of the yarn, went relatively easily.
Even though I’d have been closer to gauge with the larger, pink sample, sometimes it’s better to go with the fabric you prefer and adjust your pattern (or expectations) to suit.
28 KNITmuch | issue 16
To change the fit of the Snug as a Bug jacket, I notched out armholes, extended the sleeves to accommodate the notches, and tapered the lower section of the sleeve.


Overall, I’m very pleased with the finished product. The sleeves are still larger than I had hoped and the armhole depth could have been shortened even more, for my 5’2” [163cm] frame. My gauge fauxpas left me with a jacket that has a good, sturdy fabric that’ll be disinclined to sag, and still fits me with sufficient ease.
I have more plans for Bella Chenille Big Glimmer. I have a few balls of pink, a couple of white, and one or two of gray. I want to take one of my top-down sweater patterns and make a little capelet to go over my shoulders for when I’m watching TV on nights when Snug as a Bug is going to be too warm. Spring is coming!


 Cynthia MacDougall ktogdesign@gmail.com
My modified version of Snug as a Bug
Cynthia MacDougall ktogdesign@gmail.com
My modified version of Snug as a Bug
29KNITmuch | issue 16
Knitting with the NEW Universal Yarn MAGNOLIA
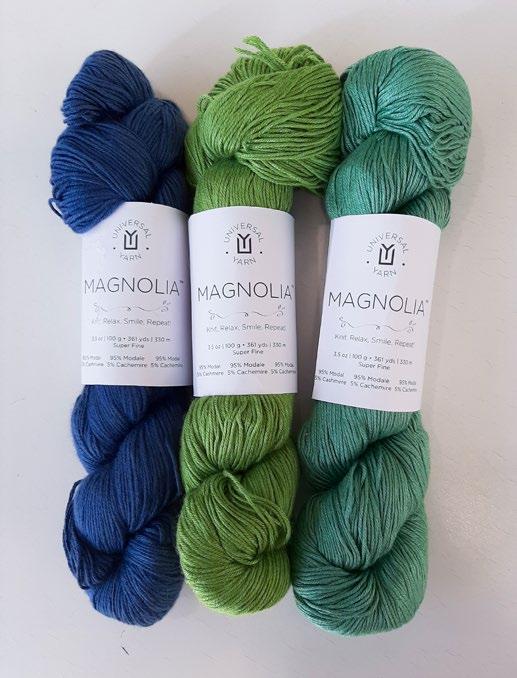
I have the pleasure of working with a brandnew yarn. Universal Yarn Magnolia is a super fine weight yarn that blends modal with cashmere to create soft knitted garments perfect for spring. Magnolia is available in 14 different colors and exudes softness with a shimmery glow that’s luxurious next to the skin. I’ve selected 3 colors to work with: Frayed Denim, Key Lime and Citrus Leaf. Although there’s still snow on the ground where I live, these colors have me anxiously anticipating the warm and sunny days ahead.
Each 3.5oz [100g] skein contains 361yds [330m], with a recommended knitting needle of US 1-3 [2.25–3.25mm] = 27 - 32 sts x 35 - 40 rows = 4” [10cm] in stocking stitch. The recommended crochet hook is US B/1-1E/4 [2.25-3.25mm] = 22 - 27 sc x 26 - 31 rows = 4” [10cm].
Magnolia is a blend of 95% modal and 5% cashmere with a very tight twist, which makes for easy care - machine washable in cold water and tumble dry at low temperature. I don’t let my knitted garments tumble to dry, but rather pull them from the dryer while still damp and lay flat to finish drying. I’ll put this to the test for my swatches to see how they react.
You may be wondering, what is modal? I knew it was a cellulose-based fiber, but I did a little research and discovered that modal is a semi-synthetic fiber made from the pulp of beech trees. It’s breathable, soft, durable and long lasting. The fabrics created from modal are often used in underwear, bedding, activewear, t-shirts and eco-friendly pillows. modal was first developed in Japan in 1951 as an alternative to silk and is very similar to regular viscose rayon. However, it’s also stronger, more breathable, and can withstand excessive moisture. It’s known for wicking away moisture which makes it perfect for spring and summer knitwear.
There are a number of sites that describe the processing of the fiber and the characteristics of the fabrics created from it. Here’s a quote from one of the sites I visited in my research (www. sustainablejungle.com).
“What does modal fabric feel like? Like a cozy, breathable, soft hug.”
That totally describes this yarn. I consider it one of those comfort skeins you squeeze and hold up to your cheek to alleviate stress. I’m really looking forward to knitting with it.
As I mentioned previously, this is a brand new yarn. When I initially planned my projects, there were no patterns designed for it, nor pictures of yarn and color samples. I selected my colors based on little square color boxes. When the yarn arrived, I got excited. It was so soft and the colors were magnificent. I held a skein up to my cheek and that’s when it told me what it wanted to be. I didn’t completely abandon my original thoughts, just tweaked them a little.
For my projects, I’ll be making a summer top, but since it’s not quite summer yet, I’ll also be making a little cardigan. To complete the ensemble, I decided to weave a wrap using all three colors that’ll make a perfect cover up over a sun dress.
Universal Yarn Magnolia is available in 14 different colors. My color choices are Frayed Denim, Key Lime, and Citrus Leaf.
Cindy O'Malley
Photos by Cindy O'Malley
30 KNITmuch | issue 16
Knitting swatches for gauge, needles, color, and pattern: It’s important


My first swatch was mainly to check the recommended gauge and needle size. Since the recommended gauge is stated as a range (27-32 sts x 35-40 R = 4” with a US Size 1-3 [2.253.25mm] needles), I opted to use a US 3 [3.25mm] needle. I cast on 35 sts, knit 4 garter stitch rows, proceeded with a slipped stitch edge and 2 garter stitches at each side, and then the stocking stitch for the main field. My results before laundering were 27 sts and 35 rows = 4” and 26 sts, and 35 rows after laundering – Right on the recommended gauge.
Summer fibers are typically cotton or linen which create beautiful knitwear but can be a little hard on the hands while knitting as there is no elasticity to them. Not so with Magnolia. I found it very easy to work with; not hard on the hands at all. It has more give to it, but it tends to be a little on the slippery side. I debated switching from metal to wood needles, but found my hands adapted to the metal after a few more rows. Before laundering, you could see a slight difference in my swatch, but after laundering, it was perfect, and the fabric drape, gorgeous.
The purpose of my second swatch was to measure gauge and determine the needle size for the pattern of the T-shirt I’m making. There are two different stitch patterns used in the shirt, but I decided I wouldn’t use one of them as I felt it was a little too open for my liking. Instead, I sampled 4 different patterns on one swatch beginning with the Broken Garter stitch pattern. I used the same number of stitches and needle size (26st x 36R in Broken Garter St on US3 [3.25mm]) as the first swatch since that’s the suggested needle size for the pattern.
Since I didn’t do a 4” x 4” swatch for each pattern section, my gauge is not really a true measurement, but it’s an indication of how the fabric will behave after laundering. My gauge before laundering on the Broken Garter stitch pattern was = 26 1/2sts x 10 rows and 24 sts and 10 rows after laundering. A little off from the pattern, but still workable as it means the T-shirt will have more ease in it for me. That’s OK.
On the garter rib pattern, I achieved 26sts x 9 rows before laundering and 24sts x 9 rows after; similar results to the Broken Garter stitch pattern. The other two patterns yielded similar results, but what I gained from this exercise was seeing the first two patterns beside each other. I really liked the combination, so I decided that’d be my plan for the T-shirt.
The first swatch using Key Lime yielded a gauge of 26 sts and 35 rows after laundering, using a US 3 [3.25mm] needle.
Pattern swatch going from bottom up – Broken Garter stitch, Garter Rib, a variation on Broken Garter stitch, and a Basket weave. Broken Garter and Garter Rib patterns are my favorites.
31KNITmuch | issue 16
This was a great exercise in playing with different pattern motifs before committing to the project. I, like most knitters, tend to only swatch when absolutely necessary, but I’m really glad I made this one. Now I know exactly what I want to do on my T-shirt project.
For my third swatch, I wanted to change the needle size to see how it affects the drape and to play with color. Part of my reasoning for this is based on the cardigan pattern I’ve selected. The designer tends to knit a bit looser than I do, so I thought I would play a little. Now is the best time to try things out.
This time, I used a US 4 [3.5mm] needle using the same number of stitches and Citrus Leaf colorway. I incorporated stripes using the Key Lime yarn in both stocking and garter stitches to see if I liked the combination. I ended up with 23sts x 35 rows after laundering which is significantly different for the stitch gauge from the pattern gauge. The fabric drape was lovely, but not really appropriate for my project. The color experiment was tremendous. I was really pleased with the results and felt comfortable proceeding with my plan.
One of my good knitting friends shared a tip to incorporate the needle size into your swatch. This way, you’ll always know what size was used for every swatch you knit. I think it’s a brilliant idea since I always think I’ll remember, and then I don’t. If you look at the lower right-hand corner of my swatch reading from right to left, you’ll see 3 purl bumps followed by 2 knit stitches, then 2 more purl bumps. Since I think in terms of metric knitting needles, the purl bumps signify I used a 3.5mm needle – 1 bump for .25, 2 bumps for .5, 3 bumps for .75. If you think in terms of US needle sizes (US 4 = 3.5mm) then you would make 4 purl bumps in a row. Whenever I need to reference this swatch again in the future, I’ll always know what needle size I used.

On another note, when I laundered my swatches, I soaked them in cool water using a non-rinse soap and laid them flat to dry. I didn’t machine wash or tumble dry since these processes can contribute to the variation in gauge. If I decide to launder my sweaters based on the yarn recommendations, I’ll first do it on my swatches. That’s another reason to knit a test swatch – you want to launder the swatches the same way you intend to launder the finished garment.
I actually enjoyed making my swatches – not something you often hear. I know what pattern motifs, color combinations and needle size I need for my two main projects…far better to learn this on a 4” swatch than a size medium sweater.
Swatch #3 on a US 4 [3.5mm] needle mixing Key Lime stripes with Citrus Leaf
32 KNITmuch | issue 16
Knit this super cute T-shirt with the NEW Magnolia yarn (free pattern)

Download the pattern for The Cherries on Top T-shirt, it’s a free knitting pattern designed for Magnolia yarn, it knits flat in two pieces, and is seamed at the shoulders and underarms. Stitches are then picked up and knit for the neckline. The front features the Broken Garter stitch pattern and the back is knit in an open Garter Lace pattern. This is a lovely T-shirt just the way it is, however, I decided to make a few changes including knitting it in the round instead of flat.
I did start to swatch the Garter Lace pattern but decided it was too open for my liking on a top. I think it would look really good on a shawl, but didn’t want to wear it on my back. So, I opted to do a combination of the Broken Garter and Garter Rib patterns from my swatching exercise.
For the balance of this article, I’ll describe the changes I made for knitting in the round and over the top. What does that mean, you ask? The only seams in my finished project are the underarms. Everything else it knitted in one piece, therefore no shoulder seams.
Let’s get started.
Using a US 2 [2.75mm] needle, I cast on 264 sts for the medium which is 2 stitches less than the front and back stitches combined.
Since I don’t have any side seams, I don’t need a seam allowance and that works out for the pattern repeat.
The next change was the HalfTwisted Rib section at the bottom edge. If worked flat, the twist is always a Ktbl (knit through back loop) on a rib stitch, i.e., a purl stitch on the Right Side (RS) becomes a knit stitch on the Wrong Side (WS), therefore, the Ktbl occurs on every knit stitch. Because I’m working in the round, that requires a Ptbl (purl through back loop) to twist that same stitch since I'm always knitting on the RS. This is a little trickier to do and there are a lot of stitches
requiring that technique. So, I opted to just do a Ktbl on only one of the knit stitches as follows.
Round 1: K1tbl, P1.
Round 2: K1tbl, K1.
Once the ribbing section was complete, I switched to a US 3 [3.25mm] needle and proceeded with the Broken Garter stitch pattern, but it changes a bit when working in the round.
Round 1: K1, P3.
Round 2: Knit.
I continued until my work measured 14” ending with Round 2.
I then turned my work and knit in reverse (on the wrong side - WS), for 1 round, placing a marker at the half way point to denote side marker.
Now I was ready to separate the front and back by having a second set of needles available.
If you don’t have a second set of the same needle size, use the next smaller size so you can leave the back stitches on the spare set while you proceed with the front.
Turn your work to knit in the proper direction (right side facing) and proceed with sleeve increases for the front until you reach the side marker. That’s when you want to transfer the back stitches to a spare needle or use another set of the same size to continue working on the front.
Cherries on Top pattern by Universal Yarn for Magnolia yarn
33KNITmuch | issue 16
Front
Cast on 1 stitch, knit to side marker and leave remaining stitches on a spare needle.

Turn work.
Cast on 1 stitch and knit to end of row.
Cast on 2 stitches at the beginning of the next 6 rows while working the bodice pattern.
Bodice pattern in Garter Rib
Row 1: Cast on 2 sts, knit to end of row

Row 2: Cast on 2 sts, P1, K1 to end of row
Follow the pattern instructions using the Garter Rib stitch until dividing for the V-neck. The instructions state to cast off the middle stitch for the V-neck, but since I’m working with 1 less stitch on the front, I didn’t do that.
I followed the pattern instructions until it stated to cast off for the shoulder seams. I didn’t do that either. Instead, I inserted a removable locking stitch marker to denote where the shoulder seam should be and worked both sides of the V-neck until the front was complete. Now it’s time for Over the Top.
Over the Top
This is where I continued knitting down the back by working across the shoulder stitches, then casting on the number of stitches (less 1) as instructed by the pattern to cast off for the back neck edge. In my case, the instructions called for 55 sts, so I cast on 54 – remember that I’m working with 1 stitch less on each of the front and back.
I continued in the Garter Rib pattern to the same point as the last row of the front sleeve increases. I counted the number of rows to make sure I was at the same place. You can measure, but I don’t rely on that completely as I want to know the exact number of rows. Instead of increasing, I decreased based on the same formula; that is, 2 sts decreased at the beginning of the next 6 rows. On the last 1 stitch decrease row, the wrong side of the work should be facing you, so work it as a knit row. If it’s a right-side row, then work it as a purl row (it depends on your row count). Then, with the wrong side facing you, use a 3 needle bind off to join the Over the Top stitches to the back stitches that you placed on hold.
The main body of the T-shirt is all together in one piece. Just follow the instructions for picking up the sleeve cuffs and neckline to complete the project. Oh wait, just one more little change. I cast off the stitches for the sleeves and neckline using a 2 stitch I-cord cast off. It makes a lovely squared edge and has become my favorite for applications such as this.
When ready to start your cast off, cast on 2 more stitches and knit 2, then transfer them back to the left needle. K1, K2togtbl (Knit 2 together through back loop) until you’re left with 2 stitches on your right needle, then cast off. It makes a beautiful cast-off edge. Weave in the ends and you’re done!
The Cherries on Top T-shirt is now complete. I really like the two different patterns together and all I had to seam were the underarms. The drape of the finished garment is beautiful and so soft and satiny to the touch. I can really see why modal is often used for undergarments and the wicking qualities of the fiber make it a great choice for a summer top.
Continuation of the Garter Rib pattern over the shoulder and down the back
The Cherries on Top T-shirt is complete using Universal Yarn Magnolia in Key Lime.
34 KNITmuch | issue 16
Substituting yarns when knitting from a pattern: How to make the switch
I’m making a lightweight cardigan using Magnolia in Citrus Leaf and Key Lime. However, the pattern for the cardigan was designed for wool fiber. That means I’m substituting a cellulose-based fiber for a protein-based fiber. This takes some careful consideration before proceeding as the two fibers behave very differently.
That’s why the swatching exercise on Day 2 is so important. It’s not just about determining the needle size but also the quality of the fabric. Is the drape of the fabric appropriate for the application? If you don’t take the time to test that out on a 4” swatch, you may go to a lot of effort and end up disappointed with the results. Based on the results I achieved through swatching, I elected to use a US 3 [3.25mm] needle as I not only achieved gauge, but I was very satisfied with the drape of the fabric. It’ll be different than a wool fabric, but I’m good with that.
The pattern I’ve chosen is called Paulie, which is available from Ravelry. It’s designed by Isabell Kraemer, who happens to be one of my favorite designers. Her designs are stylish and very wearable, and best of all, this is a free pattern. This particular pattern has been on my ‘must make’ list for some time, and now I get the chance to make it.
This pattern is worked from the top down. The sleeve stitches are put on hold, then picked up and worked down in the round. The button band and collar are picked up and worked in one piece by using short rows and finished off with a 3-stitch I-cord edging. No seams to sew, only ends to weave in and buttons to attach.

Key Lime brought out the blue tones of the Citrus Leaf, and the Citrus Leaf brought out the yellow tones of the Key Lime. When alternated in the garter section, it seemed to almost create a new color.
One more note before we get started. I mentioned that I used a US 3 [3.25mm] needle to knit this sweater. The designer’s gauge was achieved using a US 2½ [3.0mm] on wool. Since wool knits up differently from modal, it’s extremely important that you swatch to determine the needle size appropriate for the way you knit when substituting the type of yarn.
I didn’t intend to alter this pattern from the original design but made an exception on how I used the two colors. I used 3 skeins of Citrus Leaf as the Main Color (MC) and 1 skein of Key Lime as the Contrasting Color (CC) and decided to alternate the two colors on the garter stitch sections on the shoulder, hem, and cuffs.
From my swatching exercise, I discovered how the two colors complemented each other – the
I cast on the appropriate number of stitches for my size and placed the stitch markers according to the pattern instructions which had a stitch marker beside each increase. I found this a little cumbersome, so I switched to using a single marker to denote the raglan from the front and/or back. In other words, I only used 4 small markers and knew to do my increase 1 stitch before and/ or after the marker. I found this more manageable. By the way, a good way to remember Make 1 Left (M1L) vs. Make 1 Right (M1R) is this – Right of the marker = M1R; Left of the Marker = M1L.
Paulie cardigan by Isabell Kraemer, courtesy of Ravelry
35KNITmuch | issue 16
I only deviated from the pattern instructions in a couple of minor ways, mainly due to alternating the colors in the garter stitch hem. I wanted to start and end this section using Citrus Leaf (MC). The pattern calls for 20 rows meaning that if I started with Citrus Leaf, I’d end with Key Lime. I opted for 18 rows instead and cast off in Citrus Leaf using the 2-stitch I-cord method I used on the T-shirt. I really like this cast-off method for certain applications.
I also deviated from the pattern when it came to sleeve length. I like my sleeves to be either above my elbow, or down to my wrists. I’m not really a fan of midway in between. I opted to make them longer by making one additional sleeve decrease, knitting to my desired length, then working the cuff section in the same manner as the hem. I can always push long sleeves up, but you can’t pull ¾ length sleeves down. If I decide later that I prefer to have short sleeves, I can always rip them back and rework the cuff. That’s a lot easier to do and less visible than to add on later.
I kept the button band and collar in Citrus Leaf for two reasons:
1) the use of short rows on the collar would not look right if the colors were alternated, and 2) the accent color on the I-cord edge really highlights the two colors.
It’s a good idea to choose your buttons before knitting the buttonhole band to make sure they’re sized correctly for each other. I made the band first, then I went shopping for the buttons. The buttons are proportionately sized for the sweater, but the buttonholes are a little tight. Remember, this sweater was designed for wool, which has more elasticity to it than modal. I don’t intend to wear it buttoned up, but I can with a little effort.
If I’d had them in advance, I could have adjusted the size of the buttonholes. One other note, the button band and collar consumed almost a full skein of Magnolia so I suggest you start with a full skein if you don’t want any joins in this section.
After weaving in the ends and sewing on the buttons, the Paulie cardigan is complete. I love the way the two colors of Citrus Leaf and Key Lime complement each other. The I-cord edge on the button bands and collar is a wonderful accent, and the drape of the fabric is gorgeous.


As much as I love the front, the back of the cardigan is also beautiful.
I’m really pleased with how this turned out. This yarn substitution worked in the end, but not without doing my swatch homework first.
The Paulie cardigan is complete with buttons and made with Magnolia yarn in Citrus Leaf and Key Lime.
Back view of the Paulie cardigan. The Citrus Leaf and Key Lime colors complement each other perfectly.
36 KNITmuch | issue 16
Weaving with Magnolia is as beautiful as knitting with it (It’s a wrap!)
If you’re unfamiliar with weaving terminology, here’s a brief explanation of some of the terms.
Warp – the yarn that runs lengthwise on the loom.
Weft – the sideways yarn that’s on the shuttle and passes through the warp to create the fabric.
Shuttle – what you wrap the yarn around to run it through the warp.
Heddle – each thread of the warp is run through the heddle to separate the yarn; also referred to as Reed.
Rigid Heddle - a fixed panel that separates and moves the warp threads. It also acts as the beater to compress the weft threads with each pass of the shuttle.
Shed - the separation between upper and lower warp yarns through which the weft is woven.
Dpi or epi – Dents per Inch – the number of warp thread slots and eyelets per inch in the heddle or reed. Ends per Inch refers to the number of warp threads per inch.
Once the design was finalized, I entered my desired measurements into a spreadsheet I prepared, which in turn calculated the yardage needed for each color. My plan was to make a wrap approximately 16” wide x 72” in length, to wear like a stole, but with enough length to allow it to be thrown over a shoulder. After entering all my numbers into my


spreadsheet, it suggested I needed approximately 350yds of Frayed Denim, 237yds of Citrus Leaf and 308yds of Key Lime. This is an approximation, so it’s better to err on the side of caution and up these numbers by about 10%. A skein of Magnolia is 361yds so that meant I needed 1 skein of each Citrus Leaf and Key Lime, and 2 skeins of Frayed Denim.
After I had all the information I needed, it was time to ‘dress the loom’ by putting on the warp and threading it through the heddle, and loading 3 separate shuttles with my colors. Then I was ready to sit down and weave, which is the fastest part of this entire process. It took far less time to actually weave than all the preparation time, and significantly faster than knitting a stole of this size.
Image from the weaving software of my plan
The final wrap woven with Magnolia in Frayed Denim, Citrus Leaf and Key Lime
37KNITmuch | issue 16
The finished wrap is very soft and satiny to the touch and I love how the three colors of Magnolia worked beautifully together. My finished measurements turned out to be 14½” wide by 77” in length before laundering and without the fringe. I expect it will be shorter after washing it which will compress the threads together somewhat. I hem stitched the beginning and the end, but haven’t decided what to do with the fringe. I don’t intend to leave it that long but until I decide, I won’t shorten it. I may twist the ends together or tie them into groups, both of which are easier to do when it’s long. I may just cut them back to 1” but I have plenty of time to decide before the warmer weather actually gets here. And I did need to go into the second skein of the Frayed Denim to finish the project, but 1 skein of each Citrus Leaf and Key Lime did the trick.
I’m really pleased with how well these projects turned out. Working with Magnolia was wonderful and I love the colors I chose. If you recall back on Day 1, I stated that I changed my project plan a little once the yarn arrived. I had originally planned on knitting a tank top, but changed to the T-shirt. Now that everything is done and I have a little bit of each color left, I think I’ll make a tank top. If I’m short on yarn, I’ll just have to take a trip to my LYS and ask for another skein of Universal Yarn Magnolia. Though, I expect I’m likely to leave the store with more than a skein once I see some of the other 14 colors.
Cindy O'Malley cindooknits.blogspot.com
 My ensemble is complete – the Paulie cardigan, a woven stole, and the Cherries on Top T-shirt, all made with Magnolia in my favorite summer colors.
38 KNITmuch | issue 16
Welcome to Thoughtful Soles Series by Lorraine Thompson!

is a zany collection of knitted sock patterns to tickle your funny bone every time


wear them.

Thoughtful Soles Series
DARK MUSHROOMS
GINGHAM APPLES
WOOL STEW HIGH FIBRE BUMPS IN THE ROAD
WINTER IS COMING
T IS FOR TURN
TICK TOCK
WIGGLE ROOM
BALI POP SOCKS
SIMPLY PUT SOCKS
LAZY
39KNITmuch | issue 16
This
you
CLICK on the cart to purchase the pattern!
COLOURWASH
DAYS
Crochet Felting Knitting Spinning Rug Hooking Weaving
KNITmuch
Standard abbreviations & terms
alt = alternate approx = approximately beg = begin(ning)
BO= bind off
CC = contrast color ch = chain cm = centimetre(s)
cn = cable needle
co = cast on cont = continue, continuing dc = double crochet dec = decrease(s), decreasing dpn = double-pointed needle(s) foll = following g = gram(s)
hdc = half double crochet inc = increase(s), increasing in(s) = inch(es)
k = knit
Standard Yarn Weight System
Standards & Guidelines For Crochet and Knitting YarnStandards.com
kf&b or kfb = knit into front and back of st (increase) ktbl = knit through the back loop
k2tog = knit 2 sts tog (right-leaning decrease)
Categories of yarn, gauge ranges, and recommended needle and hook sizes
Standard Yarn Weight System
Standard Yarn Weight System
k3tog = knit 3 sts together (double right-leaning decrease)
m = marker m = meter(s)
Yarn Weight Symbol & Category Names
Type of Yarns in Category
Knit Gauge Range* in Stockinette Stitch to 4 inches
Yarn Weight Symbol & Category Names
Categories of yarn, gauge ranges, and recommended needle and hook sizes
Categories of yarn, gauge ranges, and recommended needle and hook sizes
Type of Yarns in Category
Knit Gauge Range* in Stockinette Stitch to 4 inches
Fingering, 10 count crochet thread
Fingering, 10 count crochet thread
Recommended Needle in Metric Size Range
Recommended Needle in Metric Size Range
m1 = Make 1 stitch: pick up the horizontal strand between 2 stitches from front to back and knit it tbl (lifted increase)
MC = main color mm = millimetre(s)
Sock, Fingering, Baby Sport, Baby DK, Light Worsted
Yarn Weight Symbol & Category Names
Type of Yarns in Category
Worsted, Afghan, Aran
Chunky, Craft, Rug Bulky, Roving Jumbo, Roving
oz = ounce(s)
p = purl
Sock, Fingering, Baby Sport, Baby DK, Light Worsted
Fingering, 10 count crochet thread
Worsted, Afghan, Aran
Sock, Fingering, Baby Sport, Baby DK, Light Worsted
Chunky, Craft, Rug Bulky, Roving Jumbo, Roving
33–40** sts 27–32 sts 23–26 sts 21–24 sts 16–20 sts 12–15 sts 7–11 sts 6 sts and fewer
Worsted, Afghan, Aran
p2tog = purl 2 sts tog (decrease) patt = pattern pfb = purl into front and back of stitch (increase) pm = place marker
psso = pass slipped stitch over
Chunky, Craft, Rug Bulky, Roving Jumbo, Roving
33–40** sts 27–32 sts 23–26 sts 21–24 sts 16–20 sts 12–15 sts 7–11 sts 6 sts and fewer
33–40** sts 27–32 sts 23–26 sts 21–24 sts 16–20 sts 12–15 sts 7–11 sts 6 sts and fewer
1.5–2.25 mm 2.25–3.25 mm 3.25–3.75 mm 3.75–4.5 mm 4.5–5.5 mm 5.5–8 mm 8–12.75 mm
Knit Gauge Range* in Stockinette Stitch to 4 inches
12.75 mm and larger
RS = right side rem = remain(ing) rep = repeat rev = reverse rnd = round sc = single crochet sl = slip skp = slip one st, knit next st, pass slipped st over knit st (dec)
Recommended Needle U.S. Size Range 000 to 1 1 to 3 3 to 5 5 to 7 7 to 9 9 to 11 11 to 17 17 and larger
1.5–2.25 mm 2.25–3.25 mm 3.25–3.75 mm 3.75–4.5 mm 4.5–5.5 mm 5.5–8 mm 8–12.75 mm
Recommended Needle in Metric Size Range
Crochet Gauge*Ranges in Single Crochet to 4 inch
Crochet Gauge*Ranges in Single Crochet to 4 inch
Recommended Hook in Metric Size Range
Recommended Hook in Metric Size Range
Recommended Hook U.S. Size Range
Steel***
Recommended Hook U.S. Size Range
12.75 mm and larger
Recommended Needle U.S. Size Range 000 to 1 1 to 3 3 to 5 5 to 7 7 to 9 9 to 11 11 to 17 17 and larger
32–42 double crochets** 21–32 sts 16–20 sts 12–17 sts 11–14 sts 8–11 sts 7–9 sts 6 sts and fewer
Steel*** 1.6–1.4 mm Regular hook 2.25 mm
1.6–1.4 mm
Regular hook 2.25 mm
Steel*** 6, 7, 8 Regular hook B–1
1.5–2.25 mm 2.25–3.25 mm 3.25–3.75 mm 3.75–4.5 mm 4.5–5.5 mm 5.5–8 mm 8–12.75 mm
12.75 mm and larger
Recommended Needle U.S. Size Range 000 to 1 1 to 3 3 to 5 5 to 7 7 to 9 9 to 11 11 to 17 17 and larger
sssk = slip next three stitches individually, knitwise. Insert tip of left needle from front to back into the fronts of these three stitches and knit them together (double left-leaning decrease)
st(s) = stitch(es)
St st = stocking stitch

tbl = through back loop
40 KNITmuch | issue 16 Standards Steel*** 6, 7, 8 Regular hook B–1
2.25–3.25 mm 3.5–4.5 mm 4.5–5.5 mm 5.5–6.5mm 6.5–9 mm 9–15 mm
32–42 double crochets** 21–32 sts 16–20 sts 12–17 sts 11–14 sts 8–11 sts 7–9 sts 6 sts and fewer
Crochet Gauge*Ranges in Single Crochet to 4 inch
Recommended Hook in Metric Size Range
tog = together tr = treble crochet
32–42 double crochets** 21–32 sts 16–20 sts 12–17 sts 11–14 sts 8–11 sts 7–9 sts 6 sts and fewer
15 mm and larger
WS = wrong side yo = yarn over
Steel*** 1.6–1.4 mm Regular hook 2.25 mm
B–1 to E–4 E–4 to 7 7 to I–9 I–9 to K–10 1⁄2
2.25–3.25 mm 3.5–4.5 mm 4.5–5.5 mm 5.5–6.5mm 6.5–9 mm 9–15 mm
2.25–3.25 mm 3.5–4.5 mm 4.5–5.5 mm 5.5–6.5mm 6.5–9 mm 9–15 mm
K–10 1 2 to M-13 M-13 to Q Q and larger
15 mm and larger
15 mm and larger
Recommended Hook U.S. Size Range
* GUIDELINES ONLY: The above reflect the most commonly used gauges and needle or hook sizes for specific yarn categories.
Steel*** 6, 7, 8 Regular hook B–1
B–1 to E–4 E–4 to 7 7 to I–9 I–9 to K–10 1 2
** Lace weight yarns are usually knitted or crocheted on larger needles and hooks to create lacy, openwork patterns. Accordingly, a gauge range is difficult to determine. Always follow the gauge stated in your pattern.
*** Steel crochet hooks are sized differently from regular hooks--the higher the number, the smaller the hook, which is the reverse of regular hook sizing.
This Standards & Guidelines booklet and downloadable symbol artwork are available at: YarnStandards.com
11 B–1 to E–4 E–4 to 7 7 to I–9 I–9 to K–10 1 2
K–10 1 2 to M-13 M-13 to Q Q and larger
* GUIDELINES ONLY: The above reflect the most commonly used gauges and needle or hook sizes for specific yarn categories.
** Lace weight yarns are usually knitted or crocheted on larger needles and hooks to create lacy, openwork patterns. Accordingly, a gauge range is difficult to determine. Always follow the gauge stated in your pattern.
K–10 1⁄2 to M-13 M-13 to Q Q and larger
* GUIDELINES ONLY: The above reflect the most commonly used gauges and needle or hook sizes for specific yarn categories.
** Lace weight yarns are usually knitted or crocheted on larger needles and hooks to create lacy, openwork patterns. Accordingly, a gauge range is difficult to determine. Always follow the gauge stated in your pattern.
*** Steel crochet hooks are sized differently from regular hooks--the higher the number, the smaller the hook, which is the reverse of regular hook sizing.
This Standards & Guidelines booklet and downloadable symbol artwork are available at: YarnStandards.com ssk = slip, slip, knit: slip 2 sts knitwise, 1 at a time, insert left-hand needle into front of both sts and knit them tog (left-leaning decrease)
*** Steel crochet hooks are sized differently from regular hooks--the higher the number, the smaller the hook, which is the reverse of regular hook sizing.
& Guidelines For Crochet and Knitting • YarnStandards.com
Standards & Guidelines For Crochet and Knitting YarnStandards.com
Saturday October 15, 2022 9am to 4pm Paris Fair Grounds, 139 Silver St, Paris,ON www.fleecefestival.com 13th Annual Demos Food Vendors Workshops
