Inspection -
Product (1 to 3 months intervals)
Operational Inspections should be carried out by trained operators with the results recorded in a permanent log.
If anything is noticed below, please see maintenance procedure further on in this document and the product install guides that give specific information on parts. Care should be taken that the rate of wear and time to the next inspection is taken into account.
Each Sport or Fitness feature shall be tested with a suitable force to confirm its function.
General Checklist
Structure is not bending, cracking, loosening, excessively corroded or other deterioration
Note: Special attention should be given to:
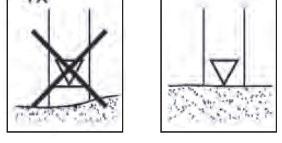
- Equipment where stability relies on a single structural support.
- The area of the structure as it enters the ground.
Surface finish has no damaged paint, rusting, other corrosion, or deterioration.
Note: Particular attention should be made to the area of the structure just as it enters the ground.
The foundation is not cracked, loose in ground or exposed due to damage or deterioration of the finished surface used.
Note: Special attention should be given to:
- Equipment where stability relies on a single structural support or a linear line of structural supports.
Site and Surfacing
- Ensure that site is clear of all dangerous objects and rubbish, and there are no trip points within the products’ Movement Space (Fitness) or Playing Area (Sports)

- If a grass surface has been selected, ensure it is in good condition.

- For more detailed inspection and maintenance of surfacing, please see separate section.
That all fixings are tightened and have no protruding sharp edges.
Welds show no visible cracks or corrosion.
Ensure all moving parts are operating smoothly.
Ensure any anti-slip surfaces (Fitness product step & seat treads) are still in serviceable condition
Ensure all parts are free from sharp edges.
Plastic items including mouldings, panels, plugs, spacers etc., are secure and not broken, loose, cracked, have no sharp edges, burnt, deformed, missing. Show no signs of embrittlement due to UV light
Ensure all product use labels (Fitness products only) and facility signage is still legible.
4
Wooden Items
All wooden items are not broken and have no sharp edges or splinters .
Note: All wooden items are prone to expansion and contraction that may cause temporary splits. This will depend on climate and temperature variance. Any cracks should be monitored to ensure they do not grow sufficiently or compromise structural strength.
Give a detailed check of all timber parts to confirm if any rot/degradation is present that could compromise its structural capacity.
Special attention shall be given to dynamic items and those that rely on one post for their stability.
The recommended inspection method for identifying early signs of degradation in timber is the use of a small diameter (approx. 3-4mm dia) steel rod with a rounded point. Attempting to insert the device a number of times at evenly spaced points around the outer face of the post, in the accessible zone where moisture and oxygen combine in their optimum, in areas under the highest levels of structural load. The probe shall not easily enter the timber when pushing and there shall be no sign of softness, when compared with a fresh timber part. Any cracks in the timber can also lead to rot establishing from the inside.
Care should be taken to not disturb material in the post potentially leading to future acceleration of degradation. Small pockets of rot do not necessarily mean the post will fail catastrophically in the near future and any suggested action should be considered carefully by the inspector depending on the amount and extent of degradation.
For structural wooden parts going direct into ground, care should be taken to ensure the inspection method and probing is carried out in the zones of the post at the greatest risk of degradation. For loose-fill surfacing at or below ground level but above the concrete foundation by temporarily scraping back the loose-fill material. For synthetic surfacing directly at or just above/below surface level. If the ground is prone to retaining water or flooding, then extra attention also needs to be taken. For larger sections of timber intended to offer greater structural stability or timbers raising concern, more sophisticated test methods such as digital resi-drill inspections are available if considered necessary.
If any concern occurs, please contact a local timber expert or contact HAGS for further advice. Where necessary products must be taken out of use, until a further investigation has been completed.
Steel items
Give a detailed check of all steel parts to confirm if any corrosion/degradation is present that could compromise its structural capacity.
The recommended inspection method for identifying early signs of corrosion in steel is visual observation and the use of a small diameter (approx. 3-4mm dia) steel rod with a rounded point. Attempting to insert the device a number of times at evenly spaced points around the outer face of the post in the accessible zone where moisture and oxygen combine in their optimum in areas under the highest levels of structural load. The probe shall not easily enter the steel when pushing and there shall be no sign of softness.
5
If areas where the surface coating is broken are detected, special attention should be given as there is a higher risk of corrosion.
For structural steel parts going direct into the ground, care should be taken to ensure the inspection method and probing is carried out in the zones of the post at the greatest risk of corrosion. For loosefill surfacing at or below ground level but above the concrete foundation by temporarily scraping back the loose-fill material. For synthetic surfacing directly at or just above/below surface level. If the ground is prone to retaining water or flooding, then extra attention also needs to be taken.
Special attention shall be given to dynamic items and those that rely on one post for their stability.
For those steel sections intended to offer greater structural stability or those raising concern, more sophisticated test methods such as ’eddy current’ tests are available if considered necessary.
If any concern occurs, please contact a local structural steel expert or contact HAGS for further advice. Where necessary products must be taken out of use, until a further investigation has been completed
HAGS Fitness products only:
Ensure that all external buffers are securely in place and not broken, loose, cracked, burnt, deformed. For items with internal buffer stops, manually manipulate the product, rotating hubs to the stop position, applying a suitable force to any cantilever arms and listen/look for signs of metal on metal contact, crushing points or squeaking (indicating a buffer may be dislodged, damaged or worn). A use test is also helpful to confirm suitability, in addition to the manual manipulation . If there is any doubt, the buffers should be replaced immediately. In particular for the Leg Press, check the resistance in the pendulum arm seat, motion stop buffers: The leading edge of the seat should be at least 24cm from the footrest, when a pulling force of 24Kg is alied to the seat. If the clearance dimension is less, the buffer stops should be replaced immediately for continued safe use of the product.
Fibre Rope;
• Ensure the rope is still firmly twisted together, without any finger trap points, paying particular attention to connection points.
• Ensure any damage is made good. If the damaged areas reduce the cross section of the rope to less than 70% of its original size, it should be replaced.
Friction pad thicknesses on hand and foot cycle mechanisms (including Trinity) should be asses sed by rotating the cranks and listening for sounds of metal on metal contact (which would indicate excessive wear) To prevent excess wear to friction pads and minimize the needs for other replacement parts, it is recommended that the cranks and cover plates are removed annually, and the thickness of the friction pads are measured, minimum recommended thickness 2mm.
6
TGO Fitness products only:
Check all fixings are tight, and if need be tighten using tools listed below.
Operate all machines, identify any squeaks, noises in moving parts.
Check all moving parts are moving as they should .
Check if LEDs are working if present on consoles
If there is a console present is this working as expected?
Check all welds and that there are no hair line fractures present. If there are, tape off and report into HAGS.
Multi-Sports products only:
Ensure any self-closing gate is operating correctly and with an acceptable closing speed.
Ensure hinge pin on the DICTATOR Tube Gate Closer is lubricated.
Ensure ball stop nets are still securely in position. Check all cables, connections, net tie-off points and net fibres. Any damaged or missing parts should be replaced.
7
Inspection Results Faults Log
Date
Faults noticed
Faults corrected
Faults outstanding and need further action
Name
Profession
Signature
8
5. Surfacing
For Fitness products; any Impact Attenuating Surfacing should undergo comprehensive routine and operational inspection and maintenance in accordance to the recommendations of EN 16630.
For Multi-sports products; there are no specific requirements for Impact Attenuating Surfacing, as access to elevated positions should not be encouraged. The choice of surfacing should be determined by specific user and site requirements assessment
The frequency of inspection will vary with the type of surface/materials used and other factors e.g heavy use, levels of vandalism, coastal location, air pollution, age of equipment, location adjacent trees. The type of equipment will also have an effect, with high intensity products being expected to wear and reduce the expected life of the surface more quickly. When an existing surface is viewed as being no longer effective it should be replaced. For all types of impact attenuating surfacing particular attention shall be given to the effects of ageing (exposure to UV, heat, cold), pollution, causing degradation, or loss of the impact attenuating properties.
If areas are discovered to be unsafe during inspection and cannot be replaced or corrected immediately, the equipment (or parts) should be secured against further use (immobilised or removed from site).
Note: Lack of maintenance may reduce the impact attenuation properties of the surface and reduce its performance from the original EN 1177 test performance.
Routine Visual Inspection
A routine visual inspection is recommended. This should consist of the following (same as Operational) as a minimum, in the case where the equipment is under intensive use or the object of vandalism, a daily check of this kind should be necessary.
Operational Inspection
Operational Inspections (1 to 3 months intervals) should be carried out by trained operators with the results recorded in a permanent log.
10
Checklist
Surface not compacted, damaged.
Surface is clean and has no contaminates, sharp objects, mould growth or obstacles.
The surface is draining well, with no water puddles or soft areas.
Additional specific checks for Rubber wet pour:
Surfaces not cracking and still bonded to all perimeter edges and equipment up-stands
Surfaces and the containment are free from protruding hard/sharp edges.
Surfaces are free from contaminates or sharp objects.
Surfaces are not vandalised, burnt or excessively worn.
Surfaces are not slippery; free from leaf build-up or other organic growths.
Additional specific checks for Loose Fill:
If a loose fill surface has been selected, ensure it is in good condition and that it is of sufficient thickness to coincide with the ‘Basic Level Marks’ on the equipment up stands. Pay particular attention to high use areas.
Particles have not consolidated and within the expected size range.
Additional specific information for Grass/Turf:
Ensure the grass is still in good condition, with no bare muddy patches .
Note: For Fitness equipment; materials such as grass have some limited impact attenuating properties and experience has shown that if well maintained, they are effective for certain fall heights and may be used without the need to conduct a test (subject to EN 16630 and national recommendations). If not adequately maintained their impact attenuation is significantly reduced
Additional specific checks for rubber Grassmatt type surfaces:
Ensure under-lying grass is still in good condition, with no bare muddy patches.
Ensure the rubber mats have not significantly consolidated into the under-lying soil.
Check adjacent mats are still securely connected and perimeter edges secured, with no trip points.
Note: The performance of Grass matt surfaces relies on the underlying soil conditions, together with the promotion of good grass growth. This can vary from site to site and can also change seasonally or over time. The installation of the product should be continually monitored and maintained as r equired.
ANNUAL MAIN INSPECTION (not exceeding 12 months)
A detailed inspection should be carried out by a specialist and the results of such inspections entered into a permanent record. The inspection is intended to establish the overall performance of the surfaces.
11
6. Maintenance Procedure
Whilst any maintenance is carried out the equipment must be secured against use and the public warned of any risks associated with the work.
Any parts replaced must comply with HAGS/TGO specifications.
See installation guides for part number, part identification and information of disassembly and assembly.
Clean all equipment at least once a year unless the provision is within 1500m of the sea in which case it should be carried out at least every three months. To remove dirt, mould, contamination, salt deposits etc. with mild detergent solution (do not use strong solvents or solutions containing chlorinated hydrocarbons, esters, ketones or abrasive cleaners or polish) using a soft cloth, sponge or brush. Special attention should be given to walk areas, foot and seat supports, handrails and horizontal surfaces.
Although bearings are usually sealed and contained with the hubs to lower the risk of any damage, it is still advised not to pressure wash the fitness equipment.
Powder Coated Finish
Periodically our products should be inspected for mechanical damage, and we recommend that the powder-coated finish components be cleaned with a mild detergent solution and soft cloth. This should be carried out at least once a year, unless the provision is within 1500m of the sea in which case it should be carried out at least every three months.
Any identified breaks or scratches in coating surface, should be made good within a month:
- Any bare metal should be thoroughly abraded with a fine grade sandpaper to remove any corrosion
- Clean area with a non -aggressive solvent.
- Immediately repaint using HAGS touch up paint. Please contact your HAGS representative for further advice. If bare metal, please use zinc rich primer before topcoat. When anti-microbial coatings were provided on the original product, ensure to order the compatible touch up paint.
Avoid any refurbishment work in direct sun or in temperature less than +10 degrees.
Particular attention should be paid to the areas adjacent to stainless steel components where corrosion on bare steel would be accelerated.
Galvanized Steel Components
Any damage or scratches penetrating the coating surface identified should be made good within a month:
- Any bare metal should be thoroughly abraded with a fine grade sandpaper to remove any corrosion.
- Clean area with a non -aggressive solvent.
- Then immediately repaint using a suitable cold galvanizing application.
12
Avoid any refurbishment work in direct sun or in temperature less than +10 degrees.
Polyethylene (plastic engraved), HPL/MEG (full colour printed) Panels, Plastic mouldings.
Normal grime deposits can be removed from the installed panels with common, non-abrasive, household detergents using paper towels, sponges or soft cloths. Always avoid excessive rubbing or wiping and the use of instruments that could cause abrasion or scratching. Rinsing is recommended to remove all traces of detergent and it should be dried thoroughly to avoid leaving marks.
Graffiti can be removed from Polyethylene panels with a suitable detergent or graffiti remover.
MEG panel’s chemical resistant composition and closed structure prevent spray paints, various inks, emulsion paints, lipstick and crayons from sticking to the surface and penetrating the material. No preventive anti-graffiti treatment is necessary. If the surface of a MEG panel should be defaced by graffiti, and for any special cleaning requirements, please contact HAGS for advice.
Should any panels need replacing, please refer to the products Installation Instructions for replacement parts.
All HAGS plastic products are UV stabilised to p rovide a long trouble-free life. However, after extended UV exposure some colour fading and material embrittlement can be expected. This will vary depending on the location and orientation of the products, but after a period of 10 years in normal environment, all products should be regularly checked for signs of embrittlement and replaced as required.
Any cosmetic damage to panels, including wear or colour fade should be monitored with panels being replaced as required.
Motion Stop Buffers
These should be replaced immediately with new when required.
HAGS Fitness products only;
Trinity Cycle
Hand and foot cycle mechanism - friction discs (8005779) These should be replaced with new when required.
TGO maintenance toolkit requirements
- Security Drive Bit Set - Pinned Hex and Pinned Torx Various Sizes
- Touch Up Pen – Green/Black/Silver
- GT85 (200ml) or equivalent maintenance oil (penetrating oil is not to be used on bearing parts)
13
You will also need some other basic tools to assist you.
These are:
- Socket Wrench.
- Cleaning Wipes
- Non-ferrous tools (for use on coastal sites)
- Bucket of water/cloth (For cleaning) - G3 Compound.
Bearing replacement tools:
- Portable brazing torch (equivalent to a Vulcane Express 472 with a type 14 Nozzle and Map/pro Gas)
- Loctite 270 or equivalent
Procedure:
Check all fixings are tight, and if need be tightened by hand. Loctite 270 may be required. (not to be used on service access items such as cover plate fixings)
Operate all machines, identify any squeaks, noises in moving parts.
Check all moving parts are moving as they should
If there is a console present, is this working as expected?
Lubricate moving parts carefully where necessary with maintenance oil
Check all welds and that there are no hair line fractures present. If there are, tape off and report into HAGS
Check all signage is present
If problem with the power smart – Lights not coming on or high or low resistance. Please refer to pages 16 and 18 before unbolting and returning for service.
Change any failed or worn bearings, saddles, signage, USB and other consumables
Clean off any salt deposits with soapy water
Paint over any chips in paint with touch-up paint in same colour
It is recommended to Spray with antiviral product regularly and at least at maintenance visits
Ensure the site is left safe and where problems have not been resolved tape off and report into HAGS
Bushes and bearings
If any noise or squeaking occurs or if it does not run smoothly, please apply maintenance oil, universal grease or silicon spray (not penetrating oil). Make sure any over-spill is entirely cleaned off.
If motion is still an issue or if the bush, bearing or swivel has worn out, replacement will be necessary. As a guide we recommend more than 0.5mm movement within component would require replacement.
The correct specification of bearing and specific instructions can be supplied by HAGS. Bearings must only be changed with the correct tools. Oilite bearings are used and due to the very soft material the
14
bearings should be pressed in and not impacted, it may be necessary to ream to replace the Oilite bearings to obtain the correct fit. Replaced Oilite b earings will require additional lubrication during a settling period.
Friction pads are used in some TGO machines for resistance. These can become noisy for various reasons. They should be assessed by rotating the cranks and listening for sounds of metal on metal contact (which would indicate excessive wear) etc. To prevent excess wear to friction pads and minimize the needs for other replacement parts it is recommended that the cranks and cover plates are removed annually and the thickness of the friction pads are measured, minimum recommended thickness 3mm. Ensure all parts are in alignment and the friction pad housing is between 1-2.5mm from the disk surface. Disc warping is often a cause of noise, also contamination with grease or other residue. Brake cleaner can be used to de-contaminate.
Fixings
Check tightness of all fixings. If loose ensure they are retightened. Note: Where fixings are not service items they are assembled using Loctite 270, removal of parts assembled with Loctite 270 usually requires the application of heat, sometimes considerable. To apply heat, use the brazing torch around the part to ‘heat soak’ the full depth of the fixing. Care is required to avoid damaging the paint.
Paint
Clean off any salt deposits with soapy water. Do not jet wash. Touch up any paint damage or chips with HAGS touch up paint – see cleaning section for more details.
Saddles and seat pad replacement
Saddles and seat pads are considered to be service parts and are not covered under the terms of the warranty for wilful damage or vandalism. The correct saddles and seat pads can be supplied by HAGS/TGO
Cardio Range
Check for loose components or missing fixings, specifically the 4 bolts on each rotational disk. Ensure these fixings are in place and tight. If any of these are loose remove them (one at a time) and replace with a new fixing ensuring Loctite 270 is applied and it is firmly tightened. If it is difficult to fit the new fixing, then you will need to clean out the threaded hole in the central axle.
Cross Trainer
- Operate the machine and identify if there are any issues such as noises or stiffness. Try and diagnose where this is coming from and resolve via maintenance oil or adjustment if possible.
- Check the 8 countersunk bolts that hold the main rotational discs in place are tight and secure. These are accessible via the cover place, by removing the two countersunk bolts. If any of these are loose remove them (one at a time) and replace with a new fixing ensuring Loctite 270 is
15
applied and it is firmly tightened. If it is difficult to fit the new fixing, then you will need to clean out the threaded hole in the central axle.
- Check the foot plank axle is tightly secured in place. If there is any lateral movement then it must be removed, and the flange bolt replaced. Ensure that Loctite 270 is applied , and it is firmly tightened.
- Check the countersunk bolts in handle bearing positions are tight and secure. If any of these are loose remove them (one at a time) and replace with a new fixing, ensuring Loctite 270 is applied and it is firmly tightened. If it is difficult to fit the new fixing, then you will need to clean out the threaded hole.
- Ensure the drainage holes are free from debris footplates
- Spray all moving parts (joints only) with a suitable maintenance oil (not penetrating oil)
- Remove cover if necessary, to access bearings.
Leg Press
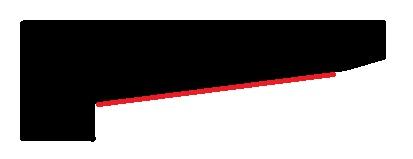
In exceptional circumstances it is possible the leg press can become jammed in the lower position, this is caused by a lack of lubrication on the brake actuator plate surfaces. A small amount of universal grease should be allied on the underside of the actuator slope at the lower end of the track (see diagram attached).
Apply grease to underside of surface marked in red on diagram (both sides of track)
16
Power Smart Range
Do NOT disassemble the power smart module generator, it is not a serviceable part and MUST be returned to the manufacturer for repair.
Check for operational functionality. Check LEDS come on the console Check the phone charging and USB ports
The USB connector can be replaced if damaged on the control console, refer to the specific product install guide.
If a Power smart generator is noisy or not functioning properly, the complete module, including generator, should be removed and returned to HAGS Do NOT disassemble the power smart module generator as there are high-power magnets inside.
For removal and re-installing the Power smart generator, LED strip and control console, please refer to specific product install guide.
Pull up assisted pull up
Tighten upper bolts.
Lat pull down shoulder press and chest press seated row
Specifically check the tear drop pin fixings. If any of these are loose ensure they are removed and replaced. Please ensure that the correct fixings are used, and that Loctite 270 is applied. Ensure the new fixing is tightened firmly in place
Prohibited Equipment
Power tools for tightening and loosening bolts are prohibited. This includes drills and impact wrenches. Using these types of power tools increases the risk of damaging the fixing and paint around the joint.
Spares
You may require spare parts from time to time for each product.
Frequency
The frequency of maintenance required will vary according to the quality of inspections and popularity of site or item of equipment. The minimum level of maintenance is high quality maintenance every quarter. A light daily /weekly/monthly check is still recommended.
17
Variation of gym equipment
Gym equipment may vary slightly from the images and diagrams. They will all still operate in the same manner and require the same level of maintenance.
Assembly/Disassembly of equipment
As fixings are removed or added panels may move and cause damage to the paint if the equipment is operated. Always check that there is a clearance gap between moving components. e.g., on the cross trainer between the crank disc and cladding.
Diagnostics
It may be necessary to do some diagnostics to identify the root cause of issues. For example:
Cardio Range Diagnostics (non-power)
Ref Issue
Possible cause
1 Stiff Brake set too strong Bushing worn
Material ingress
Misalignment
Recommended action
Loosen brake
Replace bushing, lubricate bushing
Check for material ingress and remove
Inspect moving components
2 Loose Brake set too weak Tighten brake
3 Noisy Brake disc dirty Material ingress
Worn parts
Misalignment
4 Paint Damage Due to vandalism
Due to mechanical failure
Salt deposit
Graffiti
5 Jammed Material ingress
Misalignment
Over forced
6 Loose or wobbly Stub axle
Clean brake disc
Remove ingressed material and clean
Replace worn part/s
Check dissimilar moving components are not touching
Clean area and repaint with TGO approved paint
Repair cause, and action as above
Clean with warm water and mild detergent
Clean with anti-graffiti wipes
Check for material ingress and remove
Inspect moving components
Apply force in correct direction/dismantle equipment
Check the foot plank axle is tightly secured in place. If there is any lateral movement then it must be removed, and the flange bolt replaced. Please ensure that Loctite 270 is applied , and it is firmly tightened.
18