
How to use Moodle 4.1
Teacher’s Manual for the world’s most popular LMS
Jaswinder Singh
1
How to use Moodle 4.1
Manual for the world’s most popular open source LMS
Teacher’s
This work is licensed under a Creative Commons Attribution-ShareAlike 4.0 International (CC BY-SA 4 0) License 2
This book is dedicated to Guru Tegh Bahadur Ji, (9th Guru of Sikh religion) who sacrificed his life to protect the rights of the Hindus of Kashmir.
“The one who sacrificed his life for mankind must always be remembered and thanked.”

3
Table of Contents Table of Contents 4 Preface 13 What is Moodle 13 Who Is This Book For? 13 Prerequisites What Do You Need Before You Start? 13 Chapter 1 : Introduction 14 What Is a Learning Management System? 14 Why Should You Use Moodle as LMS? 14 Moodle is Open Source 14 Sound Educational Philosophy 15 Constructivism 15 Constructionism 16 Social constructivism 16 Connected and separate 16 Community Support 16 Great documentation 16 Great Collection of Plugins 17 Language Options 17 Responsive Interface Design 17 Chapter 2 : Getting started with Moodle 18 Getting Started 18 The Moodle Interface 18 Creating a new Account 19 Editing Your User Profile 21 Manage your preferences 23 User account 23 Badges 24 Blogs 24 Roles 25 Standard view of a blank course 25 Parts of a course homepage 26 Course Formats 28 Modify Course Settings 30 Editing Mode in Moodle (Turn Editing On) - 34 Adding content to the course 35 Common Module Settings 36 Common Module Settings 36 4
Restrict Access 38 Hiding the conditions 40 Restricting whole course section access 40 Activity Completion 40 Completion tracking 40 Require View 40 Require grade 41 Receive a passing grade 41 Changing activity completion settings in bulk 41 Tags 41 Competencies 41 Summary 42 Chapter 3 : Resources in Moodle 44 Book Resource 45 What is a Book Resource? 45 How to set up a Book resource in a Moodle course? 46 How you can add content in Book resource 46 How does it work for students? 47 Import Chapters in Book 48 Import Content from Microsoft Word in Book 48 File resource in Moodle 48 How to add File Resource in Moodle Course 48 Adding URL to the course 50 Creating a folder resource 52 Adding a Text and Media area (Earlier Label) resource 55 Composing a Page Resource: 56 Adding a page resource: 56 Why should you use a Page resource and not a File Resource? 57 Adding an IMS content package 58 Summary 59 Chapter 4 - Managing your class in Moodle 60 Blocks in Moodle 60 Groups and Groupings 61 Creating a group: 62 Auto-create groups: 64 Why use groups: 65 Groupings 65 Adding groups to a grouping: 65 Cohorts 66 Creating a cohort: 67 5
Creating cohorts in bulk: 67 Understanding and using roles 67 Moodle’s Default roles description: 68 Understanding Context, Permission, Role and Capability 69 Assigning Roles in Your Course: 70 Enrolling Students in the course 70 Removing Students 71 Temporarily Suspending a User Account 71 Managing Enrollment Methods for your course 72 Summary 73 Moodle Activities 74 Chapter 5 : Assignment 75 Assignment (Submission) types: 76 Adding an Assignment activity: 77 Assignment capabilities 82 Managing Assignment Submissions: 82 Filtering submissions: 83 Allocating submissions to markers 84 Submission status: 84 Granting extensions 85 Quick grading 85 Grading individual submissions 86 Annotating submissions 87 Offline marking - downloading and uploading multiple grades and feedback files 87 Downloading student submissions 87 Summary 87 Chapter 6 : Quiz and Question Bank 88 Moodle Quiz Features 88 Moodle Question Types 89 Building a Moodle Quiz Activity 91 Creating the Quiz Body 92 Adding Questions to Quiz Activity 97 Creating a new question 98 Adding from Question bank 98 Adding a random question 99 Question Types in Detail 99 Calculated Questions 99 Calculated Multichoice 103 Calculated Simple 103 Description 104 6
Embedded Answers (Cloze) 104 Essay 104 Matching 105 Multiple Choice 107 Numerical 108 Random short-answer matching 109 Short Answer 110 True/False Question 110 Select Missing Words 111 Drag and drop into text 112 Drag and Drop markers 113 Drag and drop onto image 114 Question Bank 115 Select a category 116 To add a category 116 Deleting Categories 117 Importing Questions 118 Exporting Questions 119 Quiz layout 120 Section headings 121 Assigning points to questions 121 Quiz Override for specific user/users 121 User Overrides 121 Group Overrides 123 Quiz Reports 123 Grades Report 124 Deleting attempts 125 Responses Report 125 Statistics Report 125 Manual grading report 125 Summary 126 Chapter 7 : Glossary 127 Creating Glossaries in Moodle 128 Using Glossary: 131 Adding Entries: 132 Editing glossary entries 132 Search Options 132 Autolinking 132 Importing and Exporting Entries: 133 Printing a glossary 133 Glossary Capabilities 134 7
Effective Glossary Practices 135 Creative Glossary Uses 135 Summary 135 Chapter 8 - H5P & BigBlueButton 136 H5P Activity 136 Moodle Content bank 137 Adding H5P activity in Moodle course 138 Using H5P activity 140 Embedding H5P into other activities 140 H5P Capabilities: 140 BigBlueButton 141 Add BigBlueButton activity in Moodle 141 Using BigBlueButton 144 Summary 144 Chapter 9 - Lesson 145 Creating a Lesson Activity: 147 Building Lesson Activity 149 Adding content and questions to your lesson 151 Import questions: 151 Add a cluster: 151 Add a content page: 151 Add a question page: 153 Question types: 153 Moving your lesson forward: 154 Ending your lesson 154 Managing Lessons 154 Lesson capabilities 155 Creative Lesson Uses 155 Summary 156 Chapter 10 - Chat, Messaging and Forums 157 Forums 157 Moodle Forum types: 158 Creating a forum 159 Using Forums 162 Replying to discussions 163 Star discussions 163 Sort Discussions 163 Permalinks 163 Subscribing to forum discussions 163 Track read and unread forum posts 163 8
Display Options 164 Reply to posts via email 164 Pinned posts 165 Manually locking discussion threads 165 Locking a discussion 165 Moving a discussion 165 Splitting a discussion 165 Using groups with forums 165 Forum Capabilities: 166 Effective Forum Practices: 168 Starting the discussion 168 Encouraging participation 168 Chat Activity 169 Why use chat? 169 Why NOT use chat? 170 Creating Chat in Moodle Course 170 Using Chats 172 Chat Reports 172 Creative Chat Practices 173 Messaging 173 Message alerts: 173 Instant messaging 174 To send a message to an individual: 174 Summary 175 Chapter 11 - Database, Wiki & Workshop 176 Wiki Activity 176 Adding Wiki in Moodle Course 177 Creating first page of your wiki 179 Adding more pages: 179 Editing Wiki activity 180 Wiki capabilities 181 Effective Wiki practices 182 Group lecture notes 182 Idea Generation 182 Workshop 182 Workshop phases 183 Setup phase: 183 Submission phase: 184 Assessment phase 184 Grading evaluation phase 184 Closed 184 9
Adding Workshop Activity in Moodle 184 Using Workshop Activity: 187 Setup Phase: 188 Submission phase: 188 Assessment phase: 189 Grading evaluation phase 189 Closed Phase 190 Grading a Workshop Activity 190 Grade for submission: 190 Grade for assessment 191 Workshop Capabilities 191 Database Activity 192 Adding a Database 193 Building Database 195 Use a Preset 196 Exporting a Preset 196 Importing a preset 197 Presets for download 197 Creating Fields 197 Editing Database Templates 199 Add new entry template 200 Single template 201 List template 201 RSS template 201 CSS template 201 JavaScript template 202 Managing Databases 202 Quality of Data Entries in Database 202 Database activity capabilities 203 Creative Database Practices 204 Summary 204 Chapter 12 - Choice, Feedback and Surveys 206 Choice Activity 206 Adding a choice activity 206 Administering Choices 208 Choice Capabilities 208 Feedback Activity 208 Why use Feedback? 209 Adding a feedback activity 209 Building Feedback 211 Dependence item and Dependence value 212 10
Managing Feedback: 213 Feedback Templates: 213 Use a template 213 Save these questions as a new template 214 Delete Template 214 Export Questions 214 Import Questions 214 Feedback Capabilities: 215 Survey Activity 215 Creating Surveys: 216 Administering Surveys 218 Survey Capabilities 218 Summary 218 Chapter 13 - External Tool & SCORM 219 SCORM Packages 219 Adding SCORM Activity 219 Using SCORM Activity 222 SCORM Capabilities 223 External Tools (LTI) 224 Adding a new external tool 224 External Tool Capabilities: 227 Summary 227 Chapter 14 : Moodle Gradebook & Scales 228 Grades Interface 228 Grader Report 230 Hiding columns or individual grades 231 Editing Grades 231 Altering the grades 231 Altering the grades using Single View 232 Grade Settings 232 Set Grade Preferences 233 Grade Categories 235 Adding a grade category 236 Editing a grade category 237 Grade calculations 238 Setting a grade calculation 238 Grade Letters 238 To set your grade letter scale 238 Displaying letter grades 239 Managing grades 240 11
Automatically hide grades and feedback until a set date 240 Grade item (Adding new manual Grading items) 240 Grade History Report 242 Grade Import & Export 242 Exporting Grades 242 Import Grades 243 Scales 244 Creating a new scale 244 Single rating scale 245 Editing a scale 245 Using scales 245 Chapter 15 : Moodle Course Reports 247 Competency breakdown 247 Course completion 247 Logs 247 Live logs 248 Activity report 248 Course participation 248 Activity completion 248 Statistics 248 Event Monitoring rules 248 Insights 248 Chapter 16 - Moodle Terminology 250 Moodle Support 254 About the author 255 One last favor 256 12
Preface
What is Moodle
Moodle is an open source Learning Management System (LMS) that universities, community colleges, K–12 schools, businesses, and even individual instructors use to add web technology to their courses. More than 350 Million users from various educational organizations around the world currently use Moodle to deliver online courses and to supplement traditional face-to-face courses Moodle is available for free on the Web (http://www moodle org), so anyone can download and install it More on that later in this preface
The name Moodle has two meanings First, it’s an acronym (what isn’t these days?) for Modular Object-Oriented Dynamic Learning Environment Moodle is also a verb that describes the process of lazily meandering through something, doing things as it occurs to you to do them, an enjoyable tinkering that often leads to insight and creativity
Moodle was created by Martin Dougiamas, a computer scientist and educator who spent time supporting a LMS at a university in Perth, Australia He grew frustrated with the system and learned that engineers, not educators, had built it Martin realized that a system built by someone who started with the educational process, rather than an engineering process, would be infinitely better than what he had to work with He put his postgraduate degrees in Education and Computer Science to work and started developing Moodle as an alternative Martin now works on Moodle full-time A community of dedicated open source developers from around the world work with him in a collaborative effort to make Moodle the best LMS available. Martin lives in Australia with his wife, daughter, and son.
Who Is This Book For?
This book is for people who want to teach a course using Moodle You can use Moodle to teach a fully online course or to supplement a face-to-face course in a traditional setting It doesn’t matter if you teach at a primary school, a secondary school, in higher education, or in a corporate setting; you can use the tools and features available in Moodle to create an effective class
It is written with a perspective that you are a teacher using Moodle to teach your learners Setting up the Moodle platform or the administration tasks are not covered in this book to keep things focused and tidy for the teachers.
Prerequisites What Do You Need Before You Start?
All you need is:
● Moodle 4 1 version up and running on a web server
● An account in Moodle with teacher access to a course.
So, let’s rock!
13
Chapter 1 : Introduction
What Is a Learning Management System?
A Learning Management System as per the Wikipedia definition is “A learning management system (LMS) is a software application for the administration, documentation, tracking, reporting, automation, and delivery of educational courses, training programs, materials or learning and development programs”
LMS is the framework that handles all aspects of the learning process An LMS is the infrastructure that delivers and manages instructional content, identifies and assesses individual and organizational learning or training goals, progress tracking to achieve these goals and presents data to analyze the learning process
Most LMS’s are web applications, meaning that they run on a server and are accessed by using a web browser. Your Moodle server is probably located in your university or department, but it can be anywhere in the world You and your students can access the system from any place with an Internet connection
At their most basic, LMS provides educators with tools to create blended/hybrid courses and provide access control so that only enrolled users can view it. LMSs also act to augment the lessons the teacher is giving in a brick and mortar environment, not just replace them Corporate training departments use LMSs to deliver online training, as well as to automate record-keeping and employee registration.
They provide an easy way to upload and share materials, hold online discussions and chats, give quizzes and surveys, gather and review assignments, and record grades
Why Should You Use Moodle as LMS?
Moodle is Open Source
So, what is the big fuss about open source? There are a lot of other software available which are also Open Source.
The Answer is: Moodle is free to use for everyone and you needn't pay even a single penny for using Moodle on your servers. No one can take it away from you, increase the license cost, or make you pay for upgrades No one can force you to upgrade, adopt features you don’t want, or tell you how many users you can have. They can’t take the source code back from users, and if Martin Dougiamas decides to stop developing Moodle, there is a dedicated community of developers who will keep the project going. So, it is always going to be an ongoing project.
14
Sound Educational Philosophy
Martin’s background in education led him to adopt social constructionism as a core theory behind Moodle This is revolutionary, as most LMS systems have been built around tool sets, not pedagogy. Most commercial LMS systems are tool-centered, whereas Moodle is learning-centered
While tool-centric LMSs give you a list of tools as the interface, Moodle builds the tools into an interface that makes the learning task central You can organize your Moodle course by week, topic, or social arrangement. Additionally, while other LMSs support a content model that encourages instructors to upload a lot of static content, Moodle focuses on tools for discussion and sharing artifacts The focus isn’t on delivering information; it’s on sharing ideas and engaging in the construction of knowledge.
Moodle’s design philosophy makes this a uniquely teacher-friendly package that represents the first generation of educational tools that are truly useful
Social constructivism is a sociological theory of knowledge that applies the general philosophical constructivism into social settings, wherein groups construct knowledge for one another, collaboratively creating a small culture of shared artifacts with shared meanings. When one is immersed within a culture of this sort, one is learning all the time about how to be a part of that culture on many levels It is emphasized that culture plays a large role in the cognitive development of a person.
The set of important features that constructivist learning theory seems to be built around are:
● Knowledge construction and not knowledge reproduction is paramount
● Authentic tasks such as problem-solving are used to situate learning in a meaningful context are encouraged
● Reflection on prior experience is encouraged
● Collaborative work for learning is encouraged
● Autonomy in learning is encouraged
Moodle’s design philosophy makes this a uniquely teacher-friendly package that represents the first generation of educational tools that are truly useful. The essential constituents of Moodle’s philosophy are:
Constructivism
From a constructivist point of view, people actively construct new knowledge as they interact with their environments. All of us are potential teachers as well as learners - in a true collaborative environment we are both
15
Constructionism
Constructionism asserts that learning is particularly effective when constructing something for others to experience. We learn particularly well from the act of creating or expressing something for others to see.
Social constructivism
Social constructivism extends constructivism into social settings, wherein groups construct knowledge for one another, collaboratively creating a small culture of shared artifacts with shared meanings. When one is immersed within a culture like this, one is learning all the time about how to be a part of that culture, on many levels We learn a lot by just observing the activity of our peers.
Connected and separate
This idea looks deeper into the motivations of individuals within a discussion:
● Separate behavior is when someone tries to remain 'objective' and 'factual', and tends to defend their own ideas using logic to find holes in their opponent's ideas
● Connected behavior is a more empathic approach that accepts subjectivity, trying to listen and ask questions in an effort to understand the other point of view
● Constructed behavior is when a person is sensitive to both of these approaches and is able to choose either of them as appropriate to the current situation.
Community Support
Moodle has the biggest community of developers, teachers, and designers working all around the globe for making improvements to the product named Moodle They are more than willing to keep on adding new features, enhancing the existing ones, helping you to troubleshoot problems and the most basic in starting Using
Moodle
The Moodle community has been indispensable to the success of the system. With so many global users, there is always someone who can answer a question or give advice. At the same time, the Moodle developers and users work together to ensure quality, add new modules and features, and suggest new ideas for development Martin and his core team are responsible for deciding what features are mature enough for official releases and where to go next Because users are free to experiment, many people use and test new features, acting as a large quality control department.
Great documentation
One of the basic things missing in most of the other open source LMS's is the lack of appropriate documentation whereas Moodle is the winner in terms of the documentation also.
16
You will find tones of documents on each and every topic related to Moodle and if by chance you are not able to find any relevant topic then you can ask the community members to help you out through Moodle forums
Great Collection of Plugins
Moodle has got a large database of Pugins to enhance the learning requirements of each individual You can find modules for changing the Course formats, Add different activities, Blocks, themes etc.
Language Options
Moodle is available in all of the popular languages so that you can teach students in your own language Even you can also contribute to translate the Moodle into your own language at - http://lang moodle org/ As on date Moodle has been translated into more than 126 languages
Responsive Interface Design
Since the latest LTS version Moodle has introduced the responsive design of themes which makes all themes compatible on all devices. You need not to worry about the look and feel of your Moodle site on various devices used by the students
If you are still thinking about the features then you should give it a try to delve deep into the vast sea of Moodle In the rest of the book, we’ll discuss how you can use Moodle’s many features to enhance your teaching and provide your students with a powerful learning environment.
17
Chapter 2 : Getting started with Moodle
In this chapter we will have a walkthrough about the Moodle interface and setting up a new course on your Moodle site Then we will learn about adding new content to your course
Getting Started
As stated earlier, Moodle is a web based LMS which can be accessed through a web browser This means that in order to use Moodle, you need a computer with a web browser installed and an Internet connection You also need to have the URL of a server running Moodle If your institution uses Moodle, it will have a server with Moodle up and running. You can then get the server address from the system administrator
The Moodle Interface
When you first visit your Moodle site you will see the front page of the Moodle Site with the list of the courses which are available for the students depending on the setup by your site administrator. Let's take a moment and familiarize yourself with the interface before getting in depth
In the Header bar, the name of your Moodle site is displayed along with a link to Login to the Moodle site in the extreme left corner (1 in the image above). In between you will find the navigation items (setup by your administrator) (2 in the image above)

18
The items on the left/right hand side of the screen are generally called Blocks in Moodle terminology They can display different items as set up by the administrators which includesCalendar, Online Users etc. There are a number of useful blocks installed by default on a Moodle server.
Creating a new Account
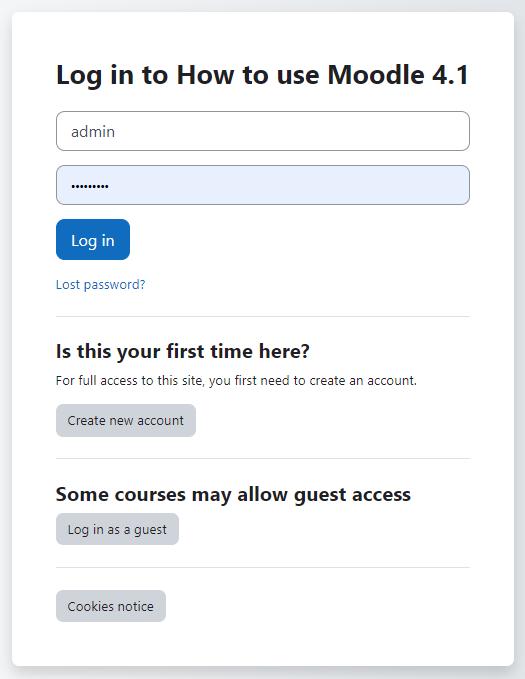
In the extreme top right corner of your Moodle site you will find a Hyperlink which says “Log In”. Click the link and Moodle will present you with the login to the site page as shown in the Figure below
19
Your username and password will depend on how your system administrator set up the system Moodle has a number of options for user authentication, including email-based self-registration, where you create your own account If you are logging in to a server run by your university or department, check with the Moodle administrator to see if you need to create an account.
As use of Moodle grows, more institutions are automatically creating accounts for all of their users, so you may already have a login. Please check with your Moodle Administrator for your account access
20
If you need to create a new account:
● Click the “Create New Account” Button
● Fill in the new account form by creating a username and password for yourself
● Enter a valid email address The system will send you an email to confirm your account You won’t be able to log in again until you confirm your account.
● Click “Create my new account ”
● Within a few minutes, you should receive an email at the account you specified on the form
Click the link in the email (or copy/paste it into the address window in your browser) to confirm your account
You now have a verified account. Your account isn’t automatically associated with the courses you’re teaching Most likely, your system administrator will assign you the role of teacher in the courses you’re teaching.
Please note that:
● You don't enter Moodle with the "teacher" or "student" role
● Everyone who logs into Moodle has no special privileges until they are allocated roles by the administrator according to their needs in individual courses or contexts
Editing Your User Profile
Once you have successfully confirmed your account and logged in, you may find yourself on the Dashboard which was known as "My Home" page in previous Moodle versions
To edit your profile -
21
● Click on the Profile link in the user menu in the top right corner as shown below
● Click the ‘Edit Profile’ link Moodle will take you to the edit profile page where you can update your details, interest, preferred language etc. On the Edit profile page, the fields with a red star next to them are required fields; they must contain some data in order for you to submit the form.

● The fields are divided into 6 sections - General, Preferences, User picture, Additional names and Optional which are all explained below
● By default only the General and User Picture sections of your profile are expanded, You can expand all the sections by clicking the Expand all link in the right corner of the page
● General Section -This section is expanded by default. First name, Surname and Email address are compulsory fields Depending on your administrator's settings (in the relevant authentication plugin settings) you may or may not be able to edit these The other settings - City/Town, Country, Timezone and Description are optional. The administrator might already have entered your city and country when your account was created The Timezone field is used to convert time-related messages on the system (such as
22
assignment deadlines) from the local timezone (the time in London) to the correct time in whichever zone you have selected.
● User picture - This section is optional and allows you to choose your own profile picture Your current picture is shown, if you have already chosen one. The "Choose a file" button allows you to choose a new picture for your profile. The picture must be in JPG or PNG format (ie the names will usually end in jpg or png) To upload an image, click the "Upload a file" button from the list in the File picker, and select the image from your computer
● Additional names - If the administrator has activated this feature then you will be able to set your alternative or additional names here.
● Interests - Use tags here to display your interests on your profile page
● Optional - There are several optional fields allowing you to add further details to your profile such as contact details and your website
● When you’re done, click the “Update profile” button at the bottom of the page.
Manage your preferences
Click on the Preferences link in the user menu in the top right corner. It will take you to the Preferences page where you can set your preferred options
The Preferences page gives users quick access to various settings they might wish to edit. By, default the preferences page will display the following sections -
● User Account
● Badges
● Roles
● Blogs
We will discuss them all one by oneUser account
Links here allow users to edit their profile information and change their password, specify how they wish to receive forum and other notifications, choose a text editor (if allowed) and view/reset their RSS token
● Edit profile - Edit profile page
● Change password - change your login password according to the site policy.
● Preferred language - Select your preferred language for displaying the content Note that changing your preferred language here will only affect the Moodle interface and not the actual course content.
● Forum preferences -
23
○ Email digest type - This setting determines how you receive any posts from Forums to which you are subscribed, allowing you to receive messages individually or on a daily basis
○ Forum auto-subscribe - This setting lets you decide if you want email copies of posts that are added to forums. If you set this to subscribe, the system will automatically email you copies of new posts in discussions that you post in, unless you manually override it when posting.
○ Forum tracking - Enabling forum tracking means highlighting the posts you have not read yet, which should improve your forum navigation.

● Editor preferences - This can usually be left as 'Default editor'.
● Messaging - The messages link will take you to the Messages page where you can send and receive messages to other users.
Badges
Here the user can manage and download their badges, set privacy levels and connect to their backpack
24
Blogs
Blog preferences may be set here, and external blogs can also be registered
Roles
The user's role assignments and permissions may be viewed and checked here
Standard view of a blank course
Once you are logged in with the credentials shared by your administrator, you will be taken to the ‘Dashboard’ tab which is a customisable page for providing users with details of their progress and upcoming deadlines.
Dashboard is a customisable page for providing users with links to their courses and activities within them, such as unread forum posts and upcoming assignments All users will have a separate dashboard customized according to their preferences You can also customize your dashboard and add or remove blocks by clicking the 'Edit Mode' toggle button On (1) and then adding required blocks (2) or repositioning them (3) in image below

25
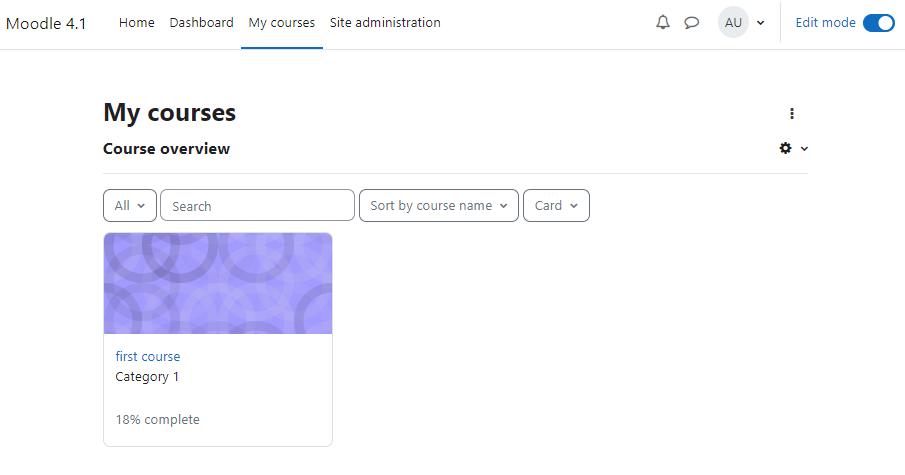
There is another tab called ‘My Courses’ On this page, you will see all your courses and the progress in each course Now let’s enter any course by clicking the Course title on My Courses page.
Our examples will be for a course homepage that is the standard default for a new install on a site There are many course options that determine a course's appearance and make it look very different from our examples The example course has a header, a footer (both content largely determined by a theme) and 2 columns in the middle with a navigation sidebar.
A standard Moodle course might look alike this on a fresh Moodle site:
Parts of a course homepage
● Moodle's basic structure is organized around courses These are basically pages or areas within Moodle where teachers can present their learning resources and activities to students They can have different layouts but they usually include a number of central sections where materials are displayed and side blocks offering extra features or information
● Courses can contain content for a year's studies, a single session or any other variants depending on the teacher or establishment. They can be used by one teacher or shared by a group of teachers
● How students enroll on courses depends on the establishment; for example they can self-enroll, be enrolled manually by their teacher or automatically by the admin
● Courses are organized into categories
26
Using the above image, here are the parts of a typical course homepage It is possible to move and hide parts of the page and different themes display blocks in different regions, so not all courses will look like this

On the left side, you will see the course index which can be used to navigate easily to the course sections as well as activities It will also display the progress in each activity if ‘Activity Completion’ is enabled on your site.
In the center region, the main course content stays You can find the course name on top, Course menu (you can change the course settings and perform other actions from this menu It was earlier known as Course Administration Menu in previous Moodle versions which is now upgraded to context based navigation menu).
27
Below the course menu, you will see the course sections which will contain all your course content including the files, activities etc
On the right side, you will see a button to ‘Add a block’. You can click this button to see all the available blocks and add as many
On the top right corner, you will see Notifications, Messages, Profile, Switch Role to, Preferences and Edit Mode On button. The ‘Edit Mode on’ allows you to add/modify the course activities/resource as well as change course settings, enroll users etc
Course Formats
Unlike some LMSs that force you into one format, Moodle provides you with a number of options for the general format of your course. You can choose to order your course chronologically by week, conceptually by topic, or socially with a big forum as the central organizing principle
● Weekly Format - As shown in the image above, The course is organized week by week, with a clear start date and a finish date. Moodle will create a section for each week of your course You can add content, forums, quizzes, and so on in the section for each week.

28
○ If you want all your students to work on the same materials at the same time, this would be a good format to choose.
○ Make sure your course start date is correct If it is not, your weeks will have the wrong date on it. This is especially important if you are restoring a course to use with a new section of students.
● Topics Format - The course is organized into topic sections that a teacher can give titles to. Each topic section consists of activities, resources and labels.
○ This is great to use if your course is objective based and each objective may take different amounts of time to complete. An example of this would be scaffolding where the students are building upon the knowledge from earlier topics.
● Social Format - This format is oriented around one main forum,the social forum, which appears listed on the main page. It is useful for situations that are more free form. They may not even be courses
● Single Activity Format - The single activity format only has 1 section, and allows the teacher to add one activity only to the course When the single activity format is selected, a drop down menu appears for the teacher to choose the activity they wish to use The best uses of this format are for displaying a single activity or resource (such as a Quiz or SCORM package) on the course page This format has replaced the SCORM format from the earlier Moodle versions as SCORM can also be chosen as an activity in this format.
Apart from the default course formats there are many more popular course formats in the Moodle plugins database which can be utilized to change the layout of your course. Some of the course formats available as plugins are:
● Grid Format - A modular and visual course format Hides all topics and creates a grid of icons (one for each topic) with short titles. Clicking on an icon brings up the content from the corresponding topic in a "lightbox" style display
● Onetopic Format - Course format which allows showing each topic in a tab, keeping the current tab between calls to resources, in such a way that when it returns from a module as the blog or the glossary it returns to the tab from where you started
Check out the official Moodle plugins directory for all course formats.

To set/modify the course format -
● Click the “Settings” link under the Course Name
29
● Expand the course format from the drop-down list under the Course Format Section which is collapsed by default.
● The settings underneath will be displayed according to the selected course format
● Enter the parameters for your course e.g. For the weekly format, set the start date and the number of weeks. For the topic format, set the number of topics. For the social format, set the course start date You don’t need to worry about the number of weeks or topics For the Single activity format choose the type of the activity which you wish to use.
Moodle allows you to switch between formats if you find that a given format isn’t working for you Simply follow the preceding instructions and select a different format You can also add or remove topics or weeks at any time So, you don’t have to worry too much about locking yourself into a format before you really understand the system.
With this general introduction to the course settings, Now let's delve deep into the other course settings also
Modify Course Settings
The settings page, as shown in Figure below, where you set the course format, also gives you access to a number of important course options. You’ll find it is important to take a moment to review the settings for your course to ensure that it behaves the way you want it to
To change your course settings:
● Click the “Settings” link under the Course Name Review each of the general options to ensure they are appropriate for your course
○ Course Full name: This is the name that is displayed on the top header of every page in your course and also in the course listings page The name should be descriptive enough so students can easily identify the course in which they are working, but it shouldn’t be too long. For example, use “English 400 Beowulf” and not “ENG400 Beowulf and the heroic poems of the ancient world ”Course Short name: Enter the institutional shorthand for your course. Many students recognize “Eng101,” but not “Introduction to composition ” The short name also appears in the navigation bar at the top of the page
○ Course Category: Your system administrator may have created course categories, such as department or college labels, to help students and teachers find their courses. Depending on how your system is set up, you may be able to categorize your course by department, subject, or other organizational principle
○ Visible: You can hide the course from students in case it is under preparation or some modification by using this setting. If it’s Hidden then only teachers and Site administrators can access this course
○ Course start date: The start date is the day the course is first active. If you are using a weekly course format, the first week will start on the date you set here
30
The start date is also used in course reports as the earliest possible date for which you can obtain logs, activity, and participation reports. In general, if your course does have a real starting date, then it makes sense to set this date to that, no matter what course format you are using.
○ Course ID number: The course ID number is used to provide a link between Moodle and your institution’s backend data systems Most Student Information Systems (SIS) has a unique identifier for each course. Moodle has its own unique identifier, which is different from the SIS ID This field is used by Moodle to store

31
the SIS unique ID so Moodle will know which course the SIS is talking about when synchronizing courses and enrollments.
● Description Section-
○ Course Summary: The summary appears in the course listings page. A good one paragraph summary will help communicate the essence of your course to your students
○ Course Image: If you wish to add some images to the course summary then you can add it here which will be displayed on the Dashboard Page
● Course Format Section-
○ Course Format - This is where you can set the course format as discussed previously
○ Hidden sections: When you hide an upcoming topic section to prevent your students from jumping ahead, you can choose to display the section as not available section or simply hide it altogether.
○ Course Layout: You can change the course layout to display all sections on a single page or else to split it into several pages with each page containing one section.
● Appearance Section -
○ Force Language: If you want to take your course in a specific language you can force it here If you do so, your students cannot change languages within the course For example for language teaching courses like German, French etc
○ Number of Announcements: Use this setting to determine the number of course news items displayed on the course page
○ Show gradebook to students: This setting allows you to select whether students can see the gradebook If set to No, it doesn’t stop instructors from recording grades, but simply prevents the students from seeing them
○ Show activity reports: This setting allows students to view their activity history in your course This is useful if you want students to reflect on their level of participation.
○ Show Activity dates: Activity dates are always shown on the course page This setting determines whether activity dates are displayed below each activity on the course page.
● Files and Uploads Section
○ Maximum upload size: This setting limits the size of files you or your students upload to the course Your system administrator sets the maximum size for the system, but you can choose to make the limit smaller than the system maximum You can also further limit the size of files that your students upload as assignment submissions and for other activities (We’ll cover them as they come up later in the book.)
● Completion Tracking Section
32
○ Completion tracking must be enabled for Activity completion Course completion criteria may also be based upon Activity completion values found in the activity's settings We will cover completion tracking in a later chapter As of now let’s see the basic settings:
○ Enable Completion Tracking - If enabled activity completion settings can be set in each activity The settings are different for each activity but we recommend to leave it enabled as default.
○ Show Activity Completion Conditions - Activity completion conditions are always shown on the activity page. This setting determines if the activity completion conditions are shown below each activity on the course page.
● Groups Section
○ Group Mode - Here you can define the group mode at the course level - “No groups”, “Separate groups” and “Visible groups” are the choices The selected setting will be the default group mode for all activities defined within that course. The group setting can affect what users see in the Participants list and who they can interact with in activities
○ Force Group Mode - If the group mode is “forced” at a course-level, then this particular group mode will be applied to every activity in that course This will override any activities that may have a special group setting.
○ Default Grouping - A grouping is a collection of groups within a course Using groupings allows you to direct tasks at one or more groups in your course, so that they can work together on the tasks. If groupings are enabled, a default grouping for course activities and resources may be set Groupings are used in case if you want to make an activity (such as an assignment or a quiz) visible to only one set of users within a course, you need first to put the users into a group and then put them into a grouping A single grouping can house one group or several groups
● Role Renaming Section:
○ You can rename the roles used in your course For example, you may wish to rename the Teacher role as “Facilitator”, “Tutor” or “Guide”. These new role names will appear within the course For example - on the participants and the override permissions pages
● Tags Section
○ You can add tags which are related to the course Tags allow students and teachers to connect different types of content on the site.
● Once you’ve made all your selections, click the “Save changes” button
Moodle’s Help System and Documentation
Throughout Moodle, you will see a question mark in a circle This is a link to Moodle’s very extensive help system. Although you shouldn’t need it very frequently after you read this book, the community has worked hard to provide you with a help system that is tied to what you are doing at that moment.
33
When you click the question mark icon, a new pop up screen will open with the help file for the item you are asking about (see below image)

Editing Mode in Moodle (Turn Editing On) -
Now, since you have set up your own Moodle course in preferred format and settings along with enrolled students, we’ll look at how to add content to your new course which comes with an announcement forum by default
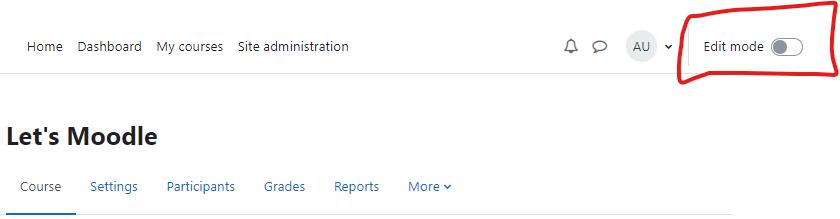
To start the process, you’ll first need to turn editing on which will allow you to add resources and activities to your course. At the top right of the page of any course you are teaching, you’ll see a toggle switch labeled, surprisingly enough, “Edit Mode.”
This is the button which will bring all the magic activities of Moodle to your course. Clicking on this button will present you with a new array of options ‘Turn editing on’ allows you to put your course in edit mode, so you can add and update activities, add content and add/edit/rearrange blocks
34
Adding content to the course
By now, you’re probably wondering, “When the heck do I get to add stuff to my course?” We’ve provided a lot of background so you’ll understand some of the available options. But, now it’s the time to start building your course
Let’s start with a news item to announce to everyone that your online materials are coming soon. The Announcements forum is a special type of forum It is automatically created when the course is first generated.
Everyone in the course can read the postings and the news is automatically emailed to them. It’s a good tool for making general announcements and sending reminders to students about upcoming assignments.

35
To add a new announcement item:
● Click the “Announcements” forum link near the top of your course page.
● Click the “Add a new topic” button You’ll see the page to add a new topic, as shown in image above.
● Enter the subject of the announcement and the message to your class
● If you click the Advanced button on the bottom, then you will see additional options like below.
● If you want to attach any files also then you can attach with the post
● Display Start & End Period which will display the news announcement between specified dates
● If you want to keep the announcement at the top of the announcement’s forum, then check the "Pinned" checkbox.
● By default, all Moodle notifications are sent out after a specified time configured by your Site Administrator. So, if you need to send the News urgently before that time has elapsed then you can check the box “Send forum post notifications with no editing-time delay” to send it immediately.
● Click the “Post to Forum” button.
Common Module Settings
All Moodle activities and resources come up with Common module settings while you are adding a new Activity or Resource to Moodle course In this section, we will cover up the common module settings in detail which will be then applied to all upcoming activities.
*Please note that these settings will appear when you add any activity or resource in your course. The other settings are different for each activity/resource which will be discussed in subsequent sections
Common Module Settings
● Availability - The Available setting has up to 3 possible options
○ Show on course page - The activity or resource is available to students (subject to any access restrictions which may be set)
○ Hide from students - The activity or resource is only available to teachers and non-editing teachers
○ Make available but not shown on course page - For simplifying the course page A link to the activity or resource must be provided from elsewhere, such as from a page resource The activity is still listed in the gradebook and other reports
● ID Number - Setting an ID number provides a way of identifying the activity for grade calculation purposes.
36
● Force Language - In Moodle 4 1, a new capability is added to force language on activity level. The teacher can force a language to be used in an individual activity, rather than for the whole course An example is if students are studying a language and the course is in their native language but a particular activity such as an Assignment is forced to their target language, to encourage them to focus
● Include in Course Content Download - If download course content is enabled, and if the content is downloadable (currently File, Folder, Page and Text and Media area) then should this item be downloaded
37
Restrict Access
The restrict access feature enables teachers to restrict the availability of any activity or even a course section according to certain conditions such as dates, grade obtained, group or activity completion.

38
*To use the restrict access feature, it must be enabled by an administrator If you are not having it, please contact your site admin
A restrict access section will then appear for teachers on the Activity settings screen, with an 'Add restriction' button. A choice of conditions appears:

● Activity Completion - This is one of the most common restrict access settings By using it, you can release the course activities once the student completes the previous activity. Instead of selecting a specific activity or resources, access may be restricted to "Previous activity with completion".
● Date - Access can be restricted from or until a certain date and time
● Grade - You can specify a condition on any grade in the course: the full course grade, the grade for any activity, or a custom grade that you create manually. You can enter either a minimum value (at least percentage), a maximum value (less than percentage), both, or neither. The activity will only appear if the student has a value for the specified grade, and if it falls within any specified number range You can add more than one grade condition All conditions must be met in order for the activity to appear
● Group - If groups or groupings are used in the course, it is possible to restrict the activity to a certain group or grouping If they are turned off for this course and not available, these options will not be present for use as a restriction.
39
● User Profile - Access can be restricted using one of the following standard profile user fields like Email Address, First name, Surname, City, Country etc.
● Restriction Set - This allows you to add a set of complex restrictions to apply complex logic.
Hiding the conditions
Notice the eye icon on the left side of the restrict access section. It is either Opened or Closed which means:
● If the eye is SHUT then students who do not meet that part of the condition will not see the activity at all.
● If the eye is OPEN the students who do not meet that part of the condition will see the activity but it will be greyed out and have information about why they can't access it yet
Restricting whole course section access
It is possible to restrict access to activities and resources within a whole course section by specifying the conditions in the settings for that particular section Do this by editing the section settings in Topic menu > Edit topic > Restrict access.
Activity Completion
Activity completion allows the teacher to set completion criteria in a specific activity's settings The criterion might be viewing, receiving a certain score or a student marking it as complete.
Depending on the type of activity, there are different completion requirements For example, a Page might have the requirement to require view; a Quiz might have the requirement to require grade while a Forum might have the requirement to require posts/discussions/replies.
Completion tracking
There are three options:
● Do not indicate activity completion - this will not show checks (ticks) next to the activity
● Students can manually mark the activity as completed - students press the check (tick) to change it (Note: they can do this even without doing the activity!)
● Show activity as complete when conditions are met - the selected completion criteria must be met before the check (tick) will change style
Require View
When this option is ticked, students have to view the activity i.e. click the link in order to complete it
40
Require grade
When this option is ticked, students have to get a grade on the activity in order to complete it For example, a quiz would be marked completed as soon as the user submits it.
Receive a passing grade
A passing grade may be required for completion of a graded activity. This condition is used together with the Require grade requirement.
Changing activity completion settings in bulk
The default settings for activity completion may be changed and several activities may have their completion settings updated at once, from the tabs in the Course completion screen. Navigate to course navigation > more > Course completion
There are three options in the dropdown menu on the top left:
● Course Completion - Course completion shows if a course has been completed. It can show the progress a student is making towards finishing the course according to specific criteria. The criteria can include meeting an activity's grade level or a manual checking "complete" by either the student and/or teacher The report can also show if the student has completed another course(s) that is marked as a "completion dependent" course On this page, you can define all conditions which will contribute towards the course completion criteria
● Default Activity Completion - Default activity completion allows you to select one or more course activities or resources and change their default settings (usually 'manual') to a setting of your choice. For example, if you always want your quizzes to be completed with a specific passing grade, you can specify this here.
● Bulk Edit Activity Completion - Bulk edit activity completion allows you to change the completion requirements of one or several existing activities in one step. For example, if you have four quizzes with manual activity completion, you can bulk edit them so that all four require a grade to be marked complete.
Tags
Teachers can add course tags here, either new tags or official tags Each tag in Moodle has a page associated with it. The tag page brings together users, courses and blog posts related to that tag A tag has a description, links to related tags, a list of users associated with that tag and Moodle blocks with resources related to it.
Competencies
Competencies describe the level of understanding or proficiency of a learner in certain subject-related skills. Competency-based education (CBE), also known as Competency-based
41
learning or Skills-based learning, refers to systems of assessment and grading where students demonstrate these competencies. From Moodle 3.1 upwards, it is possible to create and apply frameworks for evaluating students against competencies in Moodle
A course teacher can list which of the competencies they will be teaching in their course from the competencies link in the navigation drawer
A teacher can add or remove competencies from a course here, and see which competencies have been linked to which activities. Clicking on the competency name will take the teacher to a grading page for that competency
Summary
In this chapter, we’ve looked at how to create an account and personalize your profile. We’ve acquainted ourselves with Moodle’s user interface and tools available within, and we’ve chosen a course format to set up our first course.
In the next chapter, we’ll start adding different types of content to your new Moodle course which are known as Resources and Activities You can click the button ‘Add an activity or resource’ with Edit Mode on to add content in the course.
By adding the resources available in the Moodle, you can create content directly within Moodle or link to content you’ve uploaded We’ll describe each of these tools briefly now, and cover them in depth in the next chapter:
● Book: The first tool, “Book” creates a Book resource on your course page which can be used for creating a multi-page resource with Chapters and subchapters
● File: A picture, a pdf document, a spreadsheet, a sound file, a video file. You can also directly drag and drop the files onto the course home page to add them as a resource
● Folder: For helping organize files and one folder may contain other folders
● IMS Content Package: Add static material from other sources in the standard IMS content package format
● Label: Can be a few displayed words or an image used to separate resources and activities in a topic section, or can be a lengthy description or instructions
● Page: The student sees a single, scrollable screen that a teacher creates with the robust HTML editor.
● URL: You can send the student to any place they can reach on their web browser, for example Wikipedia, YouTube etc.
All the resources are known as the Static activities in Moodle as they are for sharing the information with the student in a single direction whereas the activities allow you to add interactive tools to your course.
42
An activity is a general name for a group of features in a Moodle course Usually, an activity is something that a student will do that interacts with other students and or the teacher. There are 16 different types of activities in the standard Moodle 4 1 version The bulk of this book is dedicated to describing how each of these tools works and how to apply them effectively in your course.
43
Chapter 3 : Resources in Moodle
The first thing most people want to do when they create a course in Moodle is add some content, such as put up the syllabus or a course outline As we explained in the previous chapter, you can add content to your course using the “Add an activity or resource” link in the central section of your course
A resource in Moodle terminology is something which a teacher can share with students for offline learning such as presentation, website link etc Moodle supports multiple types of resources which can be added to the Moodle course.
In Moodle core, you can see the following resource types:

*Tip* - You can identify the Resources through the color coded icon in Moodle 4 0 onwards
● Book
● File
● URL/Link
● Page
● Label
● Folder
● IMS Content Package
*Note - All the resources in Moodle are not graded and thus will not appear in the Gradebook *
44
Now let’s have a look at different resource types in Moodle in detail
Book Resource
What is a Book Resource?
Book resource can be used as a multi-page resource wherein the information is stored in a book like format in chapters & subchapters. You can also add images & other multimedia items in the Book chapters.
Book resources can be a better alternative than sharing PDF files with your students It offers easy access from within the Moodle which can also be easily modified. It also makes it easier for students to download only the specific chapters or whole book at once

45
How to set up a Book resource in a Moodle course?

In order to add a new Book resource to your Moodle course, you need to be logged into Moodle as a teacher You need to follow these steps:
● Turn the editing Mode on.
● Navigate to the course section where you want to add the Book resource
● Click “Add an activity or resource button and choose Book.
● Enter the Name of the Book and a description - This will be displayed on the course page
● You can choose the chapter number formatting. The options are:
○ None - chapter and subchapter titles are not formatted at all, use if you want to define special numbering styles For example, letters: in chapter title type "A First Chapter", "A.1 Some Subchapter",...
○ Numbers - chapters and subchapters are numbered (1, 1 1, 1 2, 2, )
○ Bullets - subchapters are indented and displayed with bullets.
○ Indented - subchapters are indented
● Custom Titles: If you enable custom titles, you will be able to create a title different from the one that appears in the ToC or display no title at all.
● Other settings: To configure the other settings, please see section Common Module settings above.
How you can add content in Book resource
O T
● Enter The chapter contents in the Content field
● Enter the tags in the Tags section.
● Click Save changes at the bottom
Once you have added your first chapter, you can add more chapters and subchapters to your book To add more chapters:

● Turn editing on by clicking the 'Turn editing on' button at the top right of the page
● Click on the + icon in the Table of Contents or first chapter. The new chapter will be inserted directly after the chapter whose title is on the same line as the red cross you click.
● You can also add Tags to Book chapters Tags allow students and teachers to connect different types of content on the site For more details about Using Tags, please visit Chapter 2.18
● Similarly, you can add other chapters in the Book
*Kindly note that you can have only two levels of chapters which means that you can only add Chapter & Sub-Chapters but not any below *
How does it work for students?
47
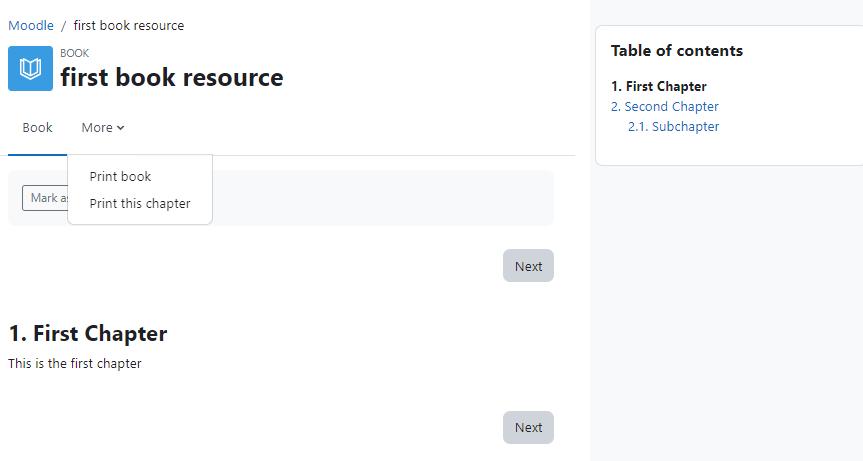
Book resources will appear in the course section where it was added They can navigate through the Book content organized in Chapters/Sub-Chapters through either with an arrow, text link or simply via the Table of Contents.
Students can also print either the whole book or any chapter by clicking the More link
Import Chapters in Book
To import chapters in the Book, you need to create your content in HTML format first before starting the import process. Here are the steps:
● Create a zip file of HTML files and optional multimedia files and folders
● Go to Book Settings > Import chapter
● Choose whether each HTML file or folder represents one chapter
● Browse for and select the zip file, either using the Add button or the drag and drop method
● Click the “Import Chapter” button
● If you wish to upload subchapters, add " sub" to the end of HTML file or folder names.
Import Content from Microsoft Word in Book
You can also import content from Microsoft Word into Moodle Book but you need to install the Microsoft Word File Import/Export plugin If you are using this plugin then you can also export books in Word format.
File resource in Moodle
A File resource is the most widely used type since it allows the teachers to share all the static information to the students The file types can include all types of media files like A picture, a pdf document, a spreadsheet, a sound file, a video file
*Please note that the students must have the recommended software program installed on their computer/mobile device to view the resource.*
How to add File Resource in Moodle Course
Method 1
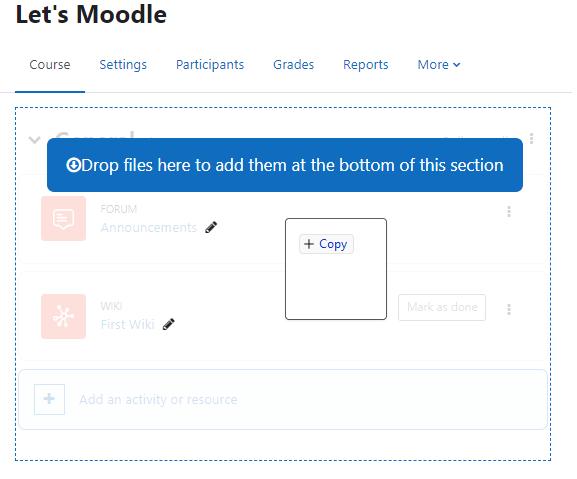
Adding a file in Moodle Course is pretty easy by simply dragging and dropping the file onto the course page in Editing Mode as shown in the image below.
48
Method 2
The other way to create File resource is to follow the traditional way as below:
● With the editing turned on in a course, click Add an Activity or Resource in the section where you want to add the file.
● Give it a name and, if required, a description
● Upload the file in the “Select Files” area either through File Picker or by Dragging & Dropping.
● In the Appearance section, you can configure how it will be displayed to the students The options are:
○ Automatic - let Moodle decide the best option for you
○ Embed - show the file as part of the Moodle page (images, PDFs, videos)
○ Force download - force the user to save the file or open it in a program on their computer
○ Open - show the file in the browser, but without the Moodle page decorations (images, PDFs, videos)
49
○
In pop-up - Same as 'Open', but opens a new browser window to show this file (without the Moodle heading, blocks, etc) - this browser window also does not have all the menus and address bar in it
● For other settings, please see section Common Module settings above.
Adding URL to the course
A URL is a link on the internet to another website or online file. Teachers can use the URL resource to provide their students with web links for research, saving the student time and effort in manually typing out the address. The URL’s can be displayed in various ways for example,

50
opening in a new window so a student can access and use the URL, close it and return easily to their original Moodle course page.
To add a URL to the course home page:
● Turn editing on.
● From the "Add an activity or resource" link, choose URL
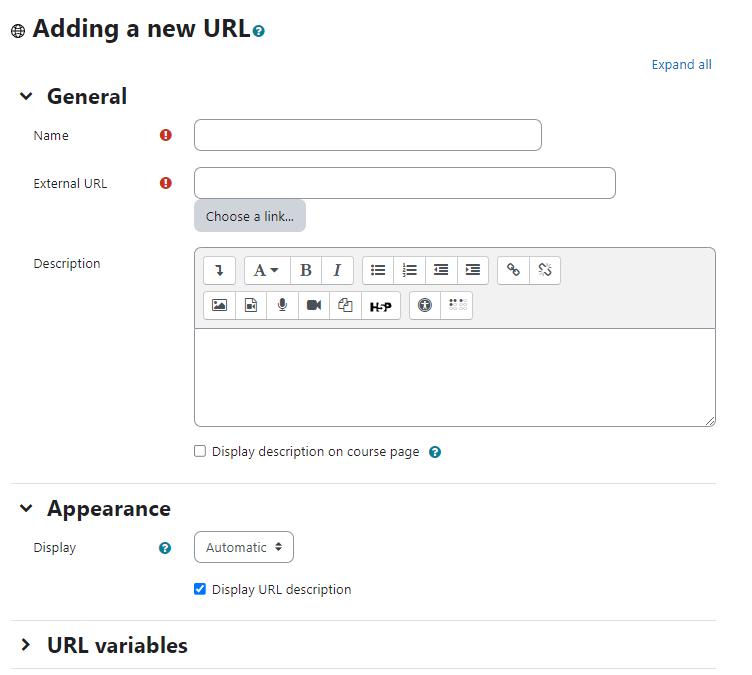
● General Section -
○ Name - Whatever you type here will form the link learners click on to view the URL so it is helpful to give it a name that suggests its purpose.
○ External URL - In External URL, type the web address of the site you want to link to, or click the Choose a link button to access other options Include the full https:// at the start.
51
○ Description - Add a description of your page here Click "Show editing tools" to display the rich text editor, and drag the bottom right of the text box out to expand it
○ Display description on the course page - If this box is ticked, the description will appear on the course page just below the name of the URL.
● Appearance -
○ Display -
■ Automatic - Make the best guess at what should happen (probably what is wanted 99% of the time).
■ Embed - Show the Moodle page with heading, blocks and footer. Show the title/description of the item and display the file directly in the page as well
■ Open - No Moodle heading, blocks, footer or description - just show the file in the web browser (e g shows image, PDF, flash animation, taking up the whole browser window)
■ In pop-up - Same as 'Open', but opens a new browser window to show this file (without the Moodle heading, blocks, etc) - this browser window also does not have all the menus in it. *** The above options are the default display options Additional display options (see below) may be enabled by an administrator in Site administration > Plugins > Activity modules > URL. Pop-up width/height - If your URL is to be displayed in a pop-up, specify the width and height here
■ Display URL name/description - To show the resource name and/or description when clicking to access the URL, simply tick the appropriate checkboxes.
● URL variables - This section allows you to pass internal information as part of the URL This is useful if the URL is actually an interactive web page that takes parameters, and you want to pass something like the name of the current user, for example.
● Click “Save and return to course” to save and return to the course home page If you want to have a look at the just composed URL then you can click on “Save and Display” to display it directly
Creating a folder resource
A folder allows a teacher to display several course resources together The resources may be of different types and they may be uploaded in one go, as a zipped folder which is then unzipped, or they may be added one at a time to an empty folder on the course page. Using a folder to display resources is neater than displaying files one by one in a list It takes up less space on the course page.
A folder may be used:
52
● For a series of files on one topic, for example a set of past examination papers in pdf format or a collection of image files for use in student projects
● To provide a shared uploading space for teachers on the course page (keeping the folder hidden so that only teachers can see it).
To add a folder to the course page, you need to first get it zipped or compressed using some file compression tool The way you do this depends on your computer and operating system You can use the open source file compression tool 7 zip.
There are two methods of adding a folder to your course.
Quick Method -
● Click the 'Turn editing on' button at the top right of the course page
● Drag and drop the folder onto the course section where you'd like it to appear
● Click the button of the action you would like to take with the folder (in our case, "Unzip") and click "Upload", You can also add the zip file to create a File resource or a SCORM package

● If necessary, edit the title of the folder by clicking the pencil icon
Longer Method -
● Click the 'Turn editing on' button at the top right of the course page
53
● Click 'Add an activity or resource' link, then in the activity chooser; select Folder then click the "Add" button (or select folder from the "Add a resource" dropdown menu) All settings may be expanded by clicking the "Expand all" link top right
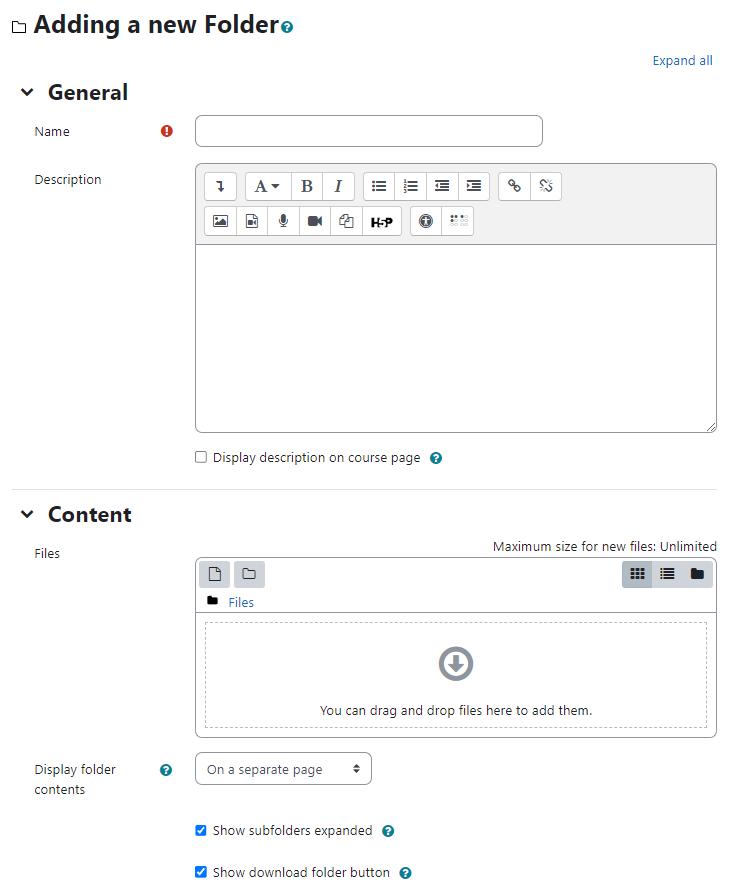
○ For General section, add name and a description
○ Enabling 'Display description on course page' will show it just below the link to the folder.
54
○ In the Content section, either drag and drop a zipped/compressed folder into the box with an arrow or click the Add button to open the File picker menu in order to choose a file from your computer or a repository
○ In the ‘Display Your Folder Contents’ section - decide here whether to have the folder displayed on a separate page (the default) or inline with or without subfolders expanded or collapsed
○ Show download folder button - If this is ticked, then a button will be displayed so students may download the contents of the folder as a zipped folder for offline viewing.
● Click "Save and return to course".
Adding a Text and Media area (Earlier Label) resource
A Text and Media area resource has multiple uses on the Moodle course page; it can serve as a spacer element. It can be used to add text, images, multimedia or code in between other resources in the different sections It is a very versatile resource and can help to improve the appearance of a course if used thoughtfully. Banners or descriptions may be added to labels to distinguish between and highlight different areas.

To add a label on the Course page:
● Click the “Turn editing on” button
55
● Click the “Add and activity or resource” link in the course page in the section where you want to add the Text and Media.
● In the popup menu select Text and Media under the resources menu
● Create your Text and Media resource using the HTML editor. You can use Label to insert images, Videos, Audio files in your course.
● Select whether to make your Text and Media visible by selecting Show or Hide from the visible menu which is collapsed by default.
● After you have created your Text and Media, click the “Save and return to course” button
Once you have created a Text and Media, the full text/video/picture of it will appear in the section where you created it
***You can use a hidden Text and Media to provide information only for other teachers on your course, since students are unable to see hidden items.
Composing a Page Resource:
A page resource creates a link to a screen that displays the content created by the teacher. The robust Text editor allows the page to display many different kinds of content such as plain text, images, audio, video, embedded code or a combination of all these. In certain cases, it might be preferable to use the page resource instead of uploading a word-processed document, particularly if the document contains text that is just to be read and not downloaded.
A page may be used:
● To present the terms and conditions of a course or a summary of the course syllabus
● To embed several videos or sound files together with some explanatory text
Adding a page resource:
● From the the "Add an activity or resource" link (or, if not present, the "Add a resource" drop down menu),choose Page
● In the "Adding a new page" screen that follows, give your page a name and a description
● Add your content to the Page content section
○ Name - Whatever you type here will form the link learners click on to view the page so it is helpful to give it a name that suggests its purpose
○ Description - Add a description of your page here
○ Display description on the course page - If this box is ticked, the description will appear on the course page just below the name of the page
● Content - Add your page content here. You can use the features of the Text editor to add media, images, links and more
● Appearance - Choose here whether or not to display the page description along with the page content when a user clicks on the page.
56
● Click Save and return to course at the bottom
Why should you use a Page resource and not a File Resource?

● Opens seamlessly - no clunky attempts to launch third party software (e g Microsoft Word) which some users may not be able to access.
● Can be accessed by mobile devices e.g. smartphones (again, not all smartphones can handle word-processed documents)
● Much easier for the Teacher to edit (i.e. saves time)
● Much more accessible, and readily configurable for reading (easier to resize text, change colours, etc, in the web browser)
● Can contain links - e.g. to files, to web pages, or to Glossary entries
57
Adding an IMS content package

IMS is a body which helps define technical standards for various things, including e-learning material. The IMS Content Packaging specification makes it possible to store chunks of material in a standard format which can be re-used in different systems, without having to convert the material into new formats
The IMS content package in Moodle enables such content packages to be uploaded and included in Moodle courses There are various options for displaying content with a navigation menu or buttons etc.
To add an IMS Content Package:
58
● Enter the Editing Mode by clicking the ‘Turn editing on’ button at the top right of the course page
● Choose IMS Content Package from the Add an Activity/Resource dropdown menu.
● In the general section provide a name and description for the IMS content package to be displayed on the course page
● In the Content section, drag and drop your IMS Content package into the box with the arrow or else click the button “Choose a file” to locate and add your IMS Content package via the File picker.
● Click Save and return to course to return back to the course home page And you’re done with the IMS content package in your course
Summary
In this chapter you have gone through the Resource types available in Moodle and how you can add them in your Moodle course. In the next chapter we will start digging more into Moodle Activities and add meaningful activities for your learners
59
Chapter 4 - Managing your class in Moodle
Now since we have covered the basics of setting up your first Moodle course and adding content to your course, we need to take a look at some of the Moodle's underlying capabilities
We will start first by discussing Blocks since anyone would like to customize the look and feel of their Moodle course first.
Blocks in Moodle
Blocks are items which may be added to the left or right or center column of any page in Moodle. They may also be added to the center of the Dashboard Any block can be made 'sticky' so that it appears in all the contexts below, such as throughout a course or a particular activity.
By default Moodle will include these standard blocks apart from the contributed blocks in the Moodle plugins database:
● Accessibility Review
● Activities
● Activity Results
● Admin Bookmarks
● Blog Menu
● Blog Tags
● Calendar
● Comments
● Completion Progress
● Course Completion Status
● Latest Announcements
● Latest Badges
● Learning Plans
● Logged in User
● Mentees
● Navigation Buttons
● Online Users
● Private Files
● Random Glossary Entry
● Recent Activity
● Recent Blog Entries
● Search Forums
● Tags
● Text
● Upcoming Events
60
There are many other contributed Blocks in the Moodle Plugins database
Groups and Groupings
In order to encourage collaborative work with online learning, you can use Moodle groups & groupings which put your students in different groups with other students

Groups can be especially useful for activities where students interact with one another With forums, wikis, and databases, students in the same group can post and reply only to each other. Each group member always works in their own group, but you can control whether or not they can see contributions of members of other groups
A group or grouping can be used on two levels:
● Course Level - The group mode defined at the course level is the default mode for all activities defined within that course To use groups you need first to set a group mode in Course Settings.
● Activity Level - Each activity that supports groups can also have its own group mode defined If the course setting "Force group mode" is set to "Yes" then the option to define the group mode for individual activities is not available. If it is set to "No", then the teacher may change the group mode
Now after differentiating between Course level & activity level groups. Let us define the group modes There are three group modes:
● No groups - There are no sub groups, everyone is part of one big community
● Separate groups - Each group can only see their own group, others are invisible.
● Visible groups - Each group works in their own group, but can also see other groups
Once the group mode is set for the course or activity, students will interact with your Moodle course as they normally would The only difference will be the people they meet in certain activities, such as forums.
For example, if you set the group mode of a forum to separate groups, Moodle will create a forum for each group Each student will see the same link to the forum, but she will be able to access
61
only the discussions for her particular group You need to create the forum only once; Moodle takes care of creating the individual group forums.
Creating a group:
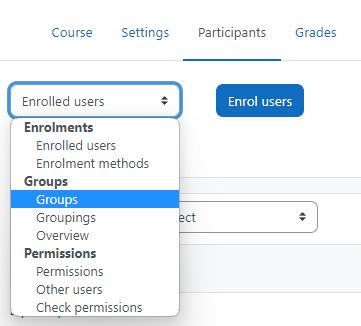
● Select Participants from Course navigation and from the dropdown select Groups
● It will show all the available groups and the members of the selected groups
● C ● A ● A
● Select Yes for Enable group messaging if you wish to engage in group conversations
● You can also add a group picture.
● Click the 'Save changes' button
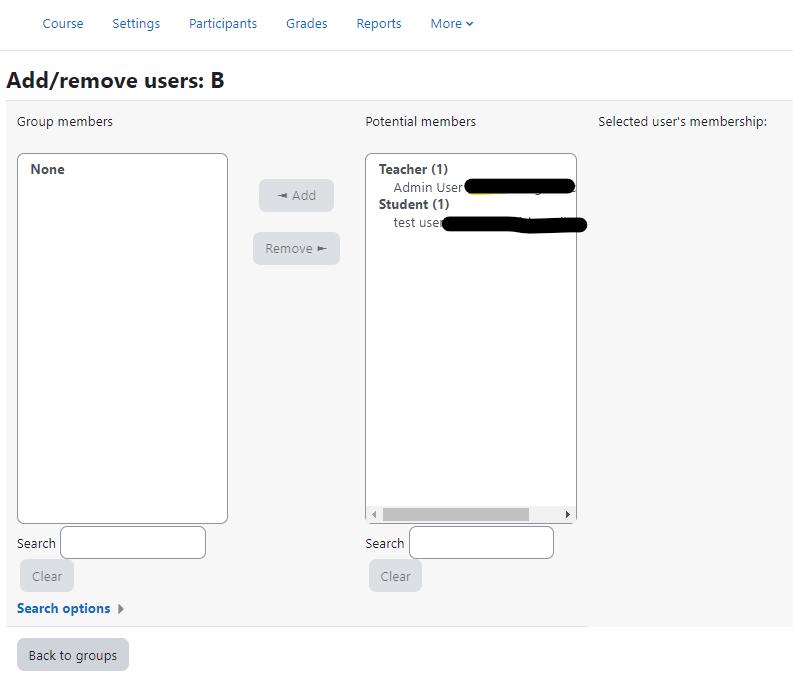
● On the next page, Select the group to which you want to add participants, then click the 'Add/remove users button.
● In the "Potential members'' list, select the users you want to add to the group Multiple users may be selected using the Crtl key.
● Click the Add button to add the users to the group
63
Once you click on the Auto Create Groups, you need to define the following:
● Naming Scheme for the Groups

A G C
64
● Auto create based on Number of Members or Number of Groups Here you can define the total number of groups or members in each group.
● Select Yes for Enable group messaging if you wish to engage in group conversations
● Under the Group Member section, you can configure:
○ Members with specific role only to be added to a group
○ Allocate Members based on random basis or alphabetically in specific order
● Under the Grouping section, you can specify if you want all the new groups to be a part of any grouping You can also add them to any existing groupings
● Once you are done, click Submit.
Why use groups:
● You are a teacher in a course where you have several classes and you want to filter your activities and gradebook so you only see one class at a time
● You are a teacher sharing a course with other teachers and you want to filter your activities and gradebook so you don’t see the students from your colleagues’ classes
● You want to allocate a particular activity, resource or topic section to just one class or set of users and you don’t want others to see it
Groupings
A grouping is a collection of groups within a course Using groupings allows you to direct tasks at one or more groups in your course, so that they can work together on the tasks
To understand in simple language you can assume it is like a collection of users is a group while a collection of groups is a grouping. They are useful when you want the students to work in the same group throughout the year/semester Groupings make it easier to manage groups when individual students are in multiple groups
Adding groups to a grouping:
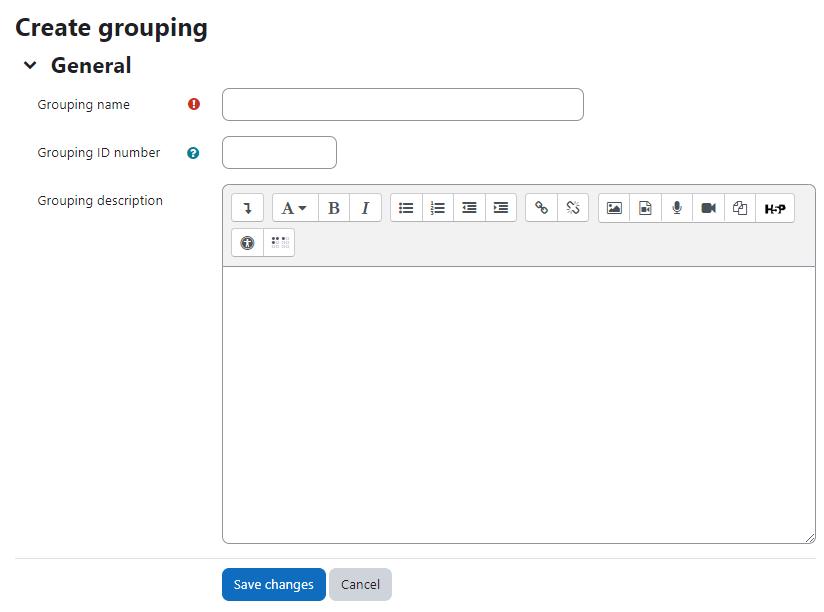
To create a grouping, follow these steps:
● Go to the Course > Participants page
● On the dropdown in the top left, select groupings.
● Here you will see already created Groupings, if any Click Create Grouping The Create grouping page will open
● Enter a name for the grouping and description (optional), then click Save changes. The Groupings page will open and you will see the new grouping listed
● However, the grouping is empty as of now, so you need to add groups in the newly created Grouping
● To add groups to the Grouping, Click the “Show groups in grouping” people icon in the edit column
● On the add/remove groups page, select the group(s) you want to add to the grouping from the “Potential members” list
● Click the arrow button that points towards the “Existing members” list.
● Click the “Back to groupings” button The group(s) you added to the grouping will now be listed in the table on the groupings page
Now when you have groupings ready, you can assign activities in your course to the groupings. Follow these steps to assign an activity to a grouping:
● With the Editing Mode On, navigate to the activity where you want to add the grouping and click Edit Settings.
● In the common module settings section select Group mode drop-down menu, select either Separate groups or Visible groups
● Then, Select the grouping from the grouping dropdown menu.

● Click Save Changes
Cohorts
Cohorts are site-wide or course category-wide groups The purpose of cohorts is to enable all members of the cohort to be easily enrolled in a course Cohorts are used to bulk enrol users into one or more courses. If you wish the cohort to be members of a group within the course you will then have to add them to a group in a further step
66
Creating a cohort:
Cohorts can be created by site administrators and other users with appropriate permissions A teacher can’t create a new cohort in Moodle To create a cohort, the steps are as below:
● Go to Site administration > Users > Accounts > Cohorts
● Click the Add New Cohort Tab
● In the Context field, you can choose between making your cohort available throughout the site "system" or in a named course category
● Cohorts are visible to teachers by default but unchecking the 'Visible' link will mean they are not available for teachers to use in their courses
● Complete the details and save the changes
● Follow the assign link opposite the cohort name in the list of available cohorts.
● Select potential users from the list then click the Add button
Creating cohorts in bulk:
Cohorts can also be created in bulk through the use of CSV files upload to the system or to a named category by going to Site administration > Users > Accounts > Cohorts > Upload cohorts
Understanding and using roles
At first glance, this may seem like administrivia, but understanding roles and groups is one of the keys to unlocking Moodle’s full potential as a learning environment A person’s role in a course determines what he can do in other words, what capabilities he has. It’s a very powerful system, but it does have a bit of underlying complexity You can use groups to create student workgroups, recitation sections, or any other arbitrary grouping you need to realize your learning design.
The roles and permissions system in Moodle provides you with a huge amount of flexibility for managing how students and other people interact with your course The new roles system supports guest, student, non-editing teacher, editing teacher, course creator, and administrator roles out of the box; it also allows you to create and customize roles, and to change what a given role can do in each activity
For example, you can now create permissions in individual forums, which allows you to let students act as moderators in one forum while you retain the moderator role in all of the other forums in your course.
A role is a collection of permissions defined for the whole system that you can assign to specific users in specific contexts The combination of roles and context define a specific user’s ability to do something on any page.
67
For many people it seems a bit daunting to understand roles, but don’t worry Using roles and permissions is something you can take slowly You can start the usual way, assigning people as students, teachers, and other roles specified by your institution. Later, when your course design grows more elaborate, you can begin to experiment with overrides and assigning specific roles in specific contexts
Moodle’s Default roles description:
The description of each standard role in Moodle including the basic description and short name is given in Table below:
Role Shortname Description
Administrator admin
Can "do everything" on the site. Administrators have full access to the entire site and to all courses. They can do all the necessary changes in the configuration files.
Manager manager
The default Manager role enables users assigned the role to access courses and modify them, as well as perform certain administrative level tasks related to courses, users, grade settings, etc.
Guest guest Can view courses but not participate Guests have minimal privileges and usually cannot enter any content except a teacher allows for it
Authenticated User user
All logged-in users in the Moodle site in any role
68
frontpage a logged in user role for the front page only. Since Moodle’s front page is also a course with ID=1 where you can add some activities where the users can participate if they have assigned this role.
Teacher editing teacher Teachers can do almost anything within a course, including adding or changing the activities and grading students By default, teachers can also assign a Non-editing teacher role and a Student role to other users
A non-editing teacher is able within a course to view and grade students' work but may not alter or delete any of the activities or resources
Student student Students can participate in courses and participate in activities within the course
Understanding Context, Permission, Role and Capability
Now, before we start using roles let’s get some basics about Context, Permission, Role and Capability.
● Context: A functional area of Moodle Contexts have a hierarchy Examples of contexts include a course, activity module, or resource
● Permission: Permissions are paired with each capability There are four possible permission values: Allow, Prevent, Prohibit and Not set /Inherit. (It is called not-set when defining roles and inherit when overriding permissions )
● Role: A named set of permissions that are associated with each capability. For example, The “Teacher” and “Student” roles come with the standard Moodle install
Authenticated user on front page Non-Editing Teacher teacher69
● Capability: A configurable aspect of program behavior Moodle has 100s of capabilities
Each capability has a computer friendly name like mod/forum: rate and a human-friendly name like “Rate posts ”
Assigning Roles in Your Course:
Most of the time, students will enroll themselves or be added automatically by your university’s enrollment system, so there shouldn’t be much need for you to manually enroll students However, if you need to add a teaching assistant, an outside guest, or a student who is having a problem with financial aid, you must manually enroll them, i e , assign them a role in your Moodle course.
*** By default, teachers are only allowed to assign the roles of non-editing teacher, student, and guest If you want to assign the role of teacher, you will need to ask your system administrator for this to be allowed
Enrolling Students in the course
When you create the course for the first time then you will be redirected to the Enrolling users page after clicking "Save and Display" on the course settings page, where you can enroll the learners in your course.
In case you want to update the users afterwards, you can access the same through the ‘Participants’ tab on the course page. It will show the list of the participants enrolled in your course including their details like First Name, Surname, Email address, Last access, Assigned Roles within the course, and the last access to the course. You can Enroll new users in your course by:

● Click “Enroll users” in the top right side as shown in the image.
● In the pop-up window, first choose the role to be assigned from the drop-down menu
Let’s say that you want to assign the Student role to your users which is set by default.
● Search the Names of the users to Enroll them as a Student in your course
70
● To limit the Enrollment duration for some specified time, expand by clicking ‘Show More’ and set the Enrollment start date, duration, end date.
● You can also recover old grades of the student if there are any in the backup files
● After finishing click “Finish enrolling users”.
● You can also assign multiple roles to users within the same course like students can be forum moderators also. To assign multiple roles to a user simply click the Role assigned currently under Roles column on the enrolled users page and assign the desired role
Removing Students
If a student drops your class, you’ll want to remove the student from your Moodle course as well. Leaving a student enrolled in your Moodle course when she is not on the official roster makes grading and class management much more difficult.
When you record grades or look for student assignments, extra students on the roll gets confusing. The nonparticipating student will also have access to your discussion boards and other potentially sensitive information
Temporarily Suspending a User Account
There may be times when you are not sure about the status of the students and you want to disable them for a while before removing them completely from your course In that case, to suspend a user from the course:
● Click the icon in the Enrollment method column against the Students name that you want to suspend.
● Under the Status drop down menu change the status from “Active” to “Suspended” and you’re done.

71
Managing Enrollment Methods for your course

If your university/institution doesn’t have an automatic enrollment system, then ensuring that only students who are officially enrolled in your course have access to your Moodle course can be trick
Some of you may want to make courses accessible for guest users also so that they can also take a sneak preview of the course which can be used especially for corporate training You may also want to let the students within your Moodle site be capable of enrolling themselves in your course For all these you have to configure the enrollment methods for your course
To manage the enrollment methods:
● Click Participants > Enrollment Methods
● It will display all the available enrollment methods including the number of students enrolled using the method in your course and options to add new enrollment methods (New enrollment methods have to be first enabled by site administrator along with the capability to add, then only you will be able to add them)
● The enrollment methods which are shown as grayed out are currently disabled. You can delete any enrollment method by clicking the delete icon
● To enable the Guest access of enrollment for the course, simply click the “Eye “ icon beside the Guest access enrollment method
● To let the students enroll themselves in your course, turn on the “Self Enrollment (Student)” method by clicking the “Eye” icon.
72
● You can also set an enrollment key for the self-enrollment method and directly add the students to a group by setting the Group enrollment key.
Summary
In this chapter, we went through managing students within your Moodle course We understood about the Roles, Permissions, Groups, Groupings and Managing Students in this chapter. In the next chapter let’s take a deep dive into the Moodle Activities
73
Moodle Activities
Activities in Moodle are the heart for online education portal. The Moodle activities allow the learner to interact with the learning material as well as other participants and or the teacher in the course
In standard Moodle you will find as many as 16 activities which are:
● Assignment
● BigBlueButton
● Chat,
● Choice
● Database
● External Tool
● Feedback
● Forum
● Glossary
● H5P
● Lesson
● Quiz
● SCORM Package
● Survey
● Wiki
● Workshop
This is going to be the most exciting & interesting part of this book, so you need to make sure to spend as much time as possible understanding Moodle activities. This will help you take the best out of Moodle and improve your online learning.
For the sake of understanding, we will group the activities which are similar in nature So, we will be covering all the activities in the following order:
● Assignment
● Quiz and Question Bank
● Glossary
● H5P & BigBlueButton
● Lesson
● Chat, Messaging and Forums
● Database, Wiki & Workshop
● Surveys, Feedback and Choice
● External Tool & SCORM
So let’s get started with the Moodle Activities in next chapters:
74
Chapter 5 : Assignment
Assignments are one of the most popular and commonly used activity types in Moodle Assignments are a refreshingly simple method for collecting student work They are a simple and flexible catch-all for things you want to grade that don’t fall into any of the other tool types
Assignments allow students to submit work to their teacher for grading The work may be text typed online or uploaded files Grading may be by simple percentages or custom scales, or more complex rubrics may be used Students may submit as individuals or in groups
The assignment activity provides a space into which students can submit work for teachers to grade and give feedback on This saves on paper and is more efficient than email It can also be used to remind students of 'real-world' assignments they need to complete offline, such as art work, and thus not require any digital content The work students submit is visible only to the teacher and not to the other students unless a group assignment is selected
Student submissions are together on one screen of your course You can require them to submit one or several files and/or to type text essays. It is possible to have them submit work as a group and you can also choose as a teacher to grade their work 'blind' in other words not to see the identities of those who have submitted assignments. Assignments can have deadlines and cut off dates - which you can also extend if necessary.
Assignments are a useful tool you can use in creative ways to collect more authentic responses from your students than is possible with the quiz engine. An assignment has an ‘available from’ date before which no students can submit anything, and a due date, after which teachers can choose not to accept submissions any more.
When reviewing assignments, teachers can leave feedback comments and upload files, such as marked-up student submissions, documents with comments or spoken audio feedback. Assignments can be graded using a numerical or custom scale or an advanced grading method such as a rubric. Final grades are recorded in the gradebook.
Markers can choose to be notified every time a student submits an assignment, or only for late submissions Markers can choose to give students feedback in the form of text or uploaded files
Managing student work using an Assignment activity gives you these benefits:
● Online Management of Students Work - With Moodle Assignment, you can go completely paperless to organize and manage the students submissions online
● Feedback and Assessment in Moodle - You can assess the submissions and assign grades to the students. You can also provide your feedback to each student.
● Reminder for upcoming due dates: Moodle will automatically send reminder notifications before any upcoming assignment submission. So your students will not miss any submissions
Let’s get started with Assignments
75
Assignment (Submission) types:
The standard ways students can submit assignments are:
● File submissions (students submit a file for assessment)
● Online text (students can type their responses directly in Moodle)

● Submission comments
● Offline Assignment
76
Adding an Assignment activity:
Let’s add our first assignment in our course. Please follow the steps below:
● In a course, with the editing turned on, choose 'Assignment' from the activity chooser.
● In the General Section:
○ In the Description field, give a general explanation of the assignment. Check the box if you want this description to display on the course page
○ In the Activity Instructions field - you can specify the actions you would like your students to complete for this assignment This will only be shown on the submissions page where a student edits and submits their assignment
○ Additional files - Here you can add files which may be of help to the students as they do their assignment, such as example submissions or answer templates
● In the Availability Section:
○ Allow Submissions From - This stops students from submitting before the shown date but it doesn't hide the assignment and any included instructions or materials.
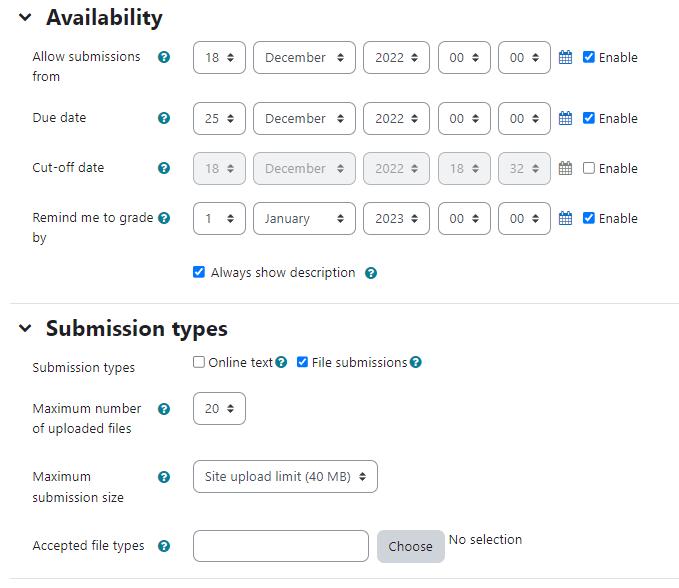
77
○ Due Date - Submissions are still allowed after this date but will be marked as late Disable it by unticking the checkbox. Assignments without a due date will appear on the dashboard with 'No Due Date' displayed
○ Cut off date - After this date, students will not be able to submit and the submit button will disappear. If you want to grant an extension, go to the assignment grading screen, click 'Edit' and choose 'Grant extension' for the relevant student
○ Remind me to grade by - A date needs to be entered here for the assignment to display on the teacher's Course overview block and in the Calendar It will show when at least one student has submitted.
● In the Submission Types Section: Here you can decide how you wish students to submit their work to you
○ Submission Types:
■ Online Text - Students type their responses directly in Moodle using a text editor. It's possible to set a word limit on an online text assignment. Students get a warning if they try to exceed the word limit
■ File Submissions - Students can upload one or more files of any type the teacher can open. The teacher can annotate uploaded PDFs, docx and odt files within the browser, and on saving, the annotated file is made available to the student.
○ Maximum number of Uploaded Files - Specify how many maximum files a student can upload
○ Maximum Submission Size - The maximum upload size refers to each file a student uploads It cannot be larger than the limit in the Course settings
○ Accepted File types - The teacher can specify the types of file the students may upload to the assignment A file type selector appears upon clicking 'Choose', offering a choice of different file types Leaving it blank will allow all file types
● Feedback Types Section:
○ Feedback comments - With this enabled, markers can leave comments for each submission (which appear on the assignment grading screen.)
○ Offline Grading Worksheet - If enabled, the teacher can download and then upload a worksheet with students when marking the assignments This is useful if you wish to download the grading list and edit it in a program such as MS Excel. When the teacher has completed their grading offline, they can then upload the spreadsheet, confirm the changes and the grades and comments will be transferred over into Moodle's gradebook
○ Feedback Files - If enabled, the teacher will be able to upload files with feedback when marking assignment submissions. These files may be marked-up student submissions, documents with comments or audio feedback It enables the Feedback Files column in the assignment grading screen
● Submission Settings section:
78
○ Require students to click the submit button - If this is set to 'No' students can make changes to their submission at any time If set to 'Yes', students can upload draft versions of the assignment until such time as they are ready to submit. Clicking the submit button tells the teacher they have finished drafting and want the work to be graded. They can no longer edit it and must ask the teacher to revert to draft status if they need to change it again
○ Require that students accept the Submission statement - An administrator can define a "Submission statement" (see below) i.e. a statement where students promise the work is their own and which they must agree to before submitting their work. If the administrator has given teachers the option of using a submission statement or not, then it will be available in the assignment settings screen
○ Additional attempts - Whether a student can make additional attempts at the assignment. Changing this setting to 'Manually' allows the teacher to go into the grader and in the "Attempt settings" section set "Allow another attempt" to either "yes" or "no". Changing the setting to "Automatically until pass" requires that "Grade to pass" in the Grade section be set If the student does not receive a passing grade then the submission will automatically be reopened and another attempt can be made. If it is kept to ‘Never’ it means only one attempt is possible.
● Group Submission Settings - These settings allow students to collaborate on a single assignment, e.g. working in the same online area or uploading, editing and reuploading an MS Powerpoint in the common assignment area When grading, the teacher may

79
choose to give a common grade and feedback to all students in the group or to give individual grades and feedback to each member.
○ Students submit in groups - If enabled, students will be divided into groups based on the default set of groups or a custom grouping. A group submission will be shared among group members and all members of the group will see each other's changes to the submission
● Notifications section - In this section, you can configure the notifications and when the email reminders will be triggered
○ Notify graders about submissions - If enabled, graders (usually the teachers) will receive a message whenever a student submits an assignment
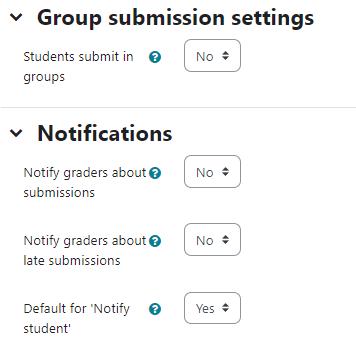
○ Notify graders about late submissions - If enabled, teachers will receive a message whenever a student submits an assignment later than the due date.
○ Default for 'Notify student' - When grading each student, should ‘Notify Student’ be ticked by default.
● Grade Section - In this section, you will configure the grading of the assignment
○ Grade - Select the type of grading used for this activity. If Scale is chosen, then choose the scale from the dropdown menu. If using the Point grading, you can then enter the maximum grade available for this activity
○ Grading Method - Choose the Advanced grading method used for calculating grades in the given context If you would like to keep it simple to default grading mechanism, choose ‘Simple Direct Grading’ here.
○ Grade Category - This field controls the category in which the grades for this assignment activity will be placed in the gradebook
80
○ Grade to Pass - This setting determines the minimum grade which is required to mark this assignment as complete This grade value is used in activity and course completion settings to mark this activity as complete. In addition, this value will be used in the gradebook to highlight pass grades in green and fail grades in red
○ Anonymous Submissions - This hides students' names when grading and instead shows randomly generated Participant numbers. Anonymous submissions hide the identity of students from markers Anonymous submission settings will be locked once a submission or grade has been made in relation to this assignment. With Anonymous submissions, students cannot see the final grade until all of the students' names have been revealed
○ Hide grader identity from students - If this setting is enabled, the identity of the user who grades an assignment is not shown, so the students can’t see who marked their assignment submission.

81
○ Use marking workflow - This lets you keep grades and feedback hidden until you are ready to release them to students. It is also useful if you want to show your progress in grading, or co-ordinate multiple markers/graders The phases are:
■ Not marked (the marker has not yet started)
■ In marking (the marker has started but not yet finished)
■ Marking completed (the marker has finished but might need to go back for checking/corrections)
■ In review (the marking is now with the teacher in charge for quality checking)
■ Ready for release (the teacher in charge is satisfied with the marking but wait before giving students access to the marking)
■ Released (the student can access the grades/feedback)
○ Marking allocation - Marking allocation can be used if marking workflow is set to Yes. Teachers can then be selected to grade or review submitted work of specific students
● In the Common Module Settings: Common Module settings are the same as mentioned in all previous activities. So this time you should choose them as an exercise.
● Click the “Save and return to course” button to make your assignment available Your assignment will appear in your course page. It will also be added to your course calendar and will appear in the Upcoming Events block to remind students when it’s due
Assignment capabilities
The assignment module has only four capabilities:
● Export own submission - This allows a user to export their own assignment submissions to a portfolio This capability is allowed for the default roles of manager, teacher, non-editing teacher and student
● Grade assignment - This allows a user to see submissions, add comments to and grade assignments This capability is allowed for the default roles of manager, teacher and nonediting teacher.
● Submit assignment - This capability allows a user to submit an assignment This capability is allowed for the default role of student only.
● View assignment - This allows a user to view assignments. This capability is allowed for the default roles of manager, teacher, non-editing teacher, student and guest
Managing Assignment Submissions:
When students have submitted their assignments, they can be accessed by clicking on the assignment activity This will bring up the Grading Summary page The Grading Summary page displays a summary of the assignment, including; number of participants, number of drafts, number of submitted assignments, due date and time remaining You will see the links to “View All Submissions” and “Grade”.
82
Clicking 'Grade' will take you to the first student in the list so you can start grading individually.
Clicking 'View all submissions' will take you to the grading table where you see all students.

The Grading Table contains columns of information about the student, the status of their submission, a link to grade their submission, a link to each submission and feedback comments and files (if enabled)
Filtering submissions:
A dropdown menu accessed from the 'Options' section allows you to filter submissions so you can for example quickly see which students have not submitted yet
83
Allocating submissions to markers
If you need to divide submissions between you can apply Groups to the Assignment and let markers know which Group(s) to mark An alternative is to use Marking Allocation - this allows anyone with a Tutor role to allocate one marker to each submission This works particularly well if marking is allocated by subject specialism.
Submission status:
If you will be assigning grades to student work, you may want to take note of the submission status before you begin the marking process. If you have required students to click the Submit button, you may find that some submissions are still marked as Draft (not submitted), meaning the
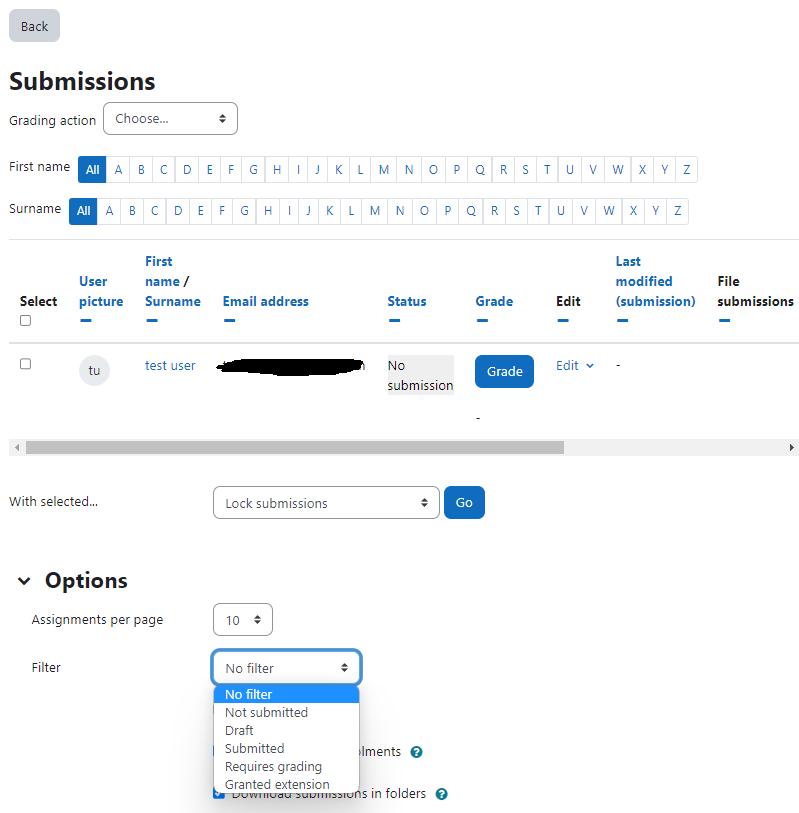
84
student has either uploaded a file(s) or entered some text, but has not clicked ‘Submit assignment’.
If it's after the due date and you are about to commence marking, you use ‘Prevent submission changes’ to stop students from making changes to their assignment. You can do this one by one by using the icon in the Edit column
Or you can select two or more students by putting a tick in the select column and going to 'Lock submissions’ from the With selected menu under the grading table.
Likewise you can also revert a student's submission to draft if they have uploaded the incorrect file. Instead of selecting ‘Prevent submission changes’ select ‘Revert the submission to draft’, or place ticks against selected students and choose 'Revert the submission to draft status' from the With selected menu under the grading table.
Granting extensions
If an assignment has a deadline, a teacher can grant individual or group assignment extensions by selecting the Edit link next to a particular student or group and then clicking 'Grant extension' and setting the new deadline
Quick grading
Quick grading allows you to enter numeric grades directly into the grading table, bypassing the more detailed grading interface. Please note:
● If you want to give feedback, you need to use the more detailed Grade interface.
● Quick grading is incompatible with advanced grading e g Rubrics, and is not recommended when there are multiple markers.
● Submission comments are a two-way private conversation between a student and staff and are visible to students immediately i e markers use the grading interface to give feedback, not the submission comments.
To access the Quick Grading interface, from the Grading Summary page click 'View all assignments'; the Grading Table displays Scroll to the bottom of the page to configure Options, and check the box for 'Quick grading'. While you're down there, you can also set the number of assignments to display per page, filter the assignments e g to see who has not submitted, unmarked assignments, etc
When you are ready to Enter the Grades:
1 You can enter grades directly into the grading table
2. Scroll to the bottom of the grading table and click 'Save all quick grading changes'
3 A confirmation displays
85
Grading individual submissions
If you have enabled File Feedback in the Assignment settings and wish to upload either the marked student assignment, a completed text based feedback document or audio feedback, click on the green tick in the Grade column (or use the icon in the Edit column and select Grade)
This brings you to the Student Grading Page where you can give grades, feedback comments and feedback files (if enabled in the Assignment settings). You can use drag and drop to upload feedback files
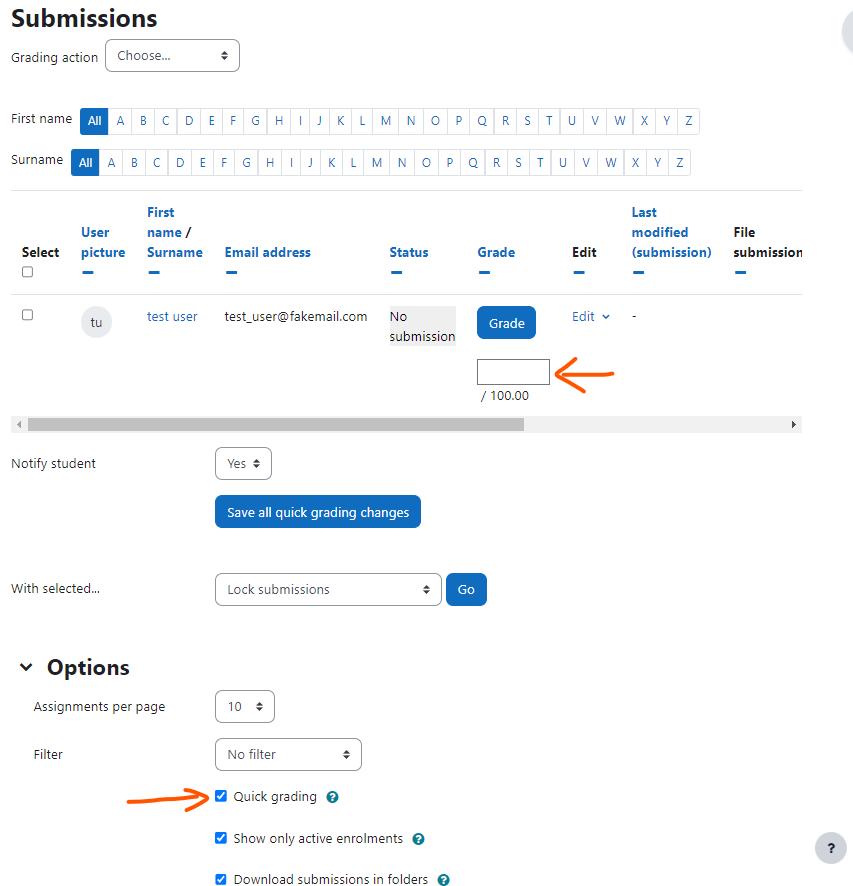
86
Annotating submissions
If the student has uploaded a PDF, docx or odt file, or if you set 'Comment inline' for an online text submission, then their submission will be displayed on the grading screen, allowing you to annotate it, using a variety of tools, stamps (if uploaded by the admin) and comments which may be saved to a comments bank. When the annotations are complete, clicking to save the changes will result in it being displayed to the student as part of their feedback
Offline marking - downloading and uploading multiple grades and feedback files
If you have enabled the ‘Offline Grading Worksheet’ then you can download the student submissions to grade offline. On the grading summary page, you will then see the dropdown menu (under Grading Action) to Download Grading Worksheet as well as Upload Grading Worksheet.
You will get a csv spreadsheet where you can enter the grades as well as the feedback comments Once you are done, you can simply save the file and upload it back to Moodle
Moodle will show you a confirmation to make changes to the gradebook based on the file Proceed to update the grades in the gradebook and all the students' grades will be updated.
Downloading student submissions
You can download a zip file containing all of the assignment submissions by selecting the ‘Download all submissions’ options from the Choose menu at the top of the grading table, or in the settings menu
File submissions will be downloaded in the format uploaded by the student. Online text submissions will be downloaded as html files Each file in the zip will include the student first and lastname at the beginning of the filename for identification purposes.
You can also download selected assignment submissions (rather than all of them) by selecting the ones you want and then choosing 'With selected....Download selected submissions'.
Summary
Assignments are an easy way to gather and track student submissions. Students can submit any type of electronic file to fulfill the requirements Instead of collecting unwieldy stacks of paper, you can let Moodle track who has turned in a paper and when. The feedback options provide you with an easy way to send grades and/or comments back to the students about their work
87
Chapter 6 : Quiz and Question Bank
Assessment tools are the heart of any Learning Management System Feedback on performance is a critical part of a learning environment, and assessment is one of the most important activities in education As educators, we can’t tell what’s going on inside students’ heads, so we need a way for them to demonstrate what they understand and what they don’t A well-designed test, even a multiple-choice test, can give you valuable information about students’ misconceptions If the feedback is rapid enough, it can also be a critical tool for students to gauge their own performance and help them become more successful
Moodle offers one of the most flexible and customizable quiz engine in the world The Moodle Quiz has been one of the best online exam tools which can be customized completely The community has added a large number of options and tools to the quiz engine, making it extremely flexible You can create quizzes with different question types, randomly generate quizzes from pools of questions, allow students to retake quizzes multiple times, and have the computer score everything
The quiz activity enables a teacher to create quizzes comprising questions of various types, including multiple choice, matching, short-answer and numerical. The teacher can allow the quiz to be attempted multiple times, with the questions shuffled or randomly selected from the question bank. A time limit may be set. Each attempt is marked automatically, with the exception of essay questions, and the grade is recorded in the gradebook. The teacher can choose when and if hints, feedback and correct answers are shown to students.
Quiz activity can be used in a Moodle course:
● As course exams
● As mini tests for reading assignments or at the end of a topic
● As exam practice using questions from past exams
● To deliver immediate feedback about performance
● For self-assessment
Moodle Quiz Features
● Quizzes can be configured to allow multiple attempts Each attempt at a question is automatically marked, and the teacher can choose whether to give feedback and/or show the correct answers
● Feedback about performance and self-assessment are important parts of a learning environment. There are several ways to give feedback to students: on each question or overall The quiz module can display feedback and scores at different times during the quiz, using the review options in the Quiz settings.
● A wide variety of Quiz reports (in addition to Grades) are available for use by the teacher Quiz reports not only can focus on a single student's attempt to answer each question, but also can perform a robust item analysis of a question's validity based upon aggregated student responses
● A single quiz can automatically select random and/or specific questions from different categories of questions
88
● There are different options for scoring (marks-grades) individual questions in a specific quiz, grading attempts for a quiz and each question type.
● The quiz settings allow different display methods They can randomize the questions for each student and or randomize the answers for each student.
● The teacher can determine the number of questions on each page of questions the student sees The teacher can change the position of any question in the quiz It is possible to put a label with information anywhere between questions.
● The teacher can choose how questions behave during the quiz It can be like a classic test, where the student gets no feedback while attempting the test, only later. Alternatively, Moodle can reveal the grades and/or feedback to the student during the quiz, and perhaps even give them another chance to answer the question (for fewer marks) having read the feedback.
Moodle Question Types
Before we dive deep into Moodle Quiz, let us take some time to get acquainted ourselves with different question types available in Moodle 4 1
● Calculated - Calculated questions offer a way to create individual numerical questions by the use of wildcards that are substituted with individual values when the quiz is taken.
● Calculated multichoice - Calculated multichoice questions are like multichoice questions with the additional property that the elements to select can include formula results from numeric values that are selected randomly from a set when the quiz is taken. They use the same wildcards than Calculated questions and their wildcards can be shared with other Calculated multichoice or regular Calculated questions. The main difference is that the formula is included in the answer choice as {= } i e if you calculate the surface of a rectangle {={l}*{w}}
● Calculated simple - Simple calculated questions offer a way to create individual numerical questions whose response is the result of a numerical formula which contain variable numerical values by the use of wildcards (i.e {x} , {y}) that are substituted with random values when the quiz is taken
The simple calculated questions offer the most used features of the calculated question with a much simpler creation interface.
● Drag and drop into text - Students select missing words or phrases and add them to text by dragging boxes to the correct location. Items may be grouped and used more than once
● Drag and drop markers - Students drop markers onto a selected area on a background image.Unlike the Drag and drop onto image question type, there are no predefined areas on the underlying image that are visible to the student
● Drag and drop onto image - Students make selections by dragging text, images or both to predefined boxes on a background image Items may be grouped
89
● Description - This question type is not actually a question It just prints some text (and possibly graphics) without requiring an answer. This can be used to provide some information to be used by a subsequent group of questions, for example
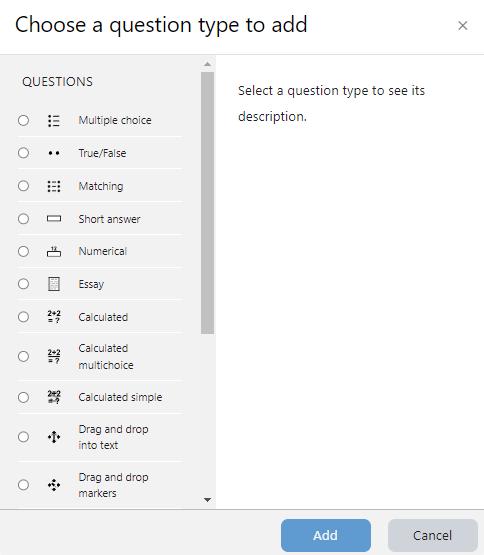
● Essay - This allows students to write at length on a particular subject and must be manually graded It is possible for a teacher to create a template to scaffold the student's answer in order to give them extra support. The template is then reproduced in the text editor when the student starts to answer the question It is also possible to include grading information for teachers marking the essay to refer to as they assess the essays,
● Matching -A list of sub-questions is provided, along with a list of answers. The respondent must "match" the correct answers with each question
● Embedded Answers (Cloze Test / Gap Fill) - These very flexible questions consist of a passage of text (in Moodle format) that has various answers embedded within it, including multiple choice, short answers and numerical answers
90
● Multiple choice - With the Multiple Choice question type you can create single-answer and multiple-answer questions, include pictures, sound or other media in the question and/or answer options (by inserting HTML) and weight individual answers
● Short Answer - In response to a question (that may include an image), the respondent types a word or phrase. There may be several possible correct answers, with different grades Answers may or may not be sensitive to case
● Numerical - From the student perspective, a numerical question looks just like a short-answer question The difference is that numerical answers are allowed to have an accepted error. This allows a continuous range of answers to be set.
● Random short-answer matching - From the student perspective, this looks just like a Matching question The difference is that the sub-questions are drawn randomly from Short Answer questions in the current category.
● Select missing words - Students select a missing word or phrase from a dropdown menu Items may be grouped and used more than once.
● True/False - In response to a question (that may include an image), the respondent selects from two options: True or False
Site Administrators can specify the order the question types appear in the question chooser so that teachers are presented with the most common ones at the top. By default, in new installations of Moodle, the most common question types will appear first
***Besides the standard question types that are part of the core Moodle distribution, there are a number of question type add-ons in the add-ons database.
Building a Moodle Quiz Activity
Adding a Moodle Quiz Activity is a two-step process In the first step, you create the quiz activity and configure its options like Layout, behavior, Attempts allowed etc. which specify the rules for interacting with the quiz
In the second step you add questions to the quiz. You can import your already built questions into Moodle Question Bank easily. The questions in a quiz body can be of any type, chosen manually or at random, and displayed in a set or random order The question pools can contain questions arranged in a manner that makes sense to you.
You can create pools based on chapters in the textbook, weeks in the semester, important concepts, or any other organizational scheme. Pools can be reused in multiple quizzes, shared between classes and courses, and even moved between systems
To start, we need to create a body for our first quiz
91
Creating the Quiz Body
When you create the quiz body, you are creating a container for the questions and setting the rules for interacting with the quiz.
To create a quiz body:
● With the Editing mode turned on, click Add an Activity or Resource and choose - Quiz It will take you to the Add a new Quiz page.
● In the General Section:
○ Name - Enter a meaningful descriptive name for the quiz It will appear in the course navigation as well as on the course page.
○ Description - Enter a description about the quiz activity You can add the details about the grading method, what they are supposed to do, time limits and other details in the description Check ‘Display description on course page’ to show it on the course page
● In the Timing Section
○ Open the Quiz - You can specify times when the quiz is accessible for people to make attempts. Before the opening time the quiz will be unavailable to students. They will be able to view the quiz introduction but will not be able to view the questions Quizzes with start times in the future display both the open and close date for students.
○ Close the Quiz - After the closing time, the students will not be able to start new attempts. Answers that the student submits after the quiz closing date will be saved but they will not be marked Even after the quiz has closed students will still be able to see the quiz description and review their attempts. What exactly they will see depends on the settings you choose for review options.
○ Time Limit - By default, quizzes do not have a time limit, which allows students as much time as they need to complete the quiz. If you do specify a time limit, several things are done to try and ensure that quizzes are completed within that time
■ A countdown timer is shown in the quiz navigation block
■ When the timer has run out, the quiz is submitted automatically with whatever answers have been filled in so far
■ If a student manages to cheat and goes over the allotted time, no marks are awarded for any answers entered after the time ran out
92
○ When time expires - There are three options as to what will happen when the time limit is up Choose the one you need from the dropdown menu:

■ Open attempts are submitted automatically
■ There is a grace period when open attempts can be submitted, but no more questions answered
■ Attempts must be submitted before time expires, or they are not counted.
● In the Grade Section
93
○ Grade Category - If you have categories in your gradebook, select the one you wish the quiz to be in here
○ Grade to pass - Here you can set a passing grade for the quiz This may be connected with Activity completion and Conditional activities such that a student will not be able to access a follow up activity until they have passed the quiz.
○ Attempts Allowed - Students may be allowed to have multiple attempts at a quiz This can help make the process of taking the quiz more of an educational activity rather than simply an assessment
○ Grading Method - When multiple attempts are allowed, there are different ways you can use the grades to calculate the student's final grade for the quiz
■ Highest grade - the final grade is the highest (best) grade in any attempt
■ Average grade - the final grade is the average (simple mean) grade of all attempts
■ First grade - the final grade is the grade earned on the first attempt (other attempts are ignored)
■ Last grade - the final grade is the grade earned on the most recent attempt only.
● In the Layout Section
○ New Page - For longer quizzes it makes sense to stretch the quiz over several pages by limiting the number of questions per page When adding questions to the quiz, page breaks will automatically be inserted according to the setting you choose here. However, you will also be able to move page breaks around by hand later on the editing page
○ Navigation Method - Choose Sequential instead of Free, if you want to force the student to progress through the questions in order and not go back to a previous question or skip to a later one
● In the Question Behaviour section
○ Shuffle within Questions - If enabled, the parts making up each question will be randomly shuffled each time a student attempts the quiz, provided the option is also enabled in the question settings This setting only applies to questions that have multiple parts, such as multiple choice or matching questions
○ How questions behave - The following question behaviors are available when creating a quiz (also when previewing questions):
■ Deferred feedback - Students must enter an answer to each question and then submit the entire quiz, before anything is graded or they get any feedback
■ Adaptive mode and Adaptive mode (no penalties) -Allows students to have multiple attempts at the question before moving on to the next question This behaviour requires that the "Whether correct" box is ticked under "During the attempt" in the "Review options" section, at a minimum
94
■ Interactive mode - After submitting one answer, and reading the feedback, the student has to click a 'Try again' button before they can try a new response They can be given hints to help them Once the student has got the question right, they can no longer change their response. Once the student has got the question wrong too many times, they are just graded wrong (or partially correct) and get shown the feedback and can no longer change their answer. There can be different feedback after each try the student makes The number of tries the student gets is the number of hints in the question definition plus one.
■ Immediate feedback - Similar to interactive mode in that the student can submit their response immediately during the quiz attempt, and get it graded. However, they can only submit one response, they cannot change it later
■ Deferred feedback or Immediate feedback with Certainty-based marking (CBM) - With CBM, the student does not only answer the question, but they also indicate how sure they are that they got the question right The grading is adjusted by the choice of certainty, so that students have to reflect honestly on their own level of knowledge in order to get the best mark.
○ Each attempts build on last - If multiple attempts are allowed and this setting is set to Yes, then each new attempt contains the results of the previous attempt This allows the student on the new attempt to concentrate on just those questions that were answered incorrectly on the previous attempt If this option is chosen then each attempt by a particular student uses the same questions in the same order, independent of randomization settings To show a fresh quiz on every attempt, select No for this setting
● In the Review options section - This section controls what information students will be shown when they review their past attempts at the quiz, and during the attempt in adaptive mode. It is a matrix with check boxes. The various pieces of information that can be controlled are:
○ The attempt - Will show how the student responded to each question
○ Whether correct - Displays whether the students' response to each question is correct or incorrect
○ Marks - Reveals the marks awarded to the student and the grade for the quiz.
○ Specific feedback - Will show the feedback for the response to the answer as set when adding the question to the quiz Each response to a question can have feedback for both correct and incorrect answers.
○ General feedback - Displays the general feedback for the whole question as set when adding the question to the quiz. You can use the general feedback to give students some background to what knowledge the question was testing
95
○ Right answer - Reveals the correct answer to each question, whether the student answered correctly or not
○ Overall feedback - Displays feedback for the entire quiz as set in the quiz settings For each of the above items, you can determine the timeframe when the students will see them:
■ During the attempt - is only available when ‘How questions behave’ has been set to ‘Immediate feedback’, ‘Immediate feedback with CBM’ and ‘Interactive with multiple tries’ If set to one of these options then a ‘Check’ button will appear below the answer and when clicked the student will submit that response and then receive immediate feedback.
■ Immediately after the attempt - means within 2 minutes of the student clicking "submit all and finish".
■ Later, while the quiz is still open - means after 2 minutes, but before the close date (if the quiz does not have a close date, this phase never ends).
■ After the quiz is closed - apply after the quiz close date has passed If the quiz does not have a close date, this state is never reached
● In the Appearance section
○ Show the user's picture - It is now possible, when displaying the user's profile picture for proctoring purposes, to choose whether a large image or thumbnail will be displayed
○ Decimal places in grades - This option determines how many digits will be shown after the decimal separator when the grade is displayed. A setting of 0 for example means that the grades are displayed as integers This setting is only used for the display of grades, not for the display or marking of answers.
● In the Safe Exam browser section
○ Require the use of Safe Exam Browser - This option will only appear if your administrator has enabled it. Safe Exam Browser is a customized web browser that must be downloaded and installed on the computer that the student uses to attempt the quiz. It restricts student use more effectively than a pop up window option Features include full screen, without web navigation options, shortcut keys including copy and paste are disabled and of course surfing the web during an exam.
● In the Extra Restrictions on Attempts -
○ Require password - If you specify a password in here then participants must enter the same password before they are allowed to make an attempt on the quiz This is useful to give only a selected group of students access to the quiz
○ Require network address - You can restrict access for a quiz to particular subnets on the LAN or Internet by specifying a comma-separated list of partial or full IP address numbers. This is especially useful for a proctored (invigilated) quiz, where you want to be sure that only people in a certain room are able to access the quiz
96
○ Enforced delay between attempts - You can set a time (from seconds to weeks) between the first and second attempt of a quiz. You can also (or alternatively) set a time from seconds to weeks for subsequent attempts after the second attempt Thus, you might allow a student to take the quiz twice immediately with no delay, but if they want to improve their score with a third attempt, they are forced to wait a week and use the time for extra revision
○ Browser security - The options in this section offer various ways to try to restrict how students may try to 'cheat' while attempting a quiz However, this is not a simple issue, and what in one situation is considered 'cheating' may, in another situation, just be an effective use of information technology. The options in this section offer various ways to try to restrict how students may try to ‘cheat’ while attempting a quiz. The available options are:
■ Full screen pop-up with some JavaScript security - There is a limit to what the quiz, which runs on a web server, can do to restrict what the student sitting at their computer can do while attempting the quiz
● In the Overall Feedback section
○ Overall feedback is text that is shown after a quiz has been attempted. The text that is shown can depend on the grade the student got Grade boundaries can be specified either as a percentage, for example “31.41%”, or as a number, for example “7” If your quiz is out of 10 marks, a grade boundary of 7 means 7/10 or better You can set as many or as few grade boundaries as you wish The form allows you up to 5 ranges at first, but you can add more by clicking the "Add 3 fields to form" button underneath
● In the common module settings - Pick up the common module settings as we have covered in earlier section of this book
● Click Save and Display to proceed to adding questions in the quiz
Adding Questions to Quiz Activity
Once you have saved your changes, you’ll see the quiz activity and description with an ‘Add Question’ button which will take you to the Questions tab where you will write and select questions from the question bank to include in the quiz body.
On the center of the page you’ll see the questions you’ve added to the quiz Since this is a new quiz, there are no questions there.
● Click the 'Add' link as in the screenshot below
● When it opens up, choose either to add a new question, to select a question from the question bank or to add a random question
97
Now, let’s discuss each option one by one.
Creating a new question
● To make a brand new question, click 'Add' and then '+ a new question'
● From the next screen, choose the question type you want to add and click "Next"
● Fill in the question form, making sure to give a grade to the correct answer
● Click "Save changes"
Adding from Question bank
● If other teachers in the course have made questions, or if a teacher made questions in an earlier quiz, these can be added to the current quiz by clicking 'Add from question bank'.
● Once you click on it, it will open a popup with all questions from Question bank
● You can choose the category on the top as well as filter questions by tags.
● Select all the questions you want to add
● If you have several questions, or you want to add all the questions, tick the box of each question or the top box and then click 'Add selected questions to the quiz'
● To sort the questions, click the column headings The default sort order (T) is short for question type.
● To ensure all previously made questions are available, make sure to tick the boxes "also show old questions"

98
Adding a random question
If you have questions in the question bank, you can add random questions to your quiz by clicking 'Add' and then '+ a random question'. This might be useful if you have students in a class taking a quiz at the same time because they are unlikely to get the same questions at the same time. The same question will never appear twice in a quiz. If you include several random questions, different questions will always be chosen for each If you mix random questions with non-random questions, then the random questions will be selected so that they do not duplicate one of the non-random questions.
*** The more questions you provide the more likely it will be that students get different questions on each attempt
***When a quiz with random questions is retaken, the random questions will be different from the ones in previous attempts
You can add one or more random questions by choosing the number and category in the question bank
Question Types in Detail
Each question type has its own form and options We’ll spend the next few pages detailing the options for each question type
Calculated Questions
Calculated questions offer a way to create individual numerical questions by the use of wildcards (i e you can use common variables names as x , y enclosed in curly braces to create the wildcards {x} and {y}) that are substituted with random values when the quiz is taken.
The main purpose of the calculated question is to create multiple versions of a question with different numerical values This means you must have at least one wildcard in one of the answers
To create a calculated question:
● Select Calculated from the “Create new question” drop-down menu.
● Select the question category.
● Give the question a descriptive name - this allows you to identify it in the question bank.
● Enter the question text: This should be the question you want the student to answer, and it must include all the information they need to calculate an answer. Therefore it must contain at least one wildcard, inside curly braces For example, if you wanted the student to sum numbers A and B, the question text might read: “What is {A} + {B}?”
● Set the Question Status - If you are finished then choose ready or if you want to save it to complete at a later time, choose draft
99
● Set the default question grade (i e the maximum number of marks for this question)
● If you wish, add general feedback for the question It will be displayed to all the students after they have completed the question.
● In the Answers Section: Enter the formula for the answer Be sure to use the same placeholders so Moodle can substitute the same values
○ Choose the grade that the student will get for this question if they give this answer This should be a percentage of the total marks available
○ Determine the tolerance for error that you will accept in the answer. The tolerance and tolerance type settings combine to give a range of acceptable scores So, if tolerance = t, correct answer = x and the difference between the user’s answer and the correct answer is dx, then the tolerance types are as follows:
■ Nominal - mark correct if dx <= t
■ Relative - mark correct if dx / x <= t
■ Geometric - mark correct if dx² / x² <= t²
○ The next 2 settings, “Answer Display” and “Format” determine the precision of the answer. You can use these to select the number of decimal places or significant
you want to use

figures
100
○ Add some feedback which the student will see if they enter this answer
○ You can specify as many answer formulae as you like - click “Add another answer blank” to add more
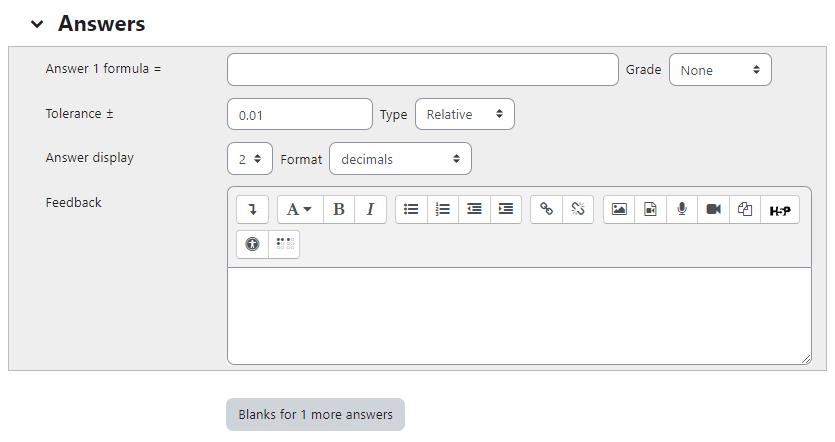
● In the Unit Handling Section you can specify units for the answers For example, if you enter a unit of ‘cm’ here, and the accepted answer is 15, then the answers ‘15cm’ and ‘15’ are both accepted as correct If you add more than one unit, you can also specify a multiplier. So, if your main answer was 5500 with unit W, you can also add the unit kW with a multiplier of 0 001 This means that the answers ‘5500’, ‘5500W’ or ‘5 5kW’ would all be marked correct Note that the accepted error is also multiplied, so an allowed error of 100W would become an error of 0.1kW.
● In the Multiple Tries Section: When questions are run using the ‘Interactive with multiple tries’ or ‘Adaptive mode’ behavior, so that the student will have several tries to get the question right, then this option controls how much they are penalized for each incorrect try The penalty is a proportion of the total question grade
● In the Question Tags section you can enter tags for the questions to easily identify them.
● Click Save Changes Button
Page 2: Choose Dataset Properties:
● On the Next page you can choose the dataset properties
● Each wildcard that you specify in the answer formula must have an associated set of possible values - this is its dataset. Each of the wildcards is listed on this page along with a choice of dataset:
○ private i e only used by this question
○ shared i.e. shared with other calculated questions in the same category
101
● To continue, simply choose your preferred dataset for each wildcard, then click “Next Page”.
Note that even when creating a question for the first time, this page may say that your wildcard "will use the same existing private dataset as before." This just means that Moodle has already tentatively created a private data set for that wildcard: if a private dataset is what you want, leave this choice selected.
Page 3: Edit the datasets
Now we need to create the set of possible values that each wildcard can take There are two ways of creating values - you can type them in yourself and add them to the list, or you can have Moodle generate them for you
Adding/deleting your own values: Adding individual values to the list is easy
● In the ‘Param’ field for each wildcard, enter the value you want
● Scroll down to the ‘Add’ section and click the Add button (leaving the number of items set to 1)
● Repeat the above steps as many times as necessary (the maximum number of items is 100)
To delete values from the list:
● In the ‘Delete’ section, select the number of items to delete
● Click the Delete button Letting Moodle create values
● Start with the “Range of Values” fields, and enter the lower and upper limits for the values you would accept
● Choose a number of decimal places for the value
● Choose the distribution of values between the limits - ‘uniform’ means any value between the limits is equally likely to be generated; ‘loguniform’ means that values towards the lower limit are more likely
● Now move down to the ‘Add’ section and click on “force regeneration”
● In the menu next to the Add button, choose the number of sets of random values (items) you wish to add to the list
● Finally, click Add to append the new values to the list
● Click Save Changes Button to finish things off
Calculated questions can use more than simple arithmetic operators. The full list of operators includes abs, acos, acosh, asin, asinh, atan, atanh, ceil, cos, cosh, deg2rad, exp, expm1, floor, log, log10, log1p, rad2deg, round, sin, sinh, sprt, tan, tanh, atan2, pow, min, max, and pi. Each function’s placeholders and other arguments are in parentheses
102
For example, if you want students to calculate the sine of one angle and two times the cosine of another, you would enter sin({a}) + cos({b}*2)
Calculated Multichoice
Calculated multichoice questions are like multichoice questions with the additional property that the elements to select can include formula results from numeric values that are selected randomly from a set when the quiz is taken. They use the same wildcards than Calculated questions and their wildcards can be shared with other Calculated multichoice or regular Calculated questions.
The main difference is that the formula is included in the answer choice as {= } i e if you calculate the surface of a rectangle {={l}*{w}}.
The value will be displayed as set by the Correct answer shows (0,1,2 etc ) and Format (decimals, significant figures) options setup
So a Choice text could be: The rectangle surface is {={l}*{w}} cm2. If {l} = 4.0, {w} = 2.5, Correct answer shows 1 and Format decimals
The choice will display as: The rectangle surface is 10.0 cm2
Calculated Multichoice setup is similar to that of calculated question type including the handling of wild cards and available functions
To add a calculated multichoice question:
● Select Calculated Multichoice from the Create New Question dropdown menu.
● Repeat steps 2 to 6 as for calculated question type
● In the Answers Section: You can provide multiple choices to choose from with a formula as the option The suggested choice formula is {={x}+ }
● Rest all steps are also the same as for the calculated question type.
● Click the “Save Changes” button to save the question
Calculated Simple
Simple calculated questions offer a way to create individual numerical questions whose response is the result of a numerical formula which contain variable numerical values by the use of wildcards (i.e. {x} , {y}) that are substituted with random values when the quiz is taken.
The simple calculated questions offer the most used features of the calculated question with a much simpler creation interface.
The only difference between the calculated and calculated simple question is that you can create the values for the wildcards right within the same page The steps are exactly the same as for the calculated question type.
103
Description
A Description question page simply shows some text (and possibly graphics) without requiring an answer It is more of a label than a question type When shuffling questions is turned off, this type of page can provide information to be used by the following group of questions.
Embedded Answers (Cloze)
Embedded answers (Cloze) questions consist of a passage of text (in Moodle format) that has various answers embedded within it, including multiple choice, short answers and numerical answers Questions of this type are very flexible, but can only be created by entering text containing special codes that create embedded multiple-choice, short answers and numerical questions
To setup an Embedded Answers (Cloze) type question:
● Select the question category
● Give the question a descriptive name - this allows you to identify it in the question bank
● Enter the passage of text (in Moodle format) into the ‘question text’ field.
● Set the ‘default question grade’ (i.e. the maximum number of marks for this question).
● Set the ‘Penalty factor’
● If you wish, add general feedback. This is text that appears to the student after he/she has answered the question
● The editor has been modified and allows you to test if your syntax is good. The different questions elements decoded will be displayed and syntax errors pinpoint. However, it cannot check if the question decoded is two questions in one because of error syntax
● Click Save changes to add the question to the category
Essay
An essay question is a free-response text area where students can enter larger blocks of text in response to your question These questions are not scored by the computer, and you will need to grade each answer manually
It is possible for a teacher to create a template to scaffold the student’s answer in order to give them extra support in the “Response Template” field. The template is then reproduced in the text editor when the student starts to answer the question
To create an essay question:
● Select Essay from the “Create new question” drop-down menu
● Give the question a descriptive name
● Enter the question text
● Enter the default mark for the question.
104
● If you wish, add general feedback and/or specific feedback
● You can also specify the options for the response submission like the editor, input box size and even you can allow the students to upload the attachments

● To provide the extra support to the students, enter it in the “Response template” section.
● To provide information to the other teachers about the grading criteria for the essay, mention it inside the “Information for graders” section.
● Click the “Save changes” button to add the question to the category
Matching
Matching questions ask students to match multiple question stems to multiple possible answers. They are useful for testing students’ understanding of vocabulary and their ability to match examples to concepts.
105
Matching questions have a content area and a list of names or statements which must be correctly matched against another list of names or statements For example “Match the Organs with the corresponding system” with the two lists “Ligaments, Skin, Capillaries” etc with “Skeletal, Muscular, urinary” etc.

Setting up a matching question in Moodle is a bit different from setting up other types of questions
To create a matching question:
● Select the question category
● Give the question a descriptive name - this allows you to identify it in the question bank.
● Enter some instructions in the ‘Question text’ field to tell the students what they are matching
● Set the ‘Default mark’ (i.e. the maximum number of points for this question).
● If you wish, add general feedback This is text that appears to the student after he/she has answered the question.
● Check the ‘shuffle’ box if you want the answers in the drop-down menus to be shuffled
Note: The Quiz display setting must also be set to shuffle within questions for this to work
● For the first matching item, enter the question and a matching answer.
● Fill in at least two questions and three answers Click ‘Blanks for 3 more questions’ to add more. You can enter as many as 10 items. You can provide extra wrong answers by giving an answer with a blank question
106
● Set the ‘Penalty for each incorrect try’
● Click Save changes to add the question to the category
Moodle will display the question in two columns The first will contain the questions The second will display a drop-down menu for each question with all possible matching answers as options
Multiple Choice
Moodle provides teachers with a lot of flexibility when creating this common question type You can create single-answer and multiple-answer questions, include pictures, sound or other media in the question and/or answer options (by inserting HTML) and weight individual answers.
There are two types of multiple choice questions - single answer and multiple answer
Single Answer Questions- These questions allow one and only one answer to be chosen by providing radio buttons next to the answers. You will specify non-negative marks for each answer; usually zero marks for wrong answers, maximum marks for correct answers and partial marks for partially correct answers
Multiple Answer Questions- You can select “multiple answers are allowed” in a Multiple Choice question type. “Multiple answers” questions types in a quiz allow one or more answers to be chosen by providing check boxes next to the answers Each answer may carry a positive or negative grade, so that choosing ALL the options will not necessarily result in good grade If the total grade is negative then the total grade for this question will be zero.
Feedback can be associated either with specific answers, or with the question as a whole
To create a multiple-choice question:
● Select the question category
● Give the question a descriptive name. The name will be used in the question lists on the quiz editing page
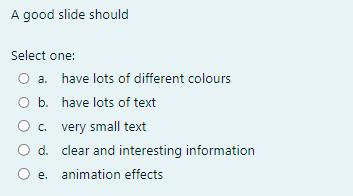
● Create the question text. If you’re using the HTML Editor, you can format the question just like a word processing document.
● Set the ‘default question grade’ (i e the maximum number of marks for this question)
107
● If you wish, add general feedback This is text that appears to the student after he/she has answered the question.
● Choose whether students can only select one answer or multiple answers
● Choose whether to shuffle the answer options and the numbering list to be displayed for the answers.
● Write your first answer in the Choice 1 text field Inserting HTML into this area also makes it possible to add an image or a sound file.
● Select a grade percentage for the answer This is the percentage of the total points for the question that selecting this response is worth. You can select negative percentages as well as positive percentages. So, selecting a correct response in a multiple answer question may give you 50% of the possible points, while selecting a wrong answer may take away 10%. Note that in a multiple-answer question, the grades must add up to 100%.
● If you wish, you can add feedback for each response It may be a bit more work, but its good practice to tell the students why each answer is right or wrong using the feedback area If students know why an answer is right or wrong, they can analyze their own thinking and begin to understand why an answer is correct Your feedback will only be displayed if you select Show Feedback in the quiz body options.
● Fill in the rest of the response choices in the rest of the form Any unused areas will be ignored.
● The option combined feedback for correct/partially correct/incorrect responses is particularly useful for multiple-response questions, where it is difficult to control what feedback students see just using the answer-specific feedback.
● Set the ‘Penalty factor’ for each incorrect try Make note that the ‘penalty factor’ only applies when the question is used in a quiz using adaptive mode - i.e. where the student is allowed multiple attempts at a question even within the same attempt at the quiz
● Click the “Save Changes” button at the bottom of the screen
Numerical
Numerical questions are a lot like short-answer questions for equations, such as the one shown in Figure below. You can create a question with an equation, and your student’s type in a numerical answer Students will get credit for answers within the range of answers you specify
To create a numerical question:
● Select the question category
● Give the question a descriptive name - this allows you to identify it in the question bank
● Enter a question in the ‘question text’ field. This can include an equation - Moodle has a couple of text filters that allow you to type an equation and have it properly typeset when displayed The Algebra filter is very good for writing common mathematical expressions in a simple way. You can also use the Equation editor provided in the Atto Text editor.
● Set the ‘default question grade’ (i e the maximum number of marks for this question)
108
● Add general feedback This is text that appears to the student after he/she has answered the question.
● Now enter the first accepted answer(s) in the Answer field
● Enter an accepted error for this answer. This is the range above or below the answer that Moodle will accept as a match. For example, if the correct answer is 5, but you will accept 4 or 6 as answers, your accepted error is 1
● Enter a grade for this answer option.
● Enter feedback for the accepted answer This is the text that the student will see if they enter a number within the accepted error of the answer.
● Repeat for each of the answers you want to accept. You can provide feedback for all wrong answers by using a wildcard, i e the asterisk character (*), as an answer with grade ‘None
● You can also specify the Units in the Unit Handling Section For example, if you enter a unit of ‘cm’ here, and the accepted answer is 15, then the answers ‘15cm’ and ‘15’ are both accepted as correct You can also specify a multiplier So, if your main answer was 5500 with unit W, you can also add the unit kW with a multiplier of 0 001 This means that the answers ‘5500’, ‘5500W’ or ‘5.5kW’ would all be marked correct. Note that the accepted error is also multiplied, so an allowed error of 100W would become an error of 01kW
● Set the ‘Penalty factor’ for multiple tries.
● Click ‘Save changes’
Random short-answer matching
This is an interesting question. You take random multiple short-answer questions and their correct answers and create a matching question out of them It’s an interesting way to reuse your short-answer questions in a new format. The Random Short-Answer Matching question looks just like a Matching question The difference is that the sub-questions are drawn randomly from the Short Answer questions in the current category
To create a random short-answer matching question:
● Select “Random short-answer matching” from the “Create new question” dropdown menu
● Give the question a descriptive name - this allows you to identify it in the question bank.
● Enter the question text to tell the students what they are matching, or use the default text
● Enter the default marks for the questions
● Provide the General Feedback which will be shown to the students after they have completed the question
● Select the number of questions you want to add to the matching question - make sure this is less than or equal to the number of short-answer questions available in this category (a verification will be done when the question is saved)
● Check Include Subcategories if you wish to choose questions from subcategories also.
● If you wish, you can add feedback for each response in the Combined Feedback Section
● Set the ‘Penalty factor’ in the Multiple Tries Section.
109
Short Answer
In a short answer question, the student types in a word or phrase in response to a question (that may include an image). Answers may or may not be case sensitive. The answer could be a word or a phrase, but it must match one of your acceptable answers exactly It’s a good idea to keep the required answer as short as possible to avoid missing a correct answer that’s phrased differently
Once the quiz is over, review student’s answers and add their acceptable answers to the list
To create a short-answer question:

● Select “Short answer” from the “Create new question” drop-down menu
● Give your question a descriptive name.
● Create the question text If you want students to fill in a blank, use the underscore to indicate where the blank is
● Set the ‘default question grade’ (i.e. the maximum number of marks for this question). • If you wish, add general feedback
● Choose whether the answers are case-sensitive. Case sensitivity can be tricky where capitalization is important Will you accept “george Washington” as well as “George Washington” as an answer?
● Fill in the answers you will accept. Give each answer a percentage of the grade if required You could give common misspellings partial credit with this option You can use wildcards to allow for variants on a word per phrase.
● Add grade for each answer
● Create feedback for any and all answers. This will appear if the student enters that answer.
● Set the ‘Penalty factor’ in the Multiple Tries Section
● Click Save Changes to add the question
True/False Question
In a true/false question a student is given only two choices for an answer in this kind of question: True or False The question content can include an image or html code
● Click Save changes
110
When feedback is enabled, the appropriate feedback message is shown to the student after the answer For example, if the correct answer is “False”, but they answer “True” (getting it wrong) then the “True” feedback is shown
To create a True/false type question:
● Select the question category
● Give the question a descriptive name - this allows you to identify it in the question bank.
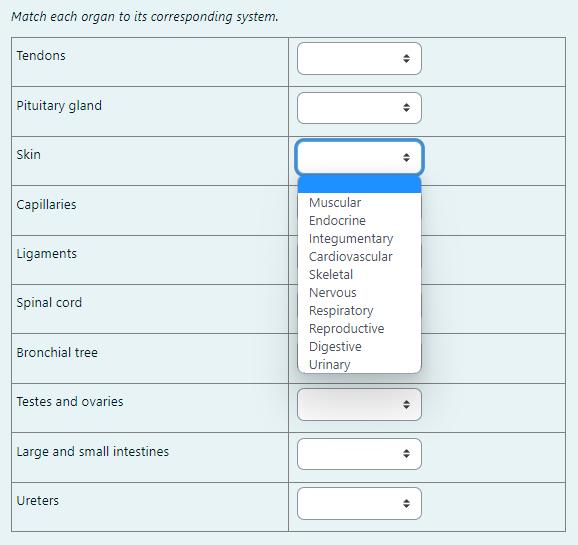
● Enter a question in the ‘question text’ field
● Set the ‘default question grade’ (i e the maximum number of marks for this question)
● If you wish, add general feedback.
● Select the correct answer - true or false
● Finally, provide feedback for each of the answers ‘true’ and ‘false’.
● Set Penalty Factor for Multiple Tries
● Click ‘Save changes’ to add the question to the category
Select Missing Words
Select missing words question type is very similar to the Drag and drop into text question type (covered in next section), but uses drop-down menus in the text instead of drag-boxes. This works well where the question text is very long and you would have to scroll a lot to do drag and drop
To a 111
● Select the question category
● Give the question a descriptive name - this allows you to identify it in the question bank

● Add the question to the text editor in the Question text field. Use double square brackets '[[n]]' with a number in place of the word you wish the students to find. For example, use [[1]] for the first word, [[2]] for the second word and so on
● Set the ‘default mark’ (i.e. the maximum number of marks for this question).
● If you wish, add general feedback
● Add the missing words or phrases in the correctly numbered boxes in the 'Choice' section If you tick 'Shuffle' the display order will be shuffled
● If choices are grouped, then only items in the appropriate group will display in the drop down menu of a blank.
● Enter the combined feedback for any correct or incorrect responses
● Enter the ‘penalty for each incorrect tries’ in the Multiple tries section.
● Click ‘Save changes’
Drag and drop into text
A drag and drop question type where missing words have to be dragged into gaps in a paragraph of text These types of questions are pretty much helpful when you want to test the learners' grammatical knowledge in language learning.
112
To add a drag and drop into text type question:
● Select the question category
● Give the question a descriptive name - this allows you to identify it in the question bank
● Add the question to the text editor, using any formatting you wish Use double square brackets '[[1 or 2 or 3]]' with a number in place of the word you wish the students to find.
● Set the ‘default mark’ (i e the maximum number of marks for this question)
● If you wish, add general feedback.
● Add the missing words or phrases in the correctly numbered boxes in the 'Choice' section (You may add extra ones to make the question harder) If you tick 'Shuffle' the display order will be shuffled.
● Choices that are marked as 'Unlimited may be used in multiple locations
● Choices that are within the same Group are color coded and may only be dropped in a gap with the corresponding color For example, if you pick 3 choices in Group A and 4 choices in Group B, then the students will see Group A as white color and Group B with Grey or any other color.
● Enter the combined feedback for any correct or incorrect responses
● Enter the ‘penalty for each incorrect tries’ in the Multiple tries section.
● Click ‘Save changes’
Drag and Drop markers
Drag and drop markers question type allows students to drop markers onto an area on a background image It differs from the Drag and Drop onto image question type in that there are no predefined areas on the underlying image that are visible to the student.
To add a drag and drop marker type question:
● Select the question category
● Give the question a descriptive name - this allows you to identify it in the question bank.
● Add the question to the text editor in the Question text field
● Set the ‘default mark’ (i.e. the maximum number of marks for this question).
● If you wish, add general feedback
● In the Preview section, click the background image button to upload an image Larger images will be displayed at a maximum 600 x 400.Your image will then display under the file upload box
● In the Markers section, add the words you want the students to drag onto the areas you select
● In the 'Number' dropdown, you can select the number of times the marker can be used Selecting 1 means that when it has been used once, it will no longer be available in the list It is fine to leave the numbers as the default 'Unlimited'; it just means that each marker will still remain once it has been used.
113
● In the Dropzones section, decide the shape you want the selectable areas to be: circle, polygon or rectangle. Our example uses a rectangle. In each 'Marker' dropdown, choose the item you want for that area
● Drop zones may be dragged into position and resized using a mouse. Alternatively they can be defined by coordinates. Click the question mark icon next to Drop zone 1 to see how to add coordinates for your chosen shape
● Once all the drop zones have been defined, you can save the changes and preview the question
● Enter the combined feedback for any correct or incorrect responses.
● Enter the ‘penalty for each incorrect tries’ in the Multiple tries section.
● Click ‘Save changes’
Drag and drop onto image
Drag and drop onto image question type allows students to drag words, images or both from a list and drop them into pre-defined gaps on a base image.
To add a drag and drop into image type question:
● Select the question category
● Give the question a descriptive name - this allows you to identify it in the question bank.
● Add the question to the text editor in the Question text field
● Set the ‘default mark’ (i e the maximum number of marks for this question)
● If you wish, add general feedback.
● In the Preview section, click the background image button to upload an image Your image will then display under the file upload box.
● In the Draggable items section, you can upload images if you leave the type as 'draggable image' or you can type in words if you change the type to 'draggable text' You may have a mixture of images and text.
● Choices that are within the same Group are colour coded and may only be dropped on a drop zone with the corresponding colour. Choices that are marked as 'Unlimited' may be used in multiple locations
● In the Drop zones section, you choose which items to go in which zone. Click the 'Refresh preview' button.
● You can then position the items on the background image and this will add their coordinates.
● Once all the drop zones have been defined, you can save the changes and preview the question.
● Enter the combined feedback for any correct or incorrect responses.
● Enter the ‘penalty for each incorrect tries’ in the Multiple tries section
● Click ‘Save changes’.
114
Before we start adding questions to our quiz or creating questions, let’s take a more detailed look at question bank and categories
Question Bank
The Question bank allows a teacher to create, preview and edit questions in a database and use them in the Quiz activity. Questions are organized in categories and subcategories similar to the way files are stored in folders and subfolders These categories may be limited to being used on the site, course or quiz level.
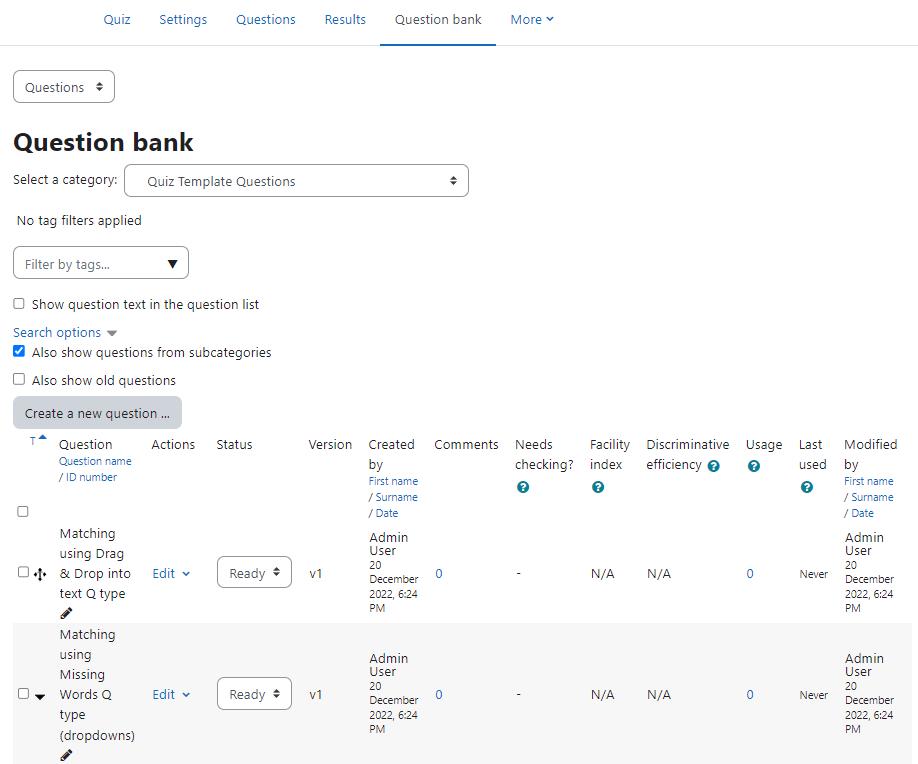
The question bank can be accessed, Either via course navigation on the main course page by clicking on "More" > "Question bank" Or otherwise you can go to the quiz and then click Question Bank in the Quiz Navigation
The columns you see in the Question bank are separate Moodle plugins What you see in the Question bank depends on what the administrator has enabled or disabled. Let’s get acquainted ourselves with the columns details:
115
● Actions - From the Actions column you can perform certain actions such as editing, duplicating or previewing questions You can also view the history of a particular question and see its versions.
● Status - From the Status column you can see which questions are ready to be used in quizzes and which need checking by colleagues Whether a question is draft or read can be specified when creating the question as well as in this column.
● Version - The Version refers to the various edits of that question - see History from the Actions menu for specific details.
● Comments - Comments allows colleagues to comment on a question, as part of the peer review/Quality assurance process
● Usage - Usage shows the number of quizzes a question is used in, with a link to more specific details
● Last Used - Last used shows when a student last attempted a question.
● Needs checking - Needs checking highlights a question whose results suggest there is a problem with it, and it should be reviewed
Select a category
Questions are organized into categories Initially each course has only one category called “Default”. It is good practice to create more categories to organize your questions. This not only makes it easier to find questions, but makes the use of random questions and matching question easier You can create a hierarchy of categories because you can create subcategories inside parent categories.
It is better than keeping all your questions in one big list in the quiz module The hierarchy feature enables you to separate categories into subcategories and sub categories into sub sub-categories etc indefinitely Categories and subcategories, etc , are very powerful when combined with random questions that can select either from one category or from a category or any of its sub categories
Each category has a context which determines where the questions in the category can be used:
● Activity context - Questions only available in the activity module
● Course context - Questions available in all activity modules in the course
● Course category context - Questions available in all activity modules and courses in the course category
● System context - Questions available in all courses and activities on the site
To add a category
● On the Question bank page, Choose Categories from the dropdown menu in the right corner.
116
● Here you will see a list of current categories as well as the button to add a new category Click the button.
● On the Add category page:
○ Choose the ‘parent’ category in which your new category will be placed. The parent category is the one in which the new category will be placed “Top” means that this category is not contained in any other category.
■ Placing your category in another category makes it a sub-category of the parent
■ Choosing ‘Top’ means that your category is a top level category, not a sub category
○ Type the name of your new question category in the text box.
○ Add an optional meaningful description in the category info area.
○ Click the ‘Add Category’ button Your new question category will appear in the list of current categories

Deleting Categories
Categories can also be created or deleted at will However, if you try to delete a category containing questions, then you will be asked to specify another category to move them to You cannot delete or move the last category in any context, there must always be one category in a context.
117
Importing Questions
If you have questions from a textbook question bank, or if you don’t want to use the web interface to create your questions, you can import them from a text file. Moodle supports a range of formats including some proprietary quiz software formats

Once you get to know a format, it may be easier to type the questions into a text file than to use the web interface It will be helpful if you already have a question bank ready in a different format and you want to import that in Moodle question bank.
Note: Moodle XML format is the recommended import question type format as it enables the maximum amount of question data (such as question feedback) to be imported.
The default formats include:
● Aiken Format: The Aiken format is a very simple way of creating multiple choice questions using a clear human-readable format. The question must be all on one line. Each answer must start with a single uppercase letter, followed by a period ‘’ or a bracket ‘)’, then a
118
space The answer line must immediately follow, starting with “ANSWER: “ (NOTE the space after the colon) and then giving the appropriate letter.
● Blackboard: If you’re converting from Blackboard to Moodle, you can export your course and import the question pools into Moodle using the Blackboard format. Blackboard format enables questions saved in all Blackboard export formats to be imported via a .dat or zip file For zip files, images import is supported
● Embedded Answers (Cloze): The Cloze format is a multiple-answer question with embedded answers These questions can be a bit tricky to develop, but they provide a unique approach. Embedded answers (Cloze) format enables the import of a passage of text with questions such as multiple-choice and short answer embedded within it.
● Gift Format: Gift format enables multiple-choice, true-false, short answer, matching, missing word, numerical and essay questions to be imported or exported via text file.
● Missing Word format: Missing word format enables questions to be imported via text file
● Moodle XML format: This is a Moodle-specific format for importing and exporting questions It allows you to import image files used in the questions
To start importing questions:
● Go to the Question Bank from Course Navigation > More Select Import from the top left dropdown menu
● Select a file format The help pop up next to the file format drop-down menu contains further details of each format
● Under the General Section: Select the category into which the imported questions will go Certain import formats, such as GIFT and Moodle XML, may include category and context data in the import file
● Select what should happen if there are no grades or an error is detected in the import process.
● Upload the file to import in the Import questions from file section and click Import
Exporting Questions
You can share questions you have created by exporting them to a text file Possible export formats are AIKEN, GIFT, Moodle XML, and XHTML These can then be easily used to support offline review and editing of all components of a set of questions, or to create paper tests
To export questions:
● Go to the Question Bank from Course Navigation > More. Select Export from the top left dropdown menu
● Select a file format. The export questions page in the Moodle documentation contains links to further information on each export format
● Select a category from which the exported questions will be taken in the General Section.
119
● Check if you want the category name to exported and/or the context to be included This only applies to some formats and is used to restore this information on import.

● You will be asked to download the exported file
Note: Images are only included if you export the questions using Moodle XML format
Quiz layout
The quiz layout will define how the quiz will be displayed to your learners You can define the quiz layout from the Questions page You can define whether to have a new page for every question or after a certain number of questions
You can add a page break between questions by clicking the arrow icon (on the left side of the Question as shown in the image below). Similarly, you can remove pages by clicking the arrow icon
120
You can also change the layout of the whole quiz by clicking the 'Repaginate' button and define how many questions per page
Questions may be moved by dragging and dropping using the crosshairs icon.
Section headings
Section headings may be added to each new page. It defines different parts of the quiz for example, you may have Multiple Choice Questions for 1 mark each in one section and Essay Type questions in another section.
For the first page, click the 'pencil' icon at the top and add your heading. For other sections, click ‘+Add’ button and choose ‘a new section heading’.
The section headings are displayed in the Quiz navigation block
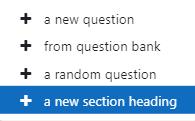
Where questions are in different sections each section has its own 'Shuffle' box to tick. This means that you can mix up questions in one section, but in another section, where their order is important, you can keep them in the order you need them to display
Assigning points to questions
You can set how many points each question is worth by changing the number in the box to the right of each question, and you can change the maximum grade by changing the number in the box top right at the top of the quiz. The default is one point per question and a 100.00 maximum grade
Quiz Override for specific user/users
There may be times that some of the users are not able to complete the quiz in time due to some issue with their device or network error etc. Dates, timing and number of allowed attempts may be changed for individual users or groups by following the Overrides link in the Quiz Navigation bar.
User Overrides
To change a quiz setting for a particular user or users, click the "add user override" button in Quiz Administration > Overrides, make the changes you wish and save or enter another override
121
● In the Override User field you can filter the username of the user for which you wish to override
● Require password - You can specify a password to be used by the student in order to attempt the quiz.
● Open/Close the quiz - Here you can specify the new timings for the Quiz opening and closing for the selected users.
● Time Limit - If enabled the time limit is stated on the initial quiz page and a countdown timer is displayed in the quiz navigation block.
● Attempts allowed - Here you can specify the total number of attempts allowed (not the extra attempts)
● You can also click the ‘Revert to Quiz defaults’ to revert back to the original settings.
● Click Save
● You can also add different overrides for different users by clicking Save and enter another override

122
Now, when you return back to the Overrides page, you will see a list of all User Overrides added till now
Group Overrides

Similarly, to change a quiz setting for a particular group, click the "add group override" button in Quiz Administration> overrides, make the changes you wish and save or enter another override Here all the settings are the same as explained above except instead of a single user, you need to filter out the group for which you want to add the override
Quiz Reports
Once students start to take the quizzes, you’ll have a lot of data available When attempts have been made on the quiz, the teacher can click the quiz name and access the reports from the ‘Results’ tab.

T
● Grades report
● Responses report
● Statistics report
● Manual grading
Let’s see each one of them below:
Grades Report
Grade reports show all the students' quiz attempts, with the overall grade, and the grade for each question There are links to review all the details of a student's attempt, just as the student would see it
The results can be downloaded in a variety of formats. At the bottom of the page is a graph showing the distribution of scores

124
There are check boxes to allow you to individually regrade or delete the selected attempts By clicking on the score link, you are able to look at an individual student exam
The teacher can select from:
● enrolled users who have attempted the quiz;
● enrolled users who have not attempted the quiz;
● enrolled users who have, or have not, attempted the quiz;
● all users who have attempted the quiz
Deleting attempts
The grading report can be used to delete selected quiz attempts, which may sometimes be necessary.
Responses Report
This is very similar to the Grades report, except that it shows the responses the students gave, rather than the marks they earned It is also possible to show the question text or the right answer, to compare with the student's response. This is helpful when the question is randomized.
For quizzes with interactive question behavior, it is possible to display responses for the first, last or all tries a student makes.
Statistics Report
Statistics report gives a statistical (psychometric) analysis of the quiz, and the questions within it
The front page of this report gives a summary of the whole test There are then links to drill down into a detailed analysis of a particular question The last section of this report is a bar graph of the percentage of correct answers (Facility index) and the Discriminative efficiency index.
The full report (overview, and detailed analysis of all questions) can be downloaded in a variety of formats, as can the quiz structure analysis table
The Quiz statistics report can be useful in:
● Finding 'broken' questions
● Ensuring that random variants are fair
● Understanding how students are responding to a particular question
Manual grading report
The Quiz manual grading report makes it easy to manually grade questions in the quiz
125
The first screen of the report lists all the questions in the quiz that need to be, or have been, manually graded (for example essay questions) with the number of attempts There is an option to also show the questions that have been automatically graded, which is useful if you ever need to edit the grades by hand.
Summary
Quizzes can be configured to allow multiple attempts. Each attempt at a question is automatically marked, and the teacher can choose whether to give feedback and/or show the correct answers. There are many ways to use a quiz
Feedback about performance and self-assessment are important parts of a learning environment. There are several ways to give feedback to students on each question or overall The quiz module can display feedback and scores at different times during the quiz, using the review options in the Quiz settings
You can install additional plugins to gamify your Moodle quiz to create a variety of interactive games for participants
A wide variety of Quiz reports (in addition to Grades) are available for use by the teacher. Quiz reports not only can focus on a single student’s attempt to answer each question, but also can perform a robust item analysis of a question’s validity based upon aggregated student responses.
A single quiz can automatically select random and/or specific questions from different categories of questions
There are different options for scoring (marks-grades) individual questions in a specific quiz, grading attempts for a quiz and each question type
The quiz settings allow different display methods. They can randomize the questions for each student and or randomize the answers for each student.
The teacher can determine the number of questions on each page of questions the student sees The teacher can change the position of any question in the quiz. It is possible to put a label with information anywhere between questions
The teacher can choose how questions behave during the quiz. It can be like a classic test, where the student gets no feedback while attempting the test, only later Alternatively, Moodle can reveal the grades and/or feedback to the student during the quiz, and perhaps even give them another chance to answer the question (for fewer marks) having read the feedback
126
Chapter 7 : Glossary
Part of becoming an expert in any field is learning the vocabulary used by practitioners Experts in an area of study develop new language and word usage to communicate new ideas or subtle variations of old ones As communities develop within a field and experts communicate with each other over time, new languages emerge Many experts find it increasingly difficult to communicate with novices as they become more immersed in the language of their field
Moodle has a tool to help you and your students develop glossaries of terms and embed them in your course The glossary activity module allows participants to create and maintain a list of definitions, like a dictionary
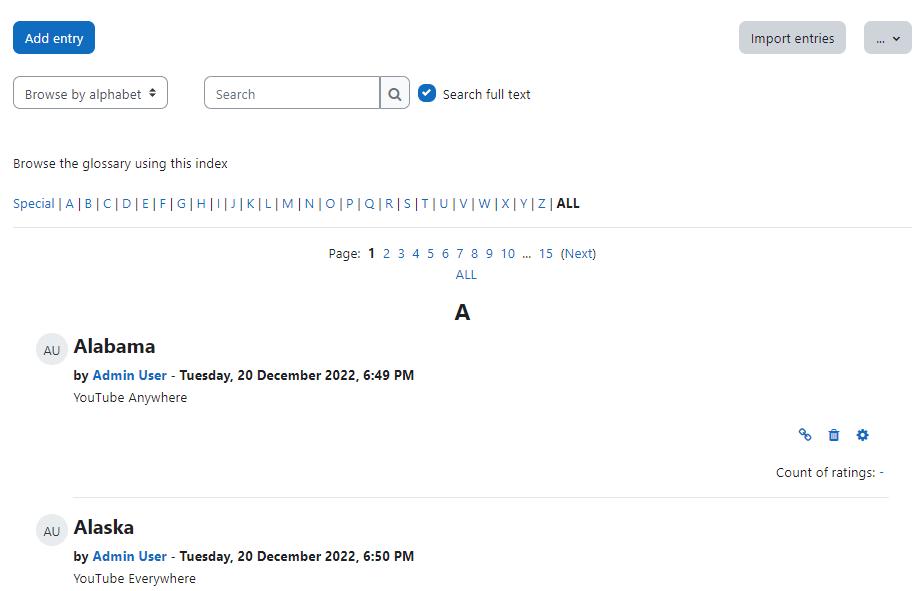
On the surface, the glossary module doesn’t seem to be more than a fancy word list In practice, however, it’s a powerful tool for learning The glossary module has a number of features that make it easy for you and your class to develop shared vocabulary lists, add comments to definitions, and even link every appearance of a word in a course to its glossary entry
Glossary can be used in many ways The entries can be searched or browsed in different formats and definitions can 'pop up' over instances of the word whenever the term appears in the module A glossary can be a collaborative activity or be restricted to entries made by the teacher Entries can be put in categories The auto-linking feature will highlight any word in the course which is located in the glossary
The glossary also allows teachers to export entries from one glossary to another (the main one) within the same module. Student entries can be set to be approved by a tutor before they are made available and students can also comment on entries.
127
The Glossary activity allows participants to create and maintain a list of definitions, like a dictionary While it can be set up and used only by the teacher, its main function is as a collaborative exercise The Glossary auto-linking filter will highlight any word in the course which is located in the Glossary

Creating Glossaries in Moodle
Each Moodle course has its own set of glossaries. Only teachers can edit the main glossary. Secondary glossaries may be configured to allow student entries and comments
128
Your Moodle course may contain one main glossary and as many secondary glossaries as you want You can export entries from any secondary glossary into the main glossary
To create a glossary:
● With the editing turned on, in the section you wish to add your glossary, click the "Add an activity or resource" link and choose Glossary
● In the General Section:
○ Name: Give your new glossary a descriptive name
○ Description: Describe the purpose of the glossary and provide instructions or background information, links etc
○ Display description on course page: If this box is ticked, the description will appear on the course page just below the name of the glossary
○ Glossary type: Here you can decide whether the glossary will be main or secondary. The glossary system allows you to export entries from any secondary glossary to the main one of the course. In order to do this, you should specify which glossary is the main one. You can only have one main glossary per course.
● In the Entries Section:
○ Approved by default: If set to "yes" then new entries appear automatically. If not, then the teacher must approve each one first.
○ Always allow editing: If set to "yes", students can edit their entries at any time. If not, then they can only edit for a certain period.
○ Duplicate entries allowed: This allows the entry of more than one definition for a given word.
○ Allow comments on entries: Students and teachers can leave comments on glossary definitions. The comments are available through a link at the bottom of the definition.
○ Automatically link glossary entries: If the Glossary auto-linking filter is enabled by an administrator, then turning this on allows individual entries in this glossary to be automatically linked whenever the concept words and phrases appear throughout the rest of the same course This includes forum postings, internal resources, week summaries and so on
● In the Appearance Section:
○ Display format: This specifies the way that each entry will be shown within the glossary The default formats are:
■ Simple, dictionary style - This looks like a conventional dictionary with separate entries No authors are displayed and attachments are shown as links
■ Continuous without author - Like the simple style Shows the entries one after another without any kind of separation but the editing icons, but only if your theme supports it, you usually have to modify the theme if you want an alternative appearance to the simple setting
■ Full with author - A forum-like display format showing author's data Attachments are shown as links
■ Full without author - A forum-like display format that does not show author's data. Attachments are shown as links.
■ Encyclopedia - Like 'Full with author' but attached images are shown inline.
■ Entry list - This lists the concepts as links.
129
■ FAQ - Useful for displaying lists of frequently asked questions It automatically appends the words QUESTION and ANSWER in the concept and definition respectively
○ Approval display format: It is possible to set an alternative display format for when entries are approved that can differ from the display format on the course page This could be useful for instance if a tutor wants to see who made a particular glossary entry before approving it but doesn't want the students' name to be displayed for others on the course page
○ Entries shown per page: Decide here how many entries to show per page
○ Show alphabet links: If set to "yes", users can browse the glossary by letters of the alphabet
○ Show 'ALL' link : If set to "yes", users can browse all the entries at once.
○ Show 'Special' link: If set to "yes", users can can browse the glossary by special characters, such as @ and #.
○ Allow print view: This provides a printer-friendly version link for students.
● In the Ratings Section:
○ Roles with permissions to rate: Glossary entries can be rated using a scale. By default, only teachers can rate glossary entries, though students can be given permission to do so if desired from Administration>Glossary administration. This is a useful tool for giving students participation grades. Any ratings given are recorded in the gradebook.
○ Aggregate type: The aggregate type defines how ratings are combined to form the final grade in the gradebook.
■ Average of ratings - The mean of all ratings
■ Count of ratings - The number of rated items becomes the final grade Note that the total cannot exceed the maximum grade for the activity
■ Maximum - The highest rating becomes the final grade
■ Minimum - The smallest rating becomes the final grade
■ Sum - All ratings are added together Note that the total cannot exceed the maximum grade for the activity
■ If "No ratings" is selected, then the activity will not appear in the gradebook
○ Scale: Select the type of grading used for the glossary If "scale" is chosen, you can then choose the scale from the "scale" dropdown If using "point" grading, you can then enter the maximum grade available for this activity
○ Grade Category: This field controls the category in which the grades for this assignment activity will be placed in the gradebook
○ Grade to Pass - This setting determines the minimum grade which is required to mark this assignment as complete This grade value is used in activity and course completion settings to mark this activity as complete. In addition, this value will be used in the gradebook to highlight pass grades in green and fail grades in red
○ Restrict ratings to items with dates in this range: You can set the time range to restrict the ratings within the time range.
● In the Common Module Settings: Common Module settings are the same as mentioned in all previous activities
● Click "Save and Display" to display your newly created glossary activity
130
Using Glossary:
When you click the "Save and Display" button then it will automatically take you to the view glossary page where you can add entries to the glossary, search entries , print and approve the entries within the glossary
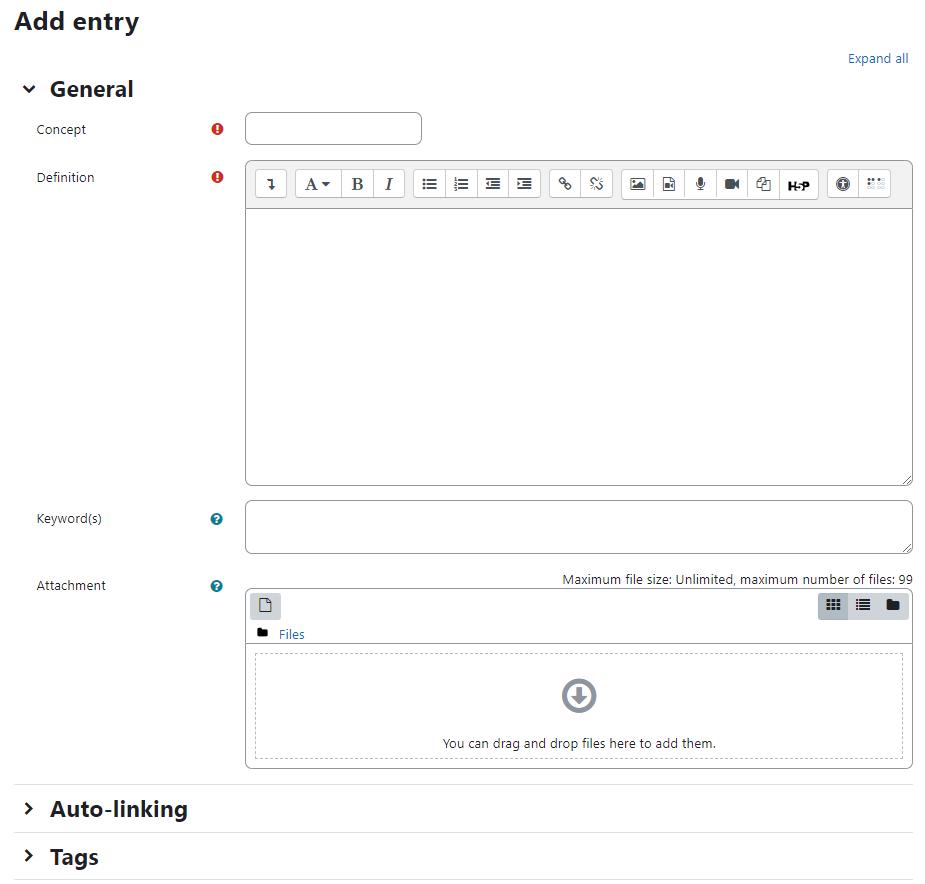
Under the main Moodle navigation bar, you’ll find the glossary description. Under that you will see the Add Entry button which will take you to a new page where you can add a new entry Directly below the Add Entry Button, you’ll see the search bar. Checking the “Search full text” box allows searching for a given word in any position in the text
Under the Search bar, you will see the Glossary Index which will help you to browse the whole glossary in a similar way like a dictionary
131
Adding Entries:
Clicking the “Add entry” button gives you access to the definition entry page
To add a new entry:
● In the General Section:
○ Enter the word you want to define in the Concept text field, as shown in Figure below
○ Add the definition of the word or concept.
○ If there are synonyms you want to include with the entry, add them to the Keyword(s) text area Make sure to Enter one word per line only
○ You can also attach files to a glossary entry. If you want to add an attachment, such as a picture or an article, you can either drag/drop it or click the "Add" button to upload via the File picker.
● In the Auto-linking Section:
○ This entry should be automatically linked: If site-wide glossary auto-linking has been enabled by an administrator and this is set to "yes", the entry will be automatically linked wherever it appears
● In the Tags section: Add relevant Glossary entry tags may be added to a specified tag collection and standard tags may be suggested or forced
● Click the “Save changes” button to add your word to the glossary
Editing glossary entries
To edit a glossary item click on the glossary name, navigate to the glossary entry you want, and then click on the Gear icon, to the bottom-right of the glossary item. You can also delete the item entirely by clicking (X)
Search Options
You can also search for a given word using the Search field. Checking the 'Search full text' option (on the right side of the Search box) allows searching for a given word in any position in the text This can take longer and return more entries than you might wish, but it is thorough. If you do not check the "Search full text" box, the search only looks for the term names The index below lets you browse the glossary according to a given letter.
Autolinking
Once you’ve added an entry to the glossary and enabled autolinking, any instance of a glossary term anywhere in Moodle will have a link to its definition. For example, if you create an entry for the word “Moodle” in the glossary, whenever someone uses the word in a forum, assignment, HTML or text page, or even in a description field, it will be clickable, as shown in Figure XX. Once you click on the word, a new window with the glossary entry will pop up
132
Importing and Exporting Entries:
As you build your glossaries, you may want to share them between classes or with other instructors Fortunately, there’s a way to export and import glossary entries without needing to share your entire course structure.
To export glossary entries:
● On the right corner next to Import entries, expand the dropdown menu > Export click the "Export entries to file" button.
● Save the automatically generated XML file on your computer
To import glossary entries via an XML file:

● Click Glossary > Import entries
● Click the "Choose a file" button and browse for the exported entries XML file on your computer
● Select the destination for the new entries: either the current glossary or a new one
● If you want to import category information, click the checkbox
● Click the "Submit" button
Printing a glossary
To get a printer-friendly view of the glossary:
● Click into the glossary and click the dropdown on the right (next to Import entries) and click Printer friendly version
● Use your browsers' print feature (for example, click the print icon top right) to print a PDF or offline version of the glossary.
133
Glossary Capabilities
The glossary module has a number of capabilities available to create roles. With capability overrides, you can enable your students to have a high degree of control over their glossaries
Glossary capabilities are:
● Approve and undo approved entries: This allows a user to approve and undo the approval of glossary entries This capability is allowed for the default roles of manager, teacher and non-editing teacher
● Create comments: This allows a user to add a comment to glossary entries. This capability is allowed for the default roles of manager, teacher, non-editing teacher and student
● Export entries: This allows a user to export glossary entries to another glossary. This capability is allowed for the default roles of manager, teacher and non-editing teacher
● Export single entry: This allows a user to export single glossary entries to a portfolio. This capability is allowed for the default roles of manager, teacher and non-editing teacher
● Export single entry of yours: This allows a user to export their own glossary entries to a portfolio. This capability is allowed for the default roles of manager, teacher, non-editing teacher and student
● Import entries: This allows a user to import glossary entries via XML file. This capability is allowed for the default roles of manager, teacher and non-editing teacher
● Manage categories: This allows a user to categories for glossary entries This capability is allowed for the default roles of manager, teacher and non-editing teacher.
● Manage comments: This allows a user to delete comments to glossary entries This capability is allowed for the default roles of manager, teacher and non-editing teacher.
● Manage entries: This allows a user to add, edit and delete glossary entries This capability is allowed for the default roles of manager, teacher and non-editing teacher
● Rate entries: This allows a user to rate glossary entries. This capability is allowed for the default roles of manager, teacher and non-editing teacher
● View glossary: This allows a user to view glossary entries within a glossary and also in the recent activity block, random glossary entry block, RSS feed for the glossary and any auto-linking glossary keywords This capability is allowed for the default roles of manager, teacher, non-editing teacher and student.
● View all raw ratings given by individuals: This allows a user to view all ratings given to glossary entries. This capability is allowed for the default roles of manager, teacher and non-editing teacher
● View total ratings that anyone received: This allows a user to view the total rating that anyone received for their glossary entries. This capability is allowed for the default roles of manager, teacher and non-editing teacher
● View the total rating you received: This allows a user to view the total rating which they received for their glossary entries This capability is allowed for the default roles of manager, teacher and non-editing teacher
134
● Create new entries: This allows a user to add glossary entries This capability is allowed for the default roles of manager, teacher, non-editing teacher and student.
Effective Glossary Practices
As an expert in your field, you are comfortable using the important terms and concepts in your area of expertise Your students, however, are not experts They may be just starting to learn new words representing new ideas and concepts. More advanced students will need to refine their learned definitions with subtle improvements to make the definitions more useful
At its most basic, Moodle’s glossary can be used like a regular word list for a class. You can develop a list of terms you know students find difficult or confusing and make the list and definitions available for your class.
If you want to get more in-depth, it is recommended to create either a weekly or chapter based word list Students can use it as they do weekly readings and assignments A weekly glossary can make it easier for students to organize their learning process
Creative Glossary Uses
● Favorite Websites collection: You can set up the glossary to create a collection of the favorite websites that students find appropriate for the class
● Annotated book reports: Students can submit their response to the glossary with concept being their name and title of book; teacher allows rating (by teacher) and comments (by all) so that it is easy for both the instructor to grade the original work (indexed by student name) AND students can share their work for peer review/comments prior to instructor grading
● FAQs for the course compiled by the instructor from feedback from students in prior term courses
● Biographies of people in a specific field like National Leaders, Sports, Social Services etc
● Collaborative Encyclopedia - Have students create an encyclopedia of what they are learning about a person, or a people, a concept, a place, an event, a thing etc
Summary
At first glance, the glossary doesn’t seem to be a very interesting tool You could simply create a word list in a word processor and upload it. The power of the glossary tool in Moodle comes from its ability to automatically create links in your course for every word in the list, and to easily build collaborative glossaries. Use the glossary tool to help your students learn the vocabulary of your field and encourage them to experiment with new terms Collaborative glossaries give your students even more practice using the new words and negotiating their meaning.
135
Chapter 8 - H5P & BigBlueButton
In the recent Moodle versions, there are many new tools added which allows the teacher to create more engaging courses in Moodle. H5P is the open source platform which allows you to create, share and reuse HTML5 content It makes it easy for everyone to create, share and reuse interactive HTML5 content

On the other hand BigBlueButton - the open source web conferencing tool is integrated in Moodle core. BigBlueButton lets you create links to real-time on-line classrooms from within Moodle
In this chapter we will have a look at both tools in detail. So, let's get started.
H5P Activity
H5P is a standalone project which allows the users to create interactive content based on HTML 5. You can use H5P.com, Lumi app, CurrikiStudio or Moodle content bank (followed in subsequent sections) to create interactive content.
136
The H5P content needs to be created separately before it can be used in the H5P activity or embedded in another activity or resource
There are more than 40 different content types available in H5P to create interactive content of all types and needs The most popular ones are Interactive videos, Quizzes and Presentations etc among others.
With its easy to use interface, H5P has opened up numerous possibilities for educators to create engaging and aesthetically pleasing content without worrying about costly softwares So, let's get started and first create H5P content in Moodle’s content bank and then use it in an H5P activity
Moodle Content bank
Content Bank is the area in Moodle which is used to create, store and manage the H5P files (At present it is only for H5P with a plan to include more options)

The content bank repository gives access to these files from the file picker.
As a teacher, when you are in a course you'll find a link to the content bank in the Navigation drawer as shown in the image below New H5P content may be created via the Add button It can be edited by clicking into the content then clicking Edit.
You can also rename, replace, download or completely delete an H5P package file from the content bank by clicking into an H5P activity and from the cog icon top right, access your chosen option
137
While discussing the purpose and configuration of each H5P activity is out of scope of this book, I will try to cover it in a separate book dedicated only for Moodle & H5P
You can also create your H5P file in H5P.com, Lumi desktop app or CurrikiStudio. Once you are ready with the file, you can export it as a h5p file
Adding H5P activity in Moodle course
The exported file can be uploaded in the content bank area and then use it in your course. Otherwise you can also upload it in the Add H5P activity page.
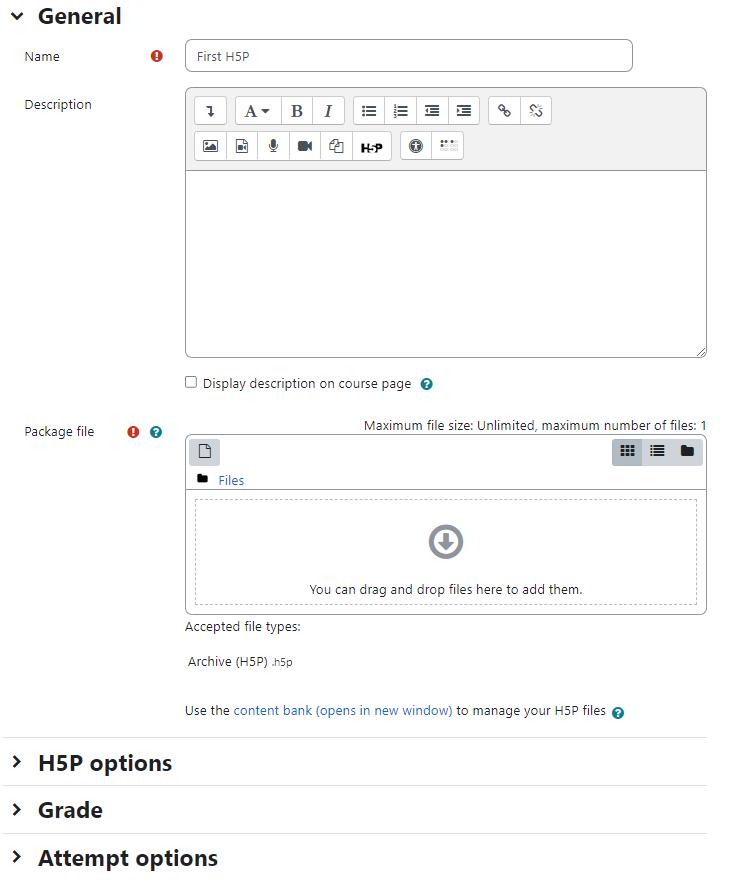
138
So, let’s see how you can add an H5P activity in Moodle course:
● With editing mode turned on, select H5P from Add an activity or Resource link
● In the General Section:
○ Name - Add a descriptive name to the H5P activity
○ Description - Add a description about the activity and objectives for the learners with this activity
○ Package file - Upload the H5P package file in this field. On the bottom of the file upload area, you will see a link to use the content bank to manage your H5P files
● H5P options section:
○ Allow Download - Check this box, if you wish the learners to download the H5P
file
○ Embed Button - Check this box if you would like the learners to reuse this activity.
○ Copyright Button - Check this box if you would like to show the copyright notice under the H5P activity
● In the Grade Section - In this section, you will configure the grading of the H5P activity..
○ Grade - Select the type of grading used for this activity If Scale is chosen, then choose the scale from the dropdown menu. If using the Point grading, you can then enter the maximum grade available for this activity
○ Grade Category - This field controls the category in which the grades for this activity will be placed in the gradebook.
○ Grade to Pass - This setting determines the minimum grade which is required to mark this activity as complete. This grade value is used in activity and course completion settings to mark this activity as complete In addition, this value will be used in the gradebook to highlight pass grades in green and fail grades in red
● In the Attempts Options section: Some H5P provide attempt tracking data for advanced reporting such as number of attempts, responses and grades
○ Enable attempt tracking - If enabled the H5P attempt tracking data will be enabled for this activity Please Note: Some H5P don't provide attempt tracking data In such cases, the following settings will have no effect
○ Grading method - When you are using Point grading, the following grading methods are available for calculating the final grade:
■ Highest grade of all attempts
■ Average (Mean) grade of all attempts
■ First Attempt (All other attempts are ignored)
■ Last Attempt (All other attempts are ignored)
■ Don’t use attempts for grading ( disable grading calculation)
○ Review attempts - Choose if you want to allow the participants to review their own attempts or not
● In common module settings - Choose the common module settings as we have explained it in the earlier part of this book.
139
● Click Save and Display the H5P activity
Using H5P activity
The students click on the H5P activity on the course page to access it. Depending on the H5P activity and teacher's settings, the activity may be gradable. Students can see their attempts from the View my attempts link top right
Teachers can see all attempts by all users from the link ‘Attempts Report’ from the navigation drawer Note that the figure refers to the number of attempts, not to the number of students who have attempted the activity.
Embedding H5P into other activities
You can embed H5P content into other activities and resources such as a Lesson or a Book, by clicking the H5P button in the Atto editor.
To embed H5P from the Content bank:
1 Click the H5P button in Atto then click 'Browse repositories'
2. Browse the Content bank repository and select an H5P file.
3 Choose to either make a copy of the file or create a shortcut
4 Click the button 'Select this file'
5. Click 'Insert H5P'.
H5P Capabilities:
● Access course category content bank files - allowed for the default roles of manager and course creator
● Access system content bank files - allowed for the default role of authenticated user
● Access course content bank files - allowed for the default roles of manager, course creator and teacher
● View content bank repository - allowed for the default roles of manager, course creator and teacher
● Access the content bank - allowed for the default roles of manager, course creator and teacher
● Delete any content from the content bank - allowed for the default roles of manager and course creator
● Delete content from own content bank - allowed for the default role of authenticated user
● Manage any content from the content bank - allowed for the default roles of manager and course creator
140
● Manage content from own content bank - allowed for the default roles of manager, course creator and teacher
● Upload new content to the content bank - allowed for the default roles of manager, course creator and teacher
● Create or edit content using a content type editor - allowed for the default roles of manager and course creator
● Download content from the content bank - allowed for the default roles of manager, course creator and teacher
● Access H5P content in the content bank - allowed for the default roles of manager, course creator and teacher
● Upload new H5P content - allowed for the default roles of manager, course creator and teacher
● Create or edit content using the H5P editor - allowed for the default roles of manager, course creator and teacher
BigBlueButton
BigBlueButton (BBN) is a fresh integration in Moodle core which allows you to link to real-time on-line classrooms from within Moodle You can specify conference times, which are then added to the calendar, and, if allowed by your admin, the sessions may be recorded for viewing later
Please note that Moodle core includes a free tier of BigBlueButton which is currently restricted to:
● The maximum length for each session is 60 minutes;
● The maximum number of concurrent users per session is 25;
● Recordings expire after seven (7) days and are not downloadable; and
● Viewers' (student) webcams are only visible to the moderator.
Kindly note BigBlueButton is disabled by default, For data protection reasons Administrators must enable it from Site administration > Plugins > Manage activities and then check the box to accept the data processing agreement
Add BigBlueButton activity in Moodle
Let’s add a new BigBlueButton activity to our course
● With editing mode turned on, select BigBlueButton from Add an activity or resource link This will take you to the ‘Adding a new BigBlueButton’ page.
● Instance Type - if a session is to be recorded then select ‘Room with recordings’, otherwise choose ‘Room only’. After a session is recorded, if there are no more sessions, select ‘Recordings only’
● In the General Section:
○ Room Name - Enter a descriptive name for the BigBlueButton activity room.
141
○ Description - Enter the description for the activity
● In the Room Settings section:
○ Welcome Message - The welcome message is displayed when the participants enter the room. If you leave it blank, it will show a default message set by the site administrator
○ Wait for Moderator - Check this box if the participants are allowed by a moderator before they can enter a room.
○ The session may be recorded - Check this if you want the users to record the session
● In the Lock Settings section:
○ Disable webcams - Select this checkbox if you want to disable the participants webcams.
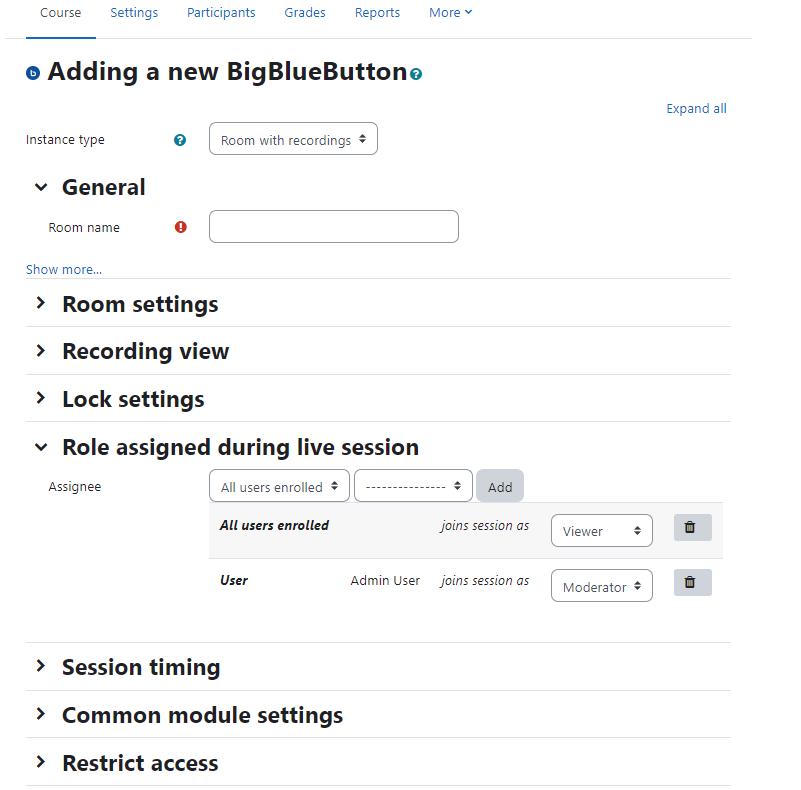
142
○ Disable Microphones - Select this checkbox if you want to disable the participants microphones.
○ Disable Private Chat - Select this checkbox if you want to disable the private chat among participants.
○ Disable Public Chat - Select this checkbox if you want to disable the public chat among participants
○ Disable Shared notes - Select this checkbox if you want to disable the option to record shared notes by participants
○ Hide User List - Select this checkbox if you want to hide the list of participants.
● In the Role assigned during live session section:
○ In this section you can define the role assigned to the users You can choose the roles for All users enrolled, Role or a specific User and assign them a Viewer or Moderator role
● In the session timing section:
○ You can define the Open & Close timings for the session in this section after which students will not be able to enter the room
● In the common Module section: Choose the common module settings as we have covered in the earlier section of the book
● Click ‘Save and Display’ to view the BigBlueButton activity
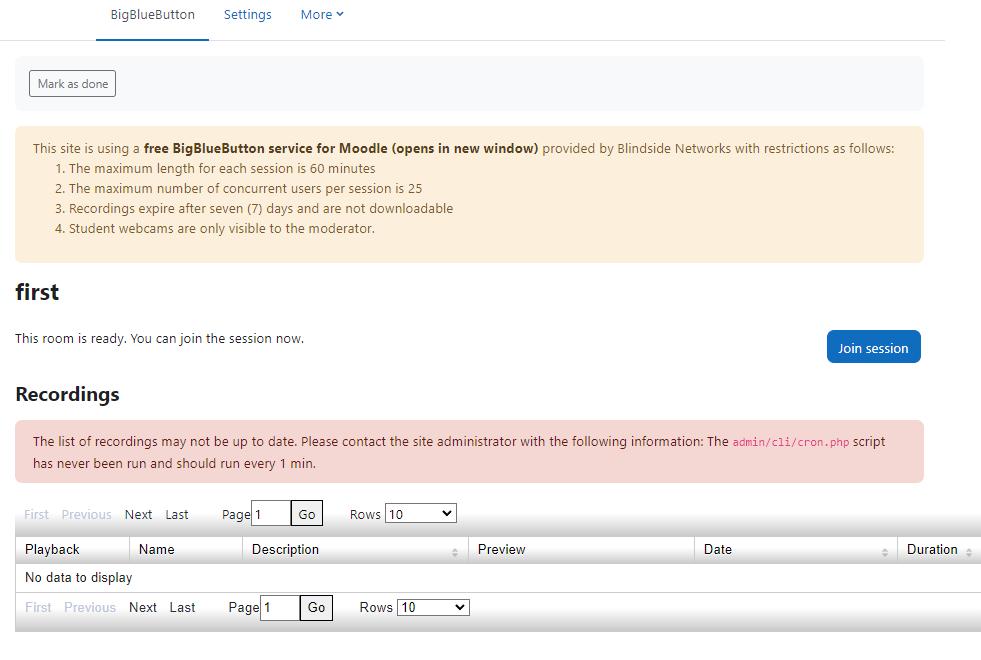
143
Using BigBlueButton
Once set up, the activity appears with a link to join when the time is correct (Before then, or if a moderator is required first a message appears saying the conference has not yet started )
On entering the room, a message will appear asking if you want to use your microphone or just listen The central area can display presentations, polls, screen sharing or an interactive whiteboard. There is also a chat option with public and private chat depending on the configuration in the previous section
In Moodle 4.1, the BigBlueButton activity allows the teachers to invite external guests into the BigBlueButton room
Summary
With an ever increasing list of better tools available for teaching, Moodle has included two most popular tools - BigBlueButton & H5P in Moodle core The new tools added allows the teachers to create more engaging courses in Moodle. While H5P opens up endless possibilities to create interactive content easily and reuse it across courses, BigblueButton integrates a Live classroom in Moodle
144
Chapter 9 - Lesson
The lesson module presents a series of pages to the student who is usually asked to make some sort of choice underneath the content area. The choice will send them to a specific page in the Lesson

In simple terms you can think of a lesson as a flowchart of pages where the student will follow specific pages depending on their choices underneath the current page
In a Lesson page's simplest form, the student can select a continue button at the bottom of the page, which will send them to the next page in the Lesson
145
The main difference between a Lesson and other activity modules available in Moodle comes from its adaptive ability With this tool, each choice the students makes can show a different teacher response/comment and send the student to a different page in the lesson. Thus with planning, the Lesson module can customize the presentation of content and questions to each student with no further action required by the teacher
There are 2 basic Lesson page types that the student will see: question pages and content pages. There are also several advanced navigational pages which can meet more specialized needs of the Teacher The Lesson module was designed to be adaptive and to use a student's choices to create a self directed lesson
The question page presents the student with a question, and the student has to enter a correct answer. After a student submits his answer, he will see the response you’ve created and will be taken to another page or looped back Question pages are scored and added to the student’s cumulative grade
A branch table’s page presents the user only with the option to select a branch. There is no correct or incorrect answer for each response, and the student’s selections do not impact his grade A lesson may be graded, with the grade recorded in the gradebook
Lessons may be used:
● For self-directed learning of a new topic
● For scenarios or simulations/decision-making exercises
● For differentiated revision, with different sets of revision questions depending upon answers given to initial question
Caution:
Before you begin creating a lesson, it’s a good idea to plan your lesson flow by drawing a flowchart. Lessons require more advanced planning than many of the other tools. They have the potential for branching on each page, so advanced planning is critical before you begin to develop your lesson Even with two choices per page, if every choice results in a new page, you will quickly need a very large number of pages. The first page will require two additional results pages, and each of these will require two more for a total of seven pages from an initial two choices. The key to minimizing the number of pages is to reuse as many as possible.
Take a few minutes to draw a flowchart for your lesson What will the first page display? What are the options? Where will the options take the student? It’s important to answer these questions for each page of the lesson to avoid getting lost while you are actually creating the content
Once you are ready with your flowchart, it’s time to start creating a lesson.
146
Creating a Lesson Activity:
To add a lesson to your Moodle course page:
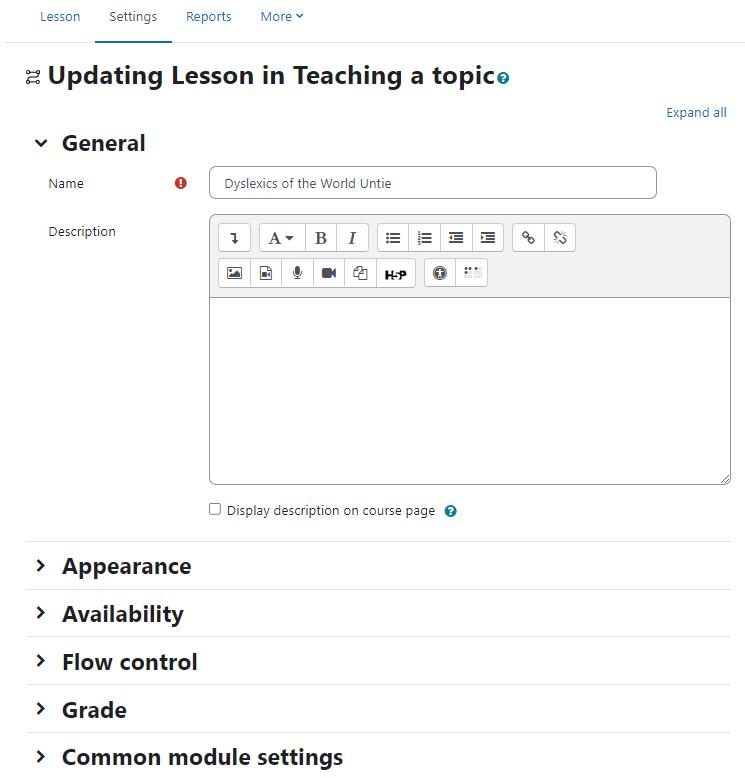
● With the editing turned on, in the section you wish to add your lesson, click the "Add an activity or resource" link and Select “Lesson”
● In the General section -Give your lesson a name, a description if needed, and tick the box if you wish that description displayed on the course page
● In the Appearance Section (Sections marked with * are visible only after expanding all fields):
147
○ Progress bar - Choose this to show a bar at the bottom of the page showing how far into the lesson the student has got.
○ Display menu - Choose this when you want to show a list of the content page titles in the Lesson to the student. Only those pages which have "Display in menu?" checked will display. The menu will not display question pages.
○ Linked media* -If you want to include a link to a media file for students to refer to, upload it here. A 'Click here to view' link will be displayed in a block called 'Linked media' on each page of the lesson The width and height of the pop-up window may be set by an admin in Site administration > Plugins > Activity modules > Lesson.
○ Display ongoing score* - Choose this to let students see their score as they work through the lesson.
○ Minimum grade to display menu* - Choose this if you want the student to go through the lesson once and get a grade before they can (on review) see and navigate through all the different pages
○ Slideshow* - Slideshow height, width and background colour are set for the whole site by an administrator in Site administration > Plugins > Activity modules > Lesson
○ Maximum Number of Answers* - Here you can set the default number of selection boxes available when you add or edit a question or content page For instance, if you are only going to use Multiple Choice questions with 3 answers in your lesson, you might select 3. You can change the default here at any time to display more or less question answers or content choices
○ Use default feedback* - Every Moodle site has a standard response (feedback) when a student selects a correct or wrong answer in a lesson Select "No" if you only what you put as a response for a specific question's answer to display In this case, when you leave the response to a question blank, the student will not see any comment about their answer The typical Moodle standard responses are: "That's the correct answer" or "That's the wrong answer".
○ Link to next activity* - Choose this to give students a link to another activity when they reach the end of the lesson (*** This can also be achieved using conditional activities.)
● In the Availability Section
○ Available from/Deadline - Here you can set a start and end date and time for your Lesson
○ Time limit - This allows you to set a time limit on the lesson which can now be seconds, minutes, hours, days or weeks. Students will see a countdown counter in a block as they work
○ Password protected lesson* - Change to "Yes" and enter the password if you want students only to access it when they know the password
● In the Flow Control Section
148
○ Allow Student Review - This puts a "Review Lesson" button on the last screen of the lesson to encourage the students to navigate through the lesson again from the start (*** Note that the students will not be able to change their answers, only view them.)
○ Provide option to try a question again - This displays a button after an incorrectly answered question so that the student can try again (but not get credit for it)
○ Maximum Number of Attempts - Decide here how many times you want students to be able to attempt each question When they reach the maximum, they will be taken automatically to the next page.
○ Action after a Correct Answer* -Choose here where you want a student to be sent to if they get a question right The options are:the next part of the Lesson (default setting)a random, unexpected pagea random page which they have not yet answeredNumber of pages to show* - You only need this if you have set "Action after a correct answer" to show an unseen or unanswered page. Otherwise, all pages will be seen
● In Grade Section
○ Set a grade and grade category here, along with a "Grade to pass" which may be connected with Activity completion and Restrict access such that a student will not be able to access a follow up activity until they have obtained the required grade in the lesson
○ Practice lesson - Practice lessons are now saved; this means they will appear in the reports .You must enable the "Retakes allowed" setting if you want students to be able to attempt a practice lesson several times
○ Custom Scoring* - Use this to give a particular number score (negative or positive) to each answer
○ Re-takes allowed - Choose this if you want your students to be able to do the lesson more than once.
○ Handling of re-takes* - If you allow your students to re-take the lesson, then decide here if the grade for all lesson attempts is the mean or the maximum.
○ Minimum Number of Questions* - Set the minimum number of questions that will be used to calculate a student's score Students will be told how many they have answered and how many more they need to answer.
● Common Module Settings - Please check out the common module settings which were discussed earlier.
● Once you are done, please click Save and Display Now we will start building our lesson activity
Building Lesson Activity
As suggested earlier before starting to build your lesson you need to plan it thoroughly Here are some tips to plan your lesson:
149
● A lesson is made up of pages which may have content for the student to read or questions for them to answer. The questions can be created by the teacher or imported. The teacher decides the order in which these pages appear
● You need to have a clear idea beforehand of what you want to do with this lesson. Is it to be a graded, linear learning experience? Or an ungraded, non-linear practice session? Will students be able to go back and revisit areas or is it just a once-only opportunity?
● Even those who are very comfortable working directly online might find it useful to note down on paper the direction they want their lesson pages to go in, rather than having to remember and visualize the navigation in their head. You can also use tools like Canva to create visuals which can be helpful while making Lesson activity.

N 150
Adding content and questions to your lesson
Over the past few years, Moodle development team have done commendable work to make it a better LMS When you visit the Lesson page, it will ask you “What would you like to do first?” The options are:
● Import questions
● Add a content page
● Add a cluster
● Add a question page
Now let’s discuss them one by one
Import questions:
If you have some questions in the following formats (discussed in the next section), you can import them to use in your lesson by clicking the Import questions link
Add a cluster:
A cluster is a group of question pages which will be offered randomly to a student as they work through the lesson.It is best if you have made the question pages beforehand and can then decide where to mark the start and end of the cluster The start is marked by a "cluster" page and the end by an "end of cluster" page.
Add a content page:
This is a page where a teacher can provide information to move the lesson forward but without requiring the student to answer specific questions The student sees the page's title, some information and then one or more buttons at the bottom to select. When the student clicks on a button, they go to the next page but their choice is not scored
● Page title: The title of a content page appears to the student at the top of the page. A teacher will also see the title in the collapsed edit mode when they are working on the Lesson, and they will also be able to choose the title (and hence this page) from the drop down “jump” lists The title in a content page is also used with the “display left menu” setting.
● Page contents: This is where the teacher can add information for the student, making use of the Text editor and its multimedia features
● Content: Here the teacher writes the text description they want the student to click on to get to the next part of the lesson These words will appear to the student as a button The teacher can check the box to have the buttons appear horizontally, or uncheck it for them to appear centered vertically
● Number of options available - How many of these you have depends on your choice in the Maximum Number of Answers setting in Lesson settings.
151
● The Jump - Each Description in a Content page has a Jumps menu "Jumps" take a student from one page to another. A "relative jump" is "next page" or "end of lesson" whereas an "absolute jump" gives the actual name of a page The teacher chooses from the dropdown the correct page to send the student to if they click on the button that will be made from this particular description Any pages created by the teacher will have their titles appear in this dropdown, allowing them to be selected When a student clicks on a
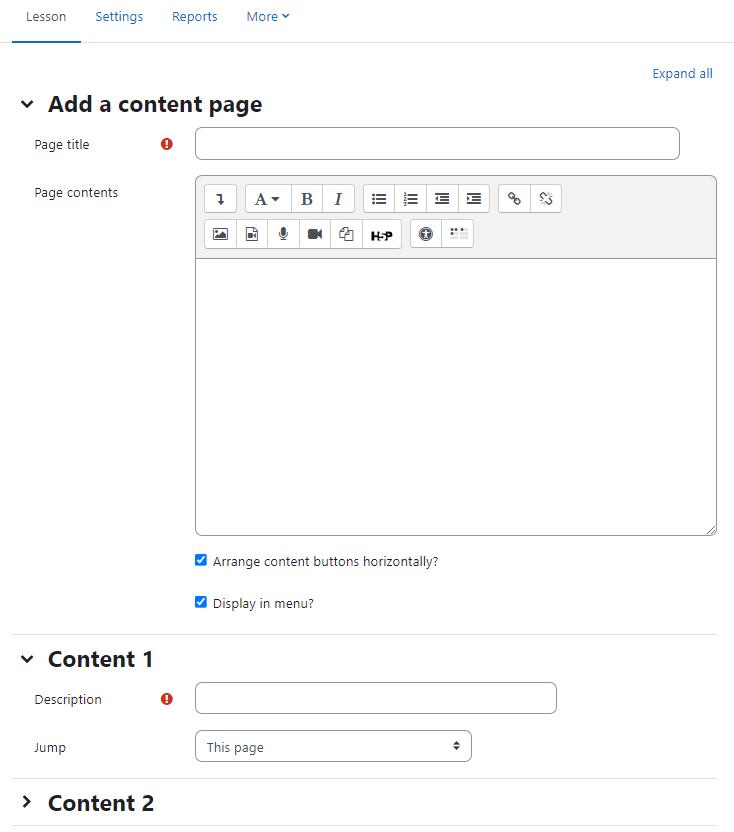
152
description button, they are sent to the page defined in the Jump associated with the button.
● Once you are done, click Save Page at the bottom
Add a question page:
Here you can choose from a variety of question types which will then be added as pages to your lesson:
*** These question types are not the same as the Quiz Question types and are in no way connected with quiz questions ***
● The format of question pages is similar to content pages.
● A typical question page could include:
○ Title - the name the student sees at the top of the question page.
○ Page contents - the actual question
○ Answer/Response/Jump/Score - Based on the response from students, you can define which page they will see next and the score they will receive
Question types:
Here are the question types which can be added in the lesson activity:
● Multichoice: The student is given a question and a list of answers The answer list will be shuffled every time the question is viewed by a student. By default they choose one answer but you can check the box "multiple answer" to allow them to choose more than one answer

● Essay: Students can write a longer answer as part of the lesson and this can be graded manually by the teacher
● Matching: This allows you to set up lists which must be matched against other lists, for instance, words, pictures, numbers etc The student must match all correctly to receive the score
153
● Numerical: This requires a number as an answer A number within a range may also be accepted as correct. The range separator to be used is the colon :
● Short answer - A student must provide a single word or short phrase answer The teacher must anticipate the possible answers and enter them in the Jump dropdown boxes, using ** wild cards if appropriate.
● True/false - The student is given a sentence and must decide if it is true or false
Moving your lesson forward:
● Once you have added your first content or question page, you reach the next screen which displays your page title/type/jumps (ie where the responses take the student to) and actions you can take next:
● The Actions icons allow you to move (if you have more than one), edit, preview or delete your pages
● The drop down allows you to create another page of your choice:
● Note the different view options:
○ Collapsed view: This gives a brief outline of the lesson structure
○ Expanded view: This shows more detail as in the screenshot below.
Ending your lesson
● To bring the lesson to a close, select the "End of Lesson" option from the Jump menu on any relevant pages
● The student will then see a generic message as in the next screenshot, with a direction back to the main course page or to view their grades
Managing Lessons
When you click on the lesson then you will see tabs at the top offering the chance to preview, edit, view reports or grade essays in the lesson
● Preview Tab: The lesson opens up in preview mode for the teacher. However, it will not show the score unless the teacher switches their role to a student
● Edit Tab: The Edit tab allows teachers to alter the lesson once it has been set up. There are two views - Collapsed and Expanded
● Reports Tab: The reports tab shows the performance of students taking the lesson. There is a general "Overview" and a "Detailed Statistics" tab Overview Tab: By clicking on the specific attempt, the teacher can view the student's answers to specific questions It is also possible to delete a student attempt by checking the attempt and using the pull down menu to change "Choose" to "Delete" Below the "Overview" can also be seen general statistics: Average score, Average time, High score, Low score, High time, Low time Detailed Statistics: More detailed reports on individual questions are available from this tab
154
● Grade essays Tab: Any essay questions which have been set in the lesson can be accessed and graded here.
*** As students complete the lesson, their scores will be recorded in the gradebook If you’ve allowed students to attempt each lesson multiple times, their scores may change as they repeat the lesson
Lesson capabilities
The lesson module has only 4 capabilities:
● addinstance - This allows a user to add a new lesson activity to the courseThis capability is allowed for the default roles of manager and teacher
● Edit -This allows a user to update lesson settings, add/edit/remove lesson pages, import questions, view lesson reports (via the reports tab) and delete attempts, and grade essay questions (via the grade essays tab) This capability is allowed for the default roles of manager and teacher.
● grade -This allows a user to grade Lesson essay questionsThis capability is allowed for the default roles of manager, teacher and non-editing teacher.
● manage -This allows a user to manage a lessonThis capability is allowed for the default roles of manager, teacher and non-editing teacher
Creative Lesson Uses
There is a hidden potential in the lesson module that makes it much more interesting than it at first appears. If you take advantage of the ability of each answer in a question page to link to any other page, you can create branching Choose Your Own Adventure-style simulations or case studies.
● Self-directed learning of a new topic - Use the lesson to introduce a new topic The learner starts out knowing nothing but can progress at his own pace, reviewing what he is not sure of and moving on when he feels ready
● Allow for different learning styles - When using the lesson to introduce a new topic, offer pages that deliver the content in different ways, according to how the students prefer to learn. For example the button "do you prefer to read?" goes to a page of text; "do you prefer to watch a video?" goes to a screencast ; "do you prefer to listen to instructions?"goes to a podcast and so on
● Role play simulations/Decision-making exercises - Use the lesson to set up situations where the learner has to make a choice each time and the scenario changes according to their selection. This could be a medical emergency for example, deciding upon the correct treatment, or a customer relations exercise, learning how best to deal with an awkward client In an educational establishment it could serve well in Humanities subjects considering moral/ethical issues.
155
● Interactive fiction - For younger (and not so younger!) students, the lesson can be used to create a "choose your own ending" type of story where the student reads a page (or even watches a video/listens to an audio file) and then decides upon the character's next move Apart from the entertainment value of this, it could be used to help guide pre-teens to behave responsibly by taking decisions for a character who is in a potentially dangerous situation
● Differentiated revision guides - Students can be taken to different sets of revision questions according to their answers, allowing them to progress from basic to intermediate to advanced according to their prior knowledge.
Summary
A lesson activity is a self directed learning tool. The lesson activity’s adaptive ability is what makes it unique Questions in a lesson can be used to create branch points where students are taken down different paths in the lesson depending on how they answer the question. When each answer to a question takes a student to a different series of pages, the lesson becomes a self-directed teaching tool
156
Chapter 10 - Chat, Messaging and Forums
Moodle provides many social interaction tools within core which can be further extended by using many popular plugins. The inbuilt interactive tools help you to create an interaction with your students in different ways By default, Moodle comes with Forums, Chat and Messaging to have communication among the participants
You can use Forums for asynchronous communication, Chats for simultaneous conversation and Messaging for private communication with your students.
So, let's start with the Forum activity in Moodle:
Forums
Forums are among the most powerful communication tools within a Moodle course The forum activity allows students and teachers to exchange ideas by posting comments as part of a 'thread'. Files such as images and media may be included in forum posts. The teacher can choose to rate forum posts and it is also possible to give students permission to rate each others' posts

Forums are the primary tool for online discussion and are the central organizing feature in the social course format. You’ve already posted your first message to a forum while editing the Site News forum back in the initial chapters When you posted your news item, you were posting to a special forum which is used in every course for posting course announcements and news.
*** Note: The News forum in a new Moodle course is just for teachers to post announcements It is NOT a discussion forum for students.
The image below demonstrates how conversations are tracked through time, and readers can review the history of a conversation simply by reading the page The technical term for this type
157
of communication is asynchronous, meaning “not at the same time” Asynchronous communications are contrasted with synchronous forms such as chat rooms, instant messaging, or face-to-face conversations
Because forums are asynchronous, students can take their time composing replies. They can draft and rewrite until they are happy with the results instead of feeling under pressure to respond immediately.
For students whose primary language is not that of the course, people with communicative disabilities, and the just plain shy, forums offer a chance to take as much time as they need to formulate a reasonable reply Other students, who might be afraid of embarrassing themselves by making a mistake when they speak up in class, can double check their responses before they send them in The asynchronous nature of the forums creates many opportunities for you not only to replicate the conversations you have in class, but also to create entirely new activities that are difficult in a classroom setting
Moodle forums also allow subscriptions. When a user subscribes to a forum, all new posts are automatically sent to the email address stored in the user’s profile This makes it easy to keep track of what’s happening in the forums without constantly logging in.
Participants can subscribe to a forum to receive notifications of new forum posts A teacher can set the subscription mode to optional, forced or auto, or prevent subscription completely. If required, students can be blocked from posting more than a given number of posts in a given time period; this can prevent individuals from dominating discussions.
Forum posts can be rated by teachers or students (peer evaluation) Ratings can be aggregated to form a final grade which is recorded in the gradebook. Forums have many uses, such as:
● A social space for students to get to know each other
● For course announcements (using a news forum with forced subscription)
● For discussing course content or reading materials
● For continuing online an issue raised previously in a face-to-face session
● For teacher-only discussions (using a hidden forum)
● A help center where tutors and students can give advice
● A one-on-one support area for private student-teacher communications (using a forum with separate groups and with one student per group)
● For extension activities, for example ‘brain teasers’ for students to ponder and suggest solutions..
Moodle Forum types:
Creating a forum is relatively easy The key to success is choosing the right options for the type of forum you want to create. In addition to the news forum, Moodle has five basic forum types:
158
● A single simple discussion - A single discussion topic which everyone can reply to (cannot be used with separate groups). Students will see the text you have placed in the Forum introduction setting as the first post of the discussion Below you will find the replies that have been posted.
● Each person posts one discussion - Each student can post exactly one new discussion topic, which everyone can then reply to The view will be basically the same as in the previous case, the only difference being the ‘Add a new discussion’ option. Viewing a forum page, the student will see the text you have written at the ‘Forum introduction’ space while creating the forum, and, if there are any, the discussions that have been started.
● Q and A forum - Students must first post their perspectives before viewing other students’ posts. The Q & A forum is best used when you have a particular question that you wish to have answered In a Q and A forum, teachers post the question and students respond with possible answers. By default a Q and A forum requires students to post once before viewing other students’ postings
● Standard forum displayed in a blog-like format - An open forum where anyone can start a new discussion at any time, and in which discussion topics are displayed on one page with “Discuss this topic” links In the upper right corner of the home forum screen (above the introduction), the student may see the options the teacher has set for subscriptions to the forum, and the ‘Jump to’ field, with which you can ‘jump’ to any part of the course
● Standard forum for general use - An open forum where anyone can start a new discussion at any time. In this forum type, students will see the introduction text in a separate space above the discussion field, in which you will see the information such as the title of the discussion (which means the forum’s title), its author, the number of replies and the date of the last post
Creating a forum
To add a forum to your course:
● Click the “Turn Editing Mode” button to enter into the editing mode
● Click “Add an activity or resource” link and choose Forum from the Menu.
● In the General Section:
○ Enter the forum name and in the description field provide instructions for your students so that they are clear about what they have to do
○ Choose the forum type you want to use as specified in the section above
● In the availability section:
○ Set the due date - This is required in case you want all students to post before a certain date. This date will be displayed in the calendar as the due date for posting but posting will still be allowed after this date
○ Cut-off date - If this date is set, the forum will not accept posts after this date
● In the Attachments and word count Section:
159
○ Maximum Attachment Size - The maximum file size that may be attached to a forum post depends on the Moodle site settings. The teacher may want a smaller size limit for the forum and should bear in mind the download speeds of the course participants.
○ Maximum Number of Attachments - This setting specifies the maximum number of files that can be attached to a forum post
○ Display word count - If "Display word count" is enabled, then the number of words in forum posts will be shown at the bottom of each post

● In Subscription and Tracking section 160
○ Subscription Mode: When a participant is subscribed to a forum it means they will receive forum post notifications. There are 4 subscription mode options:
■ Optional subscription - Participants can choose whether to be subscribed
■ Forced subscription - Everyone is subscribed and cannot unsubscribe
■ Auto subscription - Everyone is subscribed initially but can choose to unsubscribe at any time
■ Subscription disabled - Subscriptions are not allowed
*** Note - Any subscription mode changes will only affect users who enrol in the course in the future, and not existing users
○ Read Tracking - Read tracking enables participants to easily check which posts they have not yet seen by highlighting any new posts There are 2 options:
■ Optional - If set to optional, participants can choose whether to turn tracking on or off via a link in the administration block (Users must also enable forum tracking in their forum preferences )
■ Off - If set to Off, the users will not be able to track the unread posts.
● In the Discussion Locking section -
○ Lock discussions after period of inactivity - The forum discussions may be automatically locked after a specified time has elapsed since the last reply
*** Note - Any user with capability to reply to locked discussions can unlock a discussion by replying to it
● In Post threshold for blocking Section -
○ Time period for blocking: Students can be blocked from posting more than a given number of posts in a given time period. If you choose any period here, you will get the next options as below:
○ Post threshold for blocking: This setting specifies the maximum number of posts which a user can post in the given time period above
○ Post threshold for warning: Students can be warned as they approach the maximum number of posts allowed in a given period. This setting specifies after how many posts they are warned
● In the Whole Forum grading section
○ Grade - Select the type of grade to be used for Forum activity The options are:
■ None - Means this activity is not graded
■ Scale - If scale is chosen then you can choose the scale from the dropdown menu below
■ Point - If point grade is chosen, you can then enter the maximum grade available for this activity
○ Grading Method - Choose the advanced grading method that should be used for calculating grades. The options are
■ Simple Direct Grading
161
■ Marking Guide
■ Rubric
○ Grade Category - Choose the category in which this forum will appear if ratings are enabled.
○ Grade to Pass - This setting determines the minimum grade required to pass. The value is used in activity and course completion, and in the gradebook, where pass grades are highlighted in green and fail grades in red.
○ Default setting for "Notify students" - Set the default value for ‘Notify Students’ checkbox on the grading form. Choosing a Yes here will help the teachers to notify every student whenever graded.
● In the Ratings section
○ Roles with permission to rate - By default, only teachers can rate forum posts, though students can be given permission to do so if desired (see Forum permissions below). This is a useful tool for giving students participation grades. Any ratings given in the forum are recorded in the gradebook
○ Aggregate type: The aggregate type defines how ratings are combined to form the final grade in the gradebook. There are five options to choose from:
■ Average of ratings - The mean of all ratings
■ Count of ratings - The number of rated items becomes the final grade. Note that the total cannot exceed the maximum grade for the activity
■ Maximum - The highest rating becomes the final grade
■ Minimum - The smallest rating becomes the final grade
■ Sum - All ratings are added together Note that the total cannot exceed the maximum grade for the activity. T> If “No ratings” is selected, then the activity will not appear in the gradebook
● In the common module settings - Please check out the common module settings section which we discussed in the earlier chapter of this book.
● Click “Save and Display” to view the forum activity
Using Forums
Depending on the type of forum you chose, you will see a different view with different options. Let’s understand them briefly
● In the (default) Standard forum for general use, students will see an introduction text in a separate space above the list of discussions. Students see a button to start a new discussion (thread)
● In a Single, simple discussion the teachers post a question and students are only able to reply. They cannot start a new topic of discussion. This is useful if you wish to keep a discussion focused Note: This forum type does not work with separate groups
● The Question and Answer forum is best used when you have a particular question that you wish to have answered The teacher posts a question and students respond with
162
possible answers
By default a Q and A forum requires students to post once before viewing other students' postings.
● The Standard forum displayed in a blog-like format works like the standard forum for general use, but the first post of each discussion is displayed (as in a blog) so that users can read it and then choose to respond by clicking the "Discuss this topic" button at the bottom right of the post
Replying to discussions
Similar to when starting a new discussion, the reply box appears inline, allowing the user to respond quickly If a more detailed reply is needed, for example, needing the editing toolbar or attachment box, clicking Advanced will display the full version
Star discussions
Discussions may be favorited or 'starred' either by clicking the three dots to the right of the discussion or by clicking directly on the star This setting is individual and will move the discussion to the top of the discussion list, under any pinned discussions.
Sort Discussions
Discussions may be sorted by replies, last post or created, by clicking the linked words at the top of the discussion list
Permalinks
A permalink allows you to link directly to a specific forum post so you can share it easily with others You will see the permalink option when clicking to reply to a post If you click the permalink (1), it is highlighted to the side (2), and you will have a particular web address (3) which you can then copy and paste to use elsewhere: (See image below)
Subscribing to forum discussions
Users can subscribe to forum discussions in several ways, to receive notification about new posts.
● From the Preferences link in the user menu they can choose to be automatically subscribed to forum discussions when they post
● They can click on the open envelope icon next to a forum discussion. (It will then change to a closed envelope )
● They can click into the forum and click the cog icon top right and subscribe to the whole forum
Track read and unread forum posts
● Access the Preferences page from the user menu and select 'Forum preferences'.
163
● For 'Forum tracking', choose Yes: highlight new posts for me and if the forum administrator has set the 'Read tracking for this forum?' to On or Optional then unread posts will be highlighted for you The posts will be highlighted in the following places:
○ Course page
○ Within the forum itself
○ In forum discussion threads
Display Options
A discussion thread may be displayed in four ways Use the pull down menu at the top of each forum discussion to select a display type
● Display replies flat, with oldest first
● Display replies flat, with newest first - The discussion will be displayed in one line and the chronological order from the newest to the oldest. This is the same as the above, just a different sort order
● Display replies in threaded form - Only the post starting the discussion will be displayed in its full form; replies will be reduced to the headlines (including information about its author and date of release) and organised chronologically; moreover, replies will be shifted towards the right so that only replies to the same post were in the same line.
● Display replies in nested form - All posts are displayed in their full forms; replies will be reduced to the headlines (including information about its author and date of release) and organised chronologically; moreover, replies will be shifted towards the right so that only replies to the same post were in the same line
Reply to posts via email
If enabled by an administrator, you can reply to forum posts via email
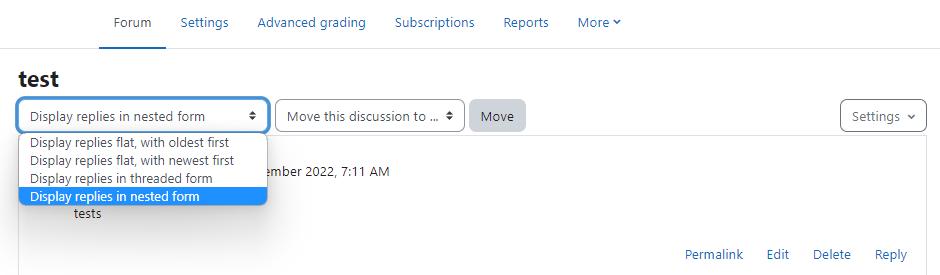
● Click the Reply by email link in the email. You will see a special unique email address to send your reply to.
● Reply using the email address provided IMPORTANT: Make sure you remove the original email content so that your forum post does not contain the quoted text.
● You should receive an email saying your reply has been successfully posted.
164
● Your post now appears in the forum
Pinned posts
When adding a new discussion as a teacher, you can make it 'sticky' by ticking the box to 'pin' the discussion to the top of the list Any forum discussions which come after that will appear underneath this pinned post. If you later untick the box to 'unpin' it, it will display as a regular forum discussion, moving down the list when others are posted
Manually locking discussion threads
By clicking 'Lock this discussion' from three dots to the right of a discussion, you can manually lock a thread so that nobody can post to it anymore. A label 'Locked' will appear underneath the locked discussion subject You can unlock it with the three dots to the right of the discussion again if necessary.
Locking a discussion
Forum threads may be automatically locked after a certain period of inactivity. This is done from the setting 'Discussion locking' when creating or editing a new forum
Moving a discussion
Teachers and other users with the capability to move discussions can move a discussion to any other forum in the course for which they have appropriate rights
● Click on the arrow in the 'Move this discussion to...' dropdown menu in the top right corner of the page and select a destination forum
● Click the Move button.
Splitting a discussion
Teachers and other users with the capability to split discussions can split a discussion thread Splitting a discussion means that beginning with the post selected and going to the end of that sub-thread, the posts are cut from the current discussion topic and put into a newly created discussion topic. If a discussion has strayed away from the original topic, splitting the discussion can provide new attention and space for the tangent discussion while keeping the original discussion on topic
● Click the link 'Split' in the forum post
● Enter a new discussion name (optional)
● Click the Split button
Using groups with forums
'Group mode' available from the Common module settings has three options (Note that you must have groups in your course to use this feature.)
165
● If the group mode is set to separate groups:
○ Teachers are given the option of adding a new discussion topic for all participants or for a selected group. If a teacher adds a new discussion topic for a selected group, then only group members can reply to it.
○ Students can only start discussions for their own group
○ Students can only reply to discussions started by other group members or discussions for their own group started by a teacher
● If the group mode is set to visible groups:
○ Teachers are given the option of adding a new discussion topic for all participants or for a selected group If a teacher adds a new discussion topic for a selected group, then only group members can reply to it.
○ Students can only start discussions for their own group
○ Students can only reply to discussions started by other group members or teachers
Forum Capabilities:
Forum capabilities are more fine-grained than any other module, giving you the ability to create a wide range of roles:
● addinstance - This allows a user to add a new forum to a course. This capability is allowed for the default roles of manager and teacher
● addnews - This allows a user to start discussions in a news forum This applies to news forums only - use mod/forum:startdiscussion in other forum types. This capability is allowed for the default roles of manager, teacher and non-editing teacher
● addquestion - This allows a user to add a question to a Q & A forum. This capability is allowed for the default roles of manager, teacher and non-editing teacher
● allowforcesubscribe - This allows a user to be subscribed automatically to forums where subscription is automatic or forced. This capability is allowed for the default roles of teacher, non-editing teacher and student It is not set for the role of manager
● Create attachments: This allows a user to add attachments to forum posts. This capability is allowed for the default roles of manager, teacher, non-editing teacher and student
● Delete any posts (anytime): This allows a user to delete any forum post (at any time) This capability is allowed for the default roles of manager, teacher and non-editing teacher.
● Delete own posts (within deadline): This allows a user to delete their own forum posts within a certain time, usually 30 minutes by default (which can be configured by Site Administrator in Site Policies)
● Edit any post: This allows a user to edit any forum post at any time. This capability is allowed for the default roles of manager, teacher and non-editing teacher.
● Export whole discussion: This allows a user to export a forum discussion to any portfolio enabled for the site. This capability is allowed for the default roles of manager, teacher and non-editing teacher
166
● Export own post: This allows a user to export their own forum posts to any portfolio enabled for the site. This capability is allowed for the default roles of manager, teacher, non-editing teacher and student
● Export post: This allows a user to export any forum post to a portfolio. This capability is allowed for the default roles of manager, teacher and non-editing teacher.
● Manage subscriptions: This allows a user to manage forum subscriptions This capability is allowed for the default roles of manager, teacher and non-editing teacher.
● Move discussions: This allows a user to move discussions to another forum This capability is allowed for the default manager, teacher and non-editing teacher roles.
● Exempt from post threshold: This allows a user to post in a forum without ever being blocked i e it exempts them from the post threshold for blocking (as set in Settings > Forum administration > Edit settings). This capability is not set for the default role of student and is allowed for the roles of manager, teacher and non-editing teacher
● Rate posts: This allows a user to rate forum posts for forums which allow posts to be rated This capability is allowed for default roles of manager, teacher and non-editing teacher and is not set for the default student role
● Reply to news: This allows a user to reply to posts in a news forum only. This capability is allowed for default roles of manager, teacher and non-editing teacher
● Reply to posts: This allows a user to reply to forum posts but not applicable for news forums This capability is allowed for default roles of manager, teacher, non-editing teacher and student
● Split discussions: This allows a user to split forum discussions. This capability is allowed for default roles of manager, teacher and non-editing teacher
● Start new discussions: This allows a user to start forum discussions. This capability is allowed for the default roles of manager, teacher, non-editing teacher and student
● View all raw ratings given by individuals: This allows a user to view all ratings given to forum posts. This capability is allowed for the default roles of manager, teacher and non-editing teacher
● View total ratings that anyone received: This allows a user to view total ratings given to forum posts This capability is allowed for the default roles of manager, teacher and non-editing teacher
● View discussions: This allows a user to view forum discussions. This capability is allowed for the default roles of manager, teacher, non-editing teacher, student and guest
● View hidden timed posts: This allows a user to create timed posts i.e. set a display start and end date for a new forum discussion It also allows a user to view timed posts while they are hidden This capability is allowed for default manager, teacher and non-editing teacher roles and is not set for the default student role.
● Always see Q and A posts: This allows a user to view Q & A forum posts without first posting. This capability is allowed for the default roles of manager, teacher and non-editing teacher
167
● View the total rating you received: This allows a user to view their own ratings for forum posts. This capability is allowed for the default roles of manager, teacher, non-editing teacher and student
● View subscribers: This allows a user to view the list of subscribers to a forum. This capability is allowed for the default roles of manager, teacher and non-editing teacher.
Effective Forum Practices:
Forums are an important tool in your Moodle toolbox. They are the primary method for students to communicate with you and each other. Social constructivism is all about discussion and negotiated meaning.
Getting students to participate in online forums can be a challenge If you simply create a forum and expect students to communicate online, you will be sadly disappointed Many times instructors create a forum, give some vague instructions, and then complain that the students aren’t spontaneously communicating with each other
Starting the discussion
For many students and instructors, starting the discussion is the hardest part Once people start talking, at least a few will probably continue the discussion. As you start your class, it would be useful to have some icebreakers to help students get to know one another and to get used to discussing issues online.
The most effective icebreakers have a strong prompt to get people started Ask specific questions like, “If you could speak to any person, living or dead, who would it be and what three questions would you ask them?” or, “What is your favorite comfort food and why?” You could also prompt people to tell stories about themselves. For example, you could ask students to tell a story starting with “On my last trip the funniest thing I saw or did was ” or “My favorite story about an animal is ” Whatever you use, make it concrete, compelling, and open-ended
Encouraging participation
The primary key to student participation in online forums is tight integration with your course goals Your forums should give students a chance to practice a skill, to collaborate on a project, or to act as resources for each other. Of course, it is important to distinguish between the types of forums and the reasons for using them in your class
Let’s take an example to help make this clearer. Suppose you have a weekly reading you want students to discuss online before meeting face-to-face There are two possibilities for this forum
If you want students to use the forum as a practice exercise, you’ll want to create a place where students can practice applying the new ideas they encountered in the reading So you may want to make each week a discussion of a case study. If you want the forum to be a resource, you may want each student to post a question about the reading. You can then use the questions as a basis for discussion in class
168
The final strategy for encouraging participation is to engage with the forums yourself If your class meets face-to-face, bring up important postings and discussions in class By merging the online environment with the face-to-face environment, you show your students that you value their participation
Chat Activity
The chat activity module allows participants to have a real-time synchronous discussion in a Moodle course. This is a useful way to get a different understanding of each other and the topic being discussed – the mode of using a chat room is quite different from the asynchronous forums The Chat module contains a number of features for managing and reviewing chat discussions.
The chat may be a one-time activity or it may be repeated at the same time each day or each week Chat sessions are saved and can be made available for everyone to view or restricted to users with the capability to view chat session logs
Chats are especially useful when the group chatting is not able to meet face-to-face, such as
● Regular meetings of students participating in online courses to enable them to share experiences with others in the same course but in a different location
● A student temporarily unable to attend in person chatting with their teacher to catch up with work
● Students out on work experience getting together to discuss their experiences with each other and their teacher
● Younger children using chat at home in the evenings as a controlled (monitored) introduction to the world of social networking
● A question and answer session with an invited speaker in a different location
● Sessions to help students prepare for tests where the teacher, or other students, would pose sample questions.
Why use chat?
Chat has an advantage over a Forum in that it takes place in Real Time. It is especially beneficial when the group chatting is not able to meet face to face Examples might be:
● Regular meetings of staff on large or split campuses to discuss student or curriculum issues;
● Regular meetings of students doing online courses to enable them to share experiences with others on the same course but potentially in a different city (or country),
● A teacher working with his students even though he is out of school
● A student temporarily unable to attend in person chatting with their tutor to catch up with work.
169
● Students out on work experience getting together to discuss their experiences with each other and their tutor
● Younger children use chat at home in the evenings as a controlled(monitored) introduction to the world of social networking.
Why NOT use chat?
● Unless a tutor/moderator is permanently present in the chatroom -or unless the chat is hidden and revealed at certain times, it is difficult to control what is said once a chat has started
● Younger students particularly may find it difficult to stay on task and be prone to adding non-useful comments or “beeping” others for the sake of it
● In some situations, a forum might be preferred as it allows for reflection before posting and gives a period of time where the post might be edited.
Creating Chat in Moodle Course
To add a chat activity in your Moodle course:
● With the editing turned on,in the section you wish to add your chat, click the "Add an activity or resource" link and choose Chat.
● In the General Section:
○ Name - Whatever you type here will form the link learners click on to enter the chat so it is helpful to give it a name that suggests its purpose
○ Description - Type the description of the chat here. Include precise instructions for students regarding the subject of the chat.
○ Display description on course page - If this box is ticked, the description will appear on the course page just below the name of the Chat.
● In the Chat sessions section
○ Next Chat Time - The day and hour of the next chat session. This will appear in the calendar so students know the schedule but it doesn't stop them accessing the chatroom at any other time If you don't want them in the chatroom at other times, then hide it (with the eye icon) or use Conditional activities to restrict access.If you don't wish to schedule chat times then ignore this and choose from the next settings.
○ Repeat/publish sessions -There are four options for scheduling future chat sessions:
■ Don't publish any chat times- there are no set times and students are welcome to chat at any time
■ No repeats - publish the specified time only- only the Next chat time will be published This could be used to schedule special events or meetings or simply to help learners identify a common time in which they can expect to find other learners in the chat room.
170
■ At the same time every day- Daily chats are useful for scheduling daily office hours or work sessions with learners.
■ At the same time every week--This setting will schedule a chat for the same day and time every week, which could be useful for instance for meeting and reviewing key ideas and questions related to the week’s content/assessment
○ Save past chat sessions - Choose from the dropdown how many days to save - or save everything by selecting Never delete messagesIf you have any concerns about discussions that might take place in your chat room, you may want to keep transcripts to check the suitability of what is discussed If your learners are using the chatroom to collaborate on a group project you won't want to delete the messages until the project is complete.
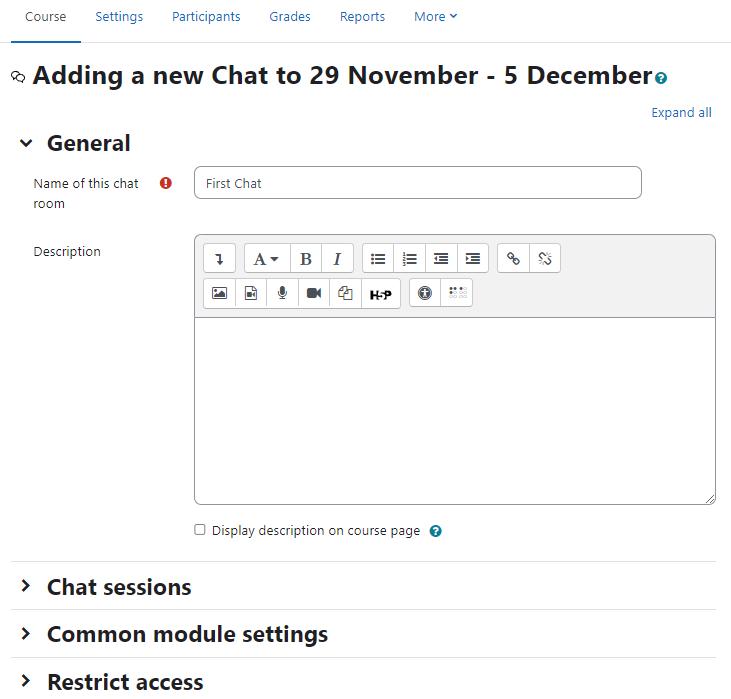
171
○ Everyone can view past sessions - Decide here whether or not allow everyone to view past chat sessions. (Teachers can always view past sessions)
● In the Common Module Settings- Choose Common module setting as appropriate or leave it as default.
● Click “Save and display” to show up the Chat activity.
Using Chats
● Entering the chat:
○ As you click the chat link on the course page you see two or three options:
■ Click here to enter the chat now - this takes you to the chat using the chosen site default chat method - for example Ajax.
■ Use a more accessible interface - this gives a simpler chat room without frames and javascript
■ View past sessions - if this has been enabled and the user is allowed to view past chat sessions, this takes them to a list of past sessions with links to the chat.
● Joining in a chat session:
○ In normal view, the screen is in two parts with the participants on the right, the messages on the left and a box at the bottom into which users type their message and press "Send" to make their contribution:
■ Users can change the appearance of the messages by clicking on "Themes" next to the "Send" button
○ The chat module contains some features to make chatting a little nicer
■ Smilies - Any smiley faces (emoticons) that you can type elsewhere in Moodle can also be typed in here and they will be displayed correctly
■ Links - Internet addresses will be turned into links automatically.
■ Emoting - You can start a line with /me to emote For example, if your name is Kim and you type /me laughs! then everyone will see "Kim laughs!"
■ Beeps - You can send a sound to other people by hitting the "beep" link next to their name A useful shortcut to beep all the people in the chat at once is to type "beep all".
■ HTML - If you know some HTML code, you can use it in your text to do things like insert images, play sounds or create different coloured and sized text.
Chat Reports
To view previous chats (if you have permission) click on the 'View past chat sessions' link. Teachers can also access past chat sessions from the Chat administration in the Settings block
172
● This will bring up a listing of each chat session under the current chat topic The listings include the time the chat started and ended, which users participated, and how many messages each user sent.
● In order for students to see past sessions, the teacher or an administrator must set up the chat to allow everyone to view past chat sessions.
Creative Chat Practices
While the chat module may not be very feature-rich at this point, it can still be an effective learning tool
The key to a successful chat is good moderation. The nature of the chat room makes it difficult to track different conversations If everyone in the class is talking at the same time, the conversation will go by too quickly. It’s important to set some ground rules to make the chat useful for everyone Try to keep everyone on the same track of the conversation If the conversation starts to get out of control, gently try to bring people back to the main flow.
● Online office hours - Many students may not be able to come to your office hours, particularly working students, who have arranged their schedules to make it to class. The chat room is an easy way to allow your students to contact you during a scheduled time to ask a quick question about an assignment or a lecture.
● Group chats - If you’ve set up student groups, each group can have its own chat Set up a chat room and set the group mode to separate or visible groups. Each group can then use its chat room for communication between group members
● Last-minute exam preparation - You could set up a chat room a week or even a night before an examination for students to discuss any study questions. Students who are working at the last minute will appreciate the opportunity to ask each other questions about the material.
Messaging
In Moodle terminology "Messaging" refers both to automatic alerts from Moodle about new forum posts, assignment submission notifications etc, and also to conversations using the instant messaging feature.
Message alerts:
● Users can receive message alerts from Moodle in a number of ways and for a number of reasons: users may for instance receive instant messages via the Messages block; students may be messaged by their course tutor via the People block; teachers might receive automatic notifications of assignment submissions and admins might receive notification of problems with the site.
173
● How these messages and others are received can be set by each user from the Messaging link in their profile. Check boxes allow the user to select how they wish to be notified of incoming messages
Instant messaging
If enabled for the site, users in Moodle have the option to send each other messages. Messages can be sent from the following places:
● The message button is now next to the user's picture
● as admin in Bulk user actions

● as a teacher from the People block
● as any logged in user from the Messages block or Online Users block
● as any logged in user by clicking on the profile of another user.
To send a message to an individual:
● From the Messages block or from your profile
○ Click on the blue link Messages in the Messages block or click the Messages link from Navigation>My profile and then type a name into the Search people and messages box To narrow the search down further, click the blue Advanced link to search for a person "only in my courses" or with keywords in messages
○ Type the message in the box and click the Send a message button
● From the Online users block
○ Click the name of one of the people currently online and click the Send message link in their profile
174
○ Type the message in the box and then click on the Send a message button
● To read and reply to a message
○ If the Messages block shows you have a message, click the envelope icon (with the number of messages)
○ Type your reply into the box and then click on the Send a message button.
○ If you receive a popup notification of a message, click Go to message to read and reply to it.
● To send a message to selected course participants:
○ Click on the Participants link in the People block on the course page.
○ Select participants from the list or use the "Select all" button at the bottom of the list
○ Choose "Add/send message" from the "With selected users..." drop-down menu.
○ Type the message then click the "Preview" button
○ Assuming you are satisfied with the message, click the "Send" button.
● Managing contacts:
○ People may be added to your list of contacts (or blocked from contacting you) by clicking the Add contact(or Block contact) icon under their name in the Messages window
○ By default the contact list is empty. In order to send a message or to create a shortcut to the person you are sending, search for them in the search box
Summary
Moodle provides various channels of communication for you and your students Forums are an asynchronous, public method for sharing ideas. Chats are a great way to have simultaneous conversations online with a group of people Messaging provides a private channel for you to communicate directly with your students Communication is key to success for any class, and it’s even more important in an online environment.
175
Chapter 11 - Database, Wiki & Workshop
In this chapter, we will get started with tools which will allow your students to collaborate with each other. There are mainly three major tools available in Moodle core - Database, Wiki and Workshop which allows different types of collaboration among learners.
A wiki is a collection of collaboratively authored web documents. A good example of such a tool is WikiPedia which has become a knowledge encyclopedia for world information Basically, a wiki page is a web page everyone in your class can create together, right in the browser, without needing to know HTML
Workshop is a peer assessment activity with many options Students submit their work via an online text tool and attachments There are two grades for a student: their own work and their peer assessments of other students’ work
The database activity module allows the teacher and/or students to build, display and search a bank of record entries about any conceivable topic The format and structure of these entries can be almost unlimited, including images, files, URLs, numbers and text amongst other things
So, let’s start with them one by one, first with Wiki
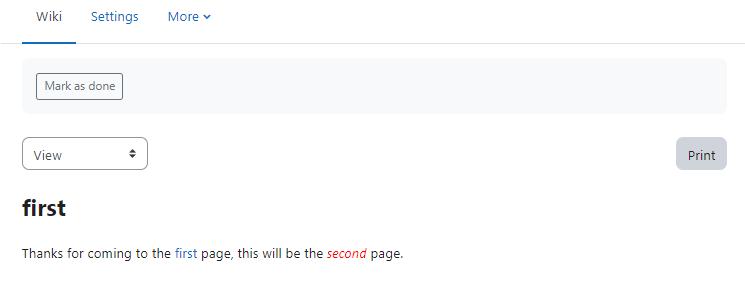
Wiki Activity
Wiki Activity is the one which allows you to create a wikipedia type collaboratively authored web document. A wiki starts with one front page. Each author can add other pages to the wiki by simply creating a link to a page that doesn’t exist yet.
A wiki is indeed a fast method for creating content as a group. It’s a hugely popular format on the Web for creating documents as a group. There is usually no central editor of a wiki, no single person who has final editorial control. Instead, the community edits and develops its own content. Consensus views emerge from the work of many people on a document
In Moodle, wikis can be a powerful tool for collaborative work The entire class can edit a document together, creating a class product, or each student can have their own wiki and work on it with you and their classmates You can also consider using wikis for online collaborative
176
assignments ranging from peer reviewing of papers to group reports, to even a new Wikipedia like page based upon your course or a single assignment learning outcomes
A history of previous versions of each page in the wiki is kept, listing the edits made by each participant
Wikis have many uses, such as
● For group lecture notes or study guides
● For members of a faculty to plan a scheme of work or meeting agenda together
● For students to collaboratively author an online book, creating content on a topic set by their tutor
● For collaborative storytelling or poetry creation, where each participant writes a line or verse
● As a personal journal for examination notes or revision (using an individual wiki)
Adding Wiki in Moodle Course
Creating a wiki is very simple and most of the work involved with creating wikis becomes easier once you start using them.
To add a wiki to your course:
● With editing mode turned on, choose Wiki from Add an Activity or Resource link
● In the General Section:
○ Name - Enter a name
○ Description - describe the purpose of the wiki and what you expect students to contribute in the description field.
○ Wiki Mode - The Wiki mode determines whether everyone can edit the wiki or they will have their own individual wiki. There are two options -
■ Collaborative Wiki
■ Individual Wiki
○ First page Name - Enter the first page name of the Wiki in the “First Page Name”*
field
● In the Format Section - Here you can set the Format of the Wiki. There are 3 options to choose from:
○ HTML - Wiki with HTML editor available for editing
○ Creole - A common wiki markup language for which a small edit toolbar is available
○ Nwiki - Mediawiki-like markup language used in the contributed Nwiki module
○ If the format is forced (checkbox ticked), there is no option to choose a format when editing a wiki page.
● Common Module Settings - Choose common module settings as we have discussed earlier in this book
● Click Save And Display to display the wiki you just created.
177
There are two wiki types (modes), collaborative and individual In addition, like any activity, the wiki has the Moodle group modes: “No Groups”, “Separate Groups” and “Visible Groups”. According to the wiki mode and the group options selected by you the format of wiki which will be displayed to the students and the permissions for them will be different.
● Collaborative

178
○ No Groups: There is only one wiki The teacher and all students can view and edit this wiki.
○ Separate Groups: There is one wiki per group Students can view and edit the wiki of their own group only.
○ Visible Groups: There is one wiki per group. Students can change the wiki of their own group only They can view the wikis for all groups
● Individual
○ No Groups: Every student has their own wiki which only they and their teacher can view and edit.
○ Separate Groups: Every student has their own wiki, which only they and their teacher can edit Students can view the wikis of other students in their group
○ Visible Groups: Every student has their own wiki, which only they and their teacher can edit Students can view the wikis of all other students in the course
Creating first page of your wiki
After you create the wiki activity, Moodle will itself take you to the first page; there also you can change the format of the wiki Click “Create Page” to proceed
On the edit page screen:
● Enter the content of the first page of your wiki in the HTML format field, if you are using the HTML format
● You can use Moodle's native HTML editor for showcasing your content.
Adding more pages:
● Type the name of your page inside double brackets (as shown in fig below) You can preview it by clicking the “preview” button towards the bottom of the screen.
● Press the “save” button
● Now click the (red) link for one of the pages (as shown in screenshot below) and you will be prompted to create it in the same way you create the first page.
● A page once created has a blue link
179
Editing Wiki activity
Depending on the type of the wiki, there are several ways to edit your page The best thing about a wiki is that nothing is lost The old version will be there - and if someone changes your version of the page - your version will also be there.
The options for editing, commenting viewing history, map and files may all be accessed both from tabs at the top and links in the navigation bar on top:
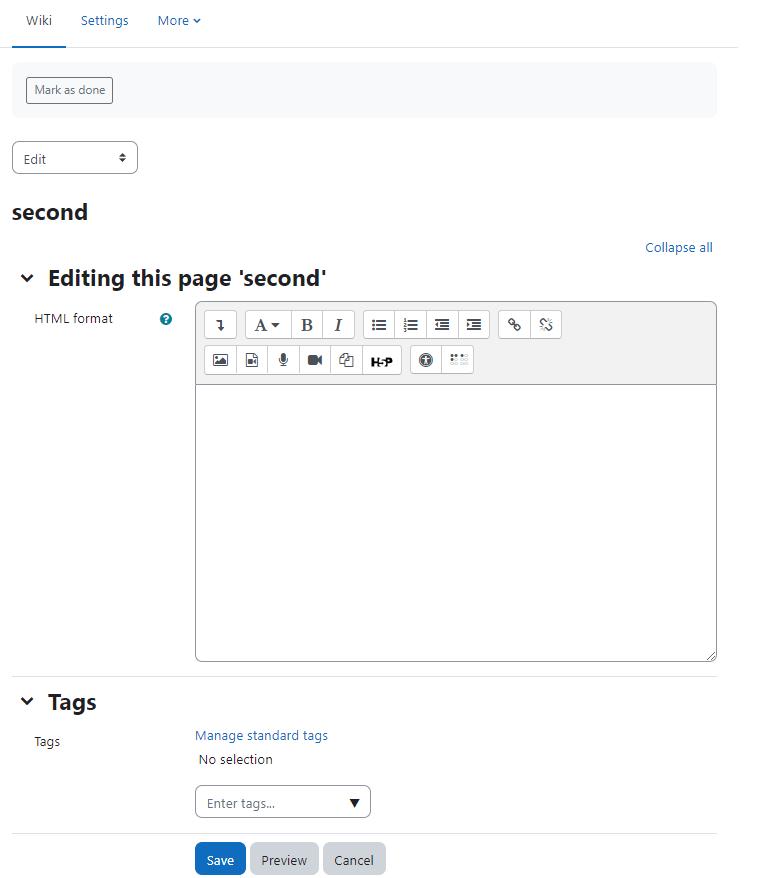
180
● View: The View tab at the top or link in the navigation block allows users to display and view the wiki page
● Edit: The Edit tab at the top or link in the navigation block allows users to edit the wiki page.
● Comments: The Comments tab at the top or link in the navigation block allows users to see and add comments about the wiki.
● History: The History tab at the top or link in the navigation block allows users to see what has been altered in the wiki You can compare the edits by clicking the “Compare Selected button. You can also restore by clicking the “Restore” button of the version you wish to restore if the latest edit is unsuitable as shown in the figure
● Map: The Map tab at the top or link in the navigation block allows users to view areas of the wiki such as a list of pages (as in the following screenshot), updated or orphaned pages etc To select what you want to see, click the Map menu dropdown box
● Files: The Files tab at the top or link in the navigation block allows users to access any files which have been added to the wiki By default, the Teacher role can add and manage files to the Files tab, but the Student role can only view them. You could change this though with a permissions override to the Manage wiki files capability (mod/wiki:managefiles) in any particular wiki
● Administration: The Administration tab at the top or link in the navigation block is available to editing teachers in the course so they can delete page versions or selected pages. Clicking the “list all” button will list available pages to delete. The first page of the wiki cannot be deleted
Wiki capabilities
● Create new wiki pages: This allows a user to create new pages in a wiki. This capability is allowed for the default roles of manager, teacher, non-editing teacher and student
● Add comments to pages: This allows a user to add a comment to wiki pages. This capability is allowed for the default roles of manager, teacher, non-editing teacher and student.
● Save wiki pages: This allows a user to edit the wiki pages. This capability is allowed for the default roles of manager, teacher, non-editing teacher and student
● Manage wiki comments: This allows a user to delete comments on wiki pages. This capability is allowed for the default roles of manager, teacher and non-editing teacher
● Manage wiki files: This allows a user to manage, delete files attached to the wiki. This capability is allowed for the default roles of manager, teacher and non-editing teacher.
● Manage wiki settings: This allows a user to edit the wiki settings This capability is allowed for the default roles of manager, teacher and non-editing teacher.
● Override wiki locks: This allows a user to override locked wiki pages This capability is allowed for the default roles of administrator, teacher and non-editing teacher.
181
● View page comments: This allows a user to view comments on wiki pages This capability is allowed for the default roles of manager, teacher, non-editing teacher and student.
● View wiki pages: This allows a user to view the wiki pages This capability is allowed for the default roles of manager, teacher, non-editing teacher and student.
Effective Wiki practices
Wikis are a simple, flexible tool for collaboration They can be used for everything from simple lists of web links to building entire encyclopedias. Wikipedia is the largest wiki in the world (http://wwwwikipedia org)
Of course, wikis in your own class won’t be that extensive. But it’s important to have a plan for your wiki before you release it to the class Students need to know the purpose of the wiki and how it fits in with the class. If it’s a personal wiki, will they be graded? Is it simply a staging area for group work that will be submitted later? Students need to know so they can submit appropriate work. A brainstorming wiki is very different from one that will be submitted for a grade
The free-form, collaborative nature of wikis makes them easy to apply in creative ways. Any sort of group process can be facilitated using a wiki
Group lecture notes
Creating a wiki for group lecture notes after a lecture gives students a chance to combine all their notes Those that missed information can get it from their peers The group can also decide what information is critical and give it proper emphasis Group lecture notes could be done with the entire class, if it is small enough, or with small working groups. Groups can also compare notes for further discussion and refinement
Idea Generation
Idea generation is a non-judgmental group creative process in which group members are encouraged to give voice to any ideas they personally consider relevant to the group exercise In a face-to-face meeting, a facilitator will usually stand in front of a big piece of paper and elicit ideas from the participants in the room A teacher can create an online version of this process by setting up a wiki for the entire class or for smaller student groups and asking people to submit ideas around a topic. People can add ideas as they occur and link to other pages for elaboration.
Workshop
Workshop is similar to the Assignment module which we covered earlier and extends its functionality in many ways However, it is recommended that both you (teacher) and your course participants (students) have used the assignment activity before using the Workshop activity.
Here are some differences between Assignment and Workshop activities in Moodle:
182
● Similar to the Assignment, course participants submit their work during the Workshop activity Every course participant submits their own work The submission may consist of a text and attachments. Therefore, Workshop submission merges both Online text and Upload file types of the Assignment module. Support for team work (in the sense of one submission per group of participants) is out of scope of the Workshop module
● The submissions are assessed using a structured assessment form defined by the course facilitator (teacher) Workshop supports several types of assessment forms All of them allows multi-criteria assessment in comparison to the Assignment module where only one grade is given to a submission
● Workshop supports the peer assessment process Course participants may be asked to assess a selected set of their peers’ submissions. The module coordinates the collection and distribution of these assessments
● Course participants get actually two grades in a single Workshop activity - grade for their submission (that is how good their submitted work is) and grade for assessment (that is how well they assessed their peers) Workshop activity creates two grade items in the course Gradebook and they can be aggregated there as needed.
● The course facilitator can select some submissions and publish them so they are available to the others at the end of Workshop activity (in comparison to the Assignment module where submitted work is available only to the author and the facilitator)
Workshop phases
The work flow for the Workshop module can be viewed as having five phases. The typical workshop activity can cover days or even weeks The teacher switches the activity from one phase to another.
The typical workshop follows a straight path from Setup to, Submission, Assessment, Grading/Evaluation, and ending with the Closed phase. However, an advanced recursive path is also possible
The progress of the activity is visualized in the so-called Workshop planner tool. It displays all Workshop phases and highlights the current one. It also lists all the tasks the user has in the current phase with the information of whether the task is finished or not yet finished or even failed
Before creating a workshop activity in your course, let's take an overview on the different phases within the workshop activity.
Setup phase:
In this initial phase, Workshop participants cannot do anything (neither modify their submissions nor their assessments) Course facilitators use this phase to change workshop settings, modify
183
the grading strategy of tweak assessment forms You can switch to this phase anytime you need to change the Workshop setting and prevent users from modifying their work.
Submission phase:
In the submission phase, Workshop participants submit their work Access control dates can be set so that even if the Workshop is in this phase, submitting is restricted to the given time frame only. Submission start date (and time), submission end date (and time) or both can be specified
Assessment phase
If the Workshop uses a peer assessment feature, this is the phase when Workshop participants assess the submissions allocated to them for the review. As in the submission phase, access can be controlled by specified date and time from when and/or until when the assessment is allowed.
Grading evaluation phase
The major task during this phase is to calculate the final grades for submissions and for assessments and provide feedback for authors and reviewers. Workshop participants cannot modify their submissions or their assessments in this phase any more Course facilitators can manually override the calculated grades Also, selected submissions can be set as published so they become available to all Workshop participants in the next phase.
Closed
Whenever the Workshop is being switched into this phase, the final grades calculated in the previous phase are pushed into the course Gradebook.This will result in the Workshop grades appearing in the Gradebook and in the workshop Participants may view their submissions, their submission assessments and eventually other published submissions in this phase
Adding Workshop Activity in Moodle
Now Let's add a workshop activity in your course:
● With the editing turned on, click the "Add an activity or resource" link and Choose ‘Workshop’
● In the General Section:
○ Name - Give a purposeful name for the Workshop activity
○ Description - Add a description of your workshop here
○ If the Display description on the course page box is ticked, the description will appear on the course page just below the name of the workshop.
● In the Grading settings section
184
○ Grading strategy - What you choose here determines the assessment form students will use and also the strategy for grading submissions. * Grading strategies can't be changed once we have entered the submission phase of a workshop. There are 4 options:
■ Accumulative Grading - Comments and a grade are given regarding the aspects of the workshop specified

185
■ Comments - Comments are given but no grade can be given to the specified aspects.
■ Number of Errors - A yes/no assessment is used and comments are given for specified assertions
■ Rubric - A level assessment is given regarding specified criteria.
○ Grade for submission - This setting specifies the maximum grade that may be obtained for submitted work. It is scaled between 0-100
○ Submission grade to pass - This setting determines the minimum grade required to pass. The value used in the activity and course completion as well as in the course gradebook.
○ Grade for assessment This setting specifies the maximum grade that may be obtained for submission assessment. It is also scaled between 0-100
○ Assessment grade to pass - This setting determines the minimum grade required to pass. The value used in the activity and course completion as well as in the course gradebook
○ Decimal places in grades - Decide here how many decimal places are allowed in the grade
● In the Submission Settings Section
○ Instructions for submission: Explain here what students must submit and related instructions
○ Submission types - Here you can specify if the students need to submit only online text or file upload You can also mark it required
○ Maximum number of submission attachments: If you wish students to attach files, select how many here, up to a maximum of 7. If you leave it at 0 then they can only enter text
○ Submission attachment allowed file types - Submission attachment file types can be restricted by providing a list of allowed file types
○ Maximum File Size: Decide here how large a file students can upload The size will depend on the course upload limit
○ Late Submissions: If enabled, students may submit their work after the submissions deadline or during the assessment phase. Late submissions cannot be edited though
● In the Assessment Settings Section
○ Instructions for assessment: Here you can write instructions for assessments online This is very useful to help students have a better understanding about the important points of a task before assessing their classmates’ submissions
○ Use Self Assessment: If enabled, a user may be allocated their own submission to assess and will receive a grade for assessment in addition to a grade for their submission
● In the Feedback Section
186
○ Overall feedback mode: If enabled, a text field is displayed at the bottom of the assessment form. Reviewers can put the overall assessment of the submission there, or provide additional explanation of their assessment
○ Maximum number of overall feedback attachments: Choose here how many (if any) files you wish reviewers to attach to their overall feedback, up to a maximum of 7
○ Feedback attachment allowed file types - attachment file types can be restricted by providing a list of allowed file types
○ Maximum overall feedback attachment size: Decide here how large a feedback file students can upload. The size will depend on the course upload limit.
○ Conclusion: It is possible to add some custom text which the students will see once they reach the end of the workshop
● In the Example Submissions section
○ Use examples: If enabled, users can try assessing one or more example submissions and compare their assessment with a reference assessment The grade is not counted in the grade for assessment If you check the box then you will find three options in this drop down menu. The first option means that the assessment of the example submission is voluntary, while the second and the third ones make it mandatory, which either requires students to assess example submissions before submitting their own work or after their own submission but before peer-assessment
● In the Availability section:
○ This section deals with setting submission times and assessment times for the workshop. That is the time when students can start submitting as well as the deadline for submitting, and similarly the time assessments for other students’ work start and when they must finish assessing other students' work You can choose your settings accordingly to facilitate the students within your class for the following fields:
■ Open for submissions from
■ Submissions deadline
■ Open for assessment from
■ Deadline for assessment
● In the Common Module Section - Choose the common module settings as we discussed earlier in the book.
● Click Save and Display to show the workshop activity
Using Workshop Activity:
When you click the Save and Display, it will take you to the workshop setup phase page.
187
Setup Phase:
In order to set the criteria for an assignment, you as a teacher need to fill out an assessment form during the setup phase Students can view this assessment form in the submission phase and focus on what is important about the task when working on their assignment. In the next phase-the assessment phase, students will assess their peers’ work based on this assessment form.
According to the grading strategy chosen in the grading settings while setting up the activity, you will get the corresponding original assessment form to edit by clicking the ‘Edit assessment form’ button in the first page of the workshop setup for the assignment The grading strategy can be one of Accumulative grading, Comments, Number of errors or Rubrics. Teachers can set each criterion in detail in the assessment form
Submission phase:
Once the workshop has been made we can then set more settings relating to submissions This is done through clicking on the menu highlighted below which is found when you click on the workshop’s link or after clicking “Save and Display” on completion of the workshop To access the menu simply click on “Allocate Submissions”. It is highlighted in the picture by the red box.
When you click on the "Allocate Submissions" link Moodle will take you to the submission allocation page where you can allocate the submissions to different students. There are 3 tabs on the page:

● Manual Allocation: Here,a teacher can manually choose which students review whose work A student can review work even if they have not submitted anything themselves
● Random Allocation: The teacher is given 5 settings that determine how the random allocation will work
○ Number of reviews: Here the teacher picks between 0 and 30 reviews for either each submission or per reviewer. That is the teacher may choose to either set the
188
number of reviews each submission must have or the number of reviews each student has to carry out
○ Prevent Reviews: If the teacher wishes for students of the same group to never review each other’s work, as most likely it is their work too in a group submission, then they can check this box and moodle will ensure that they are only allocated other students out of their group’s work to access
○ Remove current allocations: Checking this box means that any manual allocations that have been set in the Manual Allocation menu will be removed
○ Participants can assess without having submitted anything: Having this box checked allows students to assess other students’ work without having already submitted their own work
○ Add self assessments: These options when checked make sure that as well as assessing other students’ work they must also assess their own This is a good option to teach students how to be objective about their own work.
● Scheduled Allocation: If enabled, the scheduled allocation method will automatically allocate submissions for the assessment at the end of the submission phase The end of the phase can be defined in the workshop setting 'Submissions deadline'.
Internally, the random allocation method is executed with the parameters pre-defined in this form It means that the scheduled allocation works as if the teacher executed the random allocation themselves at the end of the submission phase using the allocation settings below
Assessment phase:
● Instructions for assessment - Students see these instructions when the Workshop is in the Assessment Phase. They are important to students' understanding of the task before assessing their classmates’ submissions
● Use self-assessment - Checking this box means that students may be allocated their own work to assess. This will depend on Moodle's allocation i.e. the larger the group of students the less likely it is that anyone will be allocated their own work
Grading evaluation phase
Here you can choose your settings for calculation of the grade for assessments
● Grading evaluation settings: Here you can choose your settings for calculation of the grade for assessments.
● Grade calculation method: This setting determines how to calculate grades for assessments. Currently there is only one option- comparison with the best assessment. The Comparison with the best assessment tries to imagine what a hypothetical absolutely fair assessment would look like
189
● Comparison of assessments: This setting determines how quickly the grades fall down when the assessments differ from the best assessment. This setting has 5 options: very lax, lax, fair, strict and very strict It specifies how strict the comparison of assessment should be. By using comparison with the best assessment method, all assessments will be compared with the best assessment picked up by the workshop. The more similar one assessment is with the best assessment, the higher grade this assessment will get, and vice versa
● Workshop toolbox:
○ Clear all aggregated grades: Clicking this button will reset aggregated grades for submission and grades for assessment. Teachers can re-calculate these grades from scratch in the Grade evaluation phase
○ Clear assessments: By clicking this button, grades for assessments along with grades for submission will be reset The assessment form will remain the same but all the reviewers need to open the assessment form again and re-save it to get the given grades calculated again
Closed Phase
Whenever the Workshop is being switched into this phase, the final grades calculated in the previous phase are pushed into the course Gradebook. This will result in the Workshop grades appearing in the Gradebook and in the workshop (new in Moodle 2 4 onwards) Participants may view their submissions, their submission assessments and eventually other published submissions in this phase.
Grading a Workshop Activity
The grades for a Workshop activity are obtained gradually at several stages and then they are finalized.
Participants get two grades which are calculated during the Grading evaluation phase. The teacher can edit these grades while still in this phase They will not go to the gradebook until the workshop is closed in the final phase. Note that it is possible to move between phases and even when the workshop is closed, grades could be changed directly in the gradebook if necessary.
Grade for submission:
The final grade for every submission is calculated as a weighted mean of particular assessment grades given by all reviewers of this submission. The value is rounded to a number of decimal places set in the Workshop settings form The teacher can influence the grade in two ways:
● by providing their own assessment, possibly with a higher weight than usual peer reviewers have
190
● by overriding the grade to a fixed value
Grade for assessment
Grade for assessment tries to estimate the quality of assessments that the participant gave to the peers Grades for assessment are displayed in the braces () in the Workshop grades report The final grade for assessment is calculated as the average of particular grading grades.
Workshop Capabilities
The capabilities for the workshop activities are:
● Allocate submissions for review: This allows a user to allocate a submission for assessment and set the weight of the assessment for a workshop activity This capability is allowed for the default roles of manager, teacher and non-editing teacher.
● Edit assessment forms: This allows a user to define and modify assessment forms This capability is allowed for the default roles of manager, teacher and non-editing teacher
● Ignore time restrictions: This capability allows a user to submit or assess without any time restrictions i e he is not bound to follow the deadlines
● Manage example submissions: This allows a user to submit example submissions. This capability is allowed for the default roles of manager, teacher and non-editing teacher
● Override calculated grades: This capability allows a user to override calculated grades for submission and assessment.
● Peer assess: All users with this capability are considered as potential reviewers during the allocation. Submissions can be allocated to these users for assessment.
● Publish submissions: This allows a user to publish submissions, that is to make them available when workshop is closed
● Submit: This allows a user to submit own work. All users with this capability are expected to participate in the workshop as authors
● Switch phase: This allows a user to change the current phase of the workshop.
● View workshop: This allows a user to see workshop title and introduction during the setup phase
● View all assessments: This allows a user to view all assessments in the workshop.
● View all submissions: This allows a user to view all submissions in the workshop
● View author names: This allows a user to see the name of submission author. This is typically used to control whether reviewers should know who they are assessing or whether the assessment is anonymous
● View authors of published submissions: This capability allows a user to see the names of authors of published submissions
● View published submissions: This allows a user to view published submissions when the workshop is closed
191
● View reviewer names: This allows a user to see the name of reviewer This is typically used to control whether submission authors should know who they are assessed by or whether the reviewers are anonymous
Database Activity
The Database activity allows the teacher and/or students to build, display and search a bank of record entries about any conceivable topic The format and structure of these entries can be almost unlimited, including images, files, URLs, numbers and text amongst other things
It is a simple, easy-to-use, general purpose database not meant to be very complex or powerful; it’s simply a way for multiple people to add structured data to a shared resource. The database module provides a tool for collaborative development of a database within the course
You can use the database module in a lot of creative uses which are limited by your imagination. You could use the database to create glossaries, catalogs, taxonomies, registrations, paper submissions, maps, or anything where the students in your class can fill in a form to add data.
In Moodle 4 1, the Database activity has received a major upgrade in terms of Start page, Choice of Presets, Previewing Presets and clear Approval status.
You could use the database module to:
● allow collaboration on building a collection of web links/books/journal references related to a particular subject
● display student created photos/posters/websites/poems for peer comment and review
● gather comments and votes on a shortlist of potential logos/mascot names/project ideas
● provide a student file storage area
● Maintain a log of what was done in a face-to-face class each day, so that absent students can get caught up themselves.
In previous versions of Moodle, creating a database activity was a steep learning curve for many teachers But in Moodle 4 1 there are many presets which are already available to get started with Database activity, which makes it easier to use than ever.
You also have the option of using a preset of an empty database activity, rather than creating your own from scratch. The visual layout of information when listing, viewing or editing database entries may be controlled by database templates Database activities may be shared between courses as presets and a teacher may also import and export database entries.
If the database auto-linking filter is enabled, any entries in a database will be automatically linked where the words or phrases appear within the course.
192
A teacher can allow comments on entries Entries can also be rated by teachers or students (peer evaluation) Ratings can be aggregated to form a final grade which is recorded in the gradebook
A database is made up of fields and templates. While Fields define the type of data the database will store: text, dates, files, URLs, etc Templates allow you to control the visual layout of information when listing, viewing, or editing database entries.
A database activity has four basic template types:
● List template The list template allows you to control the fields used and their layout when viewing multiple entries. Usually an overview of each entry is provided, with more detailed information available by clicking on an entry to access the single view
● Single template The single template is for displaying the detailed view of a single entry. All the data the user entered should be visible here
● Advanced Search - An advanced search template is for creating the interface form used in the advanced search.
● Add entry template - The add entry template creates the interface form used when adding or editing database entries.
Let’s first start creating our first database with already existing presets in Moodle After that we will dive deep to understand the templates in more detail.
Adding a Database
As with many of the activity modules, a little pre planning can go a long way when you are thinking about developing a database activity The field definitions determine the fields in the add template, which determine the data you can display on the list and single templates. Before you begin digging into the database, try to sketch out the fields you think you need the students to enter, and how you might want to lay them out in each template
Once you have a rough sketch, creating the database itself will be easier and you will less likely need to go back and add fields later (although you can if you need to).
To create a database activity:
● With editing mode turned on, click Add an activity or resource link and choose Database.
● In the general section:
○ Name - Give your new database a name and a description
○ Description - Give your new database a name and a description
● In the Entries Section:
○ Approval required? - If set to “yes”, the entry will only be visible once a teacher has checked and approved it.
○ Allow comments on entries - If set to “yes”, users will be able to comment on database entries
193
○ Entries required for viewing - Select here how many entries you wish the student to add before they are allowed to see entries by other people
○ Maximum number of entries - Select here the maximum number of entries you wish students to make.
● In the Availability section:
○ Available from/to - Select here when you want the database to be visible to students

194
○ Read only from/to - If you wish, select here the dates you want students to be able to see entries in the database but not be able to add their own. For example you could make a database ‘available from’ January 1st until March 1st, but ‘read only’ from January 1st to February 1st. This means students can only view entries for a month before being able to add their own
● In the Ratings Section:
○ Roles with permission to rate - To submit ratings users require the moodle/rating:rate capability and any module specific capabilities Users assigned the following roles - Manager, Teacher, Non-editing teacher should be able to rate items. The list of roles may be amended via the permissions link in the administration block
○ Aggregate type - The aggregate type defines how ratings are combined to form the final grade in the gradebook The options are:
■ No Ratings
■ Average of Ratings
■ Count of Ratings
■ Maximum Rating
■ Minimum Rating
■ Sum of Ratings
○ In the Common Module Section: Choose the common module setting appropriately as we have covered them in the earlier part of this book
○ Click the “Save changes” button and you will be taken to the database setup page
Building Database
When you first visit the database activity after setting up then it will be displayed like as shown in figure below:
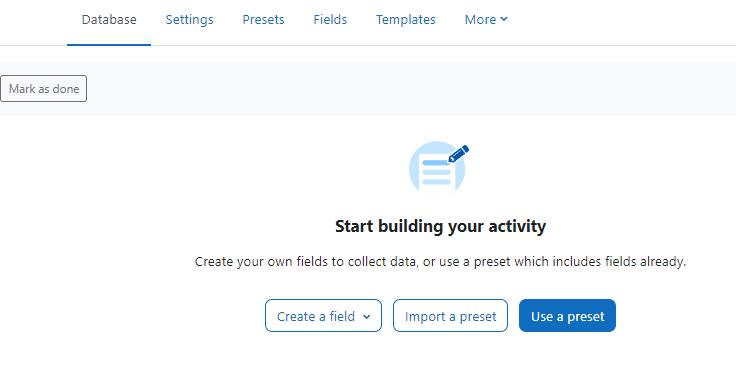
195
If you have used the database activity in earlier Moodle versions, then you can start creating the fields which will be a slightly tough option for a new Moodle teacher For newbies the other two options - Import a Preset or use a Preset are the starting points. So, we will first go with Using the existing presets, then importing the presents and finally creating our own fields. Use a Preset
The Database activity offers four presets you can use or adapt instead of creating your own Click the name of a preset to preview it and click the button Use preset bottom right to select your preferred preset
The four presets in the Moodle core are:
● Image Gallery - Use this preset to collect images.
● Journal - Use this preset for a journal, diary, reflections tool or research log
● Proposals - Use this preset to collect proposals for topics, research, projects, etc. Fields include status such as approved, declined, revised or pending
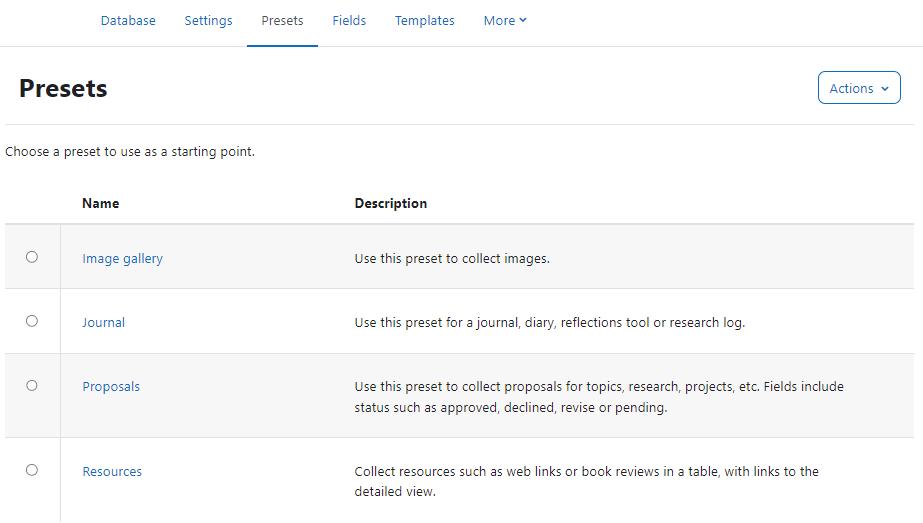
● Resources - Collect resources such as web links or book reviews in a table, with links to the detailed view.
Exporting a Preset
To share your Database activity, you have two options:
● Export it as a zip file, which can then be imported to another course or Moodle site.
○ To export the database as a zip file, navigate to the Templates tab, click the Actions menu, select Export preset
196
● Save as a preset, which publishes the Database for other teachers on your site to use It will then appear in the preset list.
○ To export the database activity as a Preset, navigate to the templates tab, click the Actions menu, select Publish preset on this site
Importing a preset
● When creating a new Database activity, click the button Import preset on the starter page once you have saved your settings
● Alternatively, click the link Presets in the Database activity navigation.
After the import, you can customise the fields and, if needed, add or import entries You will see a "Overwrite current settings" checkbox after the "Import" button has been pressed If checked/ticked, the Database activity overwrites some of its current general settings by those stored in the preset.
Presets for download
You can browse other presets from the Database presets collection on Moodle.net (Moodle’s OER Platform). You can create your own presets as well and share them with others.
Creating Fields
Now, let’s take a deep dive into the technical aspects of the Database activity - Fields The field definitions create the basic structure of the database and determine what kind of information students can enter into your database
For example a database of famous paintings may have a picture field called painting, for uploading an image file showing the painting, and two text fields called artist and title for the name of the artist and the painting. By combining several fields with appropriate names and types you should be able to capture all the relevant information about the items in your database
You are provided with a choice of 12 data field types
● Checkbox: This allows you to offer checkboxes for the user to select. Add the options one under the other The word will appear next to a checkbox when the user clicks to add an entry. They can check more than one box.
● Date: This allows a user to enter a date by picking a day, month and year from a drop down list.
● File: Users can upload a file from their computer If it is an image file then the picture field may be a better choice
● Coordinates: Users can enter a geographic location using latitude and longitude. When students view the entry, links are automatically generated to geographic data services such as Google Maps, Google Earth, or Multimap.
197
● Dropdown List: For students to select an option from a drop-down menu Enter each option on a different line in the options text field.
● Multiselect List: For students to select multiple options from a drop-down menu (by holding down the Control or Shift key as they click)

● Number: For students to enter a number (positive, negative, or zero).
● Image: For students to upload an image file from their computer
● Radio buttons: For students to select just one option from a list. If used, “radio buttons” is a required field; a student may only submit his database entry after selecting an option
● Short Text: For students to enter text up to 60 characters in length For longer text, or for text that requires formatting such as headers and bullet points the textarea field should be used
● Text area: For students to enter text longer than 60 characters in length and/or include formatting such as headers and bullet points
198
● URL: For students to enter a URL Selecting “Autolink the URL” will make the URL a clickable link, and entering a forced name for the link means that the name will be used for the hyperlink You can choose to have the URL open in a new window if so desired
To create the fields for your database:
● On the database setup page, navigate to Fields tab and select the field type you want to add from the “Create a new field” dropdown menu
● Enter a field name and a field description. The field name is used to create the templates, so make it unique and long enough to be descriptive, but not too long to retype
● If necessary, add/select the options for each field type For example, you can set the height and width of the text area generated by the textarea field
Once you’ve defined the fields you want to use in your database, as shown in figure above, you are ready to begin editing your templates
Editing Database Templates
As we mentioned earlier, templates offer a user interface with the visual layout of database fields for different pages You will have different templates for Add a new entry, List view, Single entry view, Advanced search view etc.
Database templates all work on the same principle They are basically HTML pages with a new set of tags for the database module to interpret When editing a template, Moodle displays a list
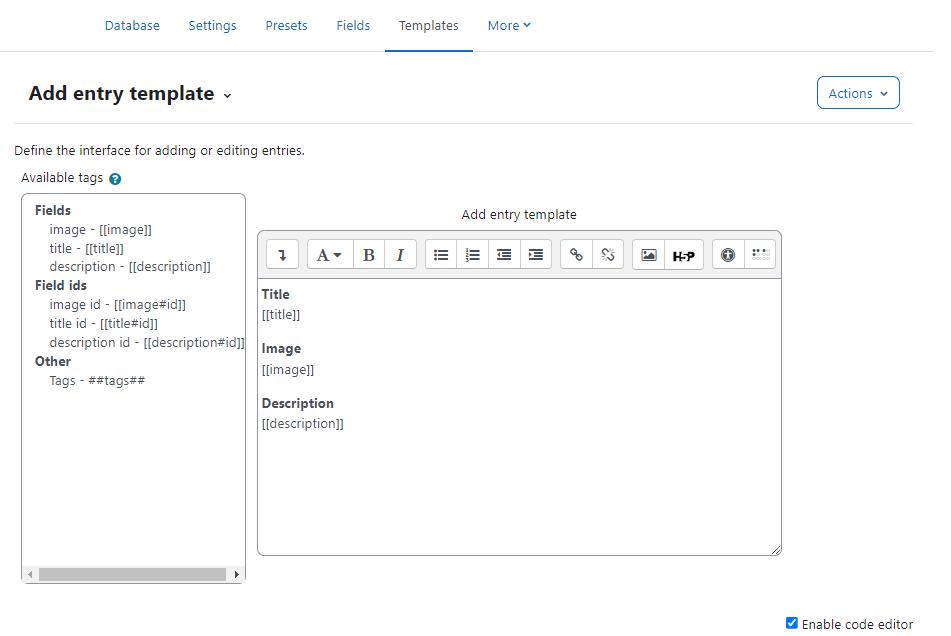
199
of available tags on the left side of the editing screen Double clicking on any of the tags adds it to the template. The database activity interprets these new tags before sending the template’s HTML to the browser for display It looks for words enclosed in either two square brackets ([[) or two hash signs (##), representing two different types of interface elements it can add to the template.
Square Brackets
The square brackets define data tags, which tell the module to replace the word in the brackets with the value or form element of the field with the same name So if you have a database with a name field, you would represent it in the template with [[name]] In the single or list template, the module would replace it with the data in the name field for that entry. In the list template, the module would replace it with a text field, and put the value in the text field if you’re editing the entry instead of creating a new one.
Hash ## Tags
The ## tags indicate the word should be replaced by an icon or link for interacting with the module. These tags are used to place the edit and delete icons, and links for More, Approve, Comments, and User If you want to add the edit icon to a template, you just add a tag that looks like ##edit## When the user looks at the page with the tag, the database module replaces it with the edit icon. If the user then clicks on the icon, it takes her to the edit template.
Aside from the replacement tags, creating a template is just like creating an HTML page Use a table to lay out the data elements (this is an acceptable use of tables for layout), add descriptive text around the replacement tags, and publish The database makes it easy to rapidly view your changes by flipping between the Templates tab and the tab for the template you are working on.
As mentioned previously, there are three basic templates necessary to use the database: list, single, and add The three other templates RSS, CSS, and JavaScript are more advanced templates and aren’t necessary for basic database use. To edit a template:
● On the database page, click the Templates tab
● Click one of the template links below the row of tabs.
● When you are done, click the “Save template” button
Add new entry template
Add new entry template is used to create and edit new entries In this template, data tags are replaced with the form element for the field If the user is editing an entry, the field will have the data from the field in the form element for editing as well
If you have a lot of form elements, consider grouping them together logically. For example, if you have a database asking students to build a catalog of insects found during a field trip, you may
200
want to separate the description and taxonomy from the location data It will make it easier for students to fill in and organize their data.
Single template
The single template provides a detailed view of an entry. This template should list all of the available data. Again, consider organizing the data if you have a lot of fields in your database. This is used to display a single entry at a time and so has more space for display and can use, for example, larger versions of images or optionally provide more information than shown in the list view.

List template
The list template is the first page students will see when they come to your database The list template should give an overview of the entries and enable users to click through to the single or edit template The form has three areas: the Header, Body, and Footer
RSS template
The RSS template allows you to structure the RSS feed from the database If you have enabled RSS feeds for the database in the database options, the database will publish the entries in a feed This template allows you to structure how the entries in the feed appear to the readers
201
CSS template
The CSS template defines the CSS styles for all of the templates in the database If you know CSS, you can adjust the template’s fonts, spacing, colors, and other display information.
JavaScript template
Like the CSS template, the JavaScript template is used by the other templates. The JavaScript template allows you to add new behaviors to the templates by defining JavaScript routines that can be loaded when the template page loads You can use JavaScript to manipulate the way elements are displayed in the List, Single or Add templates Basically you need to enclose the part you want to manipulate in any named html element. The naming is essential as it allows you to identify the element for manipulation
Managing Databases
Once you have set up your database, you and your students can begin to enter data. Managing your database as students begin to populate it with data is an important factor in the success of a database activity. Someone will need to maintain the quality of the entries and give students credit for participating
Quality of Data Entries in Database
Once students have started to add entries to your database, you will need to track their data to help ensure they are making useful contributions Managing the quality of database entries can be a tedious exercise, but it can also be a learning opportunity for your students Students will enter their data according to their interpretation of the activity and their abilities. An inaccurate or disorganized entry from a student is a potential opportunity for feedback to help the student learn
The database module has a few tools that will be useful to you in ensuring data quality:
● Comments: Comments are a great tool for feedback to motivate your students and help them improve their entries.
● Require approval: The ultimate quality assurance tool is the “Require approval” option in your database options. As mentioned earlier, this option hides an entry from the rest of the class until you or someone with approval capability approves it You might want to use this capability to help students produce good material by giving them feedback before approving an entry.
● Rating for good entries: Giving grades for entries is the single most powerful motivator for students. It also rewards students for their time and effort. As always, if you don’t want to assign a numerical grade to an entry, you can create a custom scale and assign a qualitative grade When you rate an entry, the grade is added to the gradebook, like a rated forum post.
202
Rating and comments can be turned into a collaborative venture with your students By default, students are allowed to add comments, but only teachers are allowed to rate entries. However, you can enable collaborative rating by setting a student role override.
Database activity capabilities
● Approve unapproved entries: This allows a user to approve and undo the approval of Database activity module entries. This capability is allowed for the default roles of manager, teacher and non-editing teacher
● Write comments: This allows a user to add comments to Database activity module entries. This capability is allowed for the default roles of manager, teacher, non-editing teacher and student
● Export all database entries: This allows a user to export all Database activity module entries This capability is allowed for the default roles of manager, teacher and non-editing teacher.
● Export a database entry: This allows a user to export Database activity module entries This capability is allowed for the default roles of manager, teacher and non-editing teacher.
● Export own database entry: This allows a user to export their own Database activity module entries. This capability is allowed for the default roles of manager, teacher, nonediting teacher and student
● Manage database activity comments: This allows a user to edit and delete database activity module comments. This capability is allowed for the default roles of manager, teacher and non-editing teacher
● Manage database activity entries: This allows a user to add, edit and delete database activity module entries This capability is allowed for the default roles of manager, teacher and non-editing teacher
● Manage templates: This allows a user to manage database templates. This capability is allowed for the default roles of manager and teacher
● Manage all template presets: This allows a user to manage database presets. This capability is allowed for the default role of manager only
● Rate entries: This allows a user to rate database activity module entries This capability is allowed for the default roles of manager, teacher and non-editing teacher.
● View all raw ratings given by individuals: This allows a user to view all ratings given to database activity module entries. This capability is allowed for the default roles of manager, teacher and non-editing teacher
● View presets from all users: This allows a user to view database presets from all users. This also allows a user to export entries. This capability is allowed for the default roles of manager, teacher and non-editing teacher
203
● View total ratings that anyone received: This allows a user to view total ratings for database activity module entries. This capability is allowed for the default roles of manager, teacher and non-editing teacher
● View entries: This allows a user to view database activity module entries. This capability is moderated by any submission requirements in the database set-up, such as the number of entries required before viewing This capability is allowed for the default roles of manager, teacher, non-editing teacher, student and guest.
● View the total rating you received: This allows a user to view all ratings which they have received for database activity module entries. This capability is allowed for the default roles of manager, teacher and non-editing teacher.
● Write entries: This allows a user to add entries to a database activity and edit or delete any entries which they have previously added. This capability is allowed for the default roles of manager, teacher, non-editing teacher and student
● Add a new database activity: This allows a user to add a new database activity to the course This capability is allowed for the default roles of manager and teacher
Creative Database Practices
With a little creativity, the database activity can become a useful tool for collaboration. The structure provided by the field definitions and the templates makes it easier for students to understand what you expect of them and to provide each other with good data. Combined with less structured activities, like wikis and forums, you have a powerful combination of thinking tools to enable your students to produce good work
You could use the database module to:
● allow collaboration on building a collection of web links/books/journal references related to a particular subject
● display student created photos/posters/websites/poems for peer comment and review
● gather comments and votes on a shortlist of potential logos/mascot names/project ideas
● provide a student file storage area
● maintain a log of what was done in a face-to-face class each day, so that absent students can get caught up themselves
Summary
Wikis can be used to help promote group-based learning by providing spaces for students to work together to create pages built on ideas, constructive feedback, and current projects. Wikis are flexible tools for collaboration that you can implement to improve your course and students’ understanding of the material
204
Workshop activity is an activity which is quite similar in nature to assignment but takes the functionality to a much more extended level Some of the extended facilities provided by the workshop activity are:
● Workshop coordinates the collection of assignments and the distribution of these assignments to peer reviewers
● Peer markers assess the submissions using a structured assessment form defined by the teacher, which permits multiple criteria to be used.
● Workshop supports several types of assessment forms (e g full rubric, commenting only)
● Course participants are graded on their own submission and on how well they assessed their peers These 2 grade items are created in the course Gradebook and can be aggregated there as needed.
● Students can practice peer assessment and the use of rubrics in advance using example submissions and a reference assessment provided by the teacher
Database activity is the Swiss army knife in the Moodle course It is also most complex to set up a database activity but it can be used to cater a lot of creative uses which makes it a quite useful activity module
205
Chapter 12 - Choice, Feedback and Surveys
Moodle has three tools specifically designed for collecting ungraded feedback from your students: surveys, choices and feedback.
Choices are small, one-question surveys They act as small web polls that you may have seen on other websites. You can use a choice to get rapid feedback from your students about any topic you wish, as long as it’s only one question long The feedback activity module enables a teacher to create a custom survey for collecting feedback from participants using a variety of question types including multiple choice, yes/no or text input
So, let’s start with Choice first:
Choice Activity
A choice activity is very simple – the teacher asks a question and specifies a choice of multiple responses It can be useful as a quick poll to stimulate thinking about a topic; to allow the class to vote on a direction for the course; or to gather research consent. Unlike surveys, the choice tool allows you to ask any question you’d like, as long as it’s multiple-choice
Once you’ve set up your choice, it acts as a poll in your course. Students click on the choice and select their answer You can choose when and if students see the results of the choice and even let them change their minds. A choice activity may be used
● As a quick poll to stimulate thinking about a topic
● To quickly test students’ understanding
● To facilitate student decision-making, for example allowing students to vote on a direction for the course
Adding a choice activity
● Click the “Turn editing on” button and choose Choice from the Add an activity or Resource link
● In the general section
○ Choice Name - give the choice a descriptive name
○ In the Description, ask the question or make the statement from which students must make a choice.
○ Check the box if you want these instructions to display on the course page
○ Display mode for the options - This field relates to the display of the results. If you have only a few choices, choose to display the results horizontally; if you have a large number, choose to display them vertically
● In the options section:
206
○ Allow choice to be updated - In case Students change their mind they can still change their selection

○ Allow more than one choice to be selected - If this is enabled then the checkboxes display as squares instead of round (radio) buttons It is like choosing a multiple choice question rather than a single answer.
○ Limit the number of responses allowed - If learners are free to choose any option, leave 'Limit' at the default 0 If you want to restrict them to selecting a particular number, enter that number in the 'Limit' box.
207
○ Options - Here you have to specify the options that participants have to choose from.
● In the availability section - Here you can set a start and/or end date for the Choice
○ Allow responses from - Specify the start date for responding.
○ Allow responses until - Specify the due date for responding.
○ Show preview - Enabling Show preview will mean that students can view the choices before the time when they are allowed to make their selection.
● In the results section
○ Publish results - This simply means 'display results to students'.
○ Show column for unanswered - This might be useful if you need to quickly check who has not yet made a selection
○ Include responses from inactive/suspended users - This might or might not be useful to you depending on your organisation's policies
● In the common module section - Choose appropriate settings as we have discussed earlier
● Click Save and Display to view the Chat Activity
Administering Choices
After students have answered the choice, you can see their responses via the “View xx responses” link at the top right of the choice page. Unlike the students’ view of the results, irrespective of whether results are published anonymously, you’ll see a column for each response with the student’s picture and name
A teacher may download the results of a Choice activity by clicking the 'View responses' link and then on the next screen selecting from ODS, Excel or text format.
Choice Capabilities
The choice module capabilities are restricted to managing the responses from students:
● Record a choice - This allows a user to answer the choice
● Read responses - This allows a user to view other users’ responses.
● Delete responses - This allows a user to delete choice responses
● Download responses - This allows a user to download the full dataset of responses from other users
Feedback Activity
The Feedback activity allows you to create and conduct surveys to collect feedback Unlike the Survey tool it allows you to write your own questions, rather than choose from a list of pre-written questions and unlike the Quiz tool, you can create non-graded questions The Feedback activity is ideal for course or teacher evaluations.
208
Feedback responses may be anonymous if desired, and results may be shown to all participants or restricted to teachers only Any feedback activities on the site front page may also be completed by non-logged-in users.
Why use Feedback?
Apart from the obvious use here of evaluating a course, feedback surveys have a variety of uses, both within a course and for non-logged in users on the front page. The ability to set them as "anonymous" means also that sensitive issues can be surveyed without students worrying who might see their responses. Some ideas:
● Guest surveys - Anonymously, on the front page, non-logged in users such as parents can be questioned on their opinions about, eg, the website design, school policies, school meals
● Sign up! - Guests can be invited to sign up for events/courses via the feedback module.
● Contact us - Non-logged in users can use an instance of the feedback module as a "contact us" form
● Anti-bullying surveys - Students can be asked to highlight anonymously any incidences of bullying, along with their location and type
● Making choices - Students can select course modules or subjects they wish to study in a subsequent year/semester The results can be exported and easily collated to match availability
Adding a feedback activity
To add a feedback activity:
● With the editing mode turned on, click the Add an activity or Resource and choose Feedback activity.
● In the General Section
○ Name - enter a descriptive name of the choice activity
○ Description - Add a description for your Feedback instance in the description field.
○ Display description on course page - If selected the above mentioned description will be displayed on course page.
● In the Availability Section
○ Allow answers from/to - choose the period when users can complete feedback
● In the Question and Submission settings section -
○ Record user names - Choose here whether to show the names of users who complete the feedback or not.
○ Allow multiple submissions - Choose here whether or not to allow users to complete the feedback more than once This is important when using Feedback for anonymous surveys on the front page as it will allow non-logged in users to complete the feedback
209
○ Enable notification of submissions - If set to 'Yes' then teachers will receive notifications when users submit feedback

○ Auto number questions - If set to 'Yes' then the questions will be automatically numbered.
● In the After Submission section
○ Show analysis page - Choose whether to show students the analysis page or only show to teachers
210
○ Completion message - Type a personalized message here that students will read after completing the feedback.
○ Link to next activity - This allows you to add a URL to another activity or webpage which you would like them to go to once they have answered the questions.
● In the common module settings section - choose appropriate settings as we have covered earlier
● Click ‘Save and Display’ once you are done.
Building Feedback
After setting a new Feedback you have to design it by adding questions Select the type of question from the drop down list Add your question details and click ‘Save question’

The following options apply to all or most question types.
● Position - This number controls the order of the questions. Position 1 is the question nearest the top of the page, so when you create or edit a question, you can choose from the dropdown of available positions. You can also rearrange questions by clicking the position up and down arrows on the main add questions screen
● Required - These questions are required to be answered and will prompt the user if they are left unanswered. These questions are highlighted with a red star for users, and have a yellow exclamation point beside them when editing Feedback questions
● Question Types - The available question types are:
○ Captcha - A test to make sure a real person is filling in the form and not an automatic spamming program of some sort Asks a person to write out some
211
distorted text which is displayed on screen You normally won’t need this unless you find you are getting spammed a lot.
○ Information This allows you to choose to display one of three types of information: the time of responding; the course and/ or the category where the feedback is located.
○ Label - Like a standard Moodle label (now text and media), this allows you to add arbitrary text between questions allowing for extra explanation or to divide the Feedback into sections
○ Longer Text Answer This option is for creating a text box (you specify how big it will appear in rows and columns) which people can write a long answer into.
○ Multiple choice -
■ Multiple choice - single answer allowed (dropdown menu) This will give you a dropdown list from which only one answer can be selected
■ Multiple choice - single answer This will give you a series of radio buttons, which starts on ‘Not selected’ and then has your options afterwards Only one can be chosen and ‘Not selected’ is a valid answer if the question is not set to ‘required’.
■ Multiple answers This will give you a series of options with a checkbox next to each one. The respondent can check as many as they want and there is currently no way to specify a limit to how many they can choose which is lower than the total
○ Multiple Choice (Rated)
■ Single Answer - This will give you a series of radio buttons, which starts on ‘Not selected’ and then has your options afterwards. Only one can be chosen and ‘Not selected’ is a valid answer if the question is not set to ‘required’
■ Single Answer Allowed (Dropdown Menu) This will give you a dropdown list from which only one answer can be selected
○ Numeric answer Here, you ask a question which must have a number as an answer and specify the acceptable range e g “How many arms would you like, if more than 2 were possible? (please specify 0-10)” with a range of 0-10 set in the options. It helps if you specify the acceptable range in the question text.
○ Short Text Answer This option lets you specify a single line answer, with an input box which is a set number of characters long (you choose). You also specify the maximum number of characters you will accept, so that the answer is not too long and/or does not run over the length of the box on screen
Dependence item and Dependence value
It is possible to direct the user to specific questions depending on a previous answer For example, if they say ‘Yes’ to the question “Do you know about Moodle?” they will be directed to a different question from if they answer ‘No’ To set dependent questions:
212
● Set up your initial question and give it a name in the Label field:
● Add a Page break
● Add the question to go to if (for example)the user replies ‘Yes’.
● In ‘Dependence item’, select the Label of your first question.
● In ‘Dependence value’ type your dependent answer (such as ‘Yes’ in our example )
● Follow the same process for the other response (such as ‘No’)
Managing Feedback:
When you first visit the feedback activity page just after creating it, then you will find several tabs in the top bar like: Overview, Edit Questions, Templates, Analysis and show responses Let’s have a look at them one by one:
● Overview - When a feedback survey has been completed the teacher will see, via the Overview tab, the number of students who have responded so far including the numbers of questions, submitted answers, description and completion message of the activity
● Edit questions - The Edit Questions tab allows you to add/edit the questions in the feedback activity.
● Template - The Template tab allows you to save this particular survey’s questions as a template for future use, or to use a template that has already been created.
● Analysis - This screen shows a graphical summary of the results of each question, along with the option to download the results to Excel
● Show responses - This screen allows the teacher to see and then delete individual responses
● Show non-respondents - Unless the responses are set to “anonymous”, there will also be a “Show non-respondents” tab where the Teacher or Feedback activity administrator can select some or all users who have not yet completed the feedback and send them a reminder message.
Feedback Templates:
Within the Feedback Module you can create and re-use sets of Feedback questions using the Template tool The Templates tab provides the following template features:
Use a template
Previously saved Templates will be listed in this area and can be selected using the dropdown menu
After selecting a Template, Moodle will display a preview of the Feedback questions contained within the Template and confirm Are you sure you want to use this template?
You will also be required to select one of two options:
213
● Delete old items: Remove any questions/text types previously added to the Feedback Activity you are viewing before importing items from the selected Template
● Append new items: Add items stored within the selected template to the current Feedback activity, to any existing questions/text types.
Once you have made your selection click “Save changes” to copy across the Feedback items or press Cancel to exit from the template copy process
Save these questions as a new template
After creating a new Feedback activity and populating it with questions, you can save it as a Template for re-use by yourself or others
When saving a new Template enter a descriptive title in the Name field and choose whether you wish to make this Template available for use by others via the Public tickbox A Public template may be viewed and re-used by users with appropriate access rights such as administrators and teacher/trainers When a Public template is used as a basis for a new Feedback, the activity settings and questions within it may be edited by the teacher/trainer; however the original Template remains unchanged.
Delete Template
To remove a Template you have created or have appropriate permissions to edit, from your Moodle site, use the Delete template… link and click the delete icon next to the corresponding template name
Export Questions
The Export Questions tool allows you to save the questions/text types within your Feedback Activity in .xml format. Clicking the Export questions link will prompt you to Save or Open this file
Import Questions
When you have previously exported and saved questions from a Feedback activity in xml format, you can re import them into a new Feedback activity.
The Import questions tool is particularly useful where you need to import questions from a different instance of Moodle and the Template tool is not applicable
After clicking on the Import questions link you will be prompted to select one of the following options:
● Delete old items - The current questions and all your user’s responses will be deleted within the current Feedback activity
214
● Append new items - All old questions and the assigned values will be preserved within the current Feedback activity and the imported questions will be added to the existing questions
Use the Choose a file button to navigate to the course Files area and upload and/or select the relevant xml file Once selected, use the Import from this file button to import the questions or use Cancel to return to the Templates general tab.
Feedback Capabilities:
● Complete a feedback: This allows a user to complete a feedback form This capability is allowed for the default role of student only
● Create private template: This allows a user to create templates for their own use in the feedback module. This capability is allowed for the default roles of manager and teacher
● Create public template: This allows a user to create templates for others to use in the feedback module. This capability is allowed for the default roles of manager and teacher.
● Delete completed submissions: This allows a user to delete feedback module submissions This capability is allowed for the default roles of manager and teacher
● Delete template: This allows a user to delete feedback module templates. This capability is allowed for the default roles of manager and teacher
● Edit items: This allows a user to edit feedback module items. This capability is allowed for the default roles of manager and teacher
● Map courses to global feedbacks: This allows a user to map courses to global feedback for the feedback module. This capability is allowed for the default role of manager only.
● Receive email notification: This allows a user to receive email notification of feedback module submissions. This capability is allowed for the default roles of teacher and nonediting teacher
● View a feedback: This allows a user to view a feedback activity This capability is allowed for the default roles of manager, teacher, non-editing teacher, student and guest.
● View the analysis page after submit: This allows a user to view the feedback module analysis page after submitting the form. This capability is allowed for the default roles of manager, teacher and student
● View reports: This allows a user to view feedback module reports This capability is allowed for the default roles of manager, teacher and non-editing teacher.
● Add a new feedback: This allows a user to add a new feedback activity to the course This capability is allowed for the default roles of manager and teacher.
Survey Activity
The Survey activity in Moodle uses pre-made questions. The Survey module is a course activity that provides a number of verified survey instruments, including COLLES (Constructivist On-Line
215
Learning Environment Survey) and ATTLS (Attitudes to Thinking and Learning Survey), which have been found useful in assessing and stimulating learning in online environments
Teachers can use these to gather data from their students that will help them learn about their class and reflect on their own teaching. The current survey focuses on getting feedback from students about the nature of the course
There are three broad types of Survey activity in Moodle which you can give:
● Attitudes to Thinking and Learning Survey (ATTLS) - ATTLS seeks to measure the extent to which a person is a ‘connected knower’ (tends to find learning more enjoyable, and is often more cooperative, congenial and more willing to build on the ideas of others) or a ‘separate knower’ (tends to take a more critical and argumentative stance to learning)
People with higher CK scores tend to find learning more enjoyable, and are often more cooperative, congenial and more willing to build on the ideas of others, while those with higher SK scores tend to take a more critical and argumentative stance to learning
● Critical incidents survey - The Critical Incidents survey asks students to consider recent events and answer questions about their relationship to those events.
● Constructivist On-line Learning Environment Survey (COLLES) - For monitoring the extent to which the interactive capacity of the World Wide Web may be exploited for engaging students in dynamic learning practices. The COLLES comprises an economical 24 statements grouped into six scales, each of which helps us address a key question about the quality of the on-line learning environment:
○ Relevance: How relevant is on-line learning to students’ professional practices?
○ Reflection: Does on-line learning stimulates students’ critical reflective thinking?
○ Interactivity: To what extent do students engage on-line in rich educative dialogue?
○ Tutor Support: How well do tutors enable students to participate in on-line learning?
○ Peer Support: Is sensitive and encouraging support provided on-line by fellow students?
○ Interpretation: Do students and tutors make good sense of each other’s on-line communications?
The COLLES has been designed to enable you to monitor the extent to which you are able to exploit the interactive capacity of the World Wide Web for engaging students in dynamic learning practices. It includes the ideal and actual experience feedback from the students.
Creating Surveys:
The limited nature of the survey tool makes surveys very easy to create. Basically, you select the set of prewritten questions you’d like to give, edit the introductory text, and you’re done.
216
To create a survey:
● With the editing mode on - Select Survey from the “Add an activity” drop-down menu in the course section where you would like to add the survey
● In the General Section:
○ Name - Enter a descriptive name for the Survey activity

○ Survey Type - Choose the type of survey which you would like to use The options are:
■ ATTLS (20 item version)
■ Critical incidents
■ COLLES (Actual)
■ COLLES (Preferred and Actual)
217
■ COLLES (Preferred)
○ Add a description of your survey in the description field To display it on the course page just check the “Display description on the course page” check box
● Select the common module options as we discussed in earlier chapters of the book.
● Click Save and Display
Administering Surveys
Once you’ve created the survey, students can begin to give their feedback They simply click on the survey name in the course section and answer the questions. Once students have begun to answer the survey questions, you can track results via the “View xx survey responses” link at the top right of the survey page where xx stands for the number of the responses submitted.
The survey report page contains links at the top right for viewing the data by Scales, by participants, or by questions. You can also download the data in a choice of three formats: Open Document Spreadsheet, Excel, or text
● The COLLES and ATTLS questions are five-point scales that range in responses from Almost Always to Almost Never These results are reported in graphical form when you view them.
● The Critical Incidents survey is a free-response survey where students must type their answers. You can see what students have typed for each answer.
Survey Capabilities
The survey module has three capabilities:
● Download responses - This allows a user to download survey responses
● Respond to survey - This allows a user to participate in a survey
● View responses - This allows a user to read survey responses via the “View xx survey responses” link at the top right of the survey page
Summary
This chapter deals with the different tools for gathering feedback data from students Moodle surveys are formal and based in theory Choices are quick and simple for both you and your students They can both provide useful data about your course and your students’ success Feedbacks can be used to create surveys which can be utilized to gather data about some sensitive issues
218
Chapter 13 - External Tool & SCORM
Moodle provides a number of ways to share the tools and open educational resources created in other systems. A teacher can utilize the videos, quizzes and other activities which are created in standard packages like SCORM, LTI compliant systems to be utilized in his Moodle course
SCORM Packages
A SCORM package is a collection of files which are packaged according to an agreed standard for learning objects. The SCORM activity module enables SCORM or AICC packages to be uploaded as a zip file and added to a course
Content is usually displayed over several pages, with navigation between the pages. There are various options for displaying content in a pop-up window, with a table of contents, with navigation buttons etc. SCORM activities generally include questions, with grades being recorded in the gradebook
SCORM packages may also be added by selecting the Single activity course format when setting up a course, and then uploading or dragging/dropping the package
SCORM activities may be used:
● For presenting multimedia content and animations
● As an assessment tool
***Moodle does not generate SCORM content. Moodle presents the content in SCORM packages to learners, and saves data from learner interactions with the SCORM package.
Adding SCORM Activity
You can add the SCORM package to Moodle course simply by dragging and dropping the zipped file onto the course page. To add a SCORM activity to your course:
● With the editing mode turned on, select SCORM from Add an activity or resource link
● In the General Section -
○ Enter a name and a description
● In the Package Section:
○ Either drag and drop a SCORM package zip file into the box with an arrow or click the Add button to open the File picker menu in order to choose a file from your computer or a repository
○ Auto Update Frequency: If you access your SCORM package from a repository (such as File system repository or Private files) you can choose to create an
219
alias/shortcut to it and then set an update frequency to set how often Moodle should check to see if there is an updated zip.
● In the Appearance Section:
○ Display Package: Choose from current or new window. Note that if you choose a new window, students need to ensure pop ups are enabled
○ Display activity name: Whether or not to display the activity name above the SCORM player

220
○ Display course structure on entry page: If this is enabled then the table of contents of the package will be displayed when the students clicks to access the package
○ Display attempt status: This preference allows a summary of the users attempts to show in the course overview block in My home and/or the SCORM entry page.
○ Width*: Stage size width as a css value, either % or pixels Default is 100%
○ Height*: Stage size height as a css value, either % or pixels. Default is 500 pixels.
○ Options (Prevented by some browsers)*: There is a series of check boxes for: Allow the window to be resized and scrolled, displaying directory links, location bar, menu bar, toolbar and/or status.
○ Student skip content structure page*: This setting specifies whether the content structure page should ever be skipped (not displayed). If the package contains only one learning object, the content structure page can always be skipped
○ Disable preview mode*: Preview mode allows a student to browse an activity before attempting it If preview mode is disabled, the preview button is hidden
○ Display course structure on entry page*: If enabled, the table of contents is displayed on the SCORM outline page.
○ Display course structure in player*: How the table of contents is displayed in the SCORM player.
○ Show Navigation*: This setting specifies whether to show or hide the navigation buttons and their position There are 3 options:
■ No - Navigation buttons are not shown
■ Under content - Navigation buttons are shown below the SCORM package content
■ Floating - Navigation buttons are shown floating, with the position from the top and from the left determined by the package
○ Display attempt status*: This preference allows a summary of the users attempts to show in the course overview block in My home and/or the SCORM entry page
● In the Availability Section: Choose here the dates you wish the SCORM package to be available to students
● In the Grade Section
○ Grading method - The grading method defines how the grade for a single attempt of the activity is determined There are 4 grading methods:
■ Learning objects - The number of completed/passed learning objects
■ Highest grade - The highest score obtained in all passed learning objects
■ Average grade - The mean of all the scores
■ Sum grade - The sum of all the scores
○ Maximum grade: Not applicable if the Grading Method is Learning objects Usual setting is 100. If your SCORM’s high score is something other than 100, you should adjust this value appropriately When grading Method is one of the score settings, then the gradebook grade is package score divided by this number
221
● In the Attempts Management Section:
○ Number of attempts: This setting enables the number of attempts to be restricted.
○ Attempts grading: If multiple attempts are allowed, this setting specifies whether the highest, average (mean), first or last completed attempt is recorded in the gradebook.
○ Force new attempt: If enabled, each time a SCORM package is accessed will be counted as a new attempt.
○ Lock after final attempt: If enabled, a student is prevented from launching the SCORM player after using up all their allocated attempts.
● In the Compatibility Settings Section
○ Force completed: If enabled, the status of the current attempt is forced to “completed”.
○ Auto-continue: If enabled, subsequent learning objects are launched automatically; otherwise the Continue button must be used.
● Choose Common module settings appropriately as we have discussed in earlier chapters of the book
● Click Save and Display to show up the SCORM activity.
Using SCORM Activity
Like a Moodle course, each SCORM package will vary with the modules used in its construction by the teacher and by the SCORM activity settings established by the teacher. The Info tab displays the general information about the activity
A teacher can access 4 report types for the SCORM activity via the reports tab:
● Basic report: The basic report page shows a table of attempts for the SCORM activity. If you have the SCORM activity set up to allow multiple attempts, there may be more than one attempt for some users. The basic report may be downloaded in ODS, Excel or text format A detailed report of each user’s attempts may be obtained by clicking on the number in the attempts column. The track details link provides information on specific SCORM values recorded in Moodle by the SCORM object.
● Graph report: The graph report displays graphs of percentage obtained against number of participants.
● Interactions report: The interactions report shows students’ responses to questions together with the correct answers.
● Objectives Report: The objectives report shows the objectives data
222
SCORM Capabilities
● Delete own attempts: This allows a user to delete their own SCORM attempts This capability is not set for any of the default roles. This capability is intended for use by developers to run ADL tests, as it makes it easier if the student can clear their own attempts.
● Delete SCORM attempts: This allows a user to delete SCORM attempts This capability is allowed for the default roles of manager, teacher and non-editing teacher
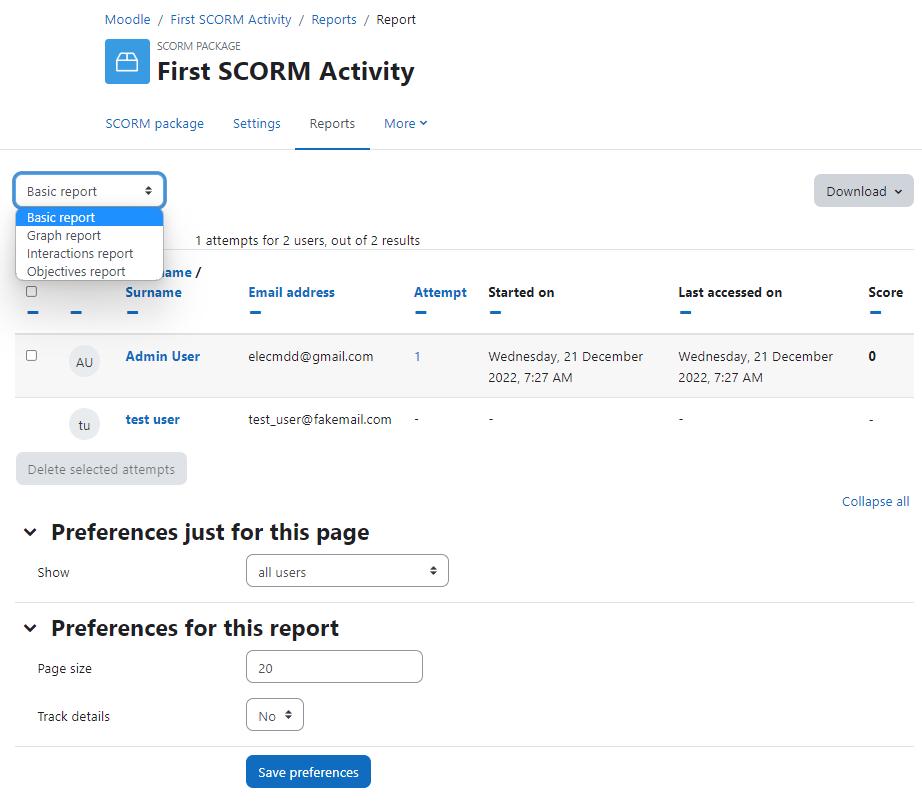
● Save tracks: This allows a user’s SCORM tracks (scores etc.) to be saved. This capability is allowed for the default roles of manager, teacher, non-editing teacher and student
● Skip overview: This allows a user to skip SCORM/AICC overviews. This capability is allowed for student’s role only
● View reports: This allows a user to view SCORM/AICC reports This capability is allowed for Administrator, teacher and non-editing teacher.
223
● View scores: This allows a user to view SCORM/AICC scores This capability is allowed for Administrator, teacher and non-editing teacher and student
External Tools (LTI)
Many websites provide materials and interactive learning exercises different from and complementary to Moodle's own resources and activities. The external tool offers a way for teachers to link to these activities from within their Moodle course page and where available to have grades sent back into Moodle. Students only need to log in to Moodle; they do not have to log in a second time to the connecting site
Sites which allow connection to Moodle in this way are known as LTI compliant and are called Tool providers. The "tools" are the exercises or materials which Moodle can connect to.
The External tool enables participants to interact with LTI-compliant learning resources and activities on other websites
For example, you can share a Moodle course from one website to another Moodle platform (from one university to another). You need to publish the provider course as LTI and then share the consumer secret and cartridge URl to the consumer to embed the course on their platform
To create an external tool activity, a tool provider which supports LTI (Learning Tools Interoperability) is required. A teacher can create an external tool activity or make use of a tool configured by the site administrator
External tool activities differ from URL resources in a few ways:
● External tools are context aware i e they have access to information about the user who launched the tool, such as institution, course and name
● External tools support reading, updating, and deleting grades associated with the activity instance
● External tool configurations create a trust relationship between your site and the tool provider, allowing secure communication between them
Adding a new external tool
Before adding an External Tool to Moodle course, you will need to have in advance the correct configuration URL, Launch URL, consumer key and secret These should have been provided to you by the managers of the LTI compliant website you are going to be connecting to.
To add a new external tool to your course:
● With the editing turned on, click the “Add an activity or resource” link and choose External tool.
224
● In the General Section:
○ Activity Name: Provide the title
○ Preconfigured tool - this is how Moodle communicates with the tool provider. If in doubt, leave as default If your administrator has made a tool available site-wide, you will be able to select it here.
○ Select content' button - allows to import the link definition from the tool rather than entering it manually This is the preferred flow when available
○ Tool URL - This is the URL for connecting to site. If your moodle site uses SSL (is on HTTPS) you will only be able to use a tool that also uses SSL
○ Launch container- this is how the external tool will be displayed
■ Default - if in doubt; leave as default
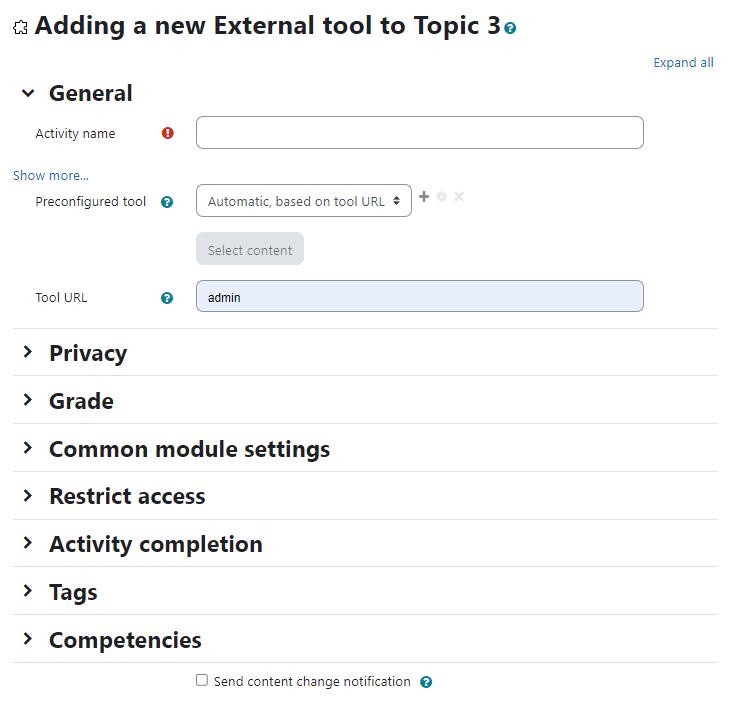
225
■ Embed - the external tool will be embedded in the Moodle course page with blocks and navigation bar
■ Embed without blocks - the external tool will be embedded in the Moodle course page but without blocks
■ New Window - the external tool will open in a new window (A new window or tab will open with the External tool and the old browser window containing the course page will not change )
○ The following settings are available by clicking ""Show more":
■ Activity description - give a short description here
■ Display description on course page - choose to show the description along with the activity name
■ Display activity name when launched - have this appear when the student clicks the link
■ Display activity description when launched - have this appear when the student clicks the link
■ Secure tool URL - This overrides the tool URL when moodle uses SSL (if your site is configured to use HTTPS in the wwwroot)
■ Consumer key -this tells the connecting LTI compliant site that your Moodle is allowed to connect. The "tool provider", i.e. the manager of the connecting LTI compliant site will issue you with this key. If you are merely linking to a tool with no secure access or gradebook sharing then you won't need a consumer key. If you are linking to a course or activity from another Moodle site, then you can add any consumer key
■ Shared secret - this is the "password" to connect to the tool - the LTI compliant site
■ Custom parameters - most times you can leave this blank The tool provider might use this to allow you to display a specific resource
■ Icon URL - you can display a different icon from the default External Tool icon by entering its URL here
■ Secure Icon URL - enter the URL of a different icon here if your students are accessing Moodle securely via SSL
■ In the Privacy Section:
■ Share launcher's name with the tool - this means that the student's name will be displayed on the connected site
■ Share launcher's email with the tool - this means that the student's email will be displayed on the connected site
■ Accept grades from the tool - if this is checked, the connecting site will send back grades to Moodle's gradebook
● In the Grade section:
226
○ Grade - Select the type of grade to be used for Forum activity The options are:
■ None - Means this activity is not graded.
■ Scale - If scale is chosen then you can choose the scale from the dropdown menu below.
■ Point - If point grade is chosen, you can then enter the maximum grade available for this activity
○ Grade Category - Choose the category in which this forum will appear if ratings are enabled
○ Grade to Pass - This setting determines the minimum grade required to pass. The value is used in activity and course completion, and in the gradebook, where pass grades are highlighted in green and fail grades in red
● Choose the common module settings as we have covered up earlier in this book.
● Click Save and Display to view the External Tool
External Tool Capabilities:
● Add external tool: This allows a user to add an External tool activity to the course. This capability is allowed for the default roles of manager, teacher and non-editing teacher
● Submit a tool to admins for configuration: This allows a user to submit an External tool to admins for configuration This capability is allowed for the default roles of manager, teacher and non-editing teacher.
● Grade external tool activities: This allows a user to grade External tool activities This capability is allowed for the default roles of manager, teacher and non-editing teacher
● Edit external tool activities: This allows a user to edit External tool activities. This capability is allowed for the default roles of manager, teacher and non-editing teacher
● View external tool activities: This allows a user to view External tool activities. This capability is allowed for the default roles of manager, teacher, non-editing teacher, student and guest
● Add a new external tool activity: This allows a user to add a new external tool activity to the course This capability is allowed for the default roles of manager and teacher
Summary
Using an SCORM or external tool can help the teachers to share the functionality provided by other systems within the Moodle course. Teachers can use the quizzes, videos and other resources provided by the other systems to integrate within the Moodle course and improve the student interaction to enhance the learning experience.
However with the advancement of other tools like H5P which can help you to create interactive content easily and without any bugs, it is not wise to use SCORM & External Tools unless you have a lot of content ready
227
Chapter 14 : Moodle Gradebook & Scales
Grades are the best part of online education - they can act as both a carrot and stick for motivating students, and they are the primary measure of success in a course. Moodle has got one of the best Gradebook capabilities in online learning environments. Moodle gradebook allows you to grade students with different criteria, override grades easily, use Letters and Scales and use even advanced grading methods
The Moodle grades area is a sophisticated tool for tracking student scores in your course You can use it for scored activities in the classroom, in Moodle and in extracurricular activities Grades aren’t the only way to give feedback to students With Moodle’s scales, you can create lists of nonnumeric feedback options for assessing student work
*Grades can be entered in multiple locations in Moodle It will depend on what you are grading where the best place is to enter the grades
Before we enter into setting up the Course gradebook, let’s first acquaint ourselves with the Gradebook Interface first
Grades Interface
Moodle allows a completely customizable Gradebook which can be helpful as well as takes a toll while learning how to best use it So, first we will introduce the gradebook interface and then see how to configure different options.
In the Course navigation menu, you will see a link to ‘Grades’ Clicking this link will take you to the Gradebook. By default you will see the Moodle Grader Report (we will see it in the next section). Under the Navigation menu, you will see a dropdown as shown in the image below:
The options include different gradebook pages like different reports, gradebook setup and others. The options are mainly divided into three parts:
● View
○ Grade Report - The grader report collects items that have been graded from the various parts of Moodle that are assessed, and allows you to view and change them as well as sort them out into categories and calculate totals in various ways
○ Grade History - The Grade history report allows teachers to select specific students, grade items and/or graders and view the grading history for certain dates
○ Overview Report - The overview report will show an overview of all grades of selected students in all courses
○ Single View - The new refreshing Single View report in Moodle 4 1 allows a course teacher to view either all the grades of one single student or a
228
single grade item for all students Now with a clearer interface, you can search by user, group or grade item. With Edit mode turned on, bulk actions on grades may be taken, for example overriding, excluding or inserting.
○ Grade Summary - The grade summary report shows the summary of students grades against each course activity
○ User Report - The User reports include a user’s grades, feedback and the course total in the current course..
● Setup
○ Gradebook Setup - This is where you will set up the Moodle gradebook. You can order the Graded activities and the order in which it will be displayed You can also add Grade Item, Outcome Item and Grade category from this page.
○ Course Grade settings - Course grade settings determine how the gradebook appears for all participants in the course. The default course grade settings are set by an administrator in Site administration > Grades
○ Preferences : Grader Report - Teachers can set their preferences for the grader report via 'My preferences' These settings will apply to all courses for that teacher The teacher may change them at any time

229
● More
○ Scales - You can manage the Scales available for the course Scales are a way of evaluating or rating a students' performance without direct grading.
○ Grade Letters - Grade letters are symbols used to represent a range of grades. For example you can assign an A+ for students scoring more than 90 marks, A to students scoring between 86-89 and so on.
○ Import - You can import Grades as a CSV or XML file, or by pasting from a spreadsheet.
○ Export - You can export the course grades as ODS, Plain Text File, XML file or Excel Spreadhseet.
Now, let’s take a deep dive and understand each report in depth
Grader Report
The grader report is the first area which you should be looking at when you are trying to see the course grades The grader report collects items that have been graded from the various parts of Moodle
When you add an assessed item in a Moodle course, the gradebook automatically creates space for the grades it will produce and also adds the grades themselves as they are generated, either by the system or by you

230
When you visit the Grader report you will see a page like the image below:
It will show all the course participants along with the course activities and the grades obtained by each student Along the top of the grader report are several rows: first the course, then the category, then the columns for each graded activity (for example: Assignment, Quiz, Lesson)
There are three ways that the categories can be displayed:
● Grades only - without the category totals column
● Aggregates - Category total column only
● Full view - grades and the aggregates (the totals column for the category)
Each section has a small icon immediately to the right of its name Clicking this will cycle through these display modes for that category
Hiding columns or individual grades
In the context of the gradebook, hiding refers to whether a student will be able to see that grade or grade item in their user report You can have an activity available on the course page for which you would not want the students to know their grade. Also in reverse - an offline activity that is hidden in the course page, but which you want the students to know their grade for
To hide/show columns or individual grades just click “Turn editing On” & then clicking the Gear Icon link will take you to the control page of that individual activity/ column where you can check the “Hidden” checkbox for hiding the grades.
Editing Grades
Editing anything in the gradebook refers to editing the grades only and none of the available operations bear any relationship to editing the main course page i e the appearance of your course page cannot be influenced by anything you do in the gradebook
The “Turn editing on” button functions separately from the main course one, so editing can be on in the gradebook, but simultaneously off when you switch back to course view. This is because editing grades and editing the course page are separate capabilities
Altering the grades
You can click “Turn editing on” at the top right to show an edit icon next to each grade. Clicking on the icon will bring up the editing screen for that grade which will allow you to set the grade, its written feedback and a number of other attributes.
231
Altering the grades using Single View
There is a new way to enter grades into the grader report using the Single View tab The single view interface allows you to enter grades in bulk for a specific grade item or a specific user To change a specific grade or all grades, click on the Override checkbox by the specific grade row or use the Override All link to check every row
Grade Settings
Course grade settings determine how the gradebook appears for all participants in the course. Here you can configure the settings for different reports.

232
Let’s see them one by one:
● General Settings
○ Aggregation position - This setting defines the location of category and course total columns Choose first or last
○ Min and max grades used in calculation - The Grades min max setting controls how the grade will be displayed if the maximum or minimum grades are changed after a student has been graded.
● Grade item Settings:
○ Grade display type - This setting determines how the grades are displayed in the grader and user reports. The options are (and a combination of each other):
■ Letter - letter or words are used to represent a range of grades
■ Percentage - relative to max and min grade
■ Real - Actual grades or scale values
○ Overall decimal places
● Overview Report: These options are self-explanatory, so choose them as per your preferences
○ Show rank
○ Hide totals if they contain hidden items
● User Report - These options are self-explanatory, so choose them as per your preferences.
○ Show rank
○ Show percentage
○ Show grades
○ Show feedback
○ Show weightings
○ Show average
○ Show letter grades
○ Show contribution to course total
○ Show ranges
○ Range decimal places
○ Show hidden items
○ Hide totals if they contain hidden items
Set Grade Preferences
You can set your personal preferences for the grader report via ‘Preferences - Grader Report’. These settings will apply to all courses for you as a teacher You can change them at any time The Set Preferences page contains the following settings:
233
● Show calculations: If enabled, when editing is turned on, a calculator icon is shown for each grade item and category, with tool tips over calculated items and a visual indicator that a column is calculated

234
● Show show/hide icons: If enabled, when editing is turned on, a show/hide icon is shown for each grade for controlling its visibility to the student.
● Show column averages: If enabled, the grader report will contain an additional row displaying the average (mean) for each category and grade item.
● Show locks: If enabled, when editing is turned on, a lock/unlock icon is shown for each grade for controlling whether the grade can be automatically updated by the related activity.
● Show user profile images: You can choose to display user profile pictures for easy identification of students.
● Show activity icons: If enabled, activity icons are shown next to activity names.
● Show ranges: If enabled, the grader report will contain an additional row displaying the range for each category and grade item.
● Show grade analysis icon: If the activity module supports it, the grade analysis icon links to a page with a more detailed explanation of the grade and how it was obtained.
● Grades selected for column averages: This setting determines whether cells with no grade should be included when calculating the average (mean) for each category or grade item.
● Show number of grades in averages: If enabled, the number of grades used when calculating the average (mean) is displayed in brackets after each average.
● Quick grading: If enabled, when editing is turned on, a text input box appears for each grade, allowing many grades to be edited at the same time Changes are saved and highlighted when the update button is clicked.
● Show quick feedback: If enabled, when editing is turned on, a feedback text input box with a dotted border appears for each grade, allowing the feedback for many grades to be edited at the same time Changes are saved and highlighted when the update button is clicked
● Students per page: This setting determines the number of students displayed per page in the grader report
● Show only active enrolments: This setting determines, if only active enrolled users will be visible in the gradebook report If enabled suspended users will not be shown in gradebook
● Enable AJAX: Adds a layer of AJAX functionality to the grader report, simplifying and speeding up common operations Depends on JavaScript being switched on at the user’s browser level
Grade Categories
Grades can be organized into grade categories. A grade category has its own aggregated grade which is calculated from its grade items There is no limit to the level of nesting of categories (a category may belong to another category). However, each grade item may belong to only one category Also, all grade items and categories belong to at least one, permanent category: the course category.
235
Adding a grade category
To add a grade category:
● Navigate to Gradebook Setup Page from the course navigation > grades
● Click the “Add category”
● Give the grade category a meaningful name
● Select the aggregation method for the grades: The aggregation determines how grades in a category are combined, such as:

○ Mean of grades - The sum of all grades divided by the total number of grades
○ Median of grades - The middle grade when grades are arranged in order of size
○ Lowest grade
○ Highest grade
○ Mode of grades - The grade that occurs the most frequently
○ Sum of grades - The sum of all grade values, with scale grades being ignored.
● In the “Category Total” Section:
○ Grade Type: There are 4 grade types
■ None - No grading possible
■ Value - A numerical value with a maximum and minimum
■ Scale - An item in a list
■ Text - Feedback only
○ Scale: This setting determines the scale used when using the scale grade type.
○ Maximum and Minimum Grade: Enter the maximum and minimum grades for the category You can also set passing marks for the category by clicking the “Show More” link.
○ Weight - A value used to determine the relative value of multiple grade items in a category or course.
236
● Click the “Save changes” button
Editing a grade category
To edit a grade category:
● Select "Gradebook setup" from the gradebook dropdown menu
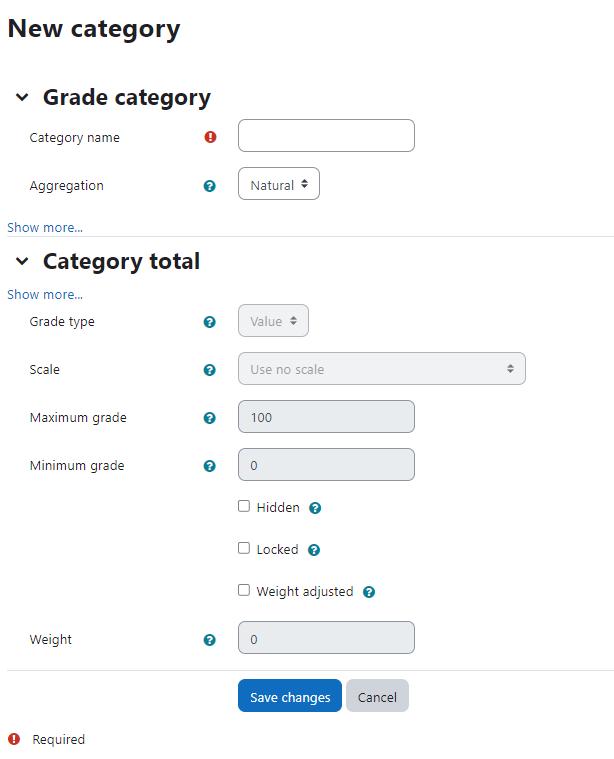
237
● Click the edit icon opposite the grade category you wish to edit
● After editing the grade category, click the "Save changes" button.
Grade calculations
A grade calculation is a formula used to determine grades, based on other grade items. Grade calculations follow the pattern of formulas/functions in popular spreadsheet programs They start with an equal (=) sign, and use common mathematical operators and functions to produce a single numerical output This output is then used as the computed value for the grade item you are editing.
Setting a grade calculation
To set a grade calculation:
● Click 'View > Grader Report'
● Click 'Turn Editing On'; a 'Controls' row should appear above the grades
● Click the 'Calculator' icon above the grade item or category you wish to edit Note: if you don't see this, then it must be enabled in Site administration>Grades>Report settings>Grader report>Show calculations
● Start with an equal sign (=)
● Type an expression using numbers, arithmetic operators, mathematical functions and ID numbers; for example =average()
● Plug in your ID numbers (see below) enclosed in double square brackets, for example =[[item1]]+[[item2]]
● Separate each function argument with a comma, as in =average([[item1]], [[item2]])+[[item3]])
● Click the "Save Changes" button
Grade Letters
Grade letters, also called letter grades, are symbols used to represent a range of grades You may choose letters (e.g., A, B, C, D, E) or words (e.g., Below Pass, Pass, Merit, Distinction).
To set your grade letter scale
Grade letters are set initially at site level To use different grade letters in a particular course:
● Select Grade Letters from the gradebook dropdown menu
● Click the edit tab in the middle of the page
● Check the override site defaults box
● Change grade letters and/or boundaries as required. (You may wish to use words, for example Below Pass, Pass, Merit, Distinction, rather than letters )
● Scroll to the bottom of the page and click the “Save changes” button.
238
Displaying letter grades
To change particular grade items, category and course summaries (called aggregations) in the grader report and user reports to display letter grades

● With the Editing mode on, click the Edit icon next to the grade category or grade item.
● Click 'Show more ' to reveal the Grade display type menu
● In the Grade display type menu, select 'Letter' (or 'Real (letter)' or 'Percentage (letter)').
● Click the "Save changes" button at the bottom of the page
239
Managing grades
Automatically hide grades and feedback until a set date
Often you would like to release the marks & feedback to students only after a certain date. To do so:
● In the Grader Report, turn editing on; further settings and controls display
● In the activity's column, in its Controls row, click the Edit icon; a settings page displays.
● To reveal the settings for dates setting, click the link to Show more; further settings display.
● For the Hidden until setting, click its Enable checkbox; it becomes editable Type in the date and time to reveal the marks and feedback
● Click Save Changes at the bottom.
Grade item (Adding new manual Grading items)
A grade item is a unit (typically an activity) where course participants are assessed through a grade or mark As such, a grade item is a container for grades and a set of settings applied to these grades The settings affect the calculation and display of the grades in the gradebook reports and exports. Grade items may refer to course activities (e.g. a quiz, an assignment etc.), Outcomes or manual grades
When you navigate to the Gradebook setup page, you will see a button to Add Grade Item in the navigation bar. Adding a new grade item is quite helpful to add manual graded items such as offline assignment, or physical demonstration or viva grades. To add a new Grade item:
● From the Gradebook setup page, click Add Grade Item
● In the Grade Item section:
○ Item name: The display name of your grade item
○ ID Number: An arbitrary string of characters used to refer to this grade item in Formulas If set, it must be unique
○ Grade type: The type of grade: None (no grading possible), Value (a numerical value), Scale (an item in a list) or Text (arbitrary text)
○ Scale: Which scale to use for grading: available only when the Scale grade type is selected
○ Maximum grade: The maximum grade that can be given (for scales: the number of items in the scale - 1)
○ Minimum grade: The minimum grade that can be given (for scales: 0)
● Parent Category section:
○ Weight Adjusted - Checking this will prevent the weight being automatically adjusted Uncheck this to reset a grade item weight to its automatically calculated value.
240
○ Weight - Value used to determine the relative values of multiple grade items in a category or course
● Click the Save Changes button.
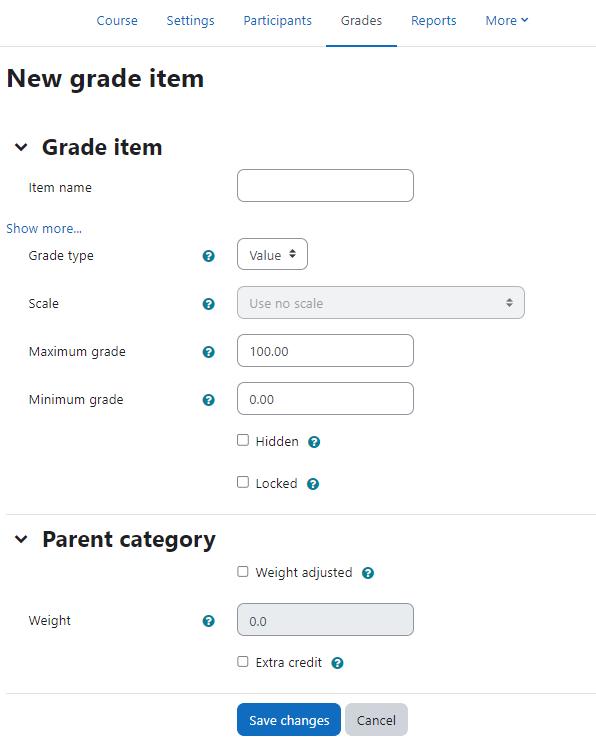
241
Grade History Report
The grade history report allows teachers to select specific students, grade items and/or graders and view the grading history for certain dates It is possible to view only revised grades and to download the data in various formats such as csv or an Excel/LibreOffice spreadsheet

Grade Import & Export
Moodle allows you to import or export the grades in different formats
Exporting Grades
To export your gradebook:
● Navigate to Grades > Export
● Select the preferences for exporting the grades like items to be included and including feedback in export etc and click Submit
● On the top bar, you can choose the file format of the exported file.
242
Import Grades
Grades may be imported as a CSV or XML file. The import file format is the same as the corresponding export format The import file format is the same as the corresponding export format.

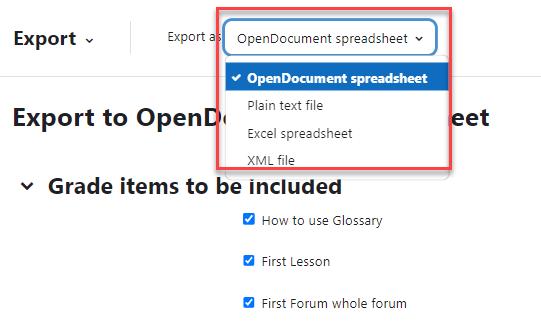
● Click Download to download the gradebook to your computer
To import grades into the gradebook:
● Navigate to Grades > Import
● Choose the file format on the top navigation bar
● Upload the file in the File area
● Set options as required.
● Click the “Upload grades” button
Please note Grade import is equivalent to manual grading in the grader report. Thus, if grades for a particular Moodle activity such as an assignment are imported, they can no longer be edited via the assignment submission page.
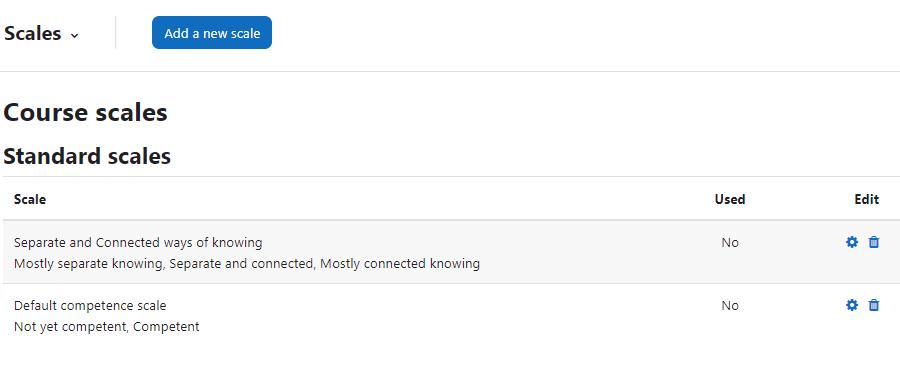
Scales
Scales allows you to grade students' performance without actually assigning a value to it. Scales give you the ability to provide qualitative, rather than quantitative, feedback, but they require careful wording. When creating scales, ensure that your word choices are meaningful to the students and provide information they can use to improve their performance in the future
Scales may be used in Forums, Glossaries and Assignments for rating and/or grading a student’s activity. You can access the available scales in the course from Grades > Scales page.
Creating a new scale
To create a scale for your course:
● Click the “Add a new scale” button in Course administration > Grades > Scales
● On the next page give your scale a name in the Name box that will identify it among other scales
244
● ‘Standard’ scale is a scale which can be applied to every course in Moodle Only those with site permissions such as administrators can make a new scale ‘standard’. A regular teacher can only create a scale for their own course
● In the Scale box, create your scale. Each item in the scale should be separated by a comma. You can use as many options here as you require. You must order the comma separated elements in increasing order of value For example, an A,B,C,D scale must be entered as D,C,B,A.
● Write a detailed description in the Description box to remind you (or other teachers) of how the scale is to be used.

● Save the changes.
Single rating scale
Only selecting one option allows you to create a "Like" scale similar to Facebook or a "Useful" scale similar to that on Moodle org So while adding a Scale in the above section, provide only one value in the Scale box to create a single rating scale.
Editing a scale
If a scale has not yet been used, you will see an edit and delete icon in the edit column Once a scale is used for an activity, it is no longer possible to delete it, and you can only edit the scale name and description
245
Using scales
You can select a scale by going to the Edit settings screen of any activity, for example an assignment, scrolling to ‘Grade’ and then selecting ‘Scale’ from the Type dropdown: Which will then open up the ‘Scale’ dropdown, allowing you to choose the scale you wish to use.
246
Chapter 15 : Moodle Course Reports
Over the years online education progressed with advanced analytics to help educators improvise their learning as well as students progress In Moodle, a number of Course reports are available to the teacher in their course to help them track the progress of their students. In this chapter we will have a look at the different course reports available
So, let’s get started.
To access the available course reports, navigate to Course > Reports
Here you will see a list of available course reports (enabled by your site administrator) as below:
Competency breakdown
The competency breakdown report allows teachers to view the competencies of each student in their course, along with their ratings Teachers can click a 'Not rated' link and rate a competency

Course completion
Course completion report shows if a course has been completed. It can show the progress a student is making towards finishing the course according to specific criteria. The criteria can include meeting an activity's grade level or a manual checking "complete" by either the student and/or teacher. The report can also show if the student has completed another course(s) that is marked as a "completion dependent" course.
247
Logs
Logs in Moodle are activity reports Logs are available at site and course level To generate a log, select any combination of group, student, date, activity, actions and level, then click the "Get these logs" button Examples of log entries include:
○ logging in or out
○ accessing a course
○ updating a course
○ viewing an activity within a course
○ viewing a forum discussion
○ creating a new forum discussion
○ replying to an existing post in a forum discussion
○ completing an activity
Live logs
Live logs are available for a course from Course > Reports > Live logs
Activity report
A course activity report shows the number of views for each activity and resource by all students
Course participation
A participation report for a particular activity can be generated by a manager, teacher or non-editing teacher Participation reports:
○ Generate a list of who has participated in a given activity, and how many times
○ Can be filtered by role, group, and action (View or Post)
○ Allow individuals or groups students (e g those who have not participated) to be easily messaged
Activity completion
Activity completion info can be viewed by managers, teachers and non-editing teachers. Teachers can mark activities completed on behalf of students by clicking into the relevant completion boxes.
Statistics
If statistics are enabled for the site, graphs and tables of user activity may be generated The statistics graphs and tables show how many hits there have been on various parts of your site during various time frames They do not show how many distinct users there have been They are processed daily at a time you specify
Event Monitoring rules
Event monitoring allows admins and teachers to receive notification when certain events happen in Moodle. To do this, a 'rule' needs to be created for the event to be monitored and then a user, such as the admin or teacher will need to subscribe to it to be notified From this page you can create a new Event monitoring rule
248
Insights
If your Moodle site administrator has enabled Analytics, you may receive special notifications called "insights" sent by learning analytics models These will vary based on the models enabled on your site Insights may be predictions about future performance or may detect current, hidden aspects or processes of learning They may apply to students, courses, cohorts, or any other entity in Moodle To access insights as a teacher, Navigation > Reports > Insights
249
Chapter 16 - Moodle Terminology
● Accessibility - An application is said to be accessible if all types of users including disabled are able to use it
● Activities - Activities in Moodle are educational things to do They include, for example: discussing a topic in a forum, writing a journal entry, submitting an assignment, or completing a quiz
● Add-on - An add-on is an optional plugin for extending Moodle Plugins may be either standard plugins (included in the Moodle download package) or add-ons Moodle = core code + plugins
● Assignments - Assignments allow the teacher to specify a task that requires students to prepare digital content (any format) and submit it by uploading it to the server Typical assignments include essays, projects, reports and so on This module includes grading facilities
● AJAX - An abbreviation for "Asynchronous JavaScript and XML" - technologies for creating interactive web applications.
● AMOS - An acronym for Automated Manipulation of Strings, Moodle's translation tool located at lang.moodle.org.
● Blocks - A Block in Moodle is an item that a teacher can add to the left or right of a Moodle course page. They provide extra information or links to aid learning. Blocks are a bit like "widgets" elsewhere online and can contain; for example, RSS news feeds, quiz results, a calendar, links to blogs, glossary terms or private files. There is also a simple HTML block which can be customised as the teacher wishes.
● Blog - A type of website usually maintained by an individual (Blogger) with regular entries of commentary, description of events or other material such as graphics or video. Entries are commonly displayed in reverse chronological order.In one line - It is a sort of online diary.
● Breadcrumb - Moodle has a navigation bar in the header (and optionally footer) that shows the location of the current page within the site structure
● Cache - A small amount of memory between a slow process and a faster process which acts as a way of improving system performance PHP caches are used to improve PHP performance
● Chat - The Chat module allows participants to have a real-time synchronous discussion via the web This is a useful way to get a different understanding of each other and the topic being discussed - the mode of using a chat room is quite different from the asynchronous forums The Chat module contains a number of features for managing and reviewing chat discussions
● Choice - A choice activity is very simple - the teacher asks a question and specifies a choice of multiple responses It can be useful as a quick poll to stimulate thinking about a topic; to allow the class to vote on a direction for the course; or to gather research consent
● Constructionism - Constructionist learning is inspired by the constructivist theory that individual learners construct mental models to understand the world around them However, constructionism holds that learning can happen most effectively when people are also active in making tangible objects in the real world In this sense, constructionism is connected with experiential learning, and builds on Jean Piaget's epistemological theory of constructivism.
250
● constructivism - This point of view maintains that people actively construct new knowledge as they interact with their environment Everything you read, see, hear, feel, and touch is tested against your prior knowledge and if it is viable within your mental world, may form new knowledge you carry with you Knowledge is strengthened if you can use it successfully in your wider environment You are not just a memory bank passively absorbing information, nor can knowledge be "transmitted" to you just by reading something or listening to someone
● Context - A Moodle context is a place where permissions are assigned to a user (usually through a role) In Moodle, contexts are layered in a hierarchy Some examples: a site is the overall context; each course category is a context in the site; each course is a context in it's course category; each topic/section is a context and the resources and activities in a topic/section are contexts. Blocks, filters and special pages are contexts that are at minimum part of the site context. Permissions are passed down automatically. For example, a user who has a teacher role in a course will be assigned that role when a Forum context is created. Roles for individuals or groups can be changed in a context. This makes it possible for one user to be a teacher in one context and a student in another.
● Database - An electronic collection of information, stored in tables of data. For example, Moodle contains a table of all users in a site.
● Database - The Database module allows the teacher and/or students to build, display and search a bank of record entries about any conceivable topic. The format and structure of these entries can be almost unlimited, including images, files, URLs, numbers and text amongst other things.
● Dataroot - The place where Moodle can save uploaded files. This directory should be readable and writable by the web server user but it should not be accessible directly via the web
● dirroot - The dirroot is the name for the directory in which you have installed Moodle It's a setting in config php that must be entered correctly
● Domain - A name given to a computer or a group of computers eg moodle org You can buy new domain names from a domain name registrar, of which there are many
● Feedback - The feedback (survey) module provides a number of verified survey instruments that have been found useful in assessing and stimulating learning in online environments Teachers can use these to gather data from their students that will help them learn about their class and reflect on their own teaching
● Forum - This activity can be the most important - it is here that most discussion takes place Forums can be structured in different ways, and can include peer rating of each posting The postings can be viewed in a variety of formats, and can include attachments By subscribing to a forum, participants will receive copies of each new posting in their email A teacher can impose subscription on everyone if they want to
● Front Page - The front page is the initial page seen by someone reaching a Moodle site It is not the home page for a course or classroom, but rather for the whole site The site settings determine which user roles can reach it. For example, the demo.moodle.org allows visitors (guests) to see its front page and asks them to log in. A user clicking on the course is taken to the "Returning to this website" Moodle login screen. Other sites may require a login before showing the front page. Many functions of a front page are similar to those found in a course. The administration block will allow topics to be added to a Front Page.
● FTP - File Transfer Protocol - a method of copying files from one computer to another. For example, you might FTP your Moodle files from your home computer to your web server.
251
● Git - Git is a revision control and source code management system used to manage Moodle's code repository
● Glossary - This activity allows participants to create and maintain a list of definitions, like a dictionary
● Grouping - A collection of groups, i e a group of groups!
● Host - Any computer on a network that offers services or connectivity to other computers on the network A host has an IP address associated with it
● HTML - HyperText Markup Language - a language used to create web pages
● IMS Content Packages - IMS content packages can be created and edited using a variety of content-authoring software Content is usually displayed over several pages, with navigation between the pages The content-authoring software produces a zip file, which can then be uploaded to your course in Moodle.
● JavaScript - A scripting language that can be used to write small programs in web pages, such as popup menus. Moodle uses a little Javascript.
● Label - Labels are text and/or images that are actually embedded directly among the other activity links in the course page.
● LAMP - LAMP, a free open source software solution stack, Linux (as OS), Appache(as a web server), MySQL (as a DBMS server), either PHP, Perl or Python (as a Scripting Language).
● LDAP - Lightweight Directory Access Protocol - is an application protocol for modifying directory services. It is commonly used for user and computer directories for domains.
● Lesson - The Lesson module in Moodle allows a series of pages to be entered. Each page can have a question at the end, and depending on the answers a student gives can lead them to any other page. A lesson delivers content in an interesting and flexible way. It consists of a number of pages Each page normally ends with a question and a number of possible answers Depending on the student's choice of answer they either progress to the next page or are taken back to a previous page Navigation through the lesson can be straight forward or complex, depending largely on the structure of the material being presented
● MAMP - Mac, Apache, MySQL and PHP configuration - for the Mac
● Meta Tag - MetaData is data about data, describing the type of data under discussion Meta tags in HTML are used to identify which version of HTML is in use, the language (both used by the browser to parse, or interpret the code) and other technical information Two special meta tags of great interest to web weavers are the content and keyword tags These provide special information that's often used by search engines to enhance retrieval of the page
● Migrate - The term used to describe moving a Moodle site from one server to another
● Moodle Docs - Moodle Docs is the Moodle Documentation wiki, where the Moodle community documents Moodle There are separate wikis for each version of Moodle
● MUA - Moodle Users Association
● MySQL - MySQL is the world's most popular open source database, recognized for its speed and reliability.
● Online text - This assignment type asks students to submit text, using the normal Moodle editing tools. Teachers can grade them online, and even add inline comments or changes.
● Offline activity - This is useful when the assignment is performed outside of Moodle. It could be something elsewhere on the web or face-to-face. Students can see a description of the assignment, but can't upload files or anything. Grading works normally, and students will get notifications of their grades.
252
● Outcomes - An Outcome is like any other grade except that it can be applied to multiple activities When the activity is marked, a mark should be given for the submission itself and for the outcome
● Permission - A permission is a part of a role which allows or denies someone to use a feature or function of Moodle There are over 450 different permissions settings in any Moodle role Each permission has 1 of 4 states that can be assigned to it: "not set", "allow", "prevent", and "prohibit Editing or creating new roles on the site level can be complicated In part because of the hierarchical nature of contexts In many contexts, roles or permissions can be overridden, and the permitted user will see a shortened list of permissions appropriate to the context
● PHPMyAdmin - PHP Application that can be used to administer your Moodle database It has an intuitive interface that is actually very basic and it is easy to set up and use.
● Quiz - This module allows the teacher to design and set quiz tests, consisting of multiple choice, true-false, and short answer questions. These questions are kept in a categorized database, and can be re-used within courses and even between courses. Quizzes can allow multiple attempts. Each attempt is automatically marked, and the teacher can choose whether to give feedback or to show correct answers. This module includes grading facilities.
● Resources - A Resource in Moodle is an item that a teacher can add to a Moodle course to support learning, such as a file, a video or link to a website. A resource differs from an activity in that it is static; ie, the student can merely look at or read it, rather than participate.
● RSS - RSS is a Web content syndication format. Its name is an acronym for Really Simple Syndication.
● SCORM - Sharable Content Object Reference Model (SCORM) is a collection of standards and specifications for web-based e-learning It defines communications between client side content and a host system called the run-time environment (commonly a function of a learning management system) SCORM also defines how content may be packaged into a transferrable ZIP file After going through SCORM standards 1 0, 1 1, 1 2, 2004 first edition, the current latest version is SCORM 2004 2nd edition
● Sections - The areas within a course that hold activities are known as sections This is a generic term that covers weeks and topics
● Server - This is where your web site or database, or both, resides You may choose to run your own server or have a hosting provider look after this for you
● Social constructionism - Social constructionism is a term that defines a particular view of education It acknowledges constructivism as a description of what each learner experiences, while focussing on the power of constructing artifacts (like text) within a social environment
● Text page - A simple page written using plain text
● Web Page - A complete single web page within Moodle, that you can format using Moodle's WYSIWYG HTML editor.
● Wiki - A Wiki enables documents to be authored collectively in a simple markup language using a web browser. The Moodle Wiki module enables participants to work together on web pages to add, expand and change the content. Old versions are never deleted and can be restored.
● WYSIWYG - WYSIWYG is an acronym for "What You See Is What You Get".
253
Moodle Support
Hopefully you won’t have any problems with your Moodle site However, just in case, you do, Moodle support is available in the following ways:
● Moodle Documentation: https://docs moodle org
● Moodle Community Forums: https://moodle.org/course/
Happy Moodling!!!
254
Starting his journey with Moodle in his part time, Jaswinder Singh is hooked up to online learning & Moodle. He was having good experience in the Railway industry with specialization in Urban Transport solutions. But after getting hands-on experience with Moodle, he has started his own business offering various elearning and edtech services
After writing the first edition of this book in 2014, Jaswinder updated this new edition with the latest Moodle version i.e. Moodle 4.1. You can read complete details about his journey from the MRTS sector to Moodle & elearning here

If you want to contact him for any suggestions, queries, inquiries; please contact him through:
● Email - mail@jassi in
● Moodle - https://moodle org/user/profile php?id=1405116
● Website - https://lmsdaily com
● Skype - jassi king20
● Facebook - 4jassiking
Ab t th th
255
One last favor
Hi, If you are reading this book till now, it means my efforts are fruitful and I have helped you in understanding Moodle. I believe that you will be able to create more meaningful & engaging online courses for your learners
If you want me to keep this book always updated to the latest LTS release of Moodle, you can support me here After making your contributions, please drop me an email so that I can update the supporter’s list.
I really appreciate your time and support during this whole journey
256
Keep Rocking!!!