4 minute read
RECIPROCATING COMPRESSOR PROBLEMS AND FAILURES – PART II
Next Article

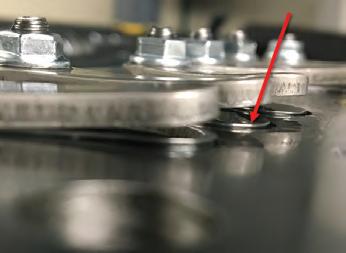
Inthe May/June issue of Mechanical Business, we finished off with some discussion of valve plates. We will continue with this topic. It is very important that all reed valves sit flat against the valve plate. Some will argue that if there is only a tiny gap between the discharge reed valves and the valve plate the discharge pressure will push the reeds closed. However, if there is any gap at all, the efficiency of the compressor will be reduced and the valve plate should be replaced.
Broken discharge reeds tend to shut down lubrication supply to the connecting rod bearings that are inline with the same cylinder as the leaking valves. The reason for this is the discharge pressure is constantly pushing the bearing clearances closed. Normally, the clearance between the bearing surfaces will open when the piston travels towards the crankshaft. However, if one or more discharge valves are broken or missing no oil will enter the clearance. This will result in accelerated wear and ultimately, compressor failure.
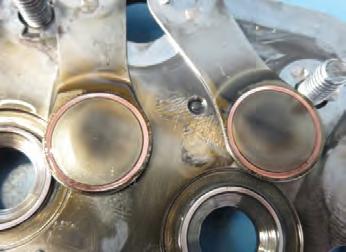
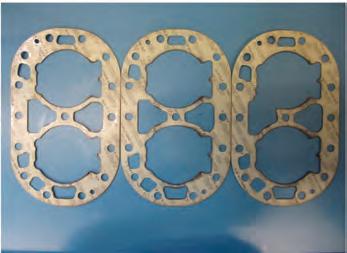
It is possible to find that the valves are all seating correctly, even though the compressor is leaking internally. Be sure to take a close look at the valve plate and cylinder head gaskets for signs of a blow-out. When the compression ratio is too high, the compressor is slugging liquid or the cylinder head is not tightened to manufacturer’s specified torque, a gasket can fail. The point of failure will always be between the high-pressure and low-pressure areas.
Cylinder condition
While the valve plates and cylinder heads are removed, ensure cross-hatching is still present on the cylinder walls. The purpose of the cross hatching is to create tiny micro-grooves to hold oil as the piston rings slide up and down within the cylinders. If the cross-hatching has worn away, then the compressor should be replaced as it will be just a matter of time before it fails.

When compressors fail, there is often metal debris present in the oil. Once the new compressor is installed and the system has run for a short period of time, it is recommended to change the oil. Additionally, follow up checks should be made. This can be done by sending an oil sample off to a testing lab and then comparing the results of the test to a virgin sample of the same oil.

Even if the cross-hatching is still present, vertical scoring may be seen. Vertical scoring can get to the point where the pressurized refrigerant above the piston leaks down into the crankcase area and this will lead to other issues such as crankcase foaming, no flow of oil from low pressure reservoir to the crankcase via the oil level regulator, low oil pressure due to a reduction in oil viscosity, and so on.
Also look for signs of overheating, particularly, the section of the cylinder that is adjacent to the discharge gallery. Discolouration of the cylinder walls due to overheating is typically due to operating at high compression ratios, operating the compressor without auxiliary cooling, or unloading the compressor too much.
Oil failure trips
Oil failure trips are a very common problem. There are several reasons why these trips occur.

Of course, a crankcase oil level that is too low will result in a trip. In most cases, the compressor can only be restarted by resetting the control. Look for any signs of oil leakage from the system. Where there is a leak, there will be oil, even on systems equipped with an oil separator. If a system leak is found, it will be necessary to repair the leak and add oil to the system. The crankcase oil level should be monitored for some time after the repair to ensure the oil level is within the compressor manufacturer’s specified limits.
Incorrect pipe sizing, and/or piping methods are often to blame for the lack of oil return to the compressor. If this occurs, check for correct pipe sizing and piping methods. Correct piping methods include the sloping of horizontal lines downward in the direction of flow, the use of p-traps at the base of vertical vapour risers, the use of inverted traps at the top of vertical risers where oil can drain into them, and the use of double risers.
When evaluating pipe sizing and piping methods, be sure to consider the effect of capacity regulation devices such as unloaders or variable speed drives. It is very important that oil returns to the compressor during both full and part load conditions.
Incorrect pipe sizing, and/or piping methods are often to blame for the lack of oil return to the compressor. If this occurs, check for correct pipe sizing and piping methods.
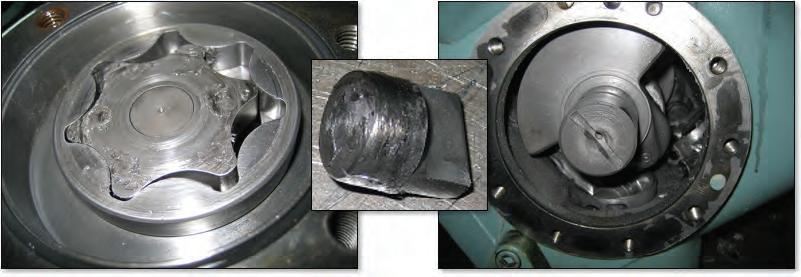
Be careful when condemning an oil pump. If the oil pump is producing any oil pressure at all, then it is turning. If the oil pump is not producing any oil pressure, then it is likely the oil pump drive key has sheared off due to the ingress of metal debris into the oil pump. In theory, this should never happen. However, if it does, remove the magnetic oil drain plug and check to see if the spring is present. The purpose of the magnetic oil drain spring is to force the lip of the strainer tight towards the compressor body. If the technician did not replace this spring during a previous service, and there is any debris present in the crankcase, then it is likely that the pump sucked in this debris and locked up. As another possibility, the strainer may be damaged (torn or separated from the sealing lip). In this case, the strainer will need to be replaced in addition to the oil pump.
When the oil pump locks up, the drive key, being an intentional weak link, will break. This prevents more serious and irreversible damage from occurring.
Aside from a low oil level, low oil viscosity may also be the reason for the oil trips. In this case, it is quite likely that the superheat of the suction gas is too low. Low suction superheats result in low oil viscosity, particularly in higher temperature systems. When this occurs, the discharge superheat will be lower than the minimum allowed value.
In Part III, we continue the discussion by talking about the purity level.
