On the Dotted Line by Kathleen M. Mitchell
.ECESSARY SUPPLIES
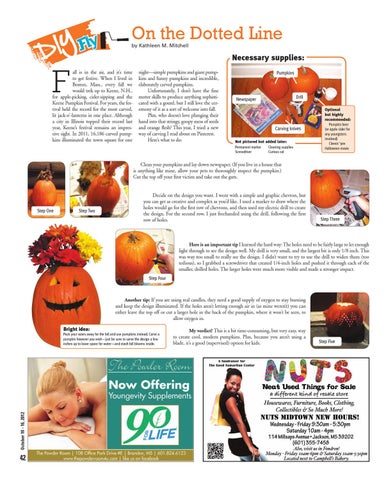
F
all is in the air, and it’s time to get festive. When I lived in Boston, Mass., every fall we would trek up to Keene, N.H., for apple-picking, cider-sipping and the Keene Pumpkin Festival. For years, the festival held the record for the most carved, lit jack-o’-lanterns in one place. Although a city in Illinois topped their record last year, Keene’s festival remains an impressive sight. In 2011, 16,186 carved pumpkins illuminated the town square for one
night—simple pumpkins and giant pumpkins and funny pumpkins and incredible, elaborately carved pumpkins. Unfortunately, I don’t have the fine motor skills to produce anything sophisticated with a gourd, but I still love the ceremony of it as a sort of welcome into fall. Plus, who doesn’t love plunging their hand into that stringy, goopy mess of seeds and orange flesh? This year, I tried a new way of carving I read about on Pinterest. Here’s what to do:
3XPSNLQV
'ULOO
1HZVSDSHU
&DUYLQJ NQLYHV .OT PICTURED BUT ADDED LATER 3HUPDQHQW PDUNHU &OHDQLQJ VXSSOLHV 6FUHZGULYHU &XULRXV FDW
/PTIONAL BUT HIGHLY RECOMMENDED 3XPSNLQ EHHU RU DSSOH FLGHU IRU DQ\ \RXQJVWHUV LQYROYHG
&ODVVLF ¶ V +DOORZHHQ PRYLH
Clean your pumpkins and lay down newspaper. (If you live in a house that is anything like mine, allow your pets to thoroughly inspect the pumpkin.) Cut the top off your first victim and take out the guts.
6WHS 2QH
6WHS 7ZR
Decide on the design you want. I went with a simple and graphic chevron, but you can get as creative and complex as you’d like. I used a marker to draw where the holes would go for the first row of chevrons, and then used my electric drill to create the design. For the second row, I just freehanded using the drill, following the first row of holes.
6WHS 7KUHH
Here is an important tip I learned the hard way: The holes need to be fairly large to let enough light through to see the design well. My drill is very small, and the largest bit is only 1/8 inch. This was way too small to really see the design. I didn’t want to try to use the drill to widen them (too tedious), so I grabbed a screwdriver that created 1/4-inch holes and pushed it through each of the smaller, drilled holes. The larger holes were much more visible and made a stronger impact. 6WHS )RXU
Another tip: If you are using real candles, they need a good supply of oxygen to stay burning and keep the design illuminated. If the holes aren’t letting enough air in (as mine weren’t) you can either leave the top off or cut a larger hole in the back of the pumpkin, where it won’t be seen, to allow oxygen in. "RIGHT IDEA
October 10 - 16, 2012
3DFN \RXU YDVHV DZD\ IRU WKH IDOO DQG XVH SXPSNLQV LQVWHDG &DUYH D SXPSNLQ KRZHYHU \RX ZLVK²MXVW EH VXUH WR FDUYH WKH GHVLJQ D IHZ LQFKHV XS WR OHDYH VSDFH IRU ZDWHU²DQG VWDVK IDOO EORRPV LQVLGH
42
My verdict? This is a bit time-consuming, but very easy, way to create cool, modern pumpkins. Plus, because you aren’t using a blade, it’s a good (supervised) option for kids.
6WHS )LYH