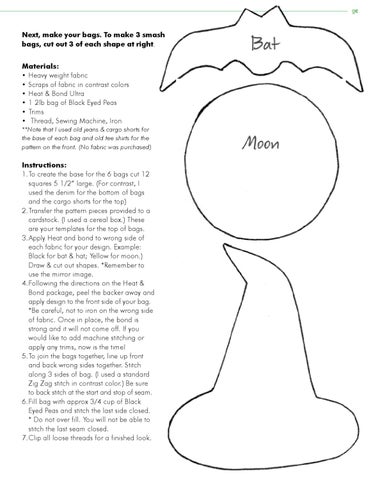
Next, make your bags. To make 3 smash bags, cut out 3 of each shape at right. Materials: • Heavy weight fabric • Scraps of fabric in contrast colors • Heat & Bond Ultra • 1 2lb bag of Black Eyed Peas • Trims • Thread, Sewing Machine, Iron **Note that I used old jeans & cargo shorts for the base of each bag and old tee shirts for the pattern on the front. (No fabric was purchased)
Instructions: 1. To create the base for the 6 bags cut 12 squares 5 1/2” large. (For contrast, I used the denim for the bottom of bags and the cargo shorts for the top) 2. Transfer the pattern pieces provided to a cardstock. (I used a cereal box.) These are your templates for the top of bags. 3. Apply Heat and bond to wrong side of each fabric for your design. Example: Black for bat & hat; Yellow for moon.) Draw & cut out shapes. *Remember to use the mirror image. 4. Following the directions on the Heat & Bond package, peel the backer away and apply design to the front side of your bag. *Be careful, not to iron on the wrong side of fabric. Once in place, the bond is strong and it will not come off. If you would like to add machine stitching or apply any trims, now is the time! 5. To join the bags together, line up front and back wrong sides together. Stitch along 3 sides of bag. (I used a standard Zig Zag stitch in contrast color.) Be sure to back stitch at the start and stop of seam. 6. Fill bag with approx 3/4 cup of Black Eyed Peas and stitch the last side closed. * Do not over fill. You will not be able to stitch the last seam closed. 7. Clip all loose threads for a finished look.
7