


Step by Step

Get Creative 6
An imprint of Mixed Media Resources, LLC
19 W 21st St, Suite 601, New York, NY 10010
Editor GLENI BARTELS
Associate Publisher
GLENI BARTELS
Creative Director
IRENE LEDWITH
Art Director
JENNIFER MARKSON
Chief Executive Officer CAROLINE KILMER
President ART JOINNIDES
Chairman JAY STEIN
Copyright © 2024 by Mark and Mary Willenbrink
All rights reserved. No part of this publication may be reproduced or used in any form or by any means—graphic, electronic, or mechanical, including photocopying, recording, or information storage-and-retrieval systems— without permission of the publisher.
The written instructions, photographs, designs, projects, and patterns are intended for the personal, noncommercial use of the retail purchaser and are under federal copyright laws; they are not to be reproduced in any form for commercial use. Permission is granted to photocopy for the personal use of the retail purchaser.
Library of Congress Cataloging-in-Publication Data has been applied for.
Manufactured in China
1 3 5 7 9 10 8 6 4 2
First Edition
Title Page: Koala Graphite pencil on drawing paper 6" x 6" (15cm x 15cm) Opposite Page: Pipes graphite on drawing paper 5" x 6" (13cm x 15cm)

It’s amazing what can be done by applying graphite to a blank sheet of paper. Capture a moment, evoke emotions, and create images that leap off the page. How to Draw Step by Step is a visual guide to achieving realistic drawings.
The drawing process for this book uses two stages. Stage one is sketching the structural sketch. The second stage is adding values to create a drawing.


Gain an understanding of how to use the supplies and learn concepts and techniques for drawing.

Read through the explanations for the tools in the next few pages before shopping for supplies. The icons shown beside the pencils and pen are further discussed on page 21.
This book uses graphite pencils, a mechanical pencil, and a ballpoint pen. Each tool has different characteristics and gives a different look to the art.


The core—or lead—of graphite pencils is made of graphite. The letters and numbers stamped on them refer to the hardness of the lead. Harder lead is labeled “H” and softer lead is labeled “B.”
The numbers on these pencils further designate the characteristics of the lead. For H pencils, the higher the number, the greater their hardness. For B pencils, the higher the number, the softer the lead.


Especially helpful for detailed drawing, mechanical pencils offer consistent, narrow line strokes. This book recommends using a mechanical pencil with 0.5 HB graphite lead, which falls between the H and the B graphite pencil leads in hardness. Mechanical pencil lead tends to break if extended too far or too much pressure is applied.
You’ll need pencils, pens, paper, and other supplies to complete the demonstrations. Here is a quick list for reference, but the materials are explained in more detail on the following pages.
• 2B graphite pencil
• 8B graphite pencil
• Mechanical pencil with 0.5mm HB graphite lead
• Ballpoint pen with black ink
• 5.5” x 8.5” (14 x 22cm) fine tooth (vellum) surface 98 lb drawing pad
• 9” x 12” (23 x 30cm) fine-tooth (vellum) surface 117lb drawing pad
• Pencil sharpener
• Kneaded eraser
• Vinyl eraser Optional Supplies
• Eraser holders
• Ruler
• French curve
• Drawing board
• Masking tape
• Pencil extender


The lines created with a ballpoint pen may range from thin and wispy to bold and dark, depending on how it is used.
Created as a visual guide, these demonstrations have minimal words with large visual steps.

Become familiar with the icons used in the demonstrations. Each icon visually directs which drawing tools are needed and shows the direction of the light source. Composition scenes icons are used if a subject appears in chapter 3.
These icons show which graphite pencils, mechanical pencil, or ballpoint pen are to be used to draw each demo.
Light source in front of the subject: The direction of the primary light source is in front of the subject, which casts shadows behind it ("Apple," page 38).
Light source behind the subject: The direction of the primary light source casts the shadows to the front ("Shoes," page 37).
An icon will appear at the top of the page if the subject of a demonstration is included in a composition scene in chapter 3. These scenes are:


With its patterned kernels and the ribbonlike sheaths of the husk, an ear of corn offers an interesting subject to draw. After completing these lessons, consider setting up your own still life drawings.


For this demonstration, you may need two donuts—one for observation and one to eat.


While following the steps of this demonstration, set up a small mirror to examine and draw your own eye.

Sketch and Proportion the Structure

Sketch a horizontal line to guide where the center of the eye is to be placed. Add proportioning lines for the top and bottom structure of the eye. 2
Form the Structural Sketch
Sketch curved lines for the upper and lower eyelids. Add circles for the iris and the pupil. Add lines for the upper fold of the lid and the arch for the brow.

Add Details
Define the form of the eye, add lines to the upper and lower lids, and sketch the form of the brow.
Sketch shadow lines.

Add Light and Middle Values
With the light source from the upper left, add the light and middle values.

Add Dark Values
Add the dark values to complete the drawing. 5
With this drawing, note that the light is shining from above, which causes the top lip to be in shadow and the bottom lip to be in the light. The teeth are also in shadow and appear darker toward the corners.
Drawing in the morning, drawing in the evening, drawing in a restaurant. Drawing the buildings, drawing the rivers, drawing your uncle and aunt. Time invested in sketching and drawing equates to improved drawing skills.


Simple rectangular shapes added to one another form the structure of the castle. The light source, which is from the back upper left, highlights the left side of the features of the castle.


Refer to the Boat (page 98), Lighthouse (page 84), and Rocks (page 48) demonstrations from chapter 2 for more detailed instructions for the elements in this scene.
Use the 2B pencil for most of the linework and values. For the details, such as the lighthouse railing and boat rigging, use the mechanical pencil.

Sketch the Shore and the Rocks
Sketch a line for the shore where the water meets the rocks. Add lines for the basic shapes of the rocks.


Proportion the Lighthouse
Sketch a horizontal baseline for the lighthouse and a vertical centerline for the tower. Add proportion lines for the tower and mud room.

3
Form the Lighthouse
Sketch the shapes of the tower, lamp room, and mud room.
Sometimes during the process of drawing, the side of the hand may smear the graphite. To avoid this, use a plain piece of paper as a slip sheet.
Add Details
Erase unwanted lines. Add the deck, the roof to the tower, and the roof to the mud room.

Look for the demonstrations of the Castle (page 86), Dragon (page 64), and Knight (page 74) for additional guidance for this scene.
Because the light source is behind the subjects from the upper left, the values of the castle, dragon, knight, and rocks are mostly dark with areas that are lighter on the upper left.

Proportion the Knight
Sketch lines at the base and top of the knight’s body. Add a vertical line, a horizontal line at the center, and an oval for the head.

Sketch the Knight's Features and Proportion the Castle
Sketch the torso, legs, and arms of the knight. Add lines for the outer proportions of the castle.

Sketch the Castle and Rocks
Begin to develop the form of the castle. Sketch the basic shapes of the rocks, and sketch a line for the rocky hillside.

Continue drawing the basic shapes of the castle and the rocks. Add the knight's tunic, shield, and sword. Throughout the process, erase unwanted lines.

Add Middle and Dark Values
Darken the top of the sky. Continue adding middle and dark values to the knight, castle, and dragon.

Add the middle and dark values to the rocks. Add more detailed dark values to the knight and castle to complete the drawing. Sign and date your drawing.
Apply the things you’ve learned by creating new compositions from demonstrations in this book. Then take it a step further. Create a greeting card, draw a portrait of a loved one or a favorite pet. Communicate with someone by drawing what you’re trying to say. The possibilities are endless. Have fun and keep up the good work!
—Mark and Mary Willenbrink

Align: to line up or arrange in a line
Atmospheric perspective: depth implied through values, colors and clarity; also referred to as “aerial perspective”
Ballpoint pen: a pen that utilizes a small metal ball at the writing tip
Baseline: a line at the bottom of a subject
Centerline: a line used to designate the center
Centerpoint: the point at the center of a square or rectangle
Composition: the arrangement of elements that make up a scene
Contour drawing: a sketch or drawing made from a single, uninterrupted line; also called “continuous line drawing”
Contrast/contrasting values: extreme differences between lights and darks or “values”
Crop: to trim the visible area of a scene or piece of artwork to better suit the drawing
Cross-hatching: two or more sets of parallel lines that cross each other to create texture in a drawing
Direct observation: to draw having the actual subject to view for observation
Direction of light: the direction of the primary light source of a subject or scene
Drawing: a completed piece of art using pencils or pen
Drawing board: a board made of Masonite or smooth wood used as a support for sketching and drawing
Drawing paper: heavier paper, 90lb or more, used for sketching or drawing
Ellipse: a circle drawn in perspective
Eraser holder: a device used to hold refillable vinyl eraser cartridges for controlled erasing
French curve: a tool used to create curves in a drawing

Gradated shading: shading that varies, light to dark or dark to light
Graphite pencil: a pencil with the core—or lead— made of graphite
Highlights: an area where the light directed onto an object is most intense
Horizon: the line where the sky appears to meet the land or water
Horizontal: something that is goes from left to right or is level with the horizon
Kneaded eraser: a soft eraser used to lift lighter graphite pencil lines from paper by pressing down on its surface
Lead: also referred to as the core of a pencil, most commonly made with graphite
Linear perspective: depth implied through line, size, and placement of elements in a drawing or composition
Masking tape: tape used to attach sketching and drawing paper to a drawing board
Measure: to use a set distance as a gauge for comparison when sketching
Mechanical pencil: a pencil that uses refillable graphite for its lead
Negative form: the light form of a subject against a dark background
One-point perspective: linear perspective with only one vanishing point
Paper content: the materials that make up the paper
Paper surface texture: the degree of smoothness or coarseness of the paper surface; also referred to as the tooth
Paper weight: the measurement of the thickness or weight of individual sheets of paper
Parallel lines: lines that go in the same direction to a vanishing point
Pencil extender: a sleeve used to increase the length of pencils
Pencil sharpener: a handheld or stationary tool used for sharpening pencils
Perspective: the visual representation of depth
Positive form: the dark form of a subject against a light background
Proportion: to compare measurements when sketching
Reference materials: photos and drawings used to observe a subject or scene
Ruler: a long, straight tool used for measuring and for making straight lines
Shade: to darken or add values with line strokes
Sketch: a rough, unfinished drawing
Sketch paper: lightweight paper, 50 to 70lb, used for sketching
Slip sheet: a sheet of paper used to rest the hand over a drawing to prevent smearing of the graphite
Structural sketch: a sketch of the structure of a subject without adding values
Symmetrical: evenly balanced on both sides
Two-point perspective: linear perspective with two vanishing points
Value scale: a strip of cardboard or paper that displays a range of values from white to black
Values: the lights and darks of an image
Vanishing point: the point where parallel lines in linear perspective appear to meet
Vertical: straight up and down
Vinyl eraser: a plastic eraser used to remove darker pencil lines from the paper surface
Aairplane, 92–93 aligning, 13, 112–115 angle aligning, 13 apple, 12–13, 38, 112–115 arch, 80, 81 atmospheric perspective, 18
B
ballpoint pen, 7, 42 barn, 82–83, 130–137 baseball glove, 23 blind contour drawing, 114
boat, 98, 100–105 bread, 39
cactus, 44, 116–121 candle, 33
candle with flame, 33 castle, 86–87, 122–129 castle scene, 122–129 centerline, 42, 66, 80, 81, 82, 84, 90 chest, 29
clothing 74–75, 122–129 composition scene icons, 21 continuous line drawing, 114 contour drawing, 114
contrast, 16, 24, 32, 43, 50
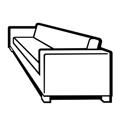
corn, 40 couch, 17, 28–29, 106–111
cove scene, 100–105 crop 66–67
curved lines, 90, 92
depth, 14–15, 18, 27, 43, 62–63, 71, 89
desert scene, 116–121
direction of light, 16, 21, 33, 37, 38, 86
direction of light icons, 21
direct observation, 33, 38, 40, 41, 69, 70, 78, 111, 112–115
dog’s nose, 14, 62–63 donut, 41
dragon, 64–65, 122–129 drawing boards, 8 drawing pad, 8 drawing, defined, 10–11 drawing tools, 7, 21 drawing tools icons, 21 drum, 22 duck, 50
E
ear, 71, 72–73, 76–77
Eiffel Tower, 81 elephant, 52–53
ellipse, 22, 31, 35 eraser holder, 9
erasers, 9, 53, 54 extreme contrast, 16 eye, 68–69, 72–73
face, 72–73, 76–77
ears, 71, 72–73, 76–77 eyes, 68–69, 73 hair, 72–73, 76–77
mouth, 69, 72–73, 76–77
perspective in, 14 farm scene, 130–137
flames, 23, 24, 101–111 flower, 46 focal point, 104 forms, 17
French curve, 9, 81
gift box, 25 grapes, 11–12, 43, 112–115
graphite pencils, 7, 21 gray scales, 17 guidelines, 85

H hair, 72–73 hand, 70, 78–79 highlights, 38
Hollywood sign, 85, 139 horizon, 14, 15, 82–83 horizontal aligning, 13 horizontal lines, 15, 45 horse, 56–57, 130–137 hot air balloon, 90–91, 116–121
Iice-cream cone, 42 icons, about, 16, 21 iguana, 51 ink blobs, 42 interior scene, 106–111
J jellyfish, 55
K key, 32
kneaded eraser, 9, 53 knight, 74–75, 122–129 koala, 58–59
L lettering, 85
lifting graphite, 53, 54 lighthouse, 84–85, 100–105
light source, 16, 21, 33, 37, 38, 86
linear perspective, 14–15, 18
line strokes, 19, 51 low contrast, 16
M
masking tape, 8 measuring, 12, 112–115 mechanical pencils, 7, 21 mine shaft, 89
moderate contrast, 16 mountains, 45, 116–121 mouth, 69, 72–73 mug, 12–13, 35, 112–115
N negative forms, 17 O
octopus, 60–61 one-point perspective, 14–15, 28–29, 106–111 owl, 61
P paper, 8
pencil grip 19, 52–53 pencil extenders, 9 pencils, 7, 21, 88
pencil sharpener, 9 pen, 7, 21, 88 perspective, 14–15, 18, 82–83 pipes, 27 pirate, 76–77 planter, 36 positive forms, 17 progress tracking, 22
proportioning, 13, 35, 45, 52, 63, 76, 112–115 pumpkin, 34
quartz, 47 R raven, 54 reference materials, 117 rocks, 48, 100–105 ruler, 9, 98
sea turtle, 66–67 shading, 19, 51, 52–53, 55 shadows, 37, 38 shapes, 12, 43, 86 shoes, 37 sketch, defined, 10 sketch pad, 8 slip sheet, 101 step-by-step progression, 135 still life composition, 112–115
straight edge, 30 structural sketch, 10, 12–15, 60, 62 supplies, 7–9, 21 symmetry, 42, 66, 80, 81, 84–85
texture, 19, 36, 49, 58–59, 61, 94
tree trunk, 49, 130–137
truck, 94, 130–137
two-point perspective, 15, 29, 82–83
ukulele, 30 unseen objects, 103
V values, 10, 11, 16–19
value scale, 17, 27 van, 96–97
vanishing points, 14, 15, 28, 96–97, 111
vertical aligning, 13 vertical lines, 15, 42, 66, 80, 84, 90 vinyl eraser, 9 viper, 67
watch, 26
X x-ray, 78–79
Y yo-yo, 31
Z zeppelin, 95
We dedicate this book to all our family and friends who have encouraged us to love life with childlike wonder.
Thank you to our family and friends and to the many art students who encouraged us throughout this process. Thank you, Pam Wissman. This journey began with you as our acquisition editor. With a grateful heart, we thank our esteemed and talented Editor, Gleni Bartels, our creative and talented Art Director, Jennifer Markson, and our Creative Director, Irene Ledwith. Each of you are amazing—you captured our vision and helped us to create an art instruction book that offers a visual guide to drawing. A special thank-you to Carrie Kilmer, our CEO, for your continued support of our vision for this book. We also want to include our thanks to editors Pam Kingsley and Lauren O'Neal.

“Capture a moment, evoke emotions, and create images that leap off the page.”
—Mark and Mary Willenbrink
How to Draw Step by Step: A Visual Guide to Realistic Drawing holds the secrets that successful artists use every day. Best-selling authors Mark and Mary Willenbrink visually teach how to draw by using hundreds of large illustrations. With demonstrations that include nature, animals, people, buildings, and transportation, you’ll discover how much fun drawing can be.
• With this simple two-stage process, you’ll sketch the structure, and then add values to complete each demonstration
• Learn how to hold the pencil or pen and get creative when using line strokes to add shading and textures to your drawings
• Icons show the direction of the light source to help you know where to place highlights and shadows
• Create the illusion of depth on a flat sheet of paper with perspective and values
• Practice the use of measuring, proportioning, and aligning for more realistic drawings
• To boost your confidence, each composition scene in chapter 3 combines several demonstrations previously learned in chapter 2
Soon, you’ll be able to draw what you like, and like what you draw!


