
10 minute read
WISCONSIN ROUND BARN

WISCONSIN
ROUND BARN By Diane Trierweiler

I have lived in California a good part of my life, but I was born in Racine, Wisconsin. This is where I first saw the round barns. How fascinating that someone came up with the idea of not having support beams in the middle of a barn. You can look up more information on this design on Google. I have been painting for about 45 years and have loved every minute of it. I have a shop in Norco, California, that has been open for 35 years. I have my own line of brushes and have published)15 books, hundreds of packets, and several videos. With the encouragement of my husband and son, I have used my love of art to help support the family. I also travel teach to chapters and conventions.
SUPPLIES
I usually paint on canvas. I like all kinds of canvases such as convexo, tack on back, or two-inch-thick gallery canvases. They can be purchased at Hobby Lobby. The canvas I used for this project is a 16x20 regular canvas. If you are not going to frame it, you can use a tack on the side canvas.
PAINTS: DecoArt® Americana® paints
• Burnt Sienna DA063 • Olive DA056 • Lamp Black DA067 • Country Blue DA041 • Black Green DA151 • Slate Grey DA068 • Burnt Umber DA064 • Graphite DA161 • Soft Black DA155 • Uniform Blue DA086 • Antique Maroon DA160 • Avocado DA052 • Evergreen DA082 • Sea Aqua DA046
DecoArt® Traditions™
• Hansa Yellow DAT52 • Opaque White DAT58 • Cerulean Blue DAT28 • Vermillion DAT09 • Yellow Deep DAT10 • Indian Yellow DAT11 • Yellow Green Light DAT21 • Naphthol Red DAT02 • Pine Green DAT19
MISCELLANEOUS SUPPLIES:
• DecoArt® Media™ White DMM21 • DecoArt® Duraclear Gloss Varnish™ DS19-3 • Table easel • Wide palette knife • Graphite • Paper towels • Water bin • Wet palette (optional but wonderful to have)

BRUSHES:
• #12 Flat • #4 Flat • 5/8” Angle shader • ½” Angle Shader • ½” Rake • ¾” Flat
Diane Trierweiler’s Signature Brushes
• #8 Long handle tongue (hog bristle) • 3/8” Long handle Landscape (hog bristle foliage) • ¾” Long handle Landscape (hog bristle foliage) • ½” Tongue (red sable short handle tongue) • 10/0 Striper (liner)
PREPARATION
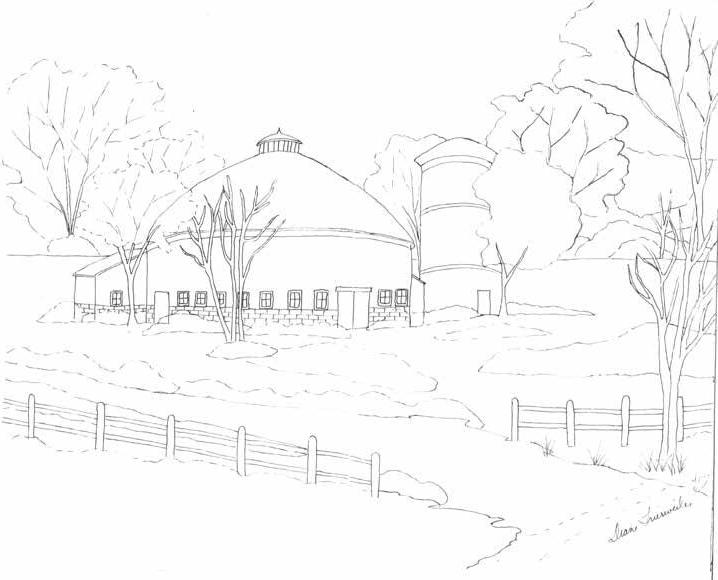
I love textural backgrounds. Using them gives your paintings more interest. You will see how it makes acrylic paintings look more like oils because you can see brush strokes under the paints. Use your large palette knife to spread the modeling paste over the entire canvas. Go back and forth with your palette knife like you were frosting a cake. If you want more texture, you can use your hog bristle brush to “swish” through the wet paste. Let dry and place your basic pattern on. There is no need to put the bushes, trees, small detail or clouds on at this time.
PAINTING INSTRUCTIONS
Please use a table easel to paint this design. The upright position and the long-handled brushes will give you a softer, more impressionistic, look. You may lay the canvas down when you are painting the details. You can see by the close-up photos that I have provided that I do not use a ruler to make straight lines or worry about going back to correct shapes to make them perfect. This is more of an impressionistic painting and you need to be loose in your painting.
SKY:
Use your long tongue to scumble (slip slap) Cerulean Blue and White, in a wet on wet method. Work on a smaller area at a time so that the paint remains wet, so that you can blend the colors together. You want to see both colors and a mix of both of them. All skies are deeper in value at the top and lighter value at the horizon blend a little Uniform Blue into the top of the sky. You can place the cloud in while the sky is still wet. Use the same dirty brush to paint in the clouds. Add White to the brush and blend it out on the palette. Use the flat edge of the brush with a light touch and swirl the color on where you want a cloud. Make sure that they are all different in size and location. Add White to the brush and highlight the tops of the clouds. Let the clouds dry a little and add a little Country Blue at the bottom of each cloud. Let dry. Tint (watered down color 80% water to 20% paint) here and there, using a little Indian Yellow and Naphthol Red.
BACKGROUND TREES:
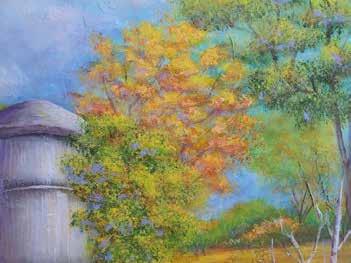
Use your 1/2 tongue brush to wash a little Sea Aqua behind where the trees will be. The green bushes on the horizon are stippled on with Pine Green, Yellow Green Light and highlighted with Olive. This is done with your landscape brush. Shade over the bushes using Evergreen along the horizon line. Dabble in some Country Blue into the shadows. The green tree: Use Evergreen, Avocado and Olive to stipple on the leaves. Stipple a little Hansa Yellow and a little White here, and there, to highlight. Tint these trees with Vermillion. Add Country Blue into the shadows. The orange tree: Use your small flat brush to paint in the trunks using Burnt Umber. The branches are painted in using your liner brush and Burnt Umber. Highlight loosely on the right sides with Indian Yellow. The foliage on the orange tree is stippled in using Yellow Deep and Vermillion. Stipple again with a brush mix of Hansa Yellow and Vermillion plus a little White. Let dry and shade the left sides of the leaf clusters with Vermillion. Tint with Naphthol Red. Let dry, and dry brush a little Country Blue e into the shadows. The yellow tree: The branches are painted with Burnt Umber. Use your landscape brush to stipple the leaves in with Yellow Deep and Indian Yellow. Highlight with Hansa Yellow and Hansa Yellow plus White. Tint a few of the leaves with Naphthol Red. The light orange tree: This tree is painted the same way as the other yellow tree, and it is tinted with a little Vermillion. The trees on the right side of the painting are painted with the same colors as the ones on the

left side. Place the pattern on for the barn, silo, and the path.
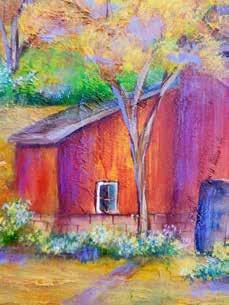
BARN:
Use your #12 flat to base in the walls of the barn with a brush mix of Hansa Yellow and Vermillion. Use your 1/2 tongue to wash Naphthol Red over this color. The center area should remain lighter in tone. You can use more than one layer of color to build up the shadows. If you need to, you can add more Hansa Yellow through the center. Let dry and use your rake brush to place in the small board lines on this area. This is done with a brush mix of Burnt Umber and Antique Maroon. Use your 5/8 angle brush to shade this area with Antique Maroon. Second, shade with Burnt Umber. Use Cerulean Blue to wash inside of the windows. Outline the windows with White and add the cross panes with White. Let dry and shade inside of the windows with Burnt Umber. Outline the windows with Soft Black.
Brick area:
Base in the brick area using a brush mix of Yellow Deep plus White. Let dry and use Burnt Umber to line in the grout lines. Shade here and there with Burnt Umber, second shade with a little Burnt Sienna.
Barn door:
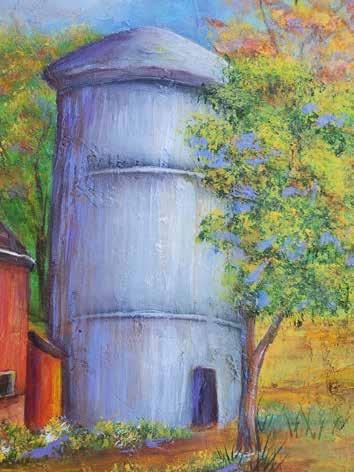
Base in the open area with Soft Black. Dry brush Country Blue into the shadows. The red area is painted in the same way as for the walls. The top frame of the door is Burnt Umber, shaded with Soft Black and highlighted with Indian Yellow. Roof: Scumble the roof with Burnt Umber and White, using your #12 flat. Shade the roof with Burnt Umber and second shade with Soft Black. Highlight horizontally with Slate Grey. Add a little White to the grey to second highlight here and there. Tint the roof with Naphthol Red. Use your liner brush to place in a White line at the bottom of the roof line. Also add a Soft Black line underneath the roof. The same colors are painted on the roofs of the outbuildings and the cupola. Dry brush Country Blue here, and there, in the dark areas. This creates a back light. Silo: Base in the silo with Slate Grey. The door opening is based in with Soft Black. Dry brush Country Blue to create shadows. Add all of the shadows in using Graphite. Second shade with Black. Use your rake brush with Burnt Umber to place in the upright lines. Highlight with White. Add Country Blue back lights into the shadows. Tint on the left side with Vermillion.
PATHWAY:
Use your large flat brush to paint in the pathway with Burnt Umber and White, wet on wet. Highlight through the center area with Slate plus a little White. Tint here, and there, using Naphthol Red. Add shadows along the sides of the pathway with Burnt Umber. Second shade with Soft Black.
Ground area:
Use your #8 long tongue, loosely place the grasses on using Yellow Deep, Hansa Yellow and Indian Yellow. Let dry and add some shadows with Burnt Sienna. The darker shadow areas are shaded with Burnt Umber. Highlight here, and there, with Hansa Yellow plus


a little White. Use your landscape brush to stipple in the bushes in front of the barn, along the pathway and patch of flowers on the bottom left. This is done with Avocado, Evergreen and Olive. Use various bright yellows to stipple in the flowers on the bushes. I also used some Uniform Blue and White for other flowers. This will tie the sky colors to the bottom of the painting. The red flowers at the bottom of the painting are stippled in with Vermillion and Naphthol Red. Use your liner brush with Evergreen to place in long grasses under trees etc. Dry brush some Country Blue here, and there, throughout the bushes to add back lights and additional color.
Birch trees:
Use your small flat brush to base in the trees with Slate Grey. Add shadows on the left sides with Burnt Umber. Highlight the right sides with White. DIY brush a little Country Blue here and there on the dark sides of the trees. Add water to Burnt Umber and wash in the shadows on the ground that the trees create. Fence: Use your small flat brush to base in the fence with Slate Grey. Add shadows with Graphite and highlights with White. Let dry and dry brush Country Blue into the shadows. Tint with a little Yellow Deep.
FINISHING:
Take another look at the painting and make sure that you have carried the palette colors throughout the painting. This can be done by adding tints of various colors on the ground and building. Example: tint with Naphthol Red on
the yellow grass. You may need to deepen the shadows on the trees. This can be done with Burnt Sienna. Make sure to brighten all of the highlights because, as you know, when colors dry, they darken. Use your large, flat brush to place one coat of Duraclear Gloss Varnish™ over the canvas. This will not make it too shiny and will seal your canvas to keep it clean and to bring out the colors.

Enlarge or reduce the size to the surface of your choice.
Note to reproduction companies/stores: The bearer of the original color magazine has full rights to have this drawing reproduced and enlarged one time for personal use. This notice has been printed in red ink for verification of authenticity.
