Decorative Painting, Mixed Media, Fine Art & More!
April 2017
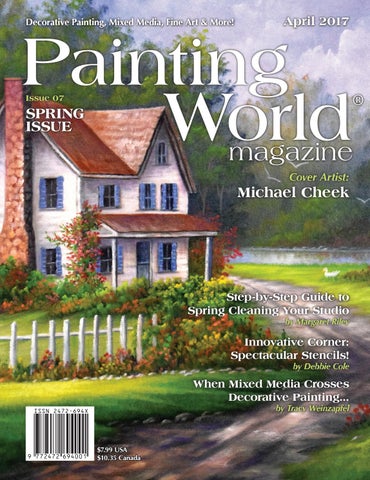
Painting World Issue 07
SPRING ISSUE
ÂŽ
magazine Cover Artist:
Michael Cheek
Step-by-Step Guide to Spring Cleaning Your Studio
by Margaret Riley
Innovative Corner: Spectacular Stencils!
by Debbie Cole
When Mixed Media Crosses Decorative Painting... by Tracy Weinzapfel
$7.99 USA $10.35 Canada
Subscribe Today! Please send me 1 year of Painting World Magazine (7 issues). I’ve included a check or money order made out to Magpie Publishing, LLC. I understand that I will receive the closest issue available depending on when my check was received. (Subscriptions received within 30 days of our next issue will begin with the following issue to allow printing time) • US Subscriptions send $29.99* (non-Ohio residents) the full years’ subscription • Ohio subscriptions send $32.16 (we have to pay state tax) • Canadian & International subscriptions must be paid with credit card or PayPal only, no checks or money orders. Please call to order or order at www.paintingworldmag.com, shipping rates vary.
for
Please include an email address if you would like to be notified that we have received your check.
Subscribe through the mail: New Subscription
Renewal
Name: Address: City: Zip Code:
State: Phone #:
Email:
Price: $29.99 USA | See website for International orders www.paintingworldmag.com DO NOT SEND CHECKS OR MONEY ORDERS FOR CANADIAN ORDERS, USE PAYPAL OR CREDIT CARD ONLY.
Mail to: Painting World Magazine, PO Box 1236 Miamisburg, Ohio 45323-1236 Your privacy is IMPORTANT to us! We never sell, share or otherwise distribute any of your personal information for any reason whatsoever. For help, please call 937-3434440 12-5 Eastern Time or email info@paintingworldmag.com any time.
*Price is for US subscriptions in lower 48 states only. Extra shipping charges apply to Hawaii, Alaska, Canada, and all other countries.
4
Painting World Magazine
From the Editor Some Notes About the February 2017 New Year Issue
We try REALLY hard to make each issue as perfect as possible, but sometimes mistakes happen and we want to correct a few from the February issue. 1. February is Issue 06, NOT Issue 07 as the typo on the cover would have you believe. This April issue is Issue 07. 2. On Page 42: Terry Holte used the Rebecca Baer® Enchanted Vine Stencil, we omitted Rebecca’s information from the Suppliers list! You can get this stencil on her website: http://shop. rebeccabaer.com or by ordering from her via phone at 301-797-1300 3. The 9” x 9” x 3-3/4” tea box used by Debbie Cole on page 45 is listed as being from Unique Woods, which is no longer in business. You can get a 9” x 7” x 3-1/2” tea box with dividers from JB Wood® Item #0986 which Debbie recommends as a perfect substitute.
Canadian Shipping Rates Reduced! Good news for Canadian subscribers! We are now having our subscriptions for you printed and shipped within Canada! Instead of paying nearly $5.00
extra per book (actual cost to ship from the USA) you’ll now only pay $10.50 shipping per year, taking your subscription prices from $61.99 to only $40.49 USD! ORDERS FOR BACK ISSUES BETWEEN SUBSCRIPTION MAILINGS WILL PAY ACTUAL COST TO GET THEM FROM THE US TO CANADA. (Sorry, we’re not warehousing back issues up there and they have to come from Ohio)
Renewal Information: If you are wondering when your subscription will expire, look at the address paper inserted with this magazine’s envelope. We are now including expirations on the address paper just below your address. Those of you who are getting close to needing to renew will get a reminder on there. All magazines will have the subscription/renewal form on the back of that paper to make it easy for you to send them in or subscribe a friend.
Have Questions? PLEASE contact us DIRECTLY! We will always fix any problems with delivery, subscriptions, orders or just answer any questions. We can’t help you if we don’t know! Our email and phone number are just to the right in the gray box --> Phone hours are 12-5pm EST and you can email us 24 hours a day!
About the Magazine Painting World Magazine publishes 7 times per year: 6 issues that arrive at your door every 2 months and one issue for the Holidays! US Subscriptions are $29.99 per year. Canadian and International subscriptions are available! Please visit our secure website online at www.paintingworldmag. com for full details and prices for international subscription shipping.
How To Contact Us Our Mailing Address: Painting World Magazine PO Box 1236 Miamisburg, OH 45343-1236 937-343-4440 (12-5pm EST) info@paintingworldmag.com Facebook: facebook.com/ PaintingWorldMag Twitter: twitter.com/Painting_World YouTube: Just search Painting World Magazine! Editor-in-Chief: Laura Rucker Proofing & Editing: Jennifer McConkey Submissions info: paintingworldmag.com/ pages/submissions
ALL RIGHTS RESERVED ON ENTIRE CONTENTS. April 2017, Issue 07 ©Magpie Publishing, LLC. Painting World Magazine is published 7 times per year by Magpie Publishing, LLC., 3318 Ultimate Way, Dayton, OH 45449, USA. All rights reserved on entire contents of magazine. We are not responsible for loss of unsolicited material. We reserve the right to edit and publish correspondence unless specific commentary and/or name and address are requested to be withheld. Reproduction of editorial or advertising contents in any way whatsoever without the written permission of the Publisher is strictly prohibited. The instructions in this magazine are published in good faith and have been checked for accuracy; however, no warranty, either expressed or implied, is made nor are successful results guaranteed. Subscription rate $29.99 for 7 issues. Distributed in the United States and worldwide. Printed & Shipped by Truax Printing®, Inc. Loudonville, OH. © 2017 Painting World Magazine Digital Edition. All rights reserved. Not for distribution, resale or reproduction. You agree to follow all international copyright laws as well as the terms and conditions outlined at paintingworldmag. April 2017 Issue com. You may NOT reprint or make copies, even for non profit uses. Any violation of these terms will result in a nonrefundable cancellation of your subscription and possible prosecution with fines up to $150,000 USD. http://www. copyright.gov/title17/ Please contact info@paintingworldmag.com if you have received this PDF illegally.
Painting World Magazine
Conventions & Events New England Traditions Regional Convention October 3-8, 2017
Best Western Royal Plaza Hotel and Trade Center
181 Boston Post Road West, Marlborough, MA 01752
Imagine • Create • Inspire! with painting friends old and new. 100+ classes, demos, special events, and the best decorative arts shopping experience in the Northeast. Thank you painters, teachers, and business partners!
Get registered: www.newenglandtraditions.org
45th Annual Society of Decorative Painters International Conference & Expo. “Oceans of Color” May 17-20, 2017 Hilton Daytona Beach Resort / Ocean Walk Village, Daytona Beach, Florida Sign up at http://decorativepainters.org
Heart of Ohio Tole’s 37th Annual Decorative Painting Convention August 14-19, 2017 Greater Columbus Convention Center Columbus, Ohio Sign up at: http://heartofohiotole.org/convention
NWDA Regional Conference & Expo September 21-25, 2017 SeaTac DoubleTree Hotel Seattle, WA Sign up at: http://nwdecorativeartists.org © 2017 Painting World Magazine Digital Edition. All rights reserved. Not for distribution, resale or reproduction. You agree to follow all international copyright laws as well as the terms and conditions outlined at paintingworldmag. com. You may NOT reprint or make copies, even for non profit uses. Any violation of these terms will result in a nonrefundable cancellation of your subscription and possible prosecution with fines up to $150,000 USD. http://www. copyright.gov/title17/ Please contact info@paintingworldmag.com if you have received this PDF illegally.
April 2017 Issue
5
Contents
08
18
Southern Charm by Featured Cover Artist: Michael Cheek
Lemon Season by Alessio Meggiato
23
Solitary Iris Watercolor by Rebecca Baer
33
A White Rose by Maureen Baker
39
You Are My Sunshine by Chris Haughey
48
Santa Barbara Coast by Diane Trierweiler
55
Prepona Butterfly by Sherry C. Nelson, MDA
64
Layered Feathers by Kelly Hoernig
68
Spring Bouquet by Sandy McTier
78
La Hydrangea by Debbie Cole, CDA
83
Baroque Peacock by Willow Wolfe
MORE GREAT ARTICLES!
30 Spring Cleaning Your Studio Mixed Media Is Crossed With 44 When Decorative Painting by Margaret Riley
by Tracy Weinzapfel
75 Innovative Corner: Spectacular Stencils! 94 Directory of Artists & Suppliers by Debbie Cole, CDA
88
Blue Pigeon by Mabel Blanco, DACA
Southern Charm by Michael Cheek
Painting World Magazine
This is a project you will want to take your time with! Don’t try to rush through it! I spent several weeks painting this project one step, one section at a time. Enjoy as you paint it! It’s well worth it in the end!!!
About Michael Michael was born in the small mountain town of Boone, North Carolina. In 1983, Michael began his journey in the art world. Over these past three decades, Michael has devoted a lot of time developing his “easy to learn” techniques. Since the early years, Michael has had the opportunity to teach countless students the joy painting can bring to an individual life! Michael now resides in Taylorsville, North Carolina where he continues to teach local workshops as well as traveling to neighboring towns and cities.
Surface: • 20” x 24” Canvas
Martin F. Weber® Prima® Oil Colors: • Ultramarine Blue 2222 • Cerulean Blue 2208 • Alizarin Crimson 2201 • Burnt Sienna 2202 • Cadmium Red Light 2204 • Cadmium Yellow Light 2206 • Titanium White 2218
Medium: • Winsor & Newton™ Liquin™
Loew-Cornell® Brushes: • #2, #6, #9, & #12 Flat Bristle, Series 1801 #4 Script Liner, Series 7050
Miscellaneous Supplies: • Tracing Paper • Black Graphite Paper • Pencil
© 2017 Painting World Magazine Digital Edition. All rights reserved. Not for distribution, resale or reproduction. You agree to follow all international copyright laws as well as the terms and conditions outlined at paintingworldmag. com. You may NOT reprint or make copies, even for non profit uses. Any violation of these terms will result in a nonrefundable cancellation of your subscription and possible prosecution with fines up to $150,000 USD. http://www. copyright.gov/title17/ Please contact info@paintingworldmag.com if you have received this PDF illegally.
April 2017 Issue
9
10
Painting World Magazine
Canvas Preparation: Use the black graphite paper to transfer the pattern onto the canvas. Let’s paint! Shall we?
Sky & Clouds: Using a #12 flat bristle, load a mix of Ultramarine Blue, Alizarin Crimson, and a touch of Titanium White. This should be a medium blue-lavender mix. Paint in the sky using criss-cross strokes, leaving some spaces for the clouds. (Figure 1) Pinch the paint out of the brush using a paper towel. Load a mix of Titanium White and a tiny touch of Cadmium Red Light (just enough to tint the white!). Load this mix on the bottom left corner of the brush. Turn the brush over so the paint is now on the top right of the brush. Working off the top right corner, push upward, releasing the brush downward in a comma stroke. Work in a circular motion to form the clouds. (Figure 2)
Distant Background Tree & Bushes: Load a mix of Ultramarine Blue, Cadmium Yellow Light, and a bit of Titanium White using a #12 flat bristle. This should be a light to medium green mix. Starting at the base of the tree and working off the flat of the brush, use short, downward strokes to paint in the tree. As you progress upward, keep the tree loose and airy on top. (Figure 3) Pinch the paint out of the brush with a paper towel. Load a bit of Cadmium Yellow Light on the bottom left corner of the brush.
April 2017 Issue
Turn the brush over so the paint is now on the top right. Working off the top right corner of the brush, push upward, releasing the brush downward in a comma stroke, also working in a circular motion to form a few clusters of foliage. Remember, this tree is in the distance, so there will not be a lot of detail. Pick up a bit more Cadmium Yellow Light in the mix, and paint in a few bushes at the base of the tree using the same technique just described. You may use a smaller flat for this step if you like. (Figure 4)
Background Trees: Using a #12 flat bristle, load a mix of Ultramarine Blue and a touch of Cadmium Yellow Light. This should be a dark green mix. Working off the flat of the brush, use short, downward strokes to paint the trees, working around the shed and house. Again, as you progress upward, keep the trees loose and airy on top. Pinch the paint out of the brush with a paper towel. Load a mix of Cerulean Blue, Cadmium Yellow Light, and a touch of Titanium White. This should be a medium to light green. Load the paint on the bottom left corner of the brush. Turn the brush over so the paint is now on the top right. Working off the top right corner of the brush, push upward, releasing the brush downward in a comma stroke, also working in a circular motion to form clusters of foliage. If you need brighter highlights, mix a bit more Cadmium Yellow Light and a touch of Titanium White in the same mix, and repeat the step.
Helpful Hints: When transferring the pattern to the canvas, only transfer basic lines. For instance, it will be difficult to paint around objects such as trees, bushes, ect. Instead of cleaning the brush in thinner each time, use a paper towel to pinch the paint out of the brush. This allows some color to remain in the bristles, causing more variety of color tones when loading the next color mixes. Refer to the photograph often for correct placement of all components of the painting. If at any time the paint feels a bit dry and it’s not moving well, add a bit of Liquin. The light source in this painting is coming from the right. With a #4 script liner, thin down Burnt Sienna and a touch of Titanium White. This should be a light brown. Paint in a few trunks and limbs, weaving them in and out of the trees. Only a few indications are necessary.
© 2017 Painting World Magazine Digital Edition. All rights reserved. Not for distribution, resale or reproduction. You agree to follow all international copyright laws as well as the terms and conditions outlined at paintingworldmag. com. You may NOT reprint or make copies, even for non profit uses. Any violation of these terms will result in a nonrefundable cancellation of your subscription and possible prosecution with fines up to $150,000 USD. http://www. copyright.gov/title17/ Please contact info@paintingworldmag.com if you have received this PDF illegally.
Painting World Magazine Figure 1
Figure 2
Figure 3
Figure 4
Figure 5
Š 2017 Painting World Magazine Digital Edition. All rights reserved. Not for distribution, resale or reproduction. You agree to follow all international copyright laws as well as the terms and conditions outlined at paintingworldmag. com. You may NOT reprint or make copies, even for non profit uses. Any violation of these terms will result in a nonrefundable cancellation of your subscription and possible prosecution with fines up to $150,000 USD. http://www. copyright.gov/title17/ Please contact info@paintingworldmag.com if you have received this PDF illegally.
April 2017 Issue
11
12
Painting World Magazine
Background Water:
Shed & 2-Story House:
Load a mix of Ultramarine Blue and Titanium White using a #9 flat bristle. This should be a light blue mix.
(#2 & #6 flats, #4 script liner) The color mixes for the shed and house are the same. Use the size brushes you feel comfortable using to paint the shed and house. Here are the color mixes: • Roofline, overhangs, windows, and door: Ultramarine Blue + Burnt Sienna (black mix) (Figure 6-7) • Shadow side (house): Titanium White + a tiny touch of Alizarin Crimson • Highlight side (shed and house): Titanium White • Window panes: Titanium White + a touch of Ultramarine Blue (light blue mix) • Shutters: Ultramarine Blue + Titanium White (medium to light blue mix) • Roofs (shed and house): Burnt Sienna + a touch of Titanium White (add more Titanium White for a brighter highlight) (Figure 8) • Chimney (shadow side): Ultramarine Blue + Burnt Sienna (black mix) (Figure 9) • Chimney (highlight side): Burnt Sienna + Titanium White (add more Titanium White for the rocks on the chimney) (Figure 10) • Posts (shadow side): Ultramarine Blue + Burnt Sienna (black mix) • Right tree’s shadow on the house: Titanium White + a touch of Ultramarine Blue + a touch of Alizarin Crimson (gray mix)
Working off the flat of the brush, use short, downward strokes to paint in the water. There is also a bit of water to the right of the house to paint in as well. Pinch the paint out of the brush. Pick up a bit of the dark tree mix on the flat of the brush. Again, use short, downward strokes, and paint this in over the blue ever so slightly to create darker reflections from the trees. Using a #2 flat bristle, load a mix of Titanium White and a touch of Ultramarine Blue. This should be a light blue mix. Working off the flat of the brush, slide the brush back and forth horizontally to form the water line. (Figure 5)
Background Bush with Red Flowers (left side of house): NOTE: It will be easier to paint the bush with flowers after you’ve painted the background grasses. With a #6 flat bristle, load a mix of Ultramarine Blue and a touch of Cadmium Yellow Light. This should be a dark green. Working off the right corner of the brush, start next to the left side of the house using short, downward strokes, tapping out loosely to the left, over the background water. Using a #2 flat bristle, load a mix of Cadmium Red Light and a tiny touch of Titanium White. Working off the right corner of the brush, tap in the red flowers very loosely. April 2017 Issue
Road: Load a mix of Ultramarine Blue and Burnt Sienna using a #9 flat bristle. This should be a dark mix (black). Working off the flat of the brush, paint in each side of the road, pulling the dark over into the middle. (Figure 11)
Pinch the paint out of the brush. Pick up Titanium White with a touch of Burnt Sienna. This should be a light brown mix. Working off the flat of the brush, paint in the middle of the road using horizontal strokes, intermixing with the previous dark mix. Work for a good blend between the two color mixes. Pick up more Titanium White, and paint in brighter highlights on the road where the light is striking. Pinch the paint out of the brush, and pick up the dark mix. Working off the flat of the brush, paint in the tire tracks just by dragging the brush through the road. (Figure 12)
All Grasses: Using a #12 flat bristle, load a mix of Ultramarine Blue and Cadmium Yellow Light. This should be a medium green mix. Working off the flat of the brush, use short, downward strokes to paint in the grasses, leaving some of the canvas showing on top. (I do this because the highlighted grasses will stay fresh when you paint them in, and not mush too much with the darker green.) (Figure 13) Pinch the paint out of the brush. Pick up a bit more Cadmium Yellow Light with a touch of Titanium White. This should be a lemon yellow mix. Working off the flat of the brush, tap in the highlighted grasses working back and forth horizontally, blending into the previous green mix. (Figure 14) Work for a soft blend.
© 2017 Painting World Magazine Digital Edition. All rights reserved. Not for distribution, resale or reproduction. You agree to follow all international copyright laws as well as the terms and conditions outlined at paintingworldmag. com. You may NOT reprint or make copies, even for non profit uses. Any violation of these terms will result in a nonrefundable cancellation of your subscription and possible prosecution with fines up to $150,000 USD. http://www. copyright.gov/title17/ Please contact info@paintingworldmag.com if you have received this PDF illegally.
Painting World Magazine Figure 6
Figure 7
Figure 8
Figure 9
Figure 11
Figure 10
Figure 12
Š 2017 Painting World Magazine Digital Edition. All rights reserved. Not for distribution, resale or reproduction. You agree to follow all international copyright laws as well as the terms and conditions outlined at paintingworldmag. com. You may NOT reprint or make copies, even for non profit uses. Any violation of these terms will result in a nonrefundable cancellation of your subscription and possible prosecution with fines up to $150,000 USD. http://www. copyright.gov/title17/ Please contact info@paintingworldmag.com if you have received this PDF illegally.
April 2017 Issue
13
14
Painting World Magazine
All Bushes & Flowers: With a #6 flat bristle, load a mix of Ultramarine Blue and a touch of Cadmium Yellow Light. This should be a dark green mix. Base in the bushes working off the bottom right corner of the brush. Work for basic shapes. (Figure 15) To paint the highlighted bushes and flowers, use the #2 flat bristle. Load the different color mixes on the bottom left corner of the brush. Turn the brush over so the paint is now on the top right of the brush. (Figure 16) Working off the top right corner, push upward, releasing the brush downward in a comma stroke, working in a circular motion. You can also tap the highlighted bushes and flowers on with the brush very loosely. (Figure 17) Here are the different color mixes: • Bushes: Cadmium Yellow Light + Titanium White • Flowers: Cadmium Red Light + Titanium White • Cadmium Red Light + Cadmium Yellow Light + Titanium White • Alizarin Crimson + Titanium White
Tree on the Right Side of the House: Using a #2 flat bristle, load a mix of Ultramarine Blue and Burnt Sienna. This should be a dark mix (black). Base in the trunk.
script liner thinned with the dark mix, paint in a few limbs. With the #6 flat bristle, load a mix of Cerulean Blue and a touch of Cadmium Yellow Light. This should be a medium mint green mix. Working off the bottom right corner of the brush, tap in the foliage over the trunk and limbs very loosely. Pick up a bit more Cadmium Yellow Light with a touch of Titanium White, and tap brighter foliage on the right side of the tree, again very loosely.
Fences: Load a mix of Titanium White, Ultramarine Blue, and a bit of Burnt Sienna using a #2 flat bristle. This should be a medium gray mix. Paint in the fences using the flat of the brush, pulling down vertically. Use the brush horizontally to paint in the fence boards going across. Pick up Titanium White, and highlight each fence post on the right side, again, pulling down vertically. For the fence boards going across, highlight on the tops horizontally. (Figure 20)
Rocks: For the larger rocks along the road and foreground grasses, use a #6 flat bristle, and load a mix of Ultramarine Blue and Burnt Sienna. This should be a dark mix (black). (Figure 18)
Pinch the paint out of the brush. Load a mix of Burnt Sienna and Titanium White on the flat of the brush.
Working off the flat of the brush, paint in hump shapes. Pinch the paint out of the brush.
Using the brush vertically, tap on the highlighted bark on the right side, using choppy, downward strokes. Using a #4
Pick up Titanium White and a bit of Burnt Sienna. This should be a light brown. Working off the flat of the brush, highlight the rocks on
April 2017 Issue
the right sides, blending in with the previous mix. For the smaller rocks, use a #2 flat bristle, and repeat the steps just described. (Figure 19)
Swan: Using a #4 script liner, pick up Titanium White, outline the swan, and then just fill the body in. Clean the brush, and pick up a bit of Cadmium Yellow Light and Cadmium Red Light. This should be orange. Paint in the bill. Remember, the swan is in the distance, so there’s no detail.
Birds: With a #4 script liner dipped in thinner, thin down Titanium White with a tiny touch of Burnt Sienna. The Burnt Sienna is to tone the white down just a bit. Paint in a few birds in flight over the background water using an elongated “M” shape. I painted three, but you can paint as many as you like!
Final Touches: Sign your painting using a #4 script liner with any color you prefer. Be sure to thin the paint to be an ink consistency. After the painting is dry, you may want or need to reinstate some of the darker and lighter values in the painting. Most of the time it is hard to achieve the brightness you need when the paint is still wet.
Varnishing Your Painting: Students always ask about varnishing their painting. Here is what I do: After the painting is completely dry to the touch, I apply one coat of Liquin to give the painting a bit of sheen.
© 2017 Painting World Magazine Digital Edition. All rights reserved. Not for distribution, resale or reproduction. You agree to follow all international copyright laws as well as the terms and conditions outlined at paintingworldmag. com. You may NOT reprint or make copies, even for non profit uses. Any violation of these terms will result in a nonrefundable cancellation of your subscription and possible prosecution with fines up to $150,000 USD. http://www. copyright.gov/title17/ Please contact info@paintingworldmag.com if you have received this PDF illegally.
Painting World Magazine Figure 13
Figure 14
Figure 15
Figure 16
Figure 17
Figure 18
Figure 20
Figure 19
Pour a small amount right on the canvas, and use a #12 flat bristle, or a larger size chip brush, to scrub and coat it, making sure the Liquin is evenly distributed. Since oil colors dry dull, this will brighten up the colors and give the piece a freshly painted look! If you want the painting to have more sheen, you may add as many coats as you like. Be sure the Liquin is completely dry before adding another coat. When applying a permanent varnish, it is said you need to wait at least six months.
Š 2017 Painting World Magazine Digital Edition. All rights reserved. Not for distribution, resale or reproduction. You agree to follow all international copyright laws as well as the terms and conditions outlined at paintingworldmag. com. You may NOT reprint or make copies, even for non profit uses. Any violation of these terms will result in a nonrefundable cancellation of your subscription and possible prosecution with fines up to $150,000 USD. http://www. copyright.gov/title17/ Please contact info@paintingworldmag.com if you have received this PDF illegally.
April 2017 Issue
15
16
Painting World Magazine
April 2017 Issue
Due to the large size of this painting, this line drawing has been reduced by half. Please enlarge 200% for full 20� x 24� painting size.
Download all line drawings ready to print here: http://bit.ly/2npUHL3
Due to the large size of this painting, this line drawing has been reduced by half. Please enlarge 200% for full 20� x 24� painting size.
Download all line drawings ready to print here: http://bit.ly/2npUHL3
Painting World Magazine
April 2017 Issue
17
Lemon Season by Alessio Meggiato
Painting World Magazine
It’s never too early to start making summery projects. I’ll teach you how to paint this lovely tray, which you can display in your kitchen this summer while drinking lemonade and enjoying the warm weather.
am honored to be a part of the “Helping Artist” team by DecoArt®. From now on, you’ll also be able to find my projects within the pages of this magazine, where I’ll share with you what I love the most. Often, my heart speaks through my hands. Creativity and fantasy are my daily “addiction”… or maybe the best cure I’ve ever experienced.
Surface: 38cm Ikea® Metal Tray #203.195.06 (inside diameter 27cm)
DecoArt Americana® Acrylics:
About Alessio Hi! I’m Alessio Meggiato! I travel all over the north part of Italy for my job, and all over Italy for my “hobby.” Despite my job keeping me very busy, I have this huge love… painting. I feel the need to cut some time out of every day to create. I was introduced to country painting about 10 years ago, and since then, I’ve started to work with several international artists, publishing projects in popular painting magazines. With the help of Terrye French, to whom I will be forever grateful, I had the chance to be a part of the “Painting with Friends” book. I’ve attended many classes with the best international artists, both in Italy and in the United States. I’ve been sharing my passion and knowledge by teaching in several stores around Italy, and
• Black Green DA157 • Burnt Sienna DAO63 • Hauser Medium Green DA132 • Honey Brown DA163 • Light Buttermilk DA164 • Light Mocha DA241 • Margarita DA299 • Marigold DA194 • Milk Chocolate DA174 • Mississippi Mud DAO94 • Plantation Pine DA113 • Primary Yellow DA201 • Snow (Titanium) White DAO1
Loew-Cornell® Brushes: • #1, #2, #4, #6, & #8 Round, Series 7000 • #4 & #10 Filbert, Series 7500 • #12 & #16 Shader, Series 7300 • 1/2” & 3/4” Maxine’s Mop, Series 270 • #18/0 Script Liner, Series 7050 • 3/4” Wash Glaze, Series 7550 • #4 Fabric Dye (#6 if you have it, it is discontinued)
Miscellaneous Supplies: • DecoArt® Multi-Purpose™ Sealer
• Sea Sponge • Transfer Paper • White & Black Graphite Paper • Paper Palette • Stylus • Adhesive Mesh Texture Tape SUP1101 (to stencil) from Laurie Speltz Creative Coach® • Matte Varnish • Ribbons (to embellish)
Preparation: Apply the Multi-Purpose Sealer using the sea sponge in the area of your tray where you will be painting. Let it dry well. Apply two good coats of Light Mocha with the sea sponge. Transfer the main design. NOTE: To apply the base coating, you may use round, filbert or flat brushes as the area requires (or at your preference). Use larger sized brushes for larger areas and smaller sized ones for smaller areas. You have to be comfortable with the brush you are using. Unless otherwise specified, base coating has to be opaque. You’ll usually float shading using several sizes of Loew-Cornell flat shader brushes. (Figure 1) Base the lemons with Marigold. Use Light Buttermilk to base coat inside of the lemons. In the central area, apply a wash of Marigold, and then divide the different slices with Light Buttermilk. For the leaves and stems, base coat with Hauser Medium Green. While they’re still wet, apply some strokes with Margarita to highlight them.
© 2017 Painting World Magazine Digital Edition. All rights reserved. Not for distribution, resale or reproduction. You agree to follow all international copyright laws as well as the terms and conditions outlined at paintingworldmag. com. You may NOT reprint or make copies, even for non profit uses. Any violation of these terms will result in a nonrefundable cancellation of your subscription and possible prosecution with fines up to $150,000 USD. http://www. copyright.gov/title17/ Please contact info@paintingworldmag.com if you have received this PDF illegally.
April 2017 Issue
19
20
Painting World Magazine Base coat the cup of the flower with Hauser Medium Green. While it’s still wet, apply some strokes with Margarita using the #1 round. (Figure 2) Shade the stems and the leaves with Plantation Pine; the veins of the leaves are back-to-back. Shade all around the inside edges as well as the separation between each of the lemons with Honey Brown. Make the shading wider on the corner. Use Marigold to shade the triangles that make the lemons, both in the larger edges and on the points, pulling with your bush toward the center to create the different colors on each slice. Shade all around the edges of the white part of the lemon with Marigold. (Figure 3) Deepen the shading on the lemons in the back with Milk Chocolate. Deepen the shading on the inside triangles of the sliced lemon with a light float of Milk Chocolate, both on the large edges and on the points. (Figure 4)
some strokes here and there. Still using the fabric dye, dry brush some Titanium White in the lighter areas. Float on the outside edges of the lemons and in the brighter areas with Titanium White. With the fabric dye, stipple in the lighter areas with Titanium White. (Figure 6)
Figure 1
Figure 2
With an 18/0 liner, line your veins with Margarita. Stencil using your Adhesive Mesh Texture Tape all over Figure 3
For the leaves, stems, and veins, deepen the shading with Black Green. Deepen the shading further with Burnt Sienna on all lemons. (Figure 5) Highlight the leaves and stems with Margarita. Repeat this step twice. Using the #6 fabric dye, dry brush some lighter highlights in the lemons with Primary Yellow. With a #1 round and a mix of Primary Yellow and Titanium White, repeat this step in the sliced lemons’ white areas and centers, and apply
April 2017 Issue
© 2017 Painting World Magazine Digital Edition. All rights reserved. Not for distribution, resale or reproduction. You agree to follow all international copyright laws as well as the terms and conditions outlined at paintingworldmag. com. You may NOT reprint or make copies, even for non profit uses. Any violation of these terms will result in a nonrefundable cancellation of your subscription and possible prosecution with fines up to $150,000 USD. http://www. copyright.gov/title17/ Please contact info@paintingworldmag.com if you have received this PDF illegally.
Painting World Magazine Figure 4
the background with Hauser Medium Green, floating here and there with Marigold.
Figure 5
Figure 6
Shade all around the inner margin of the tray and by the lemons with Mississippi Mud. Shade the ground under the lemons with Mississippi Mud. With the #12 shader, apply the checks around the border of the tray using washed down Plantation Pine. Dot in between the checks with Marigold. Let the piece dry. Varnish the tray with matte varnish to protect your artwork, following the manufacturer’s instructions. Once it’s dry, embellish the tray as you like. I used some ribbon that I passed through the openings on the edges. Have Fun! Alessio © 2017 Painting World Magazine Digital Edition. All rights reserved. Not for distribution, resale or reproduction. You agree to follow all international copyright laws as well as the terms and conditions outlined at paintingworldmag. com. You may NOT reprint or make copies, even for non profit uses. Any violation of these terms will result in a nonrefundable cancellation of your subscription and possible prosecution with fines up to $150,000 USD. http://www. copyright.gov/title17/ Please contact info@paintingworldmag.com if you have received this PDF illegally.
April 2017 Issue
21
22
Painting World Magazine
April 2017 Issue
Download all line drawings ready to print here: http://bit.ly/2npUHL3
Solitary Iris Watercolor
by Rebecca Baer
24
Painting World Magazine
A solitary iris painted in hues of violet makes a striking statement on a rich, deeply colored background. Negative stenciling and a pair of silver-leafed medallions provide the perfect, subtle accent to finish the piece.
Mission Gold Watercolors: • #552 Red Violet • #553 Permanent Violet • #545 Ultramarine Blue Deep • #544 Prussian Blue • #546 Indigo • #533 Olive • #522 Permanent Yellow Light • #567 Sepia Note: A prepared palette filled with these colors is available from Rebecca Baer. See directory in the back.
Rebecca Baer® Brushes: • 3/0 RB Classique™ Round 1000 • #7 RB Classique™ Round 1000 • #11 RB Classique™ Round 1000 • 20/0 RB Classique™ Liner 1050 • #2 RB Artiste™ Stenciler 500 • #1 RB Artiste™ Stenciler 500
About Rebecca Rebecca Baer, the creative force behind Rebecca Baer®, Inc., is an accomplished designer, author and international instructor. She has a substantial portfolio of designs published in leading United States and Japanese publications. Rebecca is also an experienced feature columnist. She has produced an extensive line of instructional tutorials, which, along with her signature products, are marketed internationally via www.rebeccabaer.com. The artist’s professional background as a technical illustrator taught her the importance of detail, which is evident in the graceful lines of her designs.
Surface from RebeccaBaer.com: • Arches Hot Press Watercolor Paper 9”x12” --or-• Arches Hot Press watercolor board 9”x12” April 2017 Issue
Miscellaneous Supplies: • Rebecca Baer® Stencil Asian Influence | ST-122 • Tracing Paper • Soft pencil (6B) • Paper Towels • Triple Well Brush Washer • Plastic WC Palette w/lid • Tissues (sans lotion) • Backing board • Masking tape • Swiffer® dry dusting cloth • Talcum Powder • RB Aluminum Leafing • Rebecca Baer® Gilded Stenciling Adhesive* *It is imperative that you do not substitute regular leafing adhesive for Rebecca Baer® (RB) Gilded Stenciling Adhesive. RB adhesive was developed for use with stencils to create detailed, gilded designs
without bleed. If you use regular (thin) adhesive it will bleed. If you wipe the brush enough to avoid bleed you will not have enough “stickiness” to make the leafing adhere. RB adhesive is effective on both porous (paper) and non-porous (glass) surfaces.
Before You Begin: Watercolors can be reused indefinitely. Set up permanent palette-not disposable. Place the desired tube colors in the individual wells and allow them to dry before closing. After use, loosely cover to allow them to dry again before sealing the palette. This keeps dust off of the paints while they are drying. When color combinations are used, I prefer to brush mix the colors to keep the elements from seeming flat. Brush mixing provides subtle variations in hue, temperature and value resulting in a more interesting painting. When selecting paper towels and tissues make sure that the tissues you use contain no lotions, which can make them less absorbent and potentially stain the paper. As for paper towels, I prefer to use Viva since they are effective and do not have an embossed pattern that may imprint on the painting.
Preparation: The iris is painted on Arches hot press paper without any preparation. Use masking tape to secure the paper to the backing board. Tape all four sides, like frame, so that the paper does not buckle when the background is painted. If using watercolor board then taping is not needed
© 2017 Painting World Magazine Digital Edition. All rights reserved. Not for distribution, resale or reproduction. You agree to follow all international copyright laws as well as the terms and conditions outlined at paintingworldmag. com. You may NOT reprint or make copies, even for non profit uses. Any violation of these terms will result in a nonrefundable cancellation of your subscription and possible prosecution with fines up to $150,000 USD. http://www. copyright.gov/title17/ Please contact info@paintingworldmag.com if you have received this PDF illegally.
Painting World Magazine to prevent warp but will result in a nice border if taped evenly.
Painting Instructions: Flowers:
You will need to transfer the design to your watercolor paper. To do this, trace the pattern onto tracing paper. Trace over the design on the back of the tracing using a very soft pencil (6B). Position the pattern on the watercolor paper as desired and secure with masking tape. Transfer the image by burnishing over the vellum with a broad item such as the edge (not the corner) of a gift card. By using a broad item you will avoid indenting the pattern into the paper as you would with a stylus.
Begin by dampening a petal with water. This will allow the watercolor to blend and soften. Use a #3 round to place Permanent Violet as shown. Notice how the color is not applied as a single path but rather as a series of curving lines. This will create lighter and darker areas so that the petal has texture with subtle hills and valleys. Use a damp brush to soften the color into the spaces between. Deepen the color with additional Permanent Violet to create the blend in the petal and the small ripples along the edge. (Figures 1ab) The flower does not have crisp
Figure 1a
Figure 1b
Figure 2a
Figure 2b
lines until it is further developed. This causes the images to appear to be soft-focus, however, this is how the steps should look. Re-moisten the petal if necessary and create the warm light blue tones using Prussian Blue. Use a damp brush to soften and blend as before. (Figures 2a-b) Pay close attention to the curvature of each petal. Paint must be applied using shape-following strokes so that the petals are correctly formed. When working in watercolors, adjusting the amount of water used creates values. Light or pastel colors are
Š 2017 Painting World Magazine Digital Edition. All rights reserved. Not for distribution, resale or reproduction. You agree to follow all international copyright laws as well as the terms and conditions outlined at paintingworldmag. com. You may NOT reprint or make copies, even for non profit uses. Any violation of these terms will result in a nonrefundable cancellation of your subscription and possible prosecution with fines up to $150,000 USD. http://www. copyright.gov/title17/ Please contact info@paintingworldmag.com if you have received this PDF illegally.
April 2017 Issue
25
26
Painting World Magazine
Figure 3a
Figure 3b
Figure 3c
Figure 3d
achieved by using a lot of water to increase the transparency of the paint. Deeper hues are achieved by using a minimal amount of water. When unsure, start light. It is easier to add more color than to try and lighten a color that has been applied too heavily. Continue using the #3 round for the larger petal areas and the 3/0 round or 20/0 liner as needed for flips, folds and narrow spaces. The step by step images show the flower developing as each segment is painted. Notice the direction of application following the curvature of each area. More water = light values; less water = dark values. Where you see purple hues use Permanent Violet. April 2017 Issue
For warmer red-violet areas (with a pinkish hue) use Red-Violet. The cool blue-violet regions are created with Ultramarine Blue Deep. Remember to keep the beard areas clear with just a hint of Prussian Blue used to transition out of the purple as you did on the first petal. Work closely with the photos and paint only one petal at a time. Do not paint adjacent petals until the other(s) beside it has dried. (Figures 3a-3d) To paint the beards dampen the area (not the whole petal) with water. Use the 20/0 liner to pull tiny strokes of Permanent Yellow Light that radiate outward. These should soften and fade away as
they approach the Prussian Blue previously applied. When dry deepen the color with Permanent Yellow Light + a touch of Red Violet. These should remain well within the yellow area. Use a damp brush to soften the rays as needed. (Figs. 4a-4b) When your flower is dry you can assess whether the colors need to be intensified or values deepened. To strengthen color, apply to the desired area and then us a damp brush to soften as needed.
Leaves & Stems: A #3 round is best suited for these elements. The greenery is painted using Olive Green as the main color and medium value. Dampen
Š 2017 Painting World Magazine Digital Edition. All rights reserved. Not for distribution, resale or reproduction. You agree to follow all international copyright laws as well as the terms and conditions outlined at paintingworldmag. com. You may NOT reprint or make copies, even for non profit uses. Any violation of these terms will result in a nonrefundable cancellation of your subscription and possible prosecution with fines up to $150,000 USD. http://www. copyright.gov/title17/ Please contact info@paintingworldmag.com if you have received this PDF illegally.
Painting World Magazine
Figure 4a
Figure 4b
the segment to be painted and apply color. (Figures 5a -5c)
add a touch of Permanent Violet to the Olive Green.
To create the lighter values add water to increase transparency and warm with a touch of Permanent Yellow Light where the color appears warmer in the photo. For cooler (blue-green) areas add a touch of Prussian Blue. To create darker values
Remember to check that an area is dry before painting the element beside it.
Figure 5a
Background: Refer to the finished painting to view the background colors and Figure 5b
rays. If you have not done so already, you may want to tape your paper to a rigid surface to paint the background (allow it to dry taped to the backboard) to minimize buckling. Paint the background in around the flowers (everything must be dry before you begin the background) varying between Indigo and Sepia. Combined, these Figure 5c
Š 2017 Painting World Magazine Digital Edition. All rights reserved. Not for distribution, resale or reproduction. You agree to follow all international copyright laws as well as the terms and conditions outlined at paintingworldmag. com. You may NOT reprint or make copies, even for non profit uses. Any violation of these terms will result in a nonrefundable cancellation of your subscription and possible prosecution with fines up to $150,000 USD. http://www. copyright.gov/title17/ Please contact info@paintingworldmag.com if you have received this PDF illegally.
April 2017 Issue
27
28
Painting World Magazine colors make black. Although the background is generally “black” I shifted toward indigo for some areas and Sepia for others, to make it more interesting. You will need to use the #7 round around the flower but need to switch to the #11 for large expanses. The #3 round can be used for tight, interior spaces. The background must be dry before you proceed. Create the rays and glow in the background using the following color removal technique. Determine where you would like to lighten the background and paint these areas with water. The water should be applied precisely where the color is to be lifted. If you are creating rays then the water has to be painted as a ray. Give the water a moment to soak in then rub the surface with a clean, dry viva paper towel. Repeat if necessary to further lighten to the desired value.
Negative Stenciling: Negative stenciling involves using water to remove paint resulting in a negative image. Secure the painted paper to your work surface or backing board to prevent shifting. Position the border (second from the right) from the Asian Influence stencil over the painted background and to the left of the flower as seen on the finished painting. Secure with low-tack tape if desired. Wet the #2 stenciler with clean water. Blot well on a paper towel to remove excess water. Make sure you have removed enough water from the brush or it will bleed under the stencil April 2017 Issue
causing the image to have unsharp edges. When in doubt, go drier. You can always increase the moisture level in the brush or repeat the process if needed.
Figure 6
Swirl gently over the stencil to dampen the paper. Rinse and blot the brush again repeat the process. The first pass will loosen the paint allowing the color to lift on the second and subsequent passes over the stencil. After the second and each ensuing pass blot the paper with the stencil in place. Repeat until the motif has lightened to the desired degree. (Figure 6)
Gilding: Dust the paper with talcum powder and sweep away as much as possible. Pick up a small amount of RB Gilded Stenciling Adhesive on a clean dry #1 stenciler. Wipe the brush well on a dry paper towel to remove excess adhesive. An inadequately wiped brush will allow adhesive to seep beneath the stencil. Pounce over the stencil until the motif is covered; this will only look like a difference in sheen (satin) on the stencil. Remove the stencil from the surface. (place the stencil in warm water to facilitate cleaning) Allow the adhesive to set up. The adhesive must be dry; it will be completely clear. Adhere leafing to the adhesive by pressing in place with a firm brush. To remove excess leafing from unwanted areas, push the leaf with a semi-stiff brush, such as a clean, dry stencil brush, to tear and remove loose leafing from the areas where there is no adhesive.
Figure 7
Buff the surface with a very soft cloth, such as a swiffer dry dusting cloth. If there are breaks in the leafing, they can be patched by repeating the above procedure or they can remain as is according to your preference. (Figure 7)
© 2017 Painting World Magazine Digital Edition. All rights reserved. Not for distribution, resale or reproduction. You agree to follow all international copyright laws as well as the terms and conditions outlined at paintingworldmag. com. You may NOT reprint or make copies, even for non profit uses. Any violation of these terms will result in a nonrefundable cancellation of your subscription and possible prosecution with fines up to $150,000 USD. http://www. copyright.gov/title17/ Please contact info@paintingworldmag.com if you have received this PDF illegally.
Painting World Magazine
Finishing: You can either mat and frame the painting under glass in the traditional manner or tear the edges and leave the ragged edge exposed by floating the painting in front of an uncut rectangle of mat board. If you opt to float the painting be sure and choose a frame with enough depth to accommodate the painting without allowing it to touch the glass. To tear the edges as shown in the photo place the painting face up on your work surface. Use a straight edge placed on the painting with the edge to be torn away exposed. You want to tear the area to be discarded pulling upward. This will create a clean edge on the face of the painting with a ragged white edge underneath. If you do this backwards you will not get the ragged white edge. For framing I opted to “float” the painting on a piece of mat board. To do this you will need foam adhesive squares to raise the painting up off the mat board. Place the foam squares on the back of the painting. Use a generous number of these so that the painting does not sag in between. Remove the backing and position the painting on the mat board. Make sure it is straight before allowing the layers to come in contact. Press firmly to adhere.
© 2017 Painting World Magazine Digital Edition. All rights reserved. Not for distribution, resale or reproduction. You agree to follow all international copyright laws as well as the terms and conditions outlined at paintingworldmag. com. You may NOT reprint or make copies, even for non profit uses. Any violation of these terms will result in a nonrefundable cancellation of your subscription and possible prosecution with fines up to $150,000 USD. http://www. copyright.gov/title17/ Please contact info@paintingworldmag.com if you have received this PDF illegally.
April 2017 Issue
29
30
Painting World Magazine
Spring Cleaning Your Studio! by Margaret Riley
Are you one of those artists that walks into your studio, only to follow a path to your table? And your friends know that you didn’t just move into your house, so that is no excuse anymore. Frustrated that you can’t find anything? Well, it is time to put on your boots, buckle up those bootstraps, and tackle this job. Time to make yourself a goal and achieve it. Let’s clean all this up, organize, and keep it that way! You’ll want to mark out a few hours (or days) to get your goal accomplished. Roll up your sleeves, and let’s get to it! Before you even begin, have available various sizes of inexpensive storage containers. Be ready to install some shelves or cabinet storage units once we find the room.
Start right as you walk inside the door. Picking up each item, ask yourself these questions: April 2017 Issue
• “How long have I had this?” More than two years… get rid of it (trash can or garage sale pile). • “Will I need this in a project that I have a sketching of and that’s on my list of things to create?” (Be reasonable! If you’ve had that sketching five years, really think seriously about getting rid of it, even if you keep saying that you’ll get it done.) • “Is it a necessary tool or item to use every time I create? Do I remember what this is for?” • “Will I really ever finish it?”
With each question, you’ll want to throw that item into a large tub. Label these tubs as:
• Trash • Donation or Garage Sale • Keep • Place in Small Containers • UFO (UnFinished Objects) • Other And you may want to label some containers by the type of creation you do. With me, it’s a large field!
As each tub fills, start another one. We’ll get to each of those tubs soon. Right now, concentrate on getting NO paths in your studio, except a path of filled tubs. You should be making some headway, but take it slow, as some people become overwhelmed and just say “Forget it!” Not you! Determination – that’s you! Once you have all the clutter sorted, let’s push all the containers to one side of the room. Time to get out the broom, mop/ sweeper, and dust cloth. Get one side of the room clean, and let it sparkle. Stand back and smile at your accomplishments thus far. Take a deep breath, and push all those containers to the other side of the room for cleaning, which will soon show all the room cleaned. Hooray!
Many artists do general crafts, scrapbooks, sewing, etc. Just label containers ready to detail-sort later. Some categories could be: • Paints • Brushes • Painting Supplies • Wood Surfaces • Canvases • Tools • Other Surfaces • Other Download all line drawings ready to print here: http://bit.ly/2npUHL3
Painting World Magazine Almost done… aaaahh-choo! It is advisable to invest in a feather duster or one of those dusters that you can change the “dusting” part on periodically. Now that the room is clean, let’s look around. Do you have any storage? Are you lucky enough to have a closet in your room? Is there space for shelving units? It can be expensive to invest in storage units, so shop around on the internet or visit local thrift shops. Maybe take some time to go to local garage sales.
The important thing is that you need to think about where you are going to put all the items sitting in those storage tubs. Sigh. But, you will be organized! Maybe a cubical storage unit will work for you. I bought two of them, and attached one on top of the other. Of course, you want to think about attaching it to your wall if you plan to load it up heavy. Purchase cloth bins to put into those cubical openings. Decide on colors that will match your décor. If you need a table, now is the time to incorporate it into your studio. But remember, it is only a place to sort out those tubs, and not a storage place.
Time for a snack! A healthy one, and something to drink. You have to keep up your strength and not become dehydrated. Keep a glass of water handy, as a moment to stop and take a drink sometimes clears the mind and gives you motivation to move forward.
Stop and look around your studio. Now is the time to paint it a new color, with everything in tubs and easy to move. I have my studio all white. I can change the curtains and covers to give a new look to it in a year or so. Some people choose a theme for their studio… mine is “The Wizard of Oz.” Thus, I can change the theme whenever I want to give a new, crisp look to my studio.
Perfect! Signs are in order! You’ve been busy, and things may still look like a disaster, but time to get organized. Ready? Let’s begin! If you have a closet, measure to be sure all your containers will fit into that area. Containers with drawers are extremely nice to have. But if you have to stack on top of each other, put in shelves.
Let’s get started on those tubs! Take it one tub at a time. Have small storage containers (shoebox size) to put small items into. As you sort, write a list of what you put into each container. I will point out that you can purchase some great containers at your local mass merchants that will hold tiny items better than just throwing them into a shoebox size container. Keep sorting all those containers. When you are finished, we’ll figure out where they are going to go. Meanwhile, carry on! You can purchase chalkboard paper, or chalkboard paint to paint onto heavy watercolor paper, to label the ends of those containers holding precious supplies. Also, you’ll want to purchase a chalk pencil. And why you ask? I have found that if I write onto these chalkboard sheets what the contents of the container are, I can find things much quicker. After all, our memories can only store so much! You can attach a clip clothespin to the back of the chalkboard paper, and clip it onto the handles of fabric bins. Use double stick tape to attach labels to plastic or wood containers.
Download all line drawings ready to print here: http://bit.ly/2npUHL3
An inexpensive way to do so is to purchase cinder blocks and boards. You can stack cinder blocks one or two high, and place the boards across them. It will be much easier to pull out a storage box stacked two high than six high! If you are lucky enough to have cabinets with a counter top, figure out what you want in the cabinets and drawers. Start putting things away once you figure out a plan. Maybe do a sketch of what will go where, and that will help you move along more quickly. April 2017 Issue
31
32
Painting World Magazine If you have a shelving unit or two, start loading them up. With each area, keep brushes together on one shelf, paints on another one, and so forth. If you think you would like to place a curtain up to cover your shelves, do it! You will be amazed how much nicer it will make your studio look. But if you like seeing all those labeled containers, keep it open. If you can keep all your shelving units alike, it will be more pleasing to the eye. If you purchased various wood cabinets and they don’t match in design, perhaps you would want to paint them. Lots of nice colors are available in the new home décor paints on the market. Decide if you want bright, vibrant colors, or pastel, soft finishes. Make the studio yours! You are the one who will have to look at it the most. Now let’s work on your table! Things should be put up now, except for a few items. You can purchase some glass blocks (used in home décor), and put a board on top of them along the back edge of your table. It will give you more space, and be handy to keep regularly used items on it. Place your regular painting items/ supplies on the table. Organize your brushes in a glass canning jar, or purchase a brush bin that turns. Above my painting counter, I have hung wall-storage paint bins.
Don’t forget a good lamp on your table, or be sure you have LOTS of lighting in your studio. These days, you have to have a place to set a computer, too, and maybe a copier.
April 2017 Issue
You might want to consider purchasing an office chair to sit in while painting. Another thing I found handy is a three-shelf cart on wheels. I can roll it to sit beside me at my table to add extra room for drying a project or to keep my painting supplies on that I don’t have room for on my table. Do you have wall space left? Let’s hang up some of those paintings you’ve done! Be proud of what you have created. Maybe even have a shelf mounted to show items that don’t hang. Oh my! Look at all that floor space. One more thing! Let’s bring in a small, comfy chair for you to relax in while reading your favorite magazine, Painting World. Do you have a window? Add blinds and/or a curtain. I have accordion blinds that are on a double cord to be up beyond the center of the window or below the center. I also have a valance up to my window, as I enjoy looking out at the lemon tree in our yard that gives me flowers in the early spring and luscious yellow lemons to view before harvest time. Walk out of your studio. Go ahead… do it! Now turn around, and come back through that door.
Wow! Look at that! It’s organized AND clean. Now the secret is this…
When you get something out and you are done with it, put it back where it belongs. If you are one that has deadlines, bring out all your supplies at once to save you time, and then put them all back when you are finished, before starting another project. Another thing I do is put things away before stopping creating for the day. It will make you revitalized before coming back into the studio the next day. Every month (set a specific day), get out the duster, and give everything a dusting, plus clean the floor. Make sure everything is back in place. This is your day to make all that organizing worth the time you gave to it.
Now grab a cup of tea or coffee, find Painting World, sit in that comfy chair, and enjoy a job well done!
Download all line drawings ready to print here: http://bit.ly/2npUHL3
A White Rose
by Maureen Baker
34
Painting World Magazine
Roses are a treasured romantic symbol of love and elegance. This lovely piece can be painted on canvas to hang in a favorite place in your home . Adjust the size of your line drawing and it can be painted on top of a large box to make a beautiful brides box. A traditional metal ware plate can create a special Mothers Day plate. No matter what you choose to paint this piece, it’s elegance will shine through.
Age 45 is when she came to realize that she should dedicate her career to doing what she loves, so she began the journey of painting professionally. She has won numerous awards locally, regionally and nationally, and has been in many juried shows and private collections throughout New England. Maureen is now designing full time and living on a wonderful natural pond where she finds great inspiration from the natural beauty around her. You can always view Maureen’s designs and schedule on her website at www.maureenbaker.com
Surface: • 14” x 11” Canvas
DecoArt® Traditions™ Acrylics:
About Maureen: Maureen has been creating art since she was a child growing up in Chelmsford, Massachusetts. Her love for color and texture lured her more and more into painting, starting on canvas and working with many different mediums on a variety of surfaces. The world of possibility grew to endless creative opportunities; walls, furniture, metal, clothing, everything is an option! Defining unique space in her home and studio was so rewarding. April 2017 Issue
• Light Grey Value DAT39 • Medium Grey Value DAT40 • Warm White DAT36 • Titanium White DAT35 • Yellow Green Light DAT16 • Pine Green DAT19 • Sap Green DAT59 • Cobalt Blue Hue DAT55 • Burnt Sienna DAT44 • Diarylide Yellow DAT13
DecoArt Traditions Brushes: • 6 Flat, TB32-B • 8 Flat, TB33-B • 10 Flat, TB34-B • 12 Flat, TB35-B • 1” Flat, TB38-B
Miscellaneous Supplies: • DecoArt DuraClear® Matte Varnish DS60 • Water Container
• Palette or Plastic Plate • Paper Towels • Palette Knife • Transfer Paper • Sponge
Techniques: Base coat: This is the
application of paint to establish a foundation of solid, opaque color to the object you’re painting. This often takes the application of two or more layers.
Float: This is the application of
transparent paint to bring value, dimension, and depth to the object you’re painting. Sideload the paint onto one side of the brush, and blend it on a palette to work the paint into the brush evenly. When you’ve properly prepared the brush, there should be a gradation in color from transparent paint to the absence of color on the other side of the brush.
Line Work: Load the damp
liner with paint and water so the paint has an “ink” consistency, or the consistency of 1% milk. Load the liner by rolling the brush’s end between your thumb and pointer finger. Next, you want to drag the paint out on your palette so the paint is evenly distributed in the brush, with no overload on the sides. When painting line work, the amount of pressure you apply to the brush will determine the thickness of the lines. The more pressure you apply, the thicker the lines.
Preparation: Base coat the canvas with one coat of Pine Green. Let it dry.
© 2017 Painting World Magazine Digital Edition. All rights reserved. Not for distribution, resale or reproduction. You agree to follow all international copyright laws as well as the terms and conditions outlined at paintingworldmag. com. You may NOT reprint or make copies, even for non profit uses. Any violation of these terms will result in a nonrefundable cancellation of your subscription and possible prosecution with fines up to $150,000 USD. http://www. copyright.gov/title17/ Please contact info@paintingworldmag.com if you have received this PDF illegally.
Painting World Magazine
Instructions: Step 1:
Step 1
This step is a wet on wet application. That means the surface is wet, and you apply the paint with a wet applicator. Wet the surface with a damp wash brush. Tap a damp sponge into Burnt Sienna, and tap here and there across the canvas. With a damp sponge, tap into Sap Green, and tap-slap here and there. Soften out the edges.
Step 2: Base coat the rose in Light Grey. Base coat the light leaves with Yellow Green Light, and the dark leaves with Pine Green. For the stem of the rose, base coat with Burnt Sienna.
Step 2
Sideload your 1” flat with Sap Green, and reinforce the darks in the lower right corner of the background.
Step 3: Using your 12 flat, sideload with Medium Grey, and shade between the petals to create your separations. Let the paint dry. Sideload your 12 flat with Medium Grey, and create back-to-back floats to form your creases on the individual petals. Pull toward the center of the rose. Let the surface dry. Sideload your 10 flat with Medium Grey, and float across the edge of some of the petals to form a flip in the petal. Let the paint dry again.
Step 3
Sideload your 10 flat with Pine Green, and shade the light leaves. Be sure to leave space to allow the floats to vary with intensity. One thing you want to avoid is stripes. Make sure you soften the floats. You want to pull your floats in the direction of the petal’s form. Keep your floats random, and vary the pressure on your brush so that it does not come out as one solid color or texture. © 2017 Painting World Magazine Digital Edition. All rights reserved. Not for distribution, resale or reproduction. You agree to follow all international copyright laws as well as the terms and conditions outlined at paintingworldmag. com. You may NOT reprint or make copies, even for non profit uses. Any violation of these terms will result in a nonrefundable cancellation of your subscription and possible prosecution with fines up to $150,000 USD. http://www. copyright.gov/title17/ Please contact info@paintingworldmag.com if you have received this PDF illegally.
April 2017 Issue
35
36
Painting World Magazine
Step 4: Step 4
Sideload your 12 flat with Warm White. Highlight the light edges of the rose petals to reinforce your separations. Let the paint dry. Using your 10 flat, sideload with Warm White, and create back-to-back floats to highlight your creases on individual petals. Pull toward the center of the rose. Let it dry. Sideload your 10 flat with Warm White, and float across some of the petals to create your bend. Make sure you look at your photo. Let the paint dry. With your 10 flat sideloaded with Yellow Green Light, highlight your dark leaves. This will look very stark. As it dries, it will darken and soften.
Step 5
Using your 10 flat sideloaded with Pine Green, reinforce the shade in the light leaves. Be sure to soften your soft edges so you don’t have lines. Highlight the stem on the right side with Yellow Green Light. Follow the shapes of the petals and leaves. Pull your brush in a curved stroke where the petal curves. Make sure to keep the paint transparent, and always refer to the photo for your lights and darks. Let the canvas dry.
Step 5:
Step 6
Repeat the previous step for the rose and leaves, and reinforce their highlights with Warm White. I wanted to show the difference a second float would make. This helps to reinforce and to soften the rose.
Step 6: Sideload your 10 flat with Diarylide Yellow, and tone your rose petals on 3/4 of the rose. The upper right quarter of the rose does not have yellow tints on the petals. Do this with very soft, very transparent floats of color. The center of the rose has some intense Diarylide Yellow where the petals meet the center. Using your 8 flat, sideload with Diarylide Yellow, and reinforce the highlights on the light leaves.
April 2017 Issue
Š 2017 Painting World Magazine Digital Edition. All rights reserved. Not for distribution, resale or reproduction. You agree to follow all international copyright laws as well as the terms and conditions outlined at paintingworldmag. com. You may NOT reprint or make copies, even for non profit uses. Any violation of these terms will result in a nonrefundable cancellation of your subscription and possible prosecution with fines up to $150,000 USD. http://www. copyright.gov/title17/ Please contact info@paintingworldmag.com if you have received this PDF illegally.
Painting World Magazine
Step 7: With your 10 flat sideloaded with Cobalt Blue, tone your rose petals on the left third of the rose in the dark areas. Do this step with very soft, very transparent floats of color.
Step 7
Sideload your 1” wash with Yellow Green Light, and highlight the upper right corner of the background. Clean your brush. Sideload your 1” flat in Burnt Sienna, and float the background in the upper and lower left side of your canvas.
Step 8: This is the finishing stage of the painting. The final highlight will reinforce the bending form of the petals and leaves. Make sure you let the floats dry between layers, before you apply more color.
Step 8
Sideload your 10 flat with Titanium White, and float your highest highlights onto the rose petals; focus on the tops of the rolls of the petals on the right side of the rose. With a liner bush loaded with Titanium White, intensify the edges of the outer petals and the edges of the petals that flip. Let the paint dry. Load your 8 flat with Sap Green, and reinforce the darks in the light leaves. Be sure to soften the edges to keep a soft transition of color. Mix Diarylide Yellow and Warm White (1:1). Sideload your 8 flat with this mix, and reinforce the highlights in the light leaves. Sideload your 6 flat with the same mix, and reinforce the highlights in the stem. You are all done painting! Sign your name! Let the canvas dry for two to three days. Varnish it with DuraClear Matte Varnish.
© 2017 Painting World Magazine Digital Edition. All rights reserved. Not for distribution, resale or reproduction. You agree to follow all international copyright laws as well as the terms and conditions outlined at paintingworldmag. com. You may NOT reprint or make copies, even for non profit uses. Any violation of these terms will result in a nonrefundable cancellation of your subscription and possible prosecution with fines up to $150,000 USD. http://www. copyright.gov/title17/ Please contact info@paintingworldmag.com if you have received this PDF illegally.
April 2017 Issue
37
38
Painting World Magazine
Due to the large size of this painting, this line drawing has been reduced by half. Please enlarge 200% for full size.
April 2017 Issue
Download all line drawings ready to print here: http://bit.ly/2npUHL3
You Are My Sunshine
by Chris Haughey
40
Painting World Magazine
My little daughter, Laura, could barely speak, but as soon as I started singing this song, that little toddler would join me singing at the top of her lungs. It was so adorable to see her serious face as she nailed every word. She would be so proud of herself when we finished!
exciting paints, mediums and techniques. I absolutely love what I do and feel very blessed that I am able to design and share my wonderful world of art.
Materials: All supplies from Cupboard Distributing.
• Groove Circle Pallet 12” 31-L475 • Dot Fade Layering Stencil 09-70805 • Nordic Layering Stencil 09-05291
DecoArt Media® Fluid Acrylics™: • Cobalt Teal Hue 13-DMFA10 • Diarylide Yellow 13-DMFA11 • Primary Cyan 13-DMFA27 • Quinacridone Gold 13-DMFA32 • Quinacridone Red 13-DMFA33 • Quinacridone Violet 13-DMFA34 • Titanium White 13-DMFA39
DecoArt Americana Acrylics:
®
About Chris The Andy Griffith Show and Bewitched are the two TV shows I recall from my childhood. With only three stations to select on our black and white TV, I spent most of my time playing with crafts. My older sister was an oil painter and I drooled over her supplies and talents. In college I majored in Fine Art (Oil Painting), but soon found out that making a living by selling oil paintings was not all fun and games. After the pitter patter of little feet went to school (BTW, oil and kids do not mix for me), I discovered the wonderful world of acrylic. I have been an addict ever since! My background in art continually encourages me to try new and April 2017 Issue
• Snow White 13-DA01 • Soft Black 13-DA155 • Spicy Mustard 13-DA264
Mediums: • DecoArt Americana Matte Spray Sealer/ Finish 13-41370 • Multi-Purpose™ Sealer 13-07930
Jo Sonja® Sure Touch® Brushes: • #6 Round, 03-1350-6 • #10/0 Script Liner, 03-1365-5/0 • 1/4” & 1/2” Angle, 03-1345-1/4, -1/2
Miscellaneous: • Double-Ended Stylus 03-11183 • Scharff® Theorem Stencil Brush 03-205-5 • Loew-Cornell® Maxine’s Mop 03-270-1/2
• Royal® Oval Wash 03-M77WO-3/4” • Painter’s Tape 16-03680 • Mono® Zero Eraser 18-57305 • Canary Tracing Paper 28-03838 • Graphite Paper 28-31011 • Extra Fine Sanding Pad 29-10611 • Specialty Sponge Set of 2 29-32227 • Mini Mister™ 46-23586
Preparation: Using the large specialty sponge, seal the surface with Multi-Purpose Sealer. Lightly sand it, and wipe it clean. With the same sponge, base coat with Snow White (Americana). Trace the pattern onto tracing paper. Transfer the main pattern lines using the transfer paper and stylus. Transfer details as needed.
Painting Instructions: Sun: Base coat the entire sun face and the rays with Diarylide Yellow. Shade Quinacridone Gold around the outer edge of the sun face, the base of the rays, and the bottom and right sides of the rays. Shade the opposite sides of the rays with the same color, but much softer. (Figure 1) Deepen the shading at the base of the sunrays with a transparent float of Soft Black.
Sky Area: Load the round with wet Cobalt Teal Hue to fill in around the rays, working each section at a time. Base coat an area, and then spray it liberally with the Mini Mister (water). Dip the tip of the round in thinned Quinacridone Violet, and touch it onto the wet background.
© 2017 Painting World Magazine Digital Edition. All rights reserved. Not for distribution, resale or reproduction. You agree to follow all international copyright laws as well as the terms and conditions outlined at paintingworldmag. com. You may NOT reprint or make copies, even for non profit uses. Any violation of these terms will result in a nonrefundable cancellation of your subscription and possible prosecution with fines up to $150,000 USD. http://www. copyright.gov/title17/ Please contact info@paintingworldmag.com if you have received this PDF illegally.
Painting World Magazine Figure 1
(Figure 2) It should start to disperse softly into the blue. If it does not immediately disperse, mist it with more water. Continue around the sun to fill in the entire sky area. When the surface is dry, float Primary Cyan along each side of every sunray. (Figure 3)
Stenciling: Position the Nordic stencil, and secure it with painter’s tape. Load the stencil brush with Primary Cyan, and wipe the excess on a paper towel. Gently dry brush over the stencil to create a soft design on the background between the rays. Use the dot fade stencil to brighten the background. Position the stencil and secure it with painter’s tape. Load the stencil brush with Snow White (Americana) and wipe the excess on a paper towel. Stencil between the rays, over the prior design. (Figure 4)
Figure 2
Face:
Outlining:
Load the 1/2” angle with Quinacridone Gold to float under the closed eyelids, down the nose, below the mouth, and around the outer edges of the cheeks.
Load the script liner with thinned Soft Black to outline the sun face, rays, eyes, eyelashes, nose, lips, and eyebrows. Use the same brush and color to paint the horizontal grooves between the sections and the side edges. (Figure 6)
To create the lip color, mix Quinacridone Red, Quinacridone Violet, and Titanium White evenly to create a rich, peachy tint, and base the lips. Touch the dirty brush in Quinacridone Red to deepen between the lips and on the right sides of both lips. Using the lip color mix, float up the right sides of the cheeks and along the bottom, and blush the tip of the nose. (Figure 5) Brighten the left sides of the lips with Titanium White. Using the same color, brighten the top left of the cheeks, the tip of the nose, and the top left of the eyelids.
Letters: Base the letters with Lamp Black. Load the script liner with Snow White (Americana) to line down the right sides and across the bottoms of the letters. With the stylus and Spicy Mustard, add dip dots down the wide parts of each letter.
Finishing: Spray seal the piece with several light coats of Matte Spray Varnish, allowing appropriate drying time between coats. Tie decorative ribbon through the holes at the top.
© 2017 Painting World Magazine Digital Edition. All rights reserved. Not for distribution, resale or reproduction. You agree to follow all international copyright laws as well as the terms and conditions outlined at paintingworldmag. com. You may NOT reprint or make copies, even for non profit uses. Any violation of these terms will result in a nonrefundable cancellation of your subscription and possible prosecution with fines up to $150,000 USD. http://www. copyright.gov/title17/ Please contact info@paintingworldmag.com if you have received this PDF illegally.
April 2017 Issue
41
42
Painting World Magazine Figure 3
Figure 4
Figure 5
Figure 6
April 2017 Issue
Š 2017 Painting World Magazine Digital Edition. All rights reserved. Not for distribution, resale or reproduction. You agree to follow all international copyright laws as well as the terms and conditions outlined at paintingworldmag. com. You may NOT reprint or make copies, even for non profit uses. Any violation of these terms will result in a nonrefundable cancellation of your subscription and possible prosecution with fines up to $150,000 USD. http://www. copyright.gov/title17/ Please contact info@paintingworldmag.com if you have received this PDF illegally.
Painting World Magazine
43
Due to the large size of this painting, this line drawing has been reduced by half. Please enlarge 200% for full size.
All Supplies for Chris’s projects are found at Cupboard Distributing!
Download all line drawings ready to print here: http://bit.ly/2npUHL3
April 2017 Issue
44
Painting World Magazine
When Mixed Media is Crossed with Decorative Painting by Tracy Weinzapfel Remember the saying “If you build it they will come?” That saying has been a driving force for me. When I went to my first decorative painting show in 2015 I was wondering how and where I would fit in this community of amazing artists. In my own right I was an artist of a different nature. I knew in my heart that there would be a fit and I had the drive to build it and make those two worlds by Tracy Weinzapfel
April 2017 Issue
meet. My no pattern, whimsical, “Let it Go” style had a place while this world offered so much to add to my style. In addition I had a collaboration with Andy Skinner, Executive Creative Director of DecoArt, Inc. who has a unique industrial style. I featured this in my article,” The Art of Collaboration” in the October 2016 Issue. Collaboration has always been key with me. I have always maintained the mantra that I will grow with each opportunity I am presented and each artist that crosses my path. I will continue to find the elements that I like from each genre and incorporate it into my style and make it my own. I will color outside the lines, outside the box and even on the outside of a wine barrel. As
an artist I think it is important to open yourself up to those opportunities. That is where I found my welcome in the world of Decorative Painting. It was demonstrating and sharing what I know and then having someone show me where they took my inspiration. In October 2016 Andy and I hosted the first Ministry of Mixology event in the United States where we jointly taught a Dare 2 Create project to all attendees. This event was dearly supported by the Decorative Painting World including
© 2017 Painting World Magazine Digital Edition. All rights reserved. Not for distribution, resale or reproduction. You agree to follow all international copyright laws as well as the terms and conditions outlined at paintingworldmag. com. You may NOT reprint or make copies, even for non profit uses. Any violation of these terms will result in a nonrefundable cancellation of your subscription and possible prosecution with fines up to $150,000 USD. http://www. copyright.gov/title17/ Please contact info@paintingworldmag.com if you have received this PDF illegally.
Painting World Magazine
one of sponsors, our very own Painting World Magazine. Dare 2 Create came together by bringing two very different artists from two different countries, to be collaborative in our art. Andy I and love working with mixed media and he is best known for dark and gothic with a strong industrial feel while I prefer the bright, vibrant and strong colors, a looser style and loves natural subjects like flowers.. We have a mutual respect and admiration for our work and what it means to teach others. What started out as a bit of fun challenging one another creatively we now push one another to paint out of our respective comfort zones and encourage experimentation with color, form and style. Bringing these challenges to the classroom we teach on a collaborative piece where we each contribute alternating layers or steps to build the whole. This style is incorporated in a single, cohesive piece. We have a rapport between us and are equally passionate about our craft. Known for our dynamic (sometimes crazy) we try to ignite creativity in those around us. We encourage our participants to experiment rather than follow the D2C class exactly. We love to see the various artists incorporate brush strokes, alter colors and add their personalities. The decorative painters take these pieces to a whole different level.
We were so excited by the number of decorative painters who signed up for this event and we were amazed at the diversity of projects that we had from our joint teaching. It was amazing to see what happens when we all work together and learn from another.
by Brenda Brown
by Deby Welty
by Deb Antonick
by Tracy Moreau
by Hannah Oxberry
Our events are for everyone, beginning to advanced. That is a key element in our art community. We always want to be inviting and inclusive (not exclusive) to those who want to get into painting.
Š 2017 Painting World Magazine Digital Edition. All rights reserved. Not for distribution, resale or reproduction. You agree to follow all international copyright laws as well as the terms and conditions outlined at paintingworldmag. com. You may NOT reprint or make copies, even for non profit uses. Any violation of these terms will result in a nonrefundable cancellation of your subscription and possible prosecution with fines up to $150,000 USD. http://www. copyright.gov/title17/ Please contact info@paintingworldmag.com if you have received this PDF illegally.
April 2017 Issue
45
46
Painting World Magazine
We now have the pleasure of teaching Dare 2 Create events all over the world (in 2017 we will be in Australia, New Zealand, London along with various locations in the USA). This has led to a Special Event at the Society of Decorative
April 2017 Issue
Painters in May 2017 that we are very excited about. It is a true collaboration of industrial, mixed media and decorative painting! It shows that Art is always changing and we can grow together
no matter what style we are comfortable with. ! It is what YOU the Artist want to make it! It is why I love the decorative painting world and those who embrace that different nature of mine!
Š 2017 Painting World Magazine Digital Edition. All rights reserved. Not for distribution, resale or reproduction. You agree to follow all international copyright laws as well as the terms and conditions outlined at paintingworldmag. com. You may NOT reprint or make copies, even for non profit uses. Any violation of these terms will result in a nonrefundable cancellation of your subscription and possible prosecution with fines up to $150,000 USD. http://www. copyright.gov/title17/ Please contact info@paintingworldmag.com if you have received this PDF illegally.
Wood Surfaces, Pattern Packets and More...
Oriental Poppies Designed by Anne Hunter
Springtime Palette Designed by Lauré Paillex
www.jbwood.com PO Box 3081 • So. Attleboro, MA 02703 • (508) 222-5790
Your ad could be here! Ads start at only $49.00 and reach about 5,500 print subscribers & thousands more on social media! Contact Tracy at sales@paintingworldmag.com to get started today!
Santa Barbara Coast
by Diane Trierweiler
Painting World Magazine
Now is the perfect time to start getting summer decorations ready. And what says “summer” more than a trip to the beach? Combine acrylic painting techniques with mixed media modeling paste to create a beautiful, textured painting of the coast to decorate your home or give as a gift.
About Diane I have been painting for about 40 years. I first started painting in oils in the fine arts. My love of painting evolved into watercolors and acrylics. I also enjoy teaching people how to paint, so 32 years ago, I opened a shop called the Tole Bridge in Norco, California. I teach classes all year long in my shop, and I have a full line of painting supplies. From there, I began to teach decorative painting as well, and to publish books, magazines, packets, and DVDs. I also travel-teach throughout the United States and Canada. The joy of painting has allowed me to meet many wonderful people and to share my passion for the arts.
Surface: • 16” x 20” Diane Trierweiler® Polyester Canvas
DecoArt Americana® Palette: • Hi-Lite Flesh DA024 • Blue Chiffon DA193 • Prussian Blue DA138 • Avocado DAO52 • Buttermilk DAO3 • Evergreen DAO82 • Peacock Teal DA326 • Cadmium Yellow DAO10 • Victorian Blue DAO39 © 2017 Painting World Magazine Digital Edition. All rights reserved. Not for distribution, resale or reproduction. You agree to follow all international copyright laws as well as the terms and conditions outlined at paintingworldmag. com. You may NOT reprint or make copies, even for non profit uses. Any violation of these terms will result in a nonrefundable cancellation of your subscription and possible prosecution with fines up to $150,000 USD. http://www. copyright.gov/title17/ Please contact info@paintingworldmag.com if you have received this PDF illegally.
April 2017 Issue
49
50
Painting World Magazine • Country Blue DAO41 • Soft Black DA155 • Terra Cotta DAO62 • Antique Teal DA158 • Yellow Green DA134 • Peaches ‘n Cream DAO23
Figure 1
DecoArt® Traditions™ Palette: • Opaque White DAT58 • Indian Yellow DAT11 • Burnt Umber DAT46 • Burnt Sienna DAT44 • Vermilion DAT09
Brushes by LoewCornell®:
Techniques:
• 3/4” Glazing, #798
Loew-Cornell® Brushes: • 3/4” Glazing, #798 • Diane Trierweiler’s Signature Brushes: • #4 & #8 Long Petal (china bristle tongues) • Buffer (long handle blender) • 10/0 Striper • 3/8 Landscaper (long handle foliage) • Petal Brush Set (#2, #4, & #8 red sable tongues, short handle)
Miscellaneous Supplies: • Palette Knife • Table Easel • DecoArt Media® Modeling Paste DMM21 • Tracing Paper • Graphite Paper • Pencil • Stylus • Paper Towels • Gloss Varnish
April 2017 Issue
When you paint an impressionistic landscape, you need to resist the urge to go back and fix things. Always paint on an easel with long handled brushes. This way, you lose the control you normally have when painting closer to the work or working flat. “To scumble” is to slip-slap two colors onto the canvas, creating a third color and texture. I usually place some kind of texture onto the surface before I begin to paint. This will give you an oil-painted look. During the process of painting, alternate between shadows and highlights in several layers. The first layer needs to be the widest, and then gradually work to a narrow shade or highlight. Never just follow the edge of an object when adding shades and highlights, but pull your shadows out to fill the triangle-shaped areas. I loosely place in base coats, and then add a textural paste with a palette knife to build up the texture. When the paste dries, I wash over the edges with
shades and highlights to push the paste into the background. “Tinting” is adding touches of color throughout the painting with a wash-consistency paint. This will carry all of your palette throughout the painting. “Backlighting” is adding lavender tones into the shadows. This is actually highlights for your shadows.
Preparation: Use your palette knife to spread the Media Modeling Paste over the entire canvas. Go back and forth with the knife to create texture. This is similar to frosting a cake. Let the paste dry, and base the entire canvas with Hi-Lite Flesh. Let it dry, and place on the basic pattern lines with graphite.
Procedure: Sky: Use your #8 long petal brush to place in the sky colors. Let
© 2017 Painting World Magazine Digital Edition. All rights reserved. Not for distribution, resale or reproduction. You agree to follow all international copyright laws as well as the terms and conditions outlined at paintingworldmag. com. You may NOT reprint or make copies, even for non profit uses. Any violation of these terms will result in a nonrefundable cancellation of your subscription and possible prosecution with fines up to $150,000 USD. http://www. copyright.gov/title17/ Please contact info@paintingworldmag.com if you have received this PDF illegally.
Painting World Magazine some of the background HiLite Flesh show through. Do this step with Blue Chiffon and Victorian Blue. You can scumble these colors on. (Figure 1) Leave some of the areas where the clouds will go unpainted. Remember that the sky should be a darker value at the top, and lighter toward the horizon. Do not rinse your brush. Add a little Hi-Lite Flesh + Opaque White to the brush. Rub your brush on a paper towel to remove excess paint. Place the clouds on in a circular motion using the flat of the brush. You may add more Victorian Blue and Blue Chiffon around the cloud edges to soften them. Use your buffer brush to gently blend the colors and soften the edges so that you do not have any hard edges. You can do all of these steps while the paint is still wet so that the paint blends well. Let the sky dry, and add tints of Vermilion, Peaches ‘n Cream, and Peacock Teal here and there throughout the sky. You should do this one color at a time.
Background Hills: Your hills in the distance should not have a hard edge. They should blend back into the background. Apply the colors with two layers. Let the first layer dry, and then apply the second layer, making sure to add shadows and highlights. Dry brush the hills in with Country Blue. Add shadows of Prussian Blue and highlights of Hi-Lite Flesh. You can use your buffer brush to do this. Use your #4 long petal brush to dry brush Prussian Blue into the areas where the green patches on the hills will be to create dark shadows where the green will go. Stipple in the green colors with Avocado and Avocado + Hi-Lite Flesh using your landscaper brush. Highlight again using Olive. Brush mix Avocado and Soft Black to make a darker green, and place in some shadows at
the bottom of the green patches. Shade under each green patch with Burnt Umber, and then with Soft Black. Tint here and there on the hills with Indian Yellow. Place in the sandy beach at the bottom of the hills with Terra Cotta and Hi-Lite Flesh. Tint with Antique Teal.
Sand Areas & UpSlopes on Hills: Use a wet-on-wet method to place the sandy beach areas. You can use your #4 long petal. Do this with Terra Cotta, Buttermilk, and Indian Yellow. While these colors are still wet, place in the green areas so that the colors blend together at the edges. The green areas are Avocado. We will be using texture over the top of this, so it is not necessary to finish this completely. Let the paint dry, and use your palette knife to spread the
Figure 2
Š 2017 Painting World Magazine Digital Edition. All rights reserved. Not for distribution, resale or reproduction. You agree to follow all international copyright laws as well as the terms and conditions outlined at paintingworldmag. com. You may NOT reprint or make copies, even for non profit uses. Any violation of these terms will result in a nonrefundable cancellation of your subscription and possible prosecution with fines up to $150,000 USD. http://www. copyright.gov/title17/ Please contact info@paintingworldmag.com if you have received this PDF illegally.
April 2017 Issue
51
52
Painting World Magazine Modeling Paste on. Mix a little paint into the paste - just enough to color it. The color should be one or two values lighter than what it is going over.
Figure 3
You don’t want to put so much paste on that all of the background color is covered. We want that to show through. You will be using the same colors as for the base of what you are painting over, except they will be just a little lighter than the base. Spread the mixed paste on the surface by pulling horizontally, leaving some of the background showing through. Remember to use common sense when placing the paste on, and pull in the direction that the slopes would be. This rule also applies to the sand and water areas. After the paste dries, loosely add shadows on the slopes and sand areas with Burnt Umber, and then deepen them with a little Soft Black. Highlight with Buttermilk. Tint here and there with Indian Yellow, Cadmium Yellow, Vermilion, and Burnt Sienna. Add Country Blue backlights into the shadows. Shadow all of the green areas with Evergreen. Tint them with Antique Teal.
April 2017 Issue
Flat Areas, House, & Palms: The technique and colors for the flat areas are the same as for the slopes. There are no specific areas of lights and darks. Be creative, and put as much sand or green areas as you like. Use your striper brush to place in the palms’ trunks with Burnt Umber. Highlight on the right sides with Peaches ‘n Cream. Use a #2 or #4 petal brush to place in the palm fronds. Do this by using Evergreen, Avocado, and Olive. Add a little Soft Black to the Evergreen, and add some darker fronds on the left sides. Tint the light sides with Cadmium Yellow. Backlight the dark sides with Country Blue. The house has walls of Terra Cotta. The roof is Terra Cotta + Buttermilk.
Add shadows of Burnt Umber on the roof and under the roofline. Highlight with Buttermilk. Tint with Vermilion. Paint the trees on the left forefront with the same colors as you used for the palms. Stipple in the foliage with your 3/8 landscaper brush. If you need to lift the highlights on the greens, you can use Yellow Green to do this. It is a transparent green, and has a lot of yellow in it. This is optional.
Rocks & Water: Use your #8 long petal to paint in the water. Do this with a wet-on-wet method. Pull your paint on in a horizontal fashion using Blue Chiffon, Victorian Blue, and Prussian Blue. Pull highlights of Opaque White throughout the water. Tint the water with Peacock Teal and Antique Teal.
© 2017 Painting World Magazine Digital Edition. All rights reserved. Not for distribution, resale or reproduction. You agree to follow all international copyright laws as well as the terms and conditions outlined at paintingworldmag. com. You may NOT reprint or make copies, even for non profit uses. Any violation of these terms will result in a nonrefundable cancellation of your subscription and possible prosecution with fines up to $150,000 USD. http://www. copyright.gov/title17/ Please contact info@paintingworldmag.com if you have received this PDF illegally.
Painting World Magazine Use your palette knife with the Modeling Paste to place in the textural water along the sand line. Do this by adding Blue Chiffon and Opaque White to the paste. Pull horizontally when you place the paste on. Let the paste dry. Go back to the water, and place in waves crashing over the distant rocks and throughout the water. Highlight them with Opaque White. Tint the water with Antique Teal, Peacock Teal, and Country Blue. Add some shadows under the waves with Victorian Blue. Dry brush Opaque White over the paste areas on the shoreline.
Add shadow tints throughout the water with Burnt Umber. This will give you the feeling of shallower places in the water.
Varnish with one coat of gloss varnish. This will bring the colors up and will not make your painting too shiny.
Place in your rocks next. Do this wet-on-wet with Terra Cotta, Burnt Umber, and Soft Black. Highlight with Peaches ‘n Cream, and then with a little Buttermilk. Tint here and there with Vermilion. Add backlights with Country Blue.
Finishing: Stand back, and look at your painting to see from a distance where you may need more shadows, highlights, and tints.
Š 2017 Painting World Magazine Digital Edition. All rights reserved. Not for distribution, resale or reproduction. You agree to follow all international copyright laws as well as the terms and conditions outlined at paintingworldmag. com. You may NOT reprint or make copies, even for non profit uses. Any violation of these terms will result in a nonrefundable cancellation of your subscription and possible prosecution with fines up to $150,000 USD. http://www. copyright.gov/title17/ Please contact info@paintingworldmag.com if you have received this PDF illegally.
April 2017 Issue
53
Due to the large size of this painting, this line drawing has been reduced by half. Please enlarge 200% for full size. 54 Painting World Magazine
April 2017 Issue
Download all line drawings ready to print here: http://bit.ly/2npUHL3
Prepona Butterfly by Sherry C. Nelson, MDA
56
Painting World Magazine
Prepona Amesia is a butterfly that I had the pleasure of photographing in the wilderness of the beautiful country of Colombia. Sharing its rarity and unusual iridescent beauty with my students gives me great enjoyment.
• Ivory Black 331 • Titanium White 644 • Raw Sienna 552 • Raw Umber 554 • Sap Green 599 • Cadmium Yellow Pale 118 • Phthalo Turquoise 526
Delta Ceramcoat® Acrylics: (for background prep) • Dark Victorian Teal 02573 • Magnolia White 02487
Sherry C. Nelson® Brushes: • #2, #4, #6, & #8 Red Sable Brights, Series 303 • #0 Liner Red Sable Round, Series 312
Supplies for Background Prep & Trim:
About Sherry My life outside of painting revolves, as much as possible, around traveling to see and photograph the exciting wildlife and flowers to be found not only in the United States but all over the world. And once I’ve had the good fortune to personally meet amazing creatures that inspire my brush and encourage me to paint them - my thoughts immediately go to how best to share those discoveries with my painting students through their artwork.
Surface: • 10” x 8” Hardboard Panel for Framing, or a wood piece of similar size
Winsor & Newton™ Artists’ Oils: Palette colors are listed in order of placement on the palette. See photo. April 2017 Issue
• Sponge Roller (to apply background acrylic color) • #220 Wet/Dry Sandpaper, or substitute #330 (for sanding between coats of acrylic and after the final coat of acrylic before applying) • Krylon® Matte Finish #1311 (to spray the prepared background before applying the design) • Krylon Spray Varnish #7002 (for the final finish on the entire piece)
Miscellaneous Supplies for Painting: • Tracing Paper • Dark, Oil-Soluble Artist’s Graphite Paper • Ballpoint Pen • Odorless Thinner • Cobalt Siccative (optional) • Palette Pad for Oils • Palette Knife • Viva® Paper Towels
• Small Piece of Cheesecloth (optional) • Tape
Introduction: My work always begins with photography, since butterflies (and most other natural elements) are complexly patterned and impossible to remember in perfect detail without a good reference. So a good camera and hours in the field learning about the creature marked the beginning of this design, as it does for so many others. I always paint in oils because they are such a forgiving medium and allow me to help my students, even beginners, to achieve a finished work in which they can take great pride. Important to the finished piece here is that I used very sparse amounts of excellent artists’ oil colors to achieve the level of detail required to make this butterfly and the other elements as realistic as possible.
The Butterfly’s Scaled Wings: All butterflies and moths belong in the family of Lepidoptera. That word, translated from the Ancient Greek, comes from the roots “lepido” and “opteryx,” meaning “scale-winged.” The scales, which cover the wing membranes, are arranged in rows like shingles on a roof, with thousands present on the two forewings and two hind wings of each creature. The scales have several important functions. They form designs of bright colors, sometimes with hidden ultraviolet patterns, used as signals to the opposite sex to attract a mate.
© 2017 Painting World Magazine Digital Edition. All rights reserved. Not for distribution, resale or reproduction. You agree to follow all international copyright laws as well as the terms and conditions outlined at paintingworldmag. com. You may NOT reprint or make copies, even for non profit uses. Any violation of these terms will result in a nonrefundable cancellation of your subscription and possible prosecution with fines up to $150,000 USD. http://www. copyright.gov/title17/ Please contact info@paintingworldmag.com if you have received this PDF illegally.
Painting World Magazine
Background Prep: I painted the original on a 10” x 8” hardboard panel, and framed it in a vintage, silver-leafed frame purchased at an antique store. If you choose to buy the pre-gessoed hardboard commonly found in stores for sale, prepare it as below, using the non-gessoed side for better movement of the oils while painting. Intense colors also advertise the butterfly’s bitter taste, which comes from the toxins it ingests and stores in the scales, to protect them from being eaten. The scales may also form camouflage patterns, which help the creature stay hidden while resting, and thus make it less likely to become a meal for a predator. And finally, dark colored areas formed by the scales absorb warmth from the sun so that the muscles that drive the wings can reach the necessary 78° temperature range that allow them to function, thereby giving the butterfly the ability to fly in cool weather. Many moths’ bodies have scales adapted into furlike “coats” to keep them warm at night, and thus able to fly. Our job as artists is to mimic the incredible realism of the scaledwing by using varied thicknesses and textures with our oils. When you apply the rich oil paint carefully and don’t overwork it, it does a better job than any other medium of creating true iridescence. Enjoy the challenge!
Base the painting surface with Ceramcoat Dark Victorian Teal + Ceramcoat Magnolia White (2-1) using a sponge roller. Let it dry, and sand with #220 wet/dry sandpaper. Recoat the surface with the same mix. Let it dry, and sand again. Spray it with #1311 Krylon Matte Finish.
Tips for Wet-on-Wet Acrylic Backgrounds: Remove the lids of new bottles of acrylic, and fill them to the bottom of the neck with water. Replace the lids, and shake well. This will reconstitute paint to the original consistency. Add enough water to bring partially used bottles to the same consistency.
Transferring the Design: Use the inked design to transfer to the painting surface, not a color placement sheet. You will want to use light graphite on dark backgrounds, and dark graphite on light backgrounds.
Lay graphite paper over the prepared painting surface. Place the inked design on top of the graphite paper. Lay a piece of tracing paper on top of the design to protect the original during transfer, and tape the stack into position. Transfer the design completely and carefully, such as such as all detail on butterfly’s wings and body, making the transfer as accurate as possible. Retain and transfer all the little fur zigzags, as well as correct flower shapes. Check during the process to make sure the design is coming off on the surface clearly. If it’s too faint, change to a newer piece of graphite. Use artist’s graphite for oils, not the papers created for acrylics that are water-soluble.
Using a Drier: You may add Cobalt Siccative, a drying agent, in fractions of a drop to each patty of oil paint on your palette to speed drying time. I use it EVERY time I paint. If a color does not remain workable on the palette for at least eight hours, you are simply using too much. Dip the palette knife into the drier, bleed off the excess against the side of the bottle, and then touch the knife tip NEXT to each patty of paint. If too much comes off the knife, do not mix the entire amount into the paint. Mix each tiny “freckle” into the paint patty using a clean palette knife. Drying time is six hours to overnight, depending on the particular pigment and relative humidity.
© 2017 Painting World Magazine Digital Edition. All rights reserved. Not for distribution, resale or reproduction. You agree to follow all international copyright laws as well as the terms and conditions outlined at paintingworldmag. com. You may NOT reprint or make copies, even for non profit uses. Any violation of these terms will result in a nonrefundable cancellation of your subscription and possible prosecution with fines up to $150,000 USD. http://www. copyright.gov/title17/ Please contact info@paintingworldmag.com if you have received this PDF illegally.
April 2017 Issue
57
58
Painting World Magazine
Understanding the Painting Process:
Painting Instructions:
The painted step-by-step photos are for you to use as a guide along with the written instructions. Read the written instructions carefully, and then work in the sequence given, referring to the multiple step sequence shown in the photos to determine actual color placement, amount of blending to be done, and so forth.
background, and spray it with the Krylon Matte Finish, as detailed above.
I wrote the instructions in the sequence in which I painted the piece; work in that order, and finish each element before going on to another. The initial step for each element shows how the base coat areas should appear, while later steps normally indicate the first blends, as well as the application of additional darks and lights. The final steps usually include the finished painting, as well as steps leading up to it.
Brush Loading & Blending Basics: You should load color onto the brights from a loading zone, a strip of sparse paint pulled from a patty of paint down on the palette. Make mixtures by moving from one loading zone to another, working back and forth to achieve a mix of two or more colors. Wipe the brush on a paper towel after applying paint to the surface, but before beginning to blend. Blend colors WHERE THEY MEET using a dry brush and short strokes. Don’t blend randomly over the entire area; just blend ON THE LINE where colors come together, creating a new value and hue with the process of blending. To blend overall will cause loss of values & clarity. April 2017 Issue
Image 01: Prepare the
Image 02: Inked Design:
Transfer the inked design to the painting surface. Carefully follow the instructions detailed in Transferring the Design above. Note the use of the all-important tracing paper overlay so that you can tell how exact you are in duplicating the pattern and what parts you still haven’t done.
Image 03: When you’re finished, remove all layers of materials from the surface. Put the dark graphite paper away, tuck the original pattern out of the way, and keep the tracing paper overlay sheet handy for steps shown below. Image04: Remember - a perfect transfer goes a long way toward a perfect finished painting.
Image 05—Palette: I’ve listed and laid out the colors, with the most frequently-used colors in the bottom row, and those less-used in the top row. On the bottom row, from left to right: Ivory Black, Titanium White, Raw Sienna, and Raw Umber. On the top row, from left to right: Sap Green, Cadmium Yellow Pale, and Phthalo Turquoise.
Brush Sizes: Use the smaller brush sizes, #2 and #4, for the smaller areas and elements of the design. But within that range, choose the largest size that is comfortable to achieve the detail necessary. The #6 is appropriate for the base coats of larger areas, such as the grass blades.
In addition, I always keep my #8 bright handy. While I don’t often paint with that size, I use it dampened with odorless thinner for cleanup; I find the larger bristle base gives better pressure for removing any messy paint or graphite lines around the edges of the design. Once the instructions list a brush, stay with that size until they say to change to a different size.
Image 06: Using the #4 bight, base sections of the wings, as shown, with a mix of Phthalo Turquoise and a bit of Sap Green. Image 07: Lay the tracing
paper overlay gently on the wet paint, placing it evenly over the painted sections. Using a ballpoint pen, draw the section lines into the wet paint, as shown.
Image 08: When you’ve
removed the pattern, you can easily see the division lines you will need to follow as you complete the sections.
Image 09: Using your best #4
with a good chisel edge, pick up very sparse amounts of Sap Green + Titanium White on the brush, holding the brush rather flat to the palette surface for an even load. Holding the brush fairly low to the surface, apply the paint with a tapping motion, with the bristles parallel to the section lines to give a textured, slightly under-blended appearance to each section. Note on the right wing that I applied the freshly loaded brush to several sections in smaller areas first…
Image 10: And then, with a dry brush, blended where the values meet using the tapping motion.
© 2017 Painting World Magazine Digital Edition. All rights reserved. Not for distribution, resale or reproduction. You agree to follow all international copyright laws as well as the terms and conditions outlined at paintingworldmag. com. You may NOT reprint or make copies, even for non profit uses. Any violation of these terms will result in a nonrefundable cancellation of your subscription and possible prosecution with fines up to $150,000 USD. http://www. copyright.gov/title17/ Please contact info@paintingworldmag.com if you have received this PDF illegally.
Painting World Magazine
Image 01
Image 02
Image 03
Image 04
Image 05
Image 06
Image 07
Image 08
Image 09
Image 10
Image 11
Image 12
Image 13
Image 14
Image 15
Š 2017 Painting World Magazine Digital Edition. All rights reserved. Not for distribution, resale or reproduction. You agree to follow all international copyright laws as well as the terms and conditions outlined at paintingworldmag. com. You may NOT reprint or make copies, even for non profit uses. Any violation of these terms will result in a nonrefundable cancellation of your subscription and possible prosecution with fines up to $150,000 USD. http://www. copyright.gov/title17/ Please contact info@paintingworldmag.com if you have received this PDF illegally.
April 2017 Issue
59
60
Painting World Magazine
Image 11: The steps I described in Images 9 and 10 for the left wing and lower sections on the right wing are complete. Do the same on the right wing, as shown in part here to complete the right wing. Image 12: For stronger final
highlights on sections, reapply a slightly greener mix of Sap Green + Titanium White with the same #4, but very sparsely and on top of the original application of light mix in each section. Tap the color on as before, “walking” the brush to create a gradation of value, and strive for an iridescent, slightly textured look. Do not overwork it.
Image 13: Wipe the brush on
a paper towel. Using a dark mix of Ivory Black + Raw Umber, gently slide the chisel edge to create the section lines that divide areas. Hold the brush at a 45° angle for the best results.
Image 14: Messed up a line? Don’t worry. When you’ve finished them all, reload the brush with the base mix + a bit of Titanium White, and “skinny up” the stray wide or messy line. Image 15: Base the dark areas
on the wings with Ivory Black + Raw Umber. As you base, don’t quite come to the edge of the graphite line, either at the wing margin or next to the blue sections; allow just a bit of space.
Image 16: After you have
based all the dark areas and smoothed the surface of the paint by brushing over it, come back with a dry brush, wiped gently on paper towel, and tap the edges of the dark areas next to the turquoise sections to connect them. Hold the brush parallel to April 2017 Issue
the section lines and at the same 45° angle while doing this step.
Image 17: Place the tracing
paper overlay once again, centering it over the painted design, and transfer the lines needed onto the dark wing areas.
Image 18: Having this easy
method of transfer at your fingertips is quick and, most importantly, more accurate than drawing the lines freehand.
Image 19: Using Raw Sienna + Ivory Black on a sparsely loaded #4, apply the faint division lines in the dark wing areas. Finally, to divide the forewings from the hind wings, apply the same mix plus a tad of Titanium White. Note that the slightly lighter mix emphasizes the slight curvature of the wing shape where the forewings overlap the hind.
Image 20: Outline the
margins of the wings using the #0 round, applying a delicate line of Titanium White thinned with odorless thinner. If the paint breaks up or won’t flow, use more thinner in the mix. This detail line is wider and whiter on the inside curves of the wing edge, and just barely there at edges of outside “bumps.” If you get the outer bumps too wide, soften a little of the black mix into them to narrow.
Image 21: With very thin Ivory Black + Raw Umber, pull the antennae lines and add thicker tips using the #0 round brush. If the antennae lines get too fat, simply use the #8 bright dampened in odorless thinner to clean up from the outside, much as you did the wider dark section lines.
Base the body with a mix of Ivory Black + Raw Umber + Titanium White in a medium-value gray. Base the head with Ivory Black + a tad of Raw Umber.
Image 22: Shade on the body
with a sparse bit of Ivory Black using the #2 bright. Make slightly curved lines of Ivory Black across the abdomen and some vertical shading lines on the thorax. Highlight on the thorax and abdomen where shown with a bit of dirty brush + Titanium White. Load the #0 round with a medium value Ivory Black + Raw Umber + Titanium White to create gray, oval eyes on the sides of the head. With the same brush, add a few tiny dots of Titanium White on the head.
Image 23: Using the #6 bright, base the dark values on the grass blades and the central stem structure of the seed head with Black + Sap Green. Note that this mix needs to have sufficient green to show as a nice grass color, but adequate black to tone the green so it’s not too bright. Allowing too much intensity in the grass blades draws the eye to areas that should be less important. Image 24: Base the light value of the grass blades and the middle value of the seed head with a mix of Sap Green + Raw Sienna + Titanium White. The Raw Sienna is important in this mix, again, to tone the green so it’s not too bright. As you apply color on the grass blades, do a bit of preliminary brushwork between values, blending with the growth direction of each area. On the seed head, add this value with the chisel of the #2 to begin the necessary underlying fine texture.
© 2017 Painting World Magazine Digital Edition. All rights reserved. Not for distribution, resale or reproduction. You agree to follow all international copyright laws as well as the terms and conditions outlined at paintingworldmag. com. You may NOT reprint or make copies, even for non profit uses. Any violation of these terms will result in a nonrefundable cancellation of your subscription and possible prosecution with fines up to $150,000 USD. http://www. copyright.gov/title17/ Please contact info@paintingworldmag.com if you have received this PDF illegally.
Painting World Magazine
Image 16
Image 17
Image 18
Image 19
Image 20
Image 21
Image 22
Image 23
Image 24
Image 25
Image 26
Image 27
Image 28
Š 2017 Painting World Magazine Digital Edition. All rights reserved. Not for distribution, resale or reproduction. You agree to follow all international copyright laws as well as the terms and conditions outlined at paintingworldmag. com. You may NOT reprint or make copies, even for non profit uses. Any violation of these terms will result in a nonrefundable cancellation of your subscription and possible prosecution with fines up to $150,000 USD. http://www. copyright.gov/title17/ Please contact info@paintingworldmag.com if you have received this PDF illegally.
April 2017 Issue
61
62
Painting World Magazine
Image 25: Now, add the lightest value on the seed head with choppy, short chisel strokes of the #2 bright using the light value green mix from the previous step + a bit more Titanium White. Image 26: Apply the grass blade highlights and the first highlights on the seed head using the appropriate brushes and the light green mix from the above steps, as shown. Add a teeny speck of Cadmium Yellow Pale to the mix if you would like a bit of a brighter highlight. Add central veining with the light grass blade values using the #4 bright. Image 27: Blend the highlights to soften and subdue them; do not overwork this step. Add more bits of Titanium White where needed to adjust the values as you go. Use the #0 round to do the best possible fine lines of light in the lightest areas of the seed head. Add a bit of Image 29 “feathering” with the same brush and thin Titanium White at the bottom edges of the larger grass blades.
Image 28: When nearly finished, I decided to add a continuation of the one grass blade at the left side of the design to give a better balance to the piece. Paint it the same as for the other grass blades. With bits of Raw Sienna + Titanium White on the #0 round, add the tiny “flowers” on the seed head, placing them randomly. Sign your finished piece with a thinned mix of Ivory Black + Sap Green using the #0 round brush.
Image 29: This is the final beauty shot of “Prepona Butterfly with Wild Grasses.”
The Final Finish A final finish helps equalize the sheen of the different oil colors and gives more protection to the acrylic background. Before varnishing, clean up any graphite
lines, etc. Wipe off handprints, smudges, and so forth. Let the paint dry thoroughly. Once you have painted a surface with oils, any finish you put over that paint needs to be an oilbased product, not water-based. Thus, the Krylon Matte Finish #1311 we used above is NOT a good choice for a final finish. I use ONLY Krylon Spray Varnish #7002. If you can buy Krylon Matte Finish #1311 at a local supplier, then they can order the #7002 for you. Otherwise, you may order from Hofcraft Inc. You must apply/reapply it exactly according to the instructions on the can. For pieces that will hang on walls, I apply only one or two coats of finish. For a piece that will receive some wear, I would recommend two coats, or even three.
Load the #4 chisel with the highlight mix, and enhance a few grass blade edges to give thickness to them. With a cheesecloth pad or a bit of soft tissue, remove a little paint where the grass blades go off the surface at the bottom; you don’t want them to pull the eye out of the painting.
April 2017 Issue
© 2017 Painting World Magazine Digital Edition. All rights reserved. Not for distribution, resale or reproduction. You agree to follow all international copyright laws as well as the terms and conditions outlined at paintingworldmag. com. You may NOT reprint or make copies, even for non profit uses. Any violation of these terms will result in a nonrefundable cancellation of your subscription and possible prosecution with fines up to $150,000 USD. http://www. copyright.gov/title17/ Please contact info@paintingworldmag.com if you have received this PDF illegally.
Painting World Magazine
Due to the large size of this painting, this line drawing has been reduced by half. Please enlarge 200% for full size.
Download all line drawings ready to print here: http://bit.ly/2npUHL3
April 2017 Issue
63
Layered Feathers
by Kelly Hoernig
Painting World Magazine
I wanted to use muted colors and a lot of layers to create a very soft background for the barely there bird pattern. I wanted your focus on the flash card but when you look closer, that is when you see all the lovely details of the background. Enjoy!
DecoArt® Mediums: • Media® White Gesso DMM18 • Matte Decou-Page™ DS106 • Matte Spray Finisher DAS13
Loew-Cornell® Brushes: • #10 Shader, Series 3300 • #1 Liner, Series 3350 • 3/4” Wash, Series 3550 • #4 Round Stroke, Series 7040 • 1” White Nylon Glaze Wash, Series 798 • 1” Mixtique Wash, Series 8000 • 3/8” Stippler, Series DM
Sanford Prismacolor® Premiere Colored Pencils:
About Kelly Hello from Indiana! I am on a quest this year to make my art more personal and meaningful. Since I am surrounded by 10 wooded acres, birds and nature fill my senses.
Surface: • 9” x 11” Artist Panel • Vintage Flashcard, approx. 3” x 9”
Acrylic Paints by DecoArt Americana: • Antique Green DA147 • Bleached Sand DA257 • Bittersweet Chocolate DA195 • Graphite DA161 • Mink Tan DAO92 • Mississippi Mud DAO94 • Oyster Beige DA313 • Shale Green DA152 • Soft Black DA155
• French Grey 50% • French Grey 70% • French Grey 90% • Ginger Root • Sandbar Brown
Miscellaneous Supplies: • Credit Card or Spreader • Black and White Graphite Paper • Sea Sponge • Water Spritz Bottle • Favorite Stencils with Little Parts of Interest • White Charcoal Pencil • Drywall Tape or Spiral Notebook Edging • Paper Ephemera (dictionary or book page, cancelled postage stamp, cardboard scraps)
Instructions: Flash Card: Rip the book text so it fits approximately 1/4 of the card, and decoupage it to the surface. When it’s dry, gesso the entire card using a credit card as a spreader.
Helpful Hints: I added a dictionary page for an extra layer but it isn’t necessary. I like seeing some of the text coming through and it goes well with the feather card. Changing the decor to match your home is easy, find four colors (values - 2 light, 1 medium, 1 dark) that play nice together. Fill in each area of the feather with a wash of color. Use Bleached Sand for the white areas, Mississippi Mud for the light brown areas, and Mississippi Mud + Soft Black for the dark areas. Pounce Bleached Sand + a touch of Mississippi Mud for the downy area. You’ll do all the details with colored pencils. Make sure to gently curve your strokes, creating nice, soft lines. Keep a sharp point so you can add more feather lines. Use Ginger Root in the lightest areas. Use Sandbar Brown on the stem, and to deepen the Ginger Root. I used the French Greys in the medium and dark areas. Start with French Grey 50%, shade with French Grey 70%, and then deepen with French Grey 90%. Wash the flashcard edges with Shale Green. Decoupage the bird stamp to the bottom right. If it stands out too much, wash Bleached Sand over it to tone it into the background more.
© 2017 Painting World Magazine Digital Edition. All rights reserved. Not for distribution, resale or reproduction. You agree to follow all international copyright laws as well as the terms and conditions outlined at paintingworldmag. com. You may NOT reprint or make copies, even for non profit uses. Any violation of these terms will result in a nonrefundable cancellation of your subscription and possible prosecution with fines up to $150,000 USD. http://www. copyright.gov/title17/ Please contact info@paintingworldmag.com if you have received this PDF illegally.
April 2017 Issue
65
66
Painting World Magazine
Background: Rip the dictionary page so it will cover 1/3 of the board. Apply Decou-Page to the right half of the board, lay the dictionary page down carefully, and then smooth it from the center out with a credit card to make sure you have all the air bubbles out. When it’s dry, apply DecouPage over the entire surface, including the dictionary page. With a 1” brush, work wet on wet to get a nice blended look. Start at a corner first with Oyster Beige, and then pick up Shale Green and blend, letting your strokes show.
Continue, adding Antique Green, and then a touch of Graphite. Keep randomly picking up the colors to create a nice mottled background. Let it dry.
With drywall tape, use Bittersweet Chocolate to apply the dots randomly. Put them in several places throughout the surface to create pockets of interest.
Spritz the entire top with water. With the sea sponge and Oyster Beige, sponge the entire area, letting some areas be brighter than others are. This will help tone the piece and give a softer overall look.
Bird Design:
Use your favorite stencils’ pieces; I find the smaller to be the more interesting. Use the DM stippler brush and Mink Tan, and then use Bittersweet Chocolate to shade while it’s still wet.
I found it easier to draw the bird and stem lines with the charcoal pencil instead of using graphite paper. If you are transferring with graphite paper, do it as lightly as possible so you don’t have to fit covering the line, since we will be applying a wash of color, not full strength color. I did the birds first, so everything will go out from them. Use the #4 round stroke brush and Oyster Beige with nice, choppy strokes; they are meant to have texture. Brighten them with Bleached Sand twice. The bird eye is Shale Green. I did the stems next, making sure each bird had one to stand on. From there, I added the leaves. I just continued adding lines and leaves until I was happy with the overall effect. Do all of the design elements with the #4 round stroke and Oyster Beige. I brightened a couple of the items near the birds with Bleached Sand. Remember that the birds should be the brightest and draw your attention.
Finishing: Spray varnish everything with 2-3 light mists. I decoupaged several pieces of cardboard to the back of the flash card. It creates space between the flash card and the bird background, but it isn’t necessary.
April 2017 Issue
© 2017 Painting World Magazine Digital Edition. All rights reserved. Not for distribution, resale or reproduction. You agree to follow all international copyright laws as well as the terms and conditions outlined at paintingworldmag. com. You may NOT reprint or make copies, even for non profit uses. Any violation of these terms will result in a nonrefundable cancellation of your subscription and possible prosecution with fines up to $150,000 USD. http://www. copyright.gov/title17/ Please contact info@paintingworldmag.com if you have received this PDF illegally.
Painting World Magazine
Download all line drawings ready to print here: http://bit.ly/2npUHL3
April 2017 Issue
67
Spring Bouquet by Sandy McTier
Painting World Magazine
Nothing says spring like seeing a vase of freshcut flowers. You can use this beautiful oil painting of hydrangeas and daisies to decorate your home, or give it as a Mother’s Day gift.
Martin F. Weber® wOil Colors: • White Permanent 7421 • Raw Sienna 7426 • Prussian Blue 7425 • Sap Green 7428 • Cobalt Blue Hue 7410 • Cadmium Yellow Light Hue 7406 • Paynes Gray 7417 • Dioxazine Purple 7411 • Ultramarine Violet 7412 • French Ultramarine Blue 7429 • Phthalo Yellow Green 7424
Miscellaneous Supplies:
About Sandy Sandy lives in Georgia with her husband, three sons (all in college in three different cities), and a dachshund named Becks. She started Sandy McTier Designs in 2011 and loves painting everything from miniatures to mixed media to fine art to whimsical. Sandy travel-teaches around the world and absolutely loves sharing her passion for painting and creating with others. She is a DecoArt® Helping Artist and Dynasty Artisan. You can learn more about Sandy at www.sandymctierdesigns.com, see more of her art on her Facebook page (Sandy McTier Designs), and find her on Twitter, Pinterest, and Instagram under Sandy McTier.
Surface: • 9” x 12” Canvas
wOil® Brushes: • #6 Perfect Bright (PB) • #0 Perfect Round (PR)
• wOil Fast Dry Medium • Water Basin • Tabletop Easel • Palette Knife • Pen or Stylus • Transfer Paper • Palette Paper • Paper Towels (I prefer Viva®)
Color Mixes Used in This Painting: • Sandy’s Blue: 1 part Prussian Blue + 3 parts White Permanent. You are trying to achieve a Tiffany Blue or Robin’s Egg Blue.
Various Greens: • Dark Green: 1 part Paynes Gray + 1 part Sap Green. • Light Green: 1 part Dark Green mix + 1 part Phthalo Yellow Green + 1 part Cadmium Yellow Light Hue + a touch of White Permanent. • Aqua: 1 part Cobalt Blue Hue + 1 part Phthalo Yellow Green + a touch of White Permanent. When I first start a design, I like to load my #6 PB with thinned down Raw Sienna, and then sketch
away. I basically block in the shapes and get an idea of what I want my design to look like. I like starting with Raw Sienna, because I feel it gives my entire painting a bit of a shine in the end. But, in the end, it’s just paint. If I’m not happy with it, I can wipe it away, and brush it right into the painting. I also like to buy fresh flowers and use them as inspiration in my paintings. I take photos of flowers and have a lot of reference photos so that I can see how elements appear at different angles, etc. Most of the time, though, I just start sketching and designing, and what happens, happens. The painting evolves over time, and I frequently brush things into the background – like an overgrown leaf or flower. This can change the colors in the background, and I often forget how many leaves or flowers were in places, until I look at my background. If I know I didn’t use a color in the background, then it obviously was something that was brushed out. I tell you all of this because every time you paint this painting or any design of mine, your background will end up slightly different each time, and that is an AWESOME thing!
Here are three tips/ rules I have: • Have fun! Loosen up from your shoulders to your fingertips. If you have a death grip on the brush, it will show up in your work. Let the brush flow and move in your hand.
© 2017 Painting World Magazine Digital Edition. All rights reserved. Not for distribution, resale or reproduction. You agree to follow all international copyright laws as well as the terms and conditions outlined at paintingworldmag. com. You may NOT reprint or make copies, even for non profit uses. Any violation of these terms will result in a nonrefundable cancellation of your subscription and possible prosecution with fines up to $150,000 USD. http://www. copyright.gov/title17/ Please contact info@paintingworldmag.com if you have received this PDF illegally.
April 2017 Issue
69
70
Painting World Magazine • If you love it, leave it! Before you stroke over something a second time, sit back and look at it. Up close, things can look like a hot mess. Step back and take a look – you might just discover you have a masterpiece. • We want to work lean to fat, meaning you’ll thin down the first applications of paint with medium. Don’t use too much medium, or your strokes will drip and droop. As we progress through the painting, we will add less medium and more paint. When you arrive at a point where you feel you may want to throw the piece across the room, you may just be on the verge of having a masterpiece in waiting! All paintings get to that “ugly” stage; as frustrating as it is, push through it, and continue to fix, edit, and complete your piece of art.
of the leaves in my step-by-step photos and brushed them into the background. (Figure 2) Next, dip the chisel edge into medium, and work it into some Dioxazine Purple. Block in the hydrangeas down the edges of the vase, and paint a couple of stems in the vase. Dip the tip of your brush into medium, and work it into some Raw Sienna; paint the background (even between all of the flowers). You want to get the corner of the brush into the flowers and leaves, and not leave an outline. (Figure 3)
As you pick up the colors from the flowers and leaves, simply brush them into the background. If you pick up too much, wipe the paint off on a paper towel. Pull the brush flat from the bottom up into the vase, letting it stutter here and there. Repeat from the top of the vase down in a couple of places. Getting in between the flowers and leaves is a bit tricky, so use the corner of the brush and the chisel edge to get into those places. Don’t forget to wipe the brush often, especially before you pick up more Raw Sienna. Wash the brush.
The pattern provided is exactly accurate once enlarged, as I traced over my original design. Tape the pattern together to hold it in place, lay transfer paper down on the canvas, and start tracing your design. You basically want the shapes of things. I like to use a pen to transfer my design so that I can see what lines I’ve gone over. Remove the transfer paper and pattern. Dip the tip of the #6 PB into your medium, and mix it with some Raw Sienna to make it very inky. Loosely sketch over the pattern lines you transferred. (Figure 1) Dip the chisel edge of the #6 PB into medium, and work it into a little Sap Green; block in the leaves and the stems in the vase. Wash the brush out, and dry it off. You’ll notice I took out some April 2017 Issue
© 2017 Painting World Magazine Digital Edition. All rights reserved. Not for distribution, resale or reproduction. You agree to follow all international copyright laws as well as the terms and conditions outlined at paintingworldmag. com. You may NOT reprint or make copies, even for non profit uses. Any violation of these terms will result in a nonrefundable cancellation of your subscription and possible prosecution with fines up to $150,000 USD. http://www. copyright.gov/title17/ Please contact info@paintingworldmag.com if you have received this PDF illegally.
Painting World Magazine
Using a palette knife, mix up some Sandy’s Blue. Mix about a quartersize amount of White Permanent with a touch of Prussian Blue. In fact, just touch the tip of the palette knife on the Prussian Blue, and mix. Add some medium to the mix to make an inky consistency. Add more Prussian Blue to the mix as needed to achieve the color of a Tiffany Blue or Robin’s Egg Blue. Dip the tip of your brush into medium, and load it with Sandy’s Blue. Using the flat of the brush, softly lay the color in the background. (Figure 4) Wipe the brush off before picking up more paint. Reload, and repeat everywhere you painted with the Raw Sienna. Softly blend using the flat of the brush in a crisscross motion; wipe the brush off, and repeat. You don’t want to over-blend and make the background one color – leave the greens, purples, and mix of Raw Sienna and Sandy’s Blue. Notice that I softly went over the vase lines, but you can still see the shape.
Hydrangeas: See the worksheet for stroke work.
Base color: Dioxazine Purple + Ultramarine Violet + a very tiny touch of medium.
Mixed colors: White Permanent + Dioxazine Purple, White Permanent + Ultramarine Violet, and White Permanent + French Ultramarine Blue. I don’t add any medium to these mixes, as there is already enough on the flowers.
Sometimes, I stroke over a petal I painted previously, which gives me two petals in one color and one petal in a lighter color. This will give your clusters some dimension. Remember to refer to the worksheet.
Paint the petals using the flat corner of the brush. The faster you go, the better they will look – I promise. Paint clusters of three petals, or a random petal here and there. (Figure 5)
Now, add some petals with the French Ultramarine Blue mix. You want to keep the brighter petals where the highlight on the hydrangea is. (Figure 6)
DON’T cover up all of the rich base color, or the flower will look flat. You want to keep that dark color so that your flower has dimension! You can always put it back in, but then you have to put in some lighter petals as well, as you don’t want the dark petals appearing on top of other petals. Start with the Dioxazine Purple mix first, and, using the corner of the brush, randomly paint small strokes. When it seems like most of the color is off the brush, stroke some of the petals near the bottom of the hydrangea. This will give the shape of the petals without taking away the dark color near the base. Wipe the brush off. Reload with the Ultramarine Violet mix, and paint petals. (Figure 6)
I don’t always dot the centers on my hydrangeas, but if you’d like to, use the #0 PR brush loaded with a touch of the Ultramarine Violet + White Permanent mix, and randomly dot the centers. Load the #6 PB with the Dark Green mix, and paint small stems from the bases of the flowers, and then stems into the vase (see the finished project). Don’t go over all of the light stems in the vase that you previously painted. This will give some stems a glow and others a more opaque look. Keeping some Dark Green mix in the brush, load with the Light Green mix, and paint over all of the stems again. Add a touch of Dioxazine Purple, and swipe the brush on a few stems inside the vase.
© 2017 Painting World Magazine Digital Edition. All rights reserved. Not for distribution, resale or reproduction. You agree to follow all international copyright laws as well as the terms and conditions outlined at paintingworldmag. com. You may NOT reprint or make copies, even for non profit uses. Any violation of these terms will result in a nonrefundable cancellation of your subscription and possible prosecution with fines up to $150,000 USD. http://www. copyright.gov/title17/ Please contact info@paintingworldmag.com if you have received this PDF illegally.
April 2017 Issue
71
72
Painting World Magazine Figure 1
Figure 2
Figure 3
Figure 4
Figure 5
Figure 6
Figure 7
Figure 8
Figure 9
April 2017 Issue
Š 2017 Painting World Magazine Digital Edition. All rights reserved. Not for distribution, resale or reproduction. You agree to follow all international copyright laws as well as the terms and conditions outlined at paintingworldmag. com. You may NOT reprint or make copies, even for non profit uses. Any violation of these terms will result in a nonrefundable cancellation of your subscription and possible prosecution with fines up to $150,000 USD. http://www. copyright.gov/title17/ Please contact info@paintingworldmag.com if you have received this PDF illegally.
Painting World Magazine Wash the brush, and dry it off. Load it with the Aqua mix, and highlight a few small stems from the base of the flower.
centers of the flowers. Load the #0 PR with Raw Sienna, and dot the centers, making sure not to cover up all of the Dark Green mix.
The center of the leaf is darker, while the edges are lighter. If you lose the dark, paint it back in from the center out.
Daisies:
Wipe the brush off. Load it with Cadmium Yellow Light Hue and a touch of White Permanent, and randomly dot the Raw Sienna dots.
Slide on the chisel edge of the brush to paint the stem. Wipe the brush off.
Refer to the worksheet provided for stroke work. TIP: Use pressure on the top of the petal, slightly push, and gradually lift up on the pressure as you are painting toward the center of the flower. Make sure the petals curve and follow the shape and angle of the flower. The petals in the front are usually short, choppy dabs of color. Dip the chisel edge into medium, and load it with some Paynes Gray. Paint the daisies. Load the #6 PB with White Permanent, and, with little pressure on the bristles, paint the petals. Don’t worry if the color stutters; you will be going over the strokes again. (Figure 7) As you paint the strokes, you might get into the hydrangeas and add purples into your daisies. I love it when that happens, and usually leave it. Load with more White Permanent, and re-stroke over the petals on the front of the flower, giving that flower some dimension. The petals in the back of the flower are a gray/purplish color, which will push those petals back into the painting. The petals in the front are whiter, which will make them appear closer to the viewer. Next, load the #6 PB with the Dark Green mix, and paint the
Wipe the brush off again. Load it with the Aqua mix, and add to the highlight sides of the daisy centers. If you covered up all of the dark, load the #0 PR with the Dark Green mix, and dot it back in. After painting the vase, come back to the daisies, and glaze on a touch of color. Dip the chisel edge of the #6 PB into medium, mix it with some Dioxazine Purple, and then wipe the excess off on a paper towel. With very little pressure, swipe the brush on some of the petals, as shown in the finished picture. Repeat with some French Ultramarine Blue.
Leaf: Refer to the worksheet for stroke work. Base the leaf in with the Dark Green mix. Add a touch of the Light Green mix to the brush, and mix on the palette. You don’t want much paint on the brush, so swipe across a paper towel to get rid of excess paint if necessary. Start at the tip of the leaf, with the chisel edge of the brush on the edge of the leaf. With very little pressure, pull the chisel edge at an angle toward the base of the leaf, and quickly lift. Repeat down the side of the leaf.
Add more Phthalo Yellow Green, Cadmium Yellow Light Hue, and a touch of White Permanent; blend again on the palette. Swipe the brush across a paper towel to remove excess paint, and add more highlight strokes to the right side of the leaf. Wipe the brush off, load it with a touch of the Aqua mix, and repeat with a few strokes on the right side.
Filler/Falling Greenery: To give the impression of more greenery in the arrangement, add some swipes of color, as shown in the finished project. Load the #6 PB with the Dark Green mix, and swipe the corner of the brush here and there. Wipe the brush off. Load it with the Light Green mix, and repeat with a stroke that overlaps, but doesn’t cover up, the Dark Green stroke. Wipe the brush off again, and repeat with some of the Aqua mix.
Vase: Repaint the stems. Dip the chisel edge of the #6 PB into medium, and load it with a touch of Paynes Gray; blend on the palette. Using the chisel edge of the brush, repaint the lines of the vase, as well as the waterlines. Wash the brush out, and dry it off. (Figure 8)
© 2017 Painting World Magazine Digital Edition. All rights reserved. Not for distribution, resale or reproduction. You agree to follow all international copyright laws as well as the terms and conditions outlined at paintingworldmag. com. You may NOT reprint or make copies, even for non profit uses. Any violation of these terms will result in a nonrefundable cancellation of your subscription and possible prosecution with fines up to $150,000 USD. http://www. copyright.gov/title17/ Please contact info@paintingworldmag.com if you have received this PDF illegally.
April 2017 Issue
73
74
Painting World Magazine Dip the chisel edge into medium, and sideload one corner with a touch of White Permanent. Blend the color on the corner of the brush on the palette, and then slide the flat of the brush down the left side of the vase. The left corner is on the edge of the vase, with the right corner facing the right side of the canvas. Lightly pull the brush down, and repeat as needed to give the left side of the vase a soft, white shine. Wipe the brush off, load it with White Permanent, and highlight the waterline. Don’t highlight the waterline in the back of the vase. Load the #6 PB with a touch of Dioxazine Purple, and swipe the brush across a paper towel to get rid of excess paint. Start at the top left of the vase, and lightly pull the flat of the brush down just a bit; lift as you’re pulling the brush. Repeat from the bottom of the canvas up, again on the left side.
When you’re done, wipe the brush off, and softly pull the flat of the brush across the middle section of the vase. Wipe the brush off again, and softly pull from the right to the left, again in the middle section of the vase. This will help blur the stems a bit in the water. (Figure 9)
Finishing Touches: If necessary, brighten the front petals on the daisies with a bit more White Permanent. Brighten the highlights on the stems and leaves with the Light Green mix and/or the Aqua mix. Pull the chisel edge through a touch of Paynes Gray, and add a
shadow under the daisy petals on the rim of the vase. Start with the chisel edge next to the petal, softly pull the flat of the brush down just a bit, and lift. Repaint any petals needed to cover up the little stems that go into the hydrangea. Wipe your brush off, and softly go over the shadow again to soften the look if needed. Sign your piece of art!
Due to the large size of this painting, this line drawing has been reduced by half. Please enlarge 200% for full size.
Reload with a touch more paint, and then pick up a touch of French Ultramarine Blue. Pull color up from the back waterline on the right side, as shown in the finished picture. Pull the flat of the brush up from the bottom of the canvas, in the middle of the vase, to add some blue. Repeat where desired. Wipe the brush off, load it with White Permanent, and softly stroke the flat of the brush to add a highlight to the left side of the vase. Reload, and repeat a bit lower on the right side of the vase. It helps to hold the handle of the brush close to your wrist, with little to no pressure on the bristles while laying on the White Permanent highlight.
April 2017 Issue
© 2017 Painting World Magazine Digital Edition. All rights reserved. Not for distribution, resale or reproduction. You agree to follow all international copyright laws as well as the terms and conditions outlined at paintingworldmag. com. You may NOT reprint or make copies, even for non profit uses. Any violation of these terms will result in a nonrefundable cancellation of your subscription and possible prosecution with fines up to $150,000 USD. http://www. copyright.gov/title17/ Please contact info@paintingworldmag.com if you have received this PDF illegally.
Painting World Magazine
Innovative Corner
with Debbie Cole, CDA
Spectacular Stencils! I am continuing the series on how to create interest in a design by using special tools and am focusing on Stenciling in this issue. The art form has been around since the origins of man. Primitive stencils were created from objects found in nature which were arranged into a pattern. Pigmented “paints” were then blown or sprayed onto the negative space between the objects to create patterns. Needless to say stenciling has evolved a lot since then and is used by business, the military, silk screening, in addition to using them for artistic tools. Stencils are generally a thin sheet of material, such as paper, plastic, or metal with images cut into it. The gaps or negative space within the stencils are called “islands”. These islands allow pigment to be applied though the cut areas to create images or patterns. The actual stencil materials are called “bridges” because they separate yet keep the islands connected. The key advantage of a stencil is that it can be reused to repeatedly and rapidly produce the same patterns or produce images that would be difficult to create by hand. Stencils open up a world of creative expression for painters. They can be used to easily create patterns, borders, and lettering that can change a simple design into an intricate work of art. That is
Stencils by Laurie Speltz’s Creative Coach®
why they have become one of the hottest trends in painting today. There are many so stencil resources for painters such as Decoart, Inc and Plaid, but I thought I would spotlight a few designer inspired stencils that stand out from the rest. Laurie Speltz of the Creative Coach has created an amazing line of stencils incorporating her lighthearted whimsical style. While she has many background and border stencils that are delightful, what stands out are her series of basecoating stencils. These stencils have basic shapes and images that can be used as a guide for the basecoat rather than having to transfer a pattern. This saves so much time and makes painting easier.
© 2017 Painting World Magazine Digital Edition. All rights reserved. Not for distribution, resale or reproduction. You agree to follow all international copyright laws as well as the terms and conditions outlined at paintingworldmag. com. You may NOT reprint or make copies, even for non profit uses. Any violation of these terms will result in a nonrefundable cancellation of your subscription and possible prosecution with fines up to $150,000 USD. http://www. copyright.gov/title17/ Please contact info@paintingworldmag.com if you have received this PDF illegally.
April 2017 Issue
75
76
Painting World Magazine
Stencils by Tracy Moreau®
Tracy Moreau has created a line of elegantly detailed stencils that will inspire you and add a touch of sophistication to your art. She has a wide range of stencils that incorporate vintage motifs, patterns, borders, holiday, elegant scrolls, lettering and more. She has licensed many of her designs to DecoArt, Inc to help create the Home Décor line for them. Patricia Rawlinson of Creative Arts Lifestyle has such a wealth of stencil collections that meets the needs of all painters. She also has stencils where you can basecoat the image and then add layers of stenciling to create a completely finished image. However, these have more realistic subject matter and are exquisite when completed. One of my favorites in her line is the Chalk Typography stencils that were created by Judy Westegaard Jenkins. These are for painters would like to add typography to their artwork, but do not have calligraphy skills. Another style within her line are Clock and Banding stencils that were created to add numbers and elements to clock surfaces. This makes creating Vintage or Country clocks simple and easy to do.
pattern on the card stock with selected cutting dies and run it through the machine.
Spray the paper with a clear coat to allow them to last through multiple applications. Another way to create your own custom is by using an electronic cutting machine such as the Silhouette or Eclipes2. You can draw out the patterns and scan them into a computer or create them directly in the computer itself. The cutting machines will then cut the stencils from Mylar, contact paper, or heavy weight card stock. This method is perfect if you wish to create your own verses with special fonts for your painted projects.
Stencils by Patricia Rawlinson’s Creative Arts Lifestyle®
If the manufactured stencils do not meet your needs, be innovative and create your own stencils using cutting machines. You can create stencils with a Big Shot Machine using heavy weight card stock and cutting dies. Simply arrange a April 2017 Issue
© 2017 Painting World Magazine Digital Edition. All rights reserved. Not for distribution, resale or reproduction. You agree to follow all international copyright laws as well as the terms and conditions outlined at paintingworldmag. com. You may NOT reprint or make copies, even for non profit uses. Any violation of these terms will result in a nonrefundable cancellation of your subscription and possible prosecution with fines up to $150,000 USD. http://www. copyright.gov/title17/ Please contact info@paintingworldmag.com if you have received this PDF illegally.
Painting World Magazine
Once you have your stencils in hand, there are many important tips to remember when stenciling. First is that the stencil always needs to be keep flat so that it will not be damaged. It is also important to remember to keep the stencil taught against the surface. Lay the stencil flat against the surface and secure with removable painters tape. Make sure that the stencil has not “bubbled up” anywhere and that it is completely flush against the surface. This will eliminate the paint from bleeding under the raised edges. Should an edge of a plastic stencil become bent or raised up use a hair dryer to heat it, and then gently push it back into position. The method of application is also important. Wither using a brush, sponge or other applicator it is important to use very little paint. Overloading is the number one mistake most painters make when stenciling. The type of tool varies also. Stenciling brushes are round with short, stiff bristles generally made from hog hairs. To load the brushes pounce the tip of the brush into paint, then wipe it off on dry paper towel until a residue remains. Cosmetic sponges may also be used. In the same manner as the brush, load the sponge, then remove the excess paint on paper towel. My favorite tool is the Sponge Applicator from Clearsnap, Inc. It has a double handle with two sponge tips. Because the sponge on the tip is thin, it is very difficult to over load this tool. It also is easy to control the placement of paint during the stenciling process with this tool. When using a brush, there are two methods of application. The first method is the stippling method which is simply tapping or pouncing the loaded brush up and down over the stencil openings. This is the application used with sponges and/or the sponge applicator. The second method is the dry brush method. The brush is loaded in the same manner and then the paint is applied with a swirling motion. When using the dry brush method it is important to start on the outside of the stencil and work inward. While this can be more challenging
than the stipple method, it allows a gradation of color to be applied to the “islands”. Caring and clean of stencils is also very important. As stated above it is necessary to always keep stencils flat to avoid damaging them. When cleaning a
stencil use a large flat bottomed plastic tub so that the entire stencil can be submerged without bending it. Fill the tub with warm soapy water and place the stencil into the tub as soon as the application is completed. Use your fingers or kitchen sponge to gently remove the paint from the stencil. To store stencils they must be kept flat. Many stencils come with holes so that they can be placed in a note book. They can also be placed inside plastic craft containers or file folders and laid flat.
Stencil Suppliers: Laurie Speltz The Creative Coach® www.lauriespeltz.com 2815 100th Street #130 Urbandale, IA 50322 (515) 253-9881 info@lauriespeltz.com Tracy Moreau Tracy Moreau Designs® www.tracymoreau.net tracy.moreau@tracymoreau.net Patricia Rawlinson Creative Arts Lifestyle® www.creativeartslifestyle.com P.O. Box 938 Gallipolis, OH 45631 (740) 441-1564 customerservice@creativeartslifestyle.com
© 2017 Painting World Magazine Digital Edition. All rights reserved. Not for distribution, resale or reproduction. You agree to follow all international copyright laws as well as the terms and conditions outlined at paintingworldmag. com. You may NOT reprint or make copies, even for non profit uses. Any violation of these terms will result in a nonrefundable cancellation of your subscription and possible prosecution with fines up to $150,000 USD. http://www. copyright.gov/title17/ Please contact info@paintingworldmag.com if you have received this PDF illegally.
April 2017 Issue
77
La Hydrangea by Debbie Cole, CDA
Painting World Magazine
Spring is beginning to come around, and what better way to welcome it than with a beautiful flower painting? The hydrangea gives us a good chance to practice painting details and layering colors. You’ll also use stenciling to create a complimentary, two-toned background.
Surface: • 9” X 12” Masonite board available from Viking Woodcrafts
Stencil: • Creative Arts Lifestyle – Passport to Paris stencil #STCL36_1
Decoart Americana Acrylic Paints: • Antique Gold DAO9 • Avocado DAO52 • Bubblegum Pink DA250 • Buttermilk DAO3 • Celery Green DA208 • Cranberry Wine DA112 • Driftwood DA171 • Light Avocado DA106 • Light Buttermilk DA164 • Midnite Green DAO84 • Peony Pink DA215
DecoArt® Mediums: About Debbie Debbie Cole, CDA is an awardwinning artist that is widely recognized as one of the leading contemporary decorative painters of the 21st century. Author of numerous books and pattern packets, Debbie has been a soughtafter instructor who has taught throughout the United States, Japan, Argentina, and Canada. While Debbie loves traditional decorative painting, she also loves stamping, mixed media, and jewelry design. No matter what her medium, Debbie’s main source of inspiration comes from her faith in God. She knows that her creative talent is a gift and feels blessed to be able to share it with others. Her mission is to be able to reflect her joy onto others through her artwork.
• Media® Ultra-Matte Varnish DMM24 • Americana MultiPurpose™ Sealer DS17
Silver Brush Ltd® Brushes: • #0 Monza® Round Brush from Debbie Cole Creative Blending Set, DC-2624S (for dry brushing) • 1/2” & 3/4” Golden Natural™ Square Washes, 2008S • #6 Golden Natural Shader, 2002S • #3 Golden Natural Round, 2000S • #00 Golden Natural Script Liner, 2007S • #10 Stencil Brush, 1821S
Miscellaneous Supplies • Basic Acrylic Painting Supplies • Cheesecloth • Foam Roller • Large Sea Wool Sponge
• Palette Knife • Tracing Paper • Transfer Paper • Pencil
Preparation: Seal the board with Multi-Purpose Sealer. Allow it to dry, and sand it lightly. Remove the particles with a lightly dampened cheesecloth. Use a foam roller to base coat the surface with Light Buttermilk. Repeat until you’ve achieved a smooth and even base.
Instructions: Background: Using a palette knife, mix Light Buttermilk + Driftwood (2:1), and sponge it with a dampened sea wool sponge all over the board. Allow the paint to dry, and place the text of the stencil in the upper corner of the board. Apply Driftwood + Light Buttermilk (2:1) to the text area using a stencil brush. Repeat the text in the same manner randomly around the board. Using Driftwood, apply the main icons from the stencil in the same manner, referring to the photo for placement. Transfer on the line drawing very lightly. (Figure 1)
Flower: Base coat the flower with Buttermilk + Bubblegum Pink (1:1). Slip-slap some highlights in the upper right area of the flower with Pink Chiffon. Float to shade the left side of the flower with Bubblegum Pink + Peony Pink (3:1). (Figure 2)
© 2017 Painting World Magazine Digital Edition. All rights reserved. Not for distribution, resale or reproduction. You agree to follow all international copyright laws as well as the terms and conditions outlined at paintingworldmag. com. You may NOT reprint or make copies, even for non profit uses. Any violation of these terms will result in a nonrefundable cancellation of your subscription and possible prosecution with fines up to $150,000 USD. http://www. copyright.gov/title17/ Please contact info@paintingworldmag.com if you have received this PDF illegally.
April 2017 Issue
79
80
Painting World Magazine Transfer on the individual petals very lightly, and line them with Bubblegum Pink + Peony Pink (3:1). Referring to the photo, create a wash of the same color, and fill in the dark areas using a #3 round brush. (Figure 3) Float to highlight the individual petals with Pink Chiffon, and shade with Bubblegum Pink + Peony Pink (3:1). You may need to repeat these first floats with the same color until they become smooth and even. (Figure 4) Once you’ve completed the basic form, add lines of Bubblegum Pink + Peony Pink (3:1) to create texture. Fill in the flower centers with Pink Chiffon. Float additional highlights to the light areas of the flower with Light Buttermilk. (Figure 5)
Figure 1
April 2017 Issue
.Float the second shades with Bubblegum Pink + Peony Pink + Celery Green (3:2:1), and then Peony Pink + Celery Green (4:1). Glaze accents of Antique Gold. In the darkest areas, glaze Light Avocado, and then Cranberry Wine. To glaze, load the brush with paint as if to float, and then work the paint into the brush until the color becomes transparent. (Figure 6)
Leaves & Stem: Base coat the leaves and stems with Celery Green + Buttermilk (2:1). Dry brush the highlights with Buttermilk + Celery Green (2:1). Float to shade with Celery Green + Light Avocado (1:1). Repeat until the applications are smooth and even. (Figure 2)
Once the form is completed, float the center and vein areas with the shade color (Celery Green + Light Avocado [1:1]). Pull lines of Celery Green over the shaded vein areas. (Figure 3-4) Add a second highlight with Light Buttermilk + Celery Green (3:1) and a second shade with Avocado. Glaze accents of Antique Gold. (Figure 5) Add additional accents to the edges of the leaves with the floral shade colors. Glaze the darkest areas with Midnite Green. (Figure 6)
Finishing: Allow the painting to cure for twenty-four hours, and then apply multiple coats of UltraMatte Varnish to protect it.
Figure 2
Š 2017 Painting World Magazine Digital Edition. All rights reserved. Not for distribution, resale or reproduction. You agree to follow all international copyright laws as well as the terms and conditions outlined at paintingworldmag. com. You may NOT reprint or make copies, even for non profit uses. Any violation of these terms will result in a nonrefundable cancellation of your subscription and possible prosecution with fines up to $150,000 USD. http://www. copyright.gov/title17/ Please contact info@paintingworldmag.com if you have received this PDF illegally.
Painting World Magazine
Figure 3
Figure 4
Figure 5
Figure 6
Š 2017 Painting World Magazine Digital Edition. All rights reserved. Not for distribution, resale or reproduction. You agree to follow all international copyright laws as well as the terms and conditions outlined at paintingworldmag. com. You may NOT reprint or make copies, even for non profit uses. Any violation of these terms will result in a nonrefundable cancellation of your subscription and possible prosecution with fines up to $150,000 USD. http://www. copyright.gov/title17/ Please contact info@paintingworldmag.com if you have received this PDF illegally.
April 2017 Issue
81
82
Painting World Magazine
April 2017 Issue
Download all line drawings ready to print here: http://bit.ly/2npUHL3
Painting World Magazine
Baroque Peacock
Pendant
by Willow Wolfe
Š 2017 Painting World Magazine Digital Edition. All rights reserved. Not for distribution, resale or reproduction. You agree to follow all international copyright laws as well as the terms and conditions outlined at paintingworldmag. com. You may NOT reprint or make copies, even for non profit uses. Any violation of these terms will result in a nonrefundable cancellation of your subscription and possible prosecution with fines up to $150,000 USD. http://www. copyright.gov/title17/ Please contact info@paintingworldmag.com if you have received this PDF illegally.
April 2017 Issue
83
84
Painting World Magazine
If you’ve ever wanted to create beautiful jewelry, but aren’t sure where to start, this is the perfect project for you. For this pendant, you’ll combine acrylic and oil painting, and add a resin finish that will give the piece a professionallyfinished look.
Surface:
Miscellaneous Supplies:
Susan Lenart Kazmer ICE Resin® Art Mechanique® Hobnail Large Round Bezel, Bronze, available through Willow Wolfe
• Susan Lenart Kazmer ICE Resin, available through Willow Wolfe • Royal Talens Cobra Painting Medium 091 • Willow Wolfe Willow Wonder Tool (tool with both a stylus and a firm rubber paint scraper), available through Willow Wolfe • Brush Cleaner • Gray Transfer Paper • Medium-Grit Sandpaper • DecoArt® Multi-Purpose™ Sealer • Scissors • Small Palette Knife • Small Plastic Containers with Lids (to hold mediums and water) • Soft Cloth • Soft Paper Towels • Toothpicks • Vinegar • Water Basin • Old Flat Brush (optional) Note: Follow all manufacturers’ label instructions for tproper product usage.
Royal Talens Amsterdam Acrylics: • Titanium White 105 • Yellow Ochre 227
Royal Talens Cobra Water Mixable Oil Colours: • Pyrrole Red Deep 345 • Prussian Blue 508 • Burnt Sienna 411 • Turquoise Blue 522 • Ultramarine 504 • Titanium White 105 • Ivory Black 701
Princeton Artist Brush Co.™ Select™ Artiste Brushes:
About Willow As an instructor of the arts, Willow Wolfe has traveled extensively throughout North America and the world, conducting trade shows, seminars, and lectures. She has published a small library of internationally available books and painting kits, as well as a multitude of articles in the industry’s bestknown magazines. Willow began working with Princeton Artist Brush Co.™ over ten years ago to develop Select™ Artiste, one of North America’s bestselling brush lines. She spends considerable time in her hometown of Winnipeg, MB teaching for the Assiniboine Park Conservancy and at the Willow Wolfe Home Studio in St. James. Discover more about Willow Wolfe at www.willowwolfe.ca.
April 2017 Issue
• #4 Flat Shader, 3750FS (to use with acrylic paint) • 1/4” Oval Mop 3750OM (to use with acrylic paint) • #2 Chisel Blender 3750CB • 1/8” Mini Angular Shader 3750AS • #0 Mini Filbert 3750FB • #0 Mini Flat Shader 3750FS • #20/0 Monogram 3750MM
Canson® Papers: • 9” x 12” Disposable Palette • 9” x 12” Foundation Series Tracing Paper
Speedball® Mona Lisa™ Products: • Composition Leaf™ Gold Metal Leafing • Metal Leaf™ Adhesive • Metal Leaf Sealer
Pearls, Beads, & Findings: I discovered Valentine Rouge® jewelry during a trip to Toronto, Ontario, Canada. Jenna Ianelli, the designer and owner of Valentine Rouge, creates stunning works of art in gold vermeil and semi-precious stones. We met over coffee at her home studio, and I did a little shopping… she now finishes all of my hand-painted works of art in pearl and semi-precious stone. You may finish your peacock any way you wish.
© 2017 Painting World Magazine Digital Edition. All rights reserved. Not for distribution, resale or reproduction. You agree to follow all international copyright laws as well as the terms and conditions outlined at paintingworldmag. com. You may NOT reprint or make copies, even for non profit uses. Any violation of these terms will result in a nonrefundable cancellation of your subscription and possible prosecution with fines up to $150,000 USD. http://www. copyright.gov/title17/ Please contact info@paintingworldmag.com if you have received this PDF illegally.
Painting World Magazine
Techniques: Note: The definitions below apply to this project and to my painting techniques, and may differ from other artists’ methods. Dry-wipe (wipe): I use this technique to clean the brush without using solvents. Place the brush between the folds of a paper towel, press down, and gently pull the brush out. Brush mix: Mix two or more colors together using the brush instead of a palette knife. A “+” between colors indicates a brush-mixed color. Each time you load the brush, the color may be slightly different; this adds variety to the painting. Chisel-blending: Apply a sparse amount of paint to the surface. An excess amount will become sloppy and move around too much, causing the colors to become muddy. Blend only where two values or colors meet. Gently wiggle the brush from side to side between the two values using soft strokes. Dry-wipe the brush frequently to avoid pulling too much of one value into the other.
Preparation: Clean the surface with a mixture of vinegar and water (1:1), and wipe it with a soft, damp cloth. Sand with medium-grit sandpaper. Wipe with a damp cloth. Base the area to be painted and the balls with two coats of Multi-Purpose Sealer, allowing the surface to dry between applications.
This is the only step where you’ll use acrylics. Use the #4 flat shader to base the background of the painting surface and the balls with several light coats of Titanium White + a touch of Yellow Ochre. Let it dry. Trace the pattern onto tracing paper, and transfer the main pattern lines onto the surface using the stylus end of the Wonder Tool and gray transfer paper. Transfer details as needed. Apply Metal Leaf Adhesive to the outer and inner rims of the bezel, avoiding the balls around the outer edge. Let it dry for one hour. Apply Gold Metal Leafing to the inner and outer rims, and burnish it with a 1/4” oval mop brush. In order to get into the areas surrounding the balls, you may need to use an old flat brush to press the metal foil into the crevices. Apply a coat of Metal Leaf Sealer, and let it dry.
Mixtures: Premix the following values with a palette knife: • Medium Peach: Titanium White + Pyrrole Red Deep + Raw Sienna (10:2:1) • Dark Peach: Medium Peach + Pyrrole Red Deep (1:1)
Painting: Note: You’ll do the remainder of the project with Cobra Water Mixable Oil Colours only. If the instructions call for a thinned color, use water or Cobra Painting Medium for thinning.
Use the size brush that best fits the area in which you are working. When painting, use the #2 chisel blender, the #0 mini flat, or the #0 mini filbert to base an area; use any of these brushes to blend. Wipe the brushes between color applications and blending.
Eye: Base coat the iris with thinned Burnt Sienna + Titanium White (1:1). Highlight the iris with a stroke of Titanium White. Base coat the pupil with thinned Ivory Black. Let the eye set for a day. Apply final highlights and dots with the 20/0 monogram liner and Titanium White.
Head & Neck: Base coat the white areas with Titanium White using the #2 chisel blender or #0 mini filbert, following the growth direction. Apply Prussian Blue around the white areas, around the beak, behind the cheek, under the neck, and around the eye. Apply Ultramarine to the remainder of the head and neck. Wipe the brush, and very gently wiggle where the Prussian Blue and Ultramarine meet to merge them. Highlight with equal parts Titanium White + Turquoise Blue using a mini filbert or chisel blender. Wipe the brush, and chisel-blend. Further brighten the highlights using the monogram liner and Titanium White. Where the white areas meet with the blue around them, use the monogram liner to stroke thinned Titanium White from
© 2017 Painting World Magazine Digital Edition. All rights reserved. Not for distribution, resale or reproduction. You agree to follow all international copyright laws as well as the terms and conditions outlined at paintingworldmag. com. You may NOT reprint or make copies, even for non profit uses. Any violation of these terms will result in a nonrefundable cancellation of your subscription and possible prosecution with fines up to $150,000 USD. http://www. copyright.gov/title17/ Please contact info@paintingworldmag.com if you have received this PDF illegally.
April 2017 Issue
85
86
Painting World Magazine
Step 1: Base coat the white feathers, and establish the shading. Base coat the beak. Base coat the iris. Paint the first layer of plumes.
Step 2: Base coat the remainder of the feathers. Apply shading on the beak. Paint the pupil.
Step 3: Blend the feathers and the beak. Begin to apply highlights.
Step 4: Blend and reapply the highlights. Deepen the shading. Detail with a liner.
April 2017 Issue
Š 2017 Painting World Magazine Digital Edition. All rights reserved. Not for distribution, resale or reproduction. You agree to follow all international copyright laws as well as the terms and conditions outlined at paintingworldmag. com. You may NOT reprint or make copies, even for non profit uses. Any violation of these terms will result in a nonrefundable cancellation of your subscription and possible prosecution with fines up to $150,000 USD. http://www. copyright.gov/title17/ Please contact info@paintingworldmag.com if you have received this PDF illegally.
Painting World Magazine within the white area onto the blue area. You will need to reload the brush for every stroke to ensure the color remains pure.
Feather Plumes: Thin equal parts Titanium White + Turquoise Blue, and use the monogram liner to paint little strokes of feathers from a center point outward. Deepen near the bottom with thinned strokes of Ultramarine. Highlight with tiny strokes of Titanium White. Thin Raw Sienna + Titanium White, and use the monogram liner to paint small feather shaft lines from the head to the plumes.
Beak: Base coat the beak with Medium Peach using the #2 chisel blender. Highlight on the upper portion of the beak with Titanium White using a small chisel blender. Wipe the brush, and pat to blend. Deepen the beak with Dark Peach under the upper beak and at the back of the beak. Wipe the brush, and blend. Use a liner to paint the nostril with Dark Peach. Highlight around the nostril with Titanium White.
Finishing: To paint the pink balls, base coat them with Medium Peach using the mini filbert. Shade each ball at the base by applying Dark Peach, wiping the brush, and blending. Highlight each ball with Titanium White at the very top; wipe the brush, and blend again.
ICE Resin Finish: I finished my pendant with an incredible product called ICE Resin, which is a jeweler’sgrade two-part finish that is crystal clear and leaves a beautiful dome finish on your jewelry. If you choose not to use ICE Resin, you can finish your pendant with multiple coats of satin or highgloss varnish. It is essential to have equal parts of Part A Resin to Part B Hardener. To ensure accurate measurements, make two marks on your measuring cup with a permanent marker. One line is for the Part A Resin measurement, and the other is for the Part B Hardener measurement. Snip off the tops of the dispensing caps, and put them on the Part B Hardener and Part A Resin bottles.
Use the craft stick to drip ICE Resin from the craft cup into your bezel, or gently pour it into your bezel. “Doming” refers to a raised center to the resin when it dries (like a dome has formed on the top). To dome the resin, carefully use the craft stick to add drops of resin until you see a dome appear. Allow 6-12 hours to fully dry.
First, measure Part A Resin to the first line that you drew on your measuring cup. Make note of where it is on the line as it settles, and try to be exact. Add Part B Hardener to the second line that you drew on the cup. Mix well, yet gently, by scraping the bottom and sides with the craft stick for at least two minutes. Mix until all striations are mixed in. When they’re all mixed in, put the mixed resin aside for five minutes for the bubbles to settle.
© 2017 Painting World Magazine Digital Edition. All rights reserved. Not for distribution, resale or reproduction. You agree to follow all international copyright laws as well as the terms and conditions outlined at paintingworldmag. com. You may NOT reprint or make copies, even for non profit uses. Any violation of these terms will result in a nonrefundable cancellation of your subscription and possible prosecution with fines up to $150,000 USD. http://www. copyright.gov/title17/ Please contact info@paintingworldmag.com if you have received this PDF illegally.
April 2017 Issue
87
88
Painting World Magazine
Blue Pigeon by Mabel Blanco, DACA April 2017 Issue
Š 2017 Painting World Magazine Digital Edition. All rights reserved. Not for distribution, resale or reproduction. You agree to follow all international copyright laws as well as the terms and conditions outlined at paintingworldmag. com. You may NOT reprint or make copies, even for non profit uses. Any violation of these terms will result in a nonrefundable cancellation of your subscription and possible prosecution with fines up to $150,000 USD. http://www. copyright.gov/title17/ Please contact info@paintingworldmag.com if you have received this PDF illegally.
Painting World Magazine
I encountered these beautiful birds when I was traveling in Colombia. Seeing them inspired me to paint this Pichon de Azulejo, or Blue Pigeon.
the founder and coordinator of a school that helps artists become decorative painting teachers.
Surface: • 35 x 35 cm Canvas
DecoArt® Traditions™ Artist Acrylics:
About Mabel Mabel is an Argentinian artist, and a Senior Lecturer on drawing and painting. She’s a member of the National Society of Tole and Decorative Painters and the Tango Decorative Artists of Argentina.
• Burnt Umber DAT46 • Carbon Black DAT42 • Cobalt Blue Hue DAT55 • English Red Oxide DAT06 • Hansa Yellow DAT14 • Permanent Alizarin Crimson DAT51 • Pine Green DAT19 • Perinone Orange DAT08 • Raw Umber DAT45 • Titanium White DAT35 • Ultramarine Blue DAT26 • Yellow Oxide DAT12
Royal® & LangnickelTM Brushes: • #6, #10, & #12 AqualonTM Flat Brushes, 2150 • #1 & #3 Aqualon Round Brushes, 2250 • #1 Aqualon Liner Brush, 2595
It is important to remember that you must work for the different areas. When you go to the lower part, add more Titanium White and touches of Ultramarine Blue to the mix. Another method of preparation is to put a lot of Titanium White on the surface, and then add Permanent Alizarin Crimson or Ultramarine Blue. The background should work to create fading areas and should integrate the different colors well, respecting the clarity in the central part of the work. Allow the background to dry, and then transfer the design with tracing paper.
Left Post: Base coat the left post with the #10 flat brush and English Red Oxide, and let it dry. (Figure 1) Then, load the #3 round brush with Yellow Oxide lightened with water, and paint from the bottom up until the brush runs out of paint. Note that the left post is marked equal to the right post. (Figure 2)
In 2013, she was an honorary member of Decorative Painter Italia. She’s also a member of the board of directors of the National Museum of Decorative Painting in Atlanta, Georgia.
Miscellaneous Supplies:
Mabel has been a Helping Artist and a Traditions Artist for DecoArt®, and Jansen Art gave her the title “Traditions Artist” in 2004.
• Tracing Paper • Transfer Paper • Stylus • Pencil or Pen
Paint the rust of the gate with the #1 round brush and Burnt Umber lightened with water. Illuminate the rust of the gate with a touch of Titanium White.
Instructions:
Right Post:
Background:
Using the #10 flat brush and Yellow Oxide, paint the right post, and then let it dry. With the #3 round brush and a mix of Raw Umber + a touch of Burnt Umber lightened with water, stain the post.
She’s taught many classes, including classes at seminars and conventions. She participated in a national TV program in Bolivia in 2011, and taught at some seminars in Milan, Italy in 2011 and 2012. Mabel has won several awards over the past twenty years, and is
Base coat the entire canvas using the #12 flat brush and Permanent Alizarin Crimson + Titanium White (1:6). Use the crisscross technique, making it hazy in all directions.
© 2017 Painting World Magazine Digital Edition. All rights reserved. Not for distribution, resale or reproduction. You agree to follow all international copyright laws as well as the terms and conditions outlined at paintingworldmag. com. You may NOT reprint or make copies, even for non profit uses. Any violation of these terms will result in a nonrefundable cancellation of your subscription and possible prosecution with fines up to $150,000 USD. http://www. copyright.gov/title17/ Please contact info@paintingworldmag.com if you have received this PDF illegally.
April 2017 Issue
89
90
Painting World Magazine Figure 1
Figure 2
Stain in greater proportion on the left side and on the base.
Figure 3
Figure 4
Figure 5
Paint the breakdown of the post with the #1 round brush and Raw Umber lightened with water. With the #10 flat brush and Pine Green lightened with water, paint the right side, emphasizing the upper part.
Horizontal Post: Using Titanium White + a touch of Carbon Black + a touch of Ultramarine Blue (this will make a gunmetal color), paint the horizontal bar with the #1 round brush. (Figure 3)
Figure 6
While the surface is still wet, use Titanium White to mark the top edge and the center line, and let the paint dry. With lightened Pine Green and the #6 flat brush, paint the upper part and the bottom right sides only, and let it dry. (Figure 4)
Welding: With a watered down mix of the gunmetal mixture + Titanium White, paint the welding with small, uneven brush strokes using the #3 round brush. On the left side, add a touch of Titanium White, and highlight, also using small strokes. (Figure 4) April 2017 Issue
Š 2017 Painting World Magazine Digital Edition. All rights reserved. Not for distribution, resale or reproduction. You agree to follow all international copyright laws as well as the terms and conditions outlined at paintingworldmag. com. You may NOT reprint or make copies, even for non profit uses. Any violation of these terms will result in a nonrefundable cancellation of your subscription and possible prosecution with fines up to $150,000 USD. http://www. copyright.gov/title17/ Please contact info@paintingworldmag.com if you have received this PDF illegally.
Painting World Magazine
Pigeon:
Beak:
Legs:
Make the following mixtures (Figure 5): • Mixture 1: Titanium White + Cobalt Blue Hue + Pine Green (5:1:touch) • Mixture 2: Titanium White + Cobalt Blue Hue (4:1)
With the #1 round brush and a mixture of Hansa Yellow + Titanium White (1:1), paint the full beak. Darken the top of the beak with Raw Umber. (Figure 9-10)
Paint both legs completely using the #1 round brush and Carbon Black mixed with a touch of Titanium White. (Figure 7)
With the #6 flat brush and Mixture 1, paint the head and the top of the torso by placing the brush at a 45° angle and shaping your strokes in a saw-like pattern from the top down. If it is necessary, lighten the paint with water. Observe the picture carefully, and paint the rest with Mixture 2. (Figure 6)
Using the liner and diluted Raw Umber, outline the beak, and paint the line separating the top and bottom of the beak. Finally, with Perinone Orange, paint in the shadow.
Eye: With the #1 round brush and Carbon Black, paint a circle. When it’s dry, lighten it with small Titanium White touches. Finally, paint small, white feathers around the eye. (Figure 8)
Figure 7
With your liner and Titanium White or Cobalt Blue Hue, mark the feathers in the appropriate places, and let them dry. With the same brush and diluted Carbon Black, paint the small beak feathers. Paint some feathers over the eyes, forming a kind of eyebrow, with Titanium White. With the liner and Titanium White, paint the breast feathers and below the beak. With the liner and Carbon Black, paint some small feathers under the beak. Using diluted Yellow Oxide, paint the feathers between the beak and the wing, following the direction indicated on the sketch.
Figure 8
With well-diluted Carbon Black, paint the shadow of the wing over the white feathers. Using the same well-diluted Carbon Black, paint the bottom of the chest and where the legs meet the body.
© 2017 Painting World Magazine Digital Edition. All rights reserved. Not for distribution, resale or reproduction. You agree to follow all international copyright laws as well as the terms and conditions outlined at paintingworldmag. com. You may NOT reprint or make copies, even for non profit uses. Any violation of these terms will result in a nonrefundable cancellation of your subscription and possible prosecution with fines up to $150,000 USD. http://www. copyright.gov/title17/ Please contact info@paintingworldmag.com if you have received this PDF illegally.
April 2017 Issue
91
92
Painting World Magazine
Figure 9
Figure 10
Figure 12
Figure 13
Figure 11
April 2017 Issue
Š 2017 Painting World Magazine Digital Edition. All rights reserved. Not for distribution, resale or reproduction. You agree to follow all international copyright laws as well as the terms and conditions outlined at paintingworldmag. com. You may NOT reprint or make copies, even for non profit uses. Any violation of these terms will result in a nonrefundable cancellation of your subscription and possible prosecution with fines up to $150,000 USD. http://www. copyright.gov/title17/ Please contact info@paintingworldmag.com if you have received this PDF illegally.
Painting World Magazine
Download all line drawings ready to print here: http://bit.ly/2npUHL3
April 2017 Issue
93
94
Painting World Magazine
Directory of Artists & Suppliers Artists: Helena Rizzaro Andrejev helenarah@gmail.com Rebecca Baer arts@rebeccabaer.com www.rebeccabaer.com Maureen Baker maureenjbaker@msn.com www.maureen-baker.com Mabel Blanco mabelblanco25@gmail.com www.mabelblanco.com Michael Cheek mscheek@charter.net www.fineartamerica.com
Kelly Hoernig questions@kellyhoernig.com www.kellyhoernig.com facebook.com/kellyhoernig.artist Sandy McTier sandymctierdesigns@aol.com sandymctierdesigns.com Alessio Meggiato alessio.meggiato@gmail.com www.facebook.com/creareperpassione Sherry C. Nelson, MDA birdlady@sherrycnelson.com www.sherrycnelson.com Margaret Riley designsbymargaret51@gmail.com
Debbie Cole, CDA debbie@debbiecole.com www.debbiecole.com
Diane Trierweiler tolebridge@aol.com www.dianetrierweiler.com
Chris Haughey chris@cdwood.com chrishaughey.wordpress.com
Tracy Weinzapfel info@tracyweinzapfelstudios.com www.tracyweinzapfelstudios.com Willow Wolfe willow@willowwolfe.ca www.willowwolfe.ca
April 2017 Issue
Š 2017 Painting World Magazine Digital Edition. All rights reserved. Not for distribution, resale or reproduction. You agree to follow all international copyright laws as well as the terms and conditions outlined at paintingworldmag. com. You may NOT reprint or make copies, even for non profit uses. Any violation of these terms will result in a nonrefundable cancellation of your subscription and possible prosecution with fines up to $150,000 USD. http://www. copyright.gov/title17/ Please contact info@paintingworldmag.com if you have received this PDF illegally.
Painting World Magazine
Suppliers: Arches® Paper www.arches-papers.com Canson® http://en.canson.com Creative Arts Lifestyle® www.creativeartslifestyle.com 740-441-1564 Cupboard Distributing® www.cdwood.com 937-652-3338 Debbie Cole Designs® www.debbiecole.com Diane Trierweiler® www.dianetrierweiler.com 951-272-6918 DecoArt, Inc.® www.decoart.com 606-365-3193 Ikea® www.ikea.com Jo Sonja’s® www.josonja.com 888-567-6652 Krylon® www.krylon.com 800-457-9566
Laurie Speltz Creative Coach® www.lauriespeltz.com 515-253-9881
Scharff Brushes®, Inc. www.artbrush.com 770-461-2200
Sherry C. Nelson’s Loew-Cornell Brushes The Magic Brush®, Inc. www.loew-cornell.com www.sherrycnelson.com 512-398-3277 866-227-9206 ®
Martin F. Weber® www.weberart.com 215-677-5600
Speedball® www.speedballart.com 800-898-7224
MFW Mission® Watercolors www.mijelloart.com 215-677-5600
Tracy Moreau® Stencils www.tracymoreau.net
Princeton Artist Brush Co.TM www.princetonbrush.com 609-403-8342 Rebecca Baer®, Inc. www.rebeccabaer.com 301-797-1300
Viking Woodcrafts® www.vikingwoodcrafts.com 800-328-0116 Willow Wolfe® www.willowwolfe.ca Winsor & Newton® www.winsornewton.com
Royal Langnickel® art.royalbrush.com 219-660-4170 Royal Talens® www.royaltalens.com Sanford® Prismacolor® www.prismacolor.com facebook.com/prismacolor
© 2017 Painting World Magazine Digital Edition. All rights reserved. Not for distribution, resale or reproduction. You agree to follow all international copyright laws as well as the terms and conditions outlined at paintingworldmag. com. You may NOT reprint or make copies, even for non profit uses. Any violation of these terms will result in a nonrefundable cancellation of your subscription and possible prosecution with fines up to $150,000 USD. http://www. copyright.gov/title17/ Please contact info@paintingworldmag.com if you have received this PDF illegally.
April 2017 Issue
95
Be Seen By Your Customers Right Here For As Little as $49!
RATES RECENTLY REDUCED BY UP TO 50% • 7 Printed Issues Per Year & Daily Social Media Updates • Our Readers are Artists, Sculptors, Home Decor Enthusiasts, Scrapbookers, Tole Painters, MixedMedia Artists and looking for your products! • Over 5500 Print Subscribers so far! • Over 9500 Social Media Followers • Design Services Available • Regular Email Newsletters
Contact sales@paintingworldmag.com today for information about rates and services. Request a Media Kit & Samples today!