9 minute read
Turbo tips
Next Article

Turbos: Best practice installation and preventing problems
Most replacement turbo breakdowns are due to improper installation or ine ective troubleshooting. Here, Nissens provides a detailed best practice guide for the installation process
Before fitting a new turbo, Nissens Automotive stresses you should always find out why the original unit failed – if the underlying cause is not identified and addressed, the replacement will also fail and will not be covered by any warranty claim. Does the intercooler leak? Is the particulate filter clogged? Are any of the hoses cracked? Does the EGR valve close properly? What is the state/condition of the engine oil, is there the appropriate oil pressure generated?
You should also check whether the vehicle manufacturer has issued a service bulletin for changing the turbocharger because certain cars require the replacement of specifi c parts or undertaking special procedures when the turbo is replaced. Ensure the new turbo, as with a Nissens unit, is of high quality and includes a gasket set. In addition, purchase any other necessary installation parts, such as the oil and air filter, oil, hose clamps and pipes, etc.
Cleaning and examination
Clean the area around the turbo before starting the disassembly and then carefully examine all the parts such as the intercooler, inlet/exhaust manifold, pipes, hoses, ventilation, air filter box, EGR, DPF, CAT, etc., that are in and around it for any faults, damage, leaks and impurities, and place all the screws and bolts into a dedicated box.
Clean these parts as they are removed and, if necessary, replace them, but take note that if the previous turbo breakdown was caused by seizure of the turbine/compressor wheel or foreign objects inside the turbo, the intercooler should always be replaced. Always replace the O-rings, gaskets and hose clamps.
Always use the correct tools – avoid using pneumatic tools, crowbars and hammers and never use liquid gaskets and exhaust gum when mounting the new turbo because it must be installed properly and with care.
Prime the turbo’s shaft by injecting new engine oil into the turbo’s oil feed before mounting the oil feed pipe and rotating it ten times. Then measure the oil pressure at the turbocharger and check the oil ow before tting the oil return.
Connecting and testing
Once the turbo is in place, start the engine and while it’s at idle for a couple of minutes, inspect the entire system. Check that all the turbo connections are leak-proof (intake air, pressure, oil and coolant, if applicable) and inspect any suspicious sounds. Ensure that there isn’t too much back pressure in the exhaust system and naturally repair any detected issues.
Connect test equipment and reset the fault before taking the car out for a drive to check if it runs correctly, and with the right boost pressure.
To learn more about turbo installation and fault diagnosis, visit the Nissens Automotive expert knowledge portal at: https://support.nissens.com/en/material/self-learning-course-turbochargercomponent-installation
Oil – the lifeblood of a turbocharger
Tom Wright, product manager at Melett, outlines the core purpose of oil in relation to the turbocharger. Wright argues there are many ways in which oil related issues can damage the components, outlines why oil is the lifeblood of a turbocharger, and details the preventable steps a technician can take.
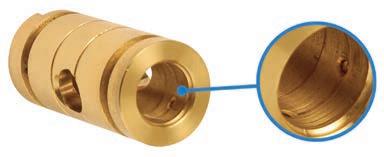
Oil contamination - scoring to journal bearings
Oil contamination
Dirty oil is one of the top killers of a turbocharger and can happen in a multitude of ways. When repairing the vehicle, if the oil system is not emptied, purged and changed correctly, it can leave debris from the previous failure, which can contaminate the new oil and cause premature failure.
If a damaged, or poor-quality oil filter is used, this is another way debris can pass through the filters and into the oil system. In addition, liquid contaminants can lead to premature oil degradation, and increased corrosion and wear, while oil degrading can also be caused by excessive temperatures or extended service intervals.
Prevention
If a turbo has failed, it’s important to ensure that all the oil systems are purged and free from any foreign objects. A simple way of preventing dirty oil from affecting the turbocharger is by taking extra care when changing the oil during servicing to prevent accidental contamination. It is also key to check for engine wear that could leave swarf deposits.
Something that must be done is to replace or clean the oil inlet pipes and in-line micro filters, as this helps to prevent carbon deposits entering the oil ow to the bearings.
It is important to get a vehicle serviced every year or every 10,000 miles, as well as changing the oil in accordance with the vehicle manual, as it gives a turbo the best chance of having a longer life cycle.
Insufficient lubrication – oil starvation
It is often caused by blockages in the oil feed pipe and micro filters within, damaged or bent oil feed pipes, a lack of priming of the new turbo, as well as a damaged or worn oil pump, or sludge and coke build up in the bearing housing from hot shutdowns.
Prevention
Using the correct grade of engine oil specified by the OEM engine manufacturer is essential to give the turbocharger a long-lasting life cycle.
Equally, oil supply is critical to the turbo, so it is important that a technician ensures the oil fow is correct. Priming the turbocharger and oil systems can stop the turbo from instant failure. Oil inlet pipes should also be cleaned or replaced to remove carbon deposits or sludge that could restrict oil flow to the bearing systems. It is important that drivers are aware that they need to allow time for the engine to warm up at the start of each journey and cool down at the end.
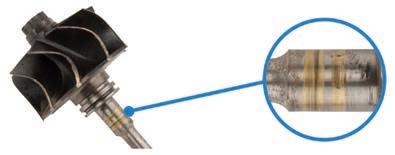
Insufficient lubrication – Material transfer from journal bearing
Oil leaks
Oil leaks are somewhat of a myth when it comes to the turbo being at fault. The biggest cause of oil leaks comes from the environment that the turbo is situated in. There are very few cases where an oil leak happens because of a component or manufacturing issue.
Oil leaks can occur when an engine is running on idle. This is because the pressure within the housings is lower, which in turn can lead to a vacuum being created, causing the oil to leak into the turbine housing. Once the engine starts to run at normal speeds the pressures will be restored, and the leak will stop.
Other things to consider are ‘engine blow by’ and ‘crank case blow by,’ both of which cause the same effect, as they increase the pressure in the crank case. This affects the oil flowing to the turbo at the correct rate, which acts as a restriction to the oil return pipe, causing the turbo to leak oil at either the turbine or compressor end.
Oil leaks can occur on VSR (high speed) balancing machines, as the ambient pressures required to create the seal are not present as no housings are used. This can then force out oil from both the compressor and turbine ends, giving the impression of a leak. This is unlikely to occur when the replacement turbo is fitted to the engine.
Prevention
When it comes to oil leaks, it is imperative that the technician ensures air, exhaust, and oil drain systems are clear from blockages or restrictions, before moving on to check there are no leaks present in the exhaust system.
The use of silicone on oil gaskets is not advised as both can easily become detached and block oil passages. Similarly, technicians should ensure the diesel particulate filter and catalytic converter are free of blockages.
The correct gaskets and o-rings should always be used, and only the correct standard of turbine housings and compressor housings should be fitted.
Lastly, technicians should always check for correct oil levels and pressure.
www.melett.com

Carwood technician testing a turbo on Turbo Technics Rig
Remanufactured turbos engineered to perform just like the OE
Carwood is an approved supplier to the world’s leading vehicle and engine manufacturers, including Jaguar Land Rover, Isuzu, Mitsubishi, CAT and Perkins, supplying remanufactured turbochargers that are designed, engineered and tested to perform just like the OE, sometimes better.
The company brings these very same parts to the aftermarket. The cost and eco-friendly reman turbos and all-new ancillary parts cover the major OEMs – Borg Warner, Garrett, Mitsubishi, IHI, Mahle and Continental – and supports both old and late model car and light commercial vehicles. Recent introductions include Mazda 6 2.0 SKYACTIV-D 2016-, Jaguar XE, E/F Pace 2017-, Range Rover Evoque 2.0 D 2019- and Peugeot Boxer 2.2 Blue HDI 2019-.
Carwood is also an official distributor for BorgWarner and an authorised Garrett reseller.
Meticulous testing
With the Ministry of Defence also one of its customers, all Carwood product must meet the very highest quality standards. Whether it’s for a Challenger tank or an independent garage, every turbo goes through the same stringent inspection, cleaning, rebuild, calibration and test procedures, with all major wearing parts replaced. For example, 95% of Carwood turbos are fitted with a brand new CHRA. Others have new journal bearing(s), thrust bearing, piston rings, retaining rings, O-rings and a shaft nut, replaced as standard. All units are then balanced and tested – variable vane turbo actuators and vanes are set and calibrated to OEM specifications using either a Turbo Technics VTR or G3 Power rig.
Online cataloguing, next-day delivery and expert technical support are provided and every one of its turbos comes with a full tting kit (gaskets, mounting studs and copper washers), for a best-practice, yet cost-effective vehicle repair.
