THE NEXT LEVEL
RUDIMENTAL DRUMMING TECHNIQUES
BY J EF F QU EE N
International Solo Snare Drum Champion
THE NEXT LEVEL - Rudimental Drumming Techniques by Jeff Queen
Copyright © Tapspace Publications, LLC (ASCAP).
First published in the United States of America by Mark Wessels Publications in 2004, and Jeff Queen Productions in 2009.
Published by Tapspace Publications, LLC in 2022.
All rights reserved. International copyright secured. Printed in USA.
JQP-TNL
tapspace.com
Notice of Liability: Any duplication, adaptation, or arrangement of this composition requires the written consent of the copyright owner. No part of this composition may be photocopied or reproduced in any way without permission. Unauthorized uses are an infringement of the U.S. Copyright Act and are punishable by law.
TO:
Thank you for your time and your teaching.
Paul Rennick, Thom Hannum, Tom Float, Ralph Hardimon and Fred Sanford.
How to use this book:
This book is intended for anyone who plays with sticks, regardless of ability. I have included many basic and fundamental exercises along with many advanced concepts, designed to take you to your own “next level.”
The main thought behind the book is that if a player can master the four basic strokes: FULL, DOWN, TAP, and UP STROKES, and learn to play 1, 2, 3, and 4 notes per hand in various combinations, then the tools are in place to be able to play anything.
When a new rudiment is introduced, you will see a slow to fast breakdown to represent learning the rudiment at a VERY SLOW tempo first, then gradually working to a faster speed:
and a build up of the rudiment starting with what one hand plays by itself, illustrating the combinations of the Basic Strokes to be used (in this case down, tap, tap, up):
I have also included the two main techniques that I use; an adaptation of the Moeller Stroke, and what I call the Velocity Stroke. Each is broken down with very basic exercises to help master the technique.
I recommend that you spend a fair amount of time on the technique portion of this book so you have a full understanding on how to apply those skills to the rest of the lessons. I can not stress how important it is for one to go through all the technique lessons in order to get the most out of this book. You might think that you are being asked to start over when you get to the first few lessons but that is okay. Just think: if you are already good, how much better could you be with a refresher course in the basics?
I have made sure the book progresses in a logical way and each skill is covered in detail before moving on to the next. This being said, you can use this book in two ways:
1. Work from page one to the end. This is for the serious player (or teacher) who knows the benefit of perfecting a skill before moving on to the next one (this is how I recommend using the book).
2. Because each chapter progresses in difficulty, a student (or teacher) could touch on different sections of the chapters at the same time. For example: the beginning of Timing Control and the first few exercises in Diddle Control, or Flam Control and the Hybrids which are related.
If you choose to work out of order, there are some concepts you may miss so refer back to earlier chapters if there is something you don’t understand.
Any way you look at it, and any way you use it, this book is going to make you a better drummer so grab your pad and sticks and have fun!
INVEST ONLY IN WHAT YOU CAN AFFORD
Make no promises that you cannot keep. Do what is asked of you. Keep your word. Tell the truth at all costs. Give 110% – always. Take the time to care. The job is a personal reflection of who performed it. Great performances are always appreciated. There are no excuses. Know your limits. The life is a reflection of the person living it. Be nice. Listen first. Be patient. Separate business and pleasure. Be careful. Have fun. Do not be afraid of failure. Do not be afraid of success. Action is turned into accomplishment.
2 The Next Level
4 4 œ > œ œ ≈ . j œœ > œ œ ≈ . j œ L R L R L R L R L R L R L R L R œ > œ œ œ ≈ . j œœ > œ œ œ ≈ . j œ L R R L L R L R L R L R R L L R L R L R œ > œ œ œ œ > .œ œ > œ œ œ œ > .œ L R R L L R L R R L L R L R R L L R L R R L L R œ > œ œ œ œ > œ œ œ œ > œ œ œ œ > œ œ œ L R R L L R L R R L L R R L R L . . . . . . . . . . . . . . . . œ > œ œ œ RLRR œ > œ œ œ LRLL œ > œ œ œ œ > œ œ œ RLRRLRLL œ > œ œ œ œ > œ œ œ RLRRLRLL œ > œ œ œ œ > œ œ œ œ > œ œ œ œ > œ œ œ RLRRLRLLRLRRLRLL
Acknowledgements
I have to give a “laurel and hardy” thank you to the following people: Jim West for being my first teacher and putting up with my lack of practice, Gary Scoffield for getting me to try out for the marching band, Scott Johnson for being the first person I ever saw “really” play a snare drum, and Jim Dugan for giving an alternate a shot at the Bluecoats snare line in 1989.
That is how I got started, now I have to thank all of the people that I met along the way:
1988: Jay Walker, Stan Schoonover
1989: Mark Tieofflo, Rob Mueller, Chris Watts and Trenton Priest
1990: Dave Dillulo, Mike Atasalp, John Whatley, Roger Carter, Mike Jackson, Jim Wunderlich, Todd Foster, Mike McIntosh, Pete Sapadin, Kevin Murphy, Mike French, Walter Powell and Paul Smieten
1991: Glen Crosby, Ed Barguiarena, and Ralph Hardimon
1992: Kevin Murray, Robert Chavira, Chip Webster, Murray Gusseck, Eric Amin, Mike Apodaca, Jon Weber, and Nick Angelis
1993: Paul Rennick, Tom Float, Robert Schitroma, Kevin Brubaker, Greg Seale, Don Click, Marc Dubois, Rick Rodriguez, Ben Maughmer, James Stienke
1994: Mike Borowski, Jeff Spanos, Paul Stivits, Derrick Logozzo
1995: Thom Hannum, Dean Shoyer, Kris Hartman, Stephen Crosby, David Bertman, Greg Hull
1996 and beyond: Bob Romano, Allen Joanis, Teddy Holcomb, Bill Bachman, Jeff Lee, Jim Mason, Donnie VanDoren, Jay Webb and anyone else who has helped me be a professional Snare Drummer.
Special thanks to Kevin Brubaker, Mike McIntosh, Rosie Miller and Kate Tice for the editing help.
Last but not least, I have to say the biggest thank you to Mark Wessels for his ability to see what was in my head and help me get this beast on paper (it only took 5 years of trips to Texas and hundreds of drafts passed back and forth). Thank you so much Mark. I couldn’t have done this without your input, vision and effort!
3 The Next Level
TECHNIQUE I. GRIP FUNDAMENTALS .....................................................................7 II. TECHNIQUE FUNDAMENTALS 12 III. DEFINITIONS 14 IV. BASIC STROKES 15 V. THE ADAPTED MOELLER STROKE ..............................................16 VI. THE VELOCITY STROKE ................................................................23 ONE HANDED WARMUPS and TWO HEIGHT CONTROL I. ONE HEIGHT WARMUPS .................................................................31 II. TWO HEIGHTS ..................................................................................33 III. COMBINATION BEATS / MOTIONS ...............................................35 IV. GRID I: MOVING ACCENTS ............................................................36 V. CRESCENDOS AND DECRESCENDOS 38 V. THE NEXT LEVEL.............................................................................39 TIMING CONTROL I. TIMING CONCEPTS 41 II. 16th NOTE TIMING ...........................................................................42 III. TRIPLET TIMING ..............................................................................45 IV. DUPLE / TRIPLE RELATIONSHIPS .................................................46 V. 16th NOTES IN TRIPLE TIME & 16th NOTE TRIPLETS ...............48 VI. THE NEXT LEVEL 49 DIDDLE CONTROL I. DIDDLE QUALITY BUILDERS .......................................................57 II. ROLL BUILDERS 60 III. PARADIDDLES 62 IV. GRID II: DIDDLE AND ROLL ISOLATION 67 V. DIDDLE INTERPRETATION ............................................................70 VI. MORE PARADIDDLE PRACTICE ..................................................73 VII. OTHER DRAG RUDIMENTS............................................................75 VIII. THE NEXT LEVEL.............................................................................77
CONTENTS
TABLE OF
BUZZ CONTROL I. BUZZ LENGTH 81 II. BUZZ SPEED 82 III. ONE HEIGHT BUZZ CONTROL 83 IV. TWO HEIGHT BUZZ CONTROL 84 V. THE NEXT LEVEL .......................................................................................85 FLAM CONTROL I. FLAM MOTIONS..........................................................................................87 II. FLAM QUALITY ..........................................................................................88 III. DOWNSTROKED MOTION RUDIMENTS ................................................92 IV. CONTROLLED REBOUND MOTION RUDIMENTS................................94 V. INVERTED MOTION RUDIMENTS 100 VI. GRID III 106 VII. COMBINATION MOTIONS 107 VIII. THE NEXT LEVEL ..................................................................................... 110 HYBRIDS 115 BACKSTICKING AND TRICKS ............................................................................ 119 SPEED I. THE PROCESS OF GETTING FASTER 123 II. SINGLE SPEED ..........................................................................................125 III. ROLL SPEED ..............................................................................................127 IV. PARADIDDLE SPEED 129 SOLO CONSTRUCTION I. COMPILING IDEAS AND SKILLS ...........................................................133 II. IDENTIFYING STRENGTHS 133 III. FINDING A THEME 133 IV. WRITING THE SOLO 135 V. PACING AND TRANSITIONS 135 VI. PREPARATION AND PERFORMANCE 136 “TRIBUTE”: A CHAMPIONSHIP RUDIMENTAL SOLO ...........................137
6 The Next Level
TECHNIQUE
If you’ve been playing the drum for any length of time, you probably want to skip right past this chapter of essential techniques and jump into the exercises. Trust me on this one... DON’T! Take some time to develop a solid understanding of the concepts that I detail through this chapter. By doing so, you will have a much better understanding for what I will
– The basics of establishing the correct grip.
– How to use the fingers, the height system, cushioning the rebound and tap hum.
– Terms and concepts used throughout the book, including the “Grid” and “4-2-1”.
– The four basic strokes we use, regardless of the technique applied.
Be sure to read all of the text in this chapter and spend several weeks working through the exercises. Patient practice on these techniques will help you tremendously in establishing a solid foundation on which to build!
(in drumming, this would be the main point of pressure to the
(This is where the bulk of the energy from the muscles will
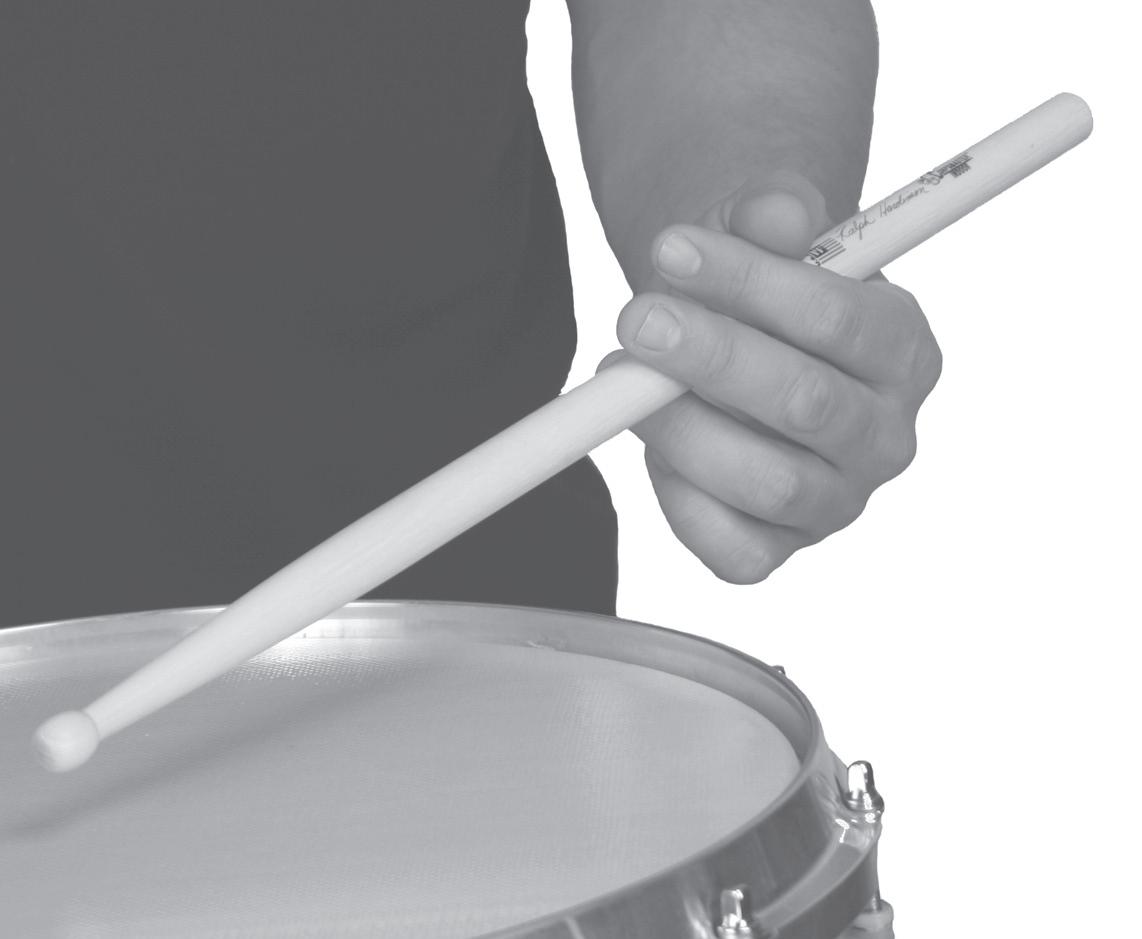
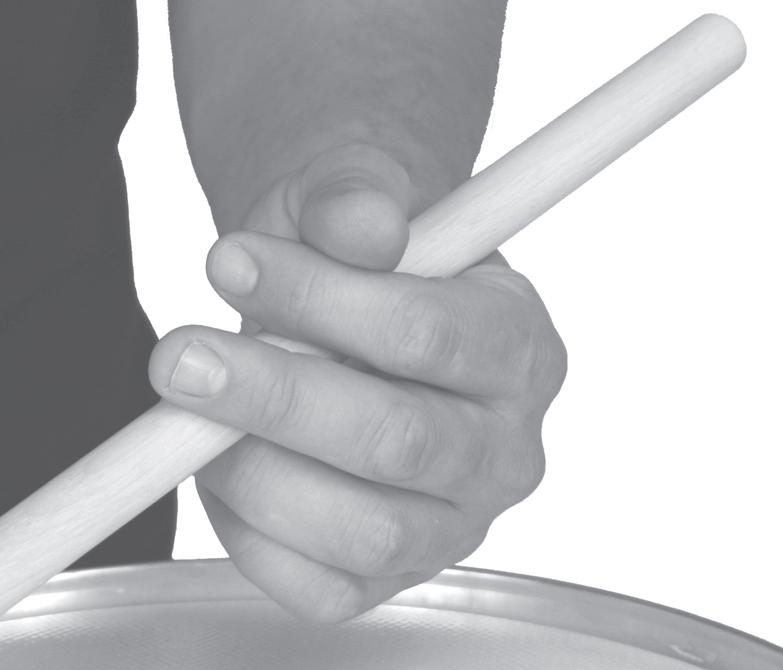
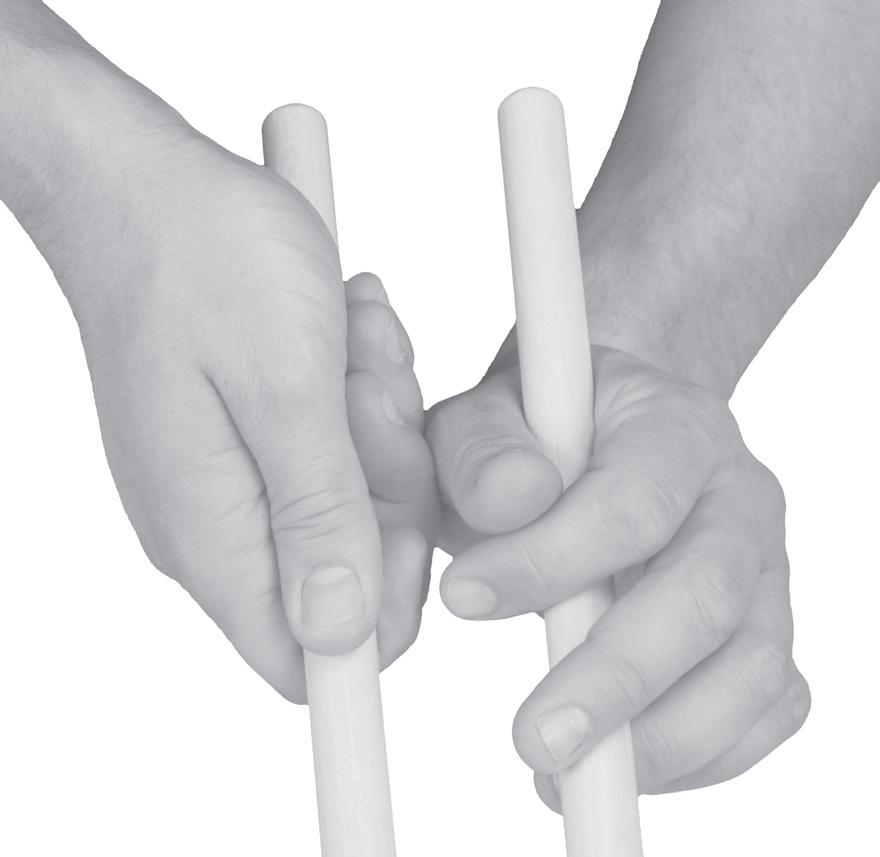
In the right hand, the fulcrum lies between the thumb and index

In the left hand, the fulcrum is in the “V” or webbing of the hand between the thumb and index finger.

7 The Next Level
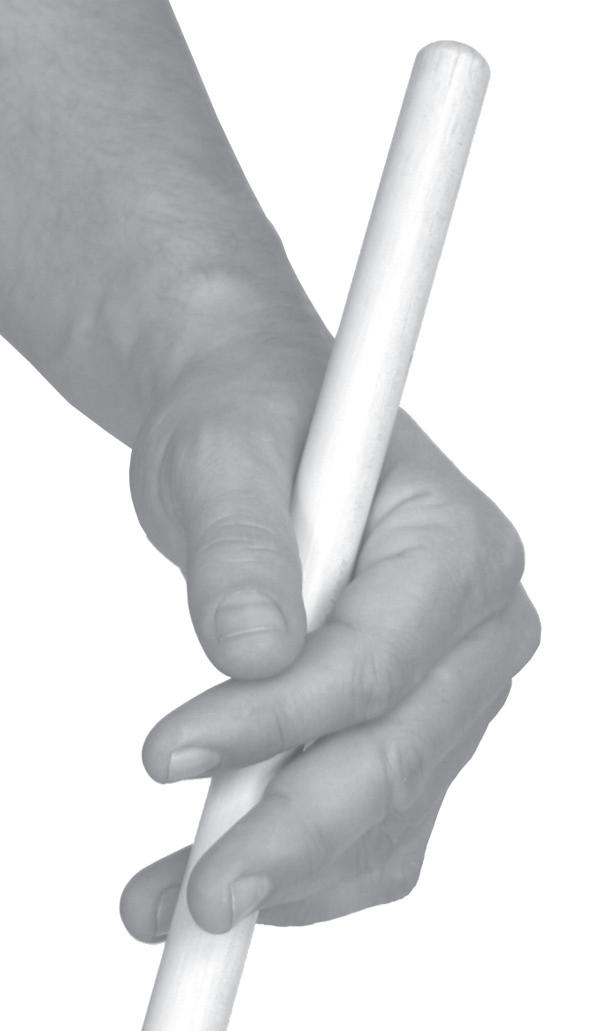
THE LEFT HAND TRADITIONAL GRIP
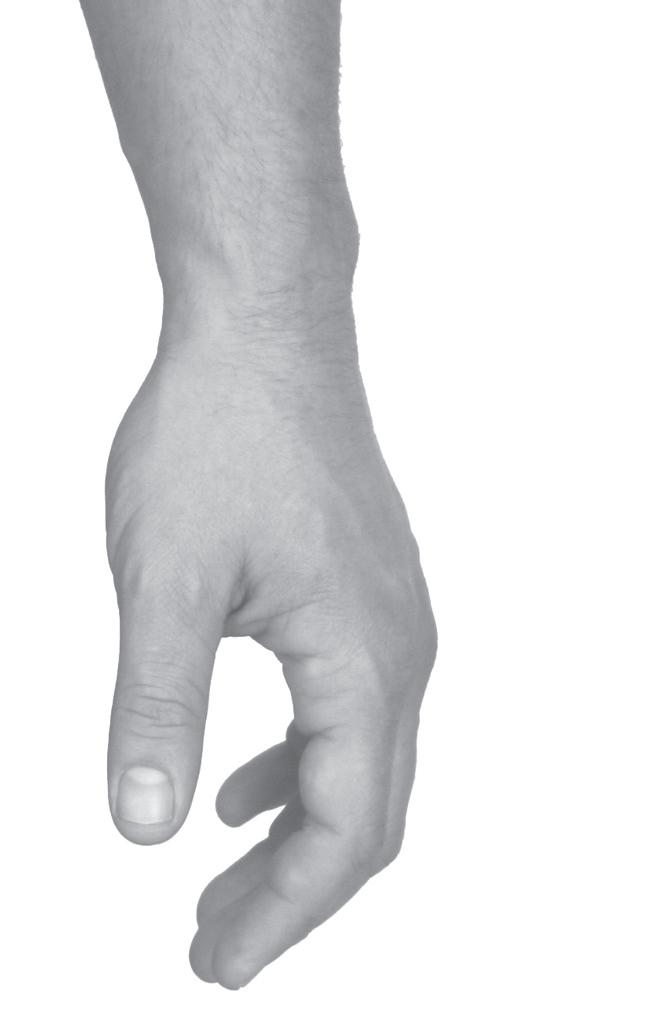
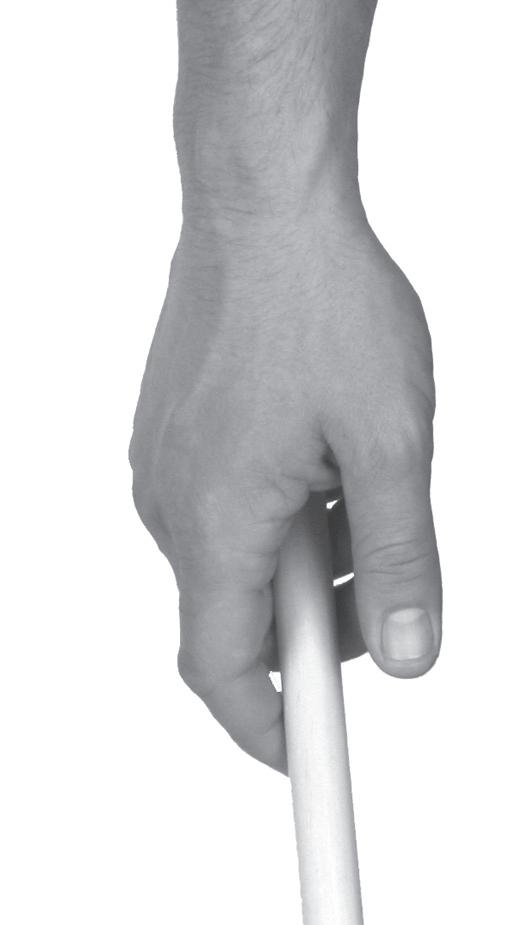
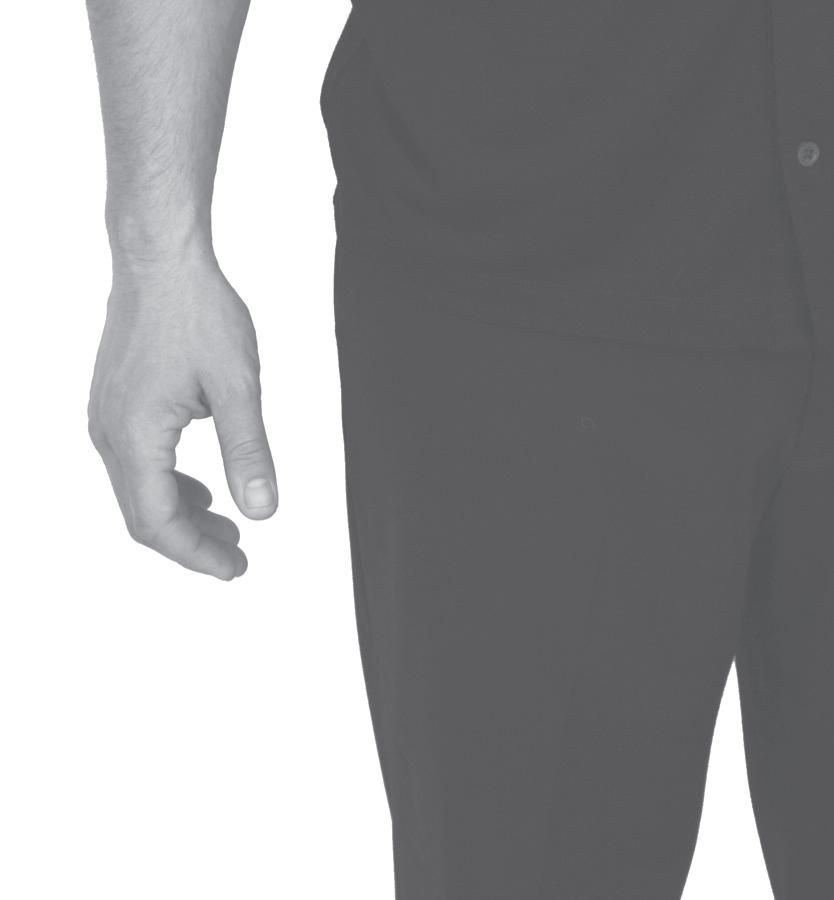
1. Start by relaxing your hand at your side.
2. Place the stick in “V” or webbing of

4. The middle finger is relaxed and on the stick, the index and ring finger are paral lel. The stick is resting on the ring finger, between the cuticle and first knuckle. The pinky is relaxed with the same curve as the ring finger.
8 The Next Level
GRIP FUNDAMENTALS: THE GRIP
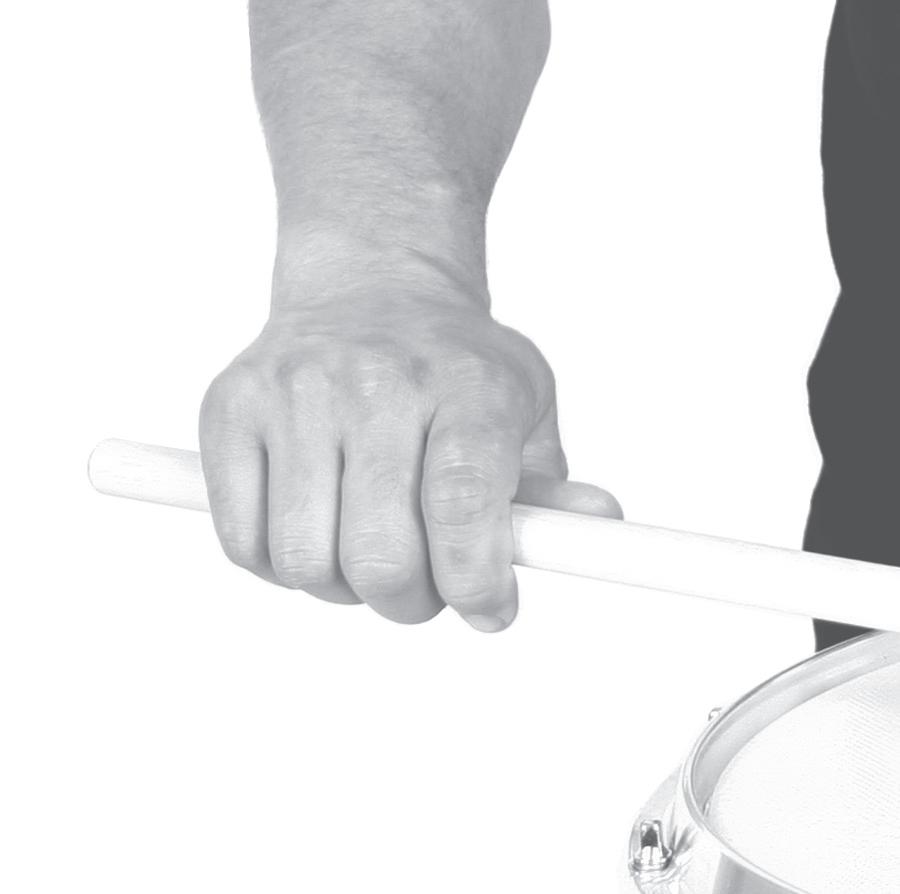
THE RIGHT HAND GRIP
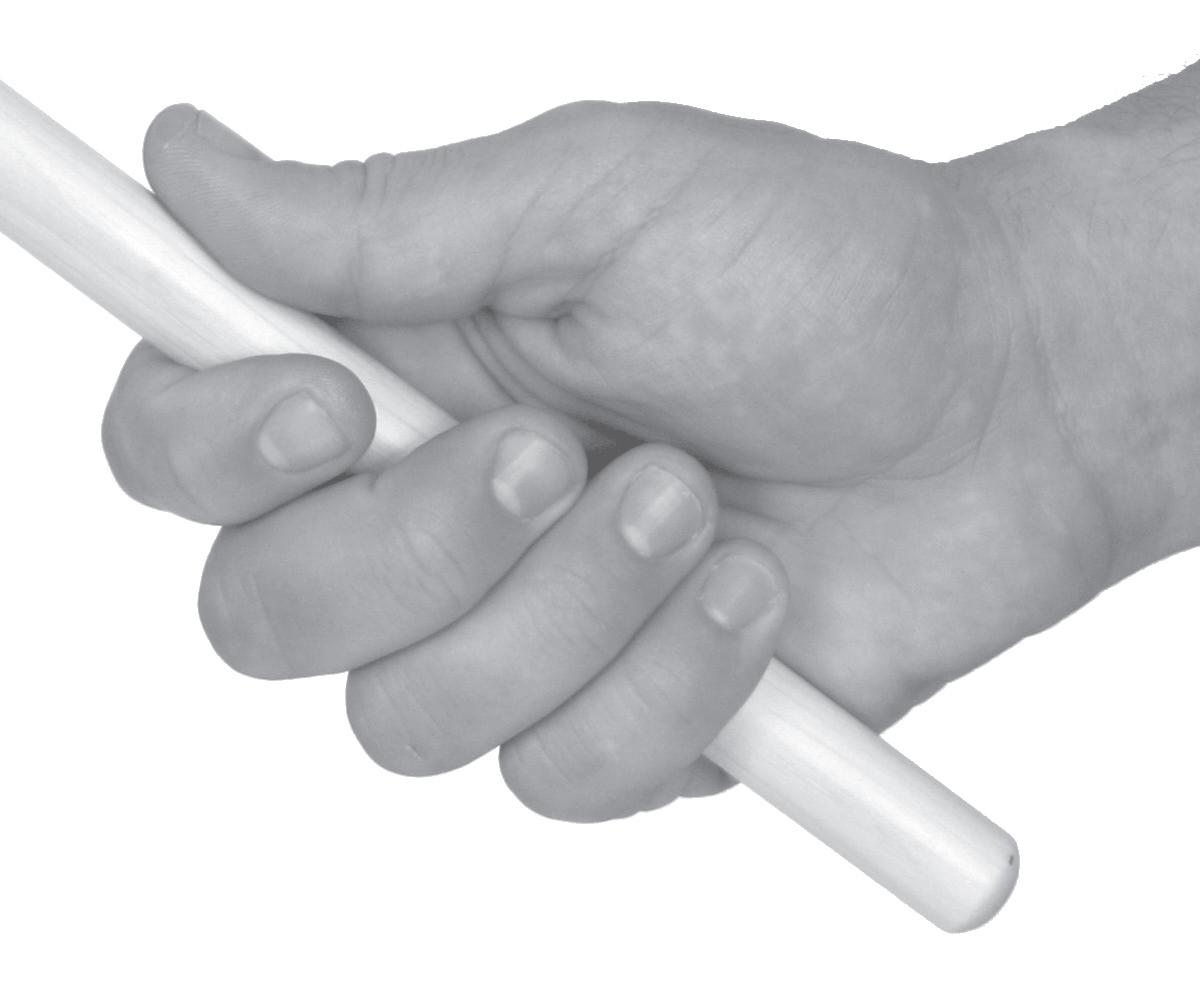
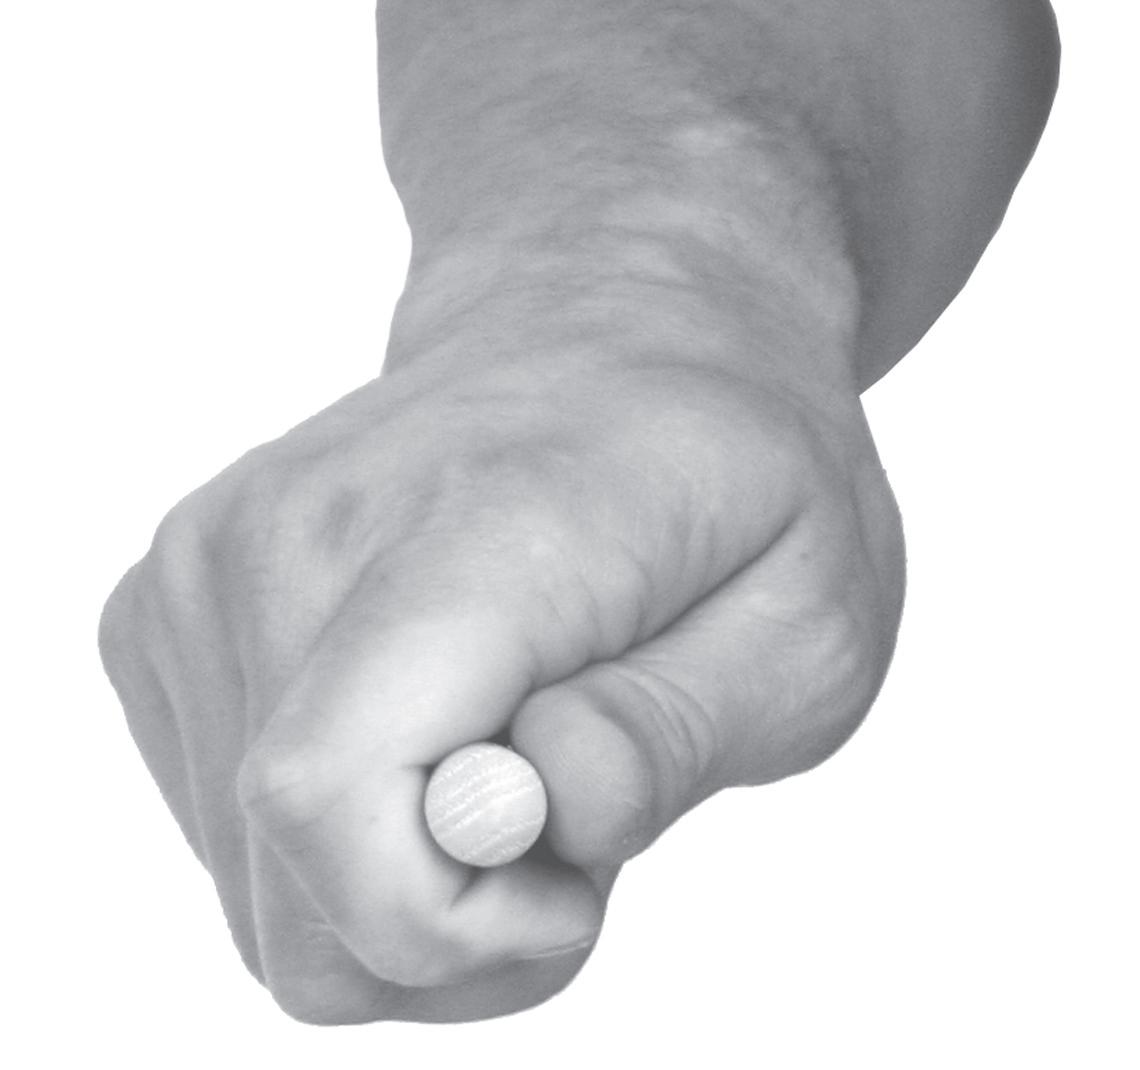
1. Start with your hand relaxed at your side.
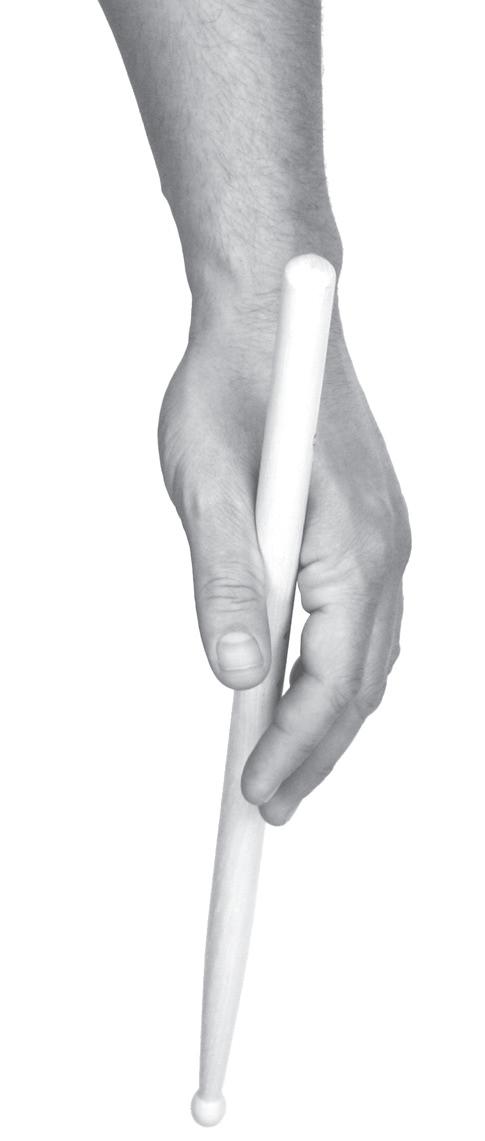
2. Place the stick in your hand, holding it with the pinky and ring finger.
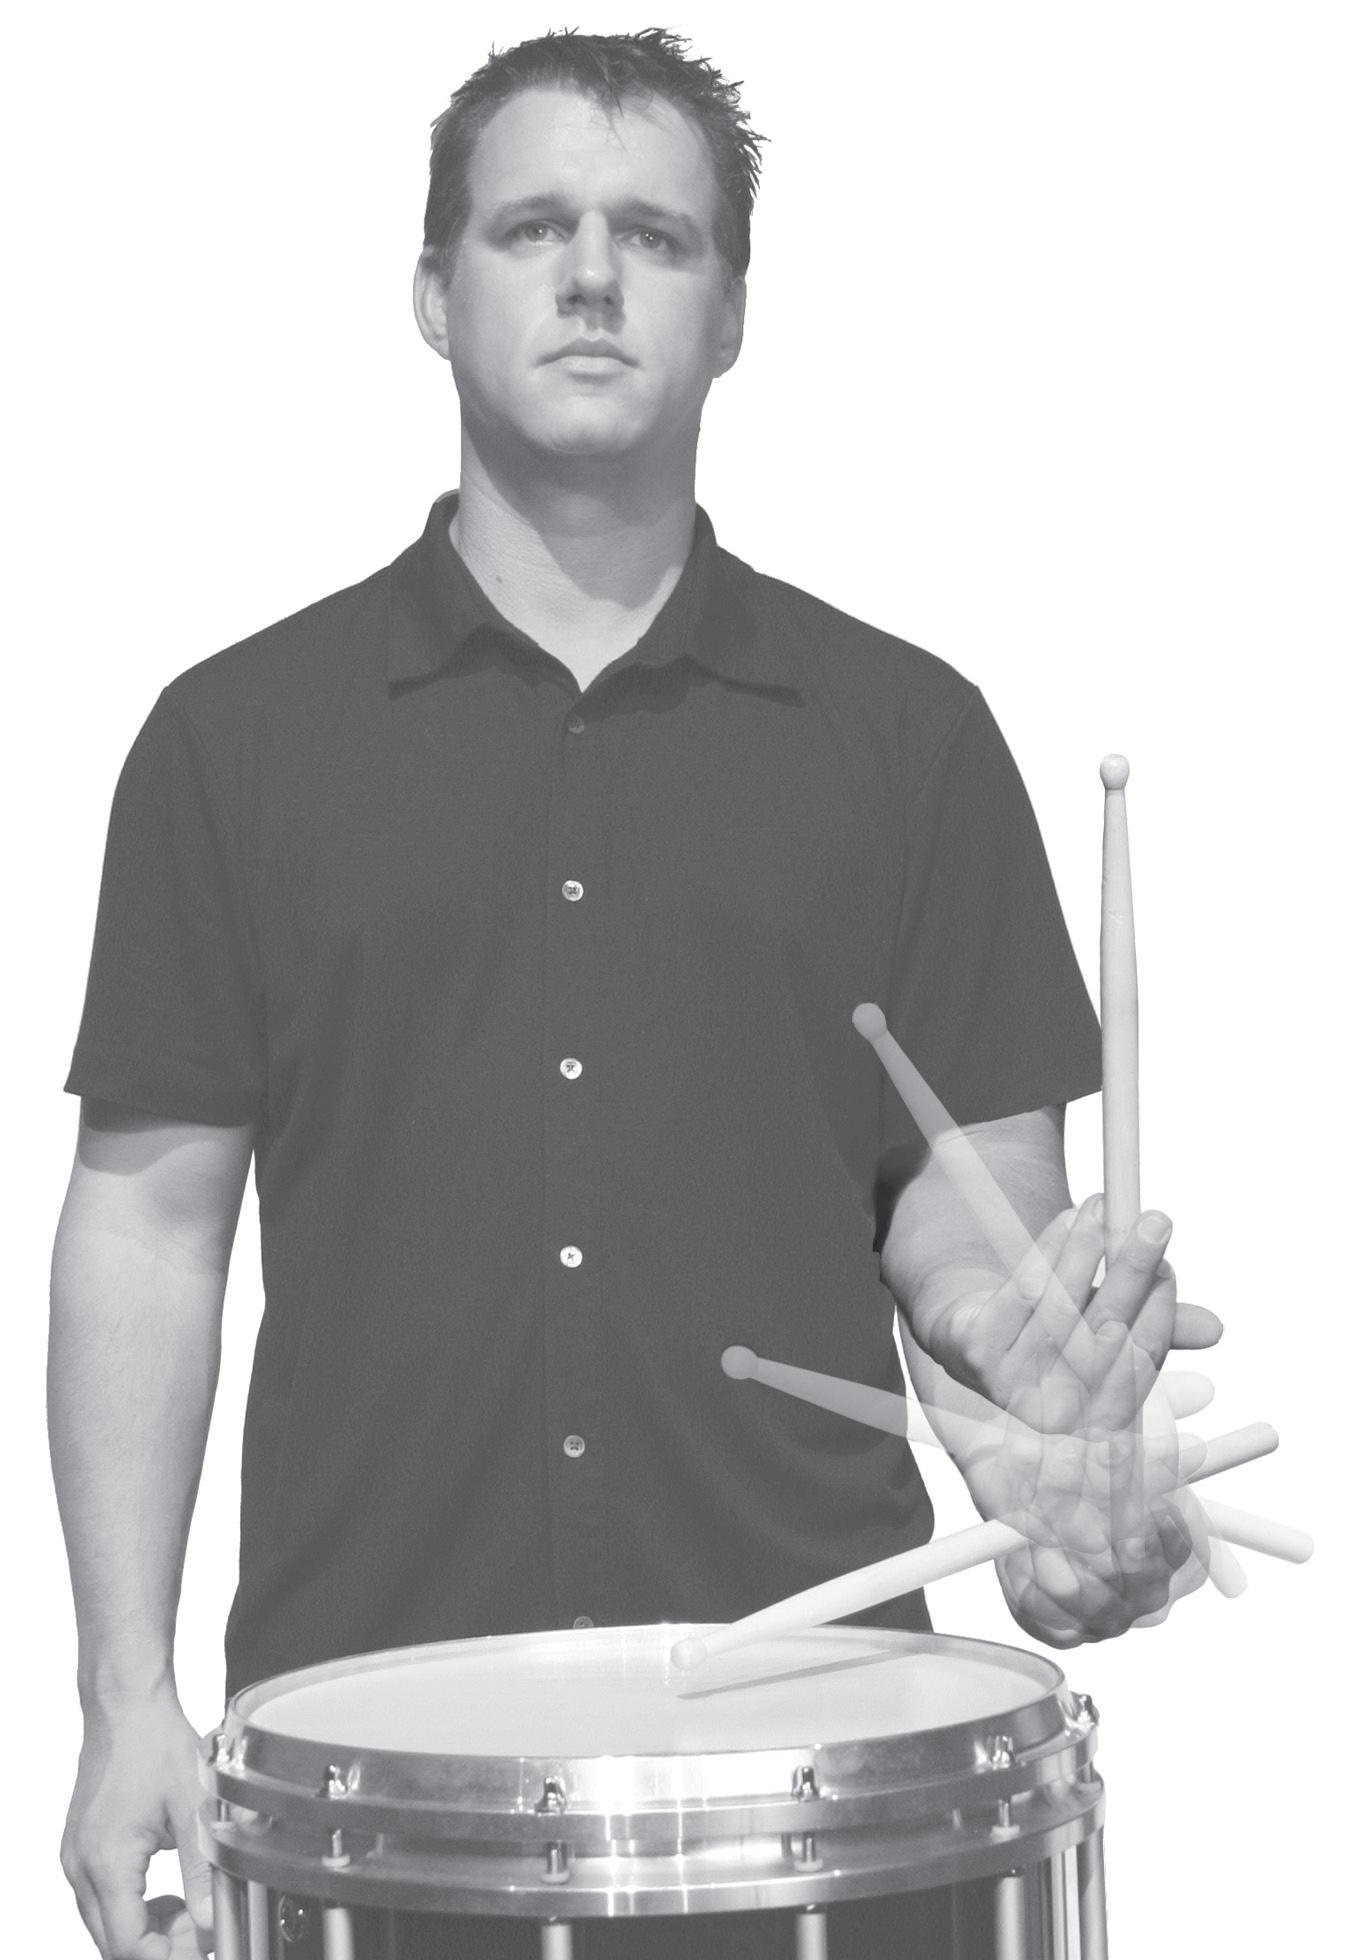
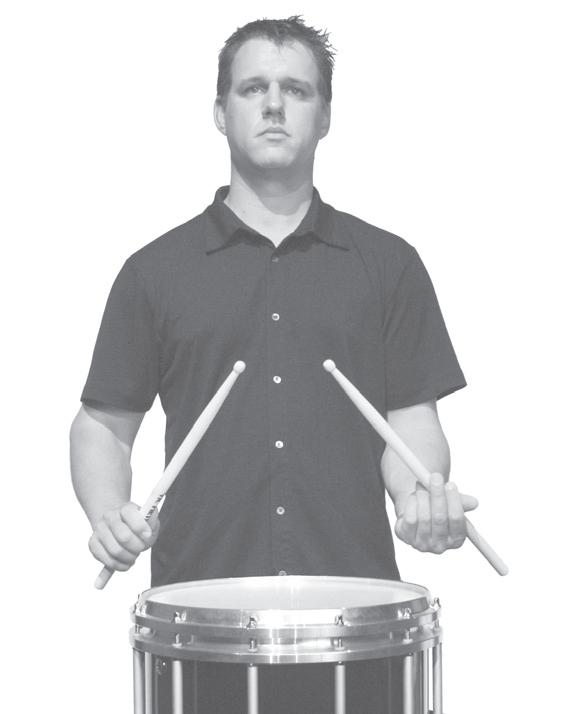
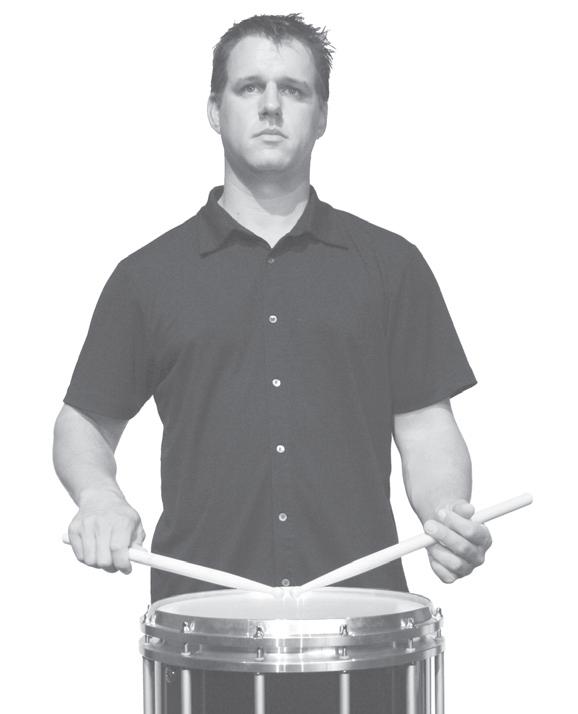
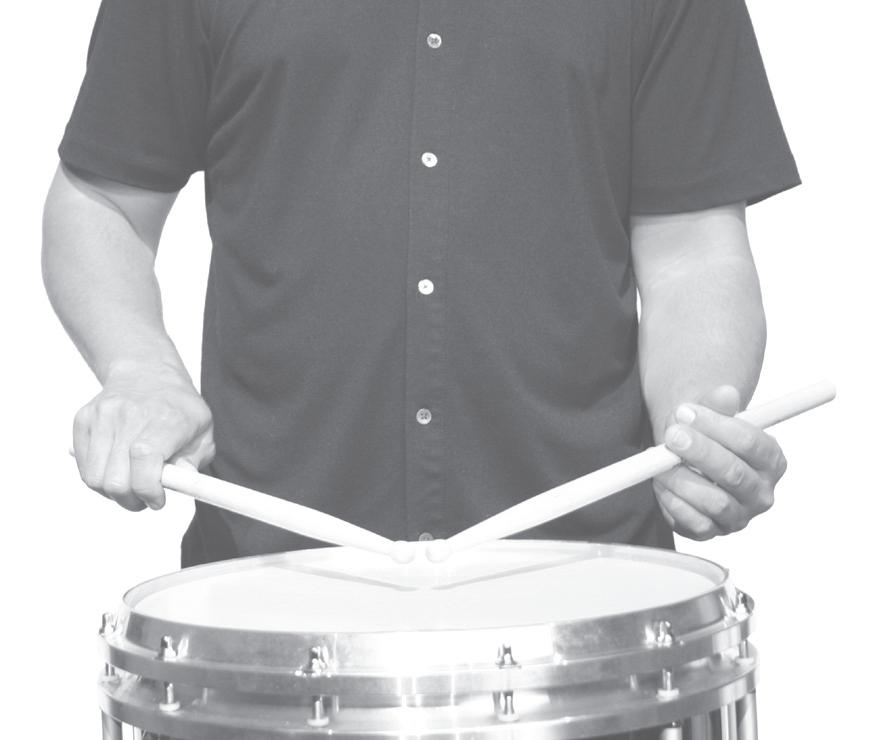
With both sticks in the center of the head and in playing position (beads about 1” off the head), relax the shoulders and arms. The sticks should form a 90 degree angle (roughly). The horizontal angle of the sticks to the head should be -10
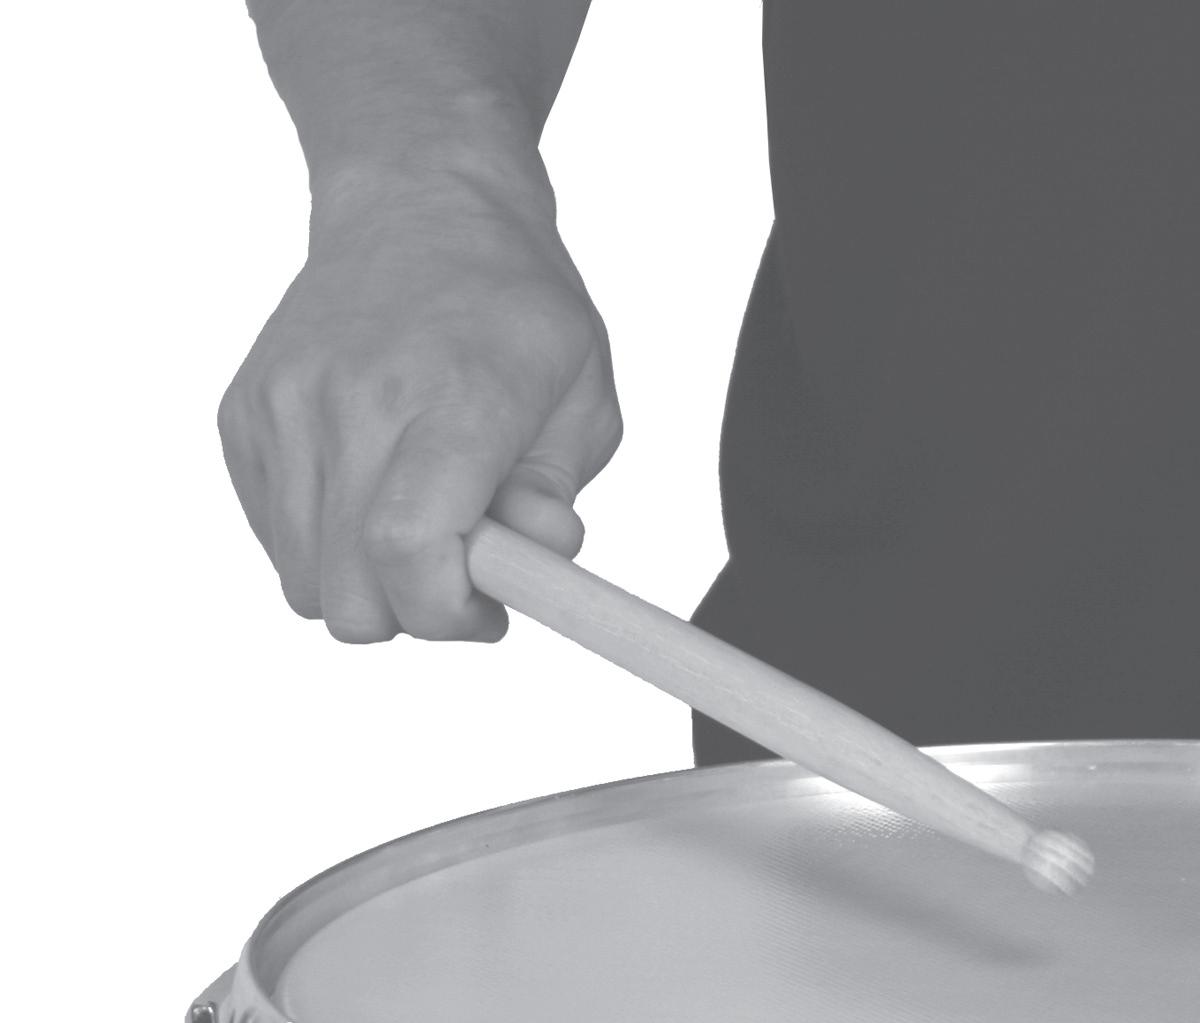
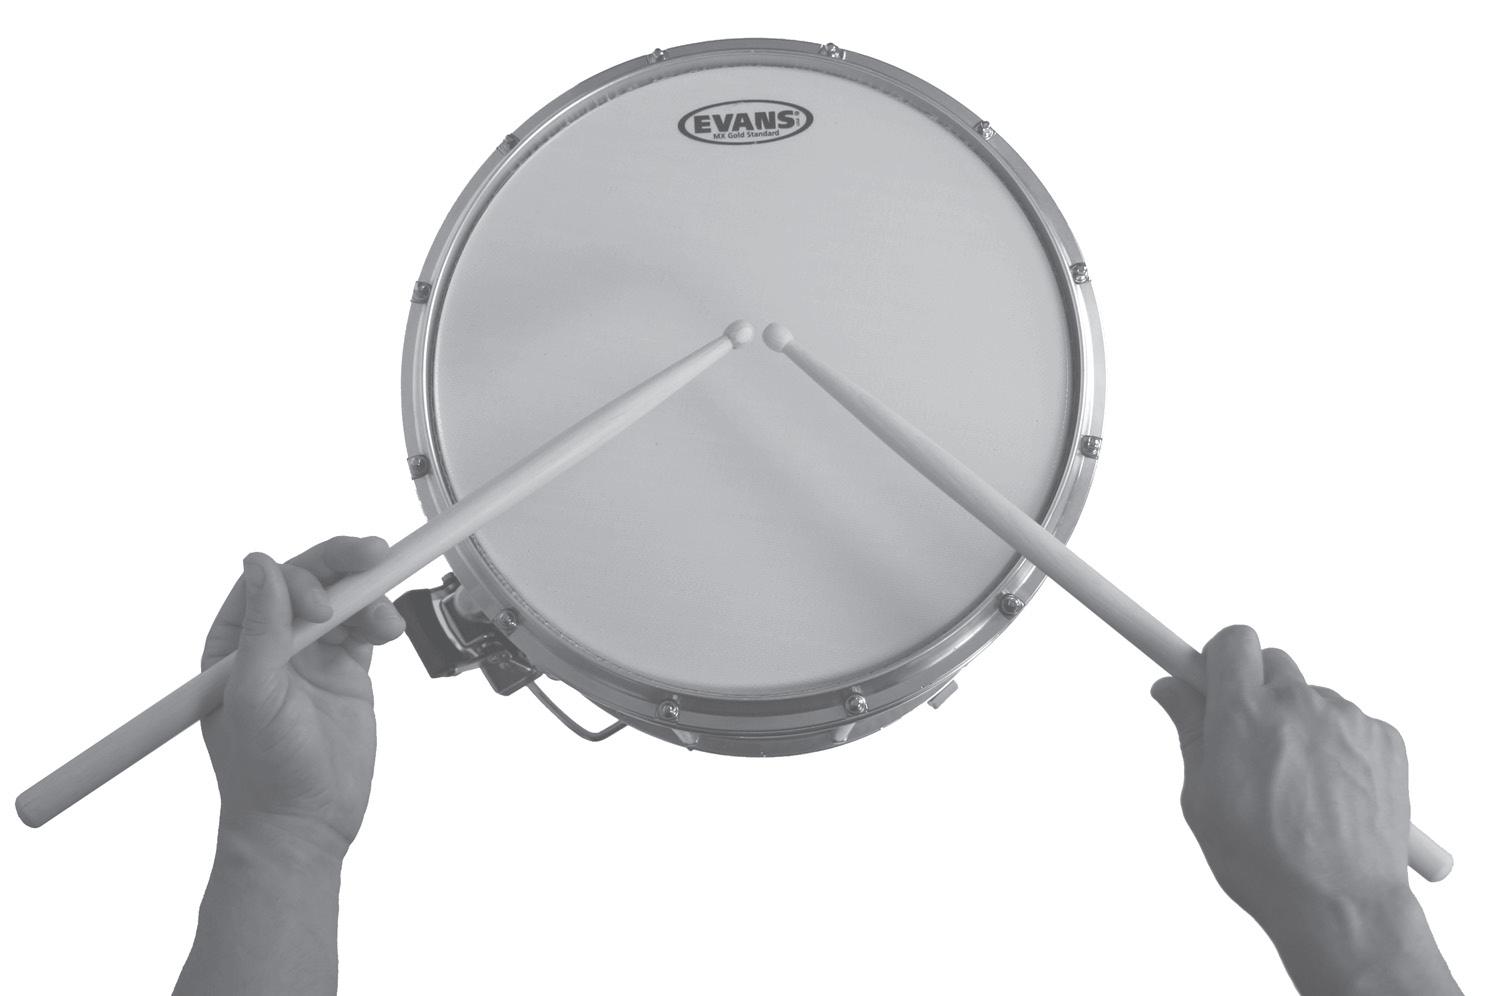
• Right Hand – Thumb is at a 45 degree angle
• Left Hand – palm slightly, open fingers relaxed
Think of the stick as water: with your fingers closed and having no gaps, the stick could not “leak” out of your hand.
9 The Next Level
For the right hand, the “front of the grip” is the underside of the index finger. Consider this example of the thumb and index finger forming a rectangle
On the left hand, the front of the grip should be thought of as an equilateral triangle between the thumb (the left leg of the triangle), index finger (right leg of the triangle) and stick itself (base of the triangle).
Even pressure should be applied from the top of the triangle (connection between thumb and index finger) to the legs of the triangle (thumb independently and index independently) so there is even distribution of energy ap plied to the base of the triangle (the stick).
The right hand “back of the grip” is the ring and pinky finger.
The left hand back of the grip is about 85% index finger and 15% finger. This means that the index finger in the left hand is doing double duty for the front and back of the grip.
You may have noticed no mention of the middle finger on either hand. The middle finger is a multi-purpose finger, adding to whichever part of the grip that needs it, based on what is being played.
10 The Next Level FRONT AND BACK OF THE GRIP
TRADITIONAL GRIP: (almost) THE SAME AS MATCHED
There are some differences between the two grips, however, there are many similarities that can help you become versatile in both grips.
• The “T” fulcrum is the same in both grips.
• The fulcrum of each grip is in the same spot on the stick.
• The front of the grip is in the same spot.
Here are some characteristics that function the same but use different muscles:
ostly index (85%) and a little bit of the ring finger (15%).
11 The Next Level
II. TECHNIQUE CONCEPTS
USING THE FINGERS
The fingers should COMPLIMENT what the wrists and forearms do. In normal playing, the fingers add support, helping to absorb the shock of a rebounded note or adding fullness to the sound via the pressure on the stick (we’ll get into how they “cushion the stick” to control the rebound on the next page).
In soloistic settings or very fast passages, the fingers can act muscles than the wrists and arms, they have the ability to move much quicker.
HEIGHT SYSTEM
I use a height system based on numbers. The degree markings you see are based upon the wrists being about 2” from the rim of the drum. I’ll refer to these heights throughout the book. number of inches for each height!
My system of defined heights breaks down as follows:
1 – pp;
1” off the head and very soft. Grace note height; -10 Degrees
9 – forte;
14” off the head and a comfortable wrist turn, standard accent height;
70 Degrees
12 The Next Level
CUSHIONING THE STICK
When you strike the head with a stick, it will want to rebound, or “bounce back” off the drum. In order to play with defined heights (especially in the case of accent/taps), you must absorb the rebound to keep the stick from bouncing back up. I absorb the energy of the natural rebound with a process I call “cushioning the stick”.
Think of what it feels like to sit down on a large velvet couch. The way you feel when you get “absorbed” into the cushions e energy of the rebound. The fingers are always on the stick to aid with cushioning/absorbing the rebound – the same way the cushions on the couch are there to catch you. The more you cushion the stick, the lower the rebound will be. The less you cushion, the higher the stick will bounce. I will also refer to this as “allowing the stick to rebound to 3 inches” (or whatever the desired height might be).
of the rebound – although at the top of the rebound, the energy is absorbed with the whole hand, not just the fingers. The fingers stay relaxed, allowing the stick to resonate. This concept is very similar to the way you would bounce a basketball for the second or multiple times.
I try not to refer to this action as “stopping the stick”. To me, “stopping the stick” means to put a “death grip” on the stick in order to keep it down – and this couldn’t be farther from the desired approach. The energy produced from the rebound can be utilized or absorbed (so you actually have to relax at the moment of impact), but if you “stop” the motion, you are ausing extra shock to your hands and the rest of your body . By cushioning the stick, the fingers can absorb the energy to the energy to allow the rebound to get the stick up again.
To test this concept, try the following exercise. Play a full stroke at Level 12, then cushion the stick on the rebound with the ger in the left hand. Allow the stick to rebound to any height (more cushion = lower rebound; less cushion = higher rebound).
All strokes start at Level 12 and rebound to the height indicated above the measure.
The main goal for any rudimental drummer should be to produce as consistent a sound as possible – all your taps sound all should have a consistent sound. In order to achieve the same sound on all “like” notes, your sticks should be moving at the same rate of speed for each note, rising to the same height as the other, the pressure in the grip should be the same in both hands, and the placement and angle of the bead
Every surface you play on has a resonance to it (a drum, coffee table, bleachers, gym floor, pad, etc.). That resonance refers to the combined underlying pitch of the surface and the sticks
Assuming that you are playing with a perfectly matched pair of sticks or mallets, a consistent tap hum can be established by playing strokes that have equal intensity, are played in time, with the same pressure in the grip. If you are allowing the drum (or surface) to resonate equally for each note – allowing the sticks to rebound and have equal resonance to them –
13 The Next Level
. . . . . . œ Œ œ Œ œ Œ œ Œ 1
Pick a practice surface and play 16th notes on one hand. If you do not change the speed of the stroke, the height of the stroke, and the pressure in the grip, you should easily hear the “tap hum” that I refer to. If you play alternating 16th notes, you might find yourself having to adjust one hand or the other to establish that same consistent “hum” (this is why that I stress having a perfectly matched pair of sticks)!
III. DEFINITIONS THE GRID
The concept of “the grid” is apparent in books as early as Ted Reed’s moved through the bar to practice quarter notes in every part of the measure. “The Grid” follows this concept by taking any rhythm pattern or rudimental figure and embellishing it with mathematical progression of moving it through the beat (or subd exercises throughout the TIMING CONTROL, DIDDLE CONTROL and FLAM CONTROL chapters of this book. A huge “thank you” to Tom Float for bringing this concept to the mainstream of rudimental drumming.
4-2-1
4-2-1 is a further mathematical application of the grid. Simply put, you can apply the “4-2-1 concept” to any rhythm pattern or rudimental figure by playing 4 counts of each success
Generally, you’ll benefit by applying “4-2-1” to any figure you practice by:
1. Establishing repetitious hand motion to a single pattern before switching to the next pattern (4’s and 2’s).
2. Learning to switch patterns consecutively, without a break between (1’s).
OTHER DEFINITIONS
STACCATO: Cut short crisply; detached. Marked by abrupt, disconnected sounds.
STACCATO MOTION: Crisp and abrupt
STACCATO SOUND: Short and angled; sharp.
LEGATO: In a smooth, even style without any noticeable break between the notes.
LEGATO MOTION: Long and fluid
LEGATO SOUND: Round and long
ANGLED RHYTHMS: Generally referring to 16th patterns and how they should fit p well as the desired articulation for the rhythm (working towards a staccato sound, without being tense).
ROUNDED RHYTHMS: Generally refers to triplet patterns and the desired articulation for the rhythm (working towards achieving a legato sound).
FOLLOW THE STICK: Refers to relaxing the muscles and allowing the hand to be moved by the force of the rebound of the stick.
DOWNSTROKED MOTION:
INVERTED MOTION: Moving from low to high.
CONTROLLED REBOUND MOTION:
14 The Next Level
IV. BASIC STROKES
Before we delve into The Adapted Moeller Stroke or the Velocity Stroke, I feel it necessary to define the four basic strokes that are used at some point or another, regardless of the technique used to play. These strokes are used across the board but some more or less, depending on the specific technique.
– A note that starts in the “up” position (level 12) and ends in the “up” position. I also call this an “8 on a Hand Stroke” or “Rebounded Stroke”. This stroke should sound the same as a downstroke, but rebound back up.
– This is a note that starts in the “up” position (level 12) and ends down (level 3) by cushioning the stick. Use this stroke to play two height passages or accent to tap heights. This stroke should sound the same as a Full
– This is basically a low full stroke, used for playing taps or lower heighted notes. This stroke starts and
– This is a note that starts “down” (level 3) and ends “up” (level 12). Basically, we will use an upstroke to get from a tap back to accent height. This stroke should sound the same as a tap, but return to the “up” position.
ed an exercise which he called “Loud Loud, Soft Soft.” This being that the loud notes are the Full Strokes and Downstrokes and the soft notes are the Taps and Upstrokes. Try this
NOTE: The upstroke on count 3 of the second bar sets you up for the following full stroke.
Now let’s put both hands together for the Morello exercise of four loud notes and four soft notes repeated, you can think
NOTE: Following an upstroke, stay in the up position as you are set up for a full stroke.
While playing either of the above exercises, make sure that all your loud notes (Full and Downstrokes) have the same sound, volume and timbre; and that all your soft notes (taps and upstrokes) have the same sound, volume and timbre.
BE VERY PARTICULAR ABOUT HOW YOU SOUND!!!
As you get into the rest of the technique portion of the book, these strokes will be referenced and you will see how they are
15 The Next Level
. . ˙ ˙ ˙ Tap (Soft) Downstroke(Loud) Upstroke (Soft) . . œ œ RL Upstrokes SoftSoftSoft
V. THE (ADAPTED) MOELLER STROKE
The Moeller Stroke (or Moeller Method) was invented by Sanford “Gus” Moeller during the early 1900’s. Gus Moeller not only pioneered the technique, but his teaching methods brought it to the mainstream for rudimental and drumset players alike.
The way I am going to break down the approach is slightly adapted from what Moeller would have actually taught. This “adaptation” has all of the same fundamentals, but is more suited to today’s “drum corps” style of playing, as well as the equipment that is commonly used (high tensioned heads, etc.). The Moeller stroke, as I will describe it in this adapted approach, is primarily a two-height technique used for playing notes low” (controlled rebound).
The concept behind the Moeller Stroke is that starts at the elbow and finishes with the bead of the stick of energy can be used to create numerous sounds, making Moeller a very efficient way to play. Moeller is great for playing fast two height passages, or playing multiple notes at varying
I generally refer to Moeller as a will produce a specific type of sound. I’ll discuss the sound pr chapter.
Many drum set players today use the Moeller Method because it a a much more “human” sound and feel. The subtle inconsistencies in sound and feel in the Moeller Method are the same reasons you will not see many drum lines using the large motion Moeller approach. However, the use of the “whip concept” is necessary for today’s rudimental drummers to achieve faster tempos, especially when going from a “low to high” stick height in rudiments such as Inverted Flam Taps, Flamacues, and Patti Fla Fla’s (chu-chuddas).
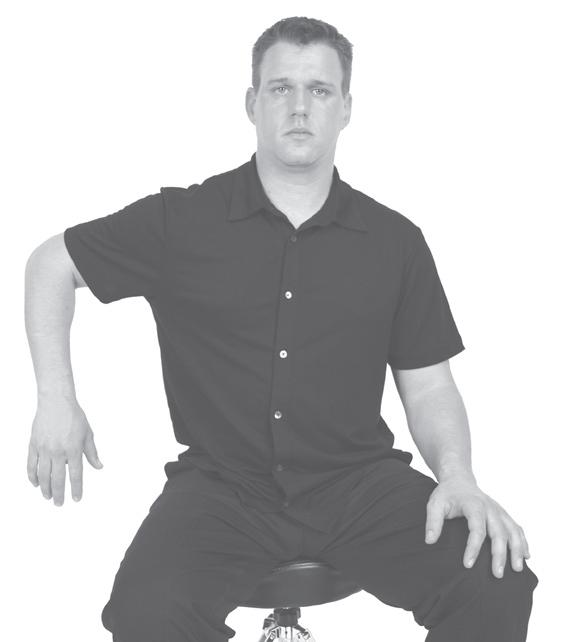
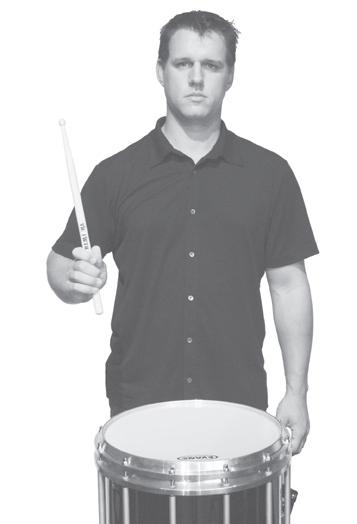
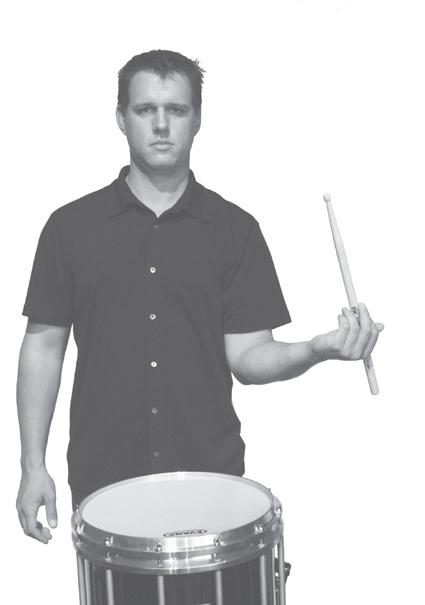
LEARNING THE WHIP MOTION / EXERCISES WITHOUT THE STICKS
Before we get into the fast tem which the entire stroke is based. I can not stress how importan
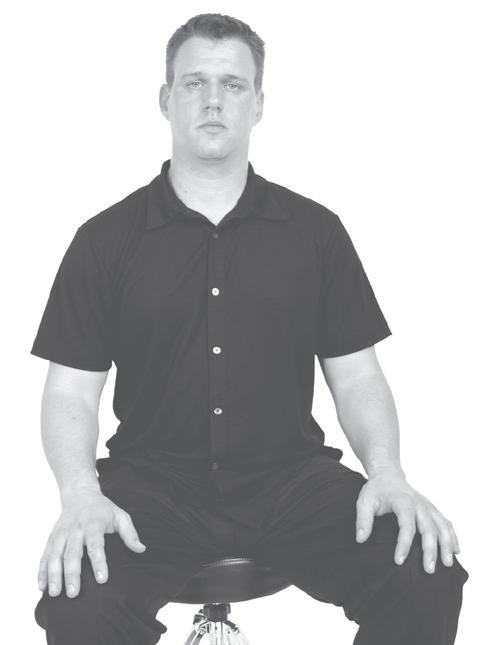
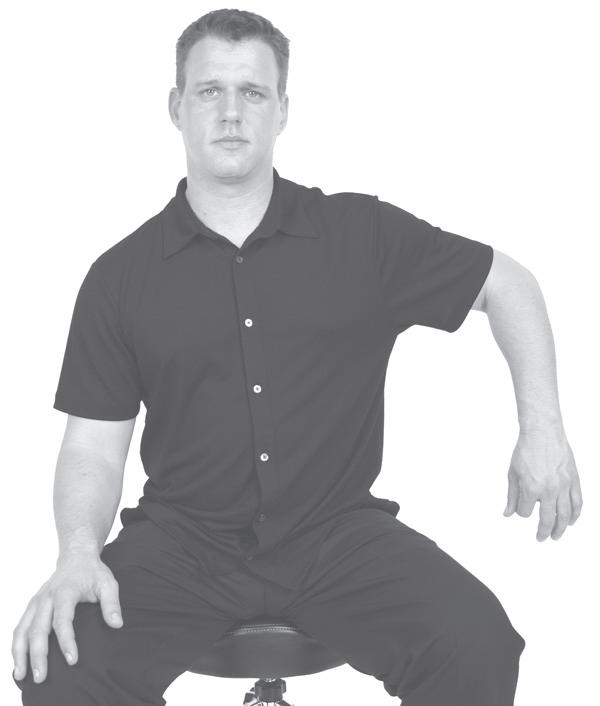
RIGHT HAND
1. Sit in a chair with hands flat on your thighs, palm down.
16 The Next Level
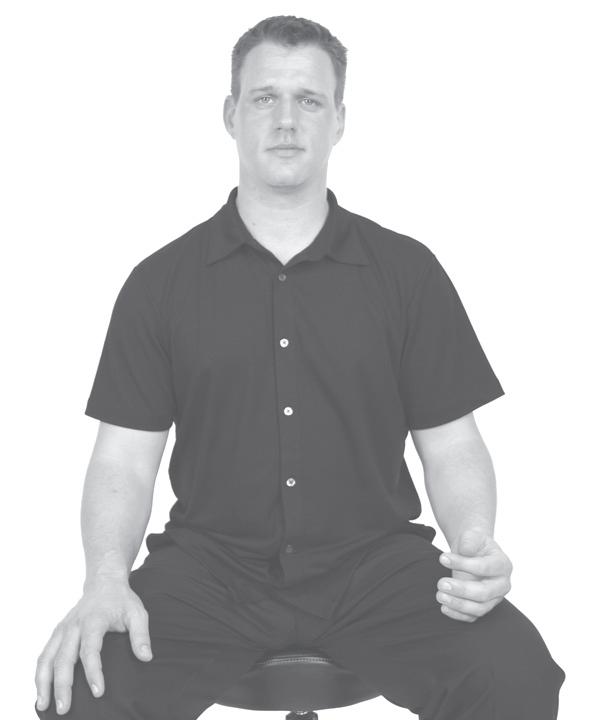
LEFT HAND
The left hand Moeller Stroke will function pretty much the same as the right – however, keep your fulcrum (thumb and index finger) attached as you go through the motion. This makes the downstroke (or slap) a “karate chop” as you hit with the side of your hand.
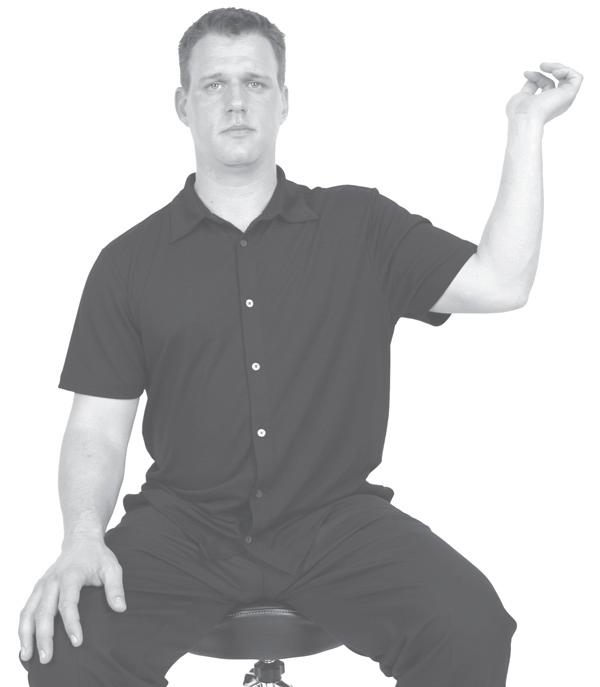
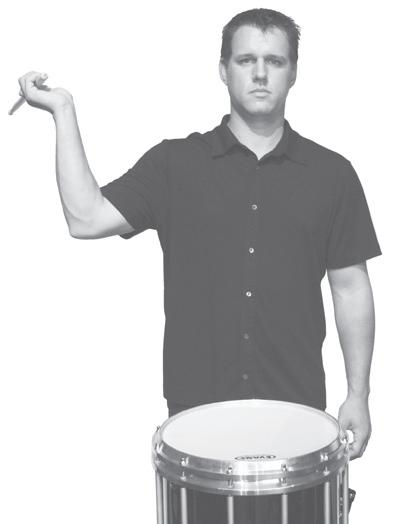
This exercise demonstrates the correct path and movement of the wrist and arm. Stay VERY relaxed and keep your hand
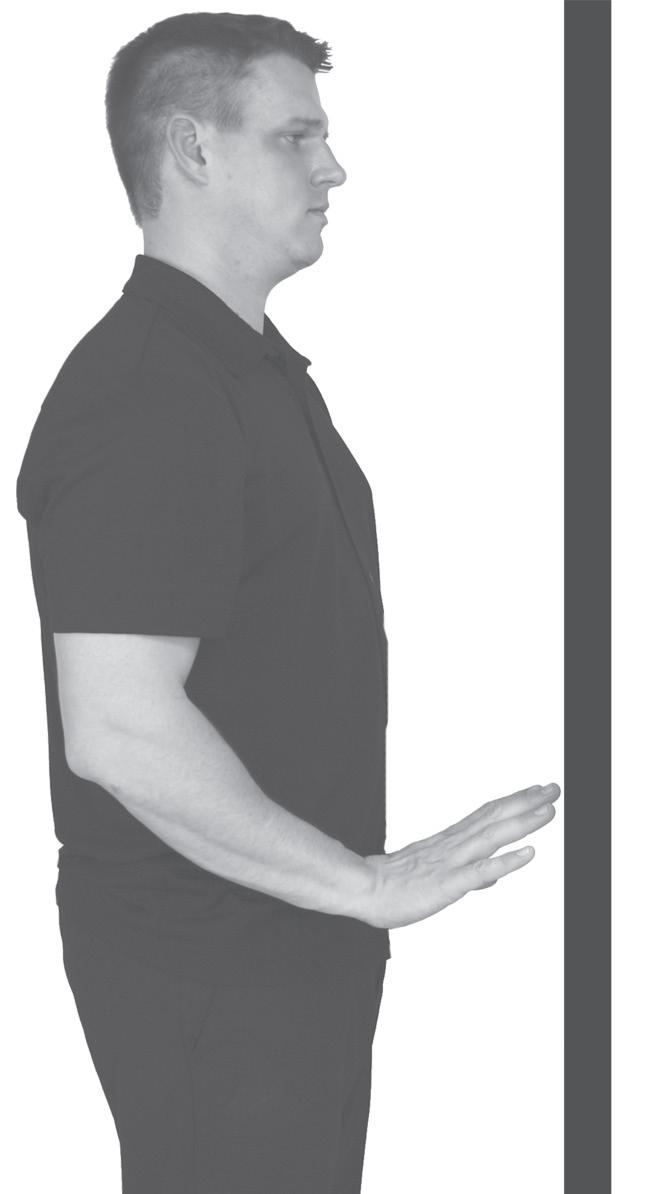

NOTICE THE RELAXED MOTION AND BEND TO THE ARM, WRIST,
HAND AND FINGERS AS THEY MOVE UP AND DOWN THE WALL
I recommend spending a least one full week of practice time devoted to learning the motion alone!
17 The Next Level
, then the wrist (whip motion).
ADAPTED MOELLER – ESTABLISHING THE GRIP
It’s important to note that the grip that you’ll use when playing the Moeller Stroke is a little different than what you’ll use for the basic technique. Here is a breakdown of how I approach the grip for the Moeller Technique:
LEFT HAND
RIGHT HAND
BOTH HANDS TOGETHER
The angle formed by the sticks should be about 110-degrees, and the sticks should be flat to the drum.
THE FRONT AND BACK OF THE GRIP
For left hand Moeller, the thumb is considered the “primary” part of the front of the grip (with the index being about 15%). The right hand and back of the grip in the left hand are exactly the same as the basic technique.
18 The Next Level
1. The fingers are long and relaxed along the stick.
1. The thumb is on the side of the stick and the back of the hand is flat to the sky.
COMPONENTS OF THE MOELLER STROKE
The Moeller Stroke consists of these major components:
1. Elbow lift (pullout/upstroke motion) – leads with the butt of the stick.
2. Elbow turn / coil for the whip.
While each of these components are learned individually, we’ll eventually “slur” all three motions into one. If you haven’t already done so, practice the EXERCISES WITHOUT THE STICKS, presented earlier in this chapter (page 10).
This motion is transferred into these types of strokes/notes (and how I will refer to them from here on out):
Taps / Flyback Notes / Rebounded Notes (notes that happen after hitting the drum). as a result of starting the motion by allowing the stick to hit the head.
Turn from the elbow, letting the stick flop back (elbow at almost a 90 degree angle).
4. Turning from the elbow, hit the drum, allowing the stick to “fly back” completely.
Turn / drop the elbow, bringing the hand and stick up in a whipping
4. Turn the elbow, hit the drum, allowing the stick to “fly back” completely.

19 The Next Level
ONE NOTE MOELLER PRACTICE (ONE MOTION, ONE SOUND)
Use this next exercise for practicing the single note Moeller described on the previous page. START AT THE SLOWEST TEMPO MARKED and perfect the motion of the large Moeller stroke before you speed up!
Keep in mind that the components of the stroke (drag, elbow turn, downstroke, rebound/rest) happen on each individual count, so work with a metronome! Use the pictures on the previous page as your guide.
q = 60-100
DragElbowTurn
AS YOU WORK ON THIS EXERCISE:
• The Moeller stroke ALWAYS starts with the stick in the set or “down” position.
• Allow the stick to rebound (or “fly-back”) completely on each do rest position before starting the motion again.
• After establishing a completely relaxed fly-back note, experimen to control the height of the rebound (see “CUSHIONING THE STICK” on page 13). More pressure = lower rebound, less pressure = higher rebound.
As you speed up the tempo or to play lower accent heights, the motion of the Moeller stroke becomes smaller:
Large Moeller - Over the head style playing, the same as the breakdown on the previous page.
Full Moeller - Level 12 "ish" accent heights where the whip comes from the elbow but is smaller than the large motion.
Half Moeller - Level 9 "ish" accent heights where the whip is primarily forearm and wrist (slight elbow motion).
Low Moeller - Level 6 and below accent heights where the whip is just a slight forearm motion leading to the wrist (almost no elbow motion).
Use this next exercise for practicing same height notes. All strokes are full Moeller, with one motion (whip) per sound. Allow the stick to rebound completely.
q = 60-100
Just a hint on how long it takes to REALLY get these motions comfortable and feel like second nature:
When I first learned the Moeller stroke, I spent about a week on on the Large, Full, and Half Moeller
TIP - “One Heighted” patterns such as the one above will be played using repeated strokes of the “One Note Moeller”, allowing the flyback notes as much height as possible, then star note will depend on how much arm / whip motion is used.
20 The Next Level
L R
4 4 ŒŒ
4 4 ˙ ˙ L R
2 NOTE MOELLER PRACTICE (ONE MOTION, TWO SOUNDS)
As I mentioned before, the benefit of the Moeller Stroke is that you can get multiple sounds from one motion. In this section, you’ll learn to get a second sound from the upstroke motion that happens at the beginning of the Moeller stroke. In the following exercise, play each accent with a full Moeller Stroke. Allow the stick to fully rebound and come to rest about 2” above the head, then start the upstroke motion on count 2. In measures 3 & 4, you’ll add the second sound of the upstroke, not as a separate motion! Because you’re only using one motion, you’re now able to get multiple sounds. M.M.= 60-130.
re, then begin to “pulse” the downbeats (m.2) by lowering the tap slightly. The heights of the taps in measures 3–5 are defined by that amount of cushioning that you apply to the rebound
s), the whip motion should get larger. Think of “slurring” one motion for two sounds by measure 5. When you reach the final ke them consistent”). M.M.= 60-130
. Remember! As the accents get bigger, the whip
3 NOTE MOELLER PRACTICE (ONE MOTION, THREE SOUNDS)
the downstroke and upstroke motions that you learned in the 2 note Moeller. The second stroke of the 3 note Moeller is produced by using your back fingers to CUSHION the stick on the w, controlled bounce. The amount of cushion that you
Use this exercise to isolate the downstroke and the “cushion stroke”. Again, the second sound is produced from the one In measure 3, the third sound is played as a result of the upstroke
Remember: One motion, three sounds – NOT 3 separate motions!
21 The Next Level
œ > œ ‘ Downstroke Upstroke . . . . . . œ œ > œ œ > œ œ > œ œ > œ œ > œ œ > œ œ > œ 12/612/3
. . . . . . œ œ > œ œ > œ œ > œ œ > œ œ > œ œ > œ œ > œ 12/3
. . œ œ > œ œ Upstroke Cushion
As you practice this next exercise, think of the 3 sounds as being a “controlled decrescendo” of sorts. As you play, begin to adjust the pressure in the fingers and amount of cushion to control the height of the second note.
Next, we’ll use the same “pulsating approach” that we used in the 2 note Moeller to develop control over the amount of elbow motion that you’ll use on the accents. Start with full strokes, then begin to pulse the downbeats by lowering the 2nd & 3rd sounds (elbow motion gets bigger as taps get softer). In 12, taps at 3). Remember: ONE motion for THREE sounds.
Same as above, but starting from tap heights and building up.
MOELLER TECHNIQUE – SUMMARY
One motion used to create multiple sounds
Always begins in the set, or “down” position
Arm, wrist & stick follow in a whipping motion
A few final thoughts:
Because you’re able to achieve multiple sounds from one motion, Remember though, the consistency of sound of the stick touches the head on the upstroke, how much arm motion is involved and how much cushioning is done with the back fingers on the taps. Only through dedicated practice will y
Also remember that Moeller is primarily used for TWO HEIGHT applications. Because you are using one motion for multiple sounds, you WILL hear a difference in sound between the downstroke, tap and upstroke, even if this difference is very slight.
The amount of height difference between the accents and taps is controlled by the amount of arm motion that is used for the downstrokes (more arm/elbow motion = higher accents) and the amount of cushioning that is applied on the taps (more cushioning = lower taps). In the “TWO HEIGHT” chapter, I will go into much more detail with the Moeller and Velocity techniques, and how to blend the two techniques together.
I can’t stress enough how important it is to completely master each Moeller exercise I’ve described in the previous pages before you move on to the next chapter! At the MINIMUM, you should spend at least a week on each exercise. If you don't learn it now, any amount of effort that you expend through the rest of this book will be wasted!
22 The Next Level
M.M.=80-120 4 4 . . œ > œ œœ > œ œœ > œ œœ > œ œ Downstroke Cushion Upstroke 8 12 . . . . œ œ œ œ œ œ œ œ œ œ œ œ L R 12/12
M.M.=60-100 8 12 . . . . œ œ œ œ œ œ œ œ œ œ œ œ L R 3/3
VI. THE VELOCITY STROKE
The Velocity Stroke is very similar to “Stone Strokes,” which were developed by George Lawrence Stone in the early 1920’s and 30’s. Stone wrote two very famous books titled Stick Control and Accents and Rebounds, both important manuals for advancing your drumming skills.
The Velocity Stroke was brought to the mainstream of modern drum corps by Thom Hannum in the late 1980’s and early 1990’s. Similar concepts to this technique are discussed in Thom’s book, Championship Concepts for Marching
Whereas the Moeller Technique is a “motion that creates a sound”, the Velocity Stroke is a “sound to create a motion”.
There is an optimum quality of sound that you can achieve on any instrument. As this relates to (deeper shell, tighter heads, primarily used outdoors), I am referring to maximum tone and volume of the drum, without distortion, along with achieving maximum snare response. If you are striving from a marching drum, the Velocity Stroke is the motion I recommend to achieve it.
How you bounce a basketball or tennis ball is the same way you should approach the Velocity Stroke.
Consider holding a ball over your head and dropping it to the ground. When the ball hits the ground, it will bounce about 2/3rds of the way back up. The only resistance to the ball is the ground (which forced the ball to rebound or bounce) and human force acting on the ball to prevent it
In order to get the ball to bounce back up to your hand, you have to put some force (velocity) behind the initial “throw”. Think about it: as you dribble a basketball, you're not simply dropping the ball on each stroke – you’re pushing it downward with the amount of energy that’s necessary to get it to rebound to the same height.
The same concept will be applied to the stick on the Velocity Stroke. To play a Velocity Stroke, you’ll need to put some energy (speed, velocity) behind the initial “throw” – pushing from the wrist and front of the grip. As soon as you throw so the stick can return to its starting point (without the hand or fingers getting in the way), then
A “full” sound is then created because you are putting enough energy behind the stick to push the maximum amount of air through the drum, activating the maximum amount of resonance from the shell and maximizing the amount of snare response. By relaxing the muscles at the point of impact, you’re allowing the stick and the drum head to fully resonate,
NOTE: There is a sharp burst of energy you’ll use to “push” the stick to the head, but then realize that the muscles should totally relax after the initial push. This relaxation will allow the hand to “follow” the stick in its return to the starting point. very sharp and short (staccato), which is directly contrasting to the sound, which
On the next page, we’ll work on a few exercises without the sticks to develop an understanding of the Velocity Stroke.
23 The Next Level
VELOCITY STROKES – WITHOUT THE STICKS
Since “Velocity” is a very wrist and muscle intensive stroke, it is important to know which muscles will be used in each hand.
RIGHT HAND
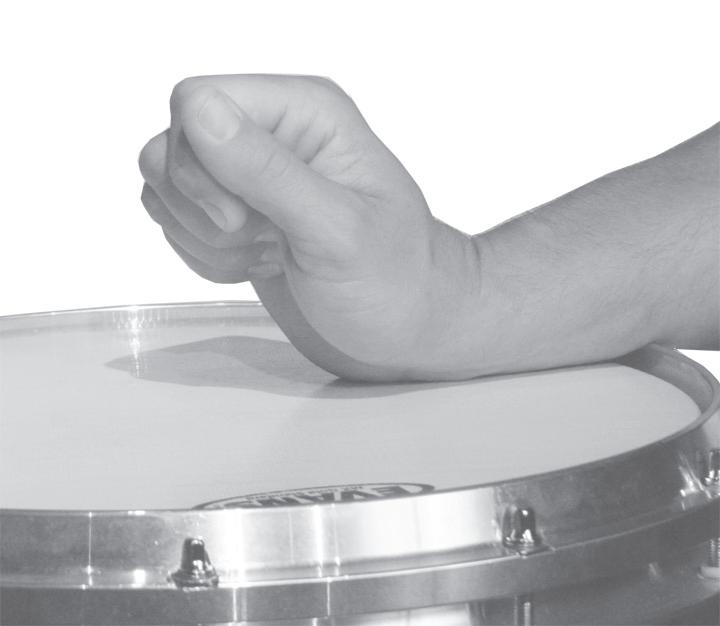
Lay your hand flat on the drum and pretend to “knock” loudly on the drum. The forearm should be flat on the drum and the wrist turning the hand in the knocking motion. Try this for 1 minute! You should eventually feel your forearm and wrist muscles getting tired. These are the same muscles that you will use to execute the Velocity Stroke.
LEFT HAND
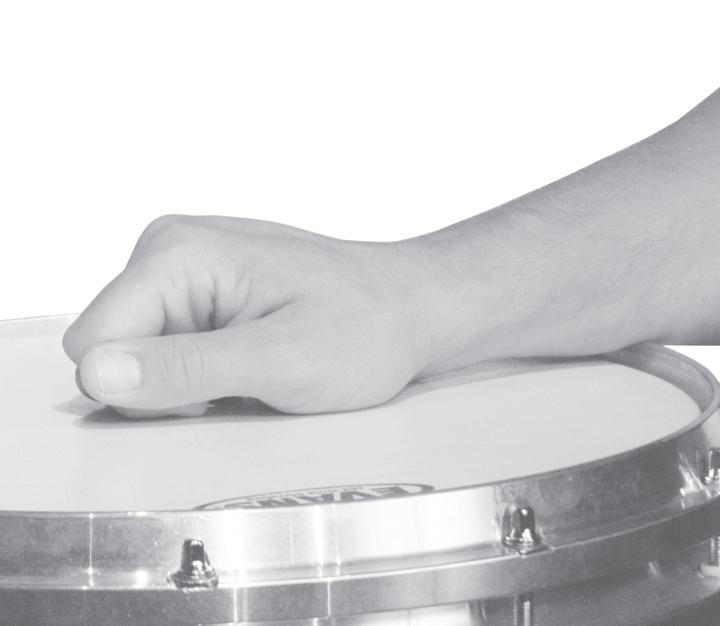
With the hand totally open and extended, palm up to the sky, slap the drum with your thumb. Keep the arm still, turning the wrist 180 degrees, while staying relaxed. Do this for 1 minute! Eventually, you’ll feel your forearm and wrist muscles getting a little tired. These are the same muscles that you will use to execute the left hand Velocity Stroke.
ESTABLISHING THE GRIP AND HAND POSITION
Compared to the basic technique, the grip for the Velocity Stroke is similar except for:
1. The thumb on the right hand is on the side of the stick, with the back of the hand flat.
2. The left hand fingers are slightly more compact.
3. Angle of the sticks is acute (less than 90º).
The left hand grip is more “compact” for this approach when compared to the Basic Technique and much more than the Moeller Stroke. By having the fingers a bit closer to the fulcr relaxed. By keeping this straight line from your thumb to your elbow, you allow the wrist to be centered on its axis and get the most rotation and a fuller sound.
The right hand is more “turned in” than in the basic technique (and much more than Moeller) to activate the front of the grip and promote wrist turn.
24 The Next Level
PRODUCING THE VELOCITY STROKE
The Velocity Stroke consists of four major components:
• Playing from the front of the grip (index thumb and middle finger on the RH; mostly thumb in the left).
• A solid wrist turn (on the axis).
Rebounded Notes (notes following a full stroke that are rebounded higher than 3).
REFER BACK TO THE BASIC STROKE ON PAGE 15 AS THE TWO CONCEPTS ARE VERY SIMILAR.
To give you a good idea of how quickly to move the stick for the Velocity Stroke, consider this example (thanks to Mike
otated, there is a specific speed that the stick is traveling, When you get to the quarter notes, rather than adjust the velocity and speed for a new note value, simply keep it the same. Because you’re pushing the stick towards the head (and not inhibiting its rebound), it will bounce back up quickly – therefore, you’ll have a slight “pause” at the top of the stroke n. There is no extraneous pressure on the fingers, nor
The next exercise is a way to ensure that you are moving the stick correctly for the Velocity Stroke. Start with playing full strokes with just the front of the grip (measure 1). Turn the wrist, engaging the muscles from above; then one by one, add the stick and the rebound should remain the same. The stick regardless of how many fingers are on the stick.
Keep your eye on the bead of the stick for the entire exercise. You should see the bead pause for a brief second at the top of the stroke just as you are about to put the stick back to the head (as in the previous example). If you see the bead pause of the stroke (right after impact to the head), this means that you are not allowing the stick to fully
the index and thumb. Add one finger at a time (measures 2–4), then slowly close down the grip to allow the stick to touch the palm of the hand (measure 5). Make sure that the motion and rebound of the stick remains the same throughout, and that the hand “follows” the stick on each rebound.
25 The Next Level
. . . . . . œ œ œ œ œ œ œ œ œ œ œ œ œ œ œ œ Allfingers,handopenSlowlyclosehand œ œ œ
LEFT HAND
Start with the stick in the “V” of the hand, fingers relaxed and extended. Add fingers in this order: index finger/thumb connection, Rest middle finger on the stick, place ring and pinky under the stick. The motion and rebound of the stick remain the same the entire time and hand should “follow” the stick on the rebound. M.M. = 60=130
REPEAT THE ABOVE EXERCISES FOR EVERY HEIGHT AND DYNAMIC LEVEL. Remember the muscles that were used without the sticks, work to engage the same muscles.
FULL VELOCITY STROKE – 1 BEAT PRACTICE
Velocity Strokes can be thought of as a combination of “beats.” Since all notes and sounds are played with the same approach, think of rudiments being a system of either single, double, triple, or more “beats” per hand.
CONSIDER THE VELOCITY STROKE AN APPROACH THAT STARTS FROM THE “UP” POSITION – JUST AS YOU WOULD WHEN DRIBBLING A BASKETBALL.
q = 100-208
1. Start with the stick in the up position at level 12, 9, 6, or 3.
A good way to tell if you are stopping the stick is to focus on the first 6” off the head. If you can see the bead of the stick for even a split second, your fingers getting in the way of the natural rebound. If you moved fluidly back to its starting point.
MASTER THE VELOCITY STROKE AT EVERY HEIGHT!
I recommend spending a least one full week of practice time devoted to learning the motion alone. Yes, for a full week (at least 10 hours) on 2 exercises (single beat & stick dribble). This is the only way to truly learn the stroke properly.
BEAT VELOCITY
• Play full strokes for both notes (both notes should sound exactly the same).
• Allow the stick to rebound to the height it started (but not past) for both notes.
• Move stick as fast as possible into the head, cushioning it at the top of the rebound.
• The stick should “pause” slightly at the top of the stroke. Push it back into the head for the second. Spend a week working on just double beats. wanted to be good when you started this book, didn’t you? Sorry – there are no short-cuts!
26 The Next Level
4 4 œ œ œ œ œ œ œ œ L Thumbonly 4 4 Œ œ Œ œ L R Œ œ Œ œ 12
4 4 œ œ ŒŒ L R
DOUBLE
Same as above, but this time playing 3 notes of equal intensity. You guessed it... I would spend a week on this one, too.
It’s important to realize that nothing changes in the motion and speed of the Velocity Stroke – whether you’re playing accents at 12 or taps at 3. In the previous exercises, you’ve developed the ability to play Velocity Strokes at each dynamic level with the same energy (the height of the stick dictates the dynamic level). In a two height situation, you’re essentially
That being said, you’ll probably also realize that a Velocity Stroke played at 3 would never “rebound” to 12 unless you The point is to make all the velocities the whether you’re playing at 12 or 3. So, in order to “get the stick back up” to level 12 in preparation for another accent
What is important to realize is that this upstroke is NOT the same as an upstroke using the Moeller technique (where the stick hits the head in reaction to the upstroke). Instead, concentrate on the DOWNWARD MOTION of the tap, then naturally let the hand “follow the stick” back up – with a very relaxed wrist motion (don’t worry too much about where the energy of the stick stops and the hand takes over. Just let the stick and the hand “do their thing”)!
In the next exercise, play a level 12 Velocity Stroke, cushioning the stick to 3. On counts 2 – 4, play three Velocity Strokes VELOCITY STROKE PLAYED AT LEVEL 3 SHOULD Watch your hand on each of the strokes to make sure that you’re using the same DOWNWARD MOTION on count 4 (the upstroke) as you are on counts 2 and 3.
Remember, you should RELAX the hand after the initial “throw”, allowing the stick to rebound off the head naturally. The upward motion on the final tap SHOULD BE FLUID AND RELAXED. M.M. = 80-208
After playing the tap, allow the hand to “follow the stick” back to accent height.
REMEMBER: Keep the same pressure in the hand on every stroke – keep the same speed/velocity on every stroke,
27 The Next Level
TRIPLE BEAT VELOCITY
q = 130-208 4 4 œ œ œ Œ L R œ œ œ Œ œ œ œ Œ œ œ œ Œ œ œ œ
œ > œ œ > œ œ > œ
The next two exercises should be thought of as “refined full strokes.” Again, the approach for every note is the same, just from different heights. M.M. = 60-130
• Start with a Full Velocity Stroke at Level 12.
• Slowly define the taps by absorbing the rebound/cushioning the stick just after impact.
• Same velocity for all strokes, regardless of height.
• REMEMBER: every note is being played the same way, from either a higher or lower point to the drum!
Now, same as above but starting with taps and increasing the accent height. M.M. = 60-130
THREE NOTE GROUPINGS (one high beat, 2 low beats)
Playing the Velocity Stroke in 3 note groupings is EXACTLY the same as you did in the 2 note groupings above – each stroke, no matter the height, is played with the same velocity. M.M. = 80-208
• Use a full stroke for the accent.
• Cushion the stick / allow the stick to rebound to 3.
• Play at Level 3 Velocity Stroke on beat three and allow the stick to rebound to accent height (m. 3 & 4).
• In measure 5 & 6, add a Level 3 Velocity Stroke on beat two: Start at 3 and rebound to 3.
Again, the next two exercises should be thought of as “refined f from different heights. M.M. = 60-100
• Start with full Velocity Strokes at Level 12.
• Slowly define the taps by absorbing the rebound/cushioning the s
• Full strokes for each note, regardless of height.
Same as above but starting with the taps and defining the accent
28 The Next Level
4 4 . . . . œ œ œ œ œ œ œ œ L R œ > 12/1212/1
4 4 . . . . œ œ œ œ œ œ œ œ L R œ > 3/34/3
4
œ > ŒŒ L R œ
3
>
8 12 . . . . œ œ œ œ œ œ œ œ œ œ œ œ L R œ 12/1212/1
8 12 . . . . œ œ œ œ œ œ œ œ œ œ œ œ L R œ 3/34/3
MOELLER AND VELOCITY: The Differences
A few good ways to distinguish the two techniques:
Moeller: Back fingers; the arm is the primary muscle group (lever).
Front of grip; the wrist is the primary muscle group (lever).
Bouncing a ball.
Starts in the down or “set” position. Starts in the up position.
One motion for multiple sounds, a very efficient technique. Individual motion for individual sound, very muscle intensive technique.
The way I play now is a combination of many years of study with both Moeller and Velocity. I use a combination of wrist and arm – probably about 80 percent wrist and 20 percent arm. When I use my arms, Moeller is the primary technique. When I use the wrist, Velocity is the primary technique. For example: On roll passages and one height diddle patterns, I use Velocity. For dense flam passages and things that require many different heights, I use Moeller. Regardless of which technique I employ at any time, my focus is ALWAYS on quality and
In the next chapter, I will go into much more detail with Moeller and Velocity techniques and how to blend them together to make the most efficient use of your energy, while producing the
29 The Next Level
30 The Next Level
ONE HANDED WARM-UPS and TWO-HEIGHT CONTROL
Now that you have general understanding of the Moeller and Velocity techniques, it is time to explore the specifics of each ition and control.
– This includes 8 on a Hand, Double and Triple Beats etc. Master each of these
– Many exercises that work on playing accent to tap heights.
– Putting many of the concepts learned so far together.
– Including crescendos and decrescendos.
– Applying all of the concepts learned in the chapter. Pay close attention to these explanations! The fundamental concepts that you learn here will come back again and again in later chapters.
These exercises should be played at one height the entire time... HOWEVER, be sure to master each one at every “one”
ake sure it is consistent with the notes before it.
REMINDER: The tempos that are listed cover a wide range. Be honest with yourself and always play within your ability. If your sound is not totally
MOELLER and VELOCITY: Use a “one note approach” for either technique. Practice at every dynamic level.
Make sure that you use the same technique for the quarter note triplets that you use for the 8th notes!
31 The Next Level
. . œ œ œ œ œ œ œ œ œ œ œ L . . 8 5 . . . . œ œ œ œ œ œ œ œ R œ œ œ œ œ L
. . œ œ œ œ œ œ œ œ œ œ œ
DOUBLE BEAT
MOELLER: Initiate each two note grouping with a full, half or low Moeller stroke. Cushion the stick “just enough” to produce a second note as close to the initial height as possible. Use a slight upstroke motion on the second note (with elbow, arm motion).
VELOCITY: Two full strokes on each double beat. follow the stick back to the attack height in order to play the second note. prepare for next attack / initiation.
TRIPLE BEAT
In Moeller, the upstroke happens on the 3rd stroke. In Velocity, there are 3 even strokes instead of 2.
QUAD BEAT
In Moeller, play the upstroke on 4th note. In Velocity, there are 4 strokes instead of 3.
COMBINATION BEATS
The next exercise uses a combination of multiple beat patterns. Apply either technique individually, or a mixture of the two (Velocity for single beats and Moeller for multiple beats – or vice versa. It’s up to you!).
Ultimately, your ability to merge the two techniques will depend on your proficiency with each of them separately. The “test” to how well versed you are comes down to sound quality. The sounds that you create should be the same, whichever technique that you employ!
= 60-152
REMINDER: Virtually everything you are going to play from here to the end of the book is a combination of either 1, 2, 3, or 4 note groupings. MASTER EACH ONE with excellent sound, technique and
32 The Next Level
4 4 œ œ œ œ œ œ ≈ œ œ œ
4 4 œ œ œ œ œ œ œ œ œ œ œ L R
4 3 œ œ œ œ ≈ œ œ œ œ œ
4 4 œ œ œ œ œ œ œ L R œ œ œ œ œ œ œ œ œ
L R q = 60-208
q = 60-208
L R q = 60-152
q
II. TWO HEIGHTS
In this segment, I will cover standard accent and tap exercises and define the approaches for each technique in depth. Before you begin these exercises, make sure that you’ve worked through the “2 Note Moeller” (p. 21) and “2 Height Velocity” (p. 27) exercises in the previous chapter. Also, refer back to the concepts (p. 15).
ESSENTIAL SKILLS NEEDED FOR THIS CHAPTER:
2 Note Moeller – page 21
2 Height Velocity – page 27
Cushioning the Stick – page 13
Tap Hum – page 13
Basic Strokes – page 15
When playing two height Velocity, all of the strokes are considered single beats at different heights.
In two height Moeller applications, the downstroke is the only motion that is produced. All other strokes happen as a result an accent is ALWAYS an upstroke.
Before we go any further with two heights exercises, let’s make sure that you know how to play two height exercises correctly. Even if you think you have this down, practice the following exercise to get EVEN BETTER definition and Experiment with controlling the buzz from the front and the back of the
“Filling it in” is a concept that has been around for a while, but was shown to me by Paul Rennick when I attended The University of North Texas. The concept is simple: Starting with one hand, you’ll “fill in” the notes between the accent and tap on the opposite hand. What you’ll gain by doing this is two-fold. First, you’ll learn to keep the opposite hand low, relaxed and “in time” with the primary hand. Second, you’ll learn to make the two hands sound alike on all the taps.
o the lead hand. M.M. = 60-208
33 The Next Level . . . . . . œ > œ œ > œ œ > œ œ > œ
œ > œ œ > œ œ > œ œ > œ œ > œ œ > œ L
œ œ > œ œ > œ œ œ > œ œ œ > œ œ œ > œ œ LRL > œ œ > œ œ > œ œ œ > œ œ œ > œ œ œ > œ LLRLLRLLRLL . . œ œ > œ œ > œ œ œ œ > œ œ œ œ > œ œ œ œ > œ œ LRLRLRL
THREE NOTE GROUPINGS
TRIPLET BUCKS q =60-172
Refer back to the discussions of Moeller and Velocity in the Technique Chapter for more information!
TRIPLET BUCKS: SHIFTING THE ACCENT
This exercise uses the same approach as above, however, the accents are shifted to different partials of the 3 note grouping (we’re applying the “Grid” approach that I discussed on page 14, and the 4-2-1 breakdown).
Use the same approach on the Moeller and Velocity techniques, only starting the process at different partials of the triplet. “FEEL THE DOWNBEATS” by tapping your foot while you practice this exercise.
FILLING IT IN
Now we’ll take the triplet bucks exercise and “fill in” the 16th bucks exercise on the previous page. Apply accents on each partial of the three note grouping.
3 NOTE CONTROL
This next exercise takes the triplet bucks and applies it to a ‘duple’ time signature. For the Velocity technique, essentially the control factor is the same throughout (though correct placement of each note within the rhythm is also important). Remember to keep the pressure in the grip the same at all times – and that velocity, regardless of height.
When using the Moeller technique, there are several control issues that make the approach on each measure different. The fundamental concepts that you’ll apply is that you’ll use a “controlled rebound” when going from high to low (meas. 1) and a “whip motion” when going from low to high (meas. 2). Measure 3 employs BOTH concepts. When using Moeller for this exercise, it is okay to play the taps slightly higher than level 3.
34 The Next Level
8 12 œ > œ œ œ > œ œ œ > œ œ œ > R > > > > > > > > > > > >
8 6 œ > œ œ œ > œ œ R RRL LL œ > œ etc. . . œ > œ œ œ > œ œ œ œ > œ q . =60-144 œ > œ œ œ L R R L L R L R œ > œ œ L R L R R L œ œ œ > œ œ œ > œ œ œ œ œ > œ œ œ q =60-172
4 4 œ > œ œ œ > œ œ œ > œ L R q = 60-120
III. COMBINATION BEATS / MOTIONS
In this section, I will go in to detail of two height beat combinations and motions. Remember to practice the following exercises with accents and without accents at every dynamic level! Refer back to the Technique chapter as necessary.
Single and Double
This exercise is a combination of one accented note followed by a low double. This pattern is called “Huck-ka-dicks”, because that’s what it sounds like. This motion is the same motion that is used for playing Paradiddle-diddles.
Use the same basic technique as in the Bucks exercise above, but consider the first note of double as a “cushioned rebound” to level 3. Play an upstroke on the second note of the diddle.
Use a full stroke for the accent, rebounded to 3, followed by a low double beat. Return the stick to accent
This one is called “Huck-digga-dicks”... again, because of the way it sounds. It’s very similar to “Huck-ka-dicks”, but with a low triple beat instead of a double. This motion is the same as when playing Flam Accents.
A combination of one high note and four low notes – called “Huck-digga-duggas”. This motion is associated with rudiments similar to the Flam Paradiddle. Use the same techniques here as described on the exercises above. These exercises are all variations of what was learned in the technique chapter of the book, only faster. Guess what? If you didn’t learn it then, you’re probably having problems with it now! There are no shortcuts.
heights first (12/3). After you have very defined heights, The possibilities are endless to what you can come up with!
35 The Next Level
œ > œ œ Œ ‘
. . œ > œ œ œ œ > œ œ œ œ > œ œ œ
. . œ Œ œ > œ œ œ œ Œ . . œ > œ œ œ . œ ‘ . . 3 > œ œ 3 œ > œ œ 3 œ > œ œ œ Œ œ > œ œ œ Œ
IV. GRID ONE: MOVING
ACCENTS
THROUGH 16th & TRIPLET PATTERNS
16th NOTE GRID PERMUTATIONS
Count the downbeats out loud, tap your foot to the downbeats and use a metronome.
16th NOTES, MOVE ONE ACCENT
16th NOTES, MOVE TWO ACCENTS
16th NOTES, MOVE THREE ACCENTS
Now, how about moving the accents backwards through the grid?
16th NOTES, MOVE ONE ACCENT BACKWARDS
36 The Next Level
4 4 . . œ > œ > œ > œ œ > œ > œ > . . œ > œ > œ > œ œ œ > œ > œ >
4 4 . . œ > œ > œ œ œ > œ > œ . . œ > œ > œ œ œ œ > œ > œ
4 4 œ > œ œ œ œ > œ œ œ œ > œ œ L R R L L R R L L R R L L R R L L R œ œ œ œ > œ œ œ œ > œ œ œ œ > œ R L R L R L . . œ > œ œ œ œ œ > œ œ œ œ L R R L 4's 1's
4 4 . . œ œ œ œ > œ œ œ . . œ œ œ œ > œ œ œ > œ
Same concept as above: this time moving 1, 2 and 3 accents through a three note grid. Try counting the fours “1,2,3,4”,
The following variations are written with just the 2’s and 1’s – don’t forget the 4’s!)
37 The Next Level 16th NOTES, MOVE TWO
4 4 . . . . œ > œ œ œ > œ > œ œ œ > œ œ œ > œ > œ œ œ > œ > œ œ > œ > œ œ œ > œ > œ œ > œ > œ œ œ > œ > œ œ . . œ œ > œ > œ œ > œ > œ œ > œ > œ œ . . œ œ > œ > œ > œ > œ > œ > œ œ > œ > œ > œ . . œ œ > œ > œ œ > œ > œ > œ > œ > œ > œ
ACCENTS BACKWARDS
> œ œ œ œ > œ œ œ > œ œ œ > œ œ œ > L R R L L R R L . . œ > œ œ œ œ > L R L R œ > œ œ œ œ > œ œ œ œ > R L R L R L . . œ > œ > œ > œ œ > œ > œ > œ œ œ > œ > œ > œ œ > . . œ > œ œ > œ œ œ œ œ > œ œ > œ œ > œ œ . . œ > œ > œ > œ > œ œ > œ œ > œ œ > œ > œ > œ > œ
V. CRESCENDOS AND DECRESCENDOS
When playing crescendos and decrescendos, you will need to know how to place the stick at any height necessary. Make sure you have practiced with different tap heights as mentioned earlier as that skill will help you tremendously with crescendos and decrescendos. Also try filling in these exercises to work on both hands crescendos and decrescendos.
TIP: If you play a crescendo, each note should be play a decrescendo, each note is obvious except that you need to think “mathematically” about the amount that each note is louder or softer than the next – and make it consistent throughout the dynamic change.
Play with the same touch and keep the same tone to your sound during all dynamic changes. Take the entire allotted time to crescendo or decrescendo. Each crescendo starts at p/3 and goes up to f/12; each decrescendo starts at f/12 and goes down to p/3. M.M. = 80-208
More Multiple Heights
This next exercise is called “Hugga-dicks” because of the way it sounds (you probably guessed that). Hugga-dicks are MUCH different than the triple beats that we worked on earlier.
There are three different heights in this exercise: 12 for the first note, 6 for the second, and 3 for the last. Think of a “controlled decrescendo” for this exercise, regardless of which technique is used. This is also the same hand motion used for Flam Taps which are covered in the FLAM CONTROL chapter later in the book.
MOELLER
• Use a high, full, or half Moeller for the accent (depending on tempo and desired height).
• Flyback note at 6 for the second.
• Upstroke starting at 3 for the third.
VELOCITY
• Use a full stroke for the accent (regardless of tempo).
• Allow stick to rebound to 6 after the accent, play a second Velocity Stroke.
• Allow stick to rebound to 3, play the third Velocity Stroke.
• Return stick to accent height.
38 The Next Level
4 4 œ œ œ œ œ œ œ œ L R 4 4 œ œ œ œ œ œ œ œ L R
4 4 œ > œ œœ > œ œ R q = 100-208 4 4 œ > œ œ œ > œ œ R q = 80-172
VI. THE NEXT LEVEL
I’ve included these final exercises so that you can apply every technique and beat combination learned in this chapter. Experiment with all different accent and tap heights. Be able to play all the exercises with Velocity AND Moeller, combining the two on multiple beat patterns. It’s up to you! Have fun with these exercises and come up with your own that feel good to you.
Find a tune that you like and play along with it. That will really help you learn to groove and become relaxed
* The next several exercises utilize the concept of “filling it in”. The base one-handed rhythm pattern is notated in the first bar, the “filled in” version is notated in the second (the sticking of the primary hand duplicates the rhythm in the previous bar). Review the concepts of “FILLING IT IN” on page 33 before working on these exercises.
39 The Next Level
. . œ ≈ œ > œ œ œ œ ‘ œ œ œ œ > œ œ œ œ œ œ RRLRLRLRRRRL ‘ œ > œ œ œ > œ œ ‘ . . œ > œ œ œ > œ œ ‘ œ œ œ œ > œ œ œ œ > œ œ œ RLRLRRRLRLRR ‘ œ œ œ > œ œ œ œ > œ œ œ RRRRRLRLRR ‘ . . œ ≈ œ œ œ œ > œ œ ‘ œ œ œ œ œ œ œ > œ œ œ L R L R R L L R L R L R L R L R L R R L ‘
Some other ways to practice the above exercises:
• Experiment with “moving the accent around” to different notes within the rhythms.
• Play the lead hand high and the fill in hand low – or vice versa
• Play at every height and dynamic level.
• Add in crescendos and decrescendos (1 bar, 2 bars, entire exercise etc.)
ONE HANDED WARMUPS & TWO HEIGHT CONTROL REVIEW:
If you have truly mastered every exercise in this chapter, you have achieved a very high level of playing and have a very solid foundation to move forward into what this book really has to offer.
When playing two heights, make sure you “look” like it sounds – if you’re playing an accent, it is high; if you’re playing a tap, it is low. This will ensure that the height matches the volume.
To recap the primary uses of Moeller and Velocity:
MOELLER: Use one motion for multiple sounds/heights and can also be applied to reach greater speeds. Employ the upstroke and downstroke to get the desired sounds or heights.
VELOCITY: Produces very consistent sound and tone from accent to tap. Same approach throughout, just from a higher or lower point to the head.
To truly meld the two styles together, you must first master each one individually
Once you have done so, you can use the style that best fits the is that I use about 60% Velocity and 40% Moeller. I use Moeller on the faster two height passages and Velocity for one height passages.
40 The Next Level 4 4 . . œ œ œ œ œ œ ≈ œ œ œ œ œ L R ‘ œ > œ œ œ > œ œ ≈ œ > œ œ > œ œ ‘ 4 4 œ œ œ œ œ œ œ œ œ œ L R L R L R R L L R R L L R L R R L L R > > > > 4 4 œ œ œ ≈ œ œ œ œ L R 4 4 œ œ œ œ œ œ œ œ œ œ L R L R R L L R R L L R L R R L L R L R
TIMING CONTROL
What I have tried to do in this chapter is present the most common rhythmic note groupings for today’s rudimental player, focusing primarily on the correct rhythmic interpretation of 16th notes, triplets, sextuplets, 5’s, 7’s and 9’s. Because there is mathematically no “stopping place” with the rhythmic values, rhythmic combinations and independence related to playing one hand against the other, I have chosen to limit the exercises in this chapter to what I feel is most applicable. This
– Hand motion and the basic math which is timing.
– An in depth study of rhythms in triple time and 8th note triplets
(including sextuplets)
Polyrhythms, Quarter Note Triplets, Ninelets, Fivelets, Sevenlets, and more.
Playing in time is one of the most important aspects of true musicianship. However, despite the importance of rhythmic accuracy, this area of development often does not get the attention and devotion it deserves. Younger players often would ming patterns those same rudiments are built upon. Even though perfecting these timing patterns may seem a bit tedious, being able to play these rhythms perfectly in time is an ESSENTIAL SKILL for any musician.The essence of playing in time comes from the ability to feel an internal pulse while you play. For those of us who were not born with a natural sense of time, we have to train ourselves to internalize this pulse or groove. We do this through practicing with a metronome and playing MATHEMATICALLY CORRECT rhythms.
To understand HOW to play in time, you must first understand the mathematical subdivisions of a beat and begin thinking of rhythms in terms of the amount of VISUAL space that each note takes up. To be mathematically correct, each note needs to take up a precise amount of space (think visually and not aurally). Below is a chart of the most common duple and triple note values in quarter time. It may help to refer back to it as you work your way through this chapter!
41 The Next Level
–
œ œ œ œ 3 œ œ œ œ œ œ œ œ œ 6 œ œ œ œ œ œ œ œ œ œ œ œ œ œ œ œ
ESTABLISHING A CONSISTENT “LEAD HAND” MOTION
One of the easiest ways that I’ve found to get students to play simple rhythms in time is to first establish a consistent “lead hand” motion. The lead hand in any alternating rhythm is simply the hand that starts the rhythm. Spend some time practicing these “base” lead hand rhythms with a metronome. Watch that your hand motion is consistent and fluid throughout. Keep in mind that for quarter notes, the s and 16ths, the stick will “float” or rebound to the up position.
Using the “lead hand” approach, you can come up with 3 very bas hand. Practice playing the lead hand on the drum and the filled-
Now, you can combine any of the “filled-in” rhythms to come up with more exercises. In the following example, I’ve combined patterns 1 and 2 into an easy timing exercise. You can come up with MORE with other combinations. Try 1 and 3. Or 2 and 3. Or 3, 2, and 1...
Important things to consider when working on ANY timing exercise:
• Always use a metronome AND tap your foot (or mark time) while you play.
• Listen for consistency of sound between the hands (tap hum).
II. 16th NOTE RHYTHM PATTERNS
Before jumping in to the basic 16th note timing exercises, I think it’s very important to establish a solid understanding of each of the 16th note rhythms that we’ll be dealing with. In the exercise below, you’ll see the “base” rhythm (often called the “check pattern”) below the various 16th rhythms that you’ll see in this section. Practice playing the base rhythm (bottom) on one hand while you play the 16th pattern (top) on the opposite hand. This will not only give you a solid understanding of the subdivision for each rhythm pattern, but it will also help develop coordination and independence between your hands.
Practice this exercise using the 4-2-1 concept (four counts of each pattern, then 2, then 1). Also try using an 8th note base rhythm instead of 16th. Don’t forget to work with a metronome and tap your foot while you play!
42 The Next Level
4 2 œ œ L R L R
4 2 œ œ L R L R œ œ L R L R 4 2 œ œ œ œ L R R L L R R L
4 1 . . . . . . œ œ œ œ œ œ œ œ œ œ œ œ œ œ . . . . . . . . ‰ œ œ œ œ œ œ . œ œ œ œ œ œ
APPROACHES TO STICKING 16th NOTE RHYTHM PATTERNS
One more item to discuss before moving on is two approaches to sticking rhythms:
Flow Sticking (sometimes called “Natural Sticking”) – where the right and left hands have a constant hand motion and relationship to the beat (right hand on “1”, “&”, while the left is on the “e” and “ah”).
– where the right and left hand always alternate, regardless of where the notes fall in relation to the
In the first exercise below, the lead hand maintains constant motion throughout (in this case, 8th notes). In the 2nd exercise, the same consistent motion is applied on the lead hand from measure 1 to 2, but in measures 3 & 4, it is the non-lead hand
Alternate sticking takes much more awareness of time because you use multiple hand motions. There is still a rhythm to the motion, but the hands will “rest” or “float” more often, depending on the tempo and division of notes.
re possible within 16th note rhythm patterns. Just flow sticking is listed so be sure to practice with natural sticking as well. Notice the “4-2-1-ness” of the exercises and remember to keep the rhythms ANGLED. Try counting the downbeats out loud for even more practice and rhythmic definition.:
43 The Next Level
œ œ œ œ œ œ œ œ œ L R L R R L L R R L L R R L L R R L œ œ œ œ œ œ ≈ œ œ R R L L R R L L R R L R L R L R L
œ œ œ œ œ œ œ œ œ R L L R R L L R R L L R R L L R R L œ œ œ œ œ œ ≈ œ œ R R L L R R L L R R L L R R L L R
œ R L œ œ œ œ œ œ œ œ œ œ œ œ œ œ L R R L L R R L L R R L L R R L L R L R R L L R L R R L . . œ œ œ ≈ œ œ œ R L L R R L R L L R R L œ œ œ œ œ œ œ œ œ œ œ œ L R R L L R L R R L L R L R R L R L L R R L R L œ R L œ œ œ œ œ œ œ œ œ ≈ œ œ œ L R R L L R L R R L R L L R L R R L R L L R R L
2 NOTE GROUPINGS
1 NOTE GROUPINGS
CHECK PATTERNS
Now let’s apply all 14 permutations into one exercise. This is a time-honored exercise that has been handed down through the ages which explores every possible combination of 16th note groupings and isolation. Simply replace the group of four 16ths in the exercise with each of the rhythm patterns below. Remember that you can practice this exercise using Flow Sticking (off the right and the left), or with Alternated Sticking.
3 Note Groupings
2 Note Groupings
1 Note Groupings
44 The Next Level
4 4 œ œ œ œ œ œ œ œ œ œ ‰ œ œ ‰ L R R L L R R L L R R L L R R L L R R L L R R L œ œ œ œ œ œ œ œ ≈ œ œ ≈ œ œ L R R L L R R L L R R L L R R L R L L R R L L R œ œ œ œ œ œ œ œ ‰ œ œ ‰ œ œ L R R L L R R L L R R L L R R L L R R L L R R L œ œ œ œ œ œ œ œ . œ œ L R R L L R R L L R R L L R R L L R R L œ œ ‰ œ œ ‰≈ œ œ ≈ œ œ L R R L L R R L R L L R R L L R
4 4 œ œ œ œ œ œ œ œ œ L R R L L R R L L R R L L R R L L R œ œ œ œ œ œ œ œ ‰. rœ L R R L L R R L L R R L L R R L R L œ œ ≈ . j œ ≈ . j œ L R L R R L R L ‰
4 2 œ œ œ œ œ œ L R R L L R R L L R R L œ L R œ œ œ œ œ ‰≈ œ œ
1) 5) 6) 11)
III. RHYTHM PATTERNS IN TRIPLE TIME
The previous exercises have all dealt with duple time signatures (1/4, 2/4, 3/4, etc.) – where each downbeat can easily be subdivided into two parts. The next several pages are devoted to triple time signatures – where each downbeat is divided into THREE parts. While you’ll often see these rhythm patterns written in “8 time signatures” (3/8, 6/8, 12/8, etc.), they are often notated as triplets within a quarter time signature.
Whatever the case, it’s important that you first develop a solid understanding of all the possible rhythmic combinations. In the exercise below, you’ll see the “base” rhythm (often called the “check pattern”) below the various “triplet” rhythms that you’ll see in the next section. Play the base rhythm (bottom) on one hand while you play the triple patterns (top) on the
Practice this exercise using the 4-2-1 concept (four counts of each pattern, then 2, then 1). Start slowly with a metronome set on 40, with a triplet subdivision. Tap your foot (or mark time) to the downbeat (first note) of each measure. Once you can play every rhythm pattern perfectly at dotted quarter equals 40, move the tempo up 10 b.p.m. Once you reach your top
FLOW AND ALTERNATE STICKING PATTERNS
The same concepts learned in the beginning of the 16th timing apply to triplets. Essentially, when using the Flow Sticking concept, you’ll start with the base rhythm (measure 1 in the following example), and simply take out the hand(s) that are
With the Alternate Sticking, you’ll simply alternate EVERY stroke, no matter what rhythms are played:
in triplet form. Use fluid hand motion to accomplish the correct rhythms. Work with a metronome and keep the rhythms ROUNDED. Try counting the downbeats out loud.
45 The Next Level
. . . . . . . . . . ‰‰ œ ‰ j œ ‰ œ œ œ ‰‰ j œ œ œ œ . . . . . . . . . . œ œ ‰ œ œ œ œ Œ j œ œ œ œ
œ œ œ R L L R R L œ ‰ œ œ ‰ œ L R L R R L R L
œ œ œ R L L R R L œ ‰ œ œ ‰ œ L R R L L R R L
. . 8 6 œ R L œ œ œ œ œ œ œ j œ œ j œ L R R L L R R L L R R L L R L R R L R L . . œ j œ R L R L œ œ ‰ œ œ ‰ L R R L R L L R j œ L R œ œ ‰‰ œ œ œ j œ R L L R R L L R R L R L
TRIPLET CHECK PATTERNS
IV. UNDERSTANDING DUPLE AND TRIPLE RELATIONSHIPS
This section of the timing chapter deals with triplet groupings (3 notes per beat) and duplet based groupings (ei ther 2 or 4 notes per beat) and how they relate to each other. Start slow with a metronome set on quarter notes with no subdivision, focusing your attention first on the hand that plays each downbeat. Once the consistency of the “downbeat hand” is established, begin to pay close attention to the evenness of the rhythm
TRIPLETS AND 8th NOTES TOGETHER
Here is an exercise that relate triplets to 8th notes. Practice become familiar with the spacing of the rhythms. one height. Realize the space between the first and second note establish th space will be larger from the first to the second note than with 8th note triplets.
46 The Next Level
4 4 œ > œ œ > œ œ > œ œ > œ L R R L L R R L L R R L L R R L œ > L R 1 NOTE GROUPINGS 8 12 . . 8 6 œ œ œ œ œ œ . œ . œ L R R L L R R L L R R L L R R L œ œ œ œ œ œ ‰ œ ‰ œ L R R L L R R L L R R L R L L R œ œ œ œ œ œ Œ j œ Œ j œ L R R L L R R L L R R L L R R L 8 6 . . œ œ œ . œ L R R L L R R L œ œ œ ‰ œ L R R L L R L R
8 12 œ œ œ œ œ œ . œ . œ L R R L L R R L L R R L L R R L œ œ ‰‰ . œ 2 Note Groupings
Note Groupings 1) 4) œ œ ‰‰ . œ
Note Groupings
Note Groupings 1) 4)
1
2
1
16th NOTES AND TRIPLETS
Here we focus on playing 16th notes and triplets together. The 16ths still have a “duple” feel so these patterns are very similar to the exercises learned above.
REMEMBER: The space between the first and second note establish the evenness of the grouping. For 16th notes, the note triplets and vice versa.
The next several exercises deal with using 16th’s as the 'check', then adding in various triplet rhythms. Focus on each
Try these rhythmic variations in place of the triplets above. Remember that when playing with Flow Sticking, use the stick-
rhythmic variations in place of the 16ths on the exercise above.
APPLYING RHYTHMIC PERMUTATIONS TO DUPLE/TRIPLE
We have applied triplets and 16th’s together but not quite like this. Below are the same types of patterns but notated in either 16th or triplet form. Make sure you know where the downbeat is at all times by tapping your foot and using a metronome.
Thanks to Glen Crosby, Ed Barguiarena and the 1991 Velvet Knights for the next exercise.
47 The Next Level
3 œ œ œ œ œ œ œ œ œ œ 3 œ œ œ 3 œ œ œ œ œ œ œ 3 œ œ œ œ œ œ œ 3 œ œ œ
5) 3 ‰ j œ ‰ 6) 3 ‰‰ j œ
≈ œ œ œ ≈ . j œ ‰ j œ ‰ . rœ œ œ > œ œ > œ > œ > œ > œ œ œ > œ > œ > œ > œ œ > œ > œ > œ > œ œ > ∑ ∑ ∑ ∑
œ œ œ œ œ œ 3 œ œ œ 3 ‰ œ œ 3 œ ‰ œ 3 œ œ ‰ L R R L L R L R R L L R L R R L L R œ œ œ œ œ 3 œ œ ‰ 3 œ œ œ 3 ‰ œ œ 3 œ ‰ œ L R R L R L L R R L R L L R R L R L œ > œ œ œ > œ œ 3 œ > œ œ 3 ‰ œ > œ 3 œ ‰ œ > 3 œ œ ‰ L R R L L R L R R L L R L R R L L R œ œ œ > œ œ 3 œ > œ ‰ 3 œ œ > œ 3 ‰ œ œ > 3 œ ‰ œ L R R L R L L R R L R L L R R L R L
V. 16th NOTES IN TRIPLE TIME & 16th NOTE TRIPLETS
We have covered 16ths and triplet timing. Now we will cover 16th timing in a triple time signature (6/8, 12/8 etc.). One common mistake students often make is to interpret similar rhythms in varying time signatures completely differently. Realize that 16th notes are ALWAYS 16th notes, 8th notes are ALWAYS 8th notes! The relationship of a given note to another stays the same regardless of meter or time signature.
In the following examples, you will see the same type of treatment to 16 Apply every sticking model you have learned to the following exercises. This exercise lists two types of check patterns in the first two measures: 8ths or 16ths. Practice with both check
3) The next exercise moves a dotted 8th note through a bar of 6/8. Use the same 4-2-1 concept, with and without the check. Remember that a dotted 8th receives the value of THREE 16ths.
TRIPLE TIMING: 16th NOTE TRIPLETS
Now that we have learned 16th patterns in quarter time, 8th and 16th patterns in 8 time, the next grouping to cover is 16th note triplets. Just as an 8th note triplet is three 8
Using the 8th note check, it’s very easy to feel the flow between the hands (I call this the “pendulum motion” because the hands swing back and forth, like a pendulum). If you’ve never worked on 16th note triplets before, you can easily feel this pendulum motion by adding a slight accent on each downbeat and upbeat:
Once you are comfortable with the 16
48 The Next Level
8 6 œ œ œ œ œ œ œ œ œ œ œ œ œ œ œ œ CHECK PATTERNS
8 6 œ œ œ œ œ œ œ œ . œ œ œ œ . œ œ œ œ CHECK PATTERNS 3) 4)
4 2 œ > œ > 3 œ > œ œ œ > L R R L L R R L L R R L œ > œ > L R R L
œ œ 3 œ œ œ œ L R R L L R R L
TRIPLE TIMING: SEXTUPLETS
Another way of notating two 16th note triplets back to back is in the form of a sextuplet. This is EXACTLY the same as two 16th note triplets in a row, the rhythm just happens to have a “6” over top of it instead of two “3’s”.
Use the accents on the downbeat to identify the beginning of the sextuplet. Be sure to evenly space each note and accent through the sextuplet. Line up the downbeat accents with the metronome, and keep the taps even and open.
Here we will practice playing sextuplets with other rhythms. We have covered every subdivision you are about to see, so be sure to start each rhythm on a downbeat (no “slurring” of rhythms), tap your foot and use a metronome. Realize the speed
As we are moving forward into more complex timing patterns, it is important to realize the relationship that certain rhythms have to each other. When two different rhythms are played at the same time, it is called a “polyrhythm.” The first polyrhythms you will learn are 2 against 3 (often referred to as 2 “over” 3, or 2:3) and 3 against 2 (3 “over” 2, or 3:2).
In the following example, measures 1 & 2 are ways that you’ll see the 2:3 polyrhythm (2 notes over 3 beats), while two beats):
If you were to say the 2:3 polyrhythm out loud it would be “ONE, Two AND Three” Here is a quick exercise to build up the polyrhythm (notice the last 2 bars are notated differently but played the same as the 2 bars before it):
49 The Next Level
6 œ > œ œ R L 6 œ > œ œ œ œ > œ 6 œ > œ œ œ œ > œ L R L R L R L R 6 œ > œ œ œ œ œ > 6 œ > œ œ œ œ œ > L R R L L R R L
3 œ œ RL 6 œ œ œ œ œ œ 6 œ œ œ œ œ œ RL RL RL RL RL RL œ œ œ œ 6 œ œ œ œ œ œ 6 œ œ œ œ œ œ
8 6 œ œ œ œ œ . œ . œ œ œœ œ œ . œ . œ œ œ œ . œ . œ œ œ œ 6 6 œ œ 6 œ œ œ œ œ œ 6 œ œ œ œ œ œ
TRIPLE TIMING: QUARTER NOTE TRIPLETS
Using the 3:2 polyrhythm example from the previous page, it's easy to understand the concept of the quarter note triplet –it is simply three quarters in the space of two beats (or 3 against 2).
When beating time to the dotted quarter in 6/8 time, 3 quarter notes make up the 3 the 8th notes as the base of the 3:2 rhythm:
The 3:2 polyrhythm can also be written in 2/4 time as a quarter note triplet. This time, use an 8th note triplet as the base of the 3:2 rhythm:
We have already discussed how hand motion can aid with timing in many ways. Here, we apply the hand motion concept to the forming of quarter note triplets. What I call the “Quarter Note Triplet” motion is present in these exercises (when you play just the lead hand of two 8
• Notice how the exercises are notated differently for the same rhythms.
• Be able to feel the pulse of either the quarter note (4/4) or dotted quarter (12/8).
Here are a few more exercises to practice the timing and speed of quarter note triplets. A quarter note triplet is played the same way, and takes up the same amount of space, regardless of where it falls in a measure.
NOTE: Don’t get thrown off by tuplet rhythms just because they look different when placed in different parts of the measure. A quarter note triplet is still a quarter note triplet, regardless what beat it starts on!
50 The Next Level
6 2 8 6 œ œ œ œ œ œ œ œ
4 4 3 œ œ œ 3 œ œ œ 3 j œ ‰ j œ ‰ œ L R R L L R R L L R R L L R R L L R 3 œ œ œ 3 œ œ œ 3 œ œ œ 3 œ œ L R R L L R R L L R R L
4 4 œ œ 3 œ œ œ L R R L L R R L L R œ œ L etc. RL 4 4 œ œ œ œ 3 œ œ œ L R R L L R R LR etc. LR œ œ œ LRLR
8 12 œ œ œ œ œ œ j œ ‰ j œ ‰ L R R L L R R L L R R L L R L R œ œ œ œ œ œ œ œ œ œ œ L R R L L R R L L R R L
NINELETS
Having gone through sextuplets and quarter note triplets, ninelets are the next logical step in our timing journey. For the examples below, remember the quarter note triplet and 3 over 2. The same “3” pulse should be felt, but there happens to be 3 notes on each beat of the “3 pulse” or quarter note triplet:
This exercise builds up the ninelet based off the quarter note triplet, one pulse at a time.
the quarter note triplet pattern (lead hand motion) and then play
at will be faster or slower. HINT: Think mathematically: Since a ninelet has 9 notes over two beats vs. 12 notes over two beats in a sextuplet, the sextuplet is faster.
As you play each measure, listen for even spacing across the entire rhythm (don’t simply start the rhythm, then speed up or
There is one more fairly common polyrhythm that I need to cover before moving further into our timing adventure: three against four or four against three. Four over three is what happens when you play four notes in the space of three beats (or vice versa for three over four). Similar to the 2:3 and 3:2 polyrhythm learned earlier in the chapter, which rhythm is “against” or “over” the other based on the time signature and what note is getting the beat.
This polyrhythm can be learned through the phrase “Pass the bread and butter.”
51 The Next Level
3 œ œ œ 9 œ œ œ œ œ œ œ œ œ
3 œ > œ œ 9 œ œ œ œ œ œ œ œ œ 9 œ œ œ œ œ œ œ œ œ L R R L L R R L L R R L L R R L L R R L L R R L L R R L L R R L L R R L
3 œ > œ œ 3 œ > œ œ 9 œ > œ œ œ > œ > 9 œ > œ œ œ > œ > L R R L L R R L L R R L L R R L L R R L 3 œ œ 3 œ > œ œ 9 œ > œ œ œ > œ œ œ > œ œ 9 œ > œ œ œ > œ œ œ > œ œ L R R L L R R L L R R L L R R L L R R L L R R L L R R L L R R L L R R L
9 > œ œ œ œ œ œ œ œ RLRLRLRLR 3 œ > œ œ 3 œ > œ œ 9 œ > œ œ œ œ œ œ œ œ LRLRL 9 œ œ œ œ œ œ 6 œ > œ œœ œœ 6 œ > œ œœ œœ 9 œ > œ œ œ œ œ œ œ œ LLL
4 4 . œ . œ œ 3 ˙ ˙ ˙ œ œ œ œ 3:4
Use this exercise to build up the 4:3 polyrhythm. Try to feel each hand / rhythm independently (3 or 4) as well as the composite rhythm (“pass the bread and butter”). Notice the last bar is notated differently but played the same as the bar before it.
The 3:4 polyrhythm is a little different because you'll use a triplet base instead of 16ths. Start slow, playing triplets on the left and the top rhythm in the right – while you tap your foot to each downbeat.
Measure 4 is the same as measure 3, but written differently. When you finally play the 3:4 polyrhythm in m.5, sing the triplet subdivision.
GROUPINGS OF 3: THEY ARE NOT ALL THE SAME
Below we will practice different groupings of notes, some triplets, some dotted 8th rhythms, and some groupings of three 16th notes. It is important to know the difference between the separate (but similar) rhythms.You will also see how the 3:4 and 4:3 polyrhythm relates as well.
GROUPINGS OF 3 AND 4 16ths
Here are examples of groupings of four and three 16ths together. Make sure you know where the downbeats are in the bar. Remember that a dotted 8th note is equal to three 16
REMEMBER: Regardless of where the accents are, you are still playing 16ths. Use the same hand motion and speed the whole time – only the accents are changing places.
Note the 4:3 for the first three counts of the second bar. Same exercise as above, just taking out the taps for the groupings of three.
Follow the same process from above for the next two exercises.
52 The Next Level
4 3 œ œ œ œ œ œ œ œ . . œ œ œ œ œ . . œ œ œ œ œ . . œ œ œ œ œ œ . . œ œ œ œ œ œ . . œ œ œ œ œ œ . œ 4 œ œ œ œ œ œ œ PassPassthePassthePasstheter &&
4 4 . . . . œ 3 œ œ œ 3 œ œ œ 3 œ œ œ 3 œ œ œ œ 3 œ œ
4 4 œ > œ œ œ œ > œ œ œ œ > œ œ œ œ > œ œ L R R L L R R L L R R L L R R L 4 4 œ > œ œ œ œ > œ œ œ œ > œ œ œ œ > L R R L L R R L L R R L L R R L 4 4 œ > œ œ œ œ > œ œ œ œ > œ œ œ œ > œ L R R L L R R L L R R L L R R L L R L R 4 4 œ > œ œ œ œ > œ œ œ œ > œ œ œ L R R L L R R L L R R L L R R L L R
TRIPLETS AND GROUPINGS OF THREE 16ths and DOTTED 8ths
This is the same concept as the previous section, but putting the 8th note triplets before the groupings of three 16th notes. Make sure you know where the downbeats fall within each note grouping. Remember that you are playing 16ths and triplets as you have done before, the accents are just in different places.
ODD NOTE GROUPINGS - FIVELETS AND SEVENLETS
elets and sevenlets. These groupings are becoming much more common in today’s rudimental world, so spend some time getting familiar with them.
an also be counted a few different ways, two of the most .” Both 5 syllable words that just “roll-offne beat. Remember the “pendulum motion” learned with
53 The Next Level
. j œ > . j œ > j œ > L R R L L R 3 œ > œ œ 3 œ > œ œ . j œ > . j œ > j œ > L R R L 4 3 3 œ > œ œ 3 œ > œ œ L R R L œ > œ œ œ > œ œ œ > œ œ œ > œ œ R R L L R R L L R R L L R R L L R R L L R R L 4 3 œ 3 œ > œ œ 3 œ > œ œ L R R L . œ > . œ > . œ > . œ > L R R L L R R L > œ œ œ > œ œ œ > œ R L L R 3 œ > œ œ 3 œ > œ œ œ > œ œ œ > œ œ œ > œ 3 œ > œ œ 3 œ > œ œ L R R L . œ > . œ > œ > . œ > . œ > œ > L R R L L R L R R L L R
. 5 œ œ œ œ L R R L L R R L 5 œ > œ œ œ œ œ > L R R L L R R L L R R L
.
ANATOMY OF A FIVELET
This exercise takes an accent and moves it through a fivelet while keeping the downbeat accented. This will help you understand the hand speed that is needed to play an even fivelet and the relationship to the downbeat of each note. Apply the same procedure as we did with the sextuplets on page 54.
FIVELETS AND OTHER RHYTHMS
Here are exercise to help you relate fivelets to other rhythms s Anatomy of a Fivelet for other accent variations.
Experiment with each of the note values below in place of the 8th notes. Try placing accents on the downbeats and throughout the rhythms to come up with your own exercises.
SEVENLETS
Sevenlets are seven notes spaced over one beat. Use the exercise below to practice evenly spacing a sevenlet over a quarter note. Again, use the “pendulum motion” to feel the downbeats and evenly space your sevenlet.
ANATOMY OF A SEVENLET
Apply the same approach to this exercise as you did on the fivelet exercise. Stay relaxed and keep a fluid hand motion.
SEVENLETS AND OTHER RHYTHMS
Use the same approach as learned with the fivelets. Experiment
54 The Next Level 4 2 7 œ > œ œ œ œ œ œ 7 œ > œ œ œ œ œ L R R L L R R L L R R L L R R L L R R L L R R L 7 œ > œ œ œ œ > œ œ œ > œ œ L R L R R L 4 2 7 œ > œ œ œ œ œ œ œ > L R R L L R R L L R R L L R R L 4 2 œ œ 5 œ œ œ œ œ L R R L L R R L L R R L L R
∑ œœ ∑ ∑
4 1
4 2 5 œ > œ œ œ œ 5 œ > œ œ œ œ L R R L L R R L L R R L L R R L L R R L œ > L R 5 5 5 5 4 2 œ œ 7 œ œ œ œ œ œ L R R L L R R L L R R L L R R L
ADVANCED TIMING PRACTICE
TIMING CHECK PATTERNS
This exercise is Tom Float’s “Chugga-da” but adapted for use with timing patterns. Keep the 8th notes constant and play mathematically correct rhythms.
Don’t feel limited to the variations I have listed, feel free to come up with your own!
Here are a handful of exercises you can apply your vast rhythmic knowledge to. Remember to tap your foot and use a
This exercise has “fourlets” in the second, third and fourth bar. These rhythms are notated this way because the exercise is in 8 time (triple time). As a result, a grouping of four is unnatural for this time signature (similar to a triplet in quarter notes or 4:3.
55 The Next Level 4 4 œ > œ > œ > RL RL 2. œ > œ > œ > œ > œ > œ > œ > œ > RL RL RL RL
œ ≈‰ œ œ . œ œ ≈ œ œ 3 ‰ œ 3 ‰ œ œ 3 ‰ j œ ‰ 3 ‰‰ j œ œ œ 6 œ œ œ œ œ 7 œ œ œ œ œ œ œ
3 j œ œ 3 œ j œ 3 ‰ œ œ RLRRRRL . . 3 œ œ œ œ œ ≈ œ œ œ LLRLLRRLR 3 œ œ œ œ œ œ œ œ œ RLRLRLRLRL
œ œ œ 4 œ œ œ œ 4 œ œ œ œ RLRLRLRLRLRLRL œ œ œ œ œ œ 4 . œ œ 4 . œ œ RLRLRLRLRL
56 The Next Level 4 4 6 œœœœœœœ œ 6 œœœœœœœ œ L R R L L R R L L R R L L R R L L R R L 4 4 œ œ œ œ œ œ œ œ œ œ œ œ L R R L L R R L L R R L L R R L L R R L L R R L œ > œ œ œ > œ œ œ > 6 œœœœœœ 6 œœœœœœ L R R L L R œ 4 4 œ 3 œ œ œ œ œ 6 œ œ œ œ œ œ 3 œ œ œ RLRLRLRLRLRLRLR 5 œ œ œ œ œ œ œ 7 œ œ œ œ œ œ œ œ œ œ œ LRLRLRLRLRLRLRLRLR œ 3 œ œ œ œ œ 6 œ œ 3 LRLRLRLR 5 7 4 4 œ œ œ œ œ œ œ œ œ œ 3 œ œ œ L R R L L R R L L R R L L R R R
DIDDLE CONTROL / with Paradiddles
This chapter deals with sticking combinations: diddle interpretation, muscle building, roll quality and sound production as it relates to multiple notes on one hand. I have broken down this chapter in the following parts:
– One handed warm-ups and other diddle strength builders.
– Ways to build your roll quality and consistency, including Inverted Roll Sticking.
– Interpreting diddles from open to closed.
– Advanced diddle rudiments (3’s, 123’s, 32 rolls etc.)
I recommend moving through the sections as they are laid out. However, if a student chooses, each section can be worked through independently at any point. Make sure you have studied the One Handed Warm-ups and Two Height Control chapter very thoroughly as the techniques mentioned (Moeller and Velocity) are explained in depth on those pages.
The exercises in this section focus on strengthening the hands and work individual diddle quality.
Use the Velocity Stroke to produce “quantized” sounds. Same height, sound, wrist turn, and rebound for every note. Feel the front of the grip for the duration of each exercise.
Use one motion for the multiple notes. Feel the back of the grip and utilize the upstroke and Double Beat is a standard that works on building diddle strength and quality. Be VERY comfortable with both the velocity analyzing your motion and sound.
These variations will also help build your roll quality. Play the accented notes at 12 and unaccented notes at 6. Use a controlled rebound for variation A and inverted motion / Moeller whip for variation B.
57 The Next Level
. . ≈ œ œ œ œ œ œ œ œ ≈ œ œ œ œ œ œ œ . . œ > œ œ > œ œ > œ œ > œ ≈ œ > œ œ > œ œ > œ œ > . . œ œ > œ œ > œ œ > œ œ > ≈ œ œ > œ œ > œ œ > œ
Here is a 12/8 version of the double beat exercise. Notice how the diddles feel slightly more open than the 16th interpretation.
Now, apply the same accent variations as used in Double Beat:
SHUPS
This exercise applies the 4-2-1 concept to 12/8 diddles. Keep the transitions open with the back to back diddles.
TRIPLE BEAT
Another standard that deserves repeating. Remember to play all notes at the same height. Practice playing accents on the downbeat of triple beat, then move the accent to the upbeat.
TRIPLE BEAT VARIATIONS
Here is a 15/16 variation for the standard Triple Beat exercise. For the accented variations, play the accented notes at 12 and the unaccented notes at 6.
Play this exercise in the same manner you would play Hugga Dicks (refer to page 36 for an explanation).
Stay relaxed on this variation and work to the accent.
58 The Next Level
8 12 . . . . . . œ œ ‰ œ œ ‰ œ œ ‰ œ œ ‰ L R œ œ ‰ œ œ ‰ œ œ ‰ œ œ ‰ œ ‰ œ œ ‰ œ œ ‰ œ œ ‰ œ R œ ‰ œ œ ‰ œ œ ‰ œ œ ‰ œ
8 12 œ > œ ‰ œ > œ ‰ œ > œ ‰ œ > œ L R
16 15 œ œ œ œ œ œ R
16 15 œ > œ œ œ > œ œ R
16 15 œ œ œ > œ œ œ > R
4 4 œ œ œ œ œ œ œ œ œ œ œ L R 8 12 œ œ ‰ œ œ ‰ œ œ L R 8 6 . . œ œ ‰ œ œ ‰ L R œ ‰
DOUBLE/TRIPLE COMBOS
This exercise practices Moeller and Velocity together. Use Moeller on multiple height patterns (hugga-dicks), Velocity on one-height patterns (double beats).
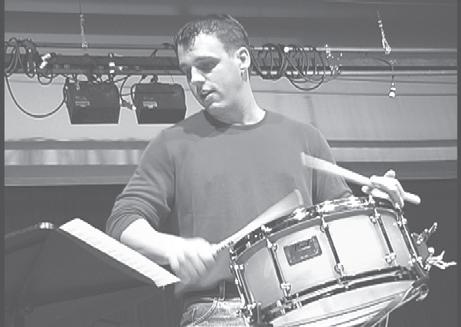
Now it is time to put the hands together after the independent practice that has happened thus far. These exercises are very similar to the “filled in” approach in the Two Height Chapter. Apply the skills learned in the one handed exercises previously Consider this: If someone had their back to you or their eyes closed,
All of the exercises in the previous section help with general control and strength of diddles. For many of the one handed exercises, repeat several times on one hand to “work out” and build your muscles. Don’t forget to warm down when done.
A few other ways to practice the exercises in this section are: Accent the first note on each hand, accent the last note on each hand, apply the 4-2-1 accent grid to each exercise and experiment with different heights all around.
59 The Next Level
œ œ œ œ œ œ œ œ œ œ œ œ œ œ R L R L L R R L R L R L œ œ œ œ œ œ œ œ œ œ œ œ œ œ œ œ L R R L L R R L L R R L L R R L œ œ œ œ œ œ œ œ œ œ œ œ œ œ œ œ œ œ œ œ œ œ œ L R R L L R R L L R R L L R R L œ œ œ œ œ œ RRRLLRR œ œ œ œ œ œ œ œ œ œ œ œ œ œ œ œ LLLRLRRRLLLLRRLL œ œ œ œ œ œ œ œ œ RRLLRRLLL œ œ œ œ œ œ œ œ œ œ œ œ œ œ RRRLLRRLLLRRLL
4 > > > > > > ≈ > > > > > > > > œ œ > œ > œ > œ > œ > œ > œ œ œ > œ œ . . ≈ œ > œ œ ≈ œ > œ > œ > œ œ œ > œ > œ >
II. ROLL BUILDERS
All of the exercises in the first section had to do with individual diddle quality. Now it is time to apply this knowledge to playing a roll. We will cover standard roll sticking, inverted roll sticking, triplet and 16th based rolls.
First, let’s do a standard “break down” of a double stroke roll. The ability to play doubles at ANY tempo and accelerate or retard smoothly is a MUST in order to proceed any further in this book.
BE HONEST WITH YOURSELF
16th ROLL BUILD UP
The following two exercises isolate the hand motion and diddle placement of each hand. Keep your hands in a consistent motion from the check to the diddles and listen for evenness of sound throughout (tap hum).
Use beat three in measures 2, 4 and 6 to “check” yourself.
TRIPLET ROLL BUILD UP
Apply the same build up concept in triple time.
60 The Next Level
. . œ œ œ œ RRLL œ œ œ RRLL 60-160
4 4 œ œ œ œ œ œ L R R L L R R LR etc. LR œ œ œ œ œ œ œ œ œ RLLRLLRLLR
4 4 œ œ œ œ œ œ œ œ œ œ L R R L L R R L L R R L L R R L etc. etc. œ œ ! œ œ ! œ œ ! œ œ ! œ œ œ œ
8 6 œ œ œ œ œ œ L R R L L R R L L R R L œ œ œ RR etc. LR 8 12 œ œ œ œ œ œ œ œ L R R L L R R L L R R L etc. etc. œ ! œ ! œ ! œ ! œ ! œ
ONE & ONE, TWO & TWO, FOUR & FOUR
The following exercises work on short roll quality. Play the check at the same height as the roll and realize there are no accents. Play with doubles on the check and singles (see the first bar of one & one’s). Experiment with different combinations to come up with your own ideas!
1
and 1
PRACTICE PLAYING A ROLL FOR 2-5 MINUTES WITHOUT STOPPING!
REMEMBER TO WARM DOWN AND STRETCH OUT YOUR HANDS AFTER PLAYING EXTENDED ROLLS.
“Inverted Roll Sticking” refers to moving (displacing) the diddle of a roll over one note. This will cause the roll sticking to be: “R-L-L-R-R” etc. Playing inverted roll sticking helps strengthen the quality of diddles and the timing of rolls.
rms of fluid hand motion and even sound. If two heights are involved, be sure to have distinct heights from accent to tap. For one height exercises, strive for a very consistent sound on
61 The Next Level
œ ! œ ! œ ! œ ! œ œ œ œ œ ! œ ! œ ! œ ! œ œ œ œ œ ! œ ! œ ! œ ! œ ! œ ! œ ! œ ! œ ! œ ! œ ! œ ! œ ! œ ! œ ! œ ! œ ! œ ! œ ! œ !
! œ ! œ ! œ ! œ ! œ ! œ œ œ œ œ œ œ ! œ ! œ ! œ ! œ ! œ !
œ œ œ œ œ œ œ œ œ œ œ œ œ œ œ œ œ œ œ RLLRRLLRRLLRRLLR . . . . œ œ œ œ œ œ œ œ œ œ œ œ œ œ œ œ œ RLLRRLLRRLLRRLLR . . œ œ œ œ œ œ œ œ œ œ œ LLRLRRLLRRL
III. PARADIDDLES
This section deals with the Paradiddle family and many of the standard variations. Apply all of the skills learned in the sections before to make sure the diddles and taps are full and open.
When using Moeller, think of the upstroke or pullout note as the note/hand that plays before the accent. When using Velocity, think of all wrist all the time and full double beats for the diddles.
SINGLE PARADIDDLE
On each of these “rudimental buildups”, work on each measure at a consistent tempo, starting at m.m.=60 (for a minimum of 15 minutes), increasing the tempo 10 bpm each time until you eventually arrive at m.m.=120. 120 then becomes the new tempo for the next measure (m.m.=60), etc., until you get to the final measure.
A good way to practice certain rudiments is to isolate one hand and “build up” the rudiment by adding one note at a time in the opposite hand. Keep the lead hand consistent, practicing with and without accents – m.m.=60-208.
INVERTED
Keep the lead hand consistent and practice with and without accents.
62 The Next Level
. . œ > œ œ œ RLRR œ > œ œ œ LRLL
4 4 œ > œ œ ≈ . j œœ > œ œ ≈ . j œ L R L R L R L R L R L R L R L R 4 4 œ œ œ œ œ œ œ œ œ œ œ RRRLLLRRRLLL
PARADIDDLE . . œ > œ œ œ RLLR œ > œ œ œ LRRL
4 4 .œ > œ ≈ œ œ .œ > œ ≈ œ œ L R L R L R L R L R L R L R L R 4 4 œ > œ œ ‰ j œœ > œ œ ‰ j œ L R L R L R L R L R L R L R L R SINGLE MILLS (DIDDLE PARA’S) . . œ > œ œ œ RRLR œ > œ œ œ LLRL
DOUBLE PARADIDDLE
Practice with two accents (as notated), one accent (beginning of each double paradiddle), and without accents.
Practice with three accents (as notated), one accent (beginning of each triple paradiddle), and without accents.
TRIPLE PARADIDDLE BUILD UP:
PARADIDDLE-DIDDLE BUILD UP:
st and second bar: the note added in the second bar comes in
Apply all of the breakdowns and build-ups from above to these exercises. Play Inverted Paradiddles or Single Mills in the place of the paradiddle and paradiddle diddles in place of the double paradiddle. Practice with all accents notated, one per
63 The Next Level
4 6 . . . . . . . . . . œ > œ œ > œ œ œ œ > œ œ > œ œ œ œ > œ œ > œ œ œ œ > œ œ > œ œ œ œ > œ œ > œ œ œ œ > œ œ > œ œ œ œ > œ œ > œ œ œ œ > œ œ > œ œ œ
œ L œ > œ œ œ œ œ œ > œ œ œ œ œ œ > œ œ œ œ œ œ > œ œ œ œ œ RLRLRRLRLRLLRLRLRRLRLRLL
DOUBLE PARADIDDLE BUILD UP:
œ œ œ œ œ RLRLLL œ > œ œ œ œ œ œ œ œ > œ œ œ œ œ œ œ RLRLRLRRLRLRLRLL
. . . . . . œ > œ œ œ œ œ œ > œ œ œ œ œ œ > œ œ œ œ œ œ > œ œ œ œ œ ‘ 6 œ > œ œ œ œ œ 6 œ > œ œ œ œ œ ‘ L R R L L R L R R L R L L R R L L R L R R L R L
4 4 œ > œ œ œ œ > œ œ > œ œ > œ œ œ œ > œ œ > œ œ > œ œ œ L R R L L R R L L R R L L R L R R L L R R L L R R L L R R L R L 4 4 œ œ œ œ > œ œ œ œ > œ œ œ œ > œ œ œ œ > œ œ œ L R R L L R L R R L L R R L R L . . . . . . œ > œ œ > œ œ œ œ > œ œ > œ œ > œ œ œ œ > œ œ > œ œ > œ œ œ
MOVING ACCENTS AROUND PARADIDDLES
64 The Next Level
PARADIDDLE 4 4 œ > œ œ œ œ > œ œ œ œ > œ œ œ œ > œ œ L R R L L R L R R L L R R L R L > > > > > > > > > > > > > > > > > > > > > > > > > > > > > > > > 4 2 œ > œ œ œ œ > œ œ œ L R R L R L L R R L L R L R R L œ œ œ L R R L R L INVERTED PARADIDDLE 4 2 œ > œ œ œ œ > œ œ œ L R L R R L L R R L R L L R R L œ œ œ L R L R R L SINGLE MILL 8 12 œ > œ œ œ œ œ œ > œ œ œ œ œ œ > œ œ œ L R R L L R L R R L R L L R R L L R L R R L R L œ > œ œ œ œ > œ > œ > œ œ œ œ > œ > œ > œ œ œ œ > œ > PARADIDDLE-DIDDLE 8 12 œ > œ œ œ œ œ œ > œ œ œ œ œ œ > œ L R R L L R R L L R L R R L L R R L L R R L R L etc. etc. œ > œ œ œ > œ œ œ > œ œ œ > œ œ œ > œ œ œ > œ œ DOUBLE PARADIDDLE 4 4 œ > œ œ œ œ œ œ œ œ > œ œ œ œ œ œ L R R L L R R L L R R L L R L R R L L R R L L R R L L R œ > œ œ œ œ œ > œ œ œ > œ œ œ œ œ > œ œ TRIPLE PARADIDDLE
LEAD IN ACCENTS
Use this exercise to stay relaxed leading into an accent and the taps that follow. 4 4 4 5 4
The following exercise moves accents through Paradiddles, Inverted Paradiddles and Mills. Play with very strict two heights and keep the rhythm very exact regardless of stickings or accents. Practice using the 4-2-1 concept.
Practice this exercise with the sticking written and try mills or inverted paradiddles in place of the paradiddles – and double
65 The Next Level
œ œ œ œ œ œ œ œ œ œ œ œ œ œ œ œ œ œ > œ œ œ œ œ > œ œ œ œ œ > œ œ œ œ œ > œ œ œ L R R L R L œ œ > œ œ œ R L R L L R R L R L œ œ œ œ œ > œ œ œ œ œ œ œ œ > œ œ œ
6
œ œ œ > œ œ œ œ > œ œ œ œ œ > œ œ œ œ > œ œ œ œ > œ œ œ œ > . . œ œ > œ œ œ œ œ > œ > œ œ œ œ œ > œ œ œ œ œ > œ œ œ œ œ >
8 9 . . œ œ œ L R R L R L œ œ œ œ œ œ œ œ œ œ œ œ œ œ œ œ œ œ RLRRLLRLRRLRLL L R R L L R L R œ 3) œ œ œ > œ > œ œ œ > œ > œ œ œ > œ > œ > œ > > œ > 6) œ œ > œ > œ > œ œ > œ > œ > œ œ > œ > œ > œ > œ > hand motion and the same pressure in the grip regardless œ œ œ œ œ œ œ œ 3 œ œ œ 3 œ œ œ 3 œ œ œ 3 œ œ œ R L L R L R R L L R R L R L L R R L L R L R R L œ œ œ œ œ œ œ 3 œ œ œ 3 œ œ œ 3 œ œ œ 3 œ œ œ R L L R R L L R L R R L L R R L R L L R R L L R
Pu-du-das and Paradiddles
The pu-du-da is the name for the sticking “RLL” or “LRR”. The rudiment sounds like the name: “puh-duh-duh”. The following exercises deal with the pu-du-da sticking and different paradiddle combinations. Experiment with Moeller and Velocity. Use a small whip for upbeat accents and upstrokes when practicing Moeller and full double beats with wrist when using Velocity. Practice with and without accents as well.
SWISS PARADIDDLES
Swiss sticking generally refers to the sticking RRL or LLR. This could also be considered an “Inverted Pu-du-da.” When using Moeller, pulse the diddles (allow the first beat to be a little louder than the second). When using Velocity, both notes of the diddle should be the same height and intensity. Keep the same pressure in the grip to have open doubles and single notes. Practice with and without accents.
PARADIDDLE REVIEW
Remember that every rudiment in the Paradiddle family is based upon the single paradiddle. Every other rudiment is some sort of variation on R-L-R-R or L-R-L-L. Make sure that you can play every exercise in the previous section with and without accents!
66 The Next Level
4 4 œ > œ œ œ > œ œ œ > œ œ œ > œ œ œ > œ œ œ L R R L R L L R R L R L L R R L R L L R R L R L L R R L L R L R 8 12 œ œ œ œ > œ œ œ œ œ œ > L R R L R L L R R L R LR etc. LLRL œ œ œ œ > œ œ œ > œ œ œ œ œ RLLRLLRLRLRRL 4 4 œ > œ œ œ œ > œ œ œ œ œ > œ œ œ > œ L R R L L R L R R L L R R L R L etc. etc.
4 4 œ > œ > œ œ > œ > œ œ > œ > œ œ > œ > œ œ > œ œ œ L R L R R L L R L R R L L R L R R L L R L R R L L R R L L R L R 8 12 œ > œ > œ œ œ œ œ > œ > œ œ L R L R R L L R L R R LR etc. RLRR œ > œ > œ œ œ œ œ > œ > œ œ œ œ RRLRRLRRLRLR
IV. GRID TWO: DIDDLE AND ROLL ISOLATION
The first group of exercises deal with isolating 16th note and triplet based rolls. Strive for mathematically correct interpretation of the diddles.
16th BASED DIDDLE AND ROLL ISOLATION
67 The Next Level
œ œ ! œ œ œ œ ! œ œ œ œ œ ! œ œ œ œ ! œ œ ! œ ! œ œ œ ! œ ! œ ! œ œ œ ! œ ! œ œ œ ! œ œ ! œ ! œ ! œ œ ! œ ! œ ! œ ! œ œ ! œ ! œ ! œ œ ! œ œ œ œ œ ! œ œ œ œ ! œ œ œ œ ! œ ! œ œ œ œ ! œ œ œ œ ! œ œ œ ! œ ! œ œ ! œ œ œ œ œ ! œ ! œ œ œ ! œ ! œ ! œ œ ! œ ! œ ! œ œ œ ! œ ! œ ! œ œ ! œ œ œ œ œ ! œ ! œ ! œ œ œ ! œ ! œ ! œ ! œ œ !
TWO HEIGHT DRAG & ROLL RUDIMENTS
Many of the rudiments that you will see below are similar to what was done in the previous section. Break down each rudiment starting at m.m.=60, perfecting the strokes before moving the metronome faster.
The 6 Stroke Roll can be played either straight alternated sticking or “hand to hand” (as notated below).

68 The Next Level
TAP DRAGS 8 6 œ > œ œ œ L R R L R L L R œ > R L DOUBLE DRAG 4 5 œ > œ œ œœ œ œ L R R L R L L R R L R L L R œ > R L 5 STROKE ROLL – DUPLE BASED 4 4 œ œ œ œ ˙ > L R L R R L R L L R œ œ R L R L 5 STROKE ROLL – TRIPLE BASED 8 6 œ > œ œ œ œ L R R L R L L R L R œ > R L 7 STROKE ROLL – DUPLE BASED 4 4 œ > œ œ œ œ œ œ L R R L R L L R L R R L R L œ > L R 7 STROKE ROLL – TRIPLE BASED 4 4 ˙ > 3 œ œ œ 3 œ œ œ L R R L R L L R L R R L R L ˙ > L R 6 STROKE ROLL
4 4 œ > œ œ œ œ œ > R R L L L L R R R R L L œ > L R 4 4 œ œ œ œ ˙ > L R L RL R R L L R œ œ R L R L LESSON 25
Below I have listed the common 16th diddle / accent permutations. Apply the 4-2-1 concept to each of the patterns. If practiced leading with both hands, these “grids” will cover Tap Drags/Lesson 25’s, 5, 6 and 7 stroke rolls.
Now the triplet permutations:
Practice each of the above using the 4-2-1 concept!
DIDDLE AND ROLL ISOLATION REVIEW
Take your time to be sure you truly understand the heights and motions involved with these rudiments. Eventually many of the hybrid rudiments that we’ll learn later will be based upon the rudiments you’ve learned here.
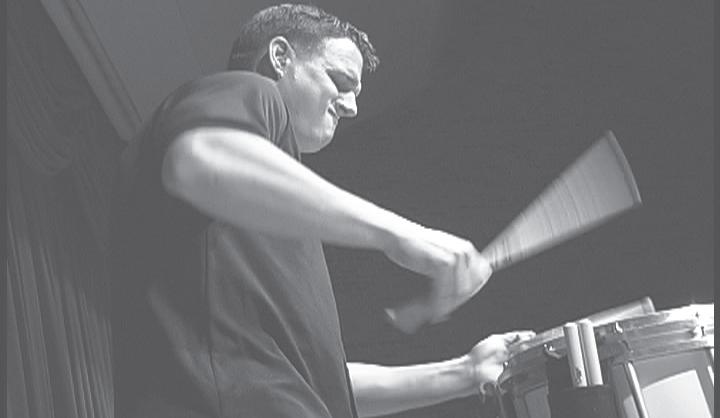
69 The Next Level
œ > ! œ œ œ œ > œ ! œ œ œ > œ œ ! œ œ > œ œ œ ! œ > ! œ > œ œ œ > œ ! > œ œ œ > œ > œ ! œ œ > œ > œ œ ! œ > ! œ > œ > œ œ > œ ! > œ > œ œ > œ > œ ! > œ œ > œ > œ > œ ! œ > ! œ ! œ œ œ > œ ! œ ! œ œ > œ œ ! œ ! œ > ! œ œ œ ! œ > ! œ > ! œ œ œ > œ > ! œ ! œ œ > œ > œ ! œ ! œ > ! œ > œ œ ! œ > ! œ > ! œ > œ œ > œ > ! œ > ! œ œ > œ > œ > ! œ ! œ > > ! œ > œ > ! œ œ > ! œ œ œ œ > œ ! œ œ œ > œ œ ! œ œ > œ œ œ ! œ > ! œ > ! œ œ œ > œ > ! œ ! œ œ > œ > œ ! œ ! œ > ! œ > œ œ ! œ > ! œ > ! œ > ! œ œ > œ > ! œ > ! œ ! œ > ! œ > œ > ! œ ! œ > ! œ > ! œ > œ ! œ ! > œ œ œ > œ ! œ œ > œ œ ! œ ! > œ > œ œ > œ ! > œ œ > œ > œ ! œ ! > œ ! œ œ > œ ! œ ! œ ! > œ œ ! œ ! > œ ! > œ œ > œ ! > œ ! œ ! > œ > œ !
V. DIDDLE INTERPRETATION
Depending on the style of music being played, there is often a need to be able to interpret diddles in many ways. I feel that “mathematically correct” is the easiest way to interpret diddles (meaning that the diddle is exactly twice the speed of the note it is based on. Example: a 32nd note diddle is exactly twice as fast as a 16th note). Mathematically correct is what I am referring to when I say “correct interpretation”. All other interpretations (open/slurred or strict/closed) are based on correct interpretation.
TAP TIMING DIDDLES
Use the next two exercises to practice 16 4 4
• Timing and hand motion are very important for this exercise.
• Use a metronome to make sure that all of the notes line up with straight 16ths.
• 1st and 2nd bars should feel like a roll motion; 3rd and 4th should feel like an inverted roll motion.
• Keep the diddles open on the transitions.
• Practice one height and with accents.
ISOLATED DIDDLE INTERPRETATION
Use this exercise to practice 16
Practice with and without accents as well.
STRAIGHT AND SWUNG DIDDLES
Here I put straight and swung diddles back to back. Work to feel the swung diddles as a similar motion to a straight roll.
Apply the 1, 2 and 3 note accent grids to the above exercise fo
70 The Next Level
œ œ œ > œ œ œ > œ œ œ > œ œ œ L R L R R L L R L R R L . . œ œ œ > œ œ œ > œ > œ œ œ > œ œ
4 4 œ œ œ > œ œ œ > œ œ œ > œ œ L R L R R L L R L R R L . . œ œ œ > œ œ œ > 3 œ œ œ > 3 œ œ œ >
4 4 œ œ œ œ L R L R R L R L 4 4 œ œ œ œ œ œ œ œ œ œ œ L R L R R L R L L R L R R L R L œ œ œ œ œ œ œ œ 6 œ œ œ œ
EXPERIMENTING WITH EXTREMES OF DRAG, DIDDLE AND ROLL INTERPRETATION
The exercises in this section explore the extremes of diddle interpretation and then apply that knowledge in isolation and consistency practice. For all of the groupings, I have explored Open; Mathematically Correct; and Over Strict. By practicing each extreme and also the correct interpretation, one can learn how to adjust their own diddle interpretation to match what is being played in a group/line setting or to fit a different style of music.
The isolation exercises that follow each of the interpretation exercises should be used to apply the knowledge gained and
All of the following exercises should be played with a “check” pattern between each measure.
71 The Next Level
œ 3 œ > ! œ ! œ 3 œ > ! œ ! œ R L œ > ! œ ! œ œ > ! œ ! œ œ > ! œ ! œ œ ! > œ ! œ L R R L L R R L L R R L STRICT œ > œ œ œ > ! œ ! œ œ > ! œ ! œ œ > ! œ ! œ œ > ! œ ! œ œ > ! œ ! œ 3 œ > œ ! œ 3 œ > œ ! œ œ > œ ! œ œ > œ ! œ œ > œ ! œ œ > œ ! œ L R R L L R R L L R R L STRICT œ > œ œ œ > œ ! œ œ > œ ! œ œ > œ ! œ œ > œ ! œ œ > œ ! œ œ ! 3 œ > œ ! œ ! 3 œ > œ ! œ ! R L œ > œ ! œ ! œ > œ ! œ ! œ > œ ! œ ! œ > œ ! œ ! L R R L L R R L L R R L STRICT œ > œ œ œ > œ ! œ ! œ > œ ! œ ! œ > œ ! œ ! œ > œ ! œ ! œ > œ ! œ ! 3 œ > ! œ œ 3 œ > ! œ œ œ ! > œ œ œ ! > œ œ œ ! > œ œ œ ! > œ œ RLRLRL STRICT œ > œ œ œ > ! œ œ œ > ! œ œ œ > ! œ œ œ > ! œ œ œ > ! œ œ
SIX STROKE ROLLS – Practice with “hand to hand” 6 Stroke Rolls as well. SEVEN
SEXTUPLET DIDDLE STICKING
Try to feel these exercises two different ways: 1) like you are playing triplet rolls, or 2) like you are trying to match (and feel) the single sticking patterns (rlrl etc.). The diddle speed is the same regardless of notation!
INVERTED SEXTUPLET ROLLS
Here are inverted rolls in sextuplet form. Stay relaxed and think of “slurring” the diddles so that there is no space from the single note to the double. Practice all one height and with the accents notated.
72 The Next Level 4 4 œ > œ œ œ > œ > œ œ œ > œ > œ œ œ > œ > œ œ œ > L R R L L R R L L R R L L R R L 6 œ > œ œ œ œ œ > 6 œ > œ œ œ œ œ > 6 œ > œ œ œ œ œ > 6 œ > œ œ œ œ œ > L R R L R L L R L R R L L R R L R L L R L R R L œ > œ ! œ ! œ > œ > œ ! œ ! œ > œ L R R L L R R L L R R L L R R L OPEN / SLURRED CORRECT 4 4 œ > œ œ œ œ > œ œ œ œ > L R R L L R R L L R R L L R R L œ > œ ! œ ! œ ! œ > œ ! œ ! œ ! L R R L L R R L CORRECT
STROKE ROLLS
4 4 œ œ 6 œ œ œ œ œ œ œ œ œ L R R L L R L R R L R L L R L R R L L R R L 4 4 3 œ œ œ œ 3 œ œ œ œ RRLL L R L R R L R LR
4 4 6 œ > œ œ œ œ œ > œ > œ L R R L R L L R L R R L R L L R 8 12 œ > œ œ œ œ œ > œ > œ œ œ L R R L R L L R L R R L R LR etc. RLLR œ > œ œ œ œ œ > œ > œ œ œ œ œ > RLLRRLLRRLLR 4 4 œ > œ ! œ ! œ > œ > œ ! œ ! L R R L L R R L R L L R R L
VI. MORE PARADIDDLE PRACTICE FEELING PARADIDDLES WITHIN ROLLS
The following exercises focus on being able to fit a paradiddle (or a variation of a paradiddle) within a long roll. Practice one height and with the accents notated. Feel the diddles of the paradiddles the same as the diddles in the long roll,
The Paradiddle 5 is a great rudiment that can help even out your paradiddles and feel the “roll motion”. Work through the
Experiment with the roll at accent height and tap height.
Try all of the following variations for the double paradiddle:
Experiment with the roll at accent height and tap height.
Try all of the following variations for the double paradiddle:
73 The Next Level
. . . . . . œ œ œ œ œ œ œ > œ œ œ œ œ œ œ œ > œ œ œ œ œ œ œ œ ! œ ! RLRLRL œ > œ œ ! œ ! œ ! œ ! œ ! œ ! œ ! RLRLRLRLR œ > œ œ ! œ ! œ ! œ ! œ ! œ ! œ ! LRLRLRLRL œ ! œ ! œ > œ œ ! œ ! œ > œ œ ! RLRLRLRLR œ ! œ > œ œ ! œ ! œ ! > œ ! > œ ! > œ ! > LRLRLRLRL œ > œ œ ! œ ! œ ! LRLRLR œ > œ œ ! œ > œ œ ! œ > œ œ ! œ > œ œ ! LRLRLRLRLRLR > œ œ ! œ ! œ ! RLRL œ > œ œ ! œ > œ œ ! œ ! > œ ! > œ ! > œ ! > RLRLRLRLRL
8 9 . . œ œ RLL œ œ œ œ œ œ œ ! œ ! œ ! œ ! œ ! œ ! RLRLRRLRLRLR œ > œ œ œ 8) œ > œ œ œ > œ œ 9) œ > œ œ œ œ > œ > 10) œ > œ > œ > œ > œ œ
. . œ œ œ œ œ œ RLRRLL œ œ œ œ œ œ œ ! œ ! œ ! RLRRLLRLR œ > 5) œ > œ > œ œ œ œ 6) œ œ œ > œ > œ > œ >
PARADIDDLE “HYBRIDS” (DRAG AND TAP–DRAG PARADIDDLES)
Again, apply the same breakdown to these rudiments as you have on the previous ones.
7/8 PARADIDDLE AND VARIATIONS
Here are some more variations to 7/8 Paradiddle which incorporate many paradiddle hybrids such as dragadiddle and drag paradiddle number one.
DIDDLE AROUND PARAS
Play the diddles open and hold back the single notes.
74 The Next Level
DRAG PARADIDDLE
4 6 œ > œ œ œ > œ œ œ L R R L R L L R R L L R L R œ > œ œ R L L R L R DRAGADIDDLE 4 4 œ > œ > œ œ œ L R L R R L L R L R œ > œ > R L R L TAP DRAG PARADIDDLE 4 4 œ > œ œ œ œ L R R L R L L R L R œ > R L FIVEADIDDLE 4 4 œ > œ > œ œ œ œ L R L R R L R L L R L R œ > œ > œ R L R L
#1
8 7 œ œ œ œ œ œ œ œ œ œ œ œ œ L R R L L R L R R L L R R L R L L R R L L R L R R L 1) œ > ! œ œ œ œ > ! œ œ œ œ > ! œ œ œ œ œ
4 4 œ ! œ ! œ œ œ ! œ ! œ œ œ ! œ ! œ œ œ ! œ ! L R R L L R L R R L L R R L R L œ ! œ ! œ œ œ ! œ ! œ œ œ œ ! œ ! œ œ œ ! œ ! œ L RL etc. RRLRLLRLRLLRLR
VII. RUFF’s AND
RATAMACUES
THE ALTERNATING RUFF
The alternating ruff is similar to a paradiddle without the single note or the “E.” There is a slight inverted motion to this rudiment: it should feel like the inverted roll or the accented second note of diddles. Think of these rudiments as such and
For the next exercise, keep the diddles open and stay relaxed. At faster tempos, it is okay to allow the diddles to “drop in”.
Realize that you are playing ruffs when diddling the last note of a paradiddle. Apply the “Grid” of accent patterns to the
On the next exercise, focus on staying relaxed at all times, keeping the diddles open and the single 16ths in time.
75 The Next Level
. . œ œ œ œ œ œ œ œ œ œ œ œ œ œ œ œ œ œ œ œ œ œ œ œ œ œ œ œ œ œ œ œ œ œ œ œ > œ œ œ > RR œ œ œ > œ œ œ > œ œ œ > œ œ œ > LRLL
œ ! R L œ > œ œ œ > œ œ œ > œ œ œ > œ œ 6 œ > œ ! œ > œ ! 6 œ > œ ! œ > œ ! œ > œ ! 6 œ > œ ! œ > œ ! œ > œ ! 6 œ > œ ! œ > œ ! œ > œ ! R L R L L R L R R L R L L R L R R L R L
8 9 . . œ œ œ ! L R R L R L œ ! > œ œ œ ! œ œ ! œ ! > œ œ œ ! œ ! > œ œ œ ! œ ! > œ œ œ ! L R R L L R L R 8 9 . . œ ! œ œ ! L R R L R L œ ! > œ ! œ œ ! œ œ ! œ ! > œ ! œ œ ! œ ! > œ ! œ œ ! œ ! > œ ! œ œ ! L R R L L R L R œ œ œ œ ! œ œ œ œ ! œ œ ! œ œ ! œ œ ! œ œ ! œ œ ! œ œ ! œ œ ! œ œ ! L R L R R L R L L R L R R L R L œ œ ! œ œ ! œ œ ! RRRLLRR œ œ œ œ ! œ ! œ œ œ œ œ œ œ ! œ œ ! œ œ ! LLLRLRRRLLLLRRLL
RATAMACUE BUILD UPS
The ratamacue is one of those rudiments that you don’t see very often – but the skills learned from playing this rudiment are invaluable. Stay relaxed for the ruff and let the triplet flow. By executing the ratamacue with proper heights and interpretation, you will have learned to relax on the low end and also have good three height control.
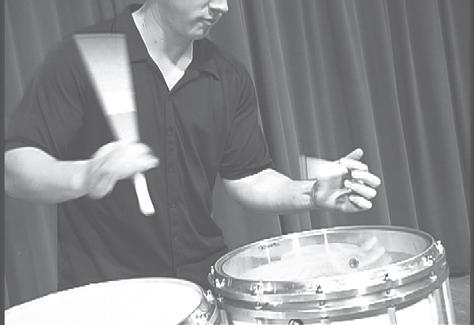
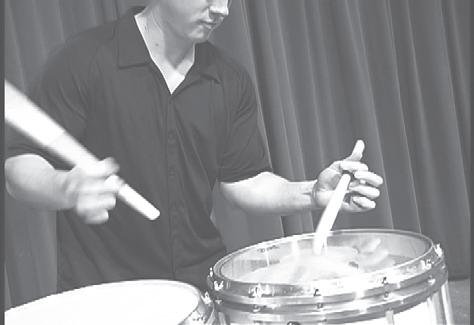
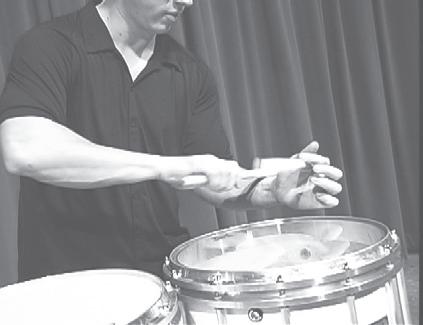
Practice with both
interpretation and drag/ruff interpretation.
76 The Next Level
DOUBLE RATAMACUE 4 6 . . œ œ œ œ œ 3 œ œ œ œ > RRLRLL RATAMACUE PRACTICE
4 4 6 œ > œ œ œ œ œ 6 œ > œ œ œ œ L R R L R L L R R L L R R L L R L R R L L R 6 œ > œ œ œ > œ œ 6 œ œ œ œ > œ œ RLLRLLRLRLRRL 4 4 œ > œ ! 3 œ œ œ œ > œ ! œ œ L R R L L R R L L R R L L R R L L R œ > œ ! œ > œ ! 3 œ œ œ œ > œ ! RLRLRLRLRL 4 4 . . œ œ 3 œ œ œ œ > œ œ RLRL SINGLE RATAMACUE
sextuplet
VIII. THE NEXT LEVEL
THE THREE STROKE ROLL (or FRENCH ROLL)
Feel this rudiment as you would a double stroke roll, only with 3 notes.
of each 3. The accents in the first two bars are to make sure that the last note of each three is played strong. Raise the lower notes (about 6) and play the accent at 9. The middle two measures
In the last two bars there can be a slight pulse to the downbeats. Think back to Triple Beat, feel the whole hand play the three, not just the fulcrum or the back fingers. Start slow and work up to the faster tempos where the feeling should be similar to a
notes to establish the hand motion of the 3’s.
The 1-2-3 is a single note (1), a double stroke (2) and then a three stroke (3). Practice all one height until comfortable with the stickings. After the rudiment is mastered at one height, move to pulsing the downbeats and three strokes while keeping the pud-du-da down. The whole rudiment should feel very relaxed and flowing.
77 The Next Level
. . . . 3 3 3 3 3 3 3 3 6 œ œ œ œ œ œ 6 œ œ œ œ œ œ 6 œ œ œ œ œ œ 6 œ œ œ œ œ œ RRRLLLRRRLLLRRRLLLRRRLLL
. . œ œ œ œ œ œ 3 œ œ œ 3 œ œ œ 3 œ œ œ 3 œ œ œ TEMPO
œ œ 6 œ œ œ œ œ œ LLLRRRLLL œ œ œ œ œ 3 œ œ œ 6 œ œ œ œ œ œ RLRLRLLLRRRLLL
. . . . 6 œ œ œ œ œ œ 6 œ œ œ œ œ œ 6 œ œ œ œ œ œ 6 œ œ œ œ œ œ RLLRRRLRRLLLRLLRRRLRRLLL t two bars for the entire exercise. œ L 6 œ œ œ œ œ œ 6 œ œ œ œ œ œ 6 œ œ œ œ œ œ 6 œ œ œ œ œ œ RLLRRRLRRLLLRLLRRRLRRLLL . . œ RR 6 œ œ œ œ œ œ 6 œ œ œ œ œ œ 6 œ œ œ œ œ œ 6 œ œ œ œ œ œ RLLRRRLRRLLLRLLRRRLRRLLL . . 6 œ œ œ œ œ 6 œ œ œ œ œ œ 6 œ œ œ œ œ œ R R L R L L R L R L R R L L R L R R L R L R L L R R L R L L R L R L R
3-2 ROLLS or EGG BEATERS
Practice this rudiment all one height, with the three stroke at 9 and the double at 3 and vice versa.
The flam is the last note of the grouping of three. Treat the flam not as a grace note but a full stroke to become comfortable with the sticking.
The first bar should be very strict rhythmically and then allow
Play with strict two heights on the accented measures at the end and slur the diddles in measure 8 to all be the same interpretation. Use the 8th note hand motion to keep the 3’s consistent.
78 The Next Level
4 5 . . . . . . . . . . œ œ œ œ œ RRRLL œ œ œ œ œ RRRLL œ œ œ œ œ œ œ œ œ œ RRRLLRRRLL œ œ œ œ œ œ œ œ œ œ œ œ œ œ œ œ œ œ œ œ RRRLLRRRLLRRRLLRRRLL 3-2 HAND MOTION 8 10 . œ œ . œ œ . œ œ L R R L L R R L L R R L . œ œ œ . œ œ œ . œ œ œ œ L R R L R L L R R L R L
4 4 œ œ œ œ œ œ œ œ L R L R R L R L L R L R R L R L 4 4 3 œ œ œ œ œ 3 œ œ œ œ L R L R L R R L R L L R L R L R R L 3-2 PRACTICE 4 2 5:3 œ œ œ œ œ 5:3 œ œ œ œ œ œ œ œ œ L R L R L R R L R L L R L R L R R L R L L R R L L R L R 4 2 5:3 œ œ œ œ œ 5:3 œ œ œ œ œ 3 œ œ L R L R L R R L R L L R L R L R R L R L L R L R BROKEN WINDOW
4 4 œ œ 3 œœœœ œ 3 œœœ 3 œœœœ RLRRRLRL LL RRRL œ œ 3 œ œ œ œ œ 3 œ œ œ œ RLRRRLRLLLRL œ > œ œ œ > œ œ œ > œ 6 œ œ œ œ œ œ œ œ RLRRRRLLRRR
3-2-1’s
This rudiment got its name because of (you guessed it): the sticking. A triple beat, double beat, then a single beat. There is a sort of inverted motion to this rudiment.
Keep in mind the slight inverted motion to this rudiment. Practice one height and then move to slightly accenting the three
together to play even sextuplets.
2-3 HAND MOTION – Use this exercise to establish the correct hand motion for 2-3 rolls.
The same approach to this exercise as in 3-2 practice. Play the grace as a full note, become comfortable with the sticking.
79 The Next Level
. . . . 3 3 3 3 3 3 3 3 6 œ œ œ œ œ œ 6 œ œ œ œ œ œ 6 œ œ œ œ œ œ 6 œ œ œ œ œ œ RRRLLRLLLRRLRRRLLRLLLRRL œ LR 6 œ œ œ œ œ œ 6 œ œ œ œ œ œ 6 œ œ œ œ œ œ 6 œ œ œ œ œ œ RRRLLRLLLRRLRRRLLRLLLRRL
. . 6 œ œ œ œ RRRLLR 6 œ œ œ œ œ œ 6 œ œ œ œ œ œ 6 œ œ œ œ œ œ 6 œ œ œ œ œ œ RRRLLRLLLRRLRRRLLRLLLRRL
. . > 6 œ > œ œ œ œ œ 6 œ > œ œ œ œ œ 6 œ > œ œ œ œ œ RRRLLRLLLRRLRRRLLR . . . . . . œ R L œ œ œ œ œ œ œ œ œ œ œ œ œ œ œ œ œ œ œ œ L R L R R L R L R L L R L R R L R L R L L R L R R L R L R L L R L R R L R L R L
rhythms
œ œ œ œ œ œ œ œ œ œ œ œ œ œ œ œ œ œ œ œ œ œ œ œ œ œ L R L R R L R L R L L R L R R L R L R L ck
œ œ œ œ rœ œ œ œ œ œ œ œ œ RRLL 5 œ œ œ œ œ 5 œ œ œ œ œ 5 œ œ œ œ œ L R L R R L R L R L
Let everything flow for this exercise. Pulse the doubles and kee
MORE PRACTICE
All of the following should feel very relaxed and very flowing. rudiments. Keep all the diddles open.
Now go back and play all of the variations with 3-2-1’s in the place of the 1-2-3’s, 2-3’s in the place of the 3-2’s, paradiddles where there are three’s, any combination will work!
DIDDLE CONTROL REVIEW
Once you have finished this chapter you should have a VERY strong sense of “stick control” and the ability to play multiple notes on a hand with extreme consistency and sound quality. Remember that you are not limited to what I have here. Try combinations of all the different exercises in this section to come up with your own!
80 The Next Level 2-3 PRACTICE 4 2 . . 5:3 œ œ œ œ œ 5:3 œ œ œ œ œ 3 œ œ œ L R L R R L R L R L L R L R R L R L R L L R L R L R 5:3 œ œ œ œ œ 5:3 œ œ œ œ œ 3 œ œ œ L etc. LRRRLLRRRLLL 5:3 œ œ œ œ œ 3 œ œ œ 5:3 œ œ œ œ œ RRLLLRRRLLRRR 6 œ œ œ œ œ œ 6 œ œ œ œ œ œ LLLRRRLLLRRR 4 2 5:3 œ œ œ œ œ 5:3 œ œ œ œ œ œ œ œ L R L R R L R L R L L R L R R L R L R L L R R L L R
4 4 6 œ œ œ œ œ œ 6 œ œ œ œ œ L R R L R L L R L R L RL etc. RRLLLR 5:3 œ œ œ œ œ 5:3 œ œ œ œ œ 3 œ œ œ RRRLLRRRLLRRR 4 4 6 œ œ œ œ œ œ 6 œ œ œ œ œ L R R L R L L R L R L RLR etc. RL 5:3 œ œ œ œ œ 5:3 œ œ œ œ œ œ œ œ œ RRRLLRRRLLRLRR
4 4 6 œ œ œ œ œ œ 6 œ œ œ œ L R R L R L L R L R L RLR etc. RLLL 4:3 œ œ œ œ 4:3 œ œ œ œ 3 œ œ œ RRRLRRRLRRRL
BUZZ CONTROL
Learning how to play a great buzz roll can teach you many things about manipulating the stick and creating even sounds The finesse required to achieve a superior buzz roll can be applied to every aspect of your playing, so study the exercises with this thought in mind.
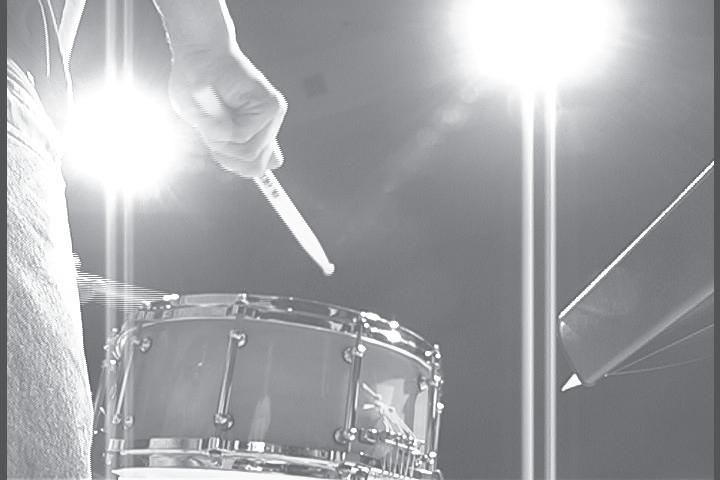
This chapter has many exercises that work on the quality, consistency, timing and hand motion of buzz rolls, including:
The approach I use is suited to the rudimental style of playing and keeping hand motions consistent. I use the front of the grip in my right hand and primarily thumb in my left hand. I use mostly wrist, keeping my motion the same as it would be
Scott Johnson used to say, “less flesh on stick.” This helped a lot when it came to achieving a smooth and even buzz roll. If you take some fingers off the stick, this allows the stick more of a chance to bounce multiple times. When releasing your the stick, and not look like you are letting go.
The length of the buzz is determined by two things: Amount of pressure in the fulcrum and the speed of stroke. The looser your fulcrum, the fewer notes you are going to get and the farther apart they are going to be. The tighter the fulcrum is, the more notes you can get out of the stick and the closer they will be. The speed of stroke affects the volume of the attack to
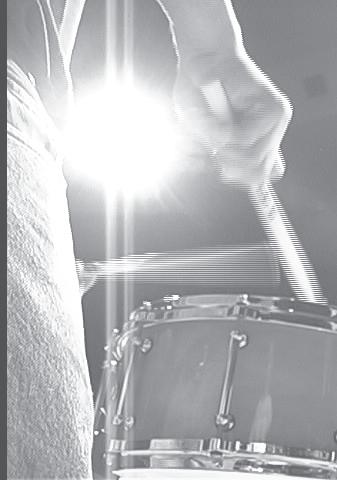
Loose Fulcrum / Less Pressure
Also practice allowing each buzz to last until the next one starts. Notice in the following exercise how the ties go PAST
81 The Next Level
œ Z Œ œ Z Œ œ Z Œ
œ Z œ Z œ Z RL RL
II. BUZZ SPEED
The goal of this section is learning to play different buzz roll checks or meters in time. Experiment with different pressures in the hand to achieve different lengths of buzz relative to the meter of the check. Remember that depending on the music, sometimes a faster check sounds better than something slower, so keep your ears open to hear the subtle differences of different meters at the same tempos.
REMINDER: The speed of the check and the texture/timbre of the buzz all depend on the musical setting which the sound is used. Use the exercises on the next page to practice different hand speeds and lengths of buzzes.
You will notice all of the notes are tied in this section. The ties should help you visualize how each buzz needs to over lap the previous one. Consider what it would sound like to tear silk. This is the sound you are looking for in a buzz roll. Some good adjectives to describe a well executed buzz roll would be: smooth, full, warm, and even. Play each exercise at m.m.=80-120.
Apply all the skills learned in the previous buzz exercises to achieve a full buzz that is smooth regardless of meter. Consider someone listening to you with his or her eyes closed, would they know the meter of the buzz? m.m.=90-110.
Be sure to practice all of the exercises at every dynamic level!
82 The Next Level 4 4 œ œ œ œ L R R L L R R L œ Z œ etc. etc. 4 4 œ œ œ œ œ Z œ œ Z L R R L L R R L etc. etc. 4 4 3 œ œ œ 3 œ œ œ 3 œ Z œ L R R L L R R L L R R L etc. etc. 4 4 œ œ œ œ œ œ œ œ œ Z œ œ Z L R R L L R R L etc. etc. 4 4 5 œ œ œ œ œ 5 œ œ œ œ œ œ Z œ œ L R R L L R R L L R R L L R R L L R R L etc. etc. 4 4 6 œ œ œ œ œ œ 6 œ œ œ œ œ œ 6 œ Z œ œ Z œ L R R L L R R L L R R L etc. etc.
4 4 œ Z œ Z œ Z œ Z L R R L L R R L œ Z œ Z etc. etc. 5 œ Z œ Z œ Z œ Z œ Z 5 œ Z œ Z œ Z œ Z œ Z œ Z
III. ONE HEIGHT BUZZ CONTROL
When I think about buzz rolls and the check patterns for them, I think just like I do for open rolls – I just happen to be playing more notes on each hand than in an open roll. Keep this in mind with the following exercises. Whatever happens, make sure that you know where the downbeat is while playing the extended buzz rolls.
Below are the 16th 4-2-1 grid patterns for 1, 2 and 3 buzzes. Apply the 4-2-1 process to each line below. Play one height without accents. The same things that were learned in the DIDDLE CONTROL chapter apply to these exercises, only with buzz strokes instead of diddles. Keep the dynamic of the exercise consistent meaning that buzzed and non-buzzed notes should be the same volume. Keep the hand motion and pressure in the grip the same for the duration of the exercise.
Apply the same treatment to triplet based buzzes as the 16ths earlier. Consistent hand motion, volume, and pressure in the
For this exercise, there is a different hand motion in the check before the buzz roll. Stay relaxed and play the buzzes full and in time being careful not to rush the triplets. Apply all the triplet grid buzz variations from earlier in the chapter.
83 The Next Level
œ œ œ œ œ œ Z œ œ œ œ œ Z Z œ Z œ Z œ œ œ Z Z œ Z œ Z œ Z œ œ Z
œ Z R L œ Z œ œ Z œ Z œ œ Z œ Z œ œ Z œ Z œ œ Z L R L R R L R L L R R L R L L R . . Z œ Z R R L œ Z œ œ Z œ Z œ Z œ L R L R R L L R œ œ Z œ Z œ Z œ œ Z R L L R R L R L œ œ œ œ Z œ œ œ Z œ œ œ Z œ œ œ Z L R R L L R R L . . Z œ R œ œ œ Z œ Z œ œ L R R L œ œ Z œ œ œ œ Z R L R L
3 œ Z œ Z œ œ œ œ œ œ œ œ 3 œ Z œ Z œ Z 3 œ Z œ Z œ Z Z 3 œ Z œ Z œ Z œ œ œ œ 3 œ Z œ Z œ Z œ œ œ œ œ Z œ Z 3 œ œ œ 3 œ œ œ œ Z œ Z œ Z œ Z œ Z œ Z œ Z œ Z Z Z Z Z Z Z Z Z Z Z Z Z Z Z Z Z Z Z Z Z 3 Z Z Z Z 3 etc.
IV. TWO HEIGHT BUZZ CONTROL
I have listed many common grid patterns with 16th notes and triplets below. Experiment with different buzz lengths such as really short and sharp to long and legato. Remember to approach the buzzes the same as you would open diddles from a technique standpoint by turning the wrist and keeping the hand motion consistent.
16th TRIPLET ALL BUZZ
Focus on the different hand motions that are used to play a full sounding buzz with different meters. Remember, less flesh on the stick for more buzz. There will be different pressures in the fulcrum to get a full buzz for the different meters. Apply any and all variations to the following two exercises.
Remember to play with strict two heights and fluid hand motion r
84 The Next Level
4 1 œ œ œ œ œ œ œ œ œ œ œ œ œ œ œ œ œ Z > œ œ œ œ Z > œ Z > œ œ œ Z > œ Z > œ Z > œ 8 6 . . œ > Z œ œ œ > Z œ œ œ > œ Z . . œ > Z œ Z œ Z œ > Z œ Z œ Z œ > Z œ Z œ Z . . œ > Z œ Z > œ œ > Z œ Z > œ œ Z œ Z > œ >
4 4 œ > Z œ Z œ Z œ Z œ > Z œ Z œ Z œ Z œ > Z œ Z L R R L L R R L etc. etc. œ > Z œ Z œ Z œ Z œ > Z œ Z œ Z œ Z 3 œ > Z œ Z œ Z 4 4 3 œ Z > œ Z œ Z 3 œ Z > œ Z œ Z 3 œ Z > œ Z L R R L L R R L L R R L etc. etc. 3 œ Z > œ Z œ Z 3 œ Z > œ Z œ Z œ Z > œ Z œ Z œ Z TRIPLET 16th
TRIP DIDDLE BUZZ
V. THE NEXT LEVEL
Diddles and Buzz Together
Here is where we put the skills of the DIDDLE CONTROL and BUZZ CONTROL chapter together. The important thing for the following exercises is the interpretation of the open doubles is correct and the buzz rolls are full.
85 The Next Level
œ œ œ œ œ Z œ Z œ Z œ Z œ Z œ Z œ Z œ Z L R L R R L R L L R R L L R R L L R R L L R R L œ œ œ œ Z œ Z œ Z œ Z œ œ œ œ RR LLR LR L RRL L 3 œ Z œ Z œ Z RLRL 3 œ Z œ Z œ Z œ œ œ œ 3 œ Z œ Z œ Z œ œ œ œ RLRLLRRLRLRRLL œ Z œ œ œ œ Z œ Z œ œ œ Z œ Z œ œ œ Z œ Z œ œ œ Z œ Z L R L R R L L R R L R L L R R L . . œ LR œ œ œ Z œ Z œ œ œ Z œ Z œ Z œ œ œ Z œ Z œ œ œ Z RRLRLLRLRLLRLRRL . . œ Z œ Z œ œ œ œ Z œ Z œ Z œ œ œ Z APPLY ANY ACCENT GRID PATTERN TO THE ABOVE EXERCISES! œ Z RL 3 œ œ œ 3 œ œ œ 3 œ Z œ Z œ Z 3 œ Z œ Z œ Z RR LL RR LR LR LR 3 œ Z œ Z 3 œ Z œ Z œ Z 3 œ œ œ 3 œ œ œ LR LR LR LL RR LL œ Z RL 3 œ œ œ 3 œ œ œ œ Z œ Z œ Z œ Z œ Z œ Z œ Z œ Z RR LL RRL RL RL RL R œ RR œ Z œ Z œ Z œ Z œ Z œ Z œ Z œ Z 3 œ œ œ 3 œ œ œ LR LR LR LR LL RRL L
INVERTED BUZZ
This is a fun rudiment that uses inverted motion with a short buzz on the second note of the diddle.
APPLY ALL THE ACCENT AND BUZZ VARIATIONS TO THE ABOVE EXERCISE!
BUZZ CONTROL REVIEW
I try not to separate techniques or approaches when it comes to playing buzz rolls. The most important thing is that you play a smooth buzz roll with even sound and no gaps or “bumps” in volume. The music dictates the approach that should be used. I try to keep the motion as similar to playing open diddles as possible to stay consistent in my approach to the drum. Based on hand motion, I use different pressures in my fulcrum to allow the buzz to be longer or shorter.
NOW, GO BACK AND PRACTICE EVERY EXERCISE IN THE DIDDLE CONTROL CHAPTER WITH BUZZ’S IN PLACE OF OPEN DIDDLES.
86 The Next Level
4 4 œ œ œ œ œ œ œ œ œ œ Z œ œ Z œ œ Z œ œ Z L R L R R L R L etc. etc. œ œ œ œ œ œ Z œ œ Z œ œ Z œ œ Z œ œ œ œ 4 4 œ œ > œ œ > œ œ > œ L R L R R L R L etc. etc. 4 4 œ > œ œ > œ œ > œ œ > L R R L R L L R L R R L R L 4 4 œ > œ œ œ Z œ > œ œ œ Z œ > œ L R R L L R L R R L L R R L R L etc. etc. œ œ œ œ Z > œ œ œ œ Z > œ œ œ œ Z > . . œ > œ œ œ Z œ œ > œ œ Z
FLAM CONTROL
In this chapter, I will cover virtually everything you ever wanted to know about flams and flam related rudiments. You will need to make sure you are familiar with the concepts of “Tap Hum” and “Cushioning the Stick” from the beginning of the book. You will also need an excellent understanding of the Moeller Stroke and Velocity Stroke as it relates to two height
– A brief introduction to Downstroked, Controlled Rebound and Inverted motions.
– Exercises that focus on the consistency and interpretation of flams.
– Flam Accents, Flam Paradiddles, etc.
– Flam Taps, Swiss and similar rudiments.
– Inverted Flam Taps, Fubars, Inverted Three’s and similar rudiments.
– Combinations of all three motions.
– Many, many, many flam exercises to hone your grace note skills.
Flam rudiments fall into three main categories of motions: Downstroked; Controlled Rebound and Inverted. If a rudiment or more of these motions.
Remember that everything breaks down the basic strokes learned in the beginning of the book. When playing flams, the motion of the upstroke or downstroke will be larger or smaller depending on the height needed for a given note. The larger upstroke motion will happen when moving from grace or tap to accent, while the smaller will be from grace to tap. The downstroke will be larger from accent to tap or grace and smaller when playing tap
This motion is the motion that is used for rudiments such as Flam Accents, Flam Paradiddles and the like. Basically, it occurs when an accent is followed by multiple low notes. The word “Downstroked” to me does not mean “freeze down” or “stop the stick.” To me, this word means to keep the taps down after the accent by cushioning the stick. This is done by ck to rebound to the desired height (usually tap or grace note height, level 3 or 1 respectively). Once allowing the stick to rebound to the desired height, the taps or grace notes are played very relaxed and rebounded from the lower height. Refer back to the Two Height Control portion of this book for
87 The Next Level
‰ œ œ œ ‰ œ > ‰ œ œ œ ‰ > œ œ rœ œ > œ œ rœ œ > œ œ L R R L L R R L L R R L L R R L
Controlled Rebound Motion (Multiple Heights)
The Controlled Rebound Motion is used in rudiments such as Flam Taps, Swiss Army Triplets, Duchuddus and various others. In Flam Taps, there are three different heights: Grace, High Tap (level 6 or 7), and Accent. In Duchuddas, the heights are the same but in a different order, the grace note follows the accent so a different level of control is needed to keep the stick down for the grace and then rebound for the tap.
Here’s an example of the Controlled Rebound Motion, as it applies to Flam Taps: 4
Inverted Motion (Low to High)
The inverted motion is an accent right after a tap, moving from a lower height to an accent height. Use Moeller to return the stick to accent height after the lower notes. Be sure to keep the pressure in the hands the same the whole time.
Here's an example of the Inverted Motion, as it applies to Inverted Flam Taps:
Flam Motions Summary
Remember: if you have worked through the Two Height Chapter, you already know how to play each of these motions and beat combinations. Refer back to the TWO HEIGHT CHAPTER for detailed information on these beat combinations and motions.
II. Flam Quality
These exercises involve grace note placement, alternating flams, produce multiple flams of the same quality and consistency. 4
In this next exercise, use the “Bucks” motion to keep the taps low for the grace notes. Notice the upbeat tap in measure 1 becomes the grace note in meas. 2. At faster tempos, apply the Moeller Whip. For the the same as the forte measures, just smaller and lower. M.M. = 60-120
88 The Next Level
4 œ > œ œ œ > œ œ œ > RRRRRR
4 4 œ > œ œ œ > œ œ œ > L R L R L R L R L R L R
rœ œ > rœ œ > rœ œ > rœ œ > L RL RR LR LL RL RR LR L
4
4 4 f œ > œ œ > œ œ > œ œ > œ L R L R L R L R etc. P œ > œ œ > œ œ > œ œ > œ
ng exercise. Remember the motions is all the same, just at
ent throughout the exercise. There are no accents in this exercise, just forte 8 on a Hand Motions. Be sure to keep the grace note placement consistent.
nded notes for the primary notes of the flams.
89 The Next Level
rœ œ œ œ rœ œ œ œ rœ œ œ ‘ œ œ œ rœ œ rœ œ rœ œ rœ œ rœ œ rœ œ rœ œ rœ œ ‘ œ rœ œ rœ œ rœ œ rœ œ LLLL rœ œ rœ œ rœ œ rœ œ rœ œ rœ œ rœ œ rœ œ rœ œ rœ œ rœ œ rœ œ rœ œ rœ œ rœ œ rœ œ rœ œ rœ œ rœ œ rœ œ rœ œ rœ œ rœ œ rœ œ rœ œ rœ œ rœ œ rœ œ rœ œ
M.M.
= 60=160
rœ œ > œ œ rœ œ > œ œ rœ œ > œ LRRLRRLR ‘ > œ œ RR rœ œ > rœ œ > rœ œ > rœ œ > rœ œ > rœ œ > rœ œ > rœ œ > LLLLLLLL ‘ œ rœ 3 œ rœ œ rœ œ rœ 3 œ rœ œ rœ œ rœ 3 œ rœ œ rœ œ rœ 3 œ rœ œ rœ œ rœ œ rœ œ rœ œ rœ œ rœ œ rœ œ rœ œ RRLLRRLL rœ œ rœ œ rœ œ rœ œ rœ œ rœ œ rœ œ rœ œ RLRLRLRL 4 4 rœ œ > œ rœ œ rœ œ rœ œ > œ rœ œ rœ œ L R R L L R R L L R etc. LR L rœ œ rœ œ rœ œ > œ rœ œ rœ œ rœ œ > œ RL RL RL RL rœ œ > œ rœ œ rœ œ rœ œ > œ rœ œ rœ œ RL RL RL RL rœ œ rœ œ rœ œ rœ œ rœ œ rœ œ rœ œ rœ œ RL RL RL RL
FLAM QUALITY: THE NEXT LEVEL
The remaining exercises in the Flam Quality section are fairly advanced. Be sure you have mastered the ability to play the grace note and primary note very consistently before moving on.
FLAM INTERPRETATION
Practice the following exercises to place the grace note in var have more space between the grace note and primary note while “
Apply the interpretation concept from above to Flam Accents, Flam Taps and Inverted Flam Taps. Remember to keep the grace note at 1”, Taps at 3” and Accents at 9-12” regardless of flam interpretation.
All of the following are endurance exercises for rebounding at • Stay low for the taps and the unaccented primary notes of the fl • Allow the stick to rebound correctly to grace, tap, or accent height.
• Think of the Tap Hum for the entire exercise.
90 The Next Level
4 4 rœ œ > rœ œ > rœ œ > œ L R R L L R L R R OpenFlams
8 12 œ > œ œ œ > œ œ œ > œ L R R L L R R L L R R L etc. etc. rœ œ > œ œ rœ œ > œ œ rœ œ > œ œ CorrectFlams 4 4 rœ œ > œ rœ œ > œ rœ œ > œ L R L R R L R L L R L R OPEN 4 4 rœ œ > œ rœ œ > œ rœ œ > L R R L R L L R L R OPEN
Don’t let the next two exercises scare you. Both deal with playing one flam, then two, three, all the way to six and back
g multiple flams in a row. You should be able to produce ality of sound before moving on.
91 The Next Level
rœ > rœ œ > œ œ rœ œ > rœ œ > rœ œ > rœ œ > œ œ rœ œ > rœ œ > LLRLetc. rœ > rœ œ > rœ œ > rœ œ > œ œ rœ œ > rœ œ > rœ œ > rœ œ > rœ œ > rœ œ > œ œ rœ œ > rœ œ > rœ œ > rœ œ > œ œ rœ œ > rœ œ > rœ œ > œ rœ œ > rœ œ > rœ œ > rœ œ > rœ œ > rœ œ > rœ œ > rœ œ > rœ œ > RRLLLRRLL
8 12 rœ œ > œ œ rœ œ > œ œ rœ œ > œ œ rœ œ > œ œ L R R L L R R L L R R L etc. rœ œ > rœ œ > rœ œ > rœ œ > œ œ rœ œ > rœ œ > rœ œ > rœ œ > œ œ RRR RL R LLL LR L rœ œ > œ œ rœ œ > rœ œ > rœ œ > rœ œ > œ œ rœ œ > rœ œ > rœ œ > RL RL LLLR L RRR > > > > > > > > > > > > > > œ R rœ œ > œ œ rœ œ > œ œ rœ œ > œ œ rœ œ > œ œ LR LR LR LR LR LR . . rœ œ > rœ œ > rœ œ > rœ œ > rœ œ > rœ œ > rœ œ > rœ œ > RR LL LL LL œ rœ œ > œ œ rœ œ > œ rœ œ > œ rœ œ > œ œ rœ œ > œ RRR LLL R œ rœ œ > LLL œ rœ œ > œ rœ œ > œ œ rœ œ > œ rœ œ > œ rœ œ > œ rœ œ > œ rœ œ > œ LL R RRR R œ rœ œ > LL œ rœ œ > œ rœ œ > œ œ rœ œ > œ rœ œ > œ rœ œ > œ rœ œ > œ œ rœ œ > LL RR RR L rœ œ > œ œ LL rœ œ > œ œ rœ œ > ≈ rœ œ > œ œ rœ œ > Œ RL LR L
III. DOWNSTROKED MOTION (High to Low)
Here we will learn all the rudiments associated with Downstroked Motion.
The Flam Accent is the basis for many of the hybrid rudiments that are going to come later in this book. The motion of the Flam Accent is the control of an accented note followed by three low notes, one of which being the grace.
92 The Next Level 8 12 œ > ‰ œ œ œ ‰ œ > ‰ œ L R R L R L R L R L R L R ‘ rœ œ > œ œ rœ œ > œ L R L R R L L R R L R L L R
FLAM ACCENT
THE
FLAM ACCENT BREAK DOWN 8 6 rœ œ > œ œ L RL R R L L R rœ œ R L FLAM ACCENT BUILD UP 8 12 œ > œ œ œ > œ œ œ > œ L R R L L R R L L R R L etc. etc. œ > œ œ rœ œ > œ œ œ > œ œ Focus on each hand’s flam accent. 8 7 rœ œ > œ œ œ rœ œ > œ L R R L L R R L etc. etc. THE FLAM PARADIDDLE BREAK DOWN / BUILD UP 4 4 rœ œ > œ œ œ L RL R R L L R L R rœ œ > R LR L 4 4 œ > œ œ œ œ ‰ œ > œ œ œ œ L R L R L R L R L R ‘ rœ œ > œ œ œ rœ œ > L RL R R L L R L RR LR L
Use this exercise to establish the placement of the grace notes for Flam Paradiddles.
The motion for this rudiment is very similar to that of a Flam Accent, just adding one more tap and one more accent. hion the second to stay down for the tap that follows.
Use the following exercise to work on approaching one and two accents the same way.
You should have excellent control of accent-to tap-heights after completing this portion of the chapter. Remember the concept of “cushioning the stick” and be sure what you are playing sounds like it looks, i.e. your taps are low and soft and
93 The Next Level
4 4 œ > œ œ œ > œ œ œ > œ œ œ > œ œ L R L R L R R L R L R L etc. rœ œ > œ œ rœ œ > œ œ rœ œ > œ œ rœ œ > œ œ RRRLLL rœ œ > œ œ œ rœ œ > œ œ œ rœ œ > œ œ œ rœ œ > œ œ œ RLRRLRLLRLRRLRLL œ œ œ œ rœ œ > œ œ œ rœ œ > œ œ œ RRLLRLRRLRLL . . œ œ œ rœ œ > œ œ œ rœ œ > œ œ œ œ RLLRLRRLRLRR
. . . . rœ œ > œ œ rœ œ > rœ œ > œ œ rœ œ > rœ œ > œ œ rœ œ > rœ œ > œ œ rœ œ > œ œ > rœ œ > œ œ œ œ œ > L R L R L R L R L R L R L R L R L R œ rœ œ > rœ œ > œ rœ œ > rœ œ > œ rœ œ > L R L R L R L R L R R L R L R L R L R L L R L R L R œ œ rœ œ > rœ œ > œ œ rœ œ > rœ œ > œ œ rœ œ > L R R L L R L R L R L R R L L R R L R L R L R L L R R L R L R . . rœ > œ œ œ rœ œ > œ œ rœ œ > rœ œ > œ œ rœ œ > RL RL RL R LLR LR
IV. CONTROLLED REBOUND MOTION
(Multiple Heights or Controlled Decrescendo)
There are two types of “Controlled Rebound” motions: the Flam Tap Motion and the Duchudda Motion. The main difference in the two is that the Flam Tap is accent, high tap, and grace note while the Duchudda is accent, grace, and tap.
Use the following exercises to become more comfortable with Flam Taps. Stay relaxed after the Downstroked accents to play the flam taps.
Note the
flam taps in the first bar. Allow the Flam Taps to feel the same as the straight double strokes.
SWISS ARMY TRIPLETS
The Swiss Army Triplet is very similar to the mills learned earlier. The motion should feel the same and very flowing. When playing a Swiss Triplet, both hands are doing the exact same thing, just at different heights. Both hands are doing controlled rebounded doubles, one from tap to grace note height and the other at accent to medium tap.
BREAK DOWN / BUILD UP
Note the dynamics here. Also be aware that each hand is doing the same thing, just at different heights.
94 The Next Level
THE FLAM TAP BREAK DOWN / BUILD UP 4 4 rœ œ > œ rœ œ > œ L R L R L RR LR L R L rœ œ > œ L R L R L R 4 4 œ > œ œ œ > œ œ L R L R L R rœ œ > œ rœ œ > rœ œ > œ rœ œ > œ L RL R L RR LR L
4 4 rœ œ > œ œ œ rœ œ > œ rœ œ > L R R L L R R LR etc. RL 4 4 œ œ œ œ rœ œ œ rœ œ L R L R R L R L L R L R R L
non-accented
8 6 rœ œ > œ œ L RL R L R R L rœ œ > L RL R 8 12 œ > œ ‰ œ > œ ‰ œ > œ L R L R L R L R 8 12 f œ > œ ‰ œ > œ ‰ œ > œ L R
Relate the Swiss motion to that of Flam Taps. Allow everything to feel the same here (either Swiss or Flam Tap). You should stay very loose and relaxed for the whole exercise. Keep the grace note heights down.
Here we combine the Downstroked motion and the controlled rebound motions. Feel the difference between the controlled
The Flammed Mill is a combination of Flam Tap followed by two single notes. This forms what could be called a “diddlepara”. There are single, double and triple Mills just as there are for paradiddles. I will break down the Single and Double
Use the controlled rebound motion for the Flam Tap and stay relaxed to play the following taps. Keep the grace notes low
95 The Next Level
8 7 4 2 rœ œ > œ œ rœ œ > œ œ rœ œ > œ œ rœ œ > œ œ rœ œ > œ RRLRRLRRLRRLRR rœ œ > œ œ rœ œ > œ œ rœ œ > œ œ rœ œ > œ œ rœ œ > œ LLRLLRLLRLLRLL rœ œ > œ œ rœ œ > œ rœ œ > œ œ rœ œ > œ RRLRRLLRLL rœ œ > rœ œ > œ œ rœ œ > rœ œ > œ œ rœ œ > RLRRLRLLRL rœ œ > œ œ rœ œ > œ œ rœ œ > œ œ L R L R R L œ > œ œ rœ 9 œ > œ œ rœ œ > œ œ rœ œ > œ œ L R L R R L
. . rœ œ > œ œ œ rœ œ > œ œ œ rœ œ > œ œ œ rœ œ > œ œ œ . . . . . . œ œ œ œ rœ œ > œ œ œ œ œ rœ œ > œ œ œ œ œ rœ œ > œ œ rœ œ > œ rœ œ > œ œ rœ œ > œ L RL R L R L RR LR L L R œ rœ œ > œ œ œ rœ œ > œ œ œ rœ œ > œ œ œ rœ œ > œ œ œ L RL R L R R L L RR LR L R L L R R L
7/8 SINGLE AND DOUBLE MILLS
Apply the above to play single and double mills together.
Relating Mills to Swiss Army Triplets
SWISS WITH A KICK
Swiss with a kick is a common term for accenting the last note after the accent or playing both flams. This usually depends on how you want them to feel or what the musical passage calls for where the flams are written.
1 FLAM BREAK DOWN / BUILD UP
FLAM BREAK DOWN / BUILD UP
96 The Next Level 4 4 rœ œ > œ > œ œ rœ œ > œ > œ L R L R R L L R R L R L L R
8 7 rœ œ > œ œ œ rœ œ > œ œ œ rœ œ > œ œ œ œ œ L R L R R L L R R L R L rœ œ > œ œ œ rœ œ > œ œ œ rœ œ > œ œ œ œ œ rœ œ > œ œ œ œ œ rœ œ > œ RR LR LR LL 4 4 rœ œ > œ œ œ rœ œ > œ œ œ rœ œ > œ œ œ L R L R R L L R R L R L L R R LR etc. RL
8 6 rœ œ œ œ > L RL R L R R L œ L R 8 12 œ œ œ œ œ œ œ œ L R L R R L L R L R R L etc. etc.
8 6 rœ œ œ œ > L RL R L R R L rœ œ L RL R 8 12 œ œ ‰ œ œ ‰ œ œ L R L R L R L R rœ œ œ œ > rœ œ œ ‰ L RL R L R R LL RL R L RL
2
Use the flam accent check to maintain consistent interpretation.Apply the above breakdowns to the slow and fast Swiss Triplets.
This rudiment is the same as the Flam Tap, only with one more note per hand. Apply the same principals to the breakdown
97 The Next Level
8 12 rœ œ > œ œ rœ œ > œ œ rœ œ > œ œ rœ œ > œ œ RLRLRL rœ œ œ œ > œ œ œ rœ œ œ œ > œ œ œ RRLRRL rœ œ > œ œ rœ œ > œ œ rœ œ > œ œ rœ œ > œ œ RLRLRL œ œ rœ œ œ œ > rœ œ œ œ > rœ œ œ œ > rœ œ œ œ > RRLRRL œ œ > rœ 9 œ œ œ > rœ œ œ œ > rœ œ œ œ > RRL œ œ rœ œ > œ œ rœ œ > œ œ rœ œ > œ œ rœ œ > œ œ œ rœ œ > œ œ rœ œ œ œ rœ œ œ œ rœ œ œ œ > œ œ œ L R L R R L L R L R R L L R L R R L L R L R R L œ œ œ rœ 9 œ œ œ rœ œ œ œ > œ œ œ L R L R R L
3 œ œ rœ œ > 3 œ > œ œ rœ œ > 3 œ > œ œ rœ œ > rœ 6 œ > œ œ rœ œ > œ œ rœ 6 œ > œ œ rœ œ > œ œ rœ 6 œ > œ œ rœ œ > œ œ 3 œ > œ œ rœ œ > rœ 6 œ > œ œ rœ œ > œ œ rœ œ > rœ œ > RR RL RR RL LL RL œ > rœ 3 œ > œ œ rœ 3 œ > œ œ rœ œ > rœ 6 œ > œ œ rœ œ > œ œ . . . . rœ œ > œ œ rœ œ > œ œ rœ œ > œ œ rœ œ > œ œ L R L R L R L R R L R L R L R L L R L R L R L R R L R L R L R L
Flam taps and Flammed 3’s. Keep the same motion and pressure in the grip.
THE DUCHUDDA
For Duchudda’s and the like, the motion is similar to that of the Flam Tap but much more controlled. The note after the accent is a grace note so the stick must get down to that height much faster than in the Flam Tap Motion. BREAK
Keep the motion of the lead hand the same throughout the exercise. Allow the stick to rebound to grace height after the first accent and the rest of the notes are taps. Use the back fi
This exercise isolates each individual hand’s duchudda.
Downstroked and controlled rebound together, work on having the same pressure in the grip.
98 The Next Level 8 7 4 2 . . rœ œ > œ œ rœ œ > œ œ rœ œ > œ œ rœ œ > œ œ rœ œ > œ L R L R L R R L R L R LR etc. RRLLLRR rœ œ > œ œ rœ œ > œ œ rœ œ > œ œ rœ œ > œ œ rœ œ > œ LLLRRRLLLRRRLL rœ œ > œ œ rœ œ > œ œ rœ œ > œ RRRLLLRR rœ œ > œ œ rœ œ > œ œ rœ œ > œ LLLRRRLL
DOWN / BUILD UP 8 6 œ > rœ œ œ L RR LR L L R œ > R L 8 12 œ > œ œ ‰ j œ ‰ œ > œ œ ‰ j œ L R L R L R L R L R L R L R L R ‘ œ > rœ œ œ œ > rœ œ ‰ L RR LR L L R R LL RL R
8 12 œ > œ œ œ > œ œ œ > œ L R R L L R R L L R R L etc. etc. œ > œ œ œ > rœ œ œ œ > œ œ
8 12 rœ œ > œ œ rœ œ > œ œ rœ œ > L R R L L R R L L R R L etc. etc. rœ œ > œ œ rœ œ > œ œ œ > rœ œ œ 4 4 rœ œ > œ œ œ œ > rœ œ œ L R R L L R R L etc. etc.
DUCHUDDA SWISS
This rudiment is an Inverted Swiss Triplet (accent first followed by the diddle) with a Duchudda going into the diddle.


BREAK DOWN / BUILD UP
and allow the interpretation to match the check for the rest of the exercise. The fast Duchudda Swiss should feel like straight Swiss Triplets (fluid and relaxed).
ot to rush into the flams.
By now you should be able control the stick very well in the aspect of multiple heights. Make sure that you can do all the g the stick to “flop” to the head. Review the exercises and make sure your heights are correct, especially when going from Accent to Grace to Tap.
99 The Next Level
. . > > > > œ > rœ œ œ œ > rœ œ œ œ > rœ œ œ œ > rœ œ œ ‰ œ > rœ œ œ œ > rœ œ œ œ > rœ œ œ œ > rœ œ œ L RR LR L R L L RR LR L R L L RR LR L R L L RR LR L R L rœ œ œ > rœ œ œ œ > rœ œ œ œ > rœ œ œ œ > rœ œ œ œ > rœ œ œ œ > rœ œ œ 9 œ > rœ œ œ œ > rœ œ œ œ > rœ œ œ RLLRLLRLLRLLRLL
œ rœ œ > œ œ œ œ > rœ œ œ ‘
V. INVERTED MOTION
Now we get into the bulk of the Inverted Rudiments. These rudiments have to do with playing accents after taps. Do your best to make the unnatural motion of moving against gravity from low to high as natural as possible. Apply Moeller when needed.
INVERTED FLAM TAPS
Inverted Flam Taps are just that… Flam Taps with the exact opposite sticking and heights. The Flam Tap is 3 heights decrescendoed while Inverted Flam Taps are crescendoed from grace to tap to accent.
TIP: Try angling your sticks into the drum. Raise the wrists so that the angle of the sticks to the drum is about 30 degrees. This will help learn the correct motion and help to keep the grace notes and the taps down.
BREAK DOWN / BUILD UP
Use the Inverted motion in the first two counts to set you up fo motion to feel the same with and without flams.
Relax on the same hand flams and feel the difference in the motion when playing the Inverts. Stay relaxed the whole time and keep correct heights.
Keep correct heights and be sure the interpretation is correct for the 16 the difference in the motions used for the Flam Accent and the Inverted Flam Taps.
100 The Next Level
4 4 rœ œ > œ rœ œ > œ L RL R R LR LR L L R rœ œ > œ L RL R R L 4 4 œ > œ œ œ > œ œ L R L R L R L R L R L R rœ œ > rœ œ > œ rœ œ > rœ œ > œ rœ œ > L RL RR LR L L RL RL RR LR L L R
4 4 rœ œ > œ rœ œ > œ rœ œ > œ rœ œ > L R R L L R R LR etc. LR 8 7 rœ œ > œ rœ œ > œ rœ œ > œ L R R L R L L R L R R L
4 4 œ > œ œ > œ œ > œ œ > L R R L R L L RR etc. LL
INVERTED 3’s
The idea and the motion of this rudiment are very similar to Inverted Flam Taps. I like to think as a little easier because you have more time to get comfortable with the low taps before you have to play an accent.
BREAK DOWN / BUILD UP
The Flamacue might be considered an “old school” rudiment, but still has plenty of use today. The Flamacue works the
101 The Next Level
. . . . rœ œ œ > œ œ rœ œ > rœ œ œ > œ œ rœ œ > œ rœ œ > rœ œ œ > œ œ rœ œ > rœ œ œ > œ œ rœ œ > L RL R R L L R R LL RL R
. . . . rœ œ > œ œ rœ œ > œ œ rœ œ > œ œ rœ œ > œ œ rœ œ > œ œ . œ > rœ œ > œ œ . œ > rœ œ > œ œ . œ > R LR L L R L R L R œ œ rœ œ > œ rœ œ > œ œ rœ œ > œ rœ œ > œ œ rœ œ > œ L R L RL R L R R L œ œ rœ œ > œ œ rœ œ > œ œ > œ rœ œ > œ rœ œ > œ œ rœ œ > œ rœ œ > œ RRLLRRRLLR . . rœ > œ œ rœ œ > œ œ rœ œ > œ RLLLRRRL rœ œ > œ œ rœ œ > œ œ rœ œ > œ LRRRLLLR rœ œ > rœ œ > œ œ rœ œ > rœ œ > œ œ rœ œ > rœ œ > œ œ rœ œ > LRLRRLRLLRLRRL
CHUTUDDAS
Chutuddas are basically alternated flamacues.
This exercise focuses on each individual hands Chutuddas.
Use the Flam Accents to refer back to the Downstroked Motion and compare the difference with the Inverted Motion while playing the Chutuddas.
102 The Next Level
8 12 rœ œ > œ œ rœ œ > œ œ rœ œ > L R R L L R R L L R R L rœ œ > œ œ rœ œ > œ œ rœ œ œ > œ 4 4 rœ œ > œ œ œ rœ œ œ > œ L R R L L R R L L R R L L R 4 4 rœ œ œ > œ rœ œ œ > œ œ L R R L L R R L L R R L L R 4 4 rœ œ > œ œ œ rœ œ œ > œ œ rœ œ > rœ œ œ > œ œ rœ œ > L R R L L R R L etc. LRLR rœ œ > œ œ rœ œ > œ œ rœ œ œ > œ œ rœ œ > rœ œ > œ œ œ RLLRR rœ œ > rœ œ œ > œ œ rœ œ > rœ > r > RLRL r > r > r > r > r
BUILD UP
BREAK DOWN /
8 6 œ > œ rœ œ L R R LL RL R œ > R L 8 12 œ > œ œ œ > œ œ œ > œ L R R L L R R L L R R L etc. etc. œ > œ œ œ > œ rœ œ œ > œ œ 8 12 œ > ‰ œ ‰ œ œ œ > ‰ L R L R L R L R œ > ‰ rœ œ œ > œ rœ œ L R L R L R R L L R R L R L
FUBARS
This rudiment is basically alternating Hand-to-Hand Patti-Fla-Fla’s. The motion for Fubars is similar to the Inverted 3 just with another accent and an extra flam.
BREAK DOWN / BUILD UP
Use this exercise to feel the different motions between the Flam Accent and the Fubar. Also, focus on the individual hand
Lots of inverted motion for these exercises. Think of heights, heights, and more heights. Use Moeller whip as needed.
103 The Next Level
. . rœ œ > rœ œ > œ rœ œ > rœ œ > œ rœ œ > rœ œ > œ rœ œ > rœ œ > œ rœ œ > rœ œ > œ rœ œ > rœ œ > œ rœ œ > rœ œ > œ rœ œ > rœ œ > œ RRLLLRRRLLLR œ œ rœ œ > œ œ rœ œ > œ œ rœ œ > œ œ rœ œ > œ œ rœ œ > rœ œ > œ rœ œ > rœ œ > œ rœ œ > rœ œ > œ rœ œ > rœ œ > œ RRLLLRRRLLLR rœ > œ LR rœ œ > œ œ rœ œ > œ œ rœ œ > œ œ rœ œ > œ œ rœ œ > rœ œ > œ rœ œ > rœ œ > œ rœ œ > œ rœ œ > rœ œ > œ rœ œ > RRLLLRRLLLRR rœ œ > rœ œ > œ œ rœ œ > rœ œ > œ rœ œ > rœ œ > œ rœ œ > œ RRLRLLRRRLLR œ > œ rœ œ > rœ œ > œ rœ œ > rœ œ > œ rœ œ > œ rœ œ > œ LLRRRLLLRRLLR
> œ rœ œ > œ rœ œ > œ rœ œ > rœ œ > œ rœ œ > œ RRLLRRRLLR
SUSIE
This is an old Blue Devils exercise. The important thing here is to keep the taps full. With only a few non-flammed notes, be sure to keep the taps low and not alter the rhythms.
SAME
The base for this rudiment is “swung” Bucks, similar motion, bu
This is another old Tom Float Blue Devil exercise. Use the four flams in a row to relax and realize what muscles and motions are being used to alternate between the inverted motion
104 The Next Level
4 4 rœ œ > œ rœ œ > œ rœ œ > rœ œ > œ L R R L R L L RRR etc. LLLR rœ œ > œ rœ œ > œ rœ œ > rœ œ > œ rœ œ > LRRLLLRRR
HAND FLAM ACCENTS
BREAK DOWN / BUILD UP 8 6 rœ œ > œ œ L RL R R L L R rœ œ > L RL R 8 12 œ > ‰ œ œ > ‰ œ œ > ‰ œ L R L R L R L R 8 12 rœ œ > œ œ rœ œ > œ œ rœ œ > œ L R R L L R L R R L L RR etc. LR rœ œ > œ œ rœ œ > œ œ rœ œ > œ œ LRLRLRLRLLR rœ œ > œ œ rœ œ > œ œ RLRRLRLR
SLOW PARADIDDLE
8 12 rœ œ > œ œ rœ œ > œ œ rœ œ > œ œ rœ œ > œ L R R L L R R L L R R LR etc. LRRL 8 12 rœ œ > œ œ rœ œ > œ œ rœ œ > œ œ rœ œ > œ L R R L L R R L L R R LR etc. LRRL 7/8 INVERT FUBARS 1 and 2 8 7 rœ œ > œ rœ œ > œ rœ œ > rœ œ > œ rœ œ > œ rœ œ > œ rœ œ > rœ œ > œ L R R L R L L R L R L R R LL etc. RRLLLR rœ œ > rœ œ > œ rœ œ > œ rœ œ > œ rœ œ > rœ œ > œ rœ œ > œ rœ œ > œ RRLLRRLLLRRLLR
INVERTED FLAM PARADIDDLE-DIDDLES
This is one of the most difficult rudiments to play in my mind. Alternating the paradiddle-diddle combines inverted motion with staying relaxed to play diddles.
BREAK DOWN / BUILD UP
Use this exercise to get comfortable with the stickings and “ease” into the inverted motion. Pay special attention to the
Use the same hand Flam Paradiddles to warm up for the motion of the inverted paradiddle-diddles, as the number of notes
Chuchudda is basically alternated Patti Fla Fla’s. Be sure to keep the tap full and at level 3.
105 The Next Level
. . . . rœ œ > œ œ œ œ œ rœ œ > œ œ œ œ œ . . œ œ rœ œ > œ œ œ œ œ œ œ rœ œ > œ œ œ œ œ R L R L R L L R R L R L L R L R ‘ œ œ œ rœ œ > rœ œ > œ œ œ œ œ rœ œ > RRLLLLRLLRRR œ œ rœ œ > œ œ œ œ œ rœ œ > rœ œ > RRRLRRLLRL œ rœ œ > œ œ œ œ œ rœ œ > œ rœ œ > œ LLRRRLRRLLLRRL
. . œ rœ œ > œ œ œ œ œ rœ œ > œ rœ œ > œ rœ œ > œ R L R L L R R L R L L R L R L R R L R L L R L R R L
. . œ rœ œ rœ œ > œ rœ œ rœ œ > œ rœ œ rœ œ > œ rœ œ
Keep the feel of flam accents the whole time. Use a little whip accented flam.
INVERTED MOTION REVIEW
Inverted motion deals with going from a low height to accent height. Stay relaxed and do your best to make an unnatural motion, natural. Use Moeller and apply the “whip” to keep the motion smooth.
VI. GRID THREE
Here we are going to combine the grid with flams and accents. I and Grid II to combine flams, diddles and accents. Have fun!.
106 The Next Level 8 12 œ > ‰ œ œ œ œ œ > ‰ œ œ œ œ L R L R L R L R L R ‘ rœ œ > ‰ œ œ œ œ rœ œ > ‰ œ œ œ œ RL L R L R L R L R L R ‘ rœ œ > ‰ œ rœ œ > œ œ rœ œ > ‰ r > L RL R L RR LR L L R L R r > r r > r > r r > rœ œ > ‰ rœ œ rœ œ > œ rœ œ rœ œ > ‰ L RL RL RL RR LR L L RR LR L
8 7 rœ œ > œ rœ œ rœ œ > œ œ L R R L L R R L L R R L 8 12 rœ œ > œ œ rœ œ > œ œ rœ œ > L R R L L R R L L R R L etc. etc. rœ œ > œ œ rœ œ > œ rœ œ rœ œ > œ œ
8 12 rœ œ > œ œ rœ œ > œ œ rœ œ > L R R L L R R L L R R L 8 6 . . rœ œ > œ œ rœ œ > œ œ rœ œ 4 4 . . rœ œ > œ > œ œ rœ œ > œ > L R R L L R R L etc. etc. . . rœ œ > œ > œ œ rœ œ œ > œ >
8 12 rœ œ > œ œ rœ œ > œ œ rœ œ > L R R L L R R L L R R L 8 6 . rœ œ > œ œ rœ œ > œ œ rœ œ
VII. COMBINATION MOTIONS
The rudiments in this section are all combinations of the motions that have been discussed prior. As a result, I am not going to waste your time with suggestions on every exercise. The only thing that I will say (and maybe more than just here) is: HEIGHT CONTROL. Be sure when learning these rudiments, or re-learning or breaking down for the first time that you are very specific about the heights you are playing. If you focus the first time, you will not have to do it again.
Use a variety of motions for all of these. Some are easier with Moeller and some are easier with Velocity. Experiment
107 The Next Level
. . œ œ rœ œ > rœ œ > œ œ rœ œ > rœ œ > œ œ rœ œ > rœ œ > œ œ rœ œ > œ œ rœ œ > œ œ rœ œ > œ œ L R L R œ œ rœ œ > rœ œ > œ œ rœ œ > rœ œ > œ œ rœ œ > R L L RR LR L . . rœ œ > œ œ rœ œ > rœ œ > œ œ rœ œ > rœ œ > œ œ œ L R R L L R L R rœ œ > œ œ rœ œ > rœ œ > œ œ rœ œ > rœ œ > œ œ . . rœ œ > œ rœ œ > rœ œ > œ rœ œ > rœ œ > œ rœ œ > rœ œ > œ rœ œ > ‘ rœ œ > ‰ rœ œ > œ œ œ rœ œ > ‰ rœ œ > œ œ œ L R L RL R L R L R L R L R ‘ ‘ rœ œ > œ rœ œ > rœ œ > œ rœ œ > rœ œ > œ rœ œ > rœ œ > œ rœ œ > L R L R R LL R L RR LR L L RR LR L ‘
ALTERNATING SWISS TRIPLETS (controlled rebound and inverted)
ALTERNATING DUCHUDDA SWISS TRIPLETS (controlled rebound and inverted)
108 The Next Level 8 7 rœ œ > œ œ œ rœ œ > œ rœ œ > rœ œ > œ L R R L L R R L etc. etc.
8 6 rœ œ > œ œ L R L R L R R L rœ œ > œ R LR L 8 12 œ > œ ‰ œ ‰ œ œ > œ ‰ œ ‰ L R L R L R L R rœ œ > œ ‰ rœ œ > œ œ rœ œ > L RL R L RR LR L R L L R 8 12 rœ œ > œ œ rœ œ > œ L R R L L RL etc. RL rœ œ > œ œ rœ œ > œ œ œ RLRLRL
8 6 œ > rœ œ œ L RR LR L R L œ > rœ R LL L 8 12 œ > œ ‰‰ œ œ œ > œ ‰‰ L R L R L R L R œ > rœ œ ‰ œ > rœ œ œ œ > rœ œ L RR LR L R LL RL R L R 8 12 rœ œ > œ œ rœ œ > œ œ rœ œ > œ œ rœ œ > œ œ L R R L L RL etc. RL etc. rœ œ > œ rœ œ > rœ œ > œ œ rœ œ > œ rœ œ > rœ œ > œ œ rœ œ > œ œ rœ œ > œ œ rœ œ > œ œ rœ œ > œ œ rœ œ > œ œ rœ œ > œ rœ œ > rœ œ > œ œ r > r > r > r > r > r > r > r > r > r > r > r > r > r >
109 The Next Level 8 12 rœ œ > œ œ rœ œ > œ œ rœ œ > œ œ rœ œ > œ œ L R R L L R R L L R R L etc. œ > rœ œ œ œ > rœ œ œ œ > rœ œ œ œ > rœ œ œ RLLLRRRLLLRR œ > œ œ rœ œ > œ œ rœ œ > œ œ rœ œ > œ œ R 4 > 4 > 4 > 4 > > > > > 9 > rœ œ œ œ > rœ œ œ œ > rœ œ œ 9 œ > rœ œ œ œ > rœ œ œ œ > rœ œ œ LLLRRRLLLRRRLLLRR . . rœ œ œ > rœ œ œ > rœ œ œ > rœ œ œ > rœ œ œ > rœ œ œ > rœ œ œ > rœ œ œ œ œ > rœ œ œ œ > rœ œ œ R L L R œ œ > rœ œ œ > rœ œ œ > rœ œ œ > rœ œ œ rœ œ R L R LL RL R . . œ œ > rœ œ œ > rœ œ œ > rœ œ œ > rœ œ œ > rœ œ œ > rœ œ œ > rœ œ œ > œ œ > rœ œ œ œ > rœ œ œ œ > L R L R œ > rœ œ œ > rœ œ œ > rœ œ œ > rœ œ œ > rœ œ œ > R LR LR L L R œ > rœ œ œ > rœ œ œ > rœ œ œ > rœ œ œ > œ œ > œ œ > > rœ œ œ > rœ œ œ > rœ œ œ œ > rœ œ œ > rœ œ RRL LR LR LLR œ œ > rœ œ œ > rœ œ œ > œ rœ œ œ > rœ œ œ > RL RR LLR LR LL R
VIII. THE NEXT LEVEL
The following exercises include a little bit of everything, a cornucopia of rudimental and grace note goodness.
THE ORIGINAL CHUGGA-DA
This exercise was made famous by Tom Float and the Blue Devils of the 1980's and eary 1990's.
Play any rudiment you know in place of the 8 Flam Paradiddles, Mills, etc. Experiment with the check as well; Flam accents, Swiss,
110 The Next Level
8 5 rœ œ > œ œ rœ œ > œ œ rœ œ > rœ œ > RLRLRLetc. rœ œ >
8 12 rœ œ > œ œ rœ œ > œ œ rœ œ > œ œ rœ œ > L RL etc. RLRL œ > œ œ rœ œ > œ œ rœ œ > œ œ rœ œ > œ œ rœ œ > RL 4 4 rœ 6 œ > œ œ œ œ œ rœ 6 œ > œ œ œ L RR etc. RLLRLLLRR rœ 4:3 œ > œ œ œ rœ 4:3 œ > œ œ œ rœ 3 œ > œ RRRLRRRLRR 8 7 rœ œ > œ œ œ rœ œ > œ L R R L L R L R R L L R rœ œ > œ œ œ œ œ rœ œ > RLRRLLL 8 7 rœ œ > œ rœ œ > œ rœ œ > œ œ L RL etc. LRRL 8 7 rœ œ > œ rœ œ > œ œ > rœ œ L RL etc. LRRL
Fred Sanford wrote the original “Flamables” many years ago. The following exercises are in the same vain that Fred wrote ments and control.
111 The Next Level œ > œ rœ œ œ rœ œ œ > œ rœ œ œ > œ rœ œ œ LLRLRRLRLRLRLL . . rœ œ œ > œ rœ œ œ > œ rœ œ œ rœ œ œ rœ œ œ RLRLRLRRLLRR
. . œ > œ œ rœ œ > œ œ rœ œ œ rœ œ œ rœ œ œ L R L R R L R L L R L R . . 3 œ rœ œ > œ œ rœ 3 œ > œ œ rœ œ > œ rœ œ > œ rœ œ > œ LLRLRLRRLRLLRRL œ rœ œ > œ rœ œ œ rœ œ > œ rœ œ > œ rœ œ > œ rœ œ > œ LLRLRRLRRLLRRL . . œ > œ rœ œ œ rœ œ > rœ œ > rœ œ > rœ œ > rœ œ > rœ œ > rœ œ > RRLRLLRLRLRLL > rœ œ œ > rœ œ œ > rœ œ œ œ > rœ œ œ > rœ œ RRLLRLRLLR 8 7 rœ œ œ > rœ œ œ > rœ œ œ > œ rœ œ œ > rœ œ œ > rœ œ œ > œ L R R L R L L R L R R L L RL etc. RR LLR L rœ œ œ > œ rœ œ œ > rœ œ œ > rœ œ œ > œ rœ œ œ > rœ œ œ > RL RL RRL LR LR LLR . . rœ œ > œ rœ œ > œ œ rœ œ > œ œ œ rœ œ > œ rœ œ >
112 The Next Level 4 4 . . rœ œ > œ rœ œ œ rœ œ > œ rœ œ œ rœ œ > œ rœ œ rœ œ > œ rœ œ rœ œ > œ RLRRLRLLRLRLRLRL rœ œ > œ rœ œ œ rœ œ > œ rœ œ œ rœ œ > œ rœ œ rœ œ > œ rœ œ rœ œ > œ LRLLRLRRLRLRLRLR 4 4 œ > œ rœ œ œ œ > œ rœ œ œ L R R L L R L R R L L R R L 4 4 rœ œ > œ œ œ rœ œ > rœ œ > rœ œ > L R R L L R R L L R L R L R 4 4 rœ œ > œ œ œ rœ œ > œ œ œ œ RLRRLRLL 4 4 rœ œ > œ œ rœ œ > rœ œ > œ rœ œ > L R R L L R R L L R R L R L 4 4 rœ œ > œ œ œ rœ 5 œ > œ œ œ RLRRLRLL 4 4 rœ œ > œ œ œ rœ œ > œ œ L R R L L R L R L R R L L R 4 4 rœ œ > œ rœ œ > rœ œ > rœ œ > œ rœ œ > RLRRRLRR 4 4 rœ œ > œ rœ œ > œ rœ œ > œ rœ œ > RLLRRLLR
HYBRIDS
This section of the book should be thought of as an appendix which can be used with any of the chapters where the “root rudiment” is used (the rudiment without any flams or diddles). What is laid out here is all of the hybrid combinations my publisher would let me have in the book. There is really no end to the number of hybrids you can come up with, so this could have been another 100 pages or so! Hopefully, the variations I have listed here will spark your imagination and you
Have fun with all of these and plug all of the variations back into the exercises in any of the chapters for basically an entire Place accents in every part of the rudiment, one by one or many at a time
Once you have been through all of the combinations listed here, you will have truly reached The Next Level!
The herta (pronounced hair-tu) is a diddle that is played with single sticking. The rudiment is primarily found in either ) or Triplet form. Hertas can be played either alternating or “same hand”.
Duple version, you are just playing doubles and “filling in” Pudda-da, or variation and “filling in” for the herta.
113 The Next Level
œ œ œ œ œ œ œ œ œ œ œ œ L R R L L R R L L R R L L R R L L R R L L R R L Same Hand Hertas œ œ œ œ œ œ œ œ L R R L L R R L L R R L L R R L œ œ œ œ œ œ œ œ L R R L L R R L L R R L L R R L
œ L œ œ œ œ œ œ œ œ œ œ œ œ RL RL RL RL RL RL œ RL œ œ œ œ œ œ RL RR LR œ œ œ œ œ œ œ œ RL RL RL RL
Here are more variations to the Herta:
FLAM HYBRIDS
You will see many “gridded” approac the flam chapter and plug the hybrids into the "root" rudiments
DOWNSTROKED HYBRIDS
FLAM ACCENT
FLAM DRAGS TRIPLE STROKED
FLAM PARADIDDLE
Don’t forget to apply the Accent Grid to the below variations.
HAND TO HAND PATTIES
114 The Next Level
8 6 4 2 œ œ œ œ œ œ œ œ RL RR LR LL œ œ Z œ œ œ œ Z œ œ RL RR LR LL œ œ œ œ œ œ œ œ œ œ RL RR RLR LLL œ œ Z œ œ œ œ œ Z œ œ œ RL RR RLR LLL 8 6 œ œ Z œ œ œ œ Z L R R L L R R L L R R L 8 6 œ > œ œ œ œ > œ œ œ L R R L L R R L L R R L L R R L
rœ œ > œ œ rœ œ > œ œ RL RL RL Flam Accent j œ œ > 3 œ œ œ œ j œ œ > œ L R R L R L R L L R R L L R
rœ œ > œ œ œ rœ œ > œ œ œ RL RR LR LL œ > rœ œ ! œ œ œ > rœ œ ! œ œ RL RRL RL L rœ œ > ! œ œ œ rœ œ > ! œ œ œ RL RR LR LL
rœ œ > œ œ rœ œ > rœ œ > œ œ rœ œ > RL R LLR LR
CONTROLLED REBOUND HYBRIDS
115 The Next Level
DUCHUDDA > r > r > r ! > r ! œ > rœ œ ! œ ! œ > rœ œ ! œ ! L R R L L R R L L R R L Duchudda Du-Cheese Du-Fives œ > œ œ rœ œ LLR L rœ œ > rœ œ > œ œ rœ œ > rœ œ > œ œ RRL R LLR L œ > œ ! œ œ LLR L rœ œ > œ ! œ ! œ rœ œ > œ ! œ ! œ RRL R LLR L œ R L rœ œ œ ! > œ rœ œ œ ! > œ L R L R R L L R L R R L rœ œ œ ! œ > rœ œ œ ! œ > L R L R R L L R L R R L œ > œ œ œ œ L R L R L R L R R L rœ œ @ > j œ rœ œ @ > j œ L R R L L R R L œ ! R L œ rœ œ > œ ! œ rœ œ > œ ! L R R L R L L R R L R L œ rœ œ œ > ! œ rœ œ œ > ! L R R L R L L R R L R L œ L rœ œ > œ œ ! œ œ œ rœ œ > œ œ ! œ œ œ RR LR LR LL RL RL œ L rœ œ > œ ! œ ! œ œ œ rœ œ > œ ! œ ! œ œ œ RR LR LR LL RL RL œ L rœ œ > œ ! œ ! œ ! œ ! œ rœ œ > œ ! œ ! œ ! œ ! œ RR LR LR LL RL RL
INVERTED HYBRIDS
Don’t forget the accent grid can be applied to all of the rudiment combinations listed here!
INVERTED FLAM TAPS
INVERTED FLAM PARADIDDLE DIDDLE
116 The Next Level FLAMACUE rœ œ œ > œ œ rœ œ > L R R L L R R L L R rœ œ ! œ > œ œ L R R L L R R L CHUTUDDAS rœ œ œ > œ rœ œ œ > œ L R R L L R R L L R R L INVERTED 3’s rœ œ > œ œ rœ œ > œ L R R L R L R L L R Inverted 3’s FUBARS rœ œ > œ rœ œ > rœ œ > œ rœ œ > L R R L R L R L L R L R Fubars
rœ œ > œ œ rœ œ > œ œ L R R L L R L R R L L R
SAME HAND FLAM ACCENTS
rœ œ > œ œ œ œ œ rœ œ > œ œ œ œ œ RL RR LL LR LL RR rœ œ > œ œ œ ! œ œ rœ œ > œ œ œ ! œ œ RL RR LL LR LL RR
rœ œ > œ rœ œ > œ rœ œ > œ rœ œ > œ L R R L R L L R L R R L R L L R > > > > > > > > > > > >
Cheese Macs
Invert
117 The Next Level CHUCHUDDA 1 ACCENT rœ œ > œ rœ œ rœ œ > œ rœ œ L R R L L R R L L R R L rœ œ > ! œ rœ œ rœ œ > ! œ rœ œ L R R L L R R L L R R L Chuchuddas Cheese Chuchuddas œ > œ ! œ j œ œ > L R R L L R R L j œ œ > ! œ ! œ j œ œ > j œ œ > ! œ ! œ j œ œ > L R R L L R R L L R R L L R R L œ > j œ œ > ! œ ! j œ œ > L R R L L R R L j œ ! œ > j œ œ ! œ > j œ œ ! œ > j œ œ ! R L R L L R L R R L R L L R ! œ > j œ œ ! œ > j œ œ ! œ > j œ œ ! œ > R L R L L R L R R L R L L R L ‘ rœ œ > ! œ œ rœ œ > ! œ œ rœ œ > ! œ œ ! œ œ RL RL RL L ‘ rœ œ > œ RRL rœ œ > ! œ rœ œ rœ œ > ! œ rœ œ rœ œ > ! œ rœ œ > ! œ rœ œ > ! œ LR LR LR LR RL LR œ > œ > œ > œ > œ > œ > œ > œ > œ > œ > œ > œ > œ > œ > œ > œ > œ > œ > œ > œ > œ > œ > œ > œ > RL RL RL etc. j œ œ > œ ! œ j œ œ > œ ! œ L R L R R L L R L R R L
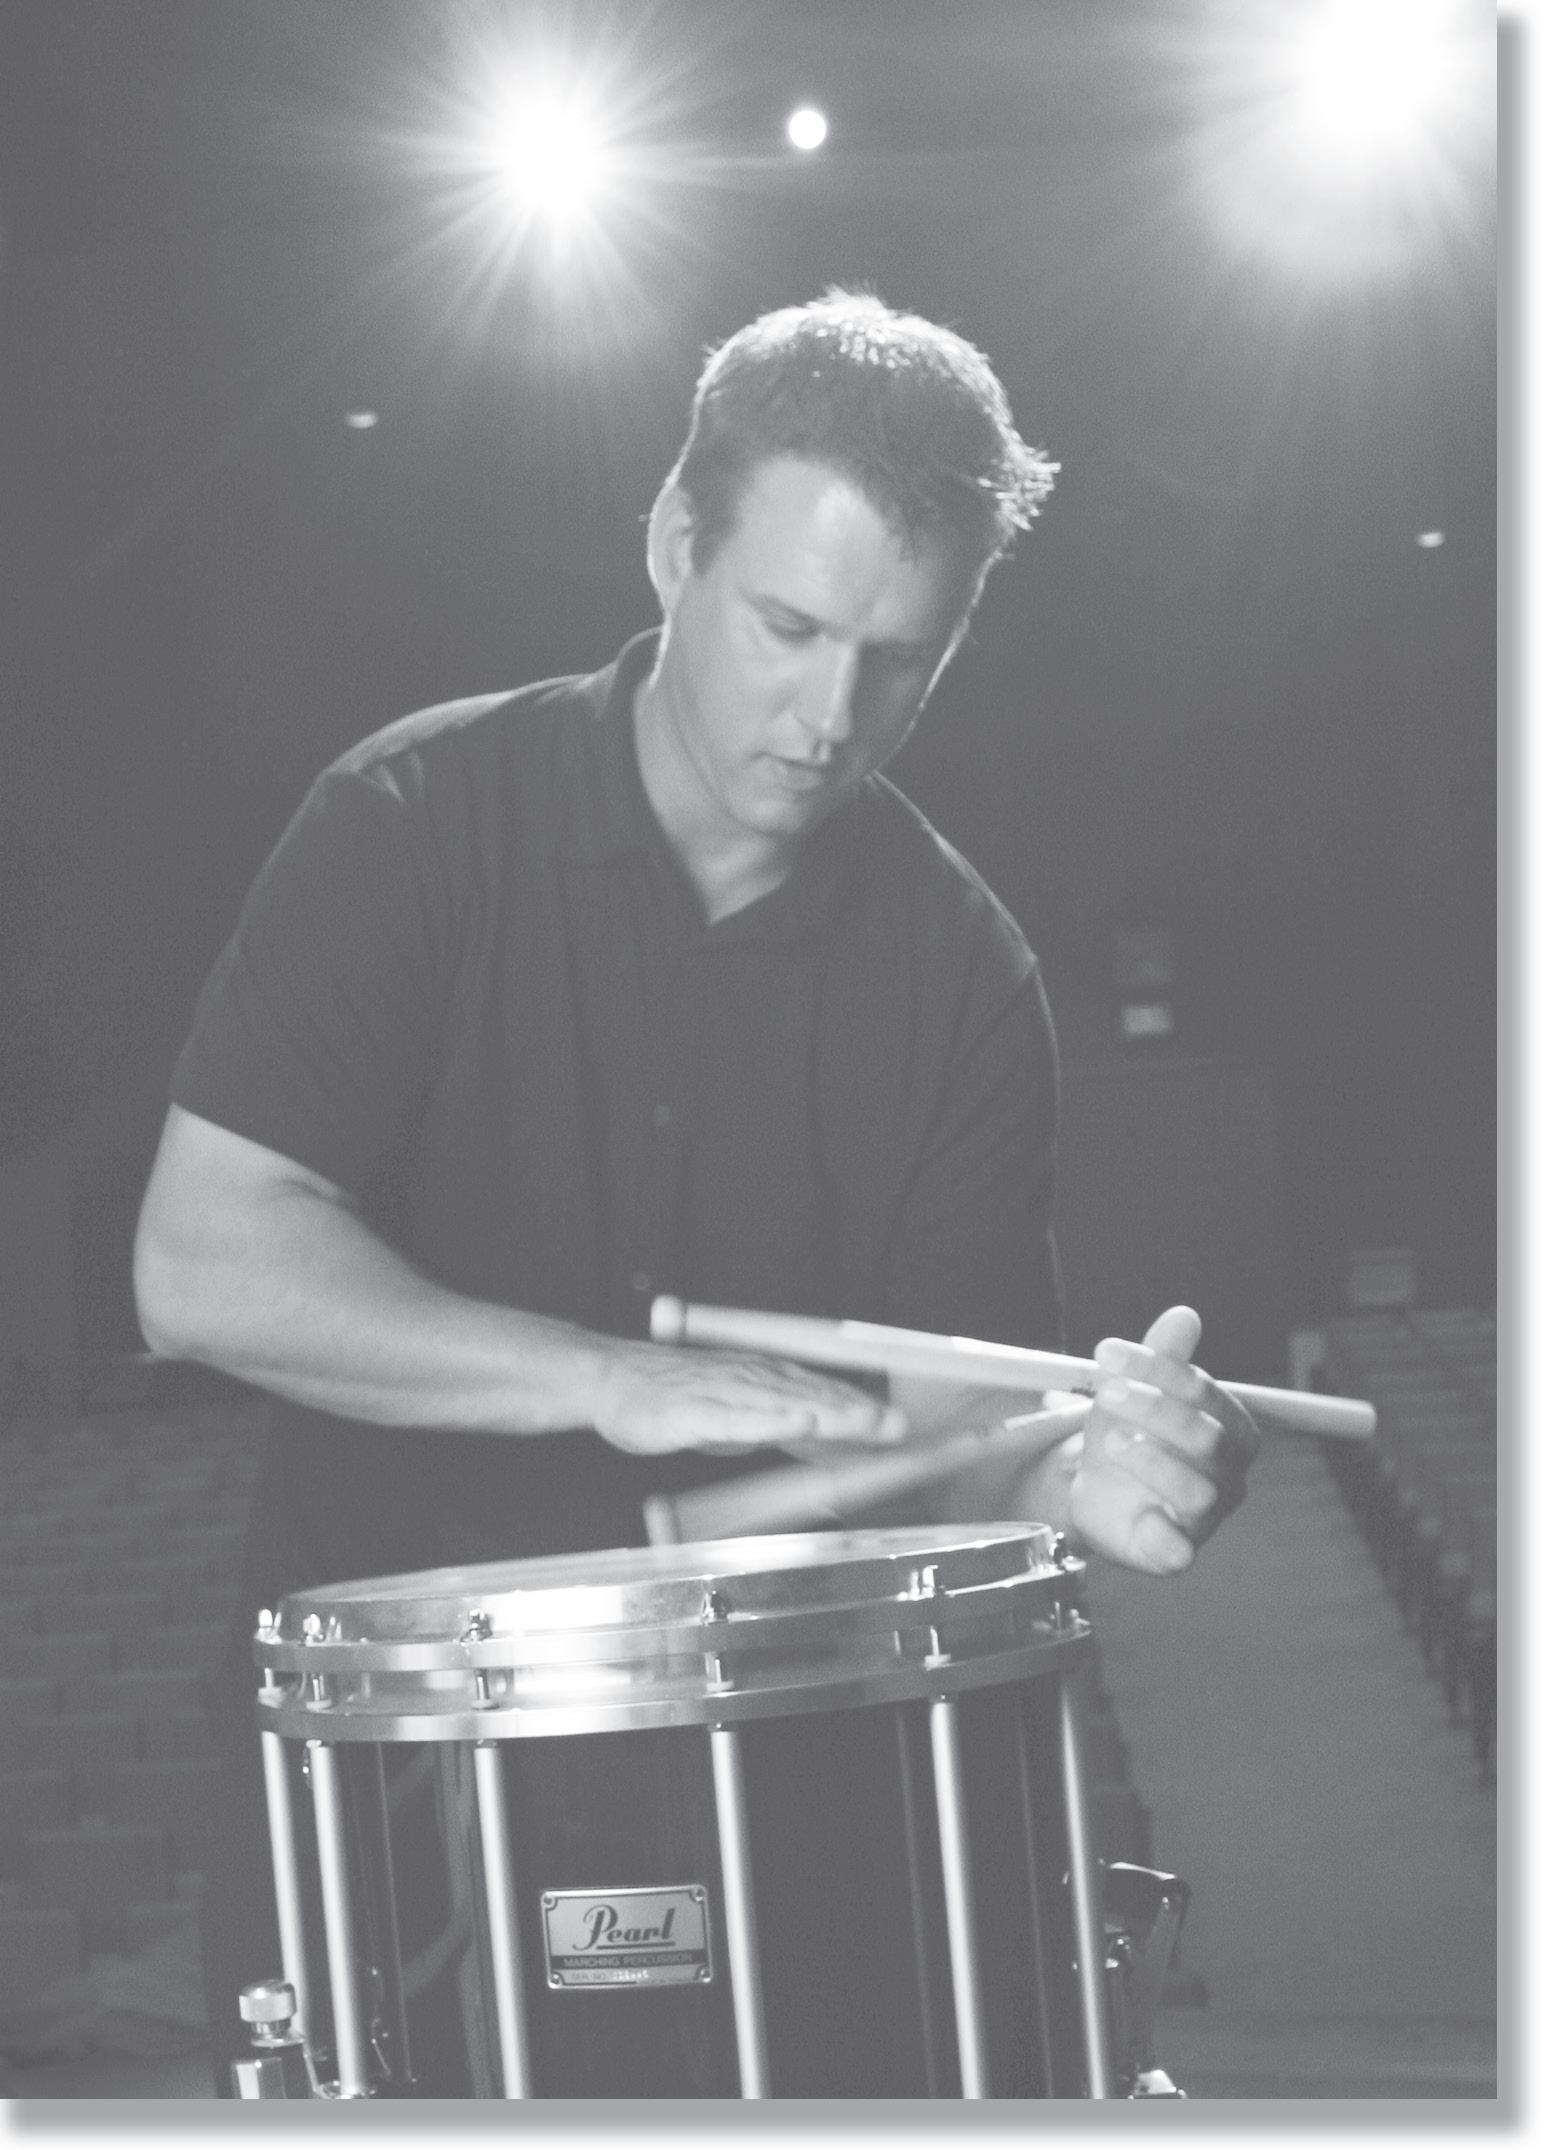
118 The Next Level
BACKSTICKING AND TRICKS
This chapter is truly “next level” as the techniques discussed are mainly for show, but can teach you a lot in terms of finesse and control of the sticks. I will cover:
I used to not teach my students’ backsticking or tricks because I did not want them to get lost in learning the “flash” of drumming. As I taught more, I realized the benefit of learning backsticking and certain tricks: how to relax, how to play
The topics covered are the basis for many other tricks. Once you have these down, experiment and come up with your own ideas!
This method of playing the drum is called “backsticking” because we play with the back (or butt) of the stick. When le and remember to keep your motions very efficient. The less you have to move to get the stick around, the better you will sound and the faster you can go.
Raise the wrist slightly and kick the stick out with the heel of your palm, holding the stick with just your fulcrum.
Reverse the process to return your stick to your regular grip.
Strike the drum with the butt of the stick and a fluid motion (the bead should be pointing toward you at about a 45 degree angle).
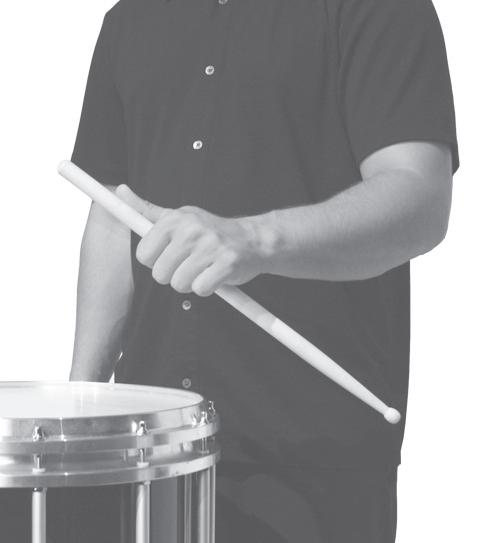
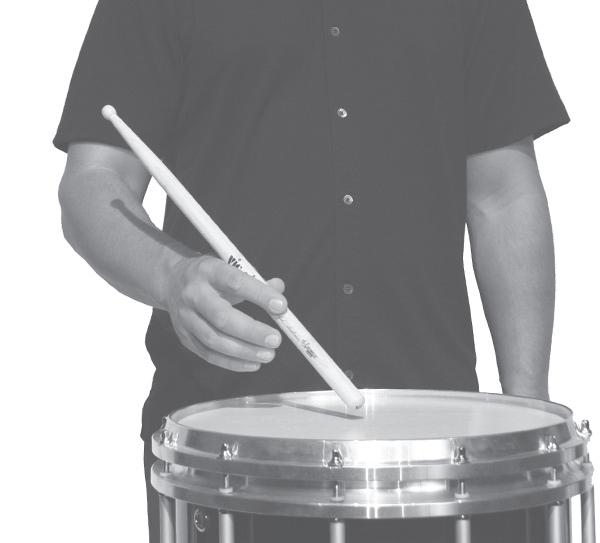
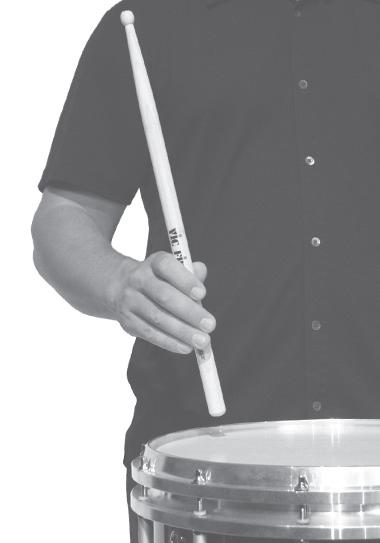
Raise the wrist just enough for the stick to clear the rim and turn your thumb towards the drum. While doing so, let your bottom fingers
Strike the drum as you would if playing matched grip. Reverse the process to return your stick to your regular traditional grip.
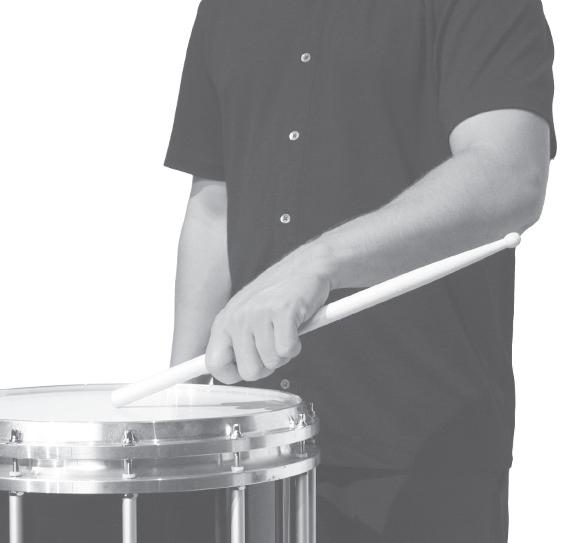
119 The Next Level
More detail of the left hand fingers and how they aid in getting the stick over to the backstick:
FOR BOTH HANDS, KEEP THE MOTION OF THE ELBOW TO A MINIMUM. THE LESS MOTION OF THE ARM AND ELBOW, THE MORE FLUID YOU WILL LOOK AND SOUND.
8 on a HAND BACKSTICK
For this exercise, work to have the regular note and backsticked note sound as similar as possible. With the right hand, use the rebound from the note prior to help get the backstickin traditional grip until the last note (just keep the stick pivoting in your fulcrum), this will help you with your speed.
Focus on having the same fluidity to the backsticked measures as
HAMBONE
To create rhythms while backsticking that are more interesting, try putting doubles between each backstick. Play very relaxed and open diddles at Level 6 or below. Strive to have the backstick note match the sound of the double strokes.
Remember to keep your motions as efficient as possible. The les you will sound and the faster you can go. Try to think of backsticking as just “a flick of the wrist”.
Below I have notated other ways / rudiments which you can backstick.
EXPERIMENT WITH ALL THE RUDIMENTS AND PATTERNS YOU KNOW AND BACKSTICK EVERYTHING THAT YOU CAN – THE POSSIBILITIES ARE ENDLESS!
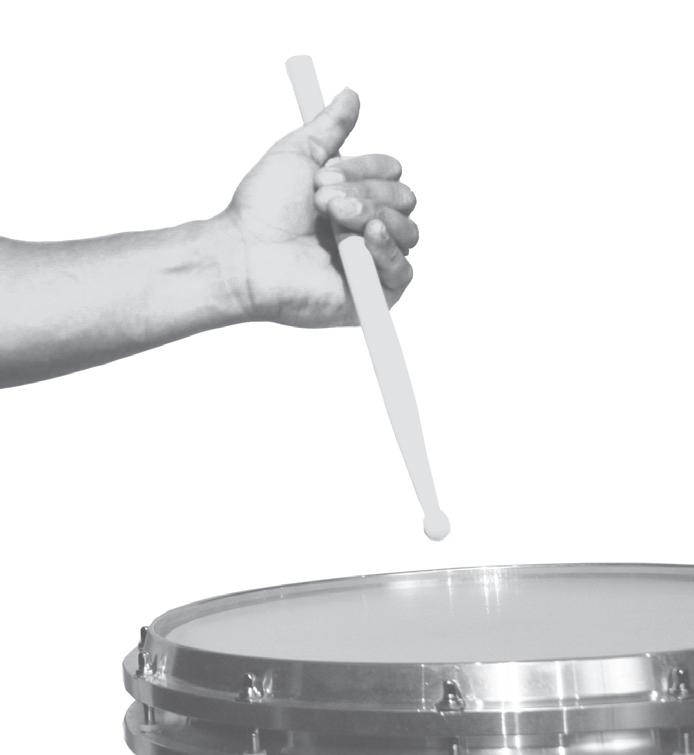
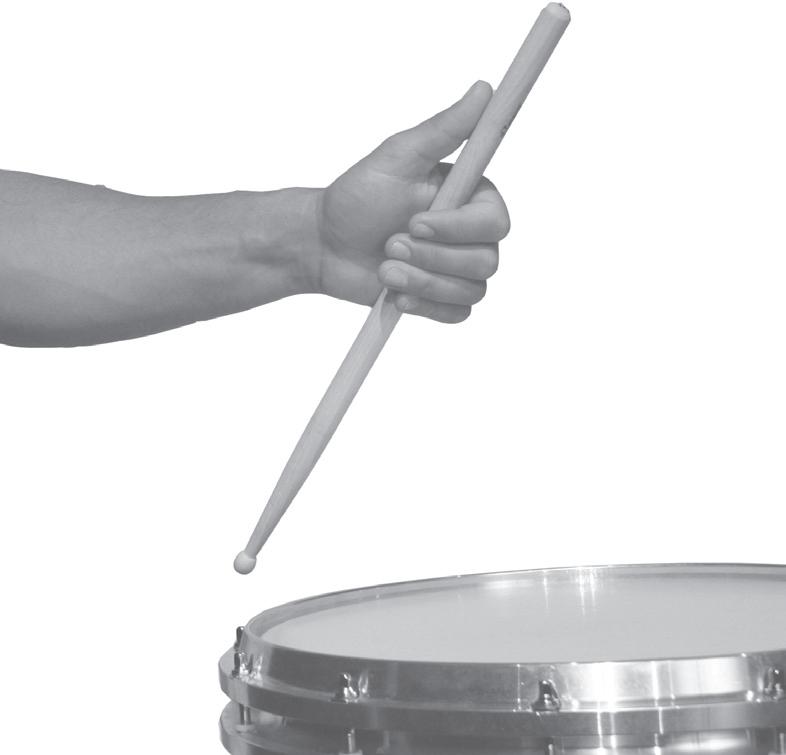
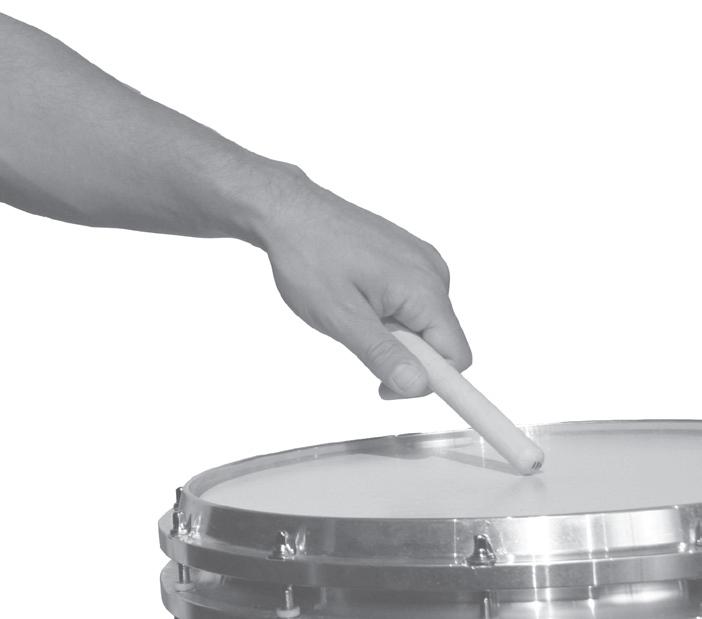
120 The Next Level
8 12 œ œ œ ! œ œ œ œ œ ! œ RL LR LL RL LR LL ! œ œ œ ! œ œ œ RL RR LR LL œ RL œ ! œ œ ! œ œ ! œ œ RL RL RL RL RL Paradiddles Hertas 4 4 œ œ œ œ œ œ œ œ R
II. SINGLE NOTE STICK DRIBBLE (Walk the Dog)
This trick is a way of playing single notes while playing stick on stick. I find it easiest to play the right stick on the left (if playing traditional grip).
Keep the fulcrum very loose and start to play the same tempo with the right hand on the left stick, about 2” to 3” from the bead of the stick.
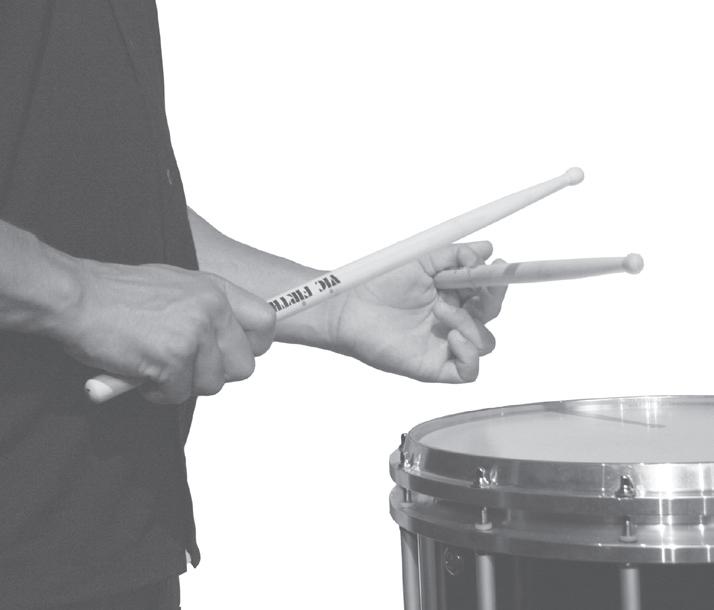
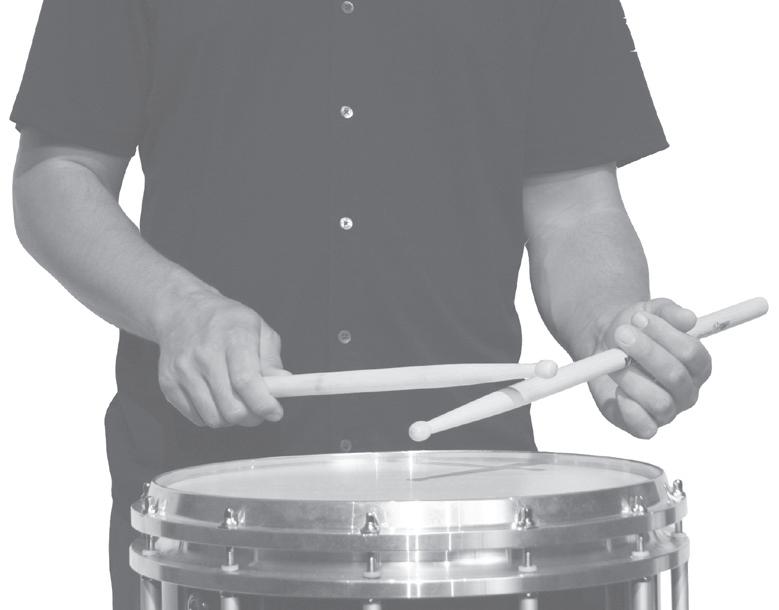
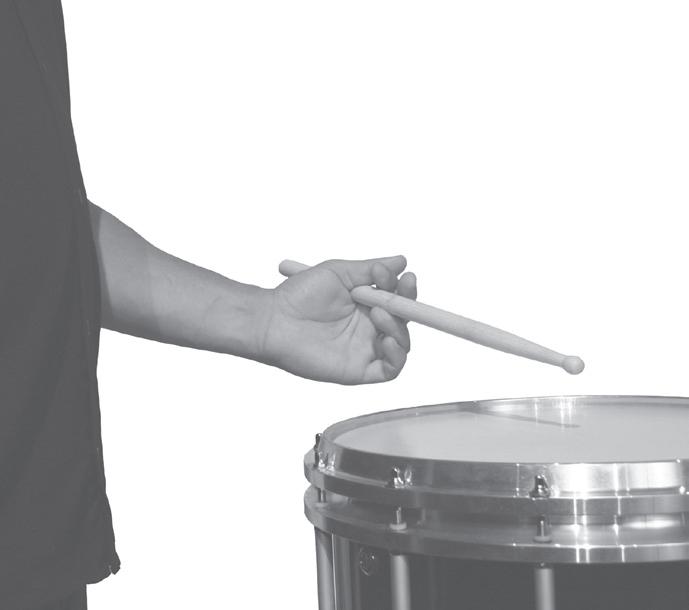
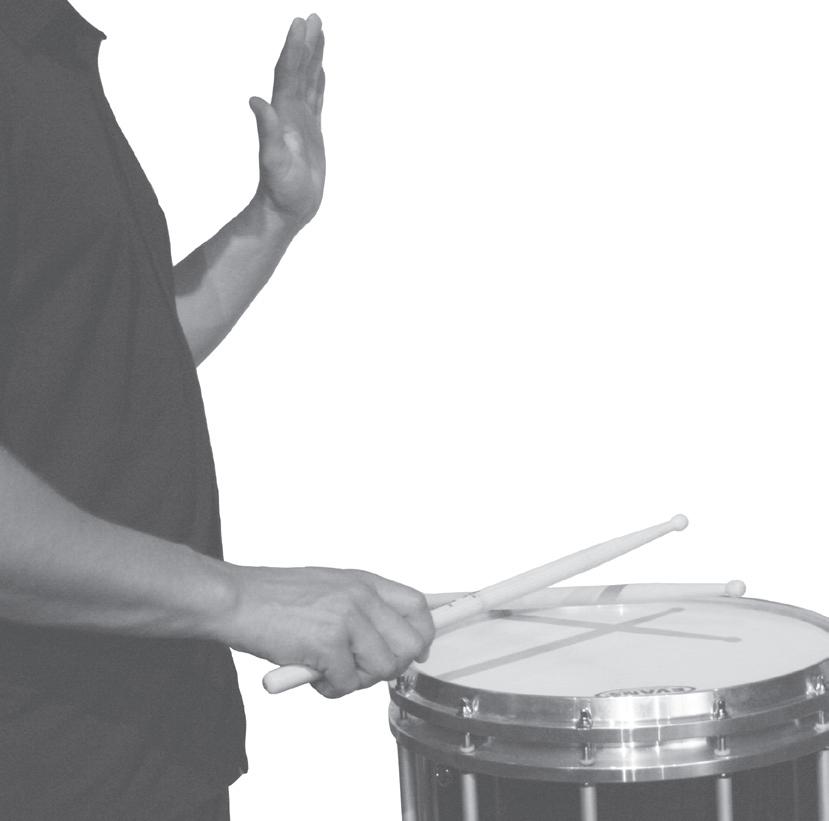
IMPORTANT:
Do not try to play the notes with the left hand, let the right hand do all the work.
Once you have the notes being played by the right hand, experiment with where the stick bounces best for you. Realize you are just creating a balance point (fulcrum) in the hand that is holding the stick. This fulcrum can be anywhere (the rim, up and down your arm, on your leg, tongue, etc.). Experiment with as many different ideas as you can!
To move the stick around, the right hand “leads” the left stick to where it wants to go. If you want to move the stick up your arm, gently angle your left arm up and play the left stick in that direction. You are basically “dribbling” the stick to the desired location. To move the stick through your fingers while dribbling, turn your hand over and dribble the stick “walked” on the rim:
121 The Next Level
III. STICK ON STICK RUDIMENTS
Once you have become very comfortable with the single note dribble, it is time to learn to play more notes and create different rudiments while executing the dribble. This is a method of adjusting the pressure in the fulcrum and the speed of the right hand stick. Below I will cover just a few of the rudiments which can be played using the stick on stick method.
FOR EVERY RUDIMENT BELOW, THE RIGHT HAND STICK SHOULD STRIKE THE LEFT ABOUT 2”-3” FROM THE LEFT BEAD.
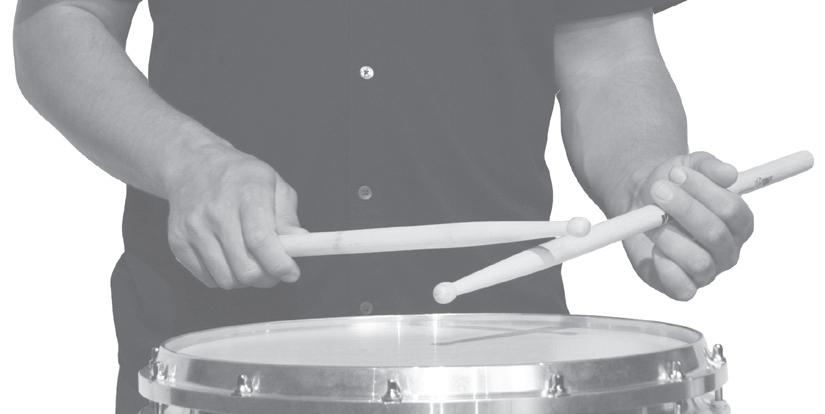
MULTIPLE NOTES ON A HAND
I have already shown you how to do single notes stick on stick earlier in the chapter, now it is time to do multiple notes from one strike of the stick on stick. Apply this process to achieve all the rudiments listed below.
1. Start by playing a “dead stroke” with the left hand (press the stick to the head and keep it there).
2. Strike the right hand on the left hand about 3” from the bead.
3. Gradually loosen the pressure in the fulcrum until you have two notes per right hand strike.
4. Experiment with different pressures in your fulcrum until you have the quality and the correct amount of notes you desire.
ROLLS: To play a roll stick on stick, follow the process from above and vary the pressure in your fulcrum until you have only two notes per strike.
3’s: Playing 3’s stick on stick is almost the same as playing a roll: just slow the right hand down until you have three notes per strike instead of two.
FLAM TAPS: The same approach as the 3’s is used here, just vary the pressure in the fulcrum and think flam taps. The trick is to make sure that you are getting the flam out. This all has to do with the timing of the right stick so when you want to hear a flam, play the right stick on the left and let it boun
FLAM ACCENTS: This rudiment combines the flam tap and the three. Use the skills learned with those two rudiments to play flam accents stick on stick, which are four notes per st
MORE RUDIMENTS: STICK ON STICK
All the previous variations are all to do with varying the pressure in the fulcrum and single motions with the right hand. Now we are going to get into some more tricky ones to play a few different rudiments with the stick on stick method.
FLAM DRAGS: This is much easier that it might seem. All you have to do is play a one handed flam drag but put the right stick on the left stick. Start with playing right handed right stick to the left one. If you have difficulty playing them would if both hands are on the drum (the right hand should be playing swung bucks, the left should be playing the diddle and grace).
CHUCHUDDAS: This is the same thing as flam drags, only loosening the grip an right rhythm comes out.
BACKSTICKING AND TRICKS REVIEW
Hopefully, you have had some fun learning these few tricks. Some skills you should take with you from learning these tricks are: better timing, different ways of manipulating the sticks to achieve similar qualities of sound (especially from the backsticking), more ways to use your fingers, and basically
Have fun and realize what I have shown you is just the tip of the iceberg. You can come up with hundreds of variations if you keep experimenting as backsticking and stick on stick are the basis for much more!
122 The Next Level
SPEED
Speed: The final frontier. In order to play faster than you do currently, you will need to try some different things from a technical standpoint. I will discuss many new concepts and ideas on how to “think” and play faster.
NOTE: The exercises in this chapter have to do with getting FASTER; they are NOT about sound quality. Quality and ut you have to learn to move faster first. Refer to the other chapters in the book and work through the exercises at faster tempos to really improve your quality at higher speeds.
– Visualization, focusing on the small muscles, short bursts of
or type of passage, apply the techniques learned here and
Step 3: Short bursts of speed
Step 4: Gaining quality and consistency
Work through this four step process for each of the sections (single, roll and paradiddle) and you will notice a drastic increase in your speed! For achieving greater speeds at the other rudiments, apply the same techniques you learned here.
at “that” fast. What I mean is you need to have a solid mental picture of just how fast you want to play. If your max speed on a rudiment is 16th notes at 160 bpm and you want to be able to play at 220, you have to really picture what playing that rudiment at 220 would feel and sound like. Do this now: note paradiddles at a comfortable speed.
Repeat the process until you cannot sing paradiddles any faster. When you get to a tempo where you have trouble articulating the words or stickings, that is your max speed (for now).
(par, par, par, etc). Do this while moving your hands in the “general motion” of a paradiddle so you can visualize what it would be to play way beyond your
Realize that you are not going to sound great at top speed right away. Be patient and “let go” of the consistency and qual, this will really push the boundaries of your speed capabilities. You can go back an
e use as drummers: Arms, wrist and fingers. The smaller the muscle group, the faster they can move. With this knowledge, your fingers can be a huge resource when it comes to
123 The Next Level
Here is 8 on a hand again, but this time with just your fingers. Isolate each finger independently and with different combinations. Treat the fulcrum and wrist as separate “fingers”.
middle finger ring finger pinky wrist combos
thumb
Practice this exercise with all the finger isolations learned th
STEP 3: SHORT BURSTS OF SPEED
Now that you know what muscles move quickly for your body, apply them to playing short bursts of speed. speed is not about endurance, speed is about playing fast. as fast as you possibly can. Apply the visualization and finger exercises from earlier and ju and see what you get. This will start to assign a motion to your visualization. Do not worry about what it sounds like. Do not worry about what your technique is like. Concentrate ONLY on how fast it is.
Do this a few times with a rudiment and then take inventory of your hands and realize what you are doing to move the sticks that fast. Are you squeezing in your fulcrum? Are you using less arm and more finger? This will differ from person to person so it is your responsibility to be aware of what muscles are moving quickly for you.
STEP 4: SPEED WITH CONSISTENCY AND QUALITY
Now that you know how fast you can play (regardless of sound), you need to slow it down and try to get the rudiment (or passage, etc.) to have the same consistency and quality as everything else you play.
Find that maximum speed again (where your sound quality starts to suffer a bit). Reverse the process you took to get it faster and slow the tempo down 5 bpm at a time. Do so until you are playing about 20 clicks you slow the tempo down, play the same way you were at max speed (use the same muscles and motions). Practice at the slower tempos with the same muscle groups that were used at the much faster tempo and focus on sound quality.
MORE SPEED TIPS THE “TWITCH”
Employ this technique to get a short burst of speed. Think about just “twitching” your muscles by jerking them slightly in very small motions (staying very relaxed). Use the “twitch” when you feel as though you can’t go any faster.
LEADING WITH THE OPPOSITE HAND
Most players are used to “leading” with their right hand, as a result, the left hand gets used to “following”. What this means in the terms of speed is the left hand is getting “pulled” along and not working as hard to play fast. Start leading with your left and get used to “pushing” to the downbeat. This will strengthen your left hand and will allow “lead” and push the tempo.
124 The Next Level 8 ON A FINGER
4 4 œ œ œ œ œ œ œ œ Retc. œ œ œ . . œ œ œ œ œ œ œ œ Letc. œ œ œ œ fulcrum
fulcrum
4 4 œ œ œ œ œ œ œ œ œ œ œ L R etc. etc. ∑
II. SINGLE SPEED
Here I focus on getting singles faster. Apply all of the finger isolation exercises and remember to treat the fulcrum and wrist as separate “fingers”. Remember the “twitch” motion as well.
SINGLE SPEED BURST 1
Use whatever it takes to get these notes out as fast as you can. By playing the singles high and low, you use large and small motions, allowing the muscles to work more or less depending on height.
d, use finger and wrist as needed. Apply the 4-2-1 concept.
Stay low and relaxed for the singles and push to the accent. Try French grip, Velocity Strokes, and Moeller strokes here. Find something that works best for you to play the fastest. Practice leading with the left as well.
TIP – Try using all fulcrum when it comes to short bursts of singles. Apply a little extra pressure in your fulcrum to get to
singles. Keep the lead hand consistent and don’t al
125 The Next Level
. . œ > œ > œ > œ > ‰ œ œ œ œ ‰ œ > œ > œ > œ > ‰
œ œ œ œ œ ≈ œ œ œ ≈ œ œ œ ≈ œ œ œ ≈ œ œ œ œ œ œ ≈œ œ œ œ œ œ œ œ œ œ œ œ ≈œ œ œ
œ > œ œ œ œ œ > œ œ œ œ œ > œ œ œ œ R L L R R L L R R L L R L R R L L R R L œ œ œ œ œ œ œ œ > œ > œ œ œ œ œ œ œ œ œ > œ > œ œ œ œ œ œ œ œ œ œ œ > œ œ œ œ œ œ œ œ R L L R R L L R R L L R R L L R R L L R R L L R R L L R L L faster
. . œ œ œ 3 œ œ œ 3 œ œ œ œ œ œ œ œ œ œ œ œ œ œ œ œ œ œ œ œ œ œ œ œ œ œ œ œ œ œ 6 œ œ œ œ œ œ œ œ œ œ œ œ œ œ œ œ œ œ œ
This is one of my favorite exercises. Stay relaxed on the two-height portion and use all available resources to play the taps as fast and consistent as possible. Remember to practice leading with the left hand as well. Thanks to Dave Dillulo for this exercise.
The next two exercises deal with accented sextuplets to work on single speed. Use primarily Moeller and think of one motion for multiple sounds. Remember it is okay to play your taps a little higher than normal if needed.
SINGLE SPEED REVIEW
Single speed is one of the hardest things to get
If you cannot “see” yourself playing as fast, or faster than you do now, you will not get there. Imagining “that” speed is hard, but after you have done some exercises thinking this way, it becomes a lot easier.
126 The Next Level 2A: LEAD HAND MOTION 4 4 œ œ 3 œ œ œ œ œ œ œ œ œ L R etc. etc. œ œ œ œ 3 œ œ œ œ œ œ œ œ œ œ œ œ œ œ œ 3 œ œ œ œ œ œ œ œ œ œ œ 3 œ 3 3 3 3 2B: FILLED IN 4 4 œ œ œ œ 6 œ œ œ œ L R R L L R R L etc. etc. œ œ œ œ œ œ œ œ œ œ œ 6 œ œ œ œ œ œ œ œ œ œ œ œ œ œ DILLULO TAPS
4 4 œ > œ œ œ > œ œ œ > œ œ œ RLRLRLRLRRR œ > œ œ œ > œ œ œ > œ œ œ œ œ LRLRLRLRLLLL
BOSTON 4 4 6 œ > œ œ œ œ œ 6 œ > œ œ œ œ L R R L L R R L L R R L L R 4 4 6 œ > œ œ œ œ œ > 6 œ > œ œ œ > L R R L L R R L L R R L L R R L
III. ROLL SPEED
When working at getting your rolls faster, experiment with different pressures in the fulcrum and fingers and applying Moeller to achieve accents without changing your motion.
REMINDER: Don’t focus too much on sound quality when working on your speed. If you sound like you are playing buzz rolls at first when pushing the limits of your speed, that is okay. Once you have achieved your goal, slow the tempo down
Try this one as fast as you can, with no regard to sound. Remember, speed can be about tricking your mind into believing
Try “pumping” your arms to get the doubles out. This is a careful way of keeping the wrist relaxed and making the arms
All I have done here is take out the accents at the beginning of each of the roll. Stay low and relaxed for the attacks of the
note triplets in 2/4), this will give you a balanced sense of pulse between your hands
Relax on the check pattern and push out the rolls with everything you can. Don’t sweat the sound in the initial runs at light . Then, after you cannot possibly go any
127 The Next Level
. . . . . . œ ! œ ! œ > œ ! œ ! œ > œ > œ ! œ ! œ > œ ! œ ! 3 > œ ! œ ! 3 œ > œ ! œ ! œ > 3 œ > œ ! œ ! œ > œ > 3 œ > œ ! œ ! œ > 3 œ > œ ! œ ! > 3 œ > œ ! œ ! 3 œ > œ ! œ ! œ > œ > 3 œ > œ ! œ ! 6 œ ! œ ! œ ! œ ! 6 œ > œ ! œ ! œ > œ ! œ ! 6 œ > œ ! œ ! œ > œ ! œ !
œ > 3 œ ! œ ! œ ! œ > 3 œ ! œ ! œ ! œ > 3 œ ! œ ! œ ! L R R L L R R L
œ œ œ œ œ œ œ ! œ ! œ ! œ ! œ ! œ ! œ ! œ ! œ ! œ ! œ ! œ !
You should be isolating your fulcrum in this exercise. Play the eighth notes relaxed and with a full wrist turn. Keep the rolls as low as you can, apply some extra pressure (a light squ Remember the more pressure that you put in your fulcrum, the faster the stick is going to bounce. Allow yourself to relax on the check patterns and push for the roll.
As you get better sound, try extending the rolls for a few counts or measures.
Pay attention to your heights from the get go here. Keep the taps down and play the rolls at the same height that your taps are at. Use the accents to loosen up and push it out for the rolls. Apply extra pressure in the fulcrum and pump the arms when needed to get the speed you are looking for.
SOUND QUALITY FOCUS
The wrist is a lot more involved in this exercise. Use the same stroke for the singles and doubles. The key is to stay relaxed the whole time, keeping the doubles open and still playing as fast as you can. By being able to make the transition from the singles to the doubles, your muscles learn to relax and help the sound on your faster rolls. exercises with sound quality in mind.
ROLL SPEED REVIEW
Realize that you can use many different motions and muscle groups to move faster with rolls. Try pumping your arms with your fulcrum and wrist in the same position, try different fingers as a fulcrum. Try as many combinations as you can think of and focus on moving faster. Remember that it is okay to let go of your sound quality at higher speeds –term – just be sure to achieve the correct quality once you gotten to your desired speed.
Try any variations of the exercises in different time signatures. You might find that you are more comfortable pushing your limits in duple or triple forms. I personally found that the triplet based roll helped my speed more because the pulse would shift hands and therefore I found it easier to push the rolls. Do what is comfortable to you, and try to come up with patterns or exercises that feel good to your hands.
128 The Next Level 4 4 œ œ 6 œ œ œ œ œ œ œ œ 6 œ ! œ ! œ ! œ ! œ ! œ ! L R R L L R R L L R R L L R R L etc. etc. œ œ œ œ 6 œ œ œ œ œ œ 6 œ ! œ ! œ ! œ ! œ ! œ ! œ œ œ œ 6 œ œ œ œ œ œ œ œ œ œ 6 œ ! œ ! œ ! œ ! œ ! œ ! œ œ œ œ œ ! œ ! œ ! œ ! 6 œ œ œ œ œ œ 6 œ ! 6 6 6 6
CHUGGADA 8 5 œ > œ œ œ > œ œ 6 œ ! œ ! œ ! œ ! L R R L L R R L L R R L L R R L L R R L 8 5 œ > œ œ œ > œ œ 6 œ ! œ ! œ ! œ ! œ ! œ !
8 6 œ œ œ œ œ œ œ œ œ œ œ L R R L L R R L L R R L L R L R R L R L L R
IV. PARADIDDLE SPEED
Paradiddles combine singles and doubles so apply everything speed wise to the following section.
PARADIDDLE SPEED BURST
The fulcrum is a big part of this exercise. Let the fingers off the stick and apply a little bit of extra pressure to get the notes The accents are crucial here; by playing the accent that follows each paradiddle, you are preparing yourself to play . If you cheat the accents, you will not be taking full advantage of the exercise. Pulse the downbeats of each paradiddle and stay very loose. Think of each hand having one smooth motion to execute each paradiddle.
Once you have mastered the exercise with the accents notated, try all one height as well.
iple paradiddles. The first half is to be played one height, try all high and all low. The second half should be a “loose” two-heights, 12” ish” and 3” ish”. You should be applying a bit of Moeller and using lots of rebound. Try this with all fingers on the stick or letting them off and squeezing in the fulcrums.
th a twist. The paradiddles are grouped in fivelets so there is one extra note to play. The extra note is there so you can slur the rhythm and learn to play faster. Treat the paradiddle y the whole fivelet as one motion. Play this with and without
Here you get the advantage of playing slow to relax before taking a jump in speed. Strive for the same technique with the
129 The Next Level
œ œ > œ > œ œ œ œ œ > œœ œ œ LRLRLL œ œ œ œœ > œ œ œ œ œ > œ > œœ œ œ œ > œ œœ œ œ œ œ œ œ œ œ œ œ œ œ œ œ œ œ œ œ œ œ œ œ œ œ œ œ œ œ œ œ œ RRLRLL
. . > œ œ œ œ > œ œ œ œ œ > œ œ œ œ L R R L L R L R L R
4 3 œ œ œ RLL 5 œ > œ œ œ œ 5 œ > œ œ œ œ œ > œ œ œ RLRRLRLRRLRLRR 5 œ > œ œ œ œ œ > œ œ œ 5 œ > œ œ œ œ œ > œ œ œ RLRRLRLRRLRLLRLRLL
3 œ > œ œ œ œ > œ œ œ œ > œ œ œ 3 œ > œ œ œ œ > œ œ œ œ > œ œ œ R R L L L R R R L L R R R L L L R R L L L R R R L L R R R L L L R R L L L R R R L L R R R L L L
– SLOW/FAST
This one is just what it says. Play the first time through slow and then double it. The idea here is that your muscles have already had a taste of what they are going to do, and then they do it twice as fast. Strive to maintain proper heights at greater speeds. Practice with every member of the paradiddle family (inverted, double paradiddle, etc.) and all one height.
REMEMBER: Try different things from a technique standpoint. Squeeze the fulcrum, pump the arms, let fingers off the stick, anything to move faster.
Apply the slow/fast treatment to this exercise as well. Use the same approach that you used in the 7/8 version. As always, get to speed you would like, then go back and work on the sound.
CHUGGA-DA PARADIDDLE
Use the flam accents to relax, and when you get to the paradiddl paradiddles sticking as well. What benefit might you have by playing inverted paradiddles? There is a little trick here. If you think of your paradiddles as slurred tap drags (or inverted paradiddles) you might be able to play them a bit faster.
1
and 1 / 2 and 2 WITH PARADIDDLES
I have notated this exercise with 8 paradiddles. Really focus on the motion you are using to create sounds. If you think micro, you will get stuck with the details. Think a little more macro and you will be surprised with what you come up with.
130 The Next Level 7/8
PARADIDDLE
8 7 œ > œ œ œ œ > œ œ œ œ > L R R L L R L R R L L R R L R L L R œ > œ œ œ œ œ œ > œ œ œ œ > œ œ œ œ > œ L R R L PARADIDDLE DIDDLE PARADIDDLE
4 4 œ > œ œ œ œ œ œ > œ œ œ œ œ œ > L R R L L R L R R L R L L R R L L R L R R L R L L R
8 6 œ > œ œ rœ œ > œ œ RLRLRL œ > œ œ rœ œ > œ œ rœ œ >
4 2 œ œ œ œ œ @ RL RL RLLR RLRR LRRL LRLL 8 6 œ œ œ œ œ œ œ @ œ @ RL RL RL RLLR RLRR LRRL LRLL
PARADIDDLE SPEED REVIEW
Remember to try all different combinations of fulcrums, fingers, wrist, and arm etc. to achieve greater speeds with paradiddles. Isolate the motion of your hands and what the small muscles are doing at faster tempos.
Speed Review and Getting Faster at Everything Else
Alrighty then, I have given you a lot of tips on getting faster on the basic things: rolls, paradiddles and singles. To get faster at your other rudiments, apply the 4-Step process in the beginning of the chapter with all the concepts learned thus far. Remember to go back and “add” the quality to your sound after you have achieved the speed you are looking for. Playing fast can be impressive, but playing fast with great sound is mind blowing.
Remember, it takes time to get faster. The more comfortable you get even just a few beats faster, the farther you can push your top end speed. Be patient and stay relaxed (and breathe).
131 The Next Level
132 The Next Level
SOLO CONSTRUCTION
In this segment, I will talk in depth about how I came up with my championship solo, Tribute – and give you some of my recommendations to help you successfully plan and perform what will hopefully be your own championship solo one day. Follow these steps to create your own solo and have fun!
Constructing your solo should begin with a brainstorming process, involving nothing more than notebook paper and a pencil. Write down everything you can do, whether it’s a trick, visual, musical idea, rudiment, melody, ANYTHING! Nothing should be left out in this process. Can you play four mallets but use sticks instead? Can you juggle? Can you stand on your head and play? Anything goes, so keep your mind open to any idea that comes to you! Work to make the list as
I can play: paradiddles, fast rolls, flam accents, old school backsticking, 3 way backsticking, walk the dog, juggle, rph, stick toss “a” and stick toss “b”, The Three Camps, everything you know how to do down on paper.
Once you have your list done, organize your ideas into categories. List all your “rudimental” ideas under one heading, all your tricks under another, all your backsticking ideas, all your rhythmic or melodic ideas together, etc. This way you will
Now that you have all your ideas organized find two or three “main” strengths (what you do the best out of your list), and be the most difficult of flashy thing). My main strengths are my fast rolls, paradiddles and backsticking. My “sub-strengths” include playing slow with great heights, my singles, and a few stick tosses. I chose to showcase each of these “main” and “sub” strengths throughout my solo, with ideas that supported them. I will cover how and where to place your ideas later in the chapter.
Now it’s time to find a way to link all your ideas and strengths together. The best way to do this is find a theme or motif a strength (main or sub) that fits into some pattern or
133 The Next Level
My solo is based on the main theme from Etude #3 from Tony Cirone’s Portraits in Rhythm:
I modified Cirone’s theme to fit some ideas I had and made it:
Your theme can be a simple one measure “lick”, a four measure phrase, a one count rhythm, an ostinato, or anything you want it to be. I have seen solos based off a Flam Drag, a 2:3 polyrhythm, a visual, and much more. There is no right or wrong when it comes to your theme for
Below I have listed many of the variations to the main theme of Tribute: This motif is presented with inverts, straight sticking, on both drums and with backsticking:
You can see that each of the motif’s are similar to the main theme but with a twist. This is a great way to keep your solo on track and making musical sense.
I also have “sub-themes” or motifs which are present throughout the piece as well (the measure to the right is the first motif I present).
I then use the accent pattern with the paradiddle theme below, then add buzzes, flams, or triplets. The theme is present but altered just enough to keep the ideas fresh. Again, you can see how all of the motifs above relate to each other through note groupings, accent placement or slight embellishments.
One of the last motif’s I used is the Bolero ostinato of:
Here are the related motifs to the Bolero theme. Some of the motifs are played with a stick toss; others simply altered the sticking slightly.
To create variations to your theme, try adding a note, taking a note away, play a flam instead of an accent, add diddles on the accents or there is no right or wrong way to go about this; experiment and have fun!
134 The Next Level
4 4 œ œ œ œ œ ≈ œ œ œ œ œ œ œ 4 4 œ œ œ œ œ ≈ œ œ œ œ œ œ
4 4 œ > œ j œ œ > œ j œ œ > œ œ j œ œ >
4 4 œ > œ œ œ œ œ œ > œ œ œ œ œ œ > œ œ œ RL RRL LR LR RL LR LR R œ > œ œ œ œ œ LR LL RR
4 2 œ . œ @ œ @ œ > ≈ RR
IV. WRITING THE SOLO
Putting the proverbial “pen to paper” can be the hardest part when actually composing a solo. Remember this: Everything you write can be used in one place or another. Some ideas may fit better in different places so keep them all, whether you use them now or not. You never know when you could use an idea that didn’t fit in one place somewhere else.
e first minute of your solo. The next idea should be a “substrength” which could lead in to another main strength. Follow this idea up with one or two “sub-strengths” and then lead
Intro stating your main theme / motif and leading into a main strength.
Sub theme with a sub strength (you can have a related motif or theme here).
Sub theme with a sub strength (feel free to vary your theme a bit here).
Once you have all these ideas on paper, the next thing to work on is your pacing and transitions, which is covered next.
Refer back to the outline in the “Writing the Solo” section above, if you have followed this, you should have a pretty good
The pacing of your solo is the most important part of the construction. You have strengths to show off and tricks that need doing, but they could be for nothing if you fail to present them well. Think of a really good joke you have heard. What made the joke so good? The punch line? The build up to the punch line? The delivery? All of those things go into a good
Consider the context you want to present your ideas. There can be a certain amount of effect by just “laying it all out there” but there could be even more effect by crescendoing into your impact, decrescendoing into it, etc. Half of the enjoythe big moment. Loud is much more effective when preceded by soft and vice versa.
Start with four bar phrases that showcase your idea or trick. Think about playing four bars of something then backsticking toss to, play the rhythm first then do the same thing while
hen play flams, play one phrase really soft then repeat it loud (or even softer), with rolls and without, basically try to increasing the intensity by embellishing as you repeat the patterns.
You also need to have some down time in your solo. This is a section that gives the judge and audience a chance to relax and simply listen to you play. This can come in the form of soft section, or a groove type section. There needs to be a few spots in your solo where the audience can tap their foot and get into what you are playing. Something simple that states anyone
Your pacing should be that you have about three main impact points (one in the beginning, one in the middle and one at the end) and interesting ideas in between your impacts. Remember to lead into your strengths and impacts to make the most of them.
135 The Next Level
TRANSITIONS
The next step is to create transitions from idea to idea that make sense. The worst thing you can hear a judge say is that you need to have better transitions. Every note you play should have some sort of musical direction and idea to it. This means that just playing a buzz roll to get from one idea to another doesn’t really cut it. Think of a creative way to get from A to B. A good way to transition from idea to idea is to “foreshadow” what is coming next. Try hinting at the rhythm or pattern by playing one count of a four count phrase and adding to it every bar; or play a phrase that is very close but not quite what is coming next. This will help tie your ideas together. The point is to make sure that you never play “filler material”, always allowing the solo to move forward.
With all of the above in mind, work on your transitions by playing in and out of your ideas in every way possible. If you keep playing the same type of phrase before or after a segment, odds are good that something similar (or what you keep playing) should go in that spot of your solo. documented as well.
Keep going through the process of playing what you have as often as possible and ideas will come to you that feel and sound good. Whatever you do, place might be perfect somewhere else, so keep track of everything the best you can.
VII. PREPARATION AND PERFORMANCE
How to you get ready to play the your whole solo for the competition? Here is what I recommend:
Finish the solo as soon as possible and start doing run-through’s. Play for anyone, anywhere, anytime. The more reps you get in, the better chance you have of encountering any mistakes you are going to make and learning how to get out of them smoothly. You will also learn how to perform as you get more comfortable with your solo.
Work on different parts all the time. Start at the end and work your way backwards, start in the middle and work forward. The point is: if you always start at the beginning, the end will be the weakest part, if you start at the end all the time, the beginning might suffer, etc.
My advice on performing the solo: PERFORM! No really, PERFORM! You are on stage for your 3-5 minutes and it is your stage. Be sure to milk this time for everything its worth. IF you make a mistake, do not acknowledge it, just keep performing. No matter what, you need to act as if you are having the best run of your solo ever. Last but not least, make sure you have allotted time for the crowd to react to what you are doing. If the crowd is giving it up for you, let them! Enjoy the applause and then start your next idea. This is where doing MANY runs (at least twice a day for a week) of the solo before the actual competition; you will be comfortable enough to wait on the crowd.
Above all, have fun while you are playing. This will be very easy to read from an audience member and they will have more fun watching you as well.
To sum it all up:
Write down your ideas on paper, find a theme, showcase your strengths and document everything you are doing. If you follow all the steps in this chapter, you will eventually come up with a solo you can be very proud of. The process could take a long time, so don’t get discouraged. Write a little bit every day and do your best to tie your ideas together. To give you an idea of how long it took to come up with Tribute – I started playing solo’s in 1990 and I didn’t come up with a solo I was happy with until 1994 (which was the first draft of Tribute). I guess what I am trying to say is if you don’t like what you come up with the first time, keep trying until you do!
Best of luck!
136 The Next Level
Dedicated to anyone who taught me in the drum corps activity and to all the people I marched or drummed with during my career.
Jeff Queen
137 The Next Level 4 Ú j > j > j > j > j Z Z > jœ Z > œ > j œ œ Z RL L LRL œ > œ œ œ œ œ œ > œ œ œ œ > œ œ œ œ œ RL RR LL RL RRL RL LR R ß œ œ y œ j œ œ > ≈ œ > œ j œ 6 œ > œ œ j œ œ > œ œ LLR RL LL RR L RRL 4 3 œ ! œ > œ ! œ > œ æ œ 3 œ œ œ œ 3 œ œ œ œ j œ œ > RLRL RL RL RL 4 4 p f . @ œ @ y > ≈ œ œ œ RR LR L œ > . œ @ œ @ œ ≈ œ œ œ RL RL 4 4 œ > œ @ RL p y . œ @ . ˙ æ R ˙ æ ˙ æ f jœ œ > ! œ j œ œ œ > ! œ RL RL RL j œ ! > œ ! œ j œ ! > œ ! œ j œ ! > œ ! œ j œ + > œ ! œ etc. 4 2 j œ ! > œ ! œ j œ ! > œ ! œ j œ œ > œ ! œ j œ œ > œ ! œ y œ œ RL RL RL RL L > œ œ œ œ œ œ œ > œ > œ œ œ œ œ œ œ œ œ œ œ œ œ œ œ ! œ œ œ !œ œ RR LLR RL R LL RR LLR L RRL RL L etc. æ y . y y y y RR L RRR y ŒÓ R 3 33 6 PART ONE: INTRO 80 4 4 Ú j œ œ > œ œ œ œ j œ œ > œ œ œ œ j œ œ > œ œ j œ œ > j œ œ Z œ Z œ > j œ œ Z > œ > j œ œ Z RL L LRL œ > œ œ œ œ œ œ > œ œ œ œ > œ œ œ œ œ RL RR LL RL RRL RL LR R ß œ œ y œ j œ œ > ≈ œ > œ j œ 6 œ > œ œ j œ œ > œ œ LLR RL LL RR L RRL 4 3 œ ! œ > œ ! œ > œ æ œ 3 œ œ œ œ 3 œ œ œ œ j œ œ > RLRL RL RL RL 4 4 p f . @ œ @ y > ≈ œ œ œ RR LR L œ > . œ @ œ @ œ ≈ œ œ œ RL RL 4 4 œ > œ @ RL p y . œ @ . ˙ æ R ˙ æ ˙ æ f jœ œ > ! œ j œ œ œ > ! œ RL RL RL j œ ! > œ ! œ j œ ! > œ ! œ j œ ! > œ ! œ j œ + > œ ! œ etc. 4 2 j œ ! > œ ! œ j œ ! > œ ! œ j œ œ > œ ! œ j œ œ > œ ! œ y œ œ RL RL RL RL L > œ œ œ œ œ œ œ > œ > œ œ œ œ œ œ œ œ œ œ œ œ œ œ œ ! œ œ œ !œ œ RR LLR RL R LL RR LLR L RRL RL L etc. æ y . y y y y RR L RRR y ŒÓ R 3 33 6 PART ONE: INTRO 80 4 4 Ú j œ œ > œ œ œ œ j œ œ > œ œ œ œ j œ œ > œ œ RR LR LR RL RL RR L j œ œ > j œ œ Z œ Z œ > j œ œ Z > œ > j œ œ Z R RLR LRL RL L LRL œ > œ œ œ œ œ œ > œ œ œ œ > œ œ œ œ œ RL RR LL RL RRL RL LR R ß œ œ y œ j œ œ > ≈ œ > œ j œ 6 œ > œ œ j œ œ > œ œ LLR RL LL RR L RRL 4 3 œ ! œ > œ ! œ > œ æ œ 3 œ œ œ œ 3 œ œ œ œ j œ œ > RLRL RL RL RL 4 4 p f . @ œ @ y > ≈ œ œ œ RR LR L œ > . œ @ œ @ œ ≈ œ œ œ RL RL 4 4 œ > œ @ RL p y . œ @ . ˙ æ R ˙ æ ˙ æ f jœ œ > ! œ j œ œ œ > ! œ RL RL RL j œ ! > œ ! œ j œ ! > œ ! œ j œ ! > œ ! œ j œ + > œ ! œ etc. 4 2 j œ ! > œ ! œ j œ ! > œ ! œ j œ œ > œ ! œ j œ œ > œ ! œ y œ œ RL RL RL RL L > œ œ œ œ œ œ œ > œ > œ œ œ œ œ œ œ œ œ œ œ œ œ œ œ ! œ œ œ !œ œ RR LLR RL R LL RR LLR L RRL RL L etc. æ y . y y y y RR L RRR y ŒÓ R 3 33 6 PART ONE: INTRO 80 TRIBUTE
© Tapspace Publications, LLC (ASCAP), All Rights Reserved.
138 The Next Level Ú f j œ œ > j œ œ > j œ œ > j œ œ > RL RL accel. 3 œ œ ! 3 ! œ œ RL RL RL 3 œ ! ! 3 9 9 œ 3 1 ! ! 3 9 9 œ RL RL RL RL RL RL 3 œ ! ! 3 9 9 œ 3 1 ! ! 3 9 9 œ RL RL RL RL RL RL Ú f p 3 y œ œ 3 œ œ œ RL L LLL f œ œ R RRR 4 4 œ œ œ > œ œ œ > œ œ œ > œ œ œ > œ œ œ > œ œ œ > RL RRL RL 4 4 pf 6 y œ œ œ 6 œ œ œ œ 6 œ œ ! œ ! œ ! œ ! œ RLRL RL RL RL RL RL Ú œ > . œ @ œ æ œ æ œ æ R y œ RR Ú p j œ œ > œ œ œ œ j œ œ > œ œ œ RR LR LR RL RL fp j œ œ > œ ! 3 œ œ œ j œ œ > œ ! 3 œ œ œ j œ œ > œ j œ œ > RL RL RL RL RL RL L F 6 œ > œ œ œ œ œ j œ 6 œ > œ œ œ œ œ j œ œ > LR LL RR RL RR LL LR œ . j œ œ > œ . œ . j œ œ > œ . œ . j œ œ > œ . j œ œ > œ . œ . j œ œ RL RL RL RL RR LR LR PART TWO (INTRO) PART THREE: Slow Section / Singles 80 108 edge to center 112 to edge on decresc. center on cresc 88 3-way Backsticking
Right stick on Left stick
Move stick between fingers, up and down arm, rim, tongue, leg, etc. Repeat as many times as necessary
139 The Next Level j œ œ > œ ! œ j œ œ > œ ! œ j œ œ > ! œ j œ œ > ! œ ! œ j œ œ > ! œ > ! œ j œ 3 œ œ œ > RL RL RL RL RL RL RL RRL 6 œ > œ œ œ œ œ 6 œ > œ œ œ œ œ 6 œ > œ œ > œ œ œ > 6 œ œ œ > œ œ œ > RL RR LLR L RR LLR RL RL œ > 3 œ œ œ y œ > œ ! œ æ œ @ œ œ œ œ RR RL RLRL LL RL L œ æ rit. Ú œ œ œ œ œ œ œ œ œ œ œ œ œ œ œ œ œ œ œ œ œ œ œ œ œ œ œ œ œ œ œ œ œ œ œ œ œ œ œ ≈ œ œ œ œ œ œ RL RR LL L RRL L 16 7 j œ œ > ! œ j œ ! > œ j œ œ > œ œ j œ ! > œ j ! œ > ! ! œ j œ œ > œ rœ œ > œ RL RL RL RL RR LR LR LL œ œ LR L p œ œ œ œ œ œ œ œ œ œ œ œ œ œ œ œ œ œ œ œ œ œ œ RLRL RL etc. 4 4 œ œ œ o œ œ LR RL RL L o > œ œ œ o > œ œ œ o > œ œ œ o > œ œ œ RL LL LR RR RL LL LR RR œ œ œ œ œ œ œ œ œ œ œ œ œ œ œ œ œ RL LL LL RL RL RL RL RLRL œ L O @ O @ O @ O @ O @ O @ O @ O @ O @ O @ O @ O @ œ œ RRL œ > œ œ œ œ œ œ > œ œ œ œ œ RL LL LL RL LL LL . . 4 2 O O O O O O O O O O O O O O O O O O PART FOUR: Backsticking
132 to center 80 edge . = 152
to center © Tapspace Publications, LLC (ASCAP), All Rights Reserved.
140 The Next Level 4 2 8 9 4 4 f Ú p œ > . œ @ œ @ y ≈ œ œ œ RR LR L F Ú œ œ œ œ œ œ œ > œ œ œ œ œ œ œ œ œ > œ œ œ œ œ œ œ œ RL RL RL RL RL RL RL RL RL RL RL RL f œ ! œ œ ! œ œ ! œ œ ! œ 6 œ > . œ @ œ @ y ! ! œ RL RL RL RL RL RL RR LR L 4 4 œ ! œ œ œ ! œ œ œ ! œ œ œ œ RL RRL R LLR L RRR 4 4 œ > o œ œ œ œ œ œ œ œ œ œ œ œ y RLRR RR RR RR RR RR R 4 4 œ œ œ œ œ > ≈ œ > œ œ œ œ œ RL RR L LLR RL L 6 œ > œ œ œ > œ œ 6 œ > œ œ œ > œ œ 6 œ > œ œ œ > œ RL RL RL etc. 6 œ > œ œ œ > œ œ 6 œ > œ œ œ > œ œ 6 ! œ œ œ ! œ RL RL RR rit. 6 œ > œ œ œ > œ œ 6 œ > œ œ œ > œ œ 6 œ > œ œ œ > œ œ œ > RL RL RL RL Ú 4 3 π ŒŒ 6 - ->> -RL RL RL œ 3 œ œ - ! 3 œ œ œ 6 - ! œRL RRL RL RRL RL PART FIVE: Closing Statement 80 126 double flip 64 TT G G
© Tapspace Publications, LLC (ASCAP), All Rights Reserved.
141 The Next Level 4 6 . . . . 4 2 4 4 œ œ œ œ ! - - ! - - œ œ ! - - ! - - - - ! œ œ œ RR LL R RRL RR LL R RRL RR LLR RR L Ú œ œ œ œ œ œ œ œ RR LLR RL L 6 œ > œ œ œ œ œ 3 œ > œ œ 6 œ > œ œ œ œ œ 3 œ > œ œ RL RR LLR LR LR LL RR LR L œ œ œ œ L RRL fp y . œ @ œ @ 3 œ œ œ 6 œ œ œ œ œ œ 6 œ œ œ œ œ œ RR LLR RRL LLR RRL LL 6 œ œ œ 6 œ œ œ œ œ œ 6 œ œ œ œ œ œ 6 œ œ œ œ œ œ 6 œ œ œ œ œ œ œ œ œ œ > œ œ RL RL RR L rit. œ > œ œ œ œ œ œ œ œ œ œ > œ œ œ œ œ œ œ œ œ œ > œ œ œ œ RB BB BBB BBB BB B œ . œ . LL L œ > œ œ œ œ œ œ > œ œ œ œ œ œ > œ œ œ RL RR LLR LR RL LR LR R 4 4 œ œ > œ œ œ RL RL L œ > œ œ œ œ œ œ > œ œ œ œ œ œ > œ œ œ RL RR LL RL RR LLRLR R 4 4 œ œ > œ œ œ RL RL L cresc. œ > œ œ œ œ œ œ > œ œ œ œ œ œ > œ œ œ RL RR LL RL RR LLRLR R 4 3 4 4 œ œ LLR R œ > œ œ œ œ > œ œ œ œ > œ œ œ LR LLR LR RL RL L 4 4 œ œ œ œ œ > œ œ œ œ > œ œ œ œ > œ œ œ RL LR RL RL LR LR RL RL L fp y . œ @ œ æ ˙ æ R
Matched Grip 164 faster faster TTT GG G
Repeat cycle as many times as desired
œ œ œ œ œ œ œ Z œ
œ œ
DRUMS
Kevlar Head
ROLLS
œ œ œ
Buzz Roll (often with a number on top indicating desired meter)
Buzz Roll (often with a number on top indicating desired meter)
Buzz Roll (often with a number on top indicating desired meter)
Open Roll (often with a number on top indicating desired meter)
œ œ
œ
œ œ
Old School
œ
ROLLS
! œ @
Old School
œ œ œ œ œ œ
Kevlar Head Mylar Head top meter)
Backstick (when used in 3-way backsticking)
Old School
Open Roll (often with a number on top indicating desired meter)
Butt (when used in 3-way backsticking)
Butt Stand-alone
142 The Next Level fp y . œ @ œ æ ˙ æ R y . œ @ œ æ y . œ @ œ æ RR ƒ y . œ @ y . œ @ y . œ @ y . œ @ RRR R œ > œ ! œ > œ ! œ > œ ! œ > œ > œ ! œ > œ ! œ > œ æ œ > œ ! œ > œ ! œ > œ ! œ > œ > œ ! œ > œ ! œ > œ æ Ï œ > œ ! œ > œ ! œ > œ ! œ > œ > œ ! œ > œ œ œ œ œ œ
œ
œ
Z
!
œ œ ! 9
Backstick Butt (when used in 3-way backsticking) œ œ œ œ
Z œ œ œ !
Backstick (when used in 3-way backsticking)
Buzz Roll (often with a number on top indicating desired meter)
of the stick at the moment of impact,
!
œ æ œ œ œ
A juggling trick whereby one hand tosses the stick to the other hand (marked by the “T”) while simultaneously grabbing the latter hand’s stick to play the note marked by the “G”.
9 -
THE PERFECT PAIR
JEFF QUEEN SIGNATURE DRUM STICK (SJQ)

As a solo performer, I’ve often had to balance my stick preference between the outdoor marching sticks (which are often too bulky for my needs) and indoor sticks (which are mostly designed to eliminate the overtones). Choosing between one or the other often meant that I had to either sacrifice speed for tone, or sound quality for a stick with a quick response.
I was extremely excited when I was approached by Vic Firth to create a stick that addresses the solo performer’s needs. I think my signature stick balances the indoor and outdoor worlds perfectly. It’s an extremely fast stick, yet still has enough “meat” to dig in and play through the head to get the sound that I’ve been looking for.
The stick is a little thinner than an outdoor stick to increase speed, and the bead is completely round, which reduces sound quality differences between the hands due to angle of approach. I also added a little weight to the back of the stick in the form of an inverted taper to allow the rebound to be even quicker off the head. All of this combined with a rounded butt end to promote backsticking quality, provides for one fast and great sounding stick!
This is absolutely the stick I use to reach for my own “next level” of playing. With the quick taper in the front of the stick, round bead, and the uniquely shaped back end, you can’t find a better stick designed with the solo performer in mind.
I’ve always felt that Vic Firth has made the finest products available. Their attention to detail and quality of their craftsmanship is second to none. I wouldn’t consider putting my name on any other drum stick!
Check it out – I think you’ll be happy with what I’ve come up with!

143 The Next Level
AVAILABLE FROM HUDSON MUSIC!
Jeff Queen’s “PLAYING WITH STICKS” DVD presents a comprehensive approach to developing hand technique and a detailed look at contemporary rudimental drumming. Jeff demonstrates all of the standard rudiments as well as cutting-edge hybrids.
“Playing with Sticks” is a perfect companion to “The Next Level!” Watch as Jeff demonstrates fundamental techniques, exercises, stick tricks and advanced concepts introduced in the book!
ASK FOR IT AT YOUR LOCAL RETAIL STORE!
OR VISIT HUDSON MUSIC ONLINE AT: HUDSONMUSIC.COM
Check out more from Jeff Queen!
THE AISLE SEAT - For Snare drum and kick drum. An intermediate level timing based solo that uses the bass drum as steady time. Available from Tapspace.com
MODULATION - Intermediate/Advanced snare solo that combines rudimental and concert skills in various time signatures while keeping the central pulse the same. Available from Tapspace.com
TAX TIME - Advanced snare solo that works low-end bounce, flam rudiments, fast roll skills and requires impeccable timing! Available from Tapspace.com.
DOUBLE FLAG - Extremely advanced snare drum solo that employs Indian hand / finger drumming techniques with thimbles! Available from Tapspace.com
TAT DUGGA DA KAA - Intermediate percussion quintet with solo snare drum. Available from rowloff.com.
144 The Next Level
