Other documents randomly have different content
Fig 5. Rear view of piano-box houses shown in fig. 4. The openings at the rear are provided for ventilation and coolness in the hot weather. Windows could be used instead of solid shutters and would make the houses lighter when closed.
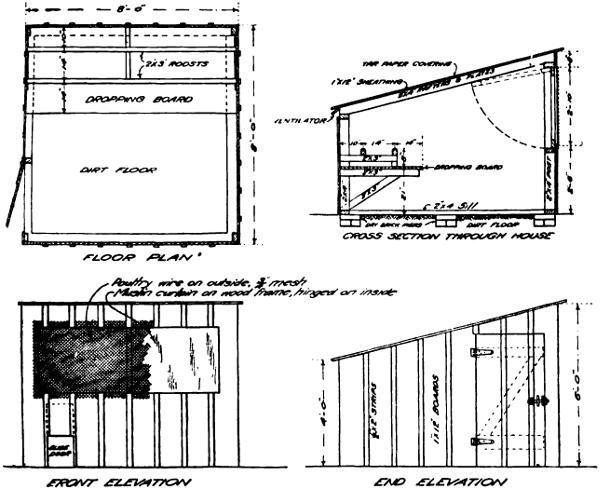
Such a house would be ample for a flock of 20 to 25 hens. It can be built quickly and easily and is cheap in construction. The material required is as follows:
BILL OF MATERIAL
Roof rafters, 5 pieces, 2 by 4 inches by 8 feet long.
Roof plates, 2 pieces, 2 by 4 inches by 8 feet long.
Sills, 4 pieces, 2 by 4 inches by 8 feet long.
Posts, 3 pieces 2 by 4 inches by 6 feet long; 2 pieces 2 by 4 inches by 4 feet long.
Stringer, 1 piece, 2 by 4 inches by 8 feet long.
Total pieces required to cut list:
7 pieces 2 by 4 inches by 16 feet long.
1 piece 2 by 4 inches by 12 feet long.
Total feet in board measure, 81.
ROOSTS AND DROPPING BOARD.
1 piece 2 by 3 inches by 16 feet long.
1 piece 2 by 3 inches by 10 feet long.
Total board measure, 13 feet.
2 pieces 1 by 12 inches by 16 feet long.
Total board measure, 32 feet.
SHEATHING BOARDS
Roof, 5 pieces 1 by 12 inches by 16 feet long.
Two sides, 2 pieces 1 by 12 inches by 10 feet long; 3 pieces 1 by 12 inches by 12 feet long; 2 pieces 1 by 12 inches by 14 feet long.
Front, 2 pieces 1 by 12 inches by 10 feet long.
Back, 2 pieces 1 by 12 inches by 16 feet long.
Total feet board measure, 216.
BATTEN STRIPS.
130 linear feet 1⁄2 by 2 inch strips, 24 board feet.
24 linear feet 7⁄8 by 2 inch strips, for curtain frame, 4 board feet.
ROOFING
80 square feet roofing paper; nails and tins.
HARDWARE
2 pairs 8-inch T hinges for door.
1 padlock for door.
3 pairs 4-inch T hinges for curtain frame and rear ventilator.
5 pounds 10-penny wire nails for framing.
10 pounds 8-penny wire nails for sheathing.
5 pounds 4-penny wire nails for stripping.
21 square feet poultry wire, 3⁄4-inch mesh, for front.
3 yards muslin for curtain.
32 rough bricks will build piers.
FLOOR
If floor is desired in house, add the following material:
2 pieces 2 by 4 inches by 16 feet long.
4 pieces 1 by 12 inches by 16 feet long.
Total feet board measure, 85.
TOTAL LUMBER REQUIRED
Without floor, 370 board feet.
With floor, 455 board feet. Lumber can be rough or dressed.
Fig. 6. Plan of a simple back-yard poultry house.
Larger drawing
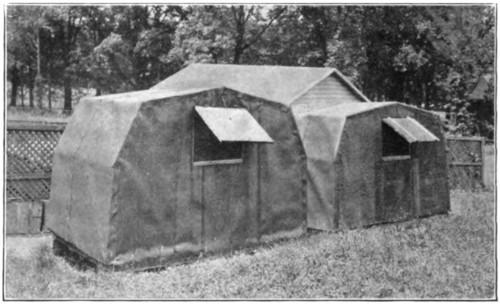
When the soil is well drained and consequently will remain dry no floor need be used in the house, the ground itself serving as the floor. Often a slight dampness can be corrected by filling up the floor several inches above the outside ground with sand, cinders, gravel, or dry dirt. Three or four inches of the surface of the floor, and of the run if a very small run is used, should be removed and replaced with fresh dirt two or three times a year. If the ground is so wet or damp that this condition can not be corrected by filling it is best to provide a board floor as this will help to keep the house dry, will allow easier cleaning, and will promote the general health and welfare of the hens. A house with a board floor should be set on posts or blocks, so that it is 5 to 12 inches above the ground. When this space is left the floor will not rot so quickly and rats are not so likely to take refuge under the house. (See fig. 7.)
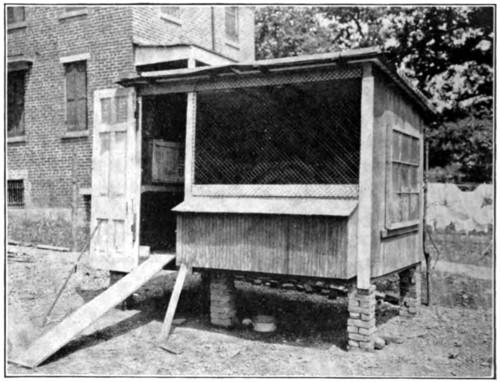
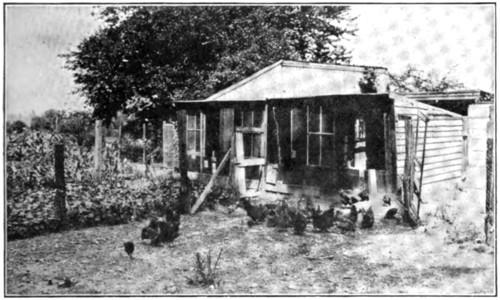
Fig. 7. A good type of open-front poultry house for a small flock. The front can be closed with a muslin curtain on cold nights. The house is set on brick piers so as not to afford a refuge for rats. Notice the nests built out on the front of the house where the eggs can be reached by raising the hinged cover.
In order to keep the flock in a clean and sanitary condition, dropping boards should be provided and roosts above them. This makes it easy to remove the droppings each morning and helps greatly to keep the house free from objectionable odors. A little sand or ashes sprinkled on the dropping board after each cleaning will be found to make the cleaning easier.
The dropping boards and roosts should be placed against the back wall. Here they are out of the way and at the same time where they are least likely to be reached by drafts. The dropping boards should be about 20 to 30 inches from the floor, depending on the height of the building. This gives space enough under them so that the hens have room to exercise and is not too high for the heavier hens to fly up to. The roosts should be 3 or 4 inches above the dropping boards. If more than a single roost is used, they should be on the same level; otherwise all the hens will try to crowd upon the highest roost. A piece of 2 by 4 or 2 by 3, laid and with the upper corners rounded off, make a good roost. A pole, or
even a piece of board 2 or 3 inches wide, may be used. If the roost is of light material and fairly long, it should be supported in the center, as well as at the ends, to prevent it from sagging badly. An allowance of 7 to 10 inches of roost space per fowl, according to the size of the birds, should be made. If more than one roost is used, they should be placed about 15 inches apart.
Nests must be provided and may be very simple. Any box about 1 foot square and 5 or 6 inches deep is suitable. An ordinary orange box with the partition in the middle serves this purpose very well, each box forming two nests. The top is removed, the box laid on its side, and a strip 3 to 4 inches wide nailed across the lower front. (See fig. 9.) Nests can be fastened against the walls of the house or set on the floor. It is preferable to fasten them against the wall, as they take too much floor space if set on the floor. One nest should be provided for each 4 or 5 hens.
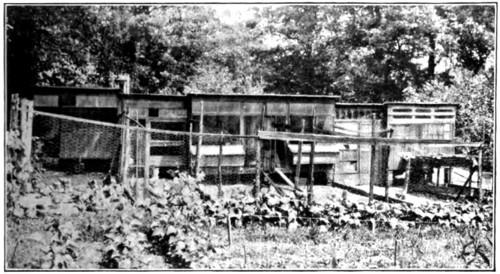
Fig. 8. A larger poultry house suitable for a suburban lot. Notice the old lumber, sash, etc., used in the construction. The utilization of such used material, which can often be purchased for a very slight sum at auction or where buildings are being wrecked, lessens the cost of the poultry buildings very materially.
The straw or other material used in the nest should be kept clean and not be allowed to get so low that the eggs when laid by the hen will strike the board bottom of the nest, as this will cause them to break and
will start the hens to eating the eggs, which is a very troublesome habit and one that is very difficult to break up once it is formed.
A litter of straw or the leaves raked up in the fall about 3 or 4 inches deep, should be used on the floor of the house. This material helps to absorb the droppings and also provides a means of feeding the grain in such a way that the hens are obliged to exercise by scratching for it.
When hens become broody, they should be “broken up” as quickly as possible. for the sooner this is done the sooner they will resume laying. To break a hen of broodiness she should be confined to a small coop, preferably with a slat bottom. Give her plenty of water to drink; she may be fed or not as desired. Not much difference will be found in the time required to break her of broodiness, whether she is fed or made to fast. Usually from 3 to 6 days’ confinement will break her, but some hens require 10 to 12 days. The broody hen will be recognized by her inclination to stay on the nest at night, the ruffling of her feathers and her picking at anyone who approaches her, and by the clucking noise she makes. The fact that her broodiness has been broken up can be recognized by the disappearance of these symptoms.
THE YARD
The yard should be inclosed by a board or wire fence. Wire fencing is preferable, as it is cheaper and the hens are less likely to fly over it. If cats prove troublesome, where one is raising young chickens, it may be necessary to cover the top of the yard with wire also. A board should not be used at the top of a wire fence, as this gives the hens a visible place to alight and tends to teach them to fly over. A 5-foot fence is high enough for most conditions, but if the hens show a tendency to fly over such a fence the flight feathers of one wing should be clipped. The larger the yard which can be provided the better the hens will do, as it not only gives them greater opportunity to exercise, but also makes it possible to maintain a sod on the yard. In most cases not enough land will be available so that a sod can be maintained.
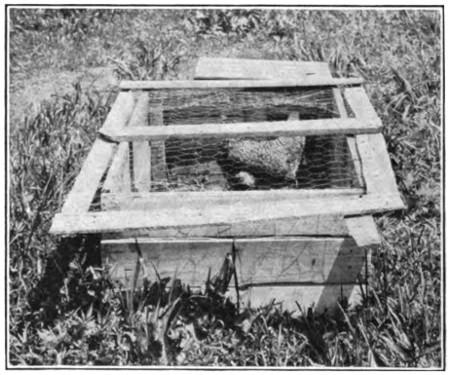
Fig. 9.—An orange box converted into a double nest by laying it on its side and nailing strips across the front to hold in the nesting material.
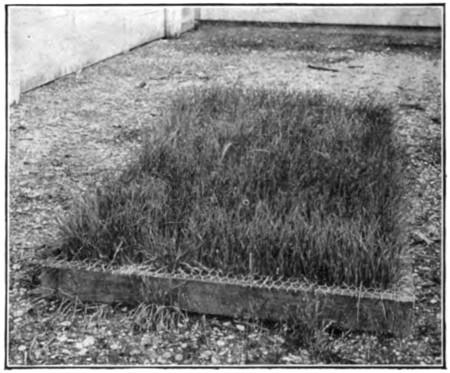
If the yard is fairly large, it can be divided into two parts and green crops, such as oats, wheat, rye, or dwarf essex rape, allowed to start in one yard while the hens are confined to the other. (See fig. 10.) The green crops should be sown very thick, and the following quantities will be found satisfactory for a yard 25 by 30 feet: Wheat, 23⁄4 pounds; oats, 11⁄2 pounds; rye 31⁄4 pounds; rape, 5 ounces. When the growing stuff reaches a height of 2 or 3 inches the hens can be turned upon it and the other yard be similarly sown.
Where it is inadvisable to divide the yard, it is possible to keep a supply of green stuff growing by using a wooden frame 2 or 3 inches high, covered with 1-inch-mesh wire. A frame made of 2 by 4 lumber, 6 feet long and 3 feet wide, with an additional piece across the center to support the wire when the hens stand on it, will be found desirable for a small yard. (See fig. 11.) A part of the yard as large as this frame is spaded up and sown, the frame placed over it, and the material allowed to grow. As soon as the green sprouts reach the wire the hens will begin to pick them off, but since they can not eat them down to the roots the sprouts will continue to grow and supply green material. This frame can be moved from place to place in the yard, and in this way different parts cultivated.
The yard should be stirred or spaded up frequently if not in sod in order to keep it in the best condition. This will not only tend to keep down any odors which might arise, but also allow the droppings to be absorbed into the soil more readily and therefore keep the yard in better condition for the hens.
Although it is necessary to keep the hens confined to their yard most of the time, it is sometimes possible to let them out where they may range upon the lawn for an hour or so in the evening when some one can be at hand to watch them, or at certain seasons of the year to allow them to run in the garden plot. This will be enjoyed greatly by the hens and will be very beneficial to them.
Fig. 10. Back-yard poultry house and flock. Notice the double yard. The green crop of the first yard has been fed off and the second yard is planted to rape, which is about ready to feed. The mulberry tree in the background provides, when the berries are ripe, nearly enough feed for a flock of 25 hens for three weeks.
FEEDING
In feeding the city flock an effort should be made to do so as cheaply as possible, consistent with the production of eggs. To accomplish this, all table scraps, kitchen waste, etc., should be utilized. Scraps of meat or left-over vegetables which can not be utilized in any other way make excellent feed. There are also many other waste products, such as beet tops, turnip tops, carrot tops, potato parings, onion tops, watermelon
and cantaloup rinds, the outside leaves of cabbages, waste lettuce leaves, bread and cake crumbs, etc., all of which are relished by the hens and can be used to the best advantage. In saving the scraps and waste it is well to separate the portions adapted for feeding to the flock and place these in a receptacle or pail of their own. Decomposed waste material or moldy bread or cake should never be saved to feed to the hens, as it is harmful to them and may cause serious bowel trouble. Sloppy material, such as dishwater, should not be thrown into their pail. It is also useless to put in such things as banana peels or the skins of oranges, as these have little or no food value. Any sour milk which is not utilized in the house should be given to the chickens. This should be fed separately, however, either by allowing the hens to drink it or by allowing it to clabber on the back of the stove and then feeding it in that condition. When the family’s table waste is not sufficient for feeding the flock, it is usually possible to get some of the neighbors who keep no hens to save material suitable for feeding. Many people are glad to do this if a small pail in which to place the waste is furnished.
frame made
by
lumber and covered with 3⁄4
mesh poultry wire used to sprout oats or other grain for the hens. The wire prevents the hens from eating the sprouts down so close as to kill the
Fig. 11.—A
of 2
4 inch
-inch
plants and from scratching out the roots. Sprouting grain unprotected will be quickly killed.
Table scraps and kitchen waste are best prepared for feeding by running them through an ordinary meat grinder. After the material has been put through the grinder it is usually a rather moist mass, and it is well to mix with it some corn meal, bran, or other ground grain until the whole mass assumes a crumbly condition. The usual method is to feed the table scraps at noon or at night, or at both times, as may be desired, in a trough or on a board. All should be fed that the hens will eat up clean, and if any of the material is left after one-half or three-quarters of an hour it should be removed. If allowed to lie it may spoil and would be very bad for the hens.
With the table scraps it is well to feed some grain. Perhaps this may be given best as a light feed in the morning. Four or five handfuls of grain (about 1⁄2 pint) scattered in the litter will be sufficient for a flock of 20 or 25 hens. By handful is meant as much as can be grasped in the hand, not what can be scooped up in the open hand. By scattering it in the litter the hens will be compelled to scratch in order to find the grain and in this way to take exercise, which is decidedly beneficial to them. If the house is too small to feed in, the grain can be scattered on the ground outside. A good grain mixture for this purpose is composed of equal parts by weight of wheat, cracked corn, and oats. Another suitable grain mixture is composed of 2 parts by weight of cracked corn and 1 part oats.

Fig. 12. An intensive back-yard poultry plant. Practically the entire back-yard is occupied by houses and covered runs, and about 70 hens are carried. Each house is 6 by 14 feet, divided into two pens with a covered yard of the same size. Each pen carries about 15 hens. The houses are raised from the ground so that the hens can run under them. The soil in the runs is renewed four times a year. A flock of 13 hens in one of these pens laid 2,163 eggs in a year. Oats are sprouted in the cellar of the dwelling house for green feed. In addition, chickens are raised here.
In addition to the grain and the table scraps it is well to feed a dry mash. This dry mash is composed of various ground grains and is placed in a mash hopper or box from which the hens can help themselves. The advantage of feeding such a mash is that the hens always have access to feed, and this tends to make up for any fault, inexperienced, or insufficient feeding. The hens do not like the dry mash so well that they are likely to overeat, but it will supply a source of feed in case they are not getting enough. The dry mash also provides a suitable medium for feeding beef scrap, a certain amount of which may or may not be necessary, depending upon the amount of meat scraps available in the table waste. If the hens show a tendency to become overfat it may be desirable to close the mash hopper during a part of the day and allow them access to it only during a certain period, preferably the afternoon.
A good dry mash is composed of equal parts by weight of corn meal, wheat bran, wheat middlings, and beef scrap. Another good mash is composed of 3 parts by weight of corn meal and 1 part beef scrap. Still a third mash, which has given excellent results, is composed of 1 pound of wheat bran, 1 pound of wheat middlings, 6.5 pounds of beef scrap, and 16.5 pounds of corn meal. The beef scrap used in the dry mash is usually the most expensive ingredient, but it is a very essential part of the mash and very efficient for egg production. It should not be eliminated or reduced unless the quantity of meat in the table scraps is considerable or unless some other product can be substituted for it. Fish scrap, when available, may replace the beef scrap, or cottonseed meal can be used to replace one-half the beef scrap in the mash. No attempt should be made to replace more than half the beef scrap with cottonseed meal, as the results in egg production and in the quality of the eggs will be unsatisfactory.
Green cut bone can often be purchased from the butcher. This material when procured fresh makes an excellent substitute for beef scrap. It should be purchased in small quantities, as it can not be kept fresh for any length of time and when spoiled may cause severe bowel trouble. It is best fed in a trough not oftener than every other day, allowing about one-half ounce per bird. Should severe or continued looseness of the bowels follow the feeding of green cut bone it should be discontinued or the quantity reduced.
Vegetable tops, parings, and other vegetable refuse supply a valuable and very necessary green feed for the hens. Lawn clippings also are a valuable green feed. They can be fed as soon as cut, or they may be dried or cured, stored in bags, and saved until winter, when they can be soaked in warm water and fed in that condition or be mixed with some of the mash or with the table scraps.
Fig. 13. Inclosure for hen and chicks with box used as a coop at the end. Both coop and run is moved each day to a fresh spot of ground. A burlap bag thrown across the top of the yard provides shade. Twenty-five chicks were put with a hen in this yard and 24 of them were raised, making good growth.
The hens should have access at all times to a supply of grit or stones of a size small enough to be swallowed readily. Grit is used by the hens to help in grinding in their gizzards the hard grains which they eat. A supply of ordinary gravel will answer the purpose of grit very well. Crushed oyster or clam shell also should be given to the hens and be kept before them at all times. If this is withheld the hens are likely to lack sufficient shell-forming material in their feed, with the result that they lay many soft-shelled or thin-shelled eggs. Grit or shell can be purchased in small quantities at any feed or poultry supply store. A plentiful supply of clean, fresh water must always be available to the hens. The fowls drink freely, especially when laying heavily, and should not be stinted of such a necessary and cheap material as water. The water pan or dish should be kept clean. If it is not washed out frequently a green slime will gather on its inner surface. This should not be allowed to happen. It is well to keep the water pan outside the house and in the shade in the summer, but in the winter, when the water may freeze, it is
best that the pan be left in the house, and it should be raised about a foot above the floor so that the hens will not kick it full of straw or other litter when scratching for their feed. When the nights are cold enough so that the water is likely to freeze the pan should be emptied each night and refilled in the morning.
LICE AND MITES
If the best results are to be expected from the flock, the hens must not be allowed to become overrun with lice or the house with mites. Usually there will be a place in the yard where the hens can dust themselves in the dry dirt. If such a place is not available, a box large enough (about 2 feet square) for the hens to get into it should be provided in the house and a quantity of dust such as ordinary road dust or fine dirt placed in it to allow the hens a place to dust themselves. A dust bath aids the hens in keeping lice in check and therefore adds to their comfort. Usually the lice are not present on the birds in sufficient number to prove particularly harmful. However, it is better to keep the hens as free as possible from this pest, and if they are not able to keep them in check by dusting themselves, other measures can be undertaken.
To rid the hens of lice, each one can be treated by placing small pinches of sodium fluorid, a material which can be obtained at most large drug stores, among the feathers next to the skin—one pinch on the head, one on the neck, two on the back, one on the breast, one below the vent, one at the base of the tail, one on either thigh, and one scattered on the underside of each wing when spread. Another method is to use a small quantity of blue ointment, a piece about as large as a pea on the skin 1 inch below the vent. If mercurial ointment is used instead of blue ointment, it should be diluted with an equal quantity of vaseline. Any of these methods will be found very effective in ridding the hens of lice and should be employed whenever the lice become troublesome. Two or three applications a year usually prove sufficient. Mites are more troublesome and more harmful than lice. They do not live upon the birds like the lice, but during the day hide in the cracks and crevices of the roosts and walls of the house, and at night they come out and get upon the fowls. They suck the hen’s blood, and if allowed to become plentiful—as they certainly will if not destroyed—will seriously
affect her health and consequently her ability to lay eggs. They may be eradicated by a few thorough applications of kerosene or some of the coal-tar products which are sold for this purpose, or crude petroleum, to the interior of the poultry house. The commercial coal-tar products are more expensive but retain their killing power longer, and they may be cheapened by reducing with an equal part of kerosene. Crude petroleum will spray better if thinned with 1 part of kerosene to 4 parts of the crude oil. Both the crude petroleum and the coal-tar products often contain foreign particles, so should be strained before attempting to spray. One must be sure that the spray reaches all of the cracks and crevices, giving especial attention to the roosts, dropping-boards, and nests, and the treatment should be repeated two or three times at intervals of a week or 10 days.[3]
For further information on the subject of poultry lice and mites and their control the reader is referred to Farmers’ Bulletin 801, “Mites and Lice on Poultry,” by F. C. Bishopp and H. P. Wood, of the Bureau of Entomology. Copies of this bulletin may be obtained free on application to the Division of Publications, United States Department of Agriculture.
HATCHING AND RAISING CHICKS
Often it is inadvisable to attempt to renew the city poultry flock by hatching and rearing chicks or buying and rearing day-old chicks. Previous experience in the raising of chickens often increases the chances of success. However, the land available is usually small in area, and no attempt should be made to raise chicks unless a plot can be provided separate from that to which the hens have access and upon which there is grass, or a supply of green feed can be furnished. Where these conditions are not available, it is better to kill the hens as soon as they have outlived their usefulness and replace them by wellmatured pullets in the fall. Where it is found desirable to hatch and rear a few chicks this can best be done with hens. Where a few day-old chicks are purchased to rear and no hens are available for the purpose, it is possible with little trouble and expense to construct a fireless brooder which will answer the purpose. Full directions for making such a brooder are given in Farmers’ Bulletin 624, page 10[4].
Copies of these publications may be obtained free from the Division of Publications, U. S. Department of Agriculture.
The hatching should be done early in the spring and should be completed if possible by the first of May. Chicks hatched before this time will have a good chance to mature and be in laying condition as pullets before the cold weather of fall sets in, and should in consequence be producers during the entire fall and winter. Early-hatched chicks are also easier to raise, as they live and thrive better than those which are still small when the hot weather begins. If it is desired to hatch and raise chicks, the reader is referred to Farmers’ Bulletin 585, “Natural and Artificial Incubation of Hens’ Eggs,” and 624, “Natural and Artificial Brooding of Chickens.”[5]
[3] [4] [5]
Copies of these publications may be obtained free from the Division of Publications, U. S. Department of Agriculture.
CULLING THE HENS
In any flock some hens will be found to be much better producers than others. Often there are a few hens which are such poor producers that they are unprofitable. Where the flock is comparatively small, the owner is often able to determine by observation which are the poor producing hens. Needless
to say, these should be the ones to kill and eat as fowls are desired for the table. All hens molt in the fall and early winter. During this molting season, which usually takes about three months, the hens lay few or no eggs. It is advisable, if well-matured pullets can be purchased at a reasonable price, to kill and eat the hens as they begin to molt, replacing the flock with newly purchased pullets. The hens should not be killed, however, until they begin to molt and their comb begins to lose its size, color, and flexibility, for if these changes have not taken place the hens will probably still be laying and at a time of year when eggs are especially valuable.
PRESERVING EGGS
A small flock of hens, even five or six, may produce enough eggs during the greater part of the year to supply the needs of a medium-sized family. Where a larger flock is kept, there will be a time during the spring and early summer when more eggs are produced than are used. These surplus eggs can either be sold or, what is perhaps more desirable, preserved in the spring for home use during the fall and early winter, when eggs are high in price and much more difficult to obtain from the flock.
The eggs to be preserved must be fresh. They should be put in the preserver on the day on which they are laid. The eggs should be clean, but it is better not to wash them. Eggs with dirty shells can be used for immediate consumption and the clean eggs preserved. Cracked eggs or those with thin or weak shells should never be used for preservation. Not only will the cracked egg itself spoil, but it will cause many of the other eggs packed in the same jar with it to spoil as well.
One of the best methods of preserving eggs is by the use of waterglass. This material can be purchased by the quart from the druggist or poultry supply men. It is a pale yellow, odorless, sirupy liquid. It should be diluted in the proportion of 1 part of waterglass to 9 parts of water which has been boiled and allowed to cool. Earthenware crocks or jars are the best containers for the purpose, since they have a glazed surface and are not subject to chemical action from the solution. The crocks or cans should be scalded out, so that they will be perfectly clean, and allowed to cool before they are used. A container holding 6 gallons will accommodate 18 dozen eggs and will require about 22 pints of solution. Too large containers are not desirable, since they increase the liability of breaking some of the eggs. Half fill the container with the waterglass solution and place the eggs in it. Eggs can be added from day to day as they are obtained, until the container is filled. Be sure that the eggs are covered with about 2 inches of waterglass solution. Cover the container and place it in a cool place, where it will not have to be moved. It should be
looked at from time to time to see that not enough of the water has evaporated so that the eggs are uncovered. If there seems to be any danger of this, sufficient cool boiled water should be added to keep them covered. Remove the eggs from the solution as desired for use and rinse them in clean, cold water. Before boiling such eggs prick a tiny hole in the large end of the shell with a needle, to keep them from cracking. As the eggs age the white becomes thinner and is harder to beat. The yolk membrane becomes more delicate, and it is correspondingly difficult to separate the whites from the yolks.
Limewater is also satisfactory for preserving eggs and is slightly less expensive than waterglass. A solution is made by placing 2 or 3 pounds of unslaked lime in 5 gallons of water which has been boiled and allowed to cool, and allowing the mixture to stand until the lime settles and the liquid is clear. The eggs should be placed in a clean earthenware jar or other suitable vessel and covered to a depth of 2 inches with the liquid. Remove the eggs as desired, rinse in clean, cold water, and use immediately.
PRACTICAL POINTERS
Keep the hens confined to your own land.
Don’t keep a male bird. Hens lay just as well without a male.
Don’t overstock your land.
Purchase well-matured pullets rather than hens.
Don’t expect great success in hatching and raising chicks unless you have had some experience and have a grass plot separate from the yard for the hens.
Build a cheap house or shelter.
Make the house dry and free from drafts, but allow for ventilation.
Fowls stand cold better than dampness.
Keep house and yard clean.
Provide roosts and dropping boards.
Provide a nest for each four or five hens.
Grow some green crop in the yard.
Spade up the yard frequently.
Feed table scraps and kitchen waste.
Also feed grain once a day.
Feed a dry mash.
Keep hens free from lice and the house free from mites.
Kill and eat the hens in the fall as they begin to molt and cease to lay.
Preserve the surplus eggs produced during the spring and summer for use during the fall and winter when eggs are scarce and high in price.
PUBLICATIONS OF THE UNITED STATES DEPARTMENT OF AGRICULTURE RELATING TO THE CARE OF POULTRY
AvailableforFreeDistributionbytheDepartment.
Standard Varieties of Chickens. (Farmers’ Bulletin 51.)
Poultry Management. (Farmers’ Bulletin 287.)
Successful Dairy and Poultry Farm. (Farmers’ Bulletin 355.)
Hints to Poultry Raisers. (Farmers’ Bulletin 528.)
Important Poultry Diseases. (Farmers’ Bulletin 530.)
Boys and Girls Poultry Clubs. (Farmers’ Bulletin 562.)
Poultry House Construction. (Farmers’ Bulletin 574.)
Natural and Artificial Incubation of Hens’ Eggs. (Farmers’ Bulletin 585.)
Natural and Artificial Brooding of Chickens. (Farmers’ Bulletin 624.)
Simple Trap Nest for Poultry. (Farmers’ Bulletin 682.)
Squab Raising. (Farmers’ Bulletin 684.)
Duck Raising (Farmers’ Bulletin 697 )
Goose Raising. (Farmers’ Bulletin 767.)
Mites and Lice on Poultry. (Farmers’ Bulletin 801.)
Standard Varieties of Chickens: 1. The American Class. (Farmers’ Bulletin 806.)
How the Produce Dealer May Improve Quality of Poultry and Eggs. (Separate 596 from Year Book 1912.)
Thanksgiving Turkey. (Separate 700 from Year Book 1916.)
The Chicken Mite, Its Life History and Habits. (Department Bulletin 553.)
FOR SALE BY THE SUPERINTENDENT OF DOCUMENTS, GOVERNMENT PRINTING OFFICE, WASHINGTON, D. C.
Refrigeration of Dressed Poultry in Transit. (Department Bulletin 17.) Price, 10c.
Commercial Fattening of Poultry. (Department Bulletin 21.) Price. 10c.
Lessons on Poultry for Rural Schools. (Department Bulletin 464.) Price, 10c.
Food Value and Uses of Poultry. (Department Bulletin 467.) Price, 5c. Eggs and Their Value as Food. (Department Bulletin 471.) Price, 5c.
Improvement of Farm Eggs. (Bureau of Animal Industry Bulletin 141.) Price, 10c.
PLAN No. 240. CAPONS AND CAPONIZING
Contribution from the Bureau of Animal Industry, A. D. Melvin, Chief.
Acknowledgment is due for this article to the United States Department of Agriculture, Washington, D. C.
A capon is an unsexed or castrated male chicken.
The true capon seldom crows.
The capon is to the poultry dealer what the fat steer is to the beef packer the source of the choicest food product of its kind. As a result of a contented disposition the capon develops more uniformly than the cockerel, and grows larger than the cockerel of the same age. Coupled with this better growth, the capon commands a better price per pound, and the demand continues good notwithstanding the fact that more and more are raised each year.
The Plymouth Rocks, Light Brahmas, Cochins, Indian Games, Langshans, Wyandottes, Orpingtons, and various crosses of these, make the best capons.
Cockerels should be caponized when they weigh from 11⁄2 to 21⁄2 pounds or when from 2 to 4 months old.
The operation is more difficult than with most other domestic animals, but can be performed rapidly and with little danger after some practice.
The making, feeding, and marketing of capons, with details concerning methods and results, are presented in this bulletin that caponizing may become a regular practice of the poultry raiser where conditions are favorable.
It is impossible to say just how long the operation of caponizing has been performed. It seems quite certain, however, that the practice was familiar to the Chinese more than 2,000 years ago. Later it was practiced by the Greeks and Romans and, through medieval times, by the people of middle and southern Europe, until in recent times it has been introduced into America. At present capons are most universally known and appreciated in France, although within the last few years the business of producing them has advanced rapidly in this country. This industry is most important in that portion of the United States east of Philadelphia, though increasing numbers of capons are being raised in the Middle Western States. During the winter months capon is regularly quoted in the markets of the larger eastern cities. Massachusetts and New Jersey are the great centers for the growing of capons, while Boston, New York, and Philadelphia are the important markets.
A Capon.
DESCRIPTION AND CHARACTERISTICS OF THE CAPON
What is a capon? A capon is an altered or castrated male chicken, bearing the same relation to a cockerel that a steer does to a bull, a barrow to a boar, or a wether to a ram. As with other male animals so altered, the disposition of the capon differs materially from that of the cockerel. He no longer shows any disposition to fight, is much more quiet and sluggish, and is more docile and easy to keep within bounds. The true capon seldom crows. Along with this change in disposition there is a change in appearance. The comb and wattles cease growing, which causes the head to appear small. The hackle and saddle feathers develop beautifully.
As a result of the more peaceful disposition of the capon he continues to grow and his body develops more uniformly and to a somewhat greater size than is the case with a cockerel of the same age. For a time the cockerel and the capon make about equal development, but as soon as the reproductive organs of the cockerel begin to develop the capon begins to outstrip him in growth. Also when finishing off the capon fattens more readily and economically. As they do not interfere with or worry one another, a large flock of capons may be kept together. Coupled with the better growth is the fact that the capon brings a better price per pound. Cockerels from 2 to 5 months
old usually bring from 15 to 25 cents a pound; if held longer than this they become “staggy,” are classed as old cocks, and do not bring more than 6 to 15 cents a pound. Capon in season brings 20 to 35 cents and often more a pound. There are two reasons, then, why it is better to caponize surplus cockerels than to raise them for market as such: (1) There is an increase in weight and (2) the price per pound is materially increased. Yet in many localities where especially fine poultry is raised, while capons usually sell for a somewhat better price, the difference is not great. In fact, for the Boston market, many capons are picked clean and sold as “south shore roasters.” Hence it will be seen that the profit in capons must depend to a great extent upon local conditions. The demand for capons continues good, notwithstanding the fact that more and more are raised each year.
SELECTION OF BREEDS
In selecting the breed best suited for caponizing several factors must be taken into consideration. Large capons bring the best prices. Consequently the breed should be large. It does not pay to caponize small fowls. Yellow legs and skin, as in other classes of poultry, are most popular. The Plymouth Rocks, Light Brahmas, Cochins, Indian Games, Langshans, and Wyandottes are all recommended by different producers, as are also various crosses of these. The Orpington also makes fine capons, but the white legs and skin are somewhat of a disadvantage in this country. The Brahmas and Cochins possess good size. By some the Brahmas are claimed to be difficult to operate upon; by others this is denied. The Plymouth Rocks and Wyandottes are somewhat smaller, but sell readily and possess the advantage of yellow skin and legs. The Langshan is large and is easily operated upon. The Indian Game is probably most useful as a cross upon some one of the other breeds, thereby improving the breast meat without materially reducing the size of the fowl. In Massachusetts the Brahma was formerly the most popular breed for this purpose because of the demand for large birds for roasters. Later crosses between the Light Brahma and the Barred or White Plymouth Rock became quite popular, while at present the pure Barred and White Plymouth Rocks are perhaps most widely used.
TIME TO CAPONIZE
In so far as the effects of the operation and the rapidity and ease of healing are concerned, the time of year when the operation is performed is of little importance. The capons seem to recover and do well at any time. Certain other considerations, however, do influence the time. The age and size of the cockerel are very important. As soon as the cockerels
pounds, or when 2 to 4 months old, they should be operated upon. The lower age and weight limits apply particularly to the American breeds, while the higher apply to the Asiatics. If smaller than this, their bodies do not give room enough to work handily. On the other hand, they should never be over 6 months old, as by this time the testicles have developed to a considerable extent, the spermatic arteries carry greater amounts of blood, and the danger of pricking these arteries and causing the fowl to bleed to death is greatly increased. The fact that capons are in greater demand and bring the best prices from the Christmas season until the end of March, and that it takes about 10 months to grow and finish them properly, makes it important to hatch the chicks in early spring so that they will be of proper size for caponizing in June, July, and August. These are by far the most popular months for the operation, though in some cases it is performed still later.

Fig. 1. Instruments used in Caponizing.
CAPONIZING INSTRUMENTS
There are several sets of instruments for performing the operation. These differ principally in the type of instrument used in getting hold of and removing the testicle. One type is the cannula (fig. 1, a). This consists of a hollow tube, the lower end of which is compressed and closed except for two small holes through which to run the horse hair or wire comprising the other part of the instrument. This type requires two hands to operate. Another type is the twisting scoop (fig. 1, b). This is a spoon-like scoop slotted in the center and mounted upon a slender rod. It is designed to slip under the testicle, allowing the spermatic cord to pass through the slot. By twisting the cord in severed. This type has the advantage of requiring only one hand to operate, but is more liable to produce “slips” than the cannula. A third style of instrument (fig. 1, i) is also in the form of a spoon or scoop, but instead of being in one piece has two jaws regulated by a slide. The testicle is caught in the scoop with the spermatic cord between the jaws, and by tightening the jaws and gently moving the instrument the cord is severed and the testicle removed. Still another type, not now in common use, is the spoon forceps. With this the testicle is simply grasped with the forceps and detached by a twisting movement. Here one hand can be used also, but the liability of slips is rather greater than with the other methods.
Figure 1, k, shows a type of forceps, consisting of two hinged arms, one of which terminates in a broad, flat surface, and the other in an end of similar shape from which the center has been removed, leaving only a narrow rim. These two ends are held closely pressed together by means of a rubber band passing across the handles. In use, the ends of the forceps are separated, the solid one slipped under the testicle and the rim then allowed to settle down over it. The cord is thus caught and the testicle can be removed. Careless or too rapid use of this instrument is likely to cause slips. Figure 1, l and m, shows two additional types of testicle removers. The type shown in l has a curved handle which brings the hand out of the line of vision, making it easier to see into the body cavity when using the instrument. A knife for making the incision into the body cavity is, of course, necessary. Almost any sharppointed, thin-bladed knife will answer the purpose well (see fig. 1, c). Some sort of spreader to spring apart the ribs far enough to allow the instruments to be inserted into the body must be used. A plain spring spreader, as shown in figure 1, d, or a sliding spreader (fig. 1, e), allowing the pressure to be gauged, will answer the purpose. A sharp-pointed hook (fig. 1, h). for tearing away the thin membranes, and a blunt probe, of which figure 1, g, is one type, for pushing aside the intestines, complete the necessary equipment. A pair of
small tweezers or nippers (fig. 1, f) is also useful in removing any foreign matter from the body.
THE OPERATION OF CAPONIZING
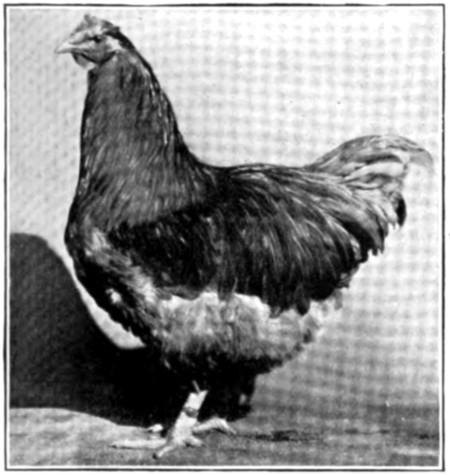
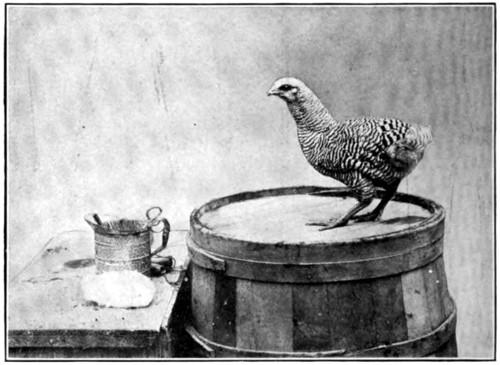
Fig. 2. Barred Plymouth Rock cockerel of suitable size to caponize.
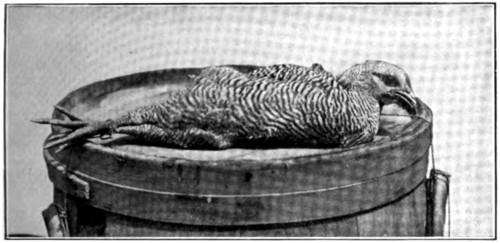
Fig. 3. Method of securing fowl in position for the operation on top of a barrel.
Fig. 4. Feathers plucked away to make ready for incision.
Before beginning the operation two conditions are absolutely essential. If these are not favorable, do not attempt to operate. The first of these is that the intestines of the fowl should be completely empty, so that they will fall away and expose the testicle to view. This can be accomplished by shutting up the fowls and withholding all food and water for 24 to 36 hours before the operation. Withholding water tends to make the blood thicker and consequently to decrease the amount of bleeding. Thirty-six hours is better than 24, especially for a beginner. The second condition is a good, strong light, so that the organs of the fowl may be clearly and easily distinguished. Direct sunlight is best for this, and in consequence it is well to operate out of doors on a bright day. Some operators have substituted the physician’s head reflector and artificial light with good success. An ordinary incandescent electric bulb fastened to a gooseneck standard and provided with a reflector can be used to good advantage when caponizing indoors. It has been suggested that a probe consisting of a small electric bulb on the end of a slender rod and operated by small dry batteries, so that it can be introduced into the body cavity, could be manufactured and used with good success.
METHODS OF HOLDING THE FOWL
When ready to operate, catch the bird and pass a noose of strong string about the legs. Do the same with both wings close to the shoulder joints. To the other end of the string are attached weights of sufficient size to hold down and stretch out the bird when placed upon the head of a barrel or box of convenient height, which is to serve as operating table. These weights are allowed to hang on opposite sides of the barrel or box (see fig. 3). A table, if so desired, may be arranged by boring holes through its top at proper distances from each other, allowing the strings to pass through these, and hanging the weights underneath. Still other ways of holding the fowl in place
have been devised, but these are unimportant so long as the fowl is held securely stretched out.
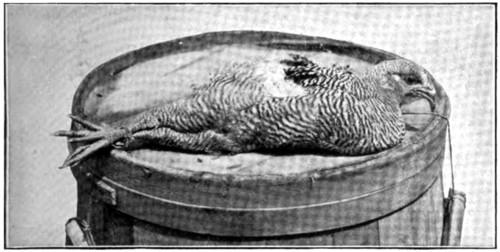
Fig. 5. The incision made. Before making the cut, the skin over the last two ribs is pulled down toward the thigh and held there while the incision is made. When the bird is released after the operation, the skin slips back into its natural position. The cut in the skin is then not directly over the incision in the body, with the result that the wound is closed and protected.
DETAILS OF THE OPERATION
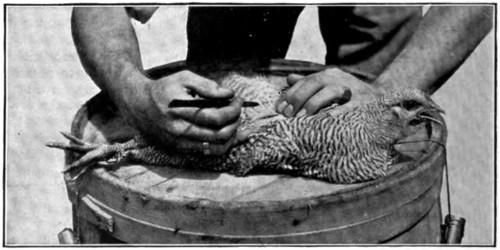
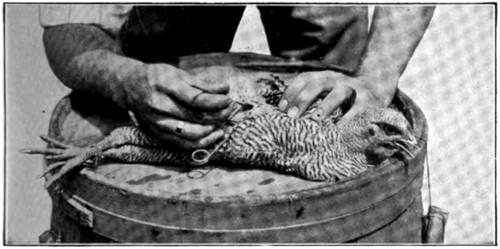
Having fastened the fowl, be sure that all the instruments are at hand. It is also well, though not necessary, to have ready some absorbent cotton and a dish of water to which have been added a few drops of carbolic acid or some other antiseptic. Having once started, carry the operation through as quickly as possible. Moisten and remove the feathers from a small area over the last two ribs just in front of the thigh (see fig. 4). With the left hand slide the skin and flesh down toward the thigh. Holding it thus, make the incision between the last two ribs (see fig. 5), holding the edge of the knife away from you as you stand back of the fowl. Lengthen the incision in each direction until it is 1 to 11⁄2 inches long. Now insert the spreader into the incision, thus springing the ribs apart, as shown in figures 6 and 7. The intestines will now be visible, covered by a thin membrane called the omentum. Tear apart this membrane with the hook, and the upper testicle, yellow or sometimes rather dark colored and about the size and shape of an ordinary bean, should be visible close up against the backbone. By pushing aside the intestines this can easily be seen, and the lower one also, in a similar position on the other side of the backbone. Expert operators usually remove both testicles through one incision. This is a desirable practice, as it saves time and is not so hard on the bird. Inexperienced operators will usually find it well to attempt the removal of the
upper or nearer testicle only and to make a second incision on the opposite side of the body for the removal of the other testicle.
If both testicles are to be removed through the same incision, remove the lower first, as the bleeding from the upper might be sufficient to obscure the lower. Each testicle is enveloped in a thin membrane. This may be and probably is best removed with the testicle, though some operators tear it open and remove the testicle only.
The delicate part of the operation is now at hand, owing to the close proximity of the spermatic artery, which runs just back of the testicle and to which the testicle is in part attached. If this is ruptured the fowl will bleed to death. The cannula, threaded with a coarse horsehair or fine wire, or one of the other forms of instrument previously described, now comes into use. If the cannula is used, allow the hair or wire protruding from the end to form a small loop just large enough to slip over the testicle. Work this over the testicle, being careful to inclose the entire organ. Now tighten up on the free ends of the hair or wire, being careful not to catch any part of the artery. If the spermatic cord does not separate, saw lightly with the hair or wire. When the testicle is free, remove it from the body. The method of removing the testicle is shown in figure 8. If only the upper testicle has been removed, turn the birds over and proceed in exactly the same manner upon the other side.
After removing the testicle, if the bleeding is at all profuse it is well to remove a portion of the blood by introducing small pieces of absorbent cotton into the body by means of the hook or nippers, allowing them to become saturated and then removing them. Be sure to remove all blood clots, feathers, or foreign matters. After the testicles and all foreign matter are removed, take out the spreaders, thus allowing the skin to slip back over the incision.
Fig. 6. Spreader in place. Tearing open the membranes.
LOSSES DUE TO CAPONIZING
Even experts are sure to kill some birds, but the loss is small, seldom exceeding 5 per cent where any considerable number are caponized, and usually not more than 2 or 3 per cent. With beginners, of course, the percentage is much larger, but with a little practice and care this is soon overcome. Any fowls which may be killed in this way are perfectly good to eat and are therefore not wasted.
A great deal of practice is required to become expert enough to operate rapidly. Consequently it is quite common in localities where many capons are grown to hire experts to do the work. These men are able to caponize a fowl every two to five minutes, and charge from 3 to 6 cents a fowl for the service. It is most humane for the beginner to make his first trials upon dead fowls.
SLIPS
Many times, particularly with beginners, while the operation seems to be entirely satisfactory, the bird will turn out to be what is known as a “slip.” A “slip” is neither cockerel nor capon, but is between the two, possessing the mischievous disposition and the appearance of an ordinary cockerel, but, as a rule, being unable to reproduce. This condition is due to the fact that a small piece of the testicle is left in the body. This piece often grows to a considerable size. As the “slips” possess the same restless disposition as the cockerels, they grow and fatten little if any better, while they do not bring as good a price in the market as the capons. Consequently it is well to use every precaution in order to avoid “slips,” as they are unprofitable as compared with capons. With the greatest care, however, “slips” are more common than are deaths due to the operation. The percentage varies all the way from 50 per cent with beginners down to 2 or 3 per cent with experts.