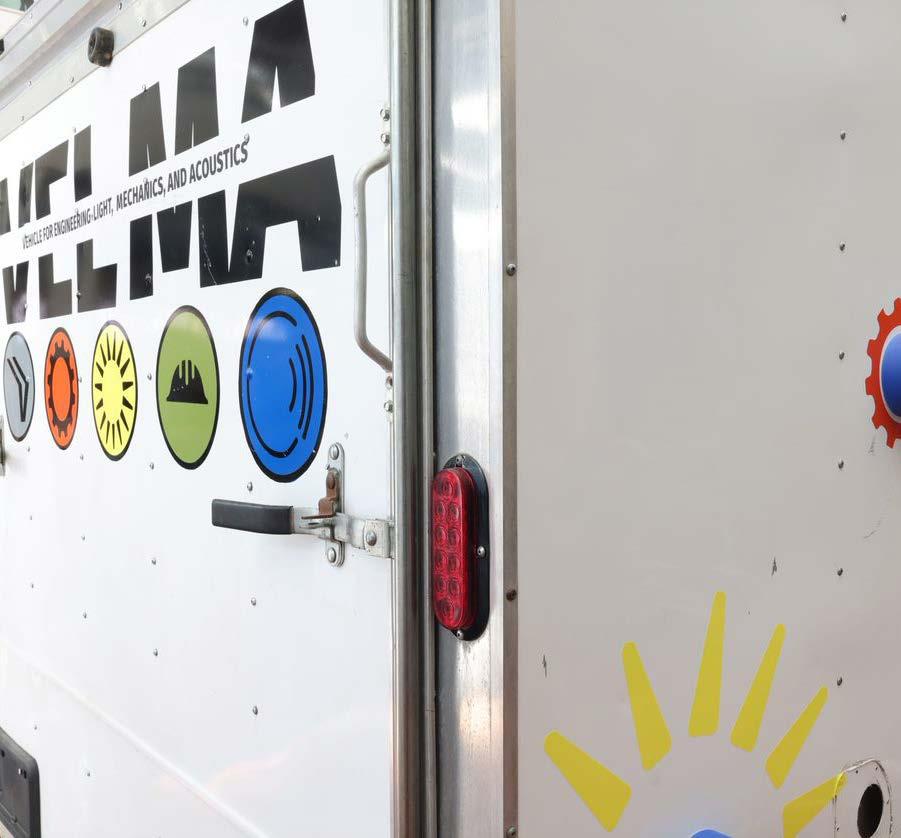
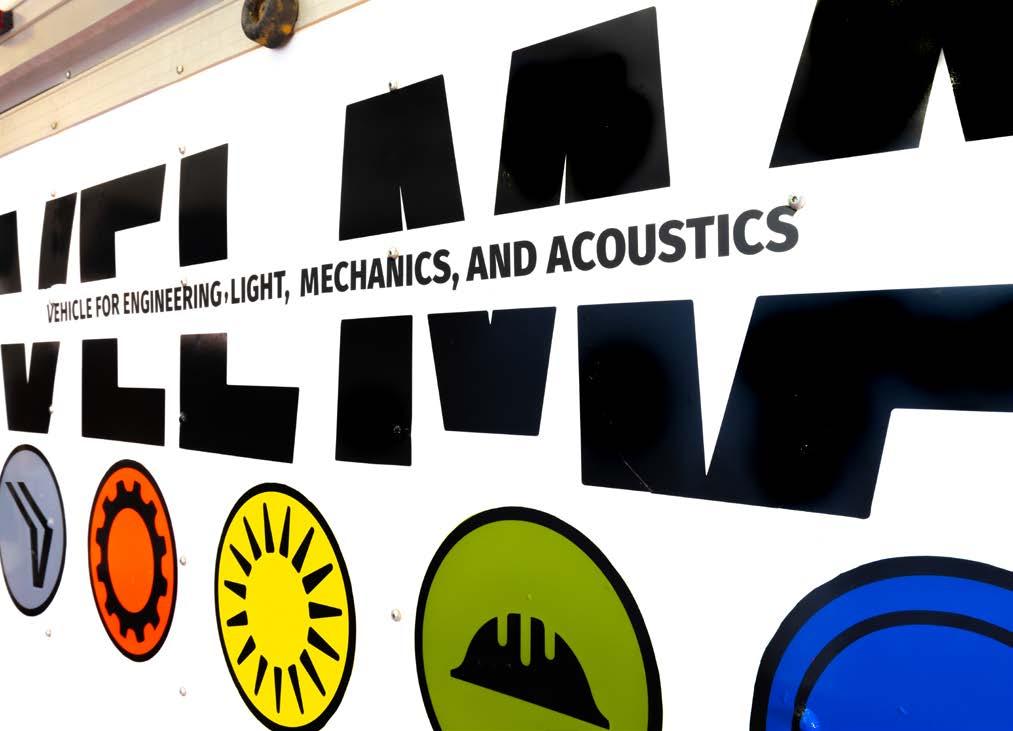
VEHICLE FOR ENGINEERING, LIGHT, MECHANICS, AND ACOUSTICS
School of Interior Architecture College of Architecture and Design University of Tennessee Knoxville Fall Semester 2021
This project is realized by a diverse and committed group of individuals and institutions that actively participated in the project’s leadership, advising, design, and technical development.
2
And to School Director Milagros Zingoni for her dedication and support to bring design-build education to the School of Interior Architecture at the University of Tennessee.
THANK YOU
A special thank you to the Angelo Donghia Foundation, which, without their financial support, this project would not have been realized. We are grateful for their dedication to supporting innovation and student experiences in interior architecture education. And to the Lenoir City Middle School, Lenoir, Tennessee who graciously partnered with us, and without, we could not have had the insights and design ideas generated from a fantastic group of 6th STEM students.
3

4
TABLE OF CONTENTS
5 01 Project Introduction 6 02 Collaboration 8 03 Project Overview 12 04 Concept and Ideation 16 05 Curriculum Design and Testing 32 06 V.E.L.M.A. Design and Construction 40 07 Arduino + Technology 70 08 Testing + Student Interaction 76 09 Outcomes and Next Steps 82
PROJECT INTRODUCTION
6
01
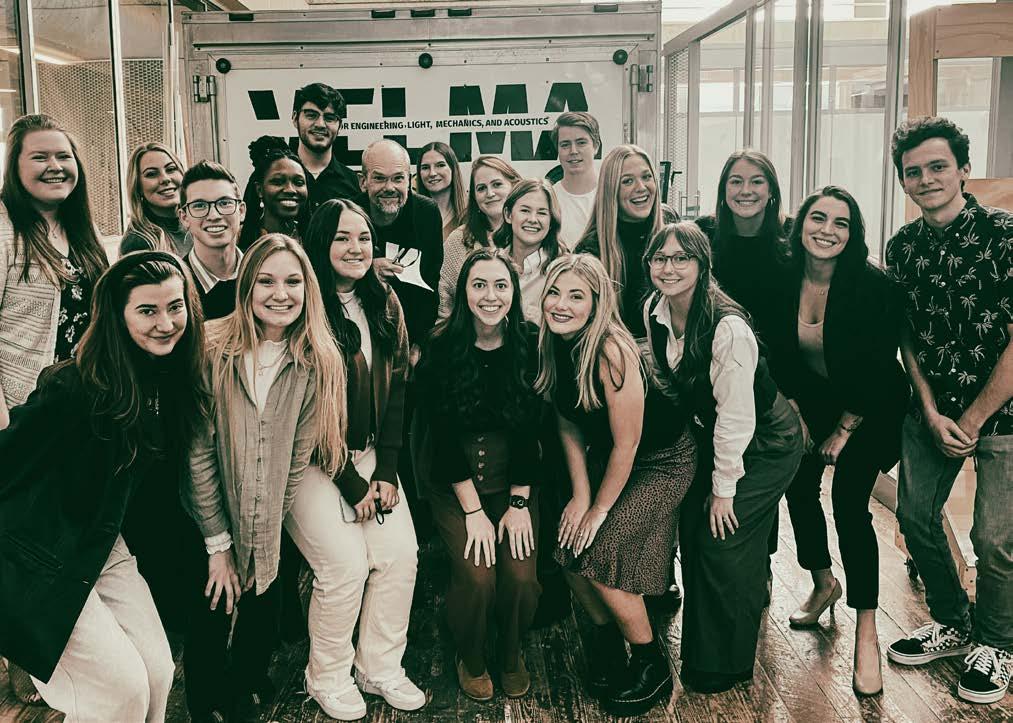
During the fall of 2021, 18 senior interior architecture students from the University of Tennessee Knoxville (UTK) completed a design-build studio to construct a prototype STEAM lab trailer named “V.E.L.M.A.” (vehicle for engineering, light, mechanics, and acoustics) for the Lenoir City STEM Middle School. The student design team partnered with 6th-grade students and crossdisciplinary experts to envision, design, and build the trailer. The VELMA trailer serves as a prototype for multi-disciplinary innovation that expands student educational STEAM experiences. This book outlines the pedagogy and practices of deep experiential learning, from the conception of the student STEM lab experience to testing the prototype with the 6th-graders.
COLLABORATION 8 PHYSICS iVsioning AdvisoryENGINEERINGDESIGNMETHODS INDUSTRIAL DESIGN EDUCATION Testing Design ConstructionLENOIRCITYMIDDLESCHOOL INTERIORARCHITECTURE
University of Tennessee Graduate School of Education, STEM Curriculum
Dustin McCarter, Holly Williams, and the 6th grade STEM Students Lenoir City Middle School, Lenoir Tennessee
Dr. Mehmet Aydeniz
02
Justin Couch Industrial Design and Interactive Technology
Dr. Tova Holmes and Dr. Larry Lee University of Tennessee Physics Department, Science Engagement
Turner Matthews Sound/Music Instrument Design
Collaboration was a foundational component to the success of the project. A group of educators, engineers, scientists, musicians, and design specialists were essential partners in all project phases. Each provided necessary knowledge, expertise, and wisdom while working with the senior interior architecture students.
Bryan Terrill Design Methods
Danny Norman and Tim Waldo Engineering and Manufacturing
10
FACULTY
SCHOOL STUDENTSINTERIOROFARCHITECTURE
David Matthews
Jacob YesseKellieKatHillaryLizzySummerEmilyHannahMadisonAndrewLaurenHannahAutumnAshleyMatthewAlyssaBriahnaAbduAdermanBondClaytonEbbertHanksHobbsJohnsonKeysLeebrickLessemRoachTessemTondreauTunnellWarrenWeeksWhite
STUDENT DESIGN-BUILD TEAM
11
12
PROJECT OVERVIEW
Partnerships and collaborations are a significant aspect of the project that allowed for the successful completion of the design-build studio. A partnership with a faculty member from the Graduate School of Education with STEM expertise helped connect the designbuild studio to a local STEM school. The STEM expert was also a semester-long partner who assisted the student design team. A 6th-grade STEM classroom and instructor were identified and became partners and co-designers in the
03 Interior architecture education includes the development of imagination to envision and implement new experiences and environments, such as the design of classroom and laboratory settings. A significant obstacle to traditional design education is providing experiential, hands-on learning that allows students to live out the challenges, complexities, and rewards of fabricating and testing their design. The STEAM trailer project is an example of 360-degree experiential learning in design education.
Once the trailer was completed, the sixth-grade students visited the tailer to test the curricular exercises. The trailer became a permanent fixture of the Lenoir City STEM Middle School.
phase of the studio posed the most significant challenges and rewards. The senior design team has three years of design education where they explored design digitally or on paper but had not experienced their work entirely constructed. The student design team learned to adapt to real-world circumstances from budgeting issues, a four-week construction schedule, supply chain complexities, materials sourcing, and little or no experience with construction. As a result, the student design team grew by correcting construction errors, learning new interactive technologies, improving team communications, and solving unexpected problems in the field.
Key student learning outcomes include developing nimbleness in addressing unexpected problems, adaptability to strategically use resources, relationship building with experts, teamwork, and empathy with the 6th-graders. The designbuild experience pointed to weaknesses in the curriculum experience related to an overemphasis on individual “do it on my own” problem solving, lack of understanding of construction detailing and application of materials, and the usefulness of “learning from” prototypes.
studio process. Senior interior architecture students provided weekly classroom experiences for the 6th graders so their ideas and passions for STEM education would help form the vision and experiences of the trailer design from an empathic or “human-centered” perspective. At the same time, a visioning team helped advise on the conceptual, curricular, and technical relevance of the design ideas generated by the student design team. The visioning team includes engineers, industrial designers, scientists, STEM specialists, and innovation consultants that worked directly with the student design team.
14
The conceptual approach for the STEM trailer was established by creating a journey map in partnership with the visioning team to build an “all-in” team design for the 18 senior interior architecture students. The student design team began designing the trailer by creating models and experimenting with light and materials. The trailer’s design was completed with digital modeling and prototype detailing before Theconstruction.construction
15
16
CONCEPT AND IDEATION
04
The concept of V.E.L.M.A. emerged from merging design ideas generated by the sixthgrade STEM students and interactive design sessions with the Leadership Visioning Team. The Leadership Visioning Team is a group comprised of experts from STEM Education, Physics, Engineering, Design Methods, and Industrial Design. The synthesis of the two groups is essential to developing an approach to the design that is empathic to the 6th graders’ needs and the wisdom and knowledge of disciplinary experts.
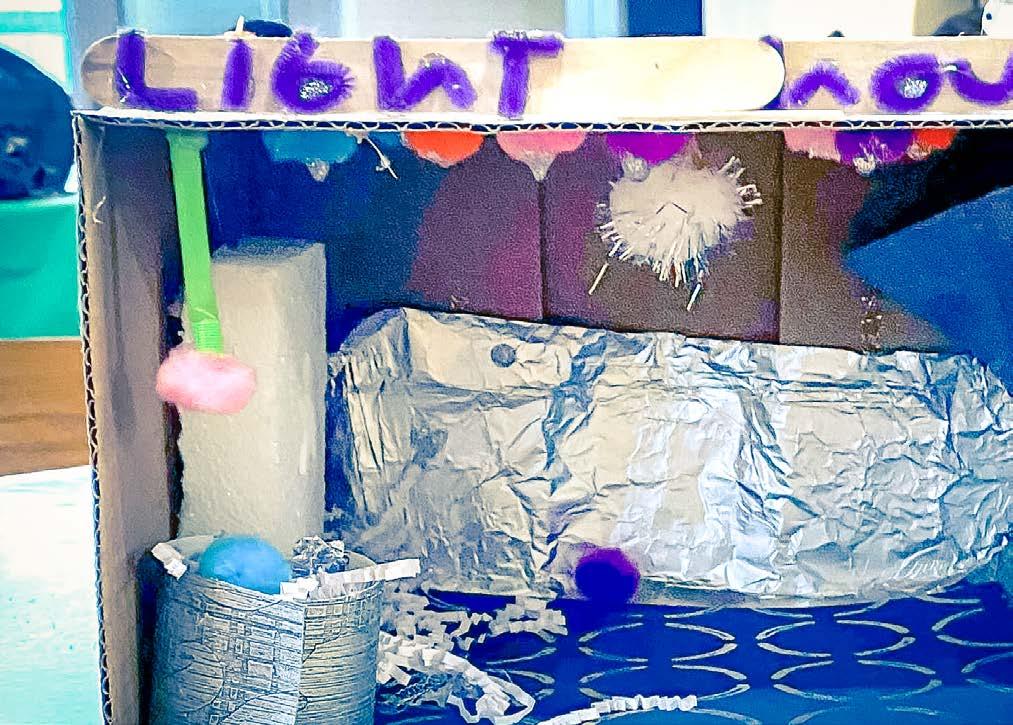
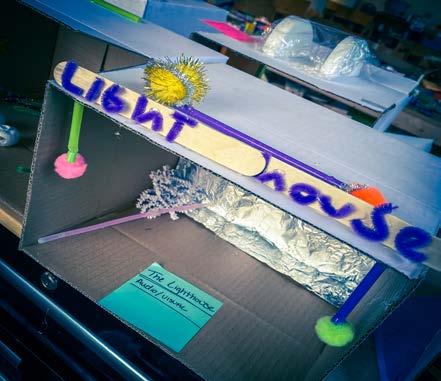
“LIGHT HOUSE” tailer model constructed by Lenoir City STEM Middle School students. Concept for an interactive light mobile STEM lab.
18

How do you want the trailer to be used.”
List three things that make you happy.
19
What are your fears for the STEM Trailer project?
The primary focus within the STEM classroom at Lenoir City Middle School is project-based critical thinking and design thinking activities to solve science, technology, engineering, and math problems. Partnership with the students, teachers and administration within the school provides invaluable insight into the students’ needs and desires. To obtain the wishes and understanding of our student design partners, we made weekly visits to Lenoir City, where we facilitated one-hour design sessions. Sessions would start with interactive question and answer sessions to learn their perspective on learning. We asked the following sample questions to gain an empathic relationship with our design partners.
List three things you enjoy.
Where would you take the trailer?
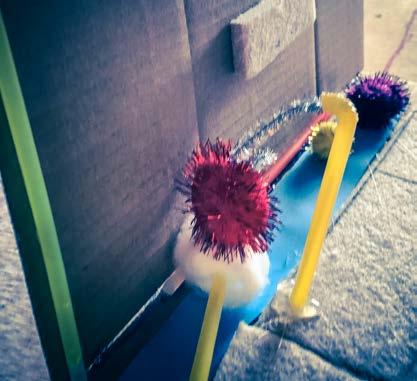
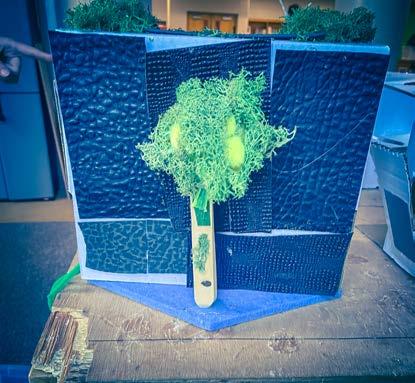
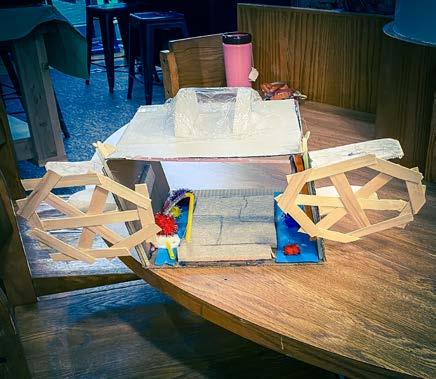
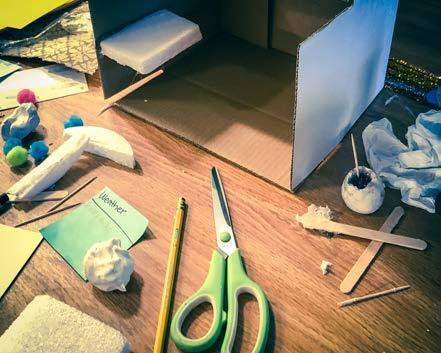
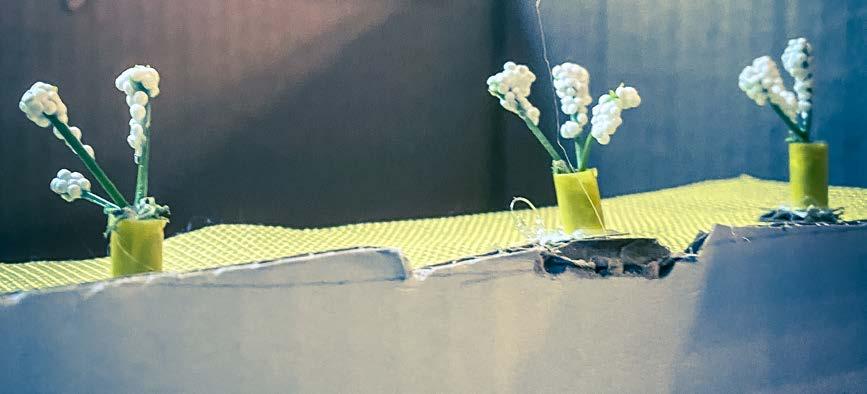
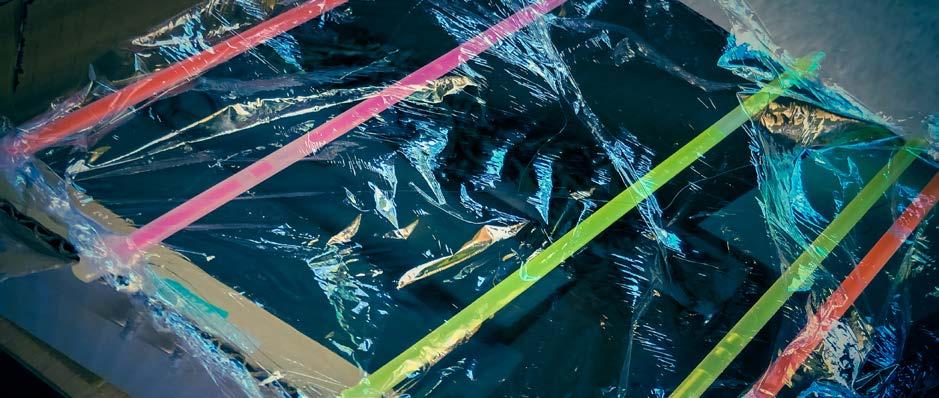
The questions were followed up with hands-on design and construction of models of their ideal mobile STEM trailers. The sixthgrade students were provided white cardboard boxes that represented the trailer and materials such as cardboard, clay, fabric samples, recycled paper, popsicle sticks, pipe-cleaners, glow sticks, and various other items provided by the UTK students. In teams of two or three students, they created a diverse set of tailer ideas that ranged from gardens to interactive lighting experiences.
What are your hopes for the STEM Trailer project?
Models created by the sixth-graders representing a variety of design ideas for their ideal STEM trailer.
List three words that describe yourself.
What are three things you have not done that you would like to do What do you want to be known for when you grow up?
20
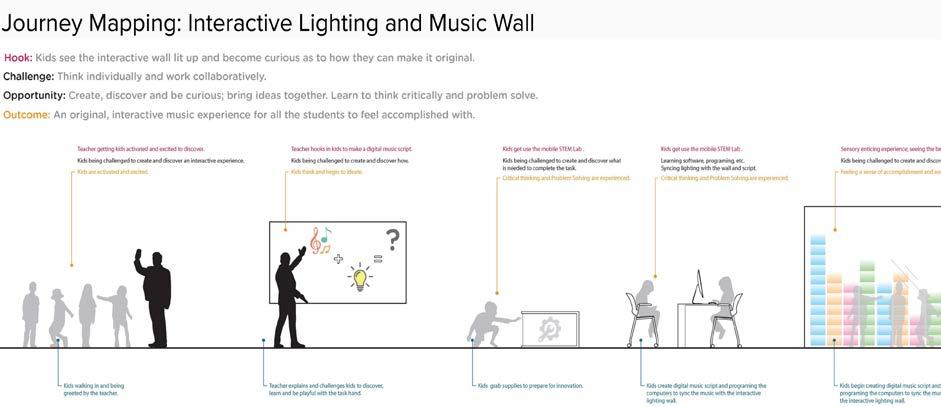
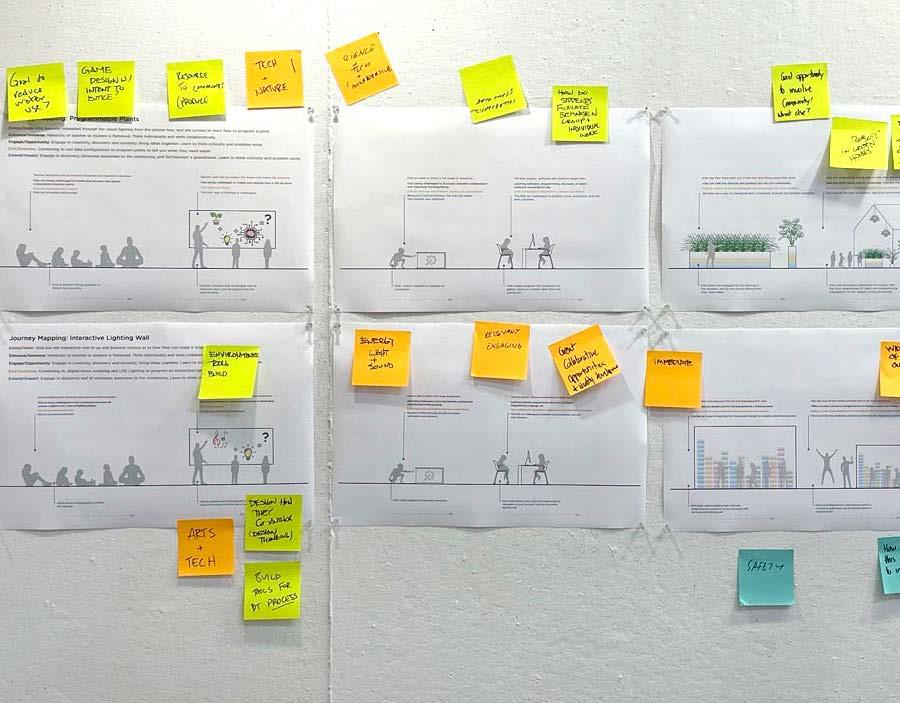
Emerging ideas from the sixth-graders design sessions included interest in light and energy and interactive experiences based in making and construction that had creative expression. From this point on, the STEM trailer would become the STEAM trailer by adding an artistic component to the science, technology, engineering, and math components. The UTK students created journey maps, a graphic representation of user actions, feelings, and thoughts over time, to outline how the users’ experiences lead to supporting the key goals and outcomes of the STEAM trailer.
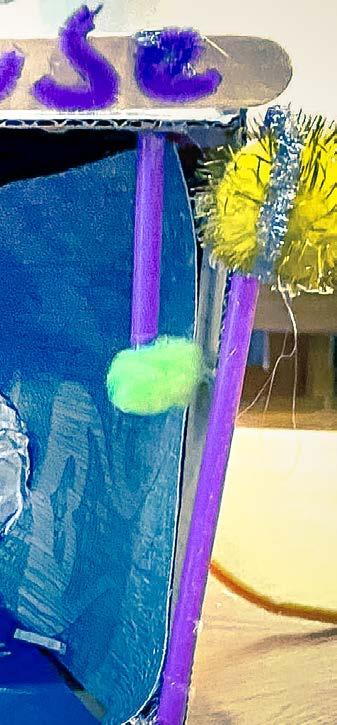
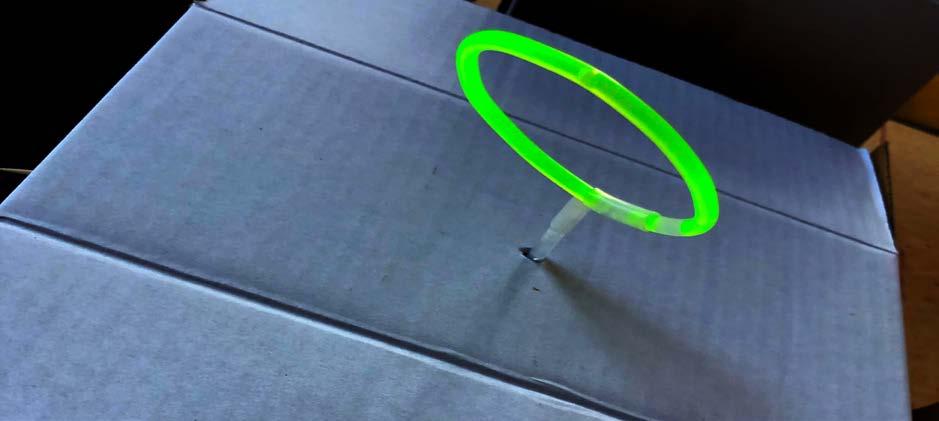
Use of glow sticks used to construct various Mobile STEM trailer models by sixth-grade students at Lenoir City Middle School.
21
22 studentsstrengths,UTK“Rose,
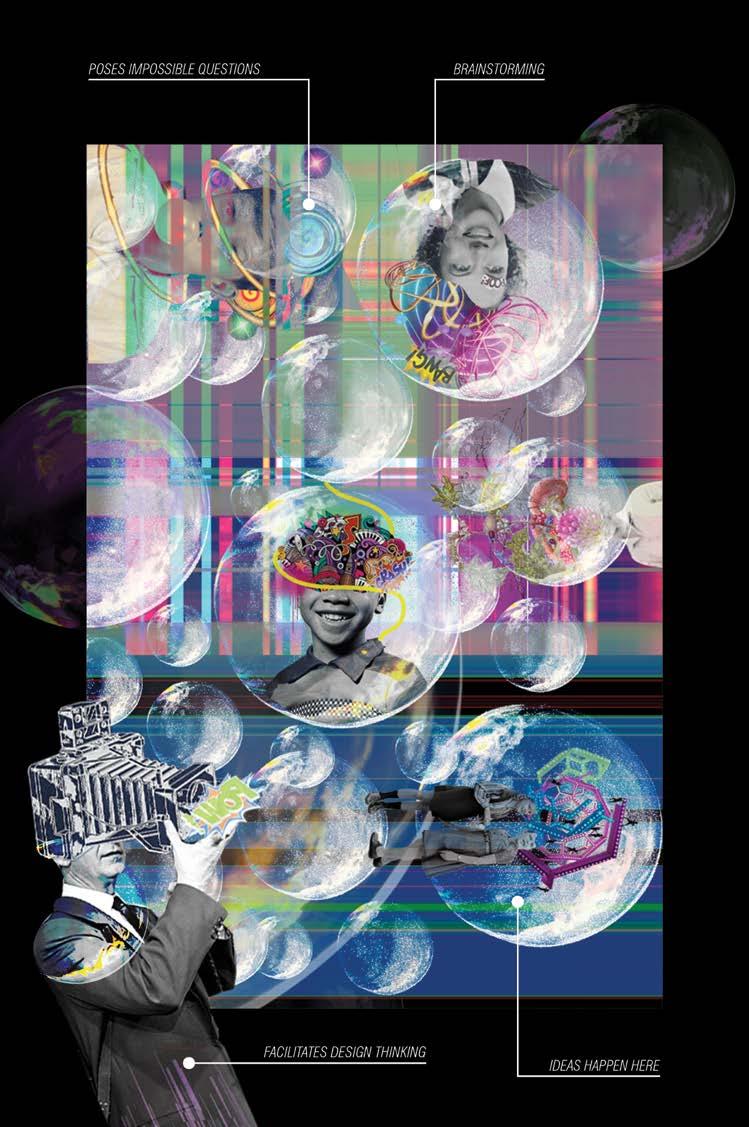
Present - the STEAM trailer has a sense of place and relation to its surroundings at Lenoir City Middle School. Relevance - the STEAM trailer addresses the issues of the sixth-graders learning and development with empathy. Actionable - the STEAM trailer is constructible and has a clear, tangible and testable outcome.
UTK Students presented journey maps to the Visioning Team. During this interactive design thinking session, the project focused more on the journey map framework by adopting the five E’s method.
Entice- the user. Enter - the STEAM experience. Engage - the core STEAM curriculum. Exit - the STEAM trailer with tangible, measurable outcomes.
Users included the students and teachers. Engage empathy mapping and understand what students and teachers were:
Othercommunity.keyissues
(seeing, hearing, touching, smelling)
SensingFeelingDoingThinking
Extend - the STEAM trailer into the
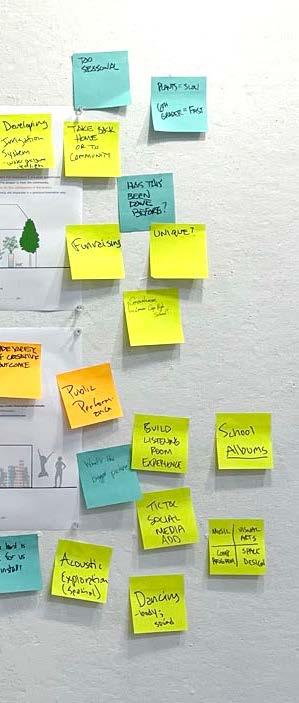
“Rose, Bud, Thorn” Design thinking session with students and the Visioning Team to identify strengths, opportunities and weaknesses of UTK students design concepts for the STEM Trailer.
FearingHoping
that emerged from the sessions included the STEAM experiences needed to become:
23
Significant - the STEAM trailer addresses the most critical issues and has a clear focus.
Usethinking.avisual metaphor for your deployable struc Teachersture. lead design thinking activities.
Students develop 3-d visualization skills. (This can be done with CAD.)
Students use Arduino or similar technologies. Has an Art or creative aesthetic aspect. abovemust includesomethingrobot,EXAMPLE:visualmeasuretrialwhole.EngagesInternet
“Wow I Did This!” ”Gotence.to make dance.”
Students are BUILDING+ DISCOVERING as the pri mary engagement activity.
Collage Two
Deployable structure where the students enter with ideation and design
Entice with a game
How will the trailer be used to build?
Building Conceptual Collages
“Feel Like a Scientist” a roll playing game of discovery to enter your Defineexperience.theMagic Circle atmosphere in the collage of the trailer.
Collage Four Exit with a Tangible Outcome
Enter with design thinking
24
Use a cube like form, or transformed cube form, in the collage as a visual metaphor for the trans formation of the trailer.
Collage One
Collage Three Engage with STEAM
Light is part of the STEAM experience. Comfort is part of the STEAM experience. The activities and experiences are original to ActivitiesSTEAM. are primarily outdoors. Students have agency in the process.
25
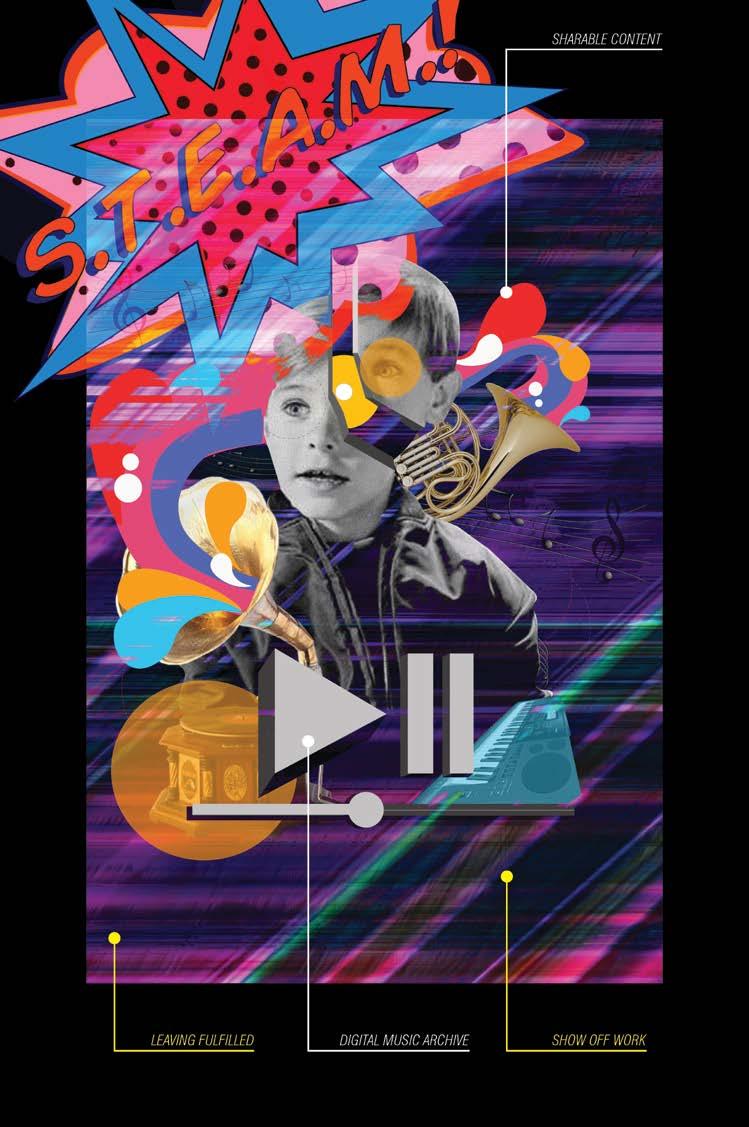
The STEAM trailer is used at other schools where the students teach the Digitalstudents.legacy and archive.
Feel like a scientist. Wow! I did this. Got to make the wheels dance. Logo of the community. Light is a core experience. Students construct and make. Has an art experience.
Collage as a medium was selected due to the ability to quickly juxtapose visual ideas that can generate various original and imaginative outcomes that set the atmospheric and experiential conditions.
Engages future manufacturing actives in part or whole. (Additive manufacturing, Robotics, or Indus Internet of Things “IIOT sensors to detect or measure things, physics to sense things…) Use a a visual EXAMPLE:metaphor….Robotics
does not mean you to have a robot, but it may include computer programming, something necessary to use a robot. Your proposal must include a concept to engage or support the above manufacturing topics.
Collage Five Extension with commu nity impact.
“Logo of the community”
This!” Experi the wheels
Four Tangible
UTK students were challenged to iterate their journey maps by creating collages that address the framework as outlined in the “Building Conceptual Collages” diagram on this page. A collage was created for each of the five E’s in the journey map. Each collage was supported with objectives determined in the collaborative design thinking sessions with the UTK students and the Visioning Team. Many of the sixth-graders concerns and ideas were incorporated, such as the STEAM trailer would support:
26

ENTICE with a game. Students will enter the STEAM trailer with an interactive game that places emphasis on science and technology.
ENTER with design thinking. Teachers will facilitate design thinking with the students to engage their ideas and perspectives related to STEAM problem-solving of issues of creating and measuring sound.
ENGAGE with programming light and sound to measure, test, and express ideas soundmaking instruments.
The totality of the experience was to engage and intertwine STEM topics with the arts to create relevance and significance to the greater community.
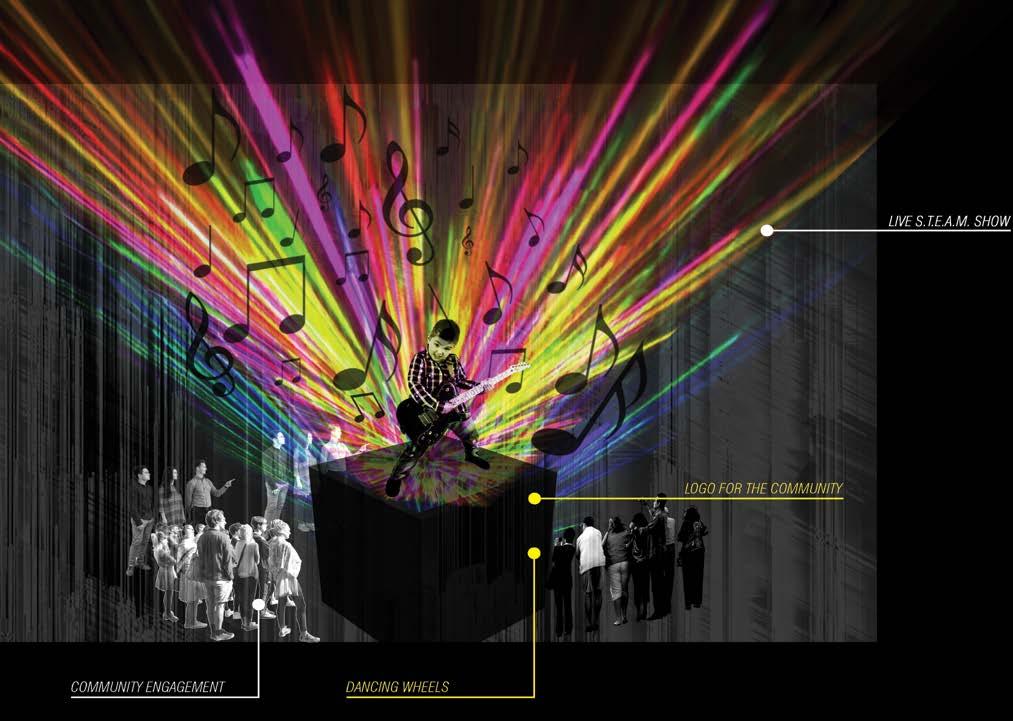
EXIT with a sound and light show. By using structuring the use of the sound-making instruments students digitally record their light and sound shows.
EXTEND with a community music event. Students create music and light events for community STEM nights.
The five E’s journey map collages represent the atmosphere and experiences that the mobile steam lab will employ.
ENTICE engagement with a game.
27
28 ENTER with design thinking.

29
ENGAGE with programing light and sound.
EXIT with a sound and light show.
30

31
EXTEND with a community music event.
CURRICULUM DESIGN AND TESTING
32
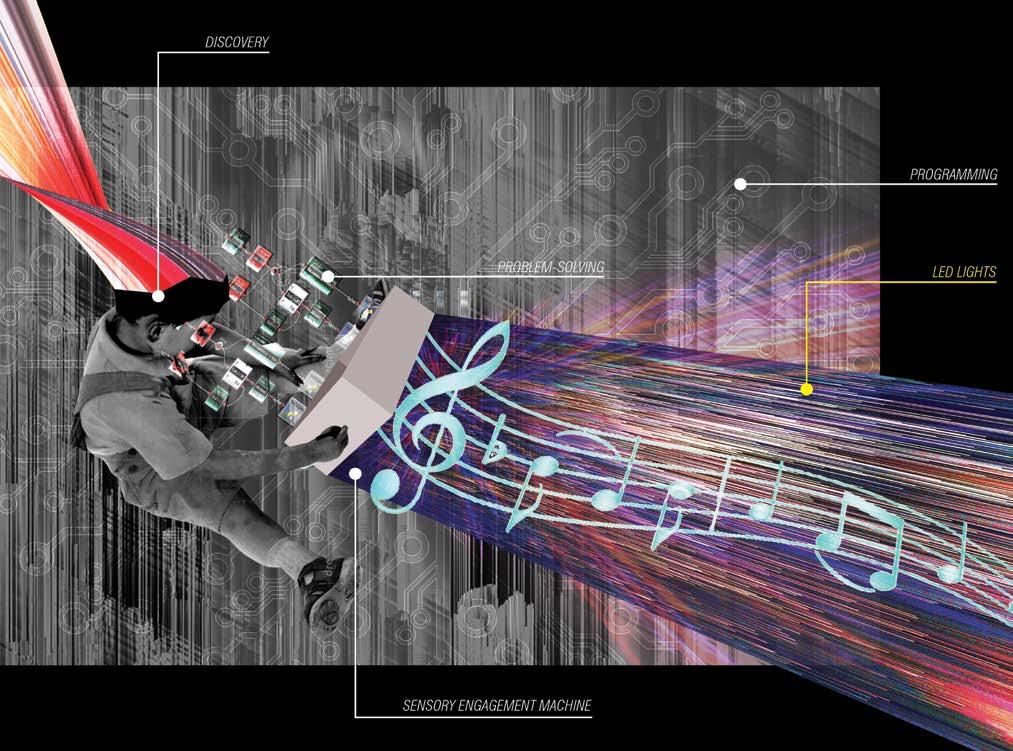
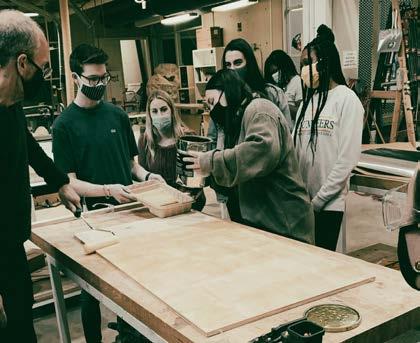
05 UTK design-build students design and testes elements of the STEAM curriculum with the Lenoir City Middle School sixth-graders. The primary focus of the curriculum design was the creation of the “entice” game that was conceived in the journey map and the testing of ideas for making sound instruments to support the “engage” core curricular activity. UTK design-build students spent three one-week sessions with the sixth-graders to discover how they explored, designed, and tested games and noise-making instruments.
Key to the success of the design of V.E.L.M.A. was designing and implementing a curricular activity to change sound energy to light energy. The UTK design-build team needed to design and test materials kits so the sixthgrade STEM students could make and test sound-making instruments similar to musical instruments with specific tonal ranges. These instruments would be eventually tested in an immersive color and light laboratory.
Sixth-grade students constructing and testing sound making instruments.

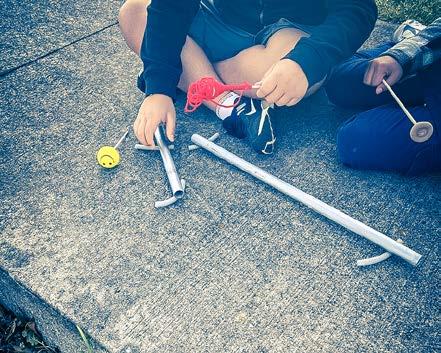
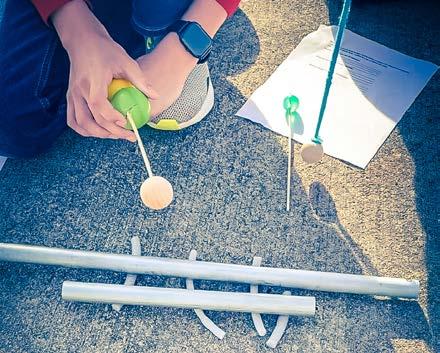
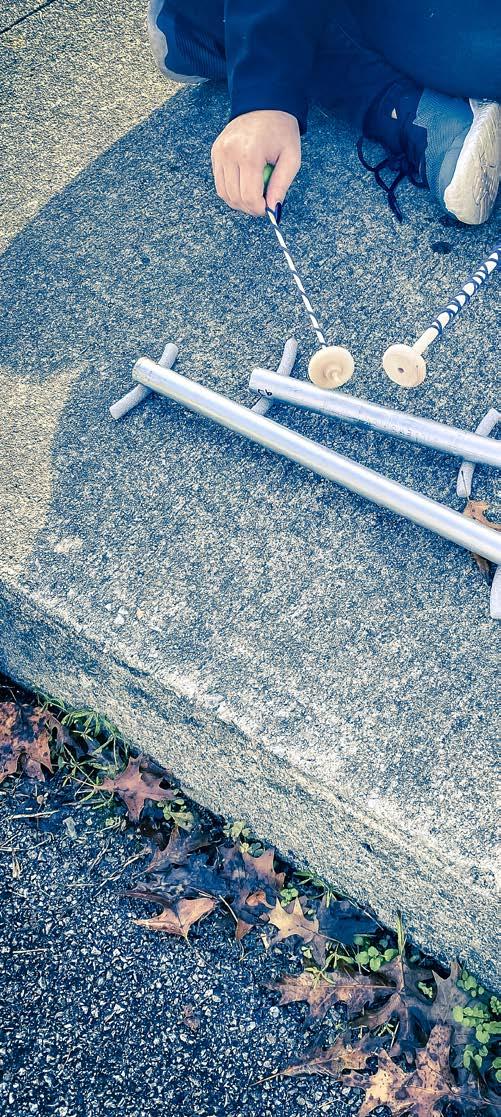
Testing of various mallet design ideas with metal tubes.
34

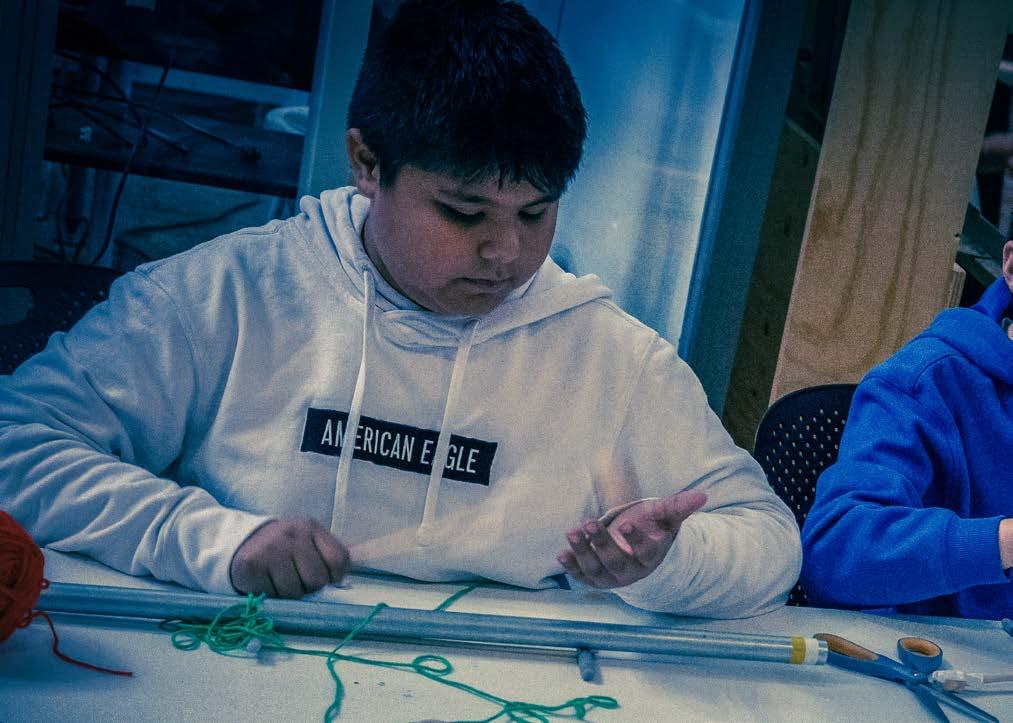
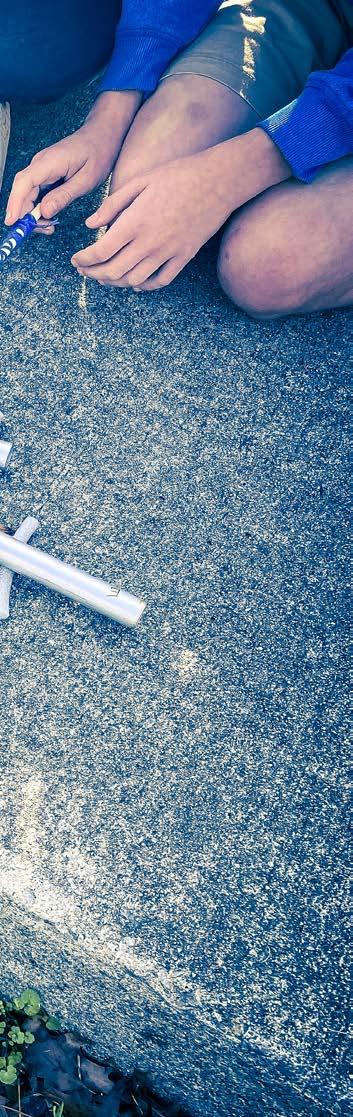
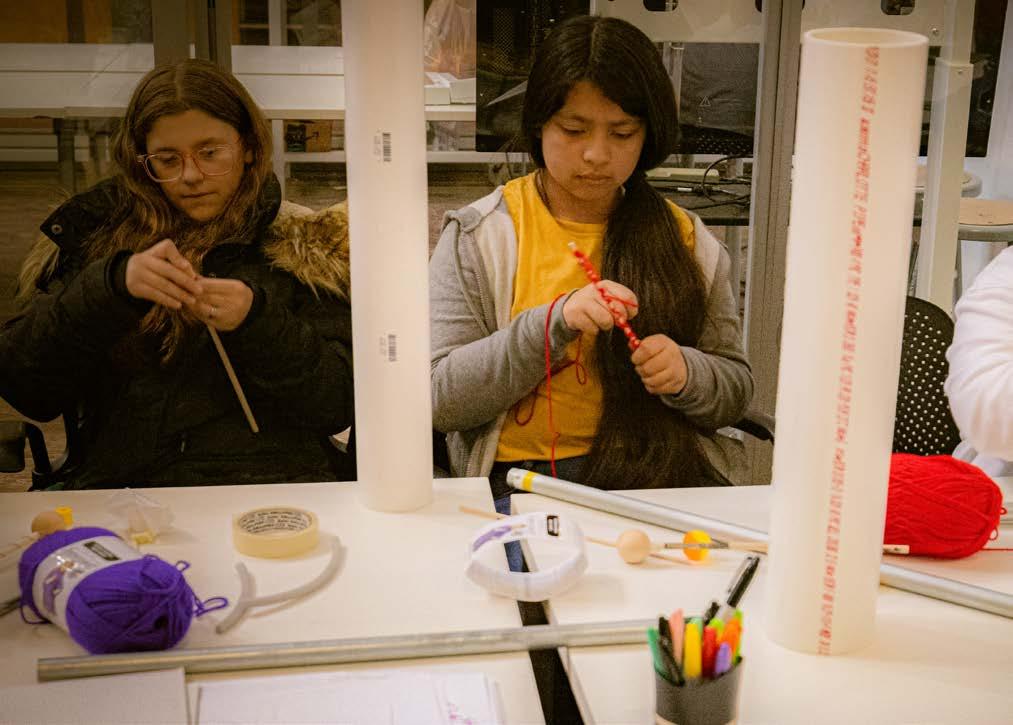
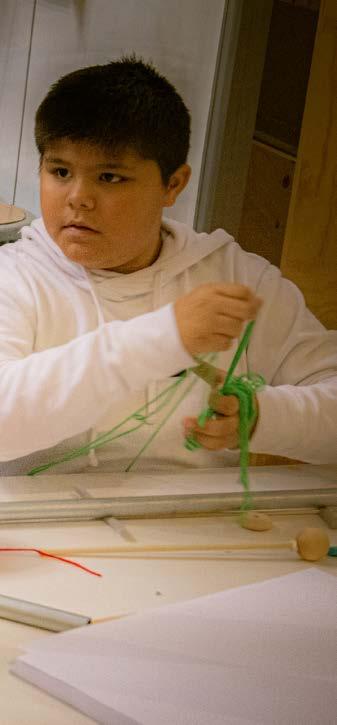
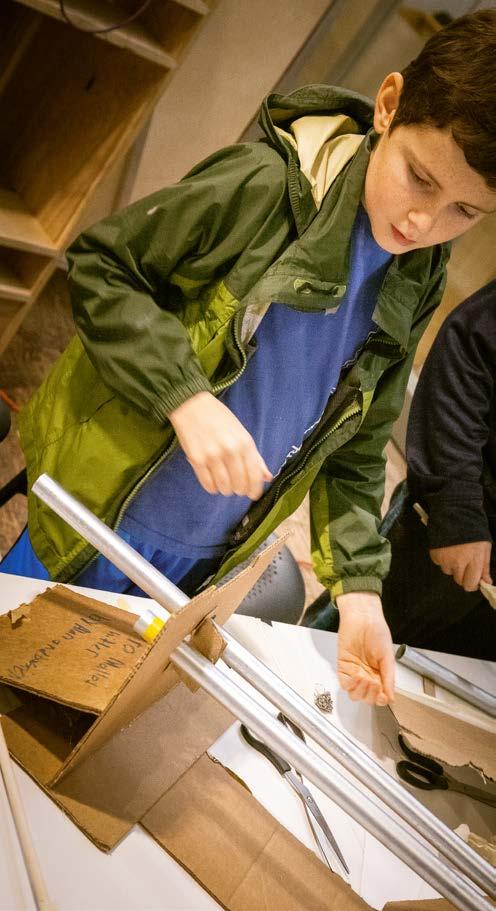
Based on the prompt of the trailer being focused on sound, light, and mainly “musical” instruments making noise from metal tubes, we tested materials to make mallets to strike the tubes with the sixthgraders. The students were placed into groups and given two metal pipes. They were asked to create mallets to strike the metal tubes to create several different sounds. Materials to construct the mallets include wooden sticks (in various lengths and diameters), wooden balls, discs, and cubes), yarn, string, pipe cleaners, a variety of toy balls, cloth, cardboard, and a variety of miscellaneous recycled materials. Tape, hot glue, and the yarn and string were used to fasten the materials together. The mallets the students designed ranged in design and noise-making capacity.
Outcomes from the experiment were the robust engagement and natural curiosity about making sounds. Of particular note is the desire of some students to modify their mallets to make the loudest possible noise. The engagement proved to be an outdoor activity, so several students could test their mallets simultaneously. The mallets created in the first curriculum testing session would be used again in the second session.
35
Oncestructure.they
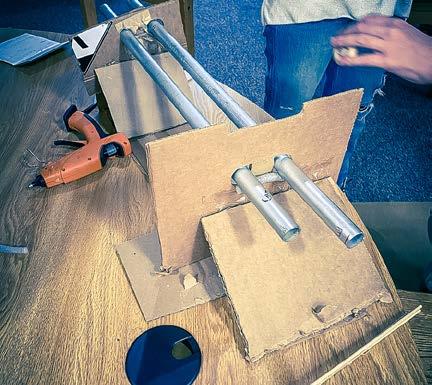
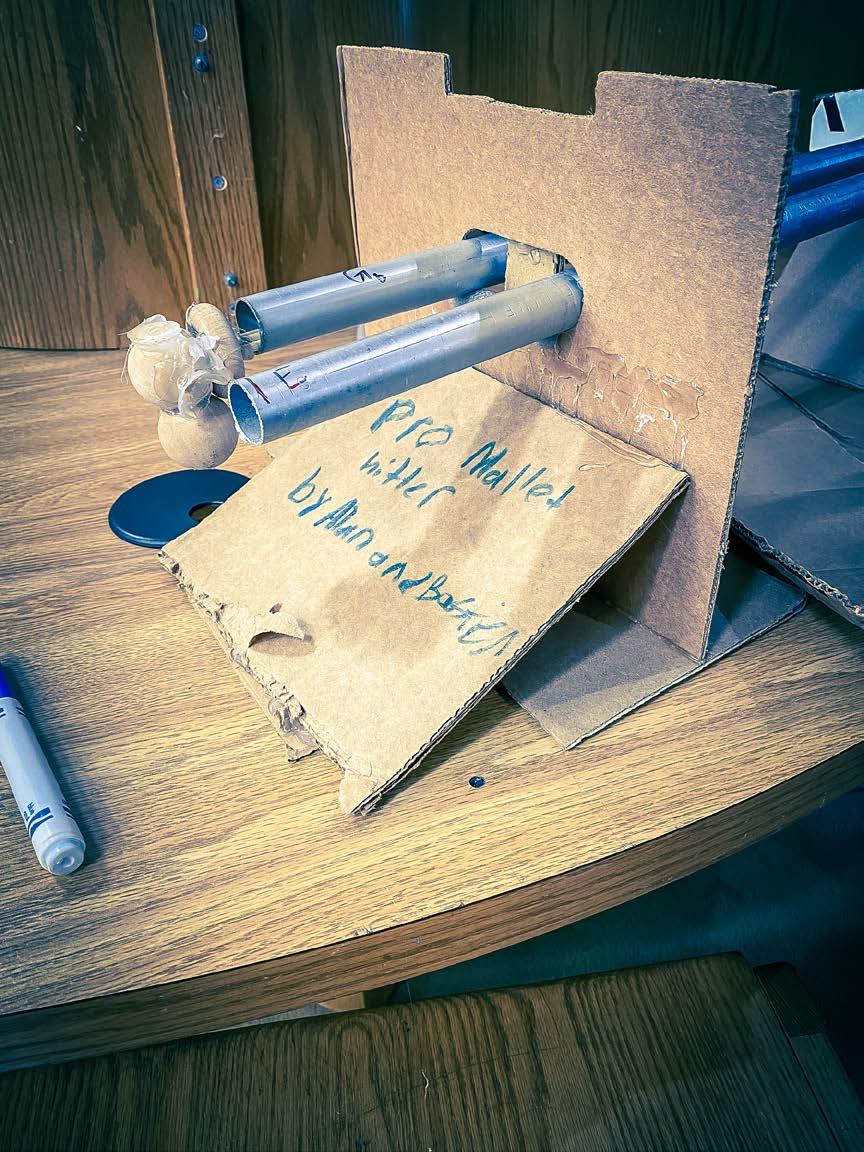
A prompt for the sixth graders were provided to see how the students imagined sound-making instruments and problem-solved on the second curricular design testing day. They were asked to design a rig (or stand) that would hold two of the metal pipes and create a sound that was in tune with the requirements of that given pipe. (Each pipe was tuned in advance to a particular note.) The students were given several materials, including fabric and installation, and they used cardboard for their primary
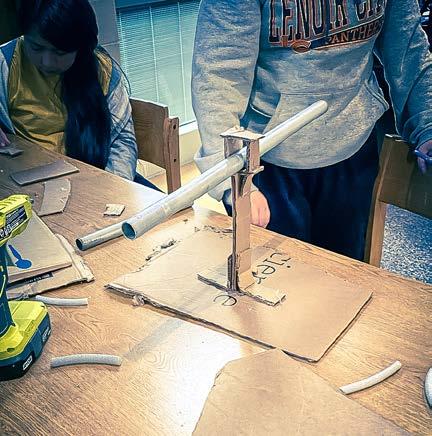
had completed a design for a rig to support the tubes, the students were asked to test the sounds with the mallets they designed in the last experiment. The students tested the sounds that occurred when they hit the pipes and adjusted their structure if the sound was too muffled or sounded flat. Apps on smartphones were used to measure the tone. The students used critical thinking to solve the problems and modified their designs accordingly. When placing the tubes in the rigs, the students discovered that changing the locations of the supports creates tones longer and more pure in quality. The materials used for the supports impacted tone quality as well. Material that transmitted vibrations easily lowered the quality and sound of the tone.
36
37
Testing
38
of board games patters

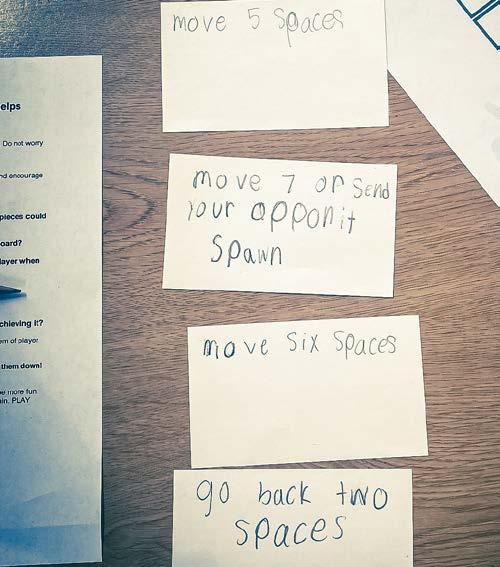

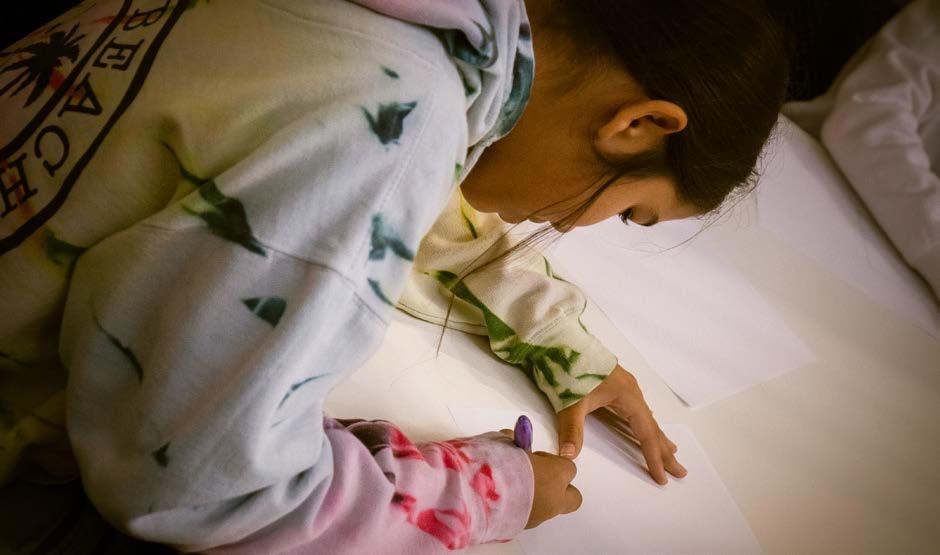
On the third day of the curricular design and testing, the sixth-graders explored a game’s design. The objective of the UTK design-build team was to gain insights into how students engaged in games as part of the design process for V.E.L.M.A.’s entice Thegame.day
They were given various additional materials such as beads, disks, dice, blank cards, fabric, markers, colored pencils, and colored paper to design the “perfect game.” Each group came up with a set of rules while playing through their original game, and some students altered their game when faced with a problem. Many of the games were variations of existing games, and the creation of clear rules became central to the success of playing the game.
39
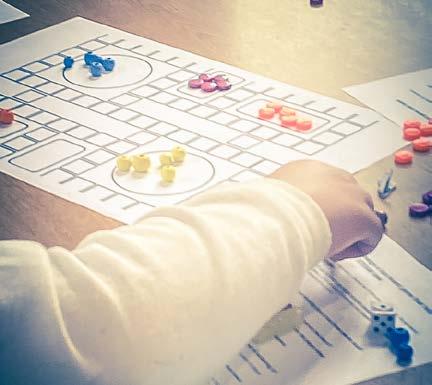
started by brainstorming what made a good board game by answering questions. Some of the questions included “what makes a board game fun,” “what are your favorite board games,” “what must be included in a board game,” and several other questions. The kids were then put into groups and asked to create their board games using a sheet of paper with preprinted geometric patterns.
games using geometric
V.E.L.M.A. DESIGN AND CONSTRUCTION
40
06
42
43

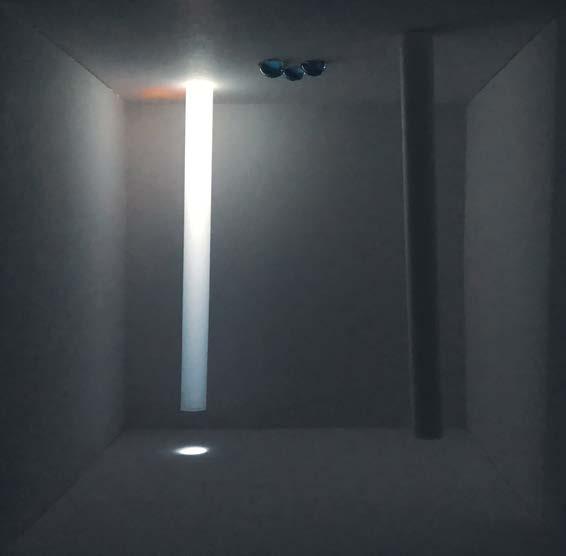
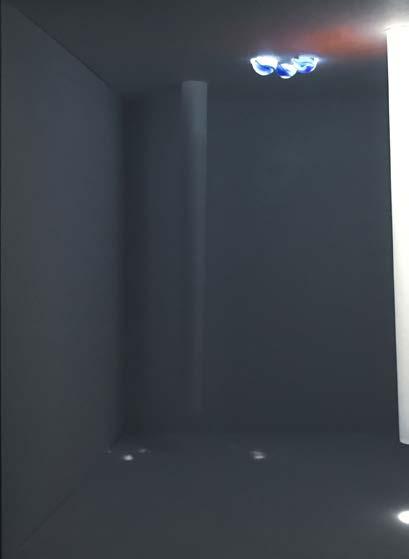
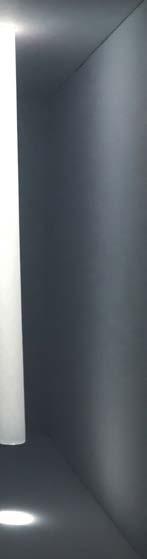
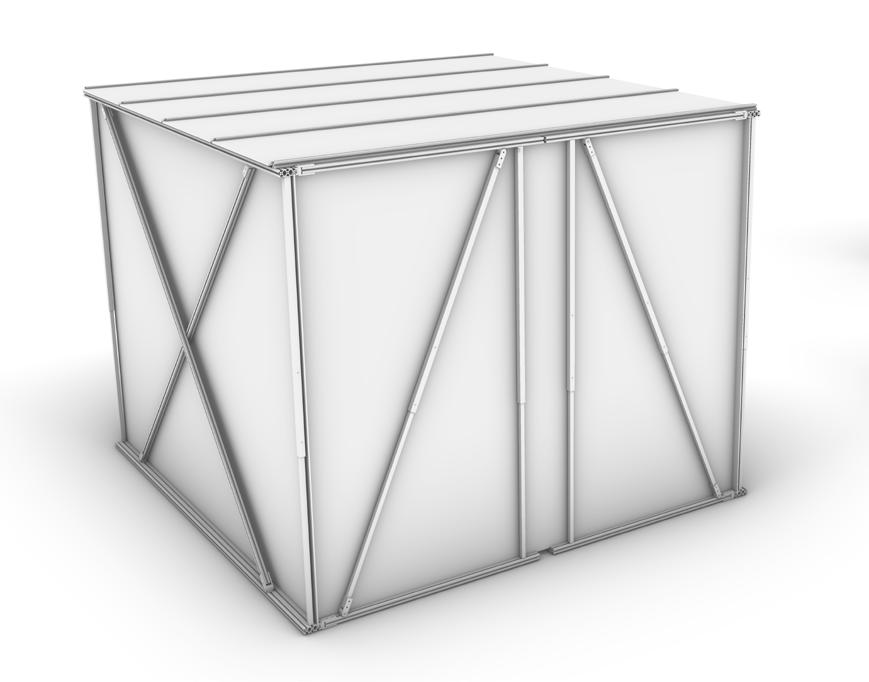
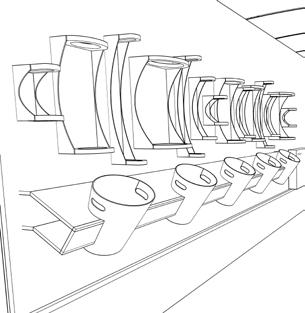
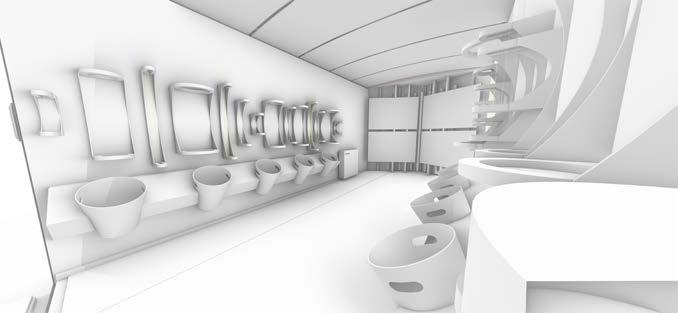
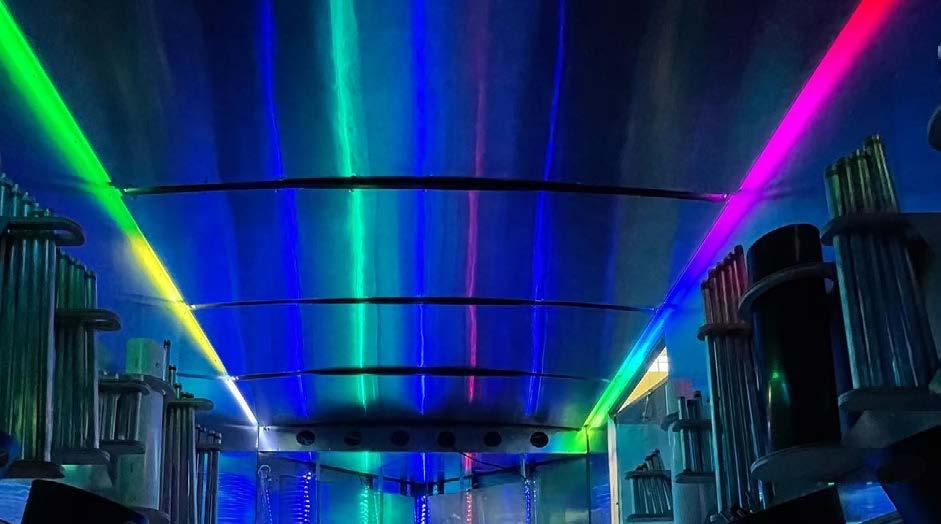
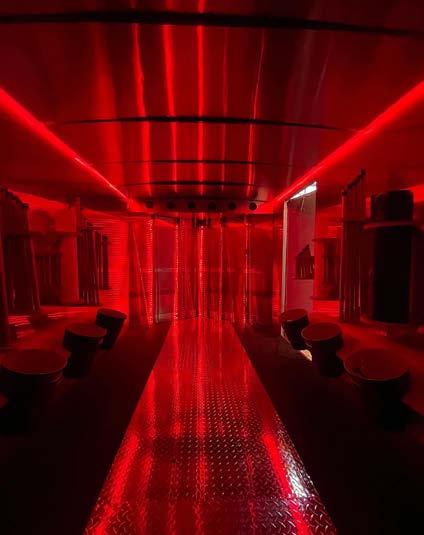
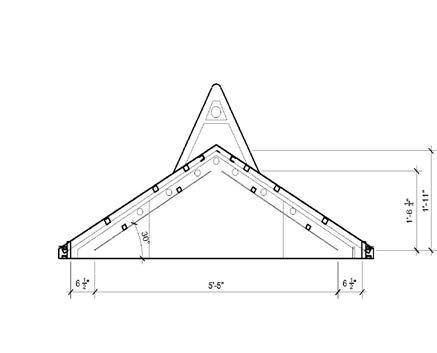
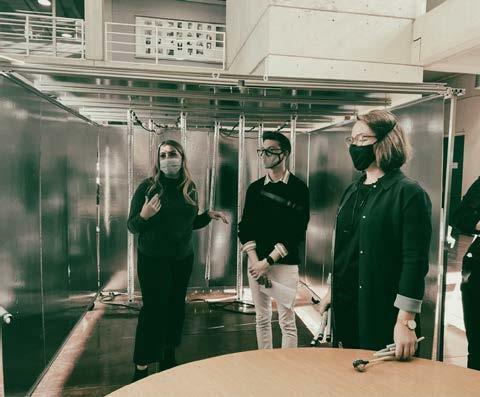
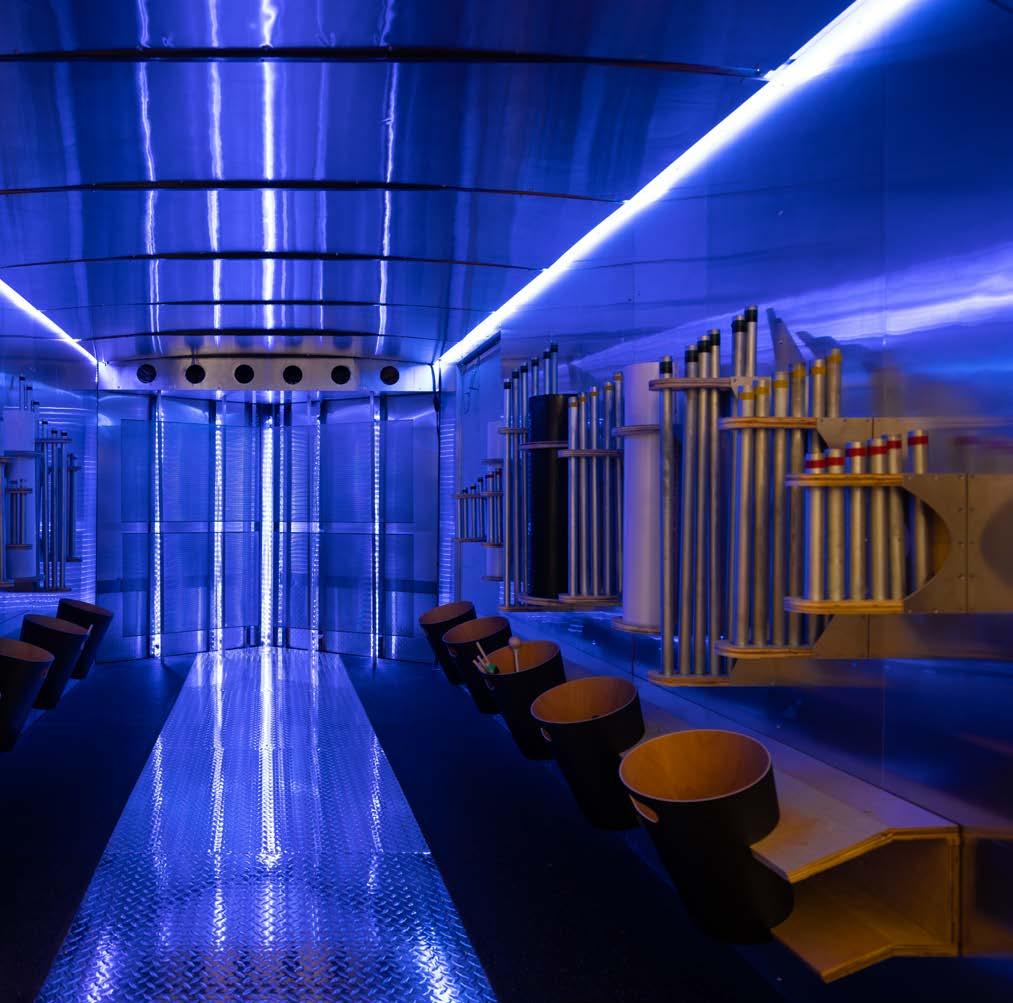
The design of V.E.L.M.A transitioned from conceptual to actualized, constructible de sign through a charrette session where the UTK design-build students research prece dent projects and ideate with sketches and models. Inspiration was found in the work of Yayoi Kusama’s infinity mirror rooms. Her fully immersive light spaces reflected in finitely to create spatial depth with vibrant colors. Students tested material models with light sources in the form of tubes to explore the relationship between space and light in cubic interiors. The synthesis of Kusa ma’s immersive light spaces and the tubular shapes of light formed the design direction for V.E.L.M.A. and the deployable structure. The deployable structure was to become an immersive light and sound cube, with the STEM students able to test their sound-mak ing instruments. The trailer would become a “candy shop” of materials to build the sound-making instruments.
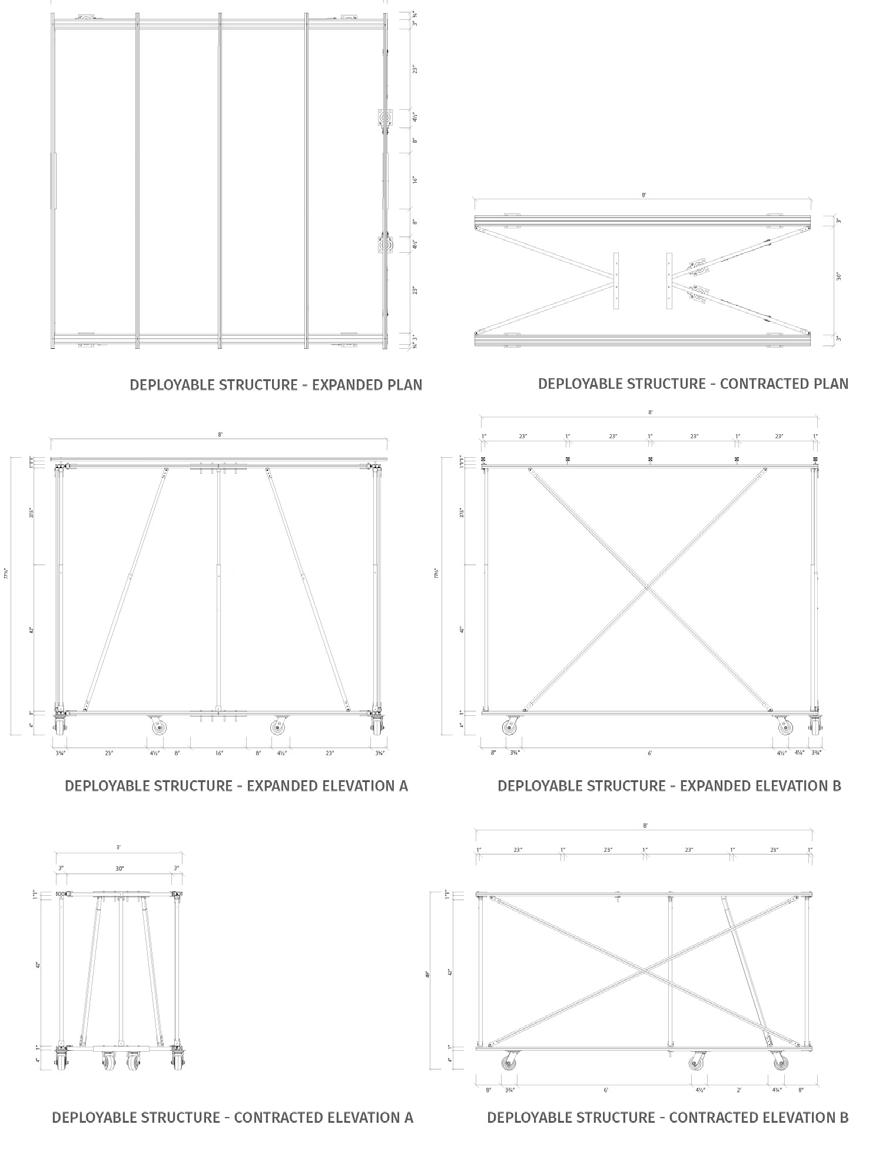
The goal for construction was to create a structure that could be inhabited at full height and have the ability to contract to fit into the V.E.L.M.A. trailer for transportation. The final design measures 8’x8’x6’ 5½” at full size and 8’x3’x4’ 1” when folded.
44
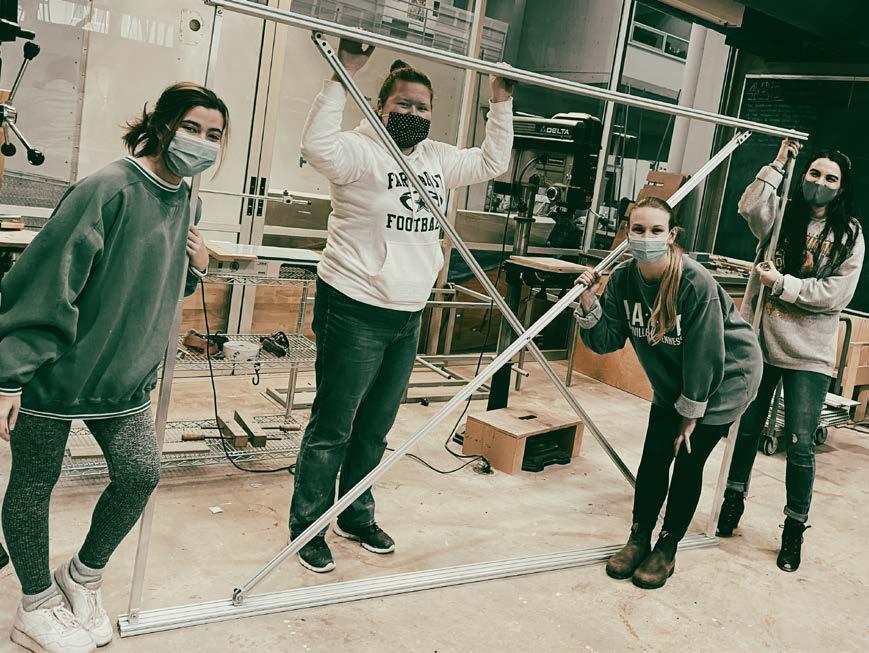
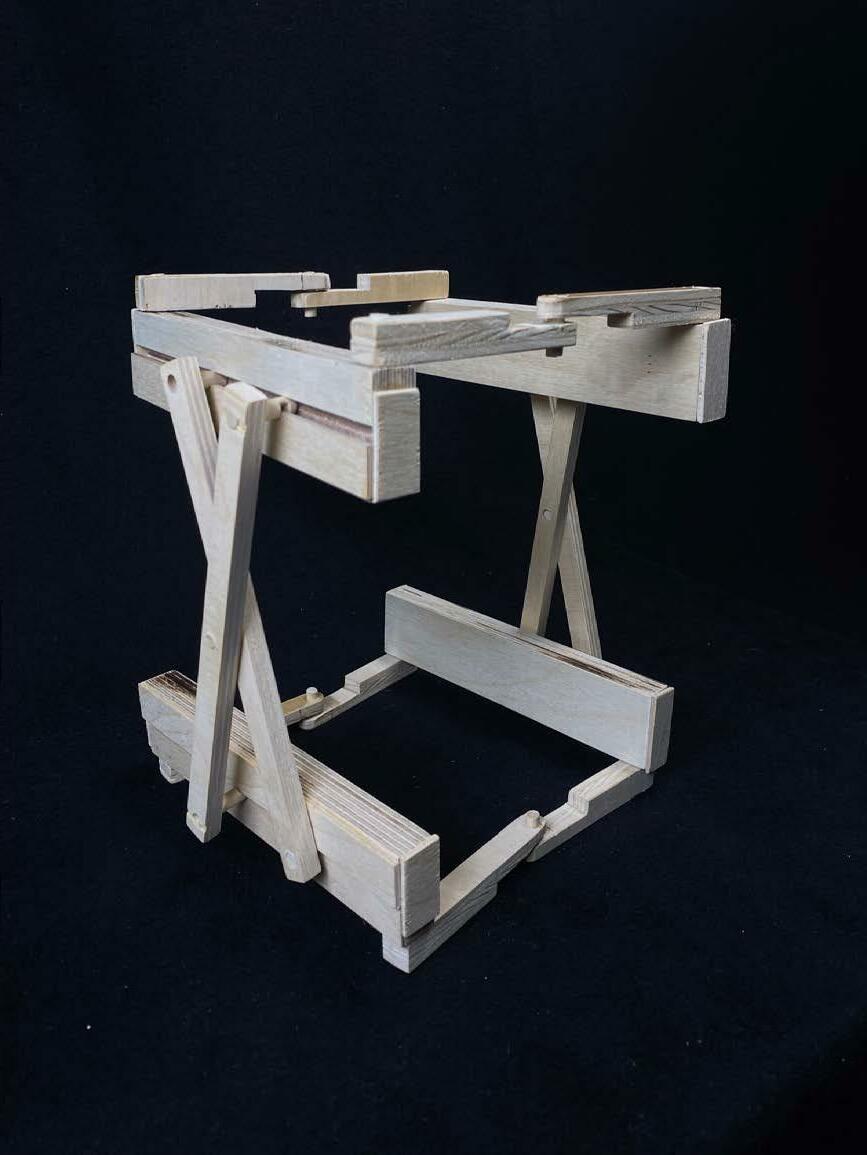
The deployable structure was required to fold into a compact shape so it could be stored inside the trailer. Study models for the deployable structure focused on constructing movable parts. Exploration of structure to fold/bend/collapse so that people could inhabit the space drove the design exploration. Some of the joints we investigated were x-bracing, bennet joints, and canopy pins. T Slot aluminum extrusion system was chosen for the framework of the deployable structure to allow for rapidpaced modular construction.
Wooden scale prototype of the deployable structure to test the ability to fold into a compact form.
45
46
47
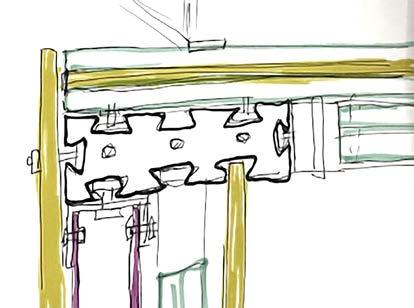
Plywood panels were constructed with laminated mirror mylar to enclose the space and to reflect the light in multiple directions. The structure incorporated casters for easy deployment from V.E.L.M.A. Adjustable cross-bracing provided structural stability that could be collapsed into a compact form. The deployable structure is intended to be a part of the STEAM learning experience. The STEM students are to be able to deploy the structure independently as part of the use of V.E.L.M.A.

48
Research into instruction for children led to the use of LEGOinspired manuals. LEGO instruction manuals are practical and challenging for children to use and assemble toys. Colorful, clearly delineated images are used to illustrate assembly systems. The instructions employ minimal words and rely on visuals to deliver the step-by-step process. This system was ideal for creating an instruction manual for putting the deployable structure together.
49
Creating an instruction manual with minimal words is essential for effective communication with a broad range of student learning preferences. The primary use of visual information places focuses on spatial skills for problem-solving. The deployment of the structure requires the use of kinesthetic abilities and cooperation with peers.
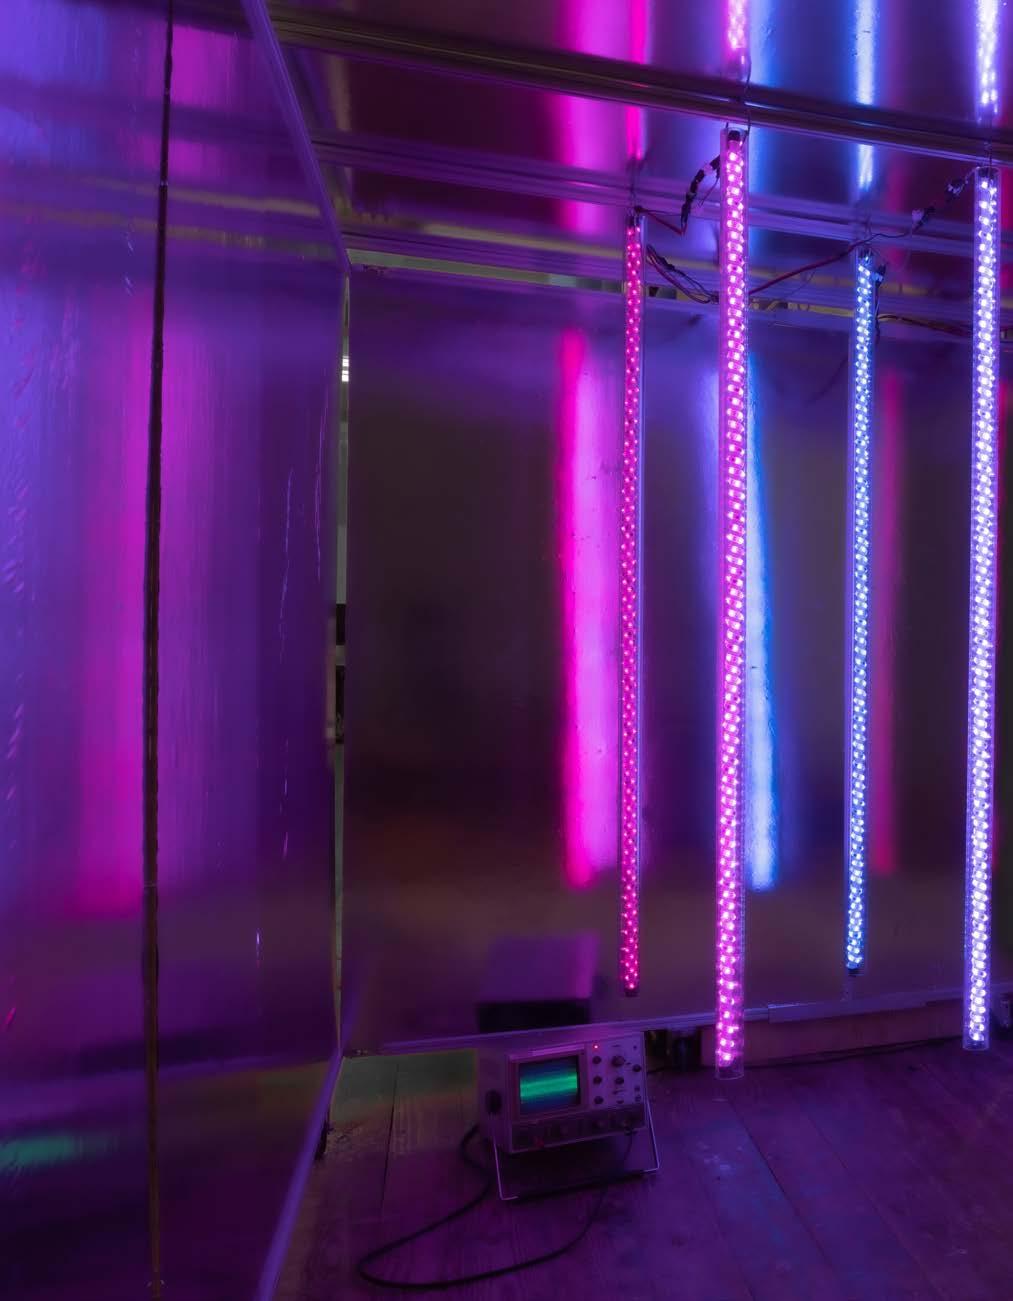
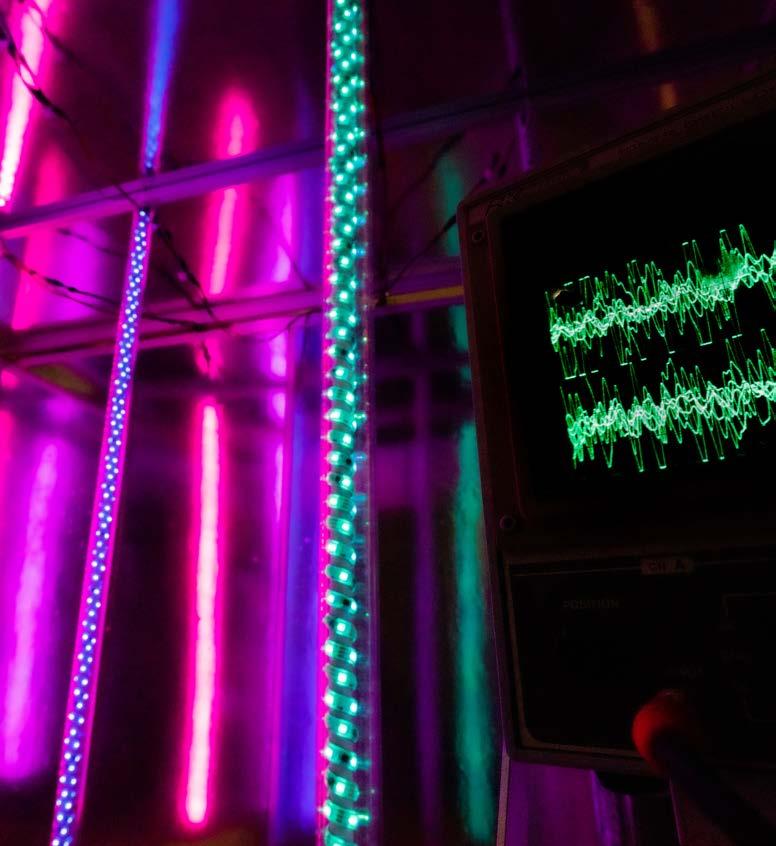
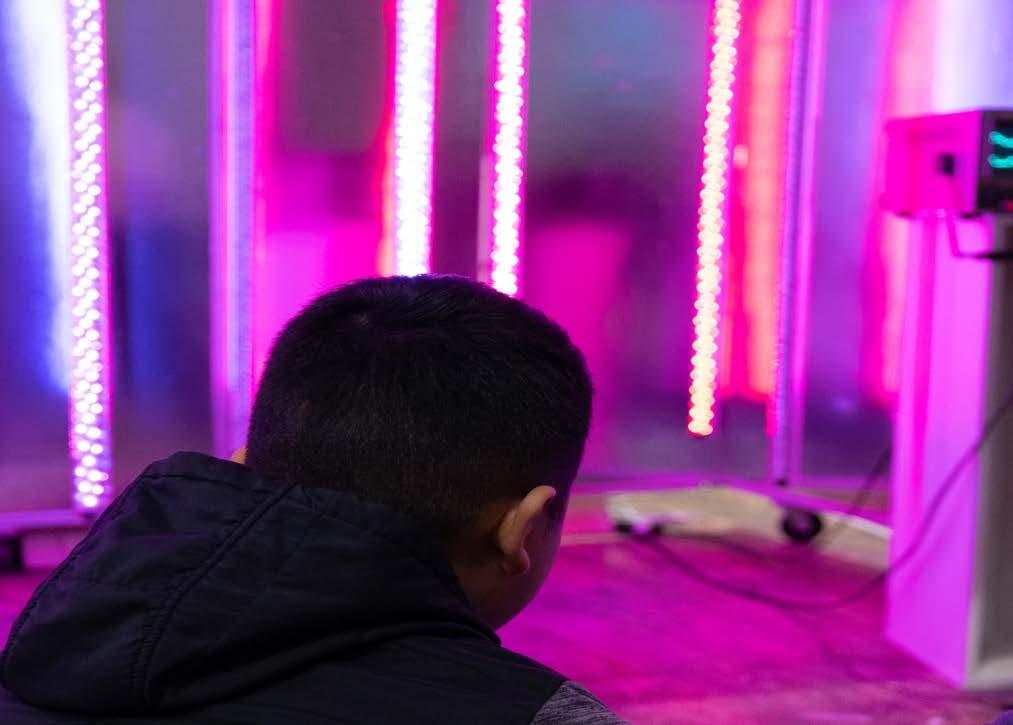
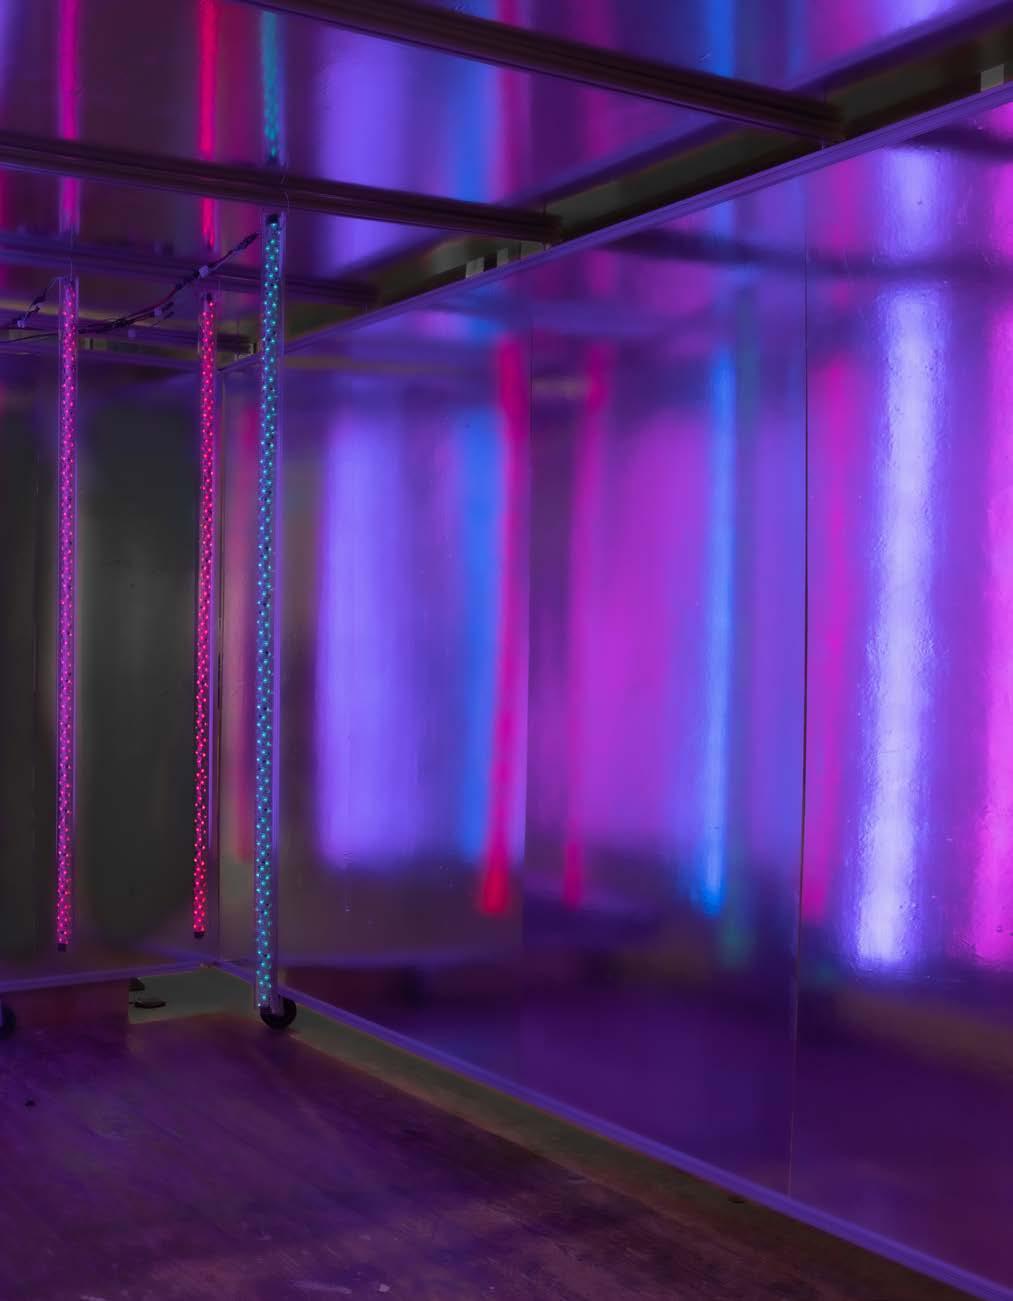
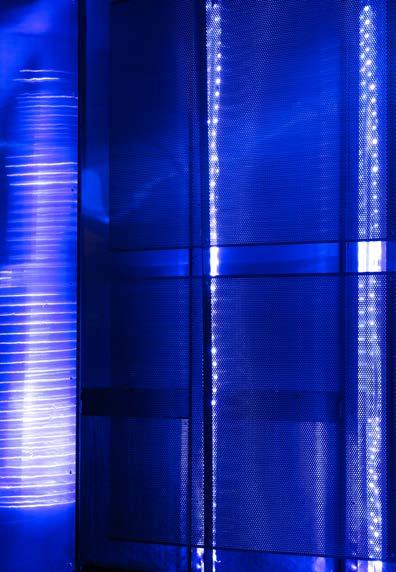
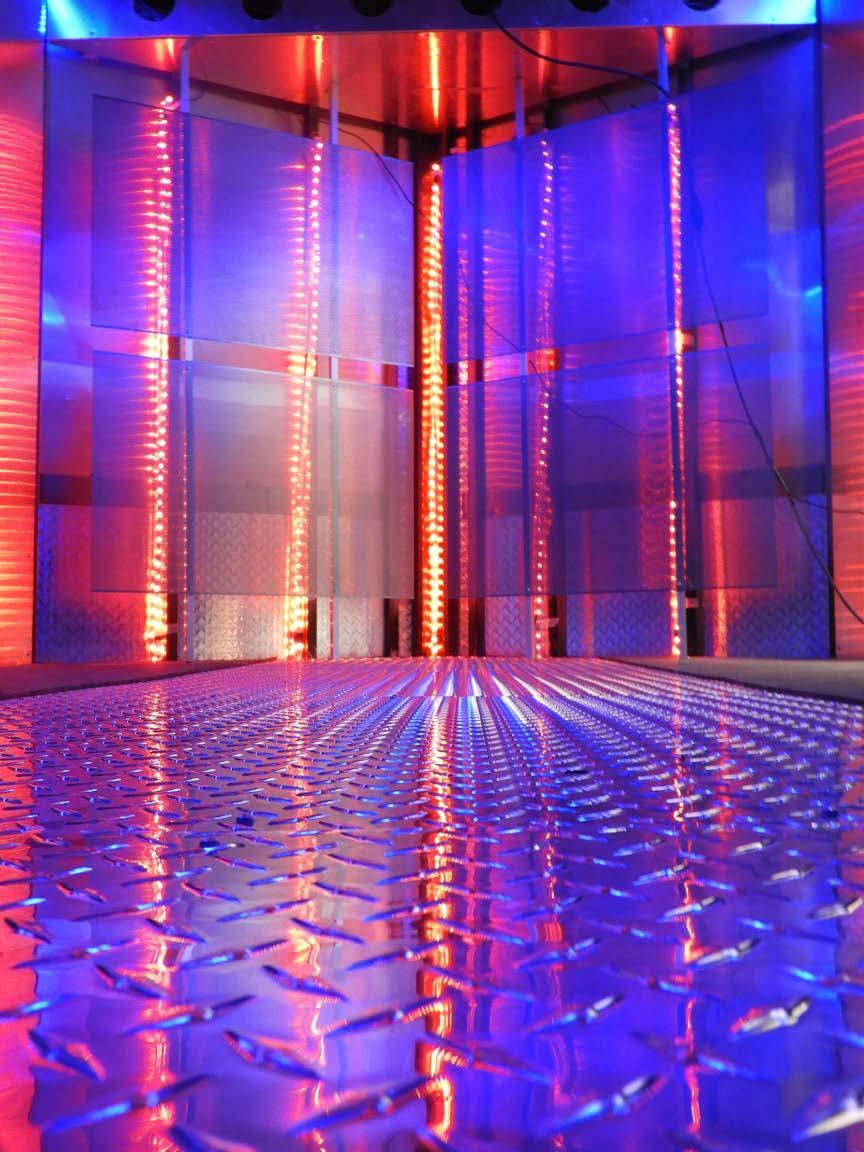
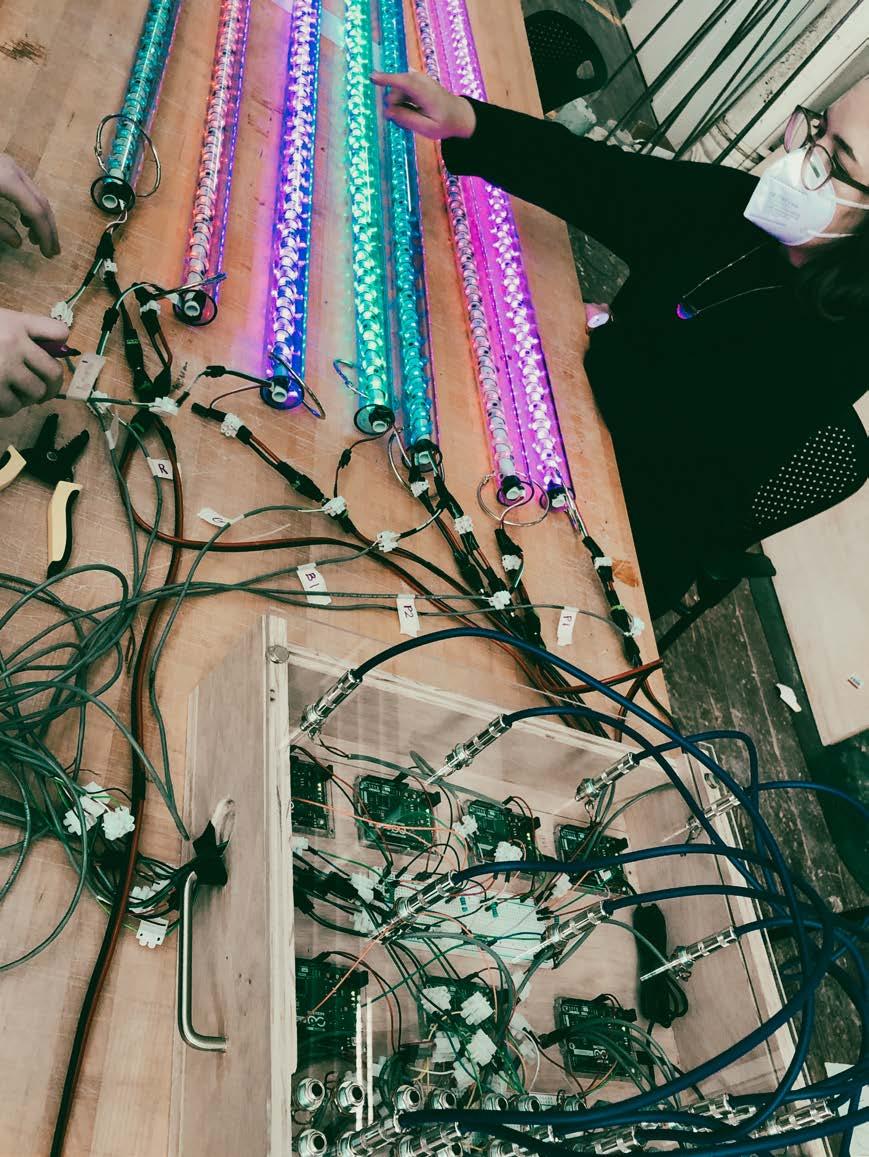
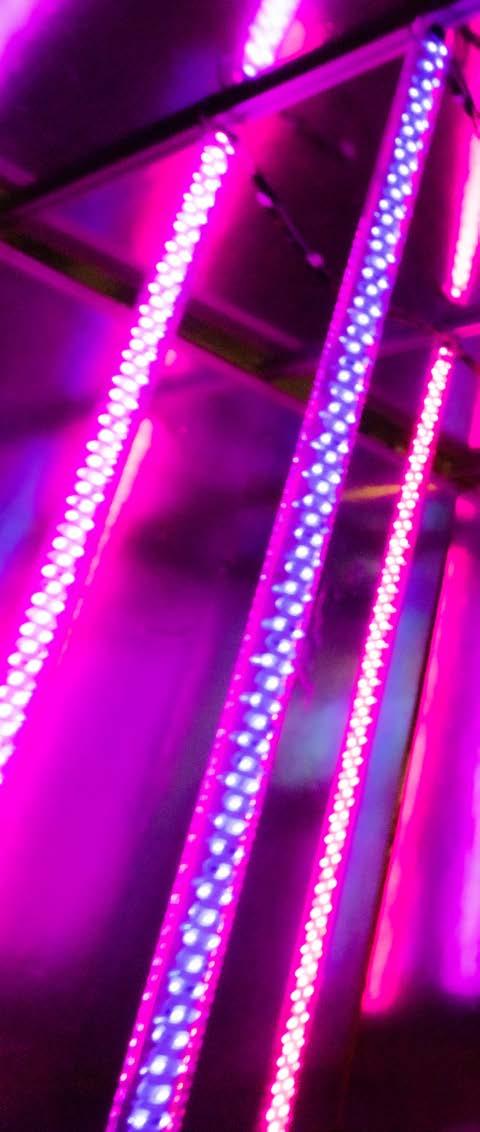
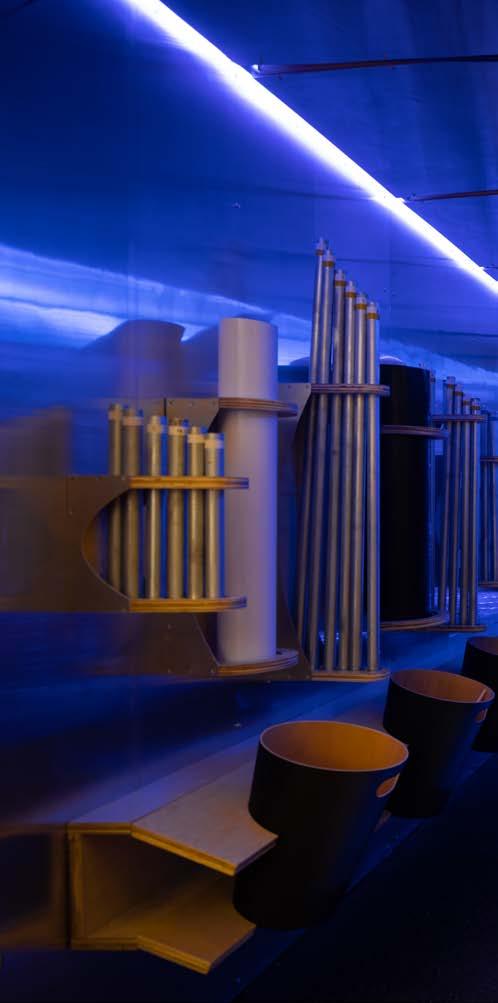
Interior of the deployable structure with illuminated light tubes energized by a variety of sound frequencies.
52
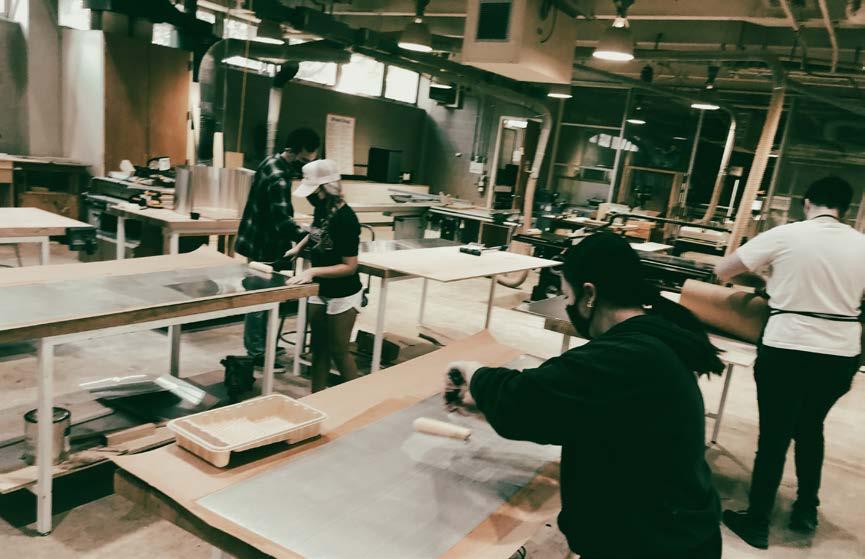
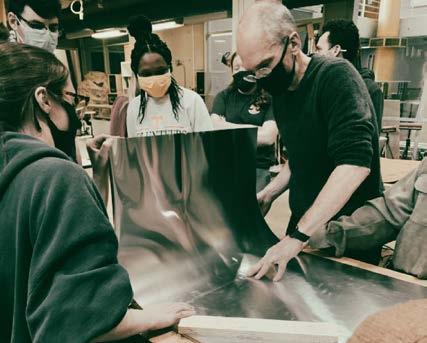
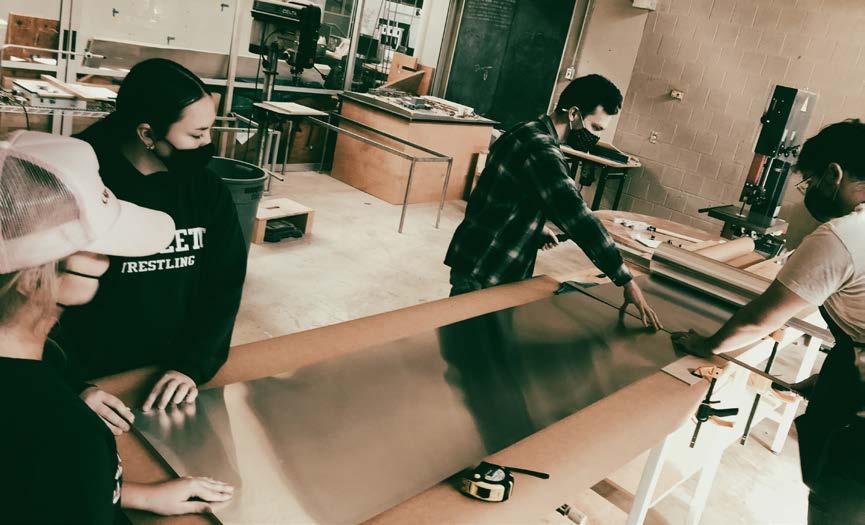
students gathered knowledge on various methods of fabrication that could be employed for the construction of the trailer interior. The concept for the trailer’s inte rior was to make light the primary experience with the palpable material qualities elusive. The design-build students explored ideas of plywood panels laminated with aluminum that would reflect the light. A series of alu minum finishes (polished, natural, sanded) was created to explore their ability to reflect light. Ultimately aluminum flashing without finish modification was chosen on its subtle light-reflective quality that redirected and multiplied the light source within the space.
The construction of the interior system pro vided many highs and lows, trials and errors for the design-build students. The hands-on experience provided opportunities to learn how to work together and communicate with all the moving parts involved in creating the interior. The students gained new perspec tives and knowledge on construction and material fabrication.
53
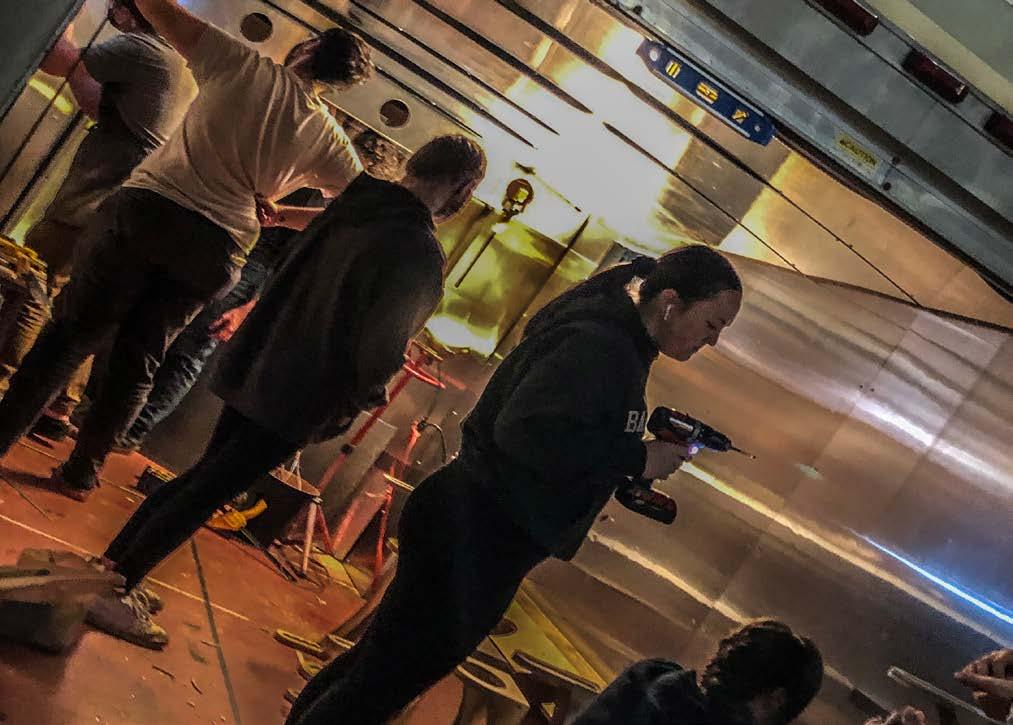
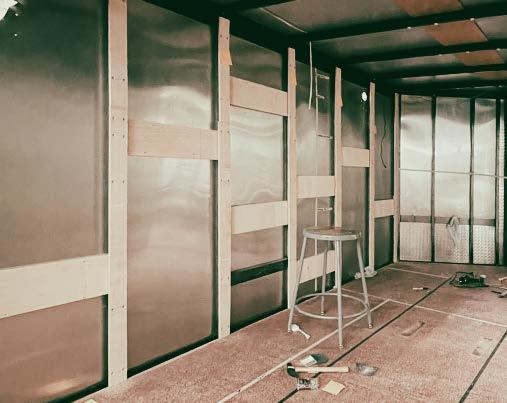
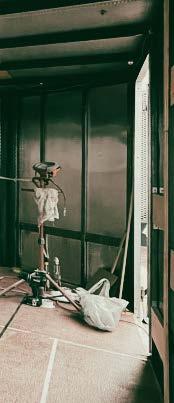
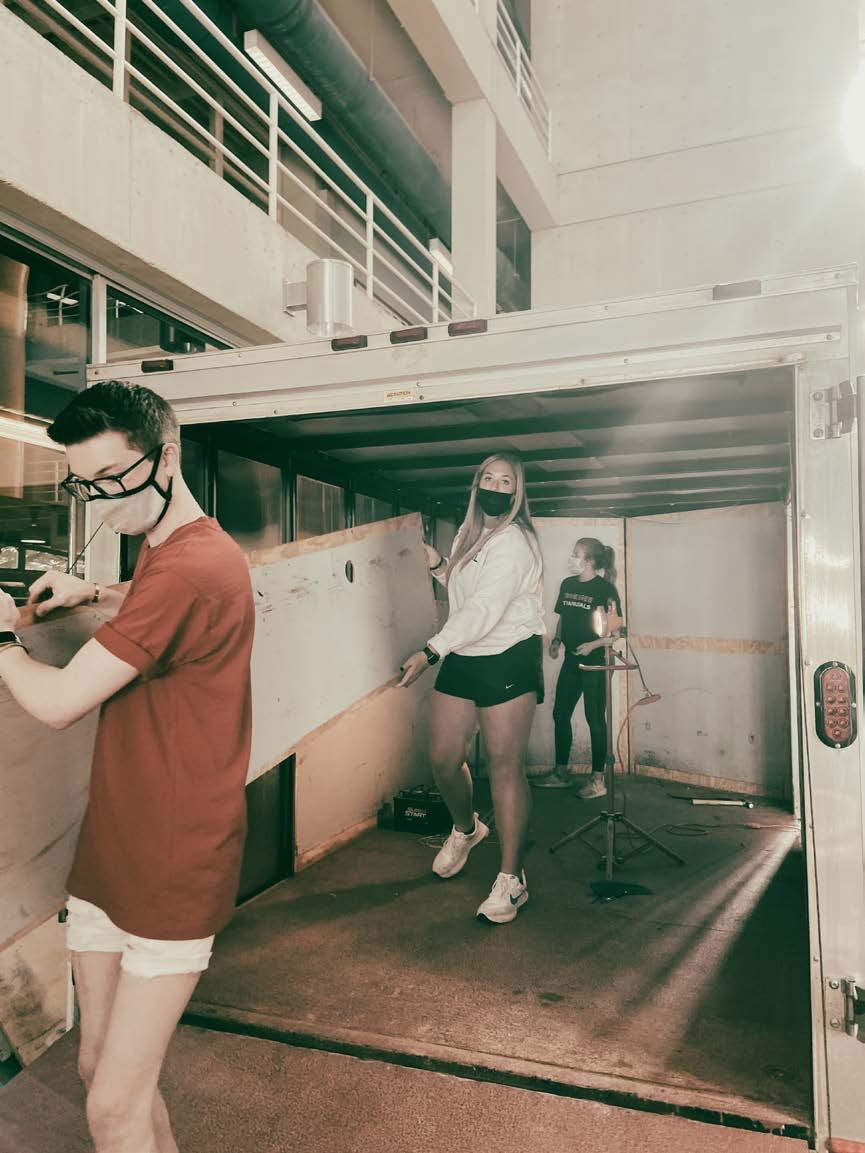
V.E.L.M.A. was acquired as a used trailer for $2,500 and required demolition of existing interior surfaces and substantial cleaning of the exterior surface. Students removed existing interior plywood panels, stripped decals, and stabilized the structure for the Design-buildrenovation.
54
55

56
57
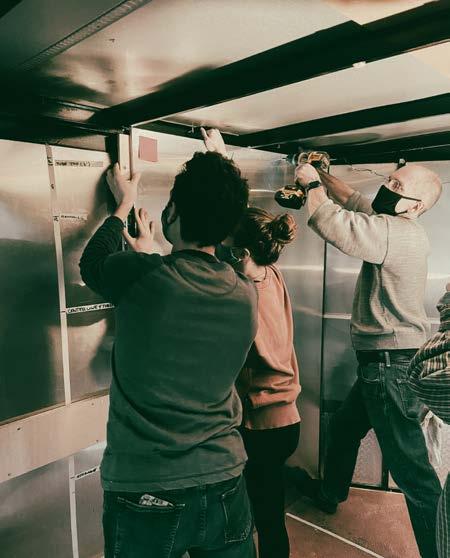
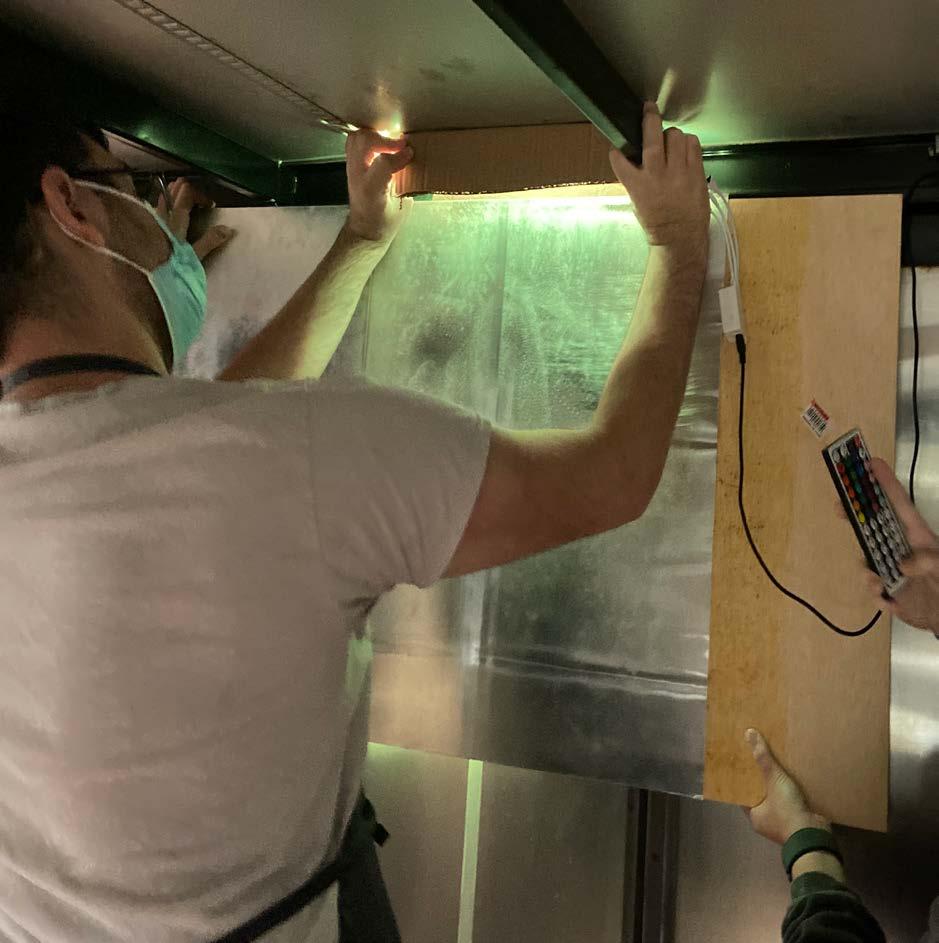
The fabrication process for the ceiling fabrication was complex and required a trial and error method for installation. The first step was to build the frames to support ceiling panels. Each frame varies in size due to the trailer’s construction dimensions being inconsistent. The process included cutting all parts for the frame, assembling, dry fitting, disassembling, re-cutting, assembling, dry fitting, and repeating until each frame fit within a 1/16” tolerance. The next step of the ceiling assembly was constructing the ceiling panels and attaching them to each frame. Due to the trailer being non-parallel, we had to cut each panel with the track manually saw to accommodate subtle angles slightly out of square. Once each panel was cut, we used contact cement to glue aluminum flashing to the plywood panels. After the tedious process of assembling each ceiling frame and panel, the next step was to attach them to the trailer. A screw location template was created to attach each fastener with high precision. This created a pattern of screws mapped with precision and accuracy. The process required 4-5 design-build team members to work cooperatively so overhead work could be completed with skill and attention to detail.
58
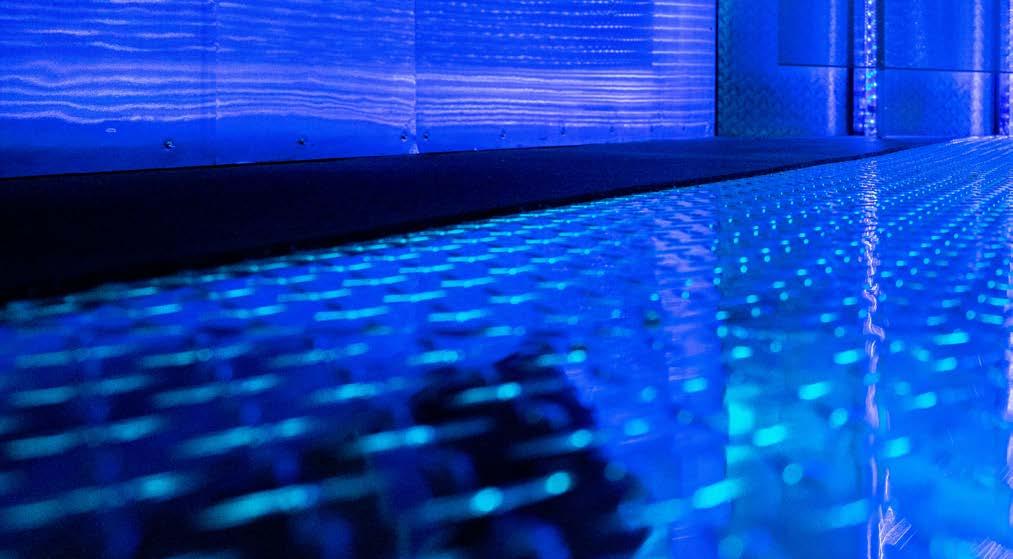
The original flooring of the trailer was plywood that was covered in thick red paint. When thinking about the new flooring for the trailer, we used a material that would draw your eye through the space. We also decided on using two different types of flooring to create a contrast in the area. The first material we used was diamond thread aluminum sheets placed down the center of the trailer. This material was chosen for its reflective and durable properties. It was also the material chosen to lead your eye through the space, as it reflects the light throughout the trailer and creates focus at the light wall at the end of the trailer. The selected second material was rubber mat flooring. This was chosen as it provides visual contrast with the aluminum diamond plate, as it is dark and light absorptive and provides a soft cushion in case a metal tube gets dropped. The aluminum is attached with screws to the plywood sub-floor, and the rubber flooring is adhered to the existing sub-floor with contact cement.
59

60
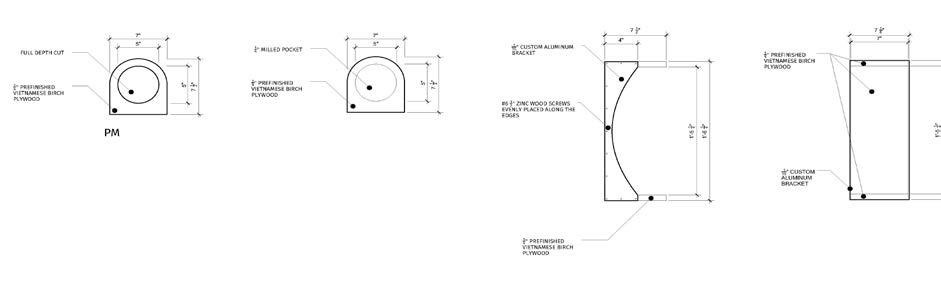
LIGHTPANEL
WALL DETAIL
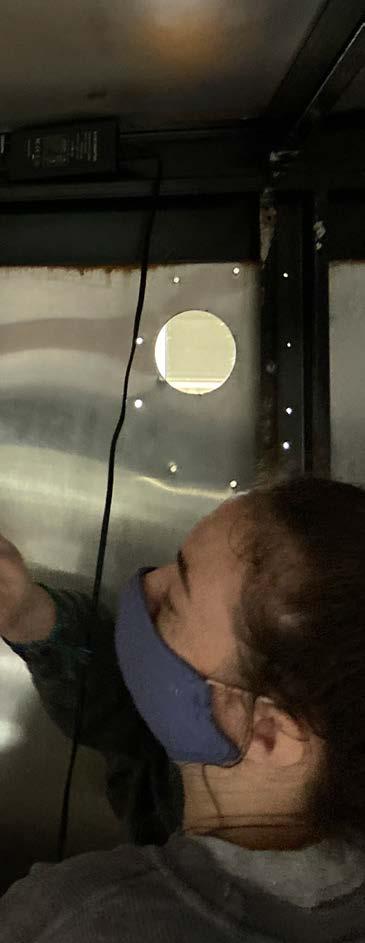
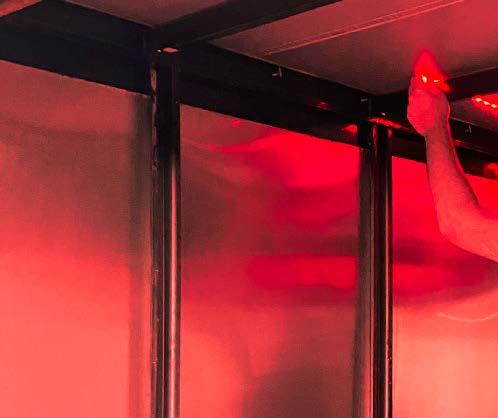
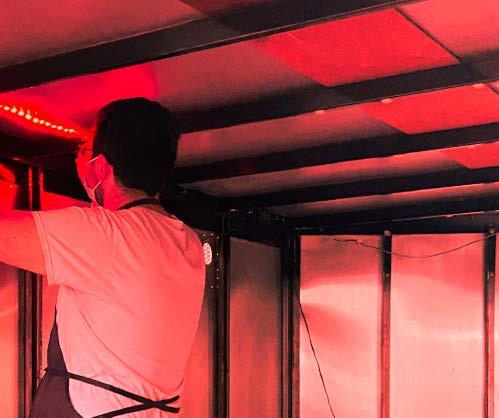
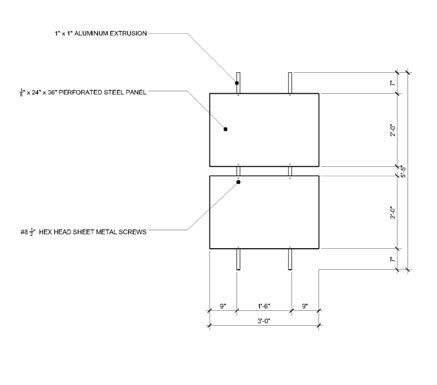
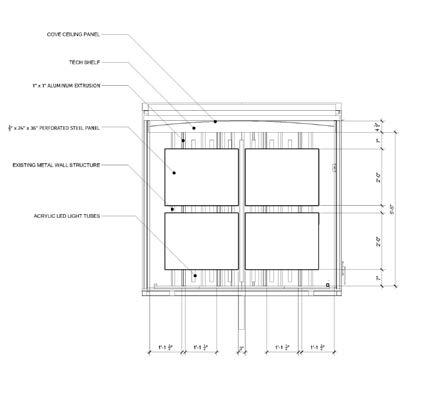
The design of the light wall located at the end of the trailer is to create a visual focus and emphasize the linear circulation axis. The light tubes are constructed similar to those in the deployable structure, with twisted LED strips encased in a glossy plastic tube to enhance the sparkle. The back wall is the interior side of the original exterior aluminum skin. The light tubes are sandwiched between the aluminum wall and the perforated metal sheets. The visual effect dissolves the material qualities and emphasizes the light energy.
The installation of the overhead tech shelf and flooring had to be coordinated before fabricating the light wall. Once these were in place, the aluminum poles were cut to the correct height. The perforated panels were dry fit and clamped to ensure precise drilling of holes for screws.
PANEL ASSEMBLY
61
62
PVC
TUBE STORAGE PLANS AND ELEVATIONS
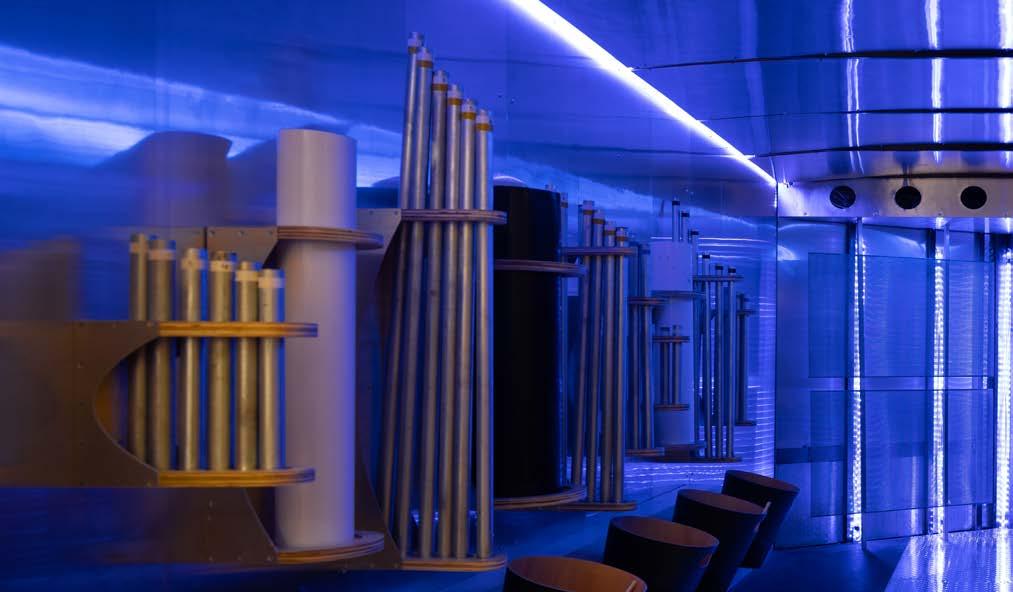
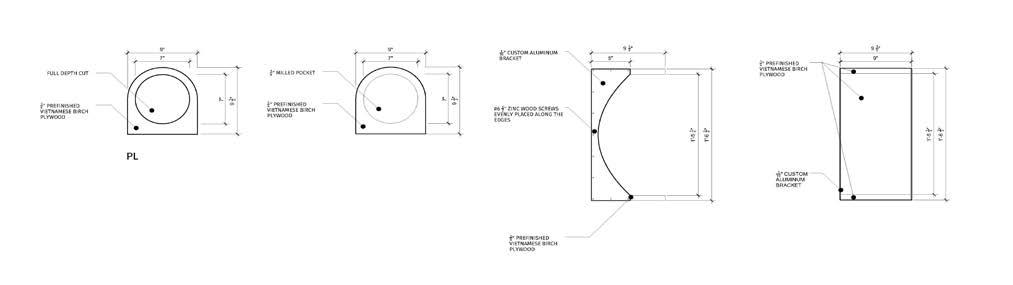
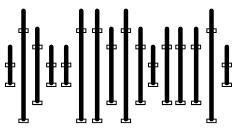
Mounted under the tube storage system are the storage buckets for the mallet and rig materials. The buckets are repurposed wooden waste baskets. The shelving holding the storage buckets was also cut using a 3 axis CNC router.
63
The tube wall-mounted storage system is visually composed to mimic a light or sound waveform. The shelving system was modeled in three dimensions to ensure accuracy in accessing the tubes and ensure reliability with tight height tolerances. The individual shelves are fabricated with 3/4” thick horizontal plywood brackets and vertical 1/16” aluminum structural supports. The 3-d model was used to generate CNC drawings for digital cutting operations. The aluminum brackets were cut using a digitally-driven abrasive water jet cutter.
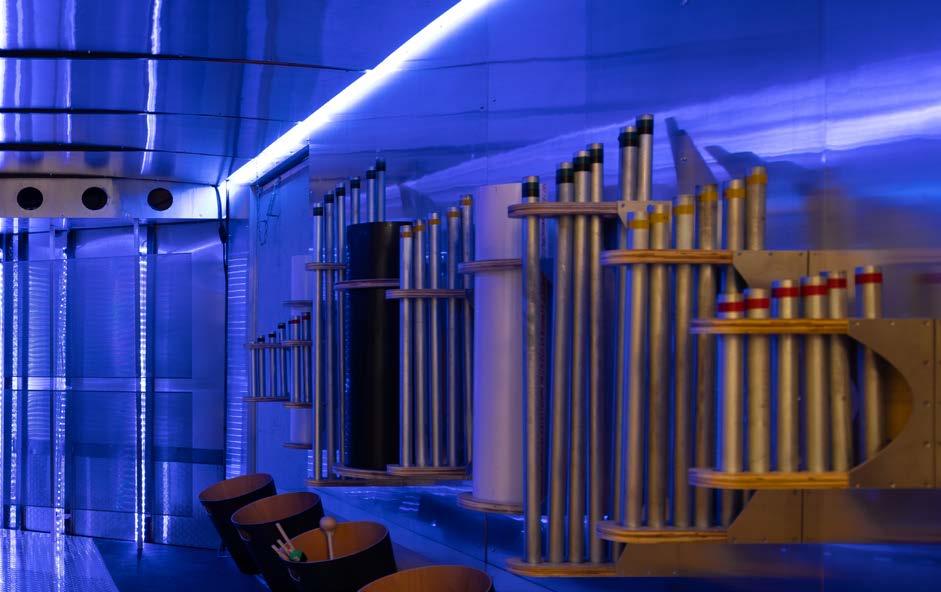
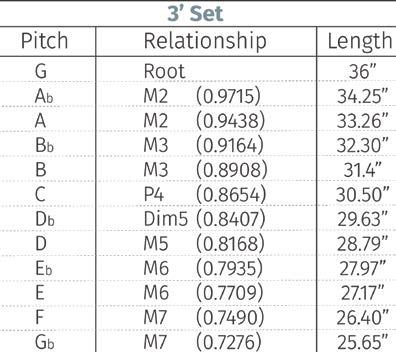
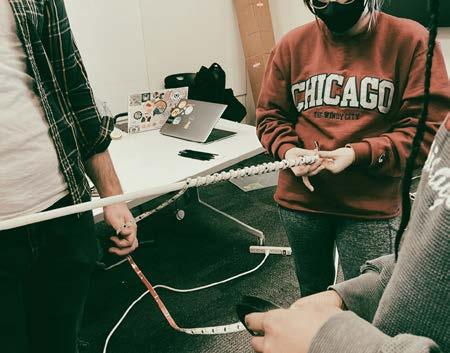
The tubes for creating sound making instruments were cut using a formula to calculate the length needed to achieve each desired pitch to make a twelve-tube tuned set. The tubes team worked in the off-campus Fab-Lab metal shop to cut and grind the tubes to get the desired pitch. A smartphone app was used to assist in the tuning process. The team also included a few miscellaneous pitched tubes to allow for greater experimentation from the STEM students. Once all the tubes were cut, the team labeled and cleaned the tubes to be placed in the trailer.
64
65
V.E.L.M.A. interior with storage buckets for materials to build sound instruments, metal and plastic tubs are mounted on wall supports for easy selection by the STEM students.
68

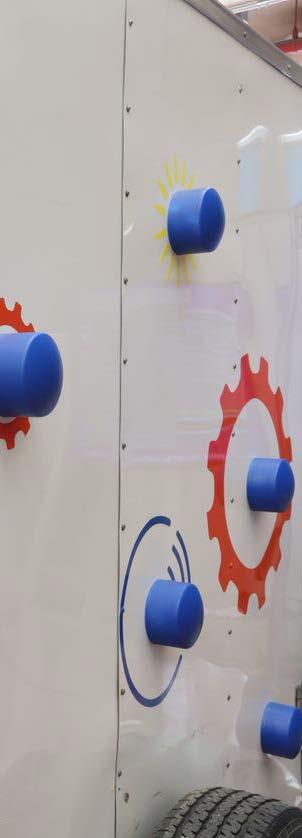
V.E.L.M.A. exterior is created to provide visual signals to operation and creative and exploratory potential housed in the interior. Vinyl graphics surround each button to provide visual aids for STEAM students to begin developing sound associations. Each graphic represents a different feature of the STEAM trailer, sound, light, mechanics, and acoustics. The heavy blue presence on the outside represents the audio graphic and the signal of producing sound with the “entice” mallet game.
69

ARDUINO
+ LIGHT + SOUND 70
07
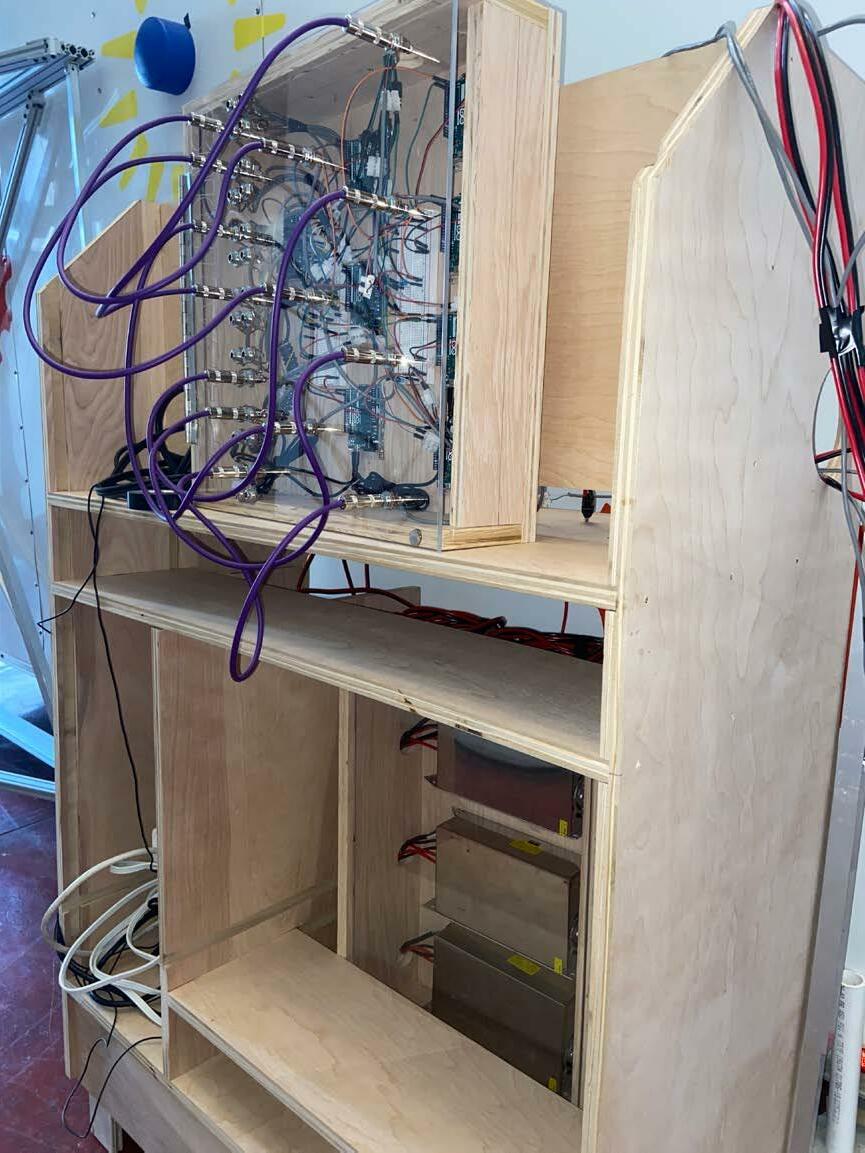
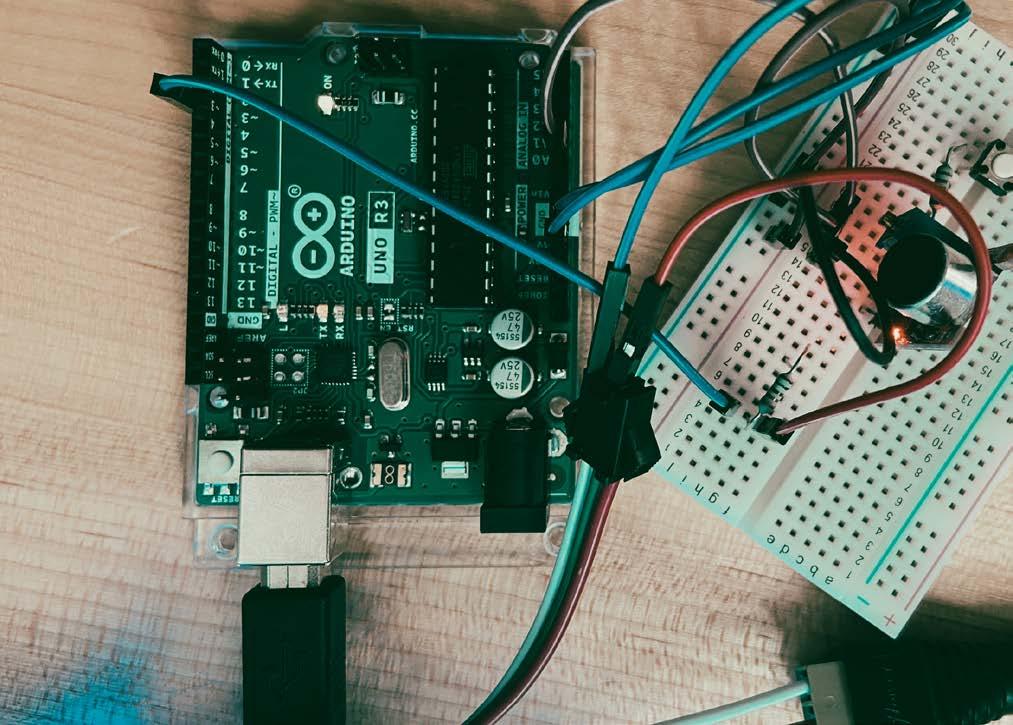
To execute the experience of changing sound energy to light energy, the use of Arduinos was crucial for success. With the help of Justin Couch, Larry Lee, and Tova Holmes, we were able to program eight micro-computers to react to eight ranges of frequencies created by the students’ noise-making “musical” performance. The electronic rig also allowed students to manually program the color that lights up to particular frequencies using patch cables. The use of the patch cables could be changed similar to an old-fashioned telephone switchboard. This gives more freedom for the students to create a unique, customized color experience, such as cre ating a show with school colors or cus tomizing sound frequency to cool or warm visual colors. The color switchboard also supports a critical STEM learning experience as moving the cables manually supports critical fundamental concepts for learning
The UTK student design-build team learned basic computer programing so that an interior would support interactive light triggered by specific sound frequencies, electrical wiring basics, soldering, and electrical safety. The testing and trouble shooting phase created a great feedback loop for learning. The design-build team learned to be nimble thinkers who could systematically test an electric system for faults and resolve issues with creativity and critical thinking skills.
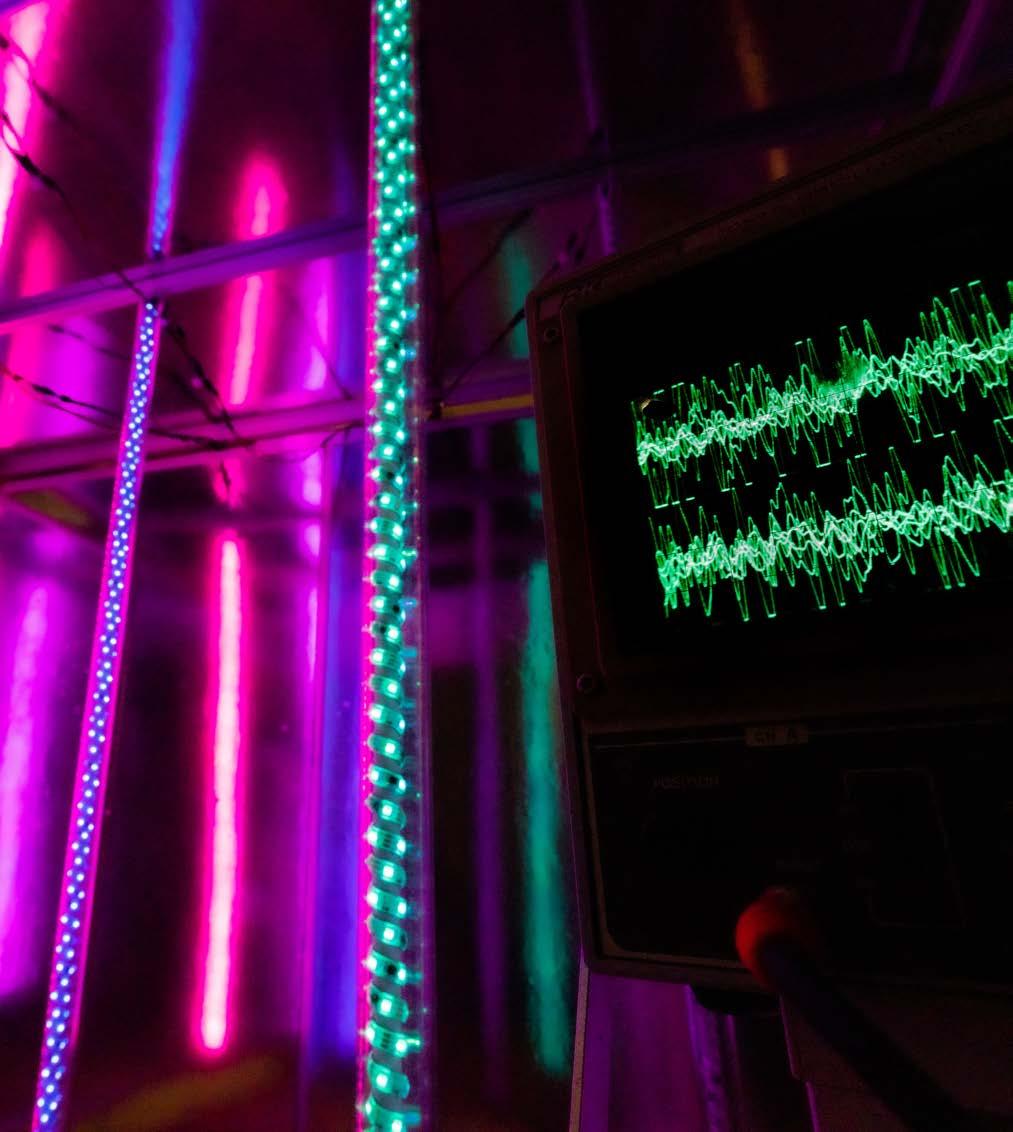
Testing and troubleshooting the system was crucial. Several safety capacitors were added to the systems to help prevent elec trical shock and damage to sensitive elec tronics. Wiring errors popped several of the capacitors, and the Arduino programming required tweaking once the system was tested with the tonal quality generated by the metal and plastic tubes.

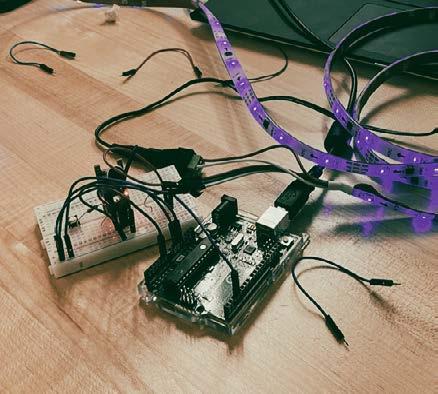
Toprogramming.createthis experience, the UTK student design-build team used eight Arudino Leonardos, two breadboards, male-tomale jumper cables, guitar patch cables, a microphone, and an audio mixer. We designed two boxes, one to house the Arduinos and the other for the power sup plies. The separation enhanced safety and portability. Each Arudino provided a digital signal that connected to a single light tube. Power was also supplied individually to each light tube. Each light tube contained a single LED strip light with individually color addressable diodes. The LED strip was wrapped around a plastic pipe and encased with a glossy plastic tube. The glossy plastic tube created a sparkle effect when illuminated. A hook was placed at the top of each light tube to hang inside the deployable light-box structure.
72

Testing of the Arudino switch board and lights.
73
74
Installation of light tubes in the deployable structure controlled by Arudino interactive program to activate lights by frequency of sound.
75
76
TESTING + STEM STUDENT INTERACTION
08
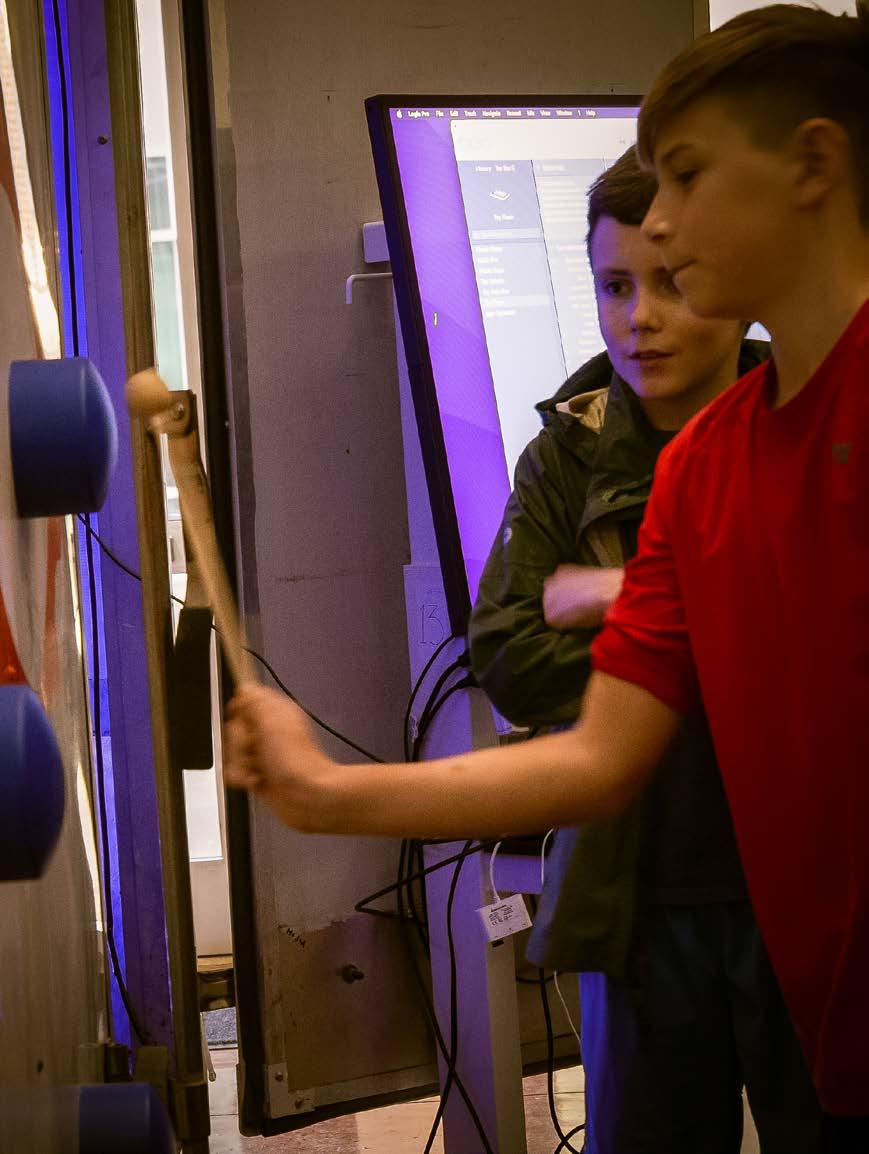
began with the ENTICE game, where with the students challenged each other to memorize the sound created with the interactive trailer surface. As the students used mallets to strike the interactive “digital drum pad,” various sounds were emitted. As the game was played, the students were asked to hypothesize how the technology that supported the game functioned. The blending of the game interaction with the challenge questions enticed students to try the game so they could imagine how the technology worked through experimentation.
The V.E.L.M.A. project concluded with on-site testing of the STEAM experience with the Lenoir City Middle School students at the University of Tennessee. Students, teachers, and administrators from the school traveled 30 miles to the campus to test V.E.L.M.A. The UTK student design-build team led students through the STEAM experience they de Thesigned.day
Sixth-grade STEM student making mallets and rigs for producing sounds to be tested in the deployable structure.
activities were the catalyst for making machines for noise making. The sixthgrade STEM students were asked to draw as many ideas as possible for devices that can make loud noises. Once they came up with ten ideas, they identified what they thought was the best idea. They then shared the idea with the student next to them and asked the neighboring student to improve the idea. Students intuitively took up the challenge to think of ways to make louder sounds and added to the neighbors drawing to illustrate how the machine needed to be modified. The design thinking activity supports divergent thinking skills and ideation without judgment to allow unconventional and student-generat ed ideas to emerge. The teamwork combined
game concluded, students engaged their imaginative skills for new ideas for sound. Students were engaged and excited to partic ipate with challenges to peers and questions about the hypotheses of how the technology
individual ideas with peer interaction to create variations in design iteration. When the design thinking phase ended, students were told that they would construct their sound-making in struments that would need to be tested for the different sounds they could make.
78
Designworked.thinking
The V.E.L.M.A. doors were opened, and the stu dents revealed the trailer interior. They were present with an array of materials to construct sound instruments. Tubes of steel and plastic in various diameters and lengths were mount ed on the wall for easy selection. Buckets be low held a wide range of materials for making striking mallets, rigs for supporting tubes, and adhesives and tools for construction. Inter active sound sensors changed the interior lighting as students made noise talking and interacting with the materials and surfaces of the trailer. Students gathered material and took them to their tables to create and test sound-making instruments.
Sixth-grade STEM student engaging in the design thinking ENTER phase of the STEAM journey. Imagining and drawing a machine to make loud noises.
Sixth-grade STEM students testing the ENGAGE phase of the STEAM journey testing the interactive game to test memory and “how it works” theories.
79
Sixth-grade STEM student constructing the mallets, rigs, and tubes for the sound making devise.
80
game concluded, students engaged their imaginative skills for new ideas for sound. Students were engaged and excited to partic ipate with challenges to peers and questions about the hypotheses of how the technology Designworked.thinking
activities were the catalyst for making machines for noise making. The sixthgrade STEM students were asked to draw as many ideas as possible for devices that can make loud noises. Once they came up with ten ideas, they identified what they thought was the best idea. They then shared the idea with the student next to them and asked the neighboring student to improve the idea. Students intuitively took up the challenge to think of ways to make louder sounds and added to the neighbors drawing to illustrate how the machine needed to be modified. The design thinking activity supports divergent thinking skills and ideation without judgment to allow unconventional and student-gener ated ideas to emerge. The teamwork com bined individual ideas with peer interaction to create variations in design iteration. When the design thinking phase ended, students were told that they would construct their sound-making instruments that would need to be tested for the different sounds they could make.
The V.E.L.M.A. doors were opened, and the students revealed the trailer interior. They were present with an array of materials to construct sound instruments. Tubes of steel and plastic in various diameters and lengths were mounted on the wall for easy selection. Buckets below held a wide range of materials for making striking mallets, rigs for support ing tubes, and adhesives and tools for con struction. Interactive sound sensors changed
81
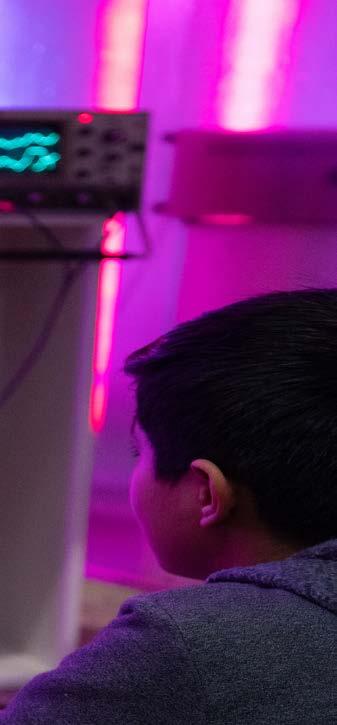
Sixth-grade stem student testing the tones of their sound making instrument to see how changes in the noise make different colors and waves on the oscilloscope.

82
OUTCOMES AND NEXT STEPS
V.E.L.M.A. is the first design-build project for the School of Interior Architecture, and the learning and engagements from the student UTK design-build team were substantial, relevant, and meaningful. Students engaged in a sprint from day one to deliver a tangible STEAM experience that demonstrated empa thy for the users, significance to the educa tional objectives, and relevance to the most important issues students and teachers face today in STEM education. Central to meeting the above criteria were establishing a sound conceptual approach from a human-centered perspective, collaboration with disciplinary experts, and partnering with the sixth-grad ers as co-designers. The importance of the partnerships cannot be understated as no one individual can be attributed as the “mastermind” designer. Still, this inaugural design-build was realized by the total ge stalt effort of all individuals involved in the project.
09
84
The educational experiences provided to the UTK design-build team are transfor mative and instrumental to their ability to mature as design professionals. The de sign-build team comprised senior interior architecture students who had little to no experience in construction. While the lack of construction experience would outwardly appear to be a limitation, it made for a rich opportunity to be involved with students who were deeply engaged and committed to learning by building with their hands. The design-build students had substantial expe rience in design on paper or the computer, but rarely did they see what they created through models and drawings constructed. The moment “things” had to be built, deep learning began.
From the most mundane task of securing materials to the realization of meeting budget constraints and the limitations of drawing or model cannot wholly describe the actual design provides a rich learning experience for the UTK design-build stu dents. V.E.L.M.A. had real-world challenges from the very beginning. This project was completed during the COVID-19 pandemic in the fall of 2021. The design-build team faced material supply chain shortages, delivery delays, and sharp, unexpected increases in prices for supplies. But despite these chal lenges, the design-build students learned how to improvise, learn from mistakes and oversights, and prioritize solving unforeseen issues as a regular part of design and Improvisationconstruction.
became one of the essential skills of the design-build team. When the design did not go as planned, students
85
86
became proactive in solving the problem as the highest priority. V.E.L.M.A. was construct ed for $12,500, including the price of the used trailer. The UTK design-build team delivered V.E.L.M.A. in 14 weeks, one semester, from the start of conceptual design to design delivery. Time and budget constraints became the driver for creative solutions that delivered real STEAM experiences for the sixth-graders.
Interior Architecture is grate ful for the generous support of the Angelo Donghia Foundation, which has provided financial support for multiple design-build opportunities. Plans include a second senior design-build for the fall of 2022. Experiences gained in the inaugural design-build project will be built upon by the faculty, visioning team, support staff, and university leadership. The future design-build project has not been fully defined but will engage a user-centered, empathy-based approach to a community need with school children.
The project had limitations as well. The delivery of the STEAM trailer is best described as a working prototype. V.E.L.M.A. works and can be maintained, but the electronic technolo gy is fragile and will be in need to be cared for to have longevity. We are grateful for the STEAM teaching staff at Lenore City Middle School and their willingness to continue with the operation and maintenance of V.E.L.M.A. as an ongoing design-build learning experi ence. We anticipate the continuing rotation of STEM sixth-graders over the coming years to engage and learn from V.E.L.M.A., both in its intended use and the need for updates and
87
Therejuvenation.Schoolof