January - March 2024
CHIMEI Museum, Taiwan
January - March 2024
CHIMEI Museum, Taiwan
CHIMEI Museum is a famous private museum in Tainan city, Taiwan. With the focus on western paintings and objects, I have joined their conservation team and participated in daily work including painting treatments, exhibition condition check and conservation related documentations.
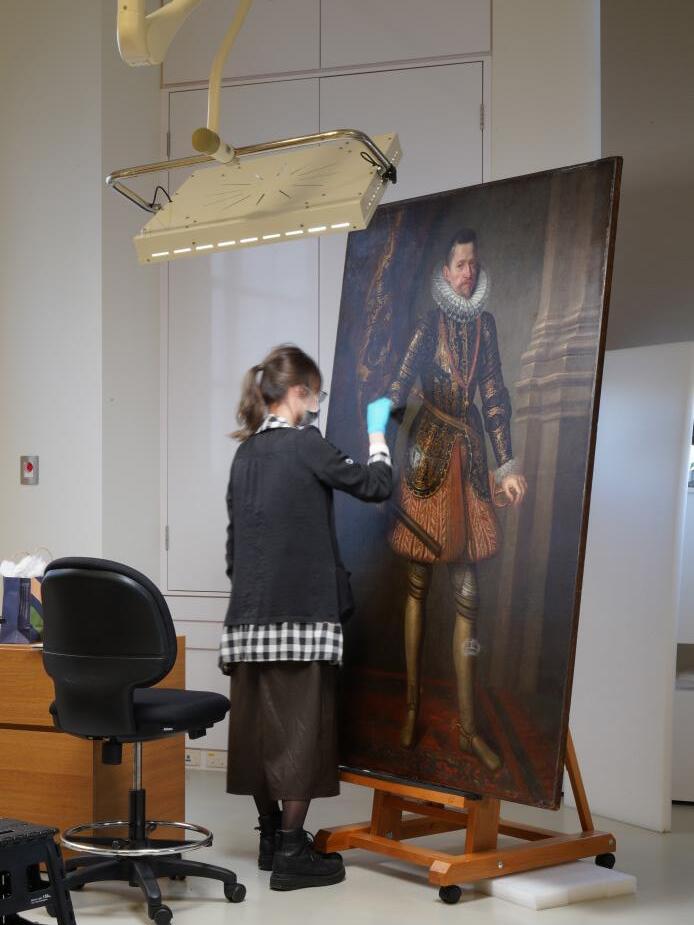
2 Conservation Project: Portrait of Archduke Albert of Austria
Type: Oil on canvas
Size: 127.4 x 194 cm (HxW)
Dated: 1630
Artist: (attr. to ) workshops of Peter Rubens
Main treatments: surface cleaning, varnish removal, old patches and filling removal, surface flattening, re-filling and retouching
This is the main project in the internship. The 17th century portrait had a yellowed varnish and two old patches were dented due to the extensive amount of aged animal glue.
The goal for the project is to remove the old varnish and old patches so the portrait will be perfect for exhibition.


Fig 3. After surface cleaning, the highest level of former retouching has been taken off easily. However, the filling required extra force to remove.
3 Revealing the original canvas from the over-sized patch

Fig 4. Another layer of filling and retouching had revealed. The patch had become more dent over time and previous conservation decided to cover it with a larger area of filling.
Fig 6. (Right) XRF of Pb element for the patched area. It is to check if any underlayer is presented.


5. The revealed tear is in fact tiny compared to the highest layer of retouching.

Fig 7. (Left) The area comparison between the former retouching (white) and new retouching (black).


TBurnishing the gilding using an agate burnisher
The treatment of the main project required time to set, meanwhile I have done the water gilding on a frame.
8. (Left) A painting frame with loss compo, before treatment.

he main project is a precious experience for me as this is the first time I have done a former patching that has covered a large area of original painting. One of the old patches has revealed been filled twice previously. If I chose to cover the dent with a larger filling like the former conservation, the area would enter a vicious cycle of becoming more dent in the future. As there are a large area of original painting has been covered, I decided to do a surface flattening and remove all the old filling and retouching.
To conclude, the painting is more like the artist's original intention after the conservation.
Fig 11 & 12. The patched area before (left) and after treatment (right). The old retouching did not match the revealed original area, and therefore there is a slight difference in the pattern of the armour.


June 2022
The Laing Gallery, TWAM
Type: Oil on canvas
Size:
Painting: 46 x91.5 (HxW);
Frame: 65 x 110.5 x 5.5 (HxWxD)
Dated: 1630
Artist: A Paul Veronese/ by George Frederick Watts
Object number: TWCMS: F6127
Main treatments: Varnish removal, Oil stain removal, retouching. FrameL compo filling, gilding, toning, reframing
With Inscription in the back: “TheFamilyofDariusal“thefeel-ofalexander “aPaulVeronese”. ByGeorgeFrederickWatts Duringhis3yearsstay ToItalyaftershootinghis firstpictureatTheacademy 1837.
A1 Introduction
project mainly focus on the removal of varnish and oilbased retouching. The later one is challeging as it did not dissolve in any kind of solvent. The yellowish oil retouching is at last remove mechanically.
The painting was sending to the British Library for exhivition.


During varnish removal, a part of colour on a woman's face cannot be removed by solvent, possibly an old retouching using oil paint.
Fig 3 Old retouching on a woman face, after solvent cleaning. The paint is not soluble in any solvent available in the studio.


Fig 4&5 (above) The old retouching stain was removed by gel soaked with acetone to soften the paint, followed by removing mechanically with a scalpel. Carefully not to remove the original paint underneath.
6

Fig 7 After removing previous retouching, isolating layer of 10% B72/Xylene is applied. Last, new retouching is applied with B72 mixed with pigments in 1-methoxy2-propanol solution.
• Majority: cleaned with NH4OH pH 9
• Sizing stain: cleaned with saliva
• Frame compo: cleaned with TAC 2%


8 (above) The outer frame, halfly cleaned on the right.
Frame compo filling
• Frame removal
• Dirt removal
• Replace Lost Mouldings
• Guiding of Filings
Fig 9&10 (left) Creating compo filling with plastic powder, using a mould moulding from the remaining original fragment of compo.


4 Result
Fig 17
The Family of Darius before Alexander the Great, before treatment.
Fig 18
The Family of Darius before Alexander the Great, aftertreatment.
Colouring the Compo
Gold Oil Guilding
New Compo Toning*
*Placement has not enough time to get to this stage


Fig 13-16 Colouring the compo filling with acrylic paint, then adding oil guilding size, let it set for 30 minutes then apply the gold leaf.


Self Conservation Project
Name: RIVER LANDSCAPE
Type: Oil on canvas
Size: With frame: 46.4 x 56.5 x 3cm (HxWxD)
Dated: 1981
Artist: Vittor Cirefice
Main treatments: Canvas flattening, aqueous cleaning, varnish removal.

3 River Landscape, during treatment when the left half is cleaned and varnish removed.
There were two dents on the canvas, one on the top centre and one on the bottom centre. The distortion is treated by moisture and pressure. The surface is cleaned with silava and the varnish is removed by white spirit and propan2-ol gel.
Fig 1 A dent in the centre of the painting, before treatment.
Fig 2 The dent was treated with moisture and pressure.


Laing Gallery, North East Museums March - May 2024
Name: WINTER, CUMBERLAND I
Type: Oil on canvas
Size: 101.6 x 127 cm (HxW)
Dated: 1963
Artist: Sheila M. Fell (1931-1979)British
Object number: TWCMS : C448
Main treatments: surface cleaning, varnish removal
A highhly textured oil painting with gaps in the brushstroke. Using silava to remove dirt and acetone to remove yellowed varnish.
The painting is going to the 'Sheila FellExhibition' (15 Nov 2024 - 07 Mar 2025), in Tullie House Museum and Art Gallery, Carisle.


Fig 1 (Top) Painting halfly through aqeous cleaning.
Fig 2 (Left) Details of high impasto and drips, during treatment.
Placement, Fine Art Restoration Company, Carlisle
1 Introduction
Aplacement worked on an altarpiece from a set of two in the St Michael’s Abbey church, Farnborough, UK. Worked in a group of four students and guided by two studio's painting conservators.

Name: THE VISITATION (COPY)
Type: Oil on canvas
Size: 14 X 4 ft (HxWxD)
Dated: 1870s
Artist: Unknown, original painting by Peter Rubens
Main treatments: Verso cleaning, aqueous cleaning, varnish removal.

The surface was tested by 4 types of solvents, the numbers of swabs to clean until no more dirt was removed were jotted down. The swabs were rolled but not rubbed on the surface.


i. DI-water: 2 swabs
ii. NH3OH pH9: 3 swabs
iii. TAC 2%: 5 swabs
Although TAC 2% gave the cleanest result, the varnish layer turned cloudy after dried for a day. Therefore, a safer solvent, ammonium hydroxide in pH 9 was chosen.


Fig 6 (left) After surface dirt removal (upper part), compared to the uncleaned bottom part

Fig 7 Solvent test for varnish removal, from above to below, propanol, MEK, acetone and IMS
• Solvent test
Various solvents were used in different areas because they have different sensitivity, and they were tested beforehand.
i. Propanol 50% in white spirit
ii. Propanol
iii. MEK
iv. Acetone
v. IMS (from weak to strong solvents)


Fig 8 Using UV light to check if the varnish removal is completed, surface without varnish does not fluorescence

Fig 10 (above) Wearing a face mask to prevent inhaling voliatile organic solvent when cleaning recto
Fig 11 (left) 'The Visitation', front (partial), with varnish removal on the sky region
• Vacuum + brush
The frame was first cleaned by dry brush with vacuum to remove loose surface dirt.
• Solvent test
i. TAC 1%
ii. TAC 2%
iii. TAC 4% (from weak to strong)
TAC 2% was chosen to clean the frame.


TFig 15 Frame, after cleaning (left) and before cleaning (right). Thicky dust layer had been removed and the under gold shiny gilding was revealed
he placement provided a precious experience in handling large paintings, and some concerns may only appear in the large size painting. For example, the canvas is a collage of three smaller pieces of canvas with different weaving. The sensitivity of the paints and the surface appearances hugely varies between areas. Therefore, solvent tests were done in each distinct colour part.
Some parts are quite sensitive to our mildest varnish removal solvent, propanol. Therefore, propanol was used in a diluted concentration, followed by checking on the surface with UV light after every swab. The cleaning process stopped immediately when there is no UV fluorescence was emitted.
Name: SUNSET FOREST
Type: Oil on canvas
Size: 30.7 x 23 cm (HxW)
Dated: Late 19th century
Artist: Unknown - Possibly Scottish

Main treatments: aqueous cleaning, varnish removal, stain removal, filling, retouching
Personal project during my master's study. The painting was full of cracks in the red paint region and was moderately discoloured, possibly by nicotine. The painting is unvarnished and thus the paint is sensitive to water.
Fig 1 (left) Sunset Forest, UV light, before treatment. UV showed a thick layer of dirt was on the surface instead of showing any resin UV fluorescence.
Fig 2 (right) Shrinkage cracks specific to the red leaves' region. Red circle indicates the region that have the cracking pattern.

Fig 3 Cross-section of the edge of a paint loss in the sky area, top right, recto, UV light, mag. 200x. Two layers of ground are identifiable as they have different fluorescence behaviours under UV.


Result

Fig 4 Gold paint stain in the bottom right corner is visible after aqueous and solvent cleaning.
Fig 5 The same area after removing the stain mechanically and applying retouching.

Laing Gallery, Private Collection
Name: KING'S EDWARD BAY
Type: Oil on canvas
Size: 57 x 73.2 cm (HxW)
Dated: 1900s
Main treatments: varnish removal, oil stain removal, filling, retouching
Privately owned painting that have severly patchy and yellowish varnish and oil stains. Nails holes have been observed in the discoloured sky.
Acetone gel is used to removed the stains, however, frame marking in the right edge is shown after framing and cannot removed by solvent gel. Retouching is applied.
Fig 1 & 2 (Right) Nail holes in the cloud region, before and after treatment.


Fig 3 & 4 (Left) Paint loss in the top center area, before and after treatment.


5 & 6
mark on the right edge, after varnish removal (top) and after retouching (bottom).


treatment.
Laing Gallery, TWAM


Fig 1 & 2 STANDING FIGURE AND LANDSCAPE NO 4, front and back, before treatment
Although a full-lining and the original strainer removal are both considered not the best option ethically, using reversible material such as BEVA 371 and the needs of a strong support can justify this treatment.
Fig 3 (Right) Ironing the tenting cracks with low heat and moisture, which produced a satisfactory result instantly, but tented again after a week.
April 2024 - current
Name: STANDING FIGURE AND LANDSCAPE NO 4
Type: Oil on canvas
Size: 91.4 x 45.9 cm (HxW)
Dated: 1970
Artist: Christine Seddon
Main treatments: full-lining, changing the original strainer to the new stretcher
This unique strainer caused the development of cracks on the two corners without the crossed member. The paint is thinly applied on an elastic cotton canvas, so the cracks have pulled the paint along with the canvas upwards, resulting in a wrinkled surface


Fig 4 Cracks with specific direction had built up in the two corners without wood members.
Fig 5 Full-lining on a polyester fabric using a vacuum table.


Laing Gallery, North East Museums
Name: PULLING TIMBRE
Type: Oil on canvas
Size: With frame: 101.2 x 162.6 x 3.3 cm (HxWxD)
Dated: 1823
Artist: James Miller Brown (1856-1908)British
Object number: TWCMS : 2024.227
Main treatments: surface cleaning, consolidation, canvas flattening, aqueous cleaning, thread-tothread bonding, filling, retouching.
The project is for "The Art of Conservation - damaged painting at south shields" exhibition in South Shields Museum and Art Gallery. The painting is hugely damaged, with the canvas is wagging and a hugh amount of paint loss and tears. It is also very discoloured with mutiple layers of dirt, grime and varnish merge together.
The project is still on-going.


Fig 1 Pulling Timbre, before treatment, The canvas is wagging in the bottom when moving. There are 5 tears and 9 paint loss on the surface.
Fig 2 Pulling Timbre, raking light from the left, before treatment,
Fig 3 Spider tissue is applied as a temporary facing during aqueous cleaning and strip lining.


Fig 5&6 The large pigment losses together with the tears were consolidate with isinglass, followed by facing, then treat the tear by threadthread bonding with isinglass and wheat starch paste.


Fig 4 Four large tears were originally treated with bandit in the back. It is removed during tear manding.

Fig 7 The painting is strip lined with liquid BEVA on polyester liinen, and stretched to a tempory strainer for surface flattening under low pressure and moisture.
Laing Gallery, North East Museums January 2025
Name: A CONTROVERSY ON COLOUR
Type: Oil on canvas
Size: painting: 112.1 x 143 cm (HxW); frame: 148.7 x 180.3 x 9.5 cm (HxWxD)
Dated: 1823
Artist: John Hayter (1800-1891) - British
Object number: TWCMS : B8434
Main treatments: participated in the frame treatment: cleaning, compo filling, colour tuning
I participated in this extremely urgent project to restore this large gilded frame with severe compo loss, especially in the bottom part.
The compo is filled with plaster and flugger filler. The compo is then tuned with acrylic colour and mica, followed by a coating of gelatine for protection.
The painting is sending to Madrid, Spain, for loan.


Fig 1 Before treatment, the bottom is especially deteriorated.
Fig 2 During aqueous cleaning with TAC 2% solution, cleaned in the left half.

Fig 3 (Top) I (left) filling compo for the urgent project with my college (right).
Fig 4 (Right) Details of compo filling, during treatment.

Fig 5 (Right) Details of compo, after treatment.

Fig 6 After treatment with the painting.

June – September 2022
Placement, Conservation Office, Hong Kong Government
The summer placement provides an opportunity to participate in various preventive conservation and practical conservation work, including condition checks before exhibitions, pest management, recto dust removal, inpainting and work with analytical instruments such as MA-XRF, HSI and Raman spectroscopy.
Fig 1. (Right) Routine pest management in the collection storerooms. Pest sticky pads with dates are placed in every corner of the rooms. If any pests are trapped, identify the type of insect and jot down the data for future preventive measurements.


Fig 2. (Left) Condition checking for loan items with the loan museum representative. Indicate any conditions that are not marked in the original report.
Hydrogel is a hydrophilic, three-dimensional network of entangled and/or cross-linked polymeric material containing more than 90% water. Compared to solution cleaning, the moisture delivery speed can have better control.

3
Fig 4 (Right) Hydrogels are made by cooking the ingredients with constant heat monitoring and stirring on a hot plate.
After all the ingredients dissolved and gave a clear solution, the mixture was poured onto a flat metal plate for curing.
‘The field’ is a modern oil painting without varnish and is water sensitive. Mould spots were found across the whole painting. As aqueous solutions are not available for this painting, the conservation team decided to use hydrogel instead.
Several gel formulas have been tested:
• Agar
• Gelatine
• Konjac/Xanthan (various ratio)
• Konjac/Xanthan with EDTA and NaCl
• Nanorestore gel peggy 6
• Nanorestore Gel Peggy 6 with EDTA


After testing, Nanorestore Gel Peggy 6 is chosen for the mould stain removal treatment.


XRF is an analytical technique that uses the interaction of X-rays with a material to determine its elemental composition.1 When X-rays irradiate a substance, some specific wavelength of X-ray would absorbed by the substance according to the element on the surface and rerelease the energy again with specific wavelength photons. By gathering the data and compared to the existing absorption spectrum, the element composition of the substance can be known.

10. The same region with a highlighting element of gold, XRF. A filling paper with a higher gold concentration is revealed.

Fig 11. RTI is technical photography that can record any distortions or irregularities on the recto and support, dramatically indicating how the paint was applied with emphasised inherent physical qualities.
It is an enhanced raking light photography by combing 36 photos with different angles of light sources thus a virtual modifiable light source is generated. RTI allows conservators to look at the object from different angles of light source by moving the virtual light in the computer programme.

Fig 12 Strip lining with a heat iron spatula, holding with a wood block. The heated part is then clamped with wood clamps and set for half day.
The strip lined canvas is afterwards reattached to the strainer with the aid of air nail gun. Both lining and original canvas were stapled together.
Fig 13 Stapling the canvas, with one person holding a staple gun, one person holding the canvas on strainer in the right position, and one person check the position of the image on the recto is in the center.
The placement provides a lot of different experiences in the conservation career including scitific research, practical treatment and routine meseum object managements. Although all the works I have done is just a very basic touch on the topic, these gave me a knowledge on the general work flow in a government museum.
'The field' was removed from the strainger before the surface cleaning procedure. Strip lining were attached to all four edges to strengthen it. A type of polyester fabric is used. The edge of the fabric is feathered for 1cm and attached to the edge with BEVA film.
The attachment of BEVA film to the original canvas is weak and needed to reattach for serveral times until a satifactory strength is achieved.

The differences in a Hong Kong museum and a Britain museum also inspired me in terms of different approach methods. The pratice in conservation varies hugely in different countries and should bare in mind that there is not only one approach to do a treatment.
May 2022 - September 2023
Dissertation Project, Northumbria Univeristy


Fig 1 & 2 (above) Samples were prepared by mixing alkyd products with ultramarine tube oil paint in various ratios.

lkyd is a fast-drying medium that has become a popular alternative to slow-drying oils since its invention in 20th century. This project aimed to investigate the impacts of artists’ alkyd media to commercially available oil paint in terms of water sensitivity.
The results found that artists’ alkyd media in ultramarine oil paint can reduce change in gloss but increase change in colour upon water swab cleaning. There is an increase in intensity of hydrophilic -C=O groups in oil paint samples upon cleaning, and 3 out of 4 tested alkyd media can reduce this change in hydrophilic contents. SEM showed the change in surface topography upon cleaning can be reduced by the alkyd medium.

3 (Above) Sample is light aged in a light aging chamber for total light dose equivalent to 50 museum years in standard environment.
Fig 4 (Left) The sample have been tested the water sensitivity with water swab rolling for 50 times after light aging.

Fig 5 Glossmetry to measure gloss differences upon water cleaning.


Fig 6 Colorimetry to measure colour differences upon water cleaning.
Fig 7 & 8 Stereomicroscopy to detect any defects by water swab cleaning method in high magnefications.
Fig 9 & 10 Back scattered electron detecting scanning Electron Microscopy (BSE-SEM) compare the changes in surface topography upon water cleaning.


Fig 11 Attenuated Total Reflectance Fouriertransform Infrared (ATR-FTIR) Spectroscopy provide insights to the reason of the change in appearance from molecular content.
Readings of colorimeter and glossimeter were plotted to graphs against the concentration of alkyd in the paint. Colourimetry were plotted with each axis of colour accroding to CIELAB color space.
Alkyd content can increase colour change in L* axis (black and white), and decreased the change in gloss after water swabs treatment.
Fig 12 Change of L* colour axis for cleaned and non-cleaned samples against concentration of alkyd medium: (a) W&N, (b) Gamblin, (c) Jackson’s, and (d) Kremer.


Three out of four tested commercial alkyd binders decreased the changes in molecular content in the FTIR spectra, but one (W&N) showed a similar increase in the intensity of both -C=O peak and -C-H peaks with pure oil paint samples.
Little evidence linked the change in pH and surface conductivity to the concentration of alkyd products in oil paint.
Fig 14 Partial FTIR-ATR spectra of 33.3% alkyd in oil paint samples showing a peak at 1726 cm-1, both water cleaned and noncleaned samples.
Fig 13 The change in pH before and after water swab cleaning against concentrations of alkyd products. No conclusive graph is gained.

The addition of alkyd medium had a mixed effects on the paint surface. On one hand, alkyd medium in oil paint could reduce the changes in surface topography upon ageing and gloss upon surface cleaning. On the other hand, alkyd content concurrently increased the colour changes upon surface cleaning.
Some insights on the reasons for these changes have been provided through (BSE) SEM and ATR-FTIR spectrometry. However, the reason for alkyd medium increasing the colour changes upon water cleaning is left unknown. Further research on elemental analysis, such as SEM-EDX, and structural analysis, such as mass spectrometry, are suggested for providing full comprehension.

Fig 15 Result presentation in the 41 th Gerry Hwdley Student Symposium, Cambridge University
1. Less controllable water swabs cleaning effect
2. Short Curation Time for paint film
Fig 16 - 18. (Bottom) Unpredicted conditions appeared in some of the samples which may affect the reading of colourimetry and glossimetry
