

Weathered Quilt
Featuring Neutral Palette by Tim Holtz
The Neutral Palette fabrics of Tim Holtz evoke the warmth of a weathered and worn parquetry wood floor in this simple design.
Collection: Neutral Palette by Tim Holtz
Technique: Scrappy Piecing
Skill Level: Advanced Beginner
Finished Sizes:
Finished Size: 711⁄2" x 821⁄2" (1.82m x 2.10m)
Finished Block Size: 16" x 171⁄2" (40.6cm x 44.5cm)
All possible care has been taken to ensure the accuracy of this pattern. We are not responsible for printing errors or the manner in which individual work varies. Please read the instructions carefully before starting this project. If kitting, it is recommended a sample is made to confirm accuracy.
Project designed by Kerri Thomson | Tech edited by Alison M. Schmidt
Fabric Requirements
DESIGN
(A) Neutral Collage Neutral
(B) Neutral Stamps Neutral
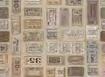
(C) Neutral Tickets Neutral
(D) Neutral Map Neutral
(E) Neutral Typewriter Neutral
(F) Neutral Gears Neutral
(G) Neutral Wood Neutral
(H) Neutral Wallpaper Neutral
(I) Neutral Tiny Print Neutral
(J) Neutral Marble Neutral
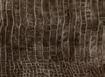
(K) Worn Croc Hickory
(L) Melange Neutral
(M) Eggs & Nest Multi
(N) Sewing Instructions Linen
(O) Worn Croc Pebble
(P) Typography Parchment
(Q) Dictionary Neutral
PWTH250.NEUTRAL 2⁄3 yard (0.61m)
PWTH251.NEUTRAL 3⁄8 yard (0.34m)
PWTH252.NEUTRAL 2⁄3 yard (0.61m)
PWTH253.NEUTRAL 5⁄8 yard (0.57m)
PWTH254.NEUTRAL 3⁄8 yard (0.34m)
PWTH255.NEUTRAL 3⁄8 yard (0.34m)
PWTH256.NEUTRAL* 1 yard (0.91m)
PWTH257.NEUTRAL 3⁄8 yard (0.34m)
PWTH258.NEUTRAL 3⁄8 yard (0.34m)
PWTH259.NEUTRAL 3⁄8 yard (0.34m)
PWTH020.HICKORY 3⁄8 yard (0.34m)
PWTH001.NEUTR 2⁄3 yard (0.61m)
PWTH031.8MULT 5⁄8 yard (0.57m)
PWTH110.LINEN 3⁄8 yard (0.34m)
PWTH020.PEBBLE 5⁄8 yard (0.57m)
PWTH175.PARCHMENT 1⁄3 yard (0.3m)1
PWTH008.NEUTR 3⁄8 yard (0.34m) * includes binding
Backing (Purchased Separately)
44" (1.12m) wide
Neutral Tickets Neutral
PWTH252.NEUTRAL 51⁄4 yards (4.80m) OR 108" (2.74m) wide
Dictionary Neutral
QBTH006.NEUTRAL 23⁄4 yards (2.51m)
Weathered Quilt


Additional Recommendations
• 100% cotton thread in colors to match
• 80" x 91" (2.03m x 2.31m) batting
Cutting
WOF = Width of Fabric
Notes:
• This quilt is designed with a scrappy vintage feeling- fabric placement is up to you, and there may be some extra fabric, allowing for more variety in piecing.
• Cut in order listed, from largest to smallest. for most efficient use of fabric.
Fabric A, cut:
(7) 3" x WOF; subcut
(4) 3" x 161⁄2" rectangles
(6) 3" x 131⁄2" rectangles
(6) 3" x 101⁄2" rectangles
(5) 3" x 71⁄2" rectangles
Fabric B, cut:
(5) 2" x WOF strips; subcut
(3) 2" x 18" rectangles
(4) 2" x 13" rectangles
(5) 2" x 8" rectangles
(4) 2" x 3" rectangles
Fabric C, cut:
(7) 3" x WOF; subcut
(4) 3" x 161⁄2" rectangles
(5) 3" x 131⁄2" rectangles
(6) 3" x 101⁄2" rectangles
(6) 3" x 71⁄2" rectangles
Fabric D, cut:
(6) 3" x WOF; subcut
(3) 3" x 161⁄2" rectangles
(5) 3" x 131⁄2" rectangles
(5) 3" x 101⁄2" rectangles
(5) 3" x 71⁄2" rectangles
Fabric E, cut:
(5) 2" x WOF strips; subcut
(3) 2" x 18" rectangles
(5) 2" x 13" rectangles
(4) 2" x 8" rectangles
(5) 2" x 3" rectangles
Fabrics F, J and K, cut from each:
(4) 3" x WOF; subcut
(4) 3" x 71⁄2" rectangles
(54) 3" x 2" rectangles
Weathered Quilt
Fabric G, cut:
(4) 3" x WOF; subcut
(4) 3" x 71⁄2" rectangles
(55) 3" x 2" rectangles
(9) 21⁄2" x WOF for binding
Fabric H, cut:
(5) 2" x WOF strips; subcut
(3) 2" x 18" rectangles
(5) 2" x 13" rectangles
(5) 2" x 8" rectangles
(5) 2" x 3" rectangles
Fabric I, cut:
(5) 2" x WOF strips; subcut
(3) 2" x 18" rectangles
(4) 2" x 13" rectangles
(5) 2" x 8" rectangles
(5) 2" x 3" rectangles
Fabric L, cut:
(7) 3" x WOF; subcut
(4) 3" x 161⁄2" rectangles
(6) 3" x 131⁄2" rectangles
(5) 3" x 101⁄2" rectangles and
(5) 3" x 71⁄2" rectangles
Fabric M, cut:
(6) 3" x WOF; subcut
(3) 3" x 161⁄2" rectangles
(5) 3" x 131⁄2" rectangles
(5) 3" x 101⁄2" rectangles
(6) 3" x 71⁄2" rectangles
Fabric N, cut:
(5) 2" x WOF strips; subcut
(3) 2" x 18" rectangles
(5) 2" x 13" rectangles
(5) 2" x 8" rectangles
(4) 2" x 3" rectangles
Fabric O, cut:
(6) 3" x WOF; subcut
(2) 3" x 161⁄2" rectangles
(5) 3" x 131⁄2" rectangles
(5) 3" x 101⁄2" rectangles
(5) 3" x 71⁄2" rectangles
Fabric P, cut:
(4) 2" x WOF strips; subcut
(2) 2" x 18" rectangles
(5) 2" x 13" rectangles
(4) 2" x 8" rectangles and (5) 2" x 3" rectangles
Fabric Q, cut:
(5) 2" x WOF strips; subcut
(3) 2" x 18" rectangles
(4) 2" x 13" rectangles
(4) 2" x 8" rectangles
(4) 2" x 3" rectangles
Weathered Quilt
Instructions
Notes:
• All seam allowances are 1⁄4" and pieces are sewn right sides together. Press the seams following the arrows in the diagrams.
• Fabrics are assigned into light, medium and dark values. When assembling blocks, select fabric combinations that are pleasing to you for a unique quilt or use the Quilt Layout diagram (page 5) as a guide for fabric placement.
Sort the cut rectangles into value groups:
• Light - Fabrics B, E, H, I, N, P and Q
• Medium - Fabrics A, C, D, L, M and O
• Dark - Fabrics F, G, J and K
Block Construction
1. Select (1) Dark and (2) Medium 3" x 71⁄2" rectangles and (2) Light and (4) Dark 2" x 3" rectangles. Lay out the rectangles in a nine patch. (Fig. 1) Sew the rectangles together in rows. Sew the rows together to complete Unit 1 (101⁄2" wide x 8" high).
2. Select (2) Light 2" x 8" rectangles (2) Medium 3" x 101⁄2" rectangles and (4) Dark 2" x 3" rectangles. Lay out the rectangles around Unit 1. (Fig. 2) Sew the pieces together in rows. Sew the rows together to complete Unit 2 (131⁄2" wide x 13" high).
2
3. Select (2) Light 2" x 13" rectangles (2) Medium 3" x 131⁄2" rectangles and (4) Dark 2" x 3" rectangles. Lay out the rectangles around Unit 2. (Fig. 3) Sew the pieces together in rows. Sew the rows together to complete a Weathered Block (161⁄2" x 18").
Fig. 3
4. Repeat Steps 1 to 3 to make (16) Weathered Blocks.
Fig. 1 Fig. 1
Fig.
Weathered Block Make 16
Weathered Quilt
Quilt Top Assembly
Note: Follow the Quilt Layout diagram while assembling the quilt.
5. Sew (4) Weathered Blocks between (5) Light 2" x 18" rectangles to create a Row (72" x 18"). Repeat to make (4) Block Rows.
6. Sew (4) Medium 3 x 161⁄2" rectangles between (5) Dark 2" x 3" rectangles to create a Sashing Row (72" x 3"). Repeat to make (5) Sashing Rows.
7. Sew the Block Rows between the Sashing Rows to complete the Quilt Top (72" x 83").
Finishing
8. Sew together all the 21⁄2" Fabric G binding strips end to end using diagonal seams. Press seams open. Press the binding strip in half wrong sides together.
9. Layer backing (wrong side up), batting, and quilt top (right side up). Baste the layers together and quilt as desired. Trim excess batting and backing even with the top after quilting is completed.
10. Leaving an 8" tail of binding, sew the binding to the top of the quilt through all layers matching all raw edges. Miter corners. Stop approximately 12" from where you started. Lay both loose ends of binding flat along quilt edge. Where the loose ends meet, fold them back on themselves and press to form a crease. Using this crease as your stitching line, sew the two open ends of the binding right sides together. Trim seam to 1⁄4" and press open. Finish sewing binding to quilt.
11. Turn the binding to the back of quilt and hand-stitch in place.


