FLAT-PACK FURNITURE
PERSONAL WORK
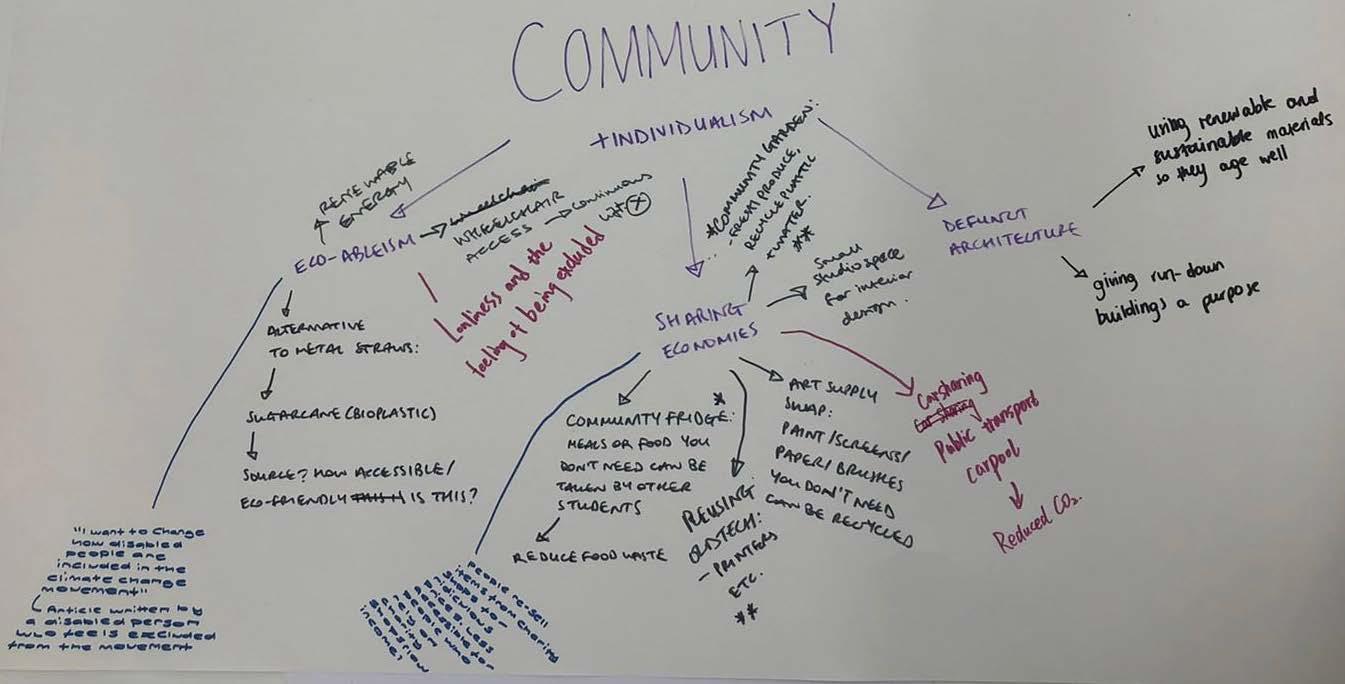
For this project, I designed a series of flatpack modular furniture under the context of community. Emphasised its social and environmental impacts. By this project, i want to make a piece of sustainable furniture and appeal more understanding and engagement to this lifestyle. I broke down the research into three areas: defunct infrastructure, sharing economy, and eco-ablism .
Community- BEDZED
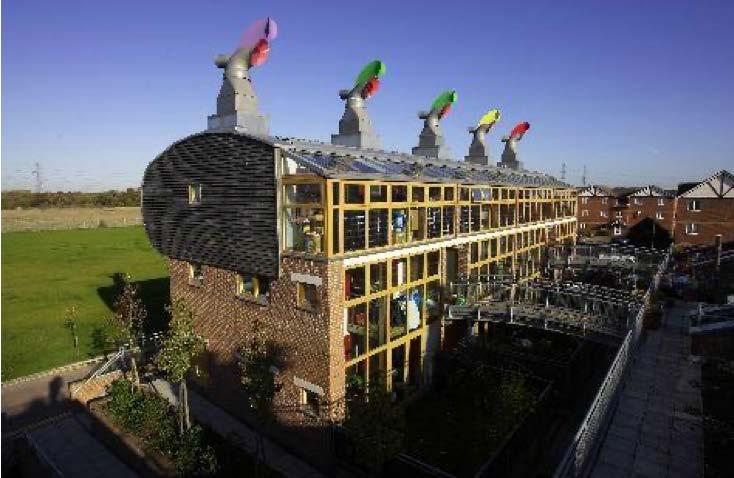
- TransporT
• Cars are discouraged.
- Zero energy
• Designed to only use renewable sources generated onsite.
- energy, WaTer efficienT
• Face south to take advantage of solar gain, water-efficient appliances.
- LoW impacT maTeriaLs
• Building materials are scourced within 35 miles of the site.
- reducing car use
• Developed Public transport system.
- pLenTy of open spaces
• 52 m2 of green spaces per person in 1990.
• Over 1000 parks and natural areas.
- good recycLing schemes
• 70% of rubbish is recycled, 1200 trees saved per day.
City- Curitiba

1
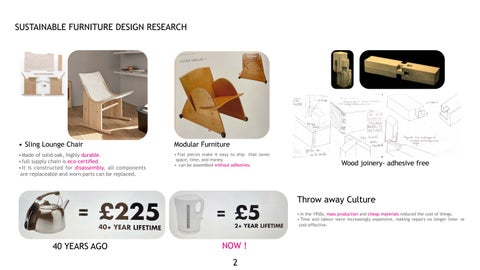
SUSTAINABLE FURNITURE DESIGN RESEARCH


• Sling Lounge Chair
• Made of solid oak, highly durable.
• full supply chain is eco-certified.
• It is constructed for disassembly, all components are replaceable and worn parts can be replaced.
Modular Furniture

• Flat pieces make it easy to ship that saves space, time, and money.

• can be assembled without adhesives.
Wood joinery- adhesive free

Throw away Culture
• In the 1950s, mass production and cheap materials reduced the cost of things.
• Time and labour were increasingly expensive, making repairs no longer time- or cost-effective. 40 YEARS AGO NOW


2
!
From the mood board, I was informed by wood joineries and Flat-Pack furniture, they gave me an understanding into the potential processes required for sustainabillity to be achieved.


For the colour palette, I was informed by Post-Modernism and Massimo Morozzi's Tangram furniture. The vibrant fresh tones will give a refreshing sense and draw people's attention.


3 MOOD BOARD
Joinery
Moldular
Upcycled clothes, Resin Suprematism
Post-Modernism
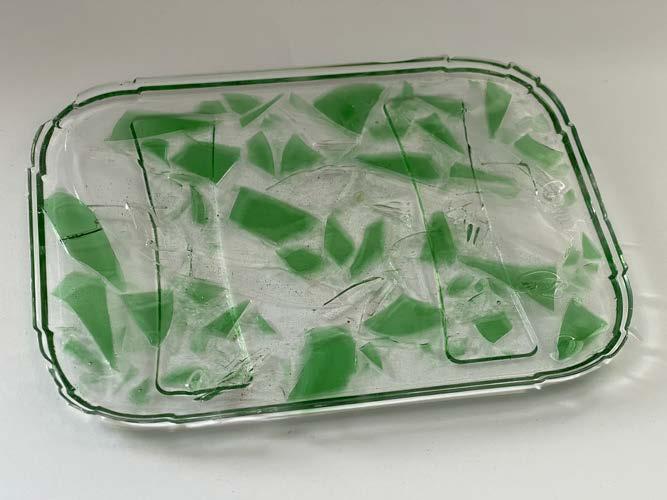
glass-recycling
Flat-Pack
MATERIAL EXPERIMENT THINKING THROUGH MAKING


MAKING PROCESS


From research, i knew black resin from terra cast is the only resin made from post consumer products, and it’s not bio-degradable. The use of epoxy resin is extremely harmful to the environment. Therefore, i moved away from this convenient path, I need to use sustainable materials for my design.


Due to the natural properties of clay, I couldn't control its size after it is dried. Foamboard is also not a good material in making a precise model. Hence, I mainly used wood sticks, cardboard and glue to construct sketch models.


4
CLAY Foam board
Epoxy resin, glass Wood sticks
DESIGN DIRECTION
Design for disassembly (Dfd)


Multi-functional
TESTING
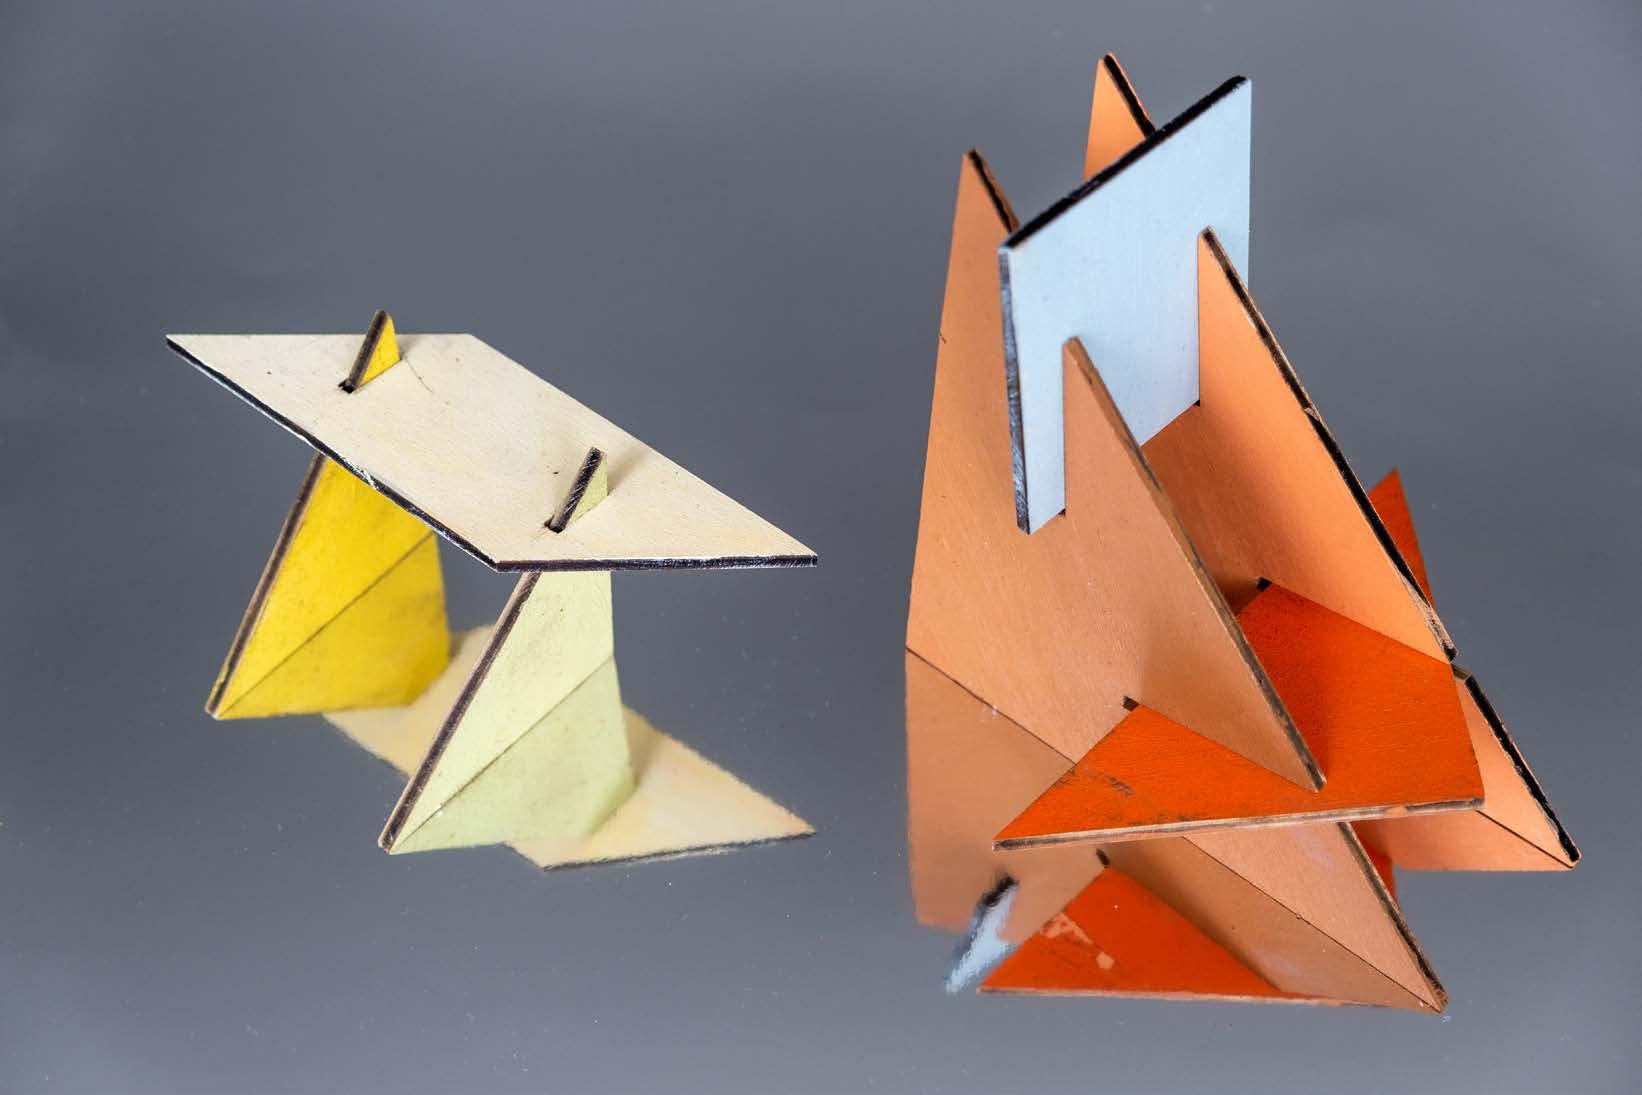
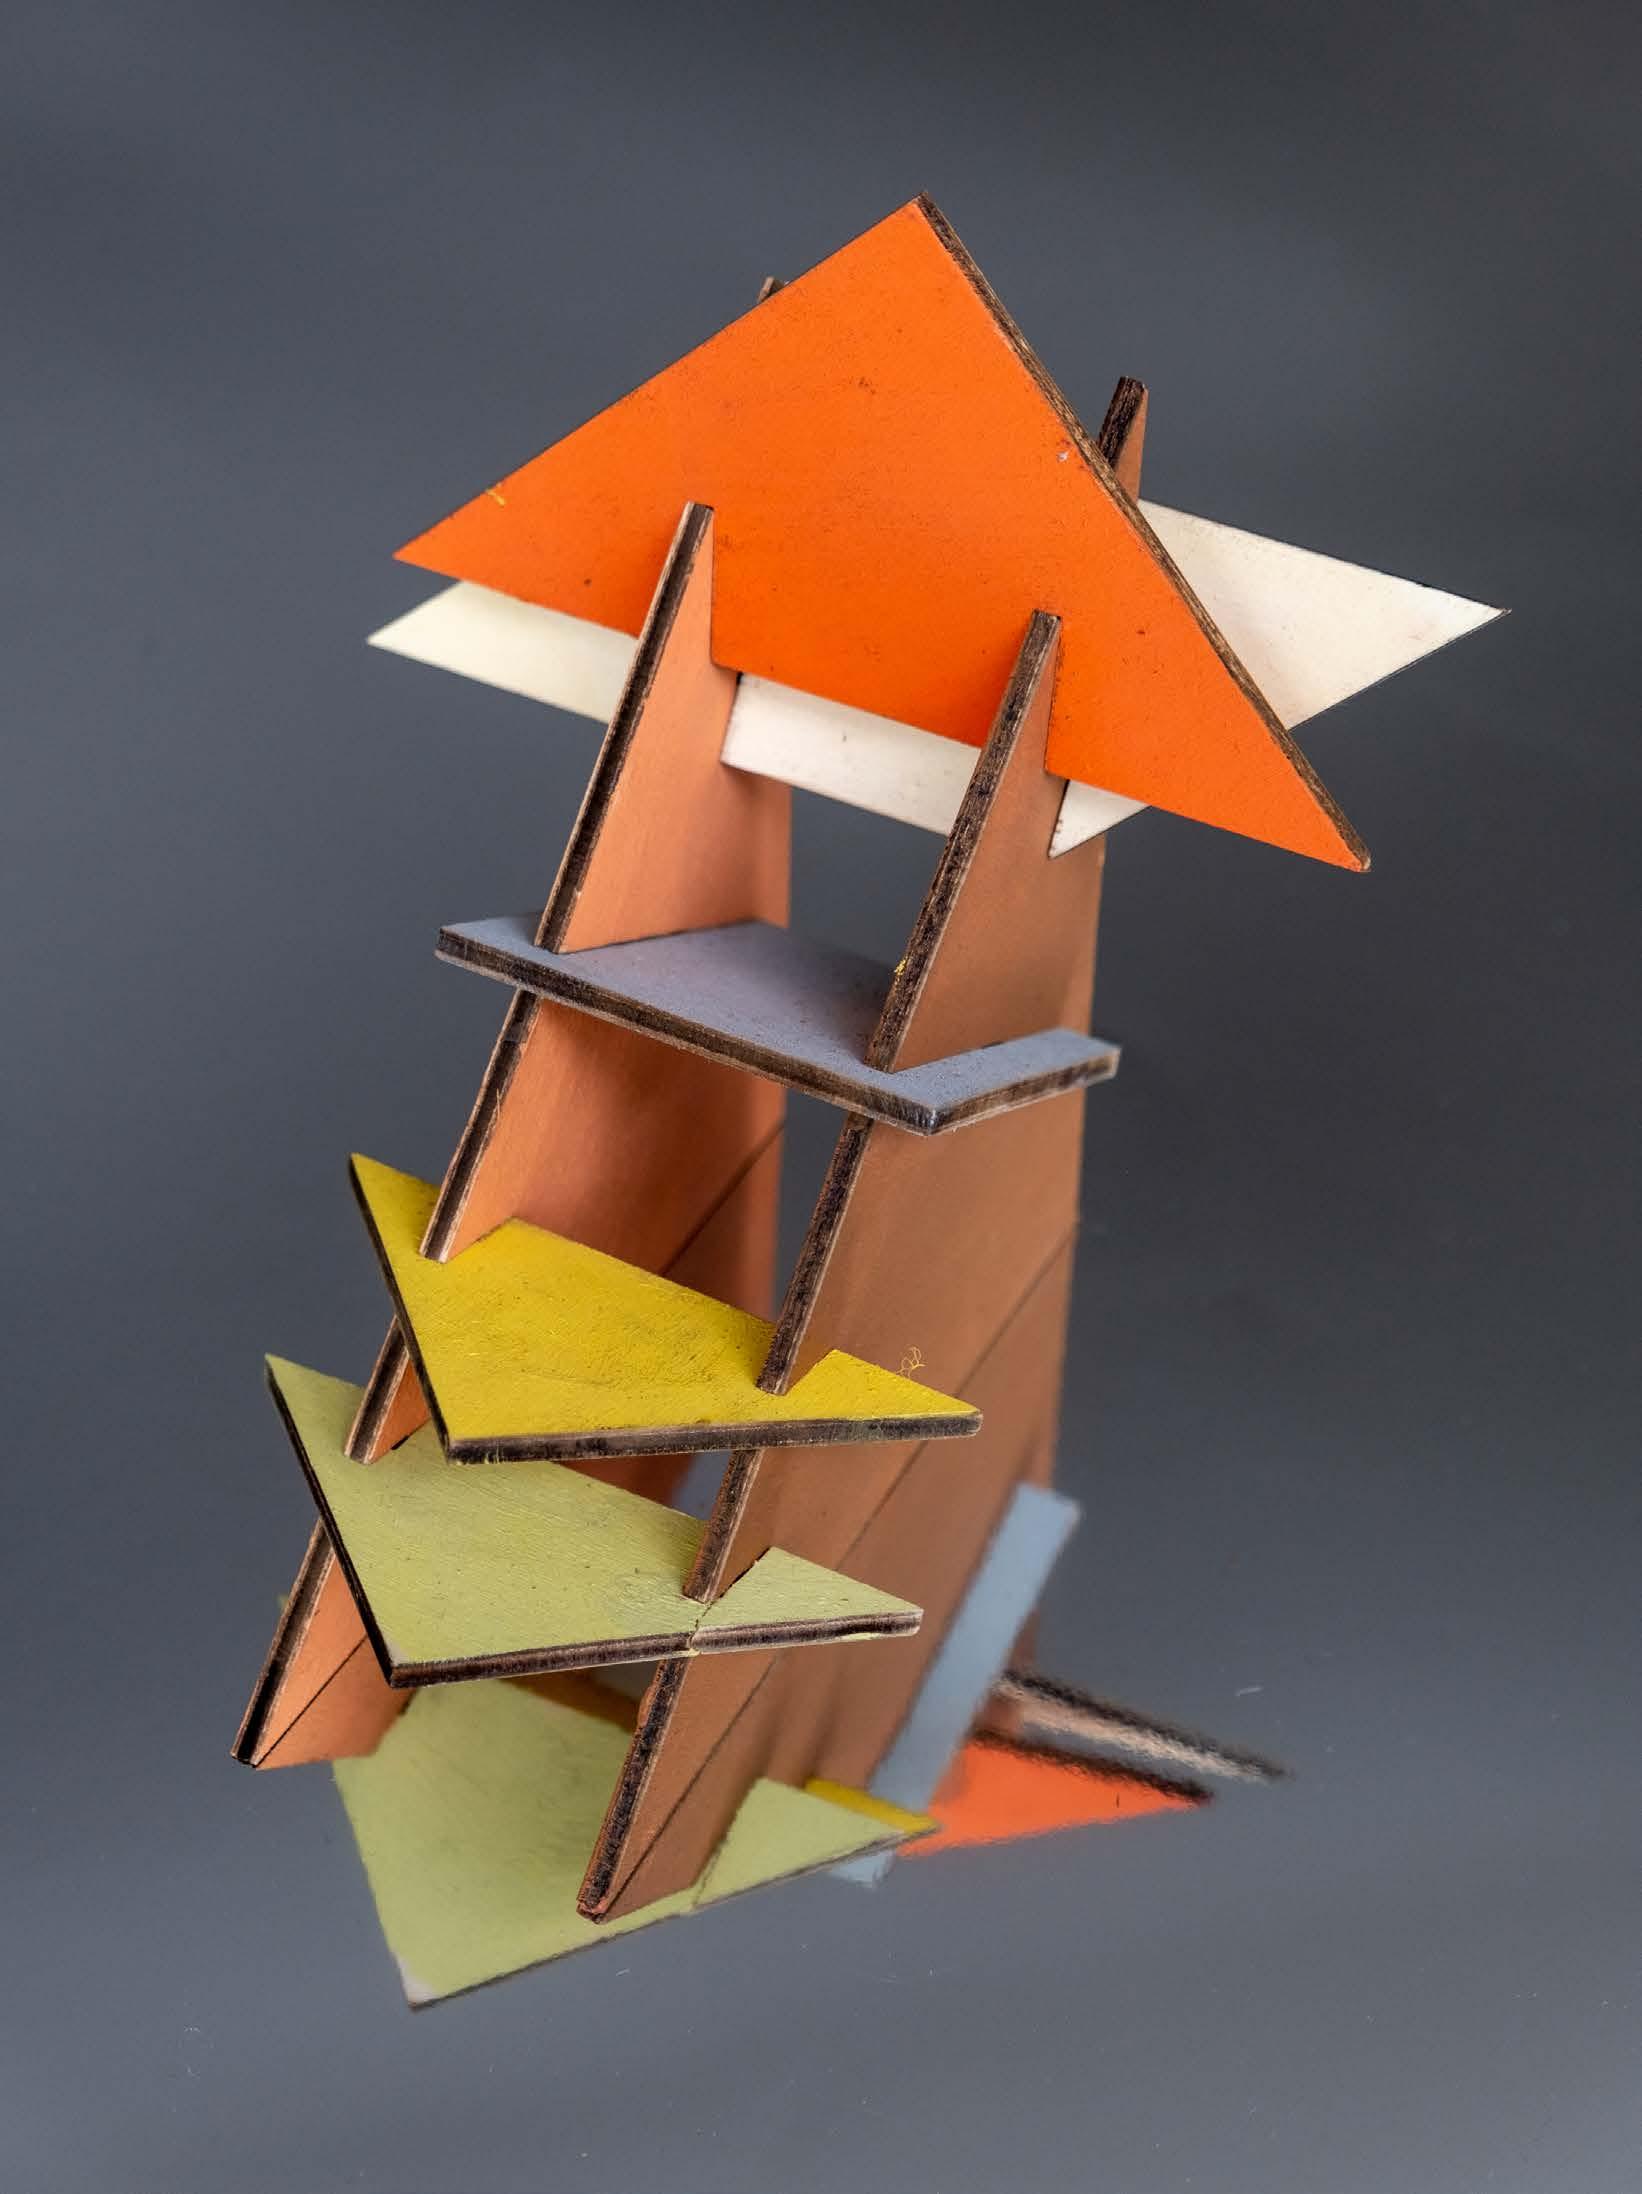
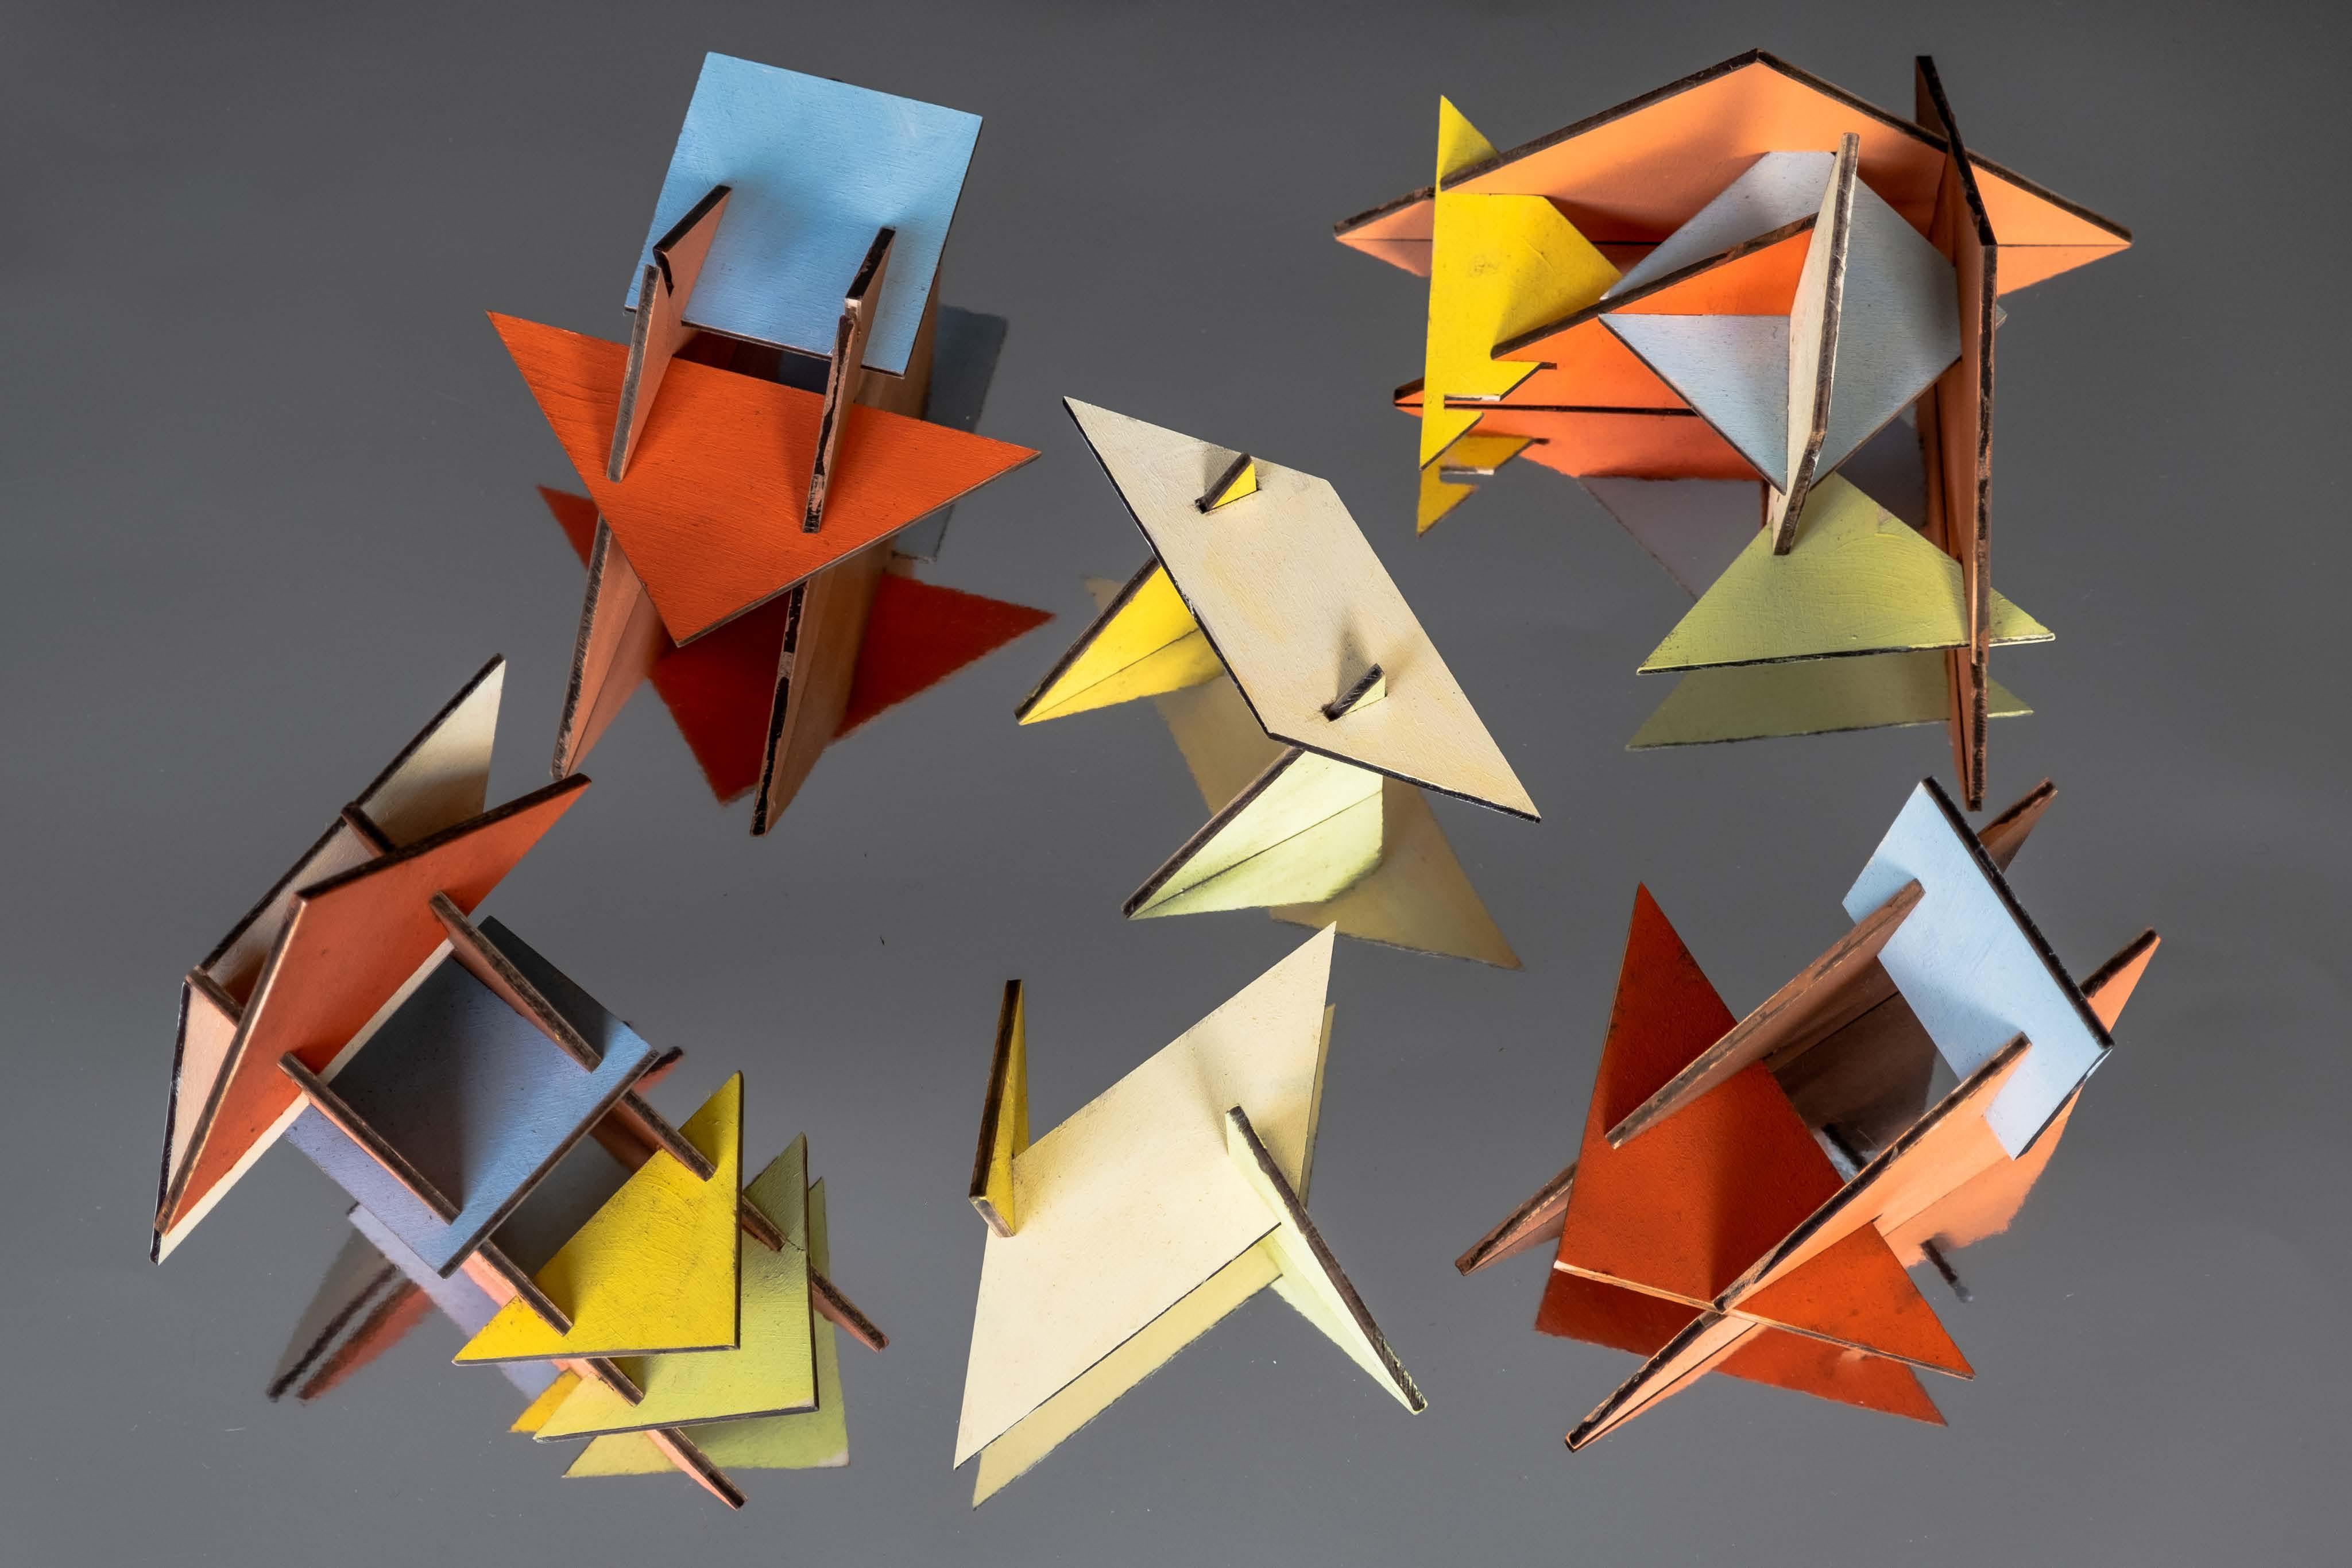
FINAL LASER CUT


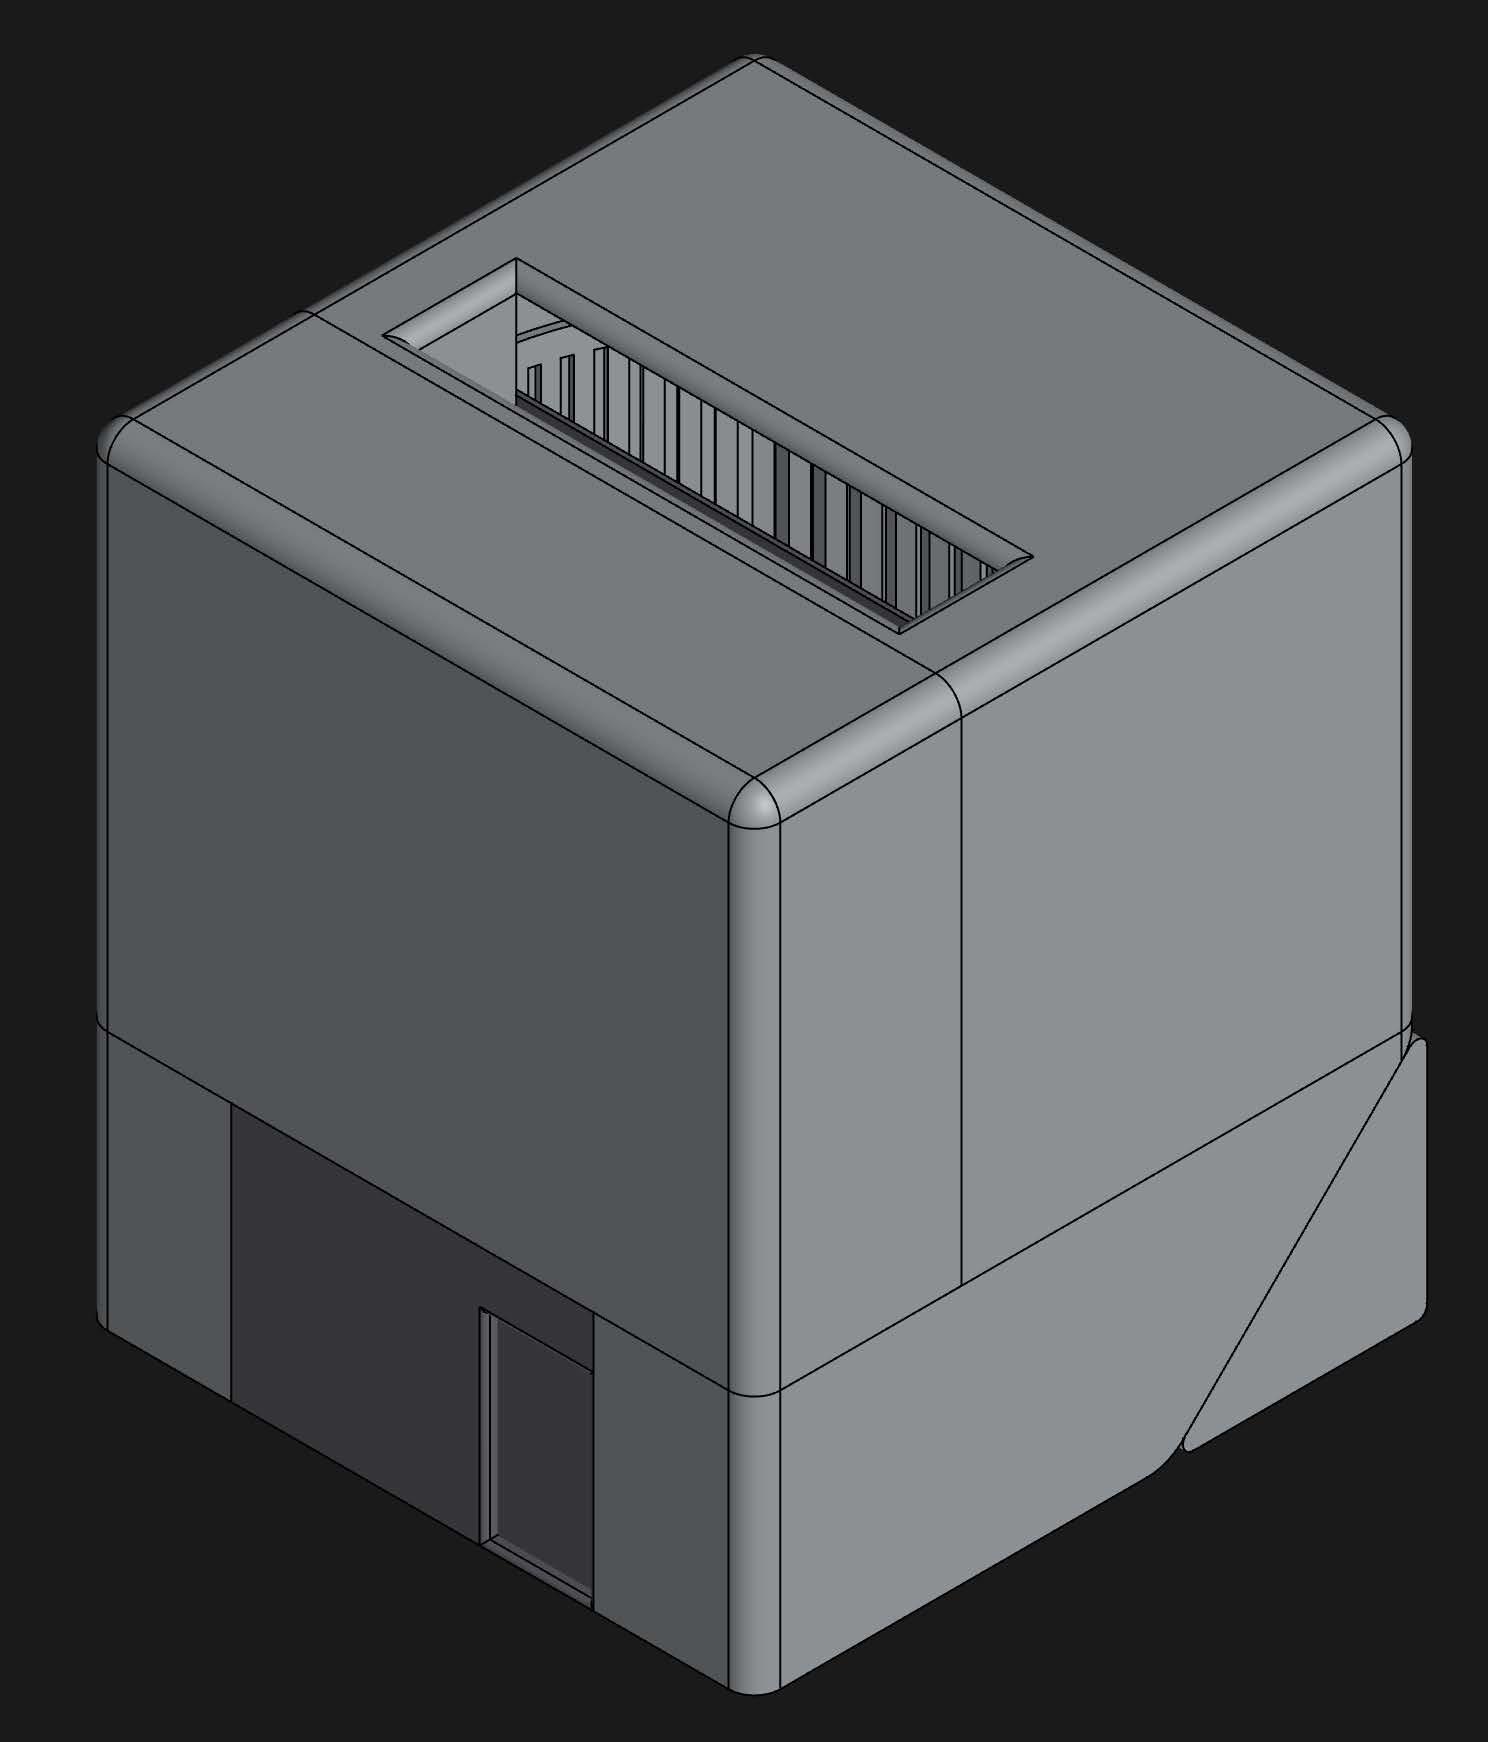
The slots are really tricky to fit in, I had to consider the thickness of the wood and make many tests as possible in order to fit them together perfectly. The thickness of the slot I found out at last was 3.6mm.
PROTOTYPING
The first scale model I made, some slots didn’t fit well.


CMF Consideration
Colour: Vibrant colour choices will draw the user’s attention and create a positive mood.

Material: I used acrylic paint to colour the plywood for the scale model. If the pieces will be made to full scale in the future, I will choose timber from a sustainable source, because it has low embodied energy, it’s non-toxic and truly sustainable.


Finish: For the full scale pieces in the future, I will dye it to enhance the wood’s natural appearance or use oil-based wood finishes from renewable resources. I will definitely avoid solvent-based wood finishes and varnishes with paint thinners that may release toxic fumes.


5
DYE WOOD PAINT WOOD PAINT WITH ACRYLICS
FINAL OUTCOME
6
WISHING WELL & WISHING NET
Inspired by folklore across different cultures, I designed the Wishing Net and Wishing Well in the Memorial Orchard of Stave Hill Ecological Park to invite people make a wish.
Aims of Stave Hill Ecological Park:

• Provide a new habitat for urban wildlife.
• Enable ecologists to discover more about the nature of urban ecology.
• Offer city residents, including schoolchildren, the chance to enjoy nature and learn through hands-on experience.

• Demonstrate the value of ‘creative conservation’ – an ecological approach to the creation of new landscapes.

7
Using twine and cordage to connect to the nature .
Rebecca / Site Manager
PERSONAL WORK
Think about what the park really needs!
Design Direction 1:


2 pavilions , one for man and one for birds. An installation for people to relax and interact with birds.


Design Direction 2:

An intervention(s) in the Memorial Orchard that references the dockland past of the park and fufill people's emotional needs. Visitors are encouraged to actively engage with it, shape the design with their own memories and stories, the tree can be their emotional support in the physical world.


Over the 30 years the park is open , people love the park because it is what it is. It made me think more about the rationale of the idea. It must not create further damage to the park. Hence, I did not move forward with this idea.
I moved forward with this idea because this idea suits the aim of the park, every tree in the memorial orchard is planted in memorial of a lost person. We have to look forward to life, I want to pass on positive energy through my design and give visitors spiritual sustenance.


8
MATERIAL TEST- TIE KNOTS


NET MAKING
I made nets with 2 kinds of techniques , the Modified snake knot and Crown knot for making cargo nets, the net making connect to part of the history of the park. I used different materials, such as old T-shirt strips, Sisal rope, and twine. Reflect to the diversity brought by park visitors to the design.

HISTORICAL OVERVIEW
Whaling pot
This large cast-iron cauldron was used to render whale blubber into valuable oil. Nets were used to catch fish back then.


CORD WITH NETTLE


IMAGE SHOWS NIGHT FISHING WITH A LAMP AND A NET
This image revealed how people catch fish with nets in the past, connected to my idea of making the net for the Memorial Orchard.


Experimenting with Nettle (a natural fibre scourced in the park)

9
Traditional overhead knot Stopper knot Clove hitch
Alpine Butterfly Bowline
Double fisherman
MEMORIAL ORCHARD- WISHING WELL

Building a Wishing Well to avoid the damage caused to real trees, as well as the process of sourcing materials (Ivy and Willow) onsite and connecting people's emotional value is at the core of this project.


The Wishing Well is a term from European folklore to describe wells where it was thought that any spoken wish would be granted.

Test with structure
Making Process
MEIJI SHRINE in TOKYO

Wishing tree full of wooden blocks with written messages/wishes from people all over the world.
Problem
Structure loose and leaning.
Solution
Adding more willow sticks to enhance the tension.


Wishing Wells from the UK
Finalising making
10
After I added more sticks in and weaved more Ivy on, the whole structure has became much better, it is looking more lively and blended into the environment . Although I know the leaves and the grass will go away very soon, the structure will stay there for a longer period of time.


Project Publication p.g. 18

https://issuu.com/swaltener/docs/commonground2022

11
FINAL
OUTCOME
Exhibition Cabinet For Museum
During the visit to the museum, I saw a huge space covered by glass, there’s a table in there showing some beautiful artifacts. However, I fell the audience can’t necessary see the collection clearly, the way they see is limited to looking at the objects and read the text. The lighting was also problematic, it was not enough for me to see the objects clearly. Therefore, I proposed my idea to change the current situation.


Direction 1
PERSONAL WORK
Rotating exhibition cabinet that allows the audience to see the history and objects while spinning.
Direction 2

Interactive exhibition cabinet that shows the artifacts gradually. I moved forward with this idea because the museum manager thinks it suits the museum context better.

12
Museum of the Order of Saint John
Design Development

Adjustments to the First model
Make the edges smooth


First idea prototyping

Identify Problems from prototyping
Adjust the shape of the cabinet according to the stone display


Change the history information section to a more interesting / interactive design
The base design will need to be adapted to a simpler and stronger design to fit in the museum context


Add more of the architecture detail about how the site has been used across the ages, Possibly bench design can be added, further increase the dwell time
The back board for history
After presenting the idea to the museum, I thought more about how children (people at different height) will interact with the design. It would be really helpful to make the angle of the steps flatter and the steps longer. I also want the audience the see the stones from different angles, therefore I think I will use some transparent materials to construct some of the stone display cases.


Final prototyping, Material planning

13
Display case for stone
Information board
The base
FINAL IDEA PLA PROTOTYPE

VISUALIZATION OF THE CABINET IN USE

14
FINAL IDEA
RELAXING LIGHTING
Background & Rationale:


For this project, I had the idea of making a relaxing lighting product compatible with the torch on mobile phones intended for people who come home tired and exhausted.


In fact, evidence indicates that emotional tiredness is associated with increased worklife conflict. Which indicates they have difficulty establishing limits on their job. (How to refuel when you're feeling emotionally drained 2021)

I aim to design a product that will help the user relax and set boundaries with work, the user of my product may come home tired, rather than turning on the light, they can run straight to the sofa and slip their phone into it and relax as the lighting effect comes out. To get a temporary sense of peace and escape.


WORK IN PROGRESS PERSONAL WORK
Inspirations
15
Lighting Product Mood Board
I was trying to see what length of the TipTop edge will work, i tried 3 cm and 6 cm, 6 cm worked better with self -standing.

I tried to make a 1:1 Prototype of my design, trying to see how it feels.
Sketching the form of the base, exploring possiblities with the handle together


Reflection on the model
After making the model, i felt it could be simplified , considering it needs to fit in a bag, the connection part may easily break, therefore i have to modify my design to suit the users' needs.


16
Development
Form exploration of the cover for phone Further exploration of form
Sketch of the Base
Test model- Base
Test Model- Spinning frame
Further development
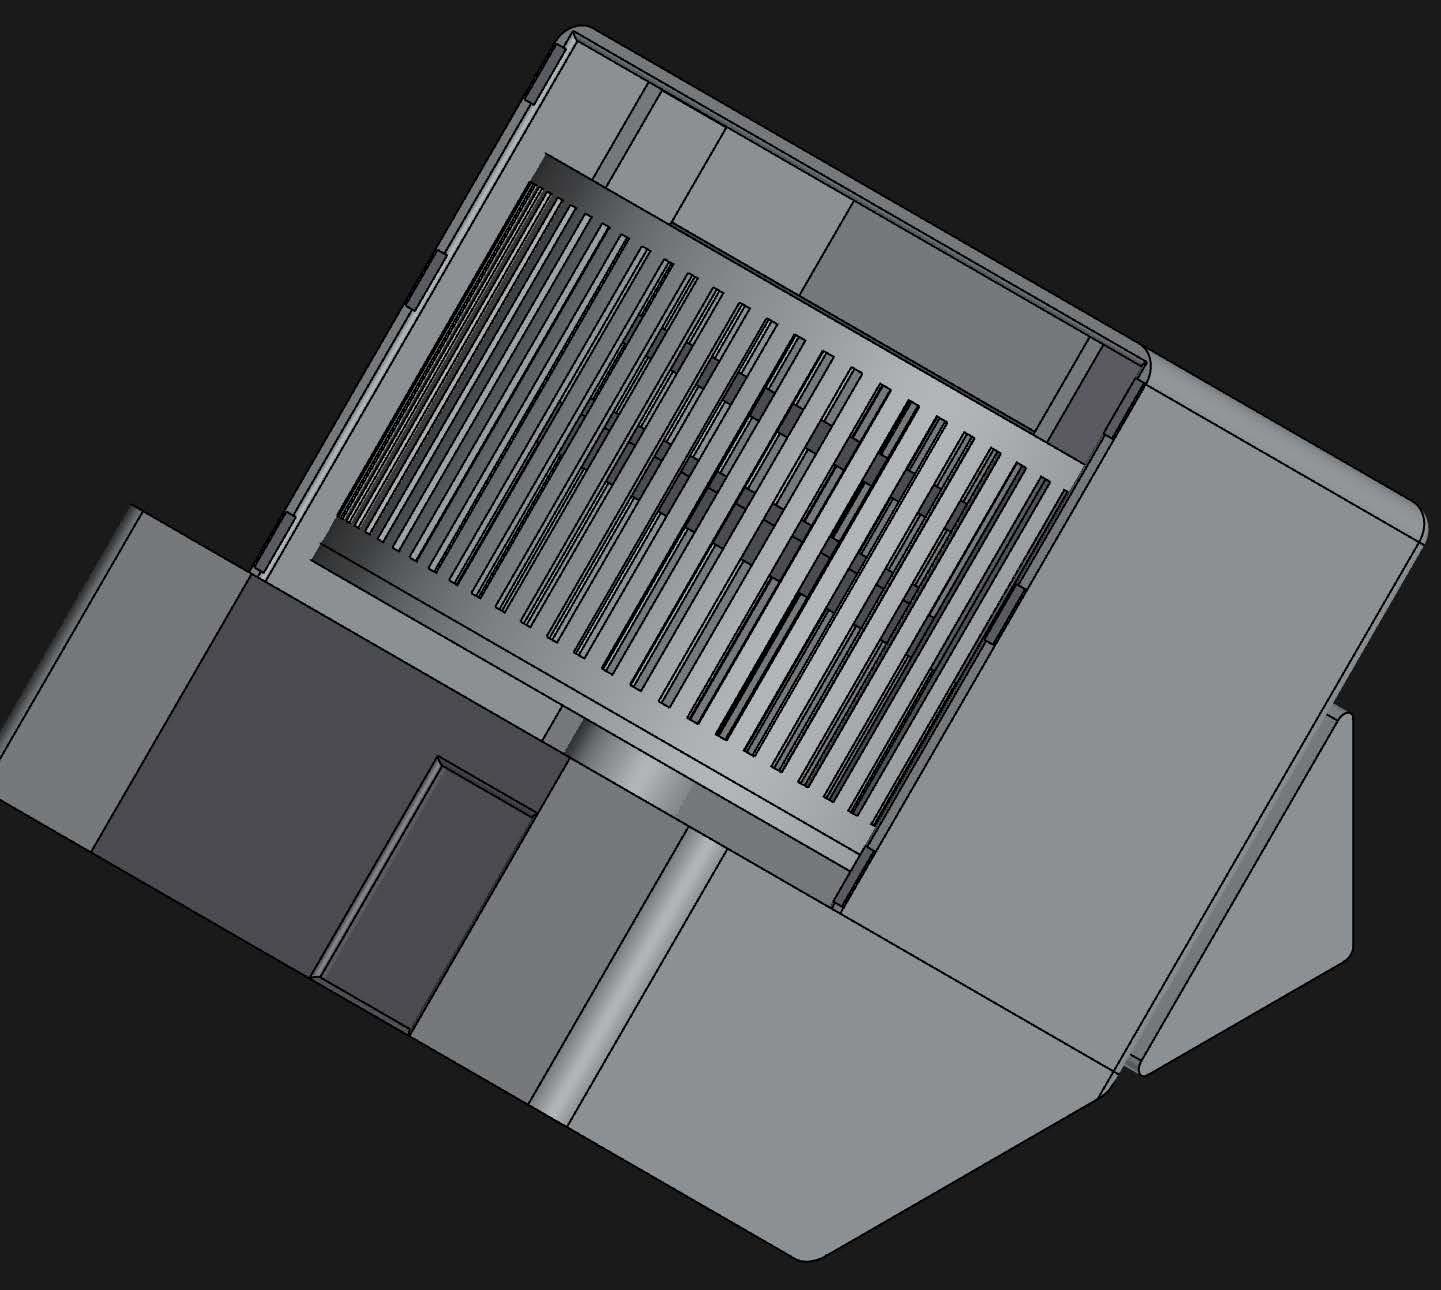
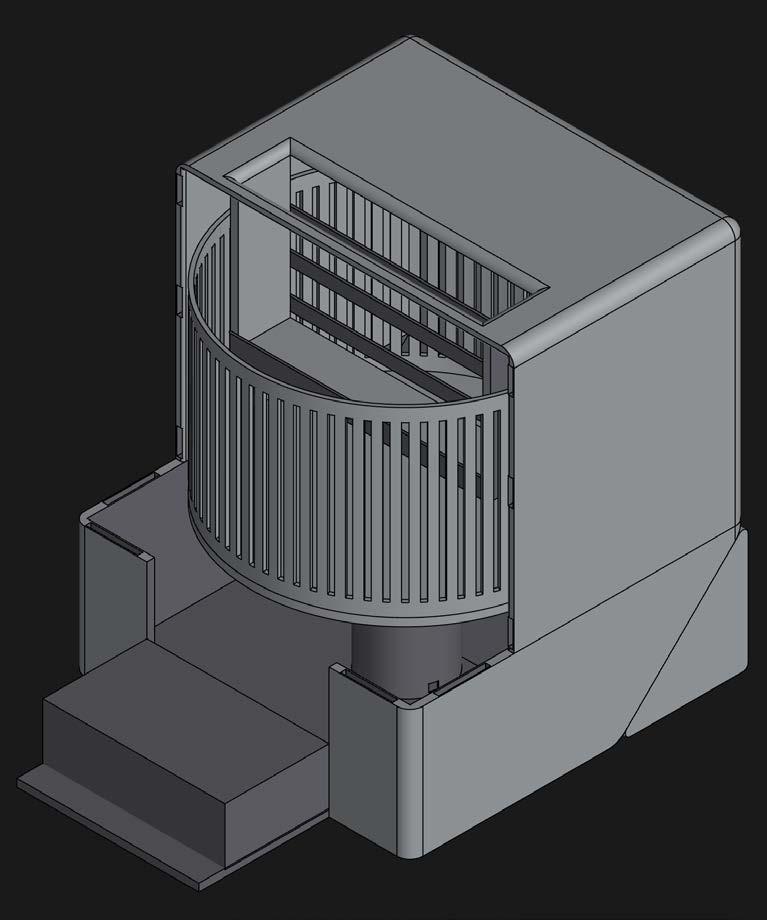
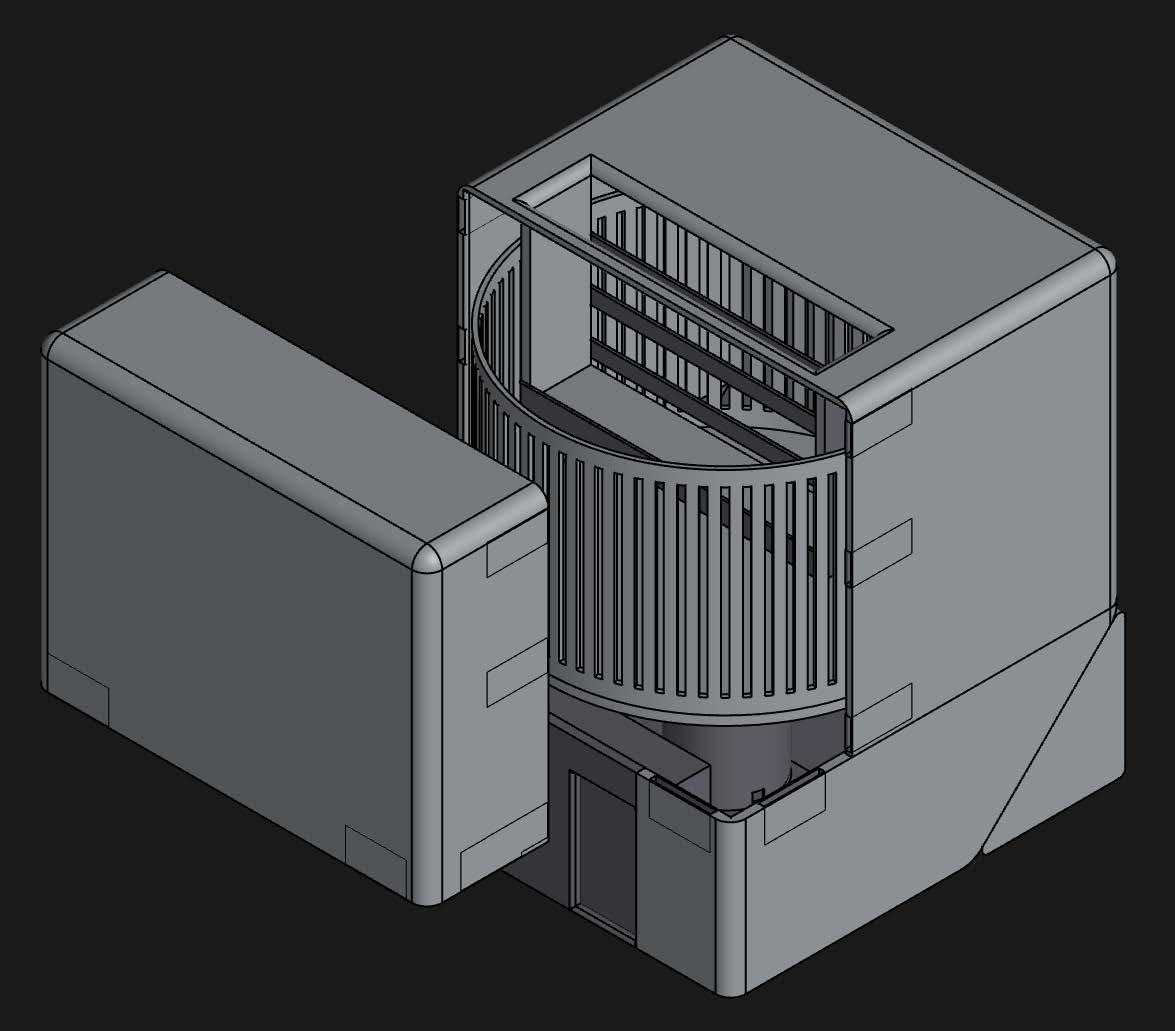
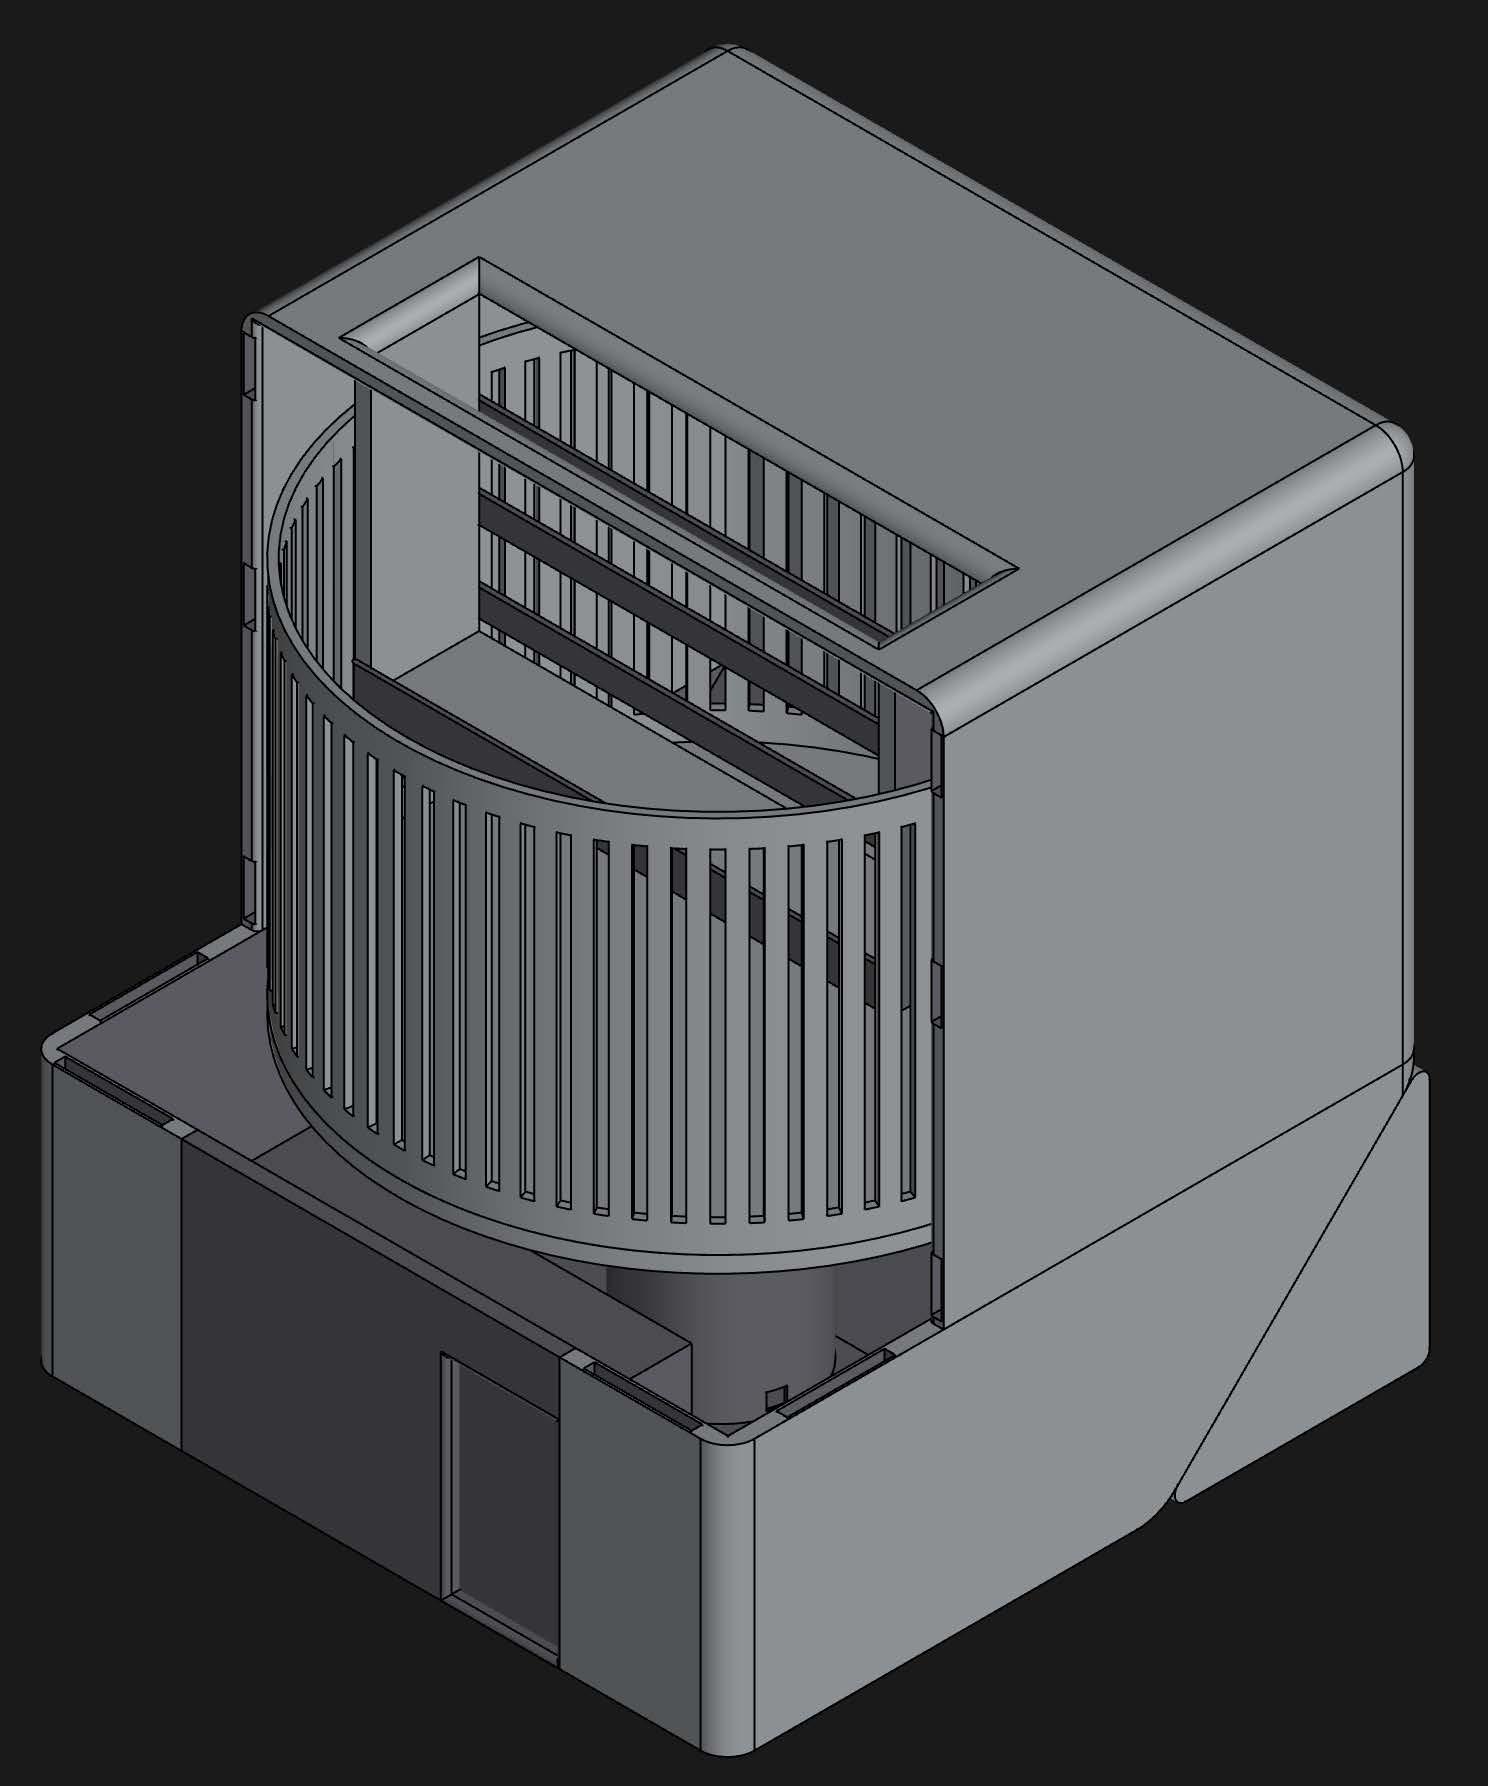
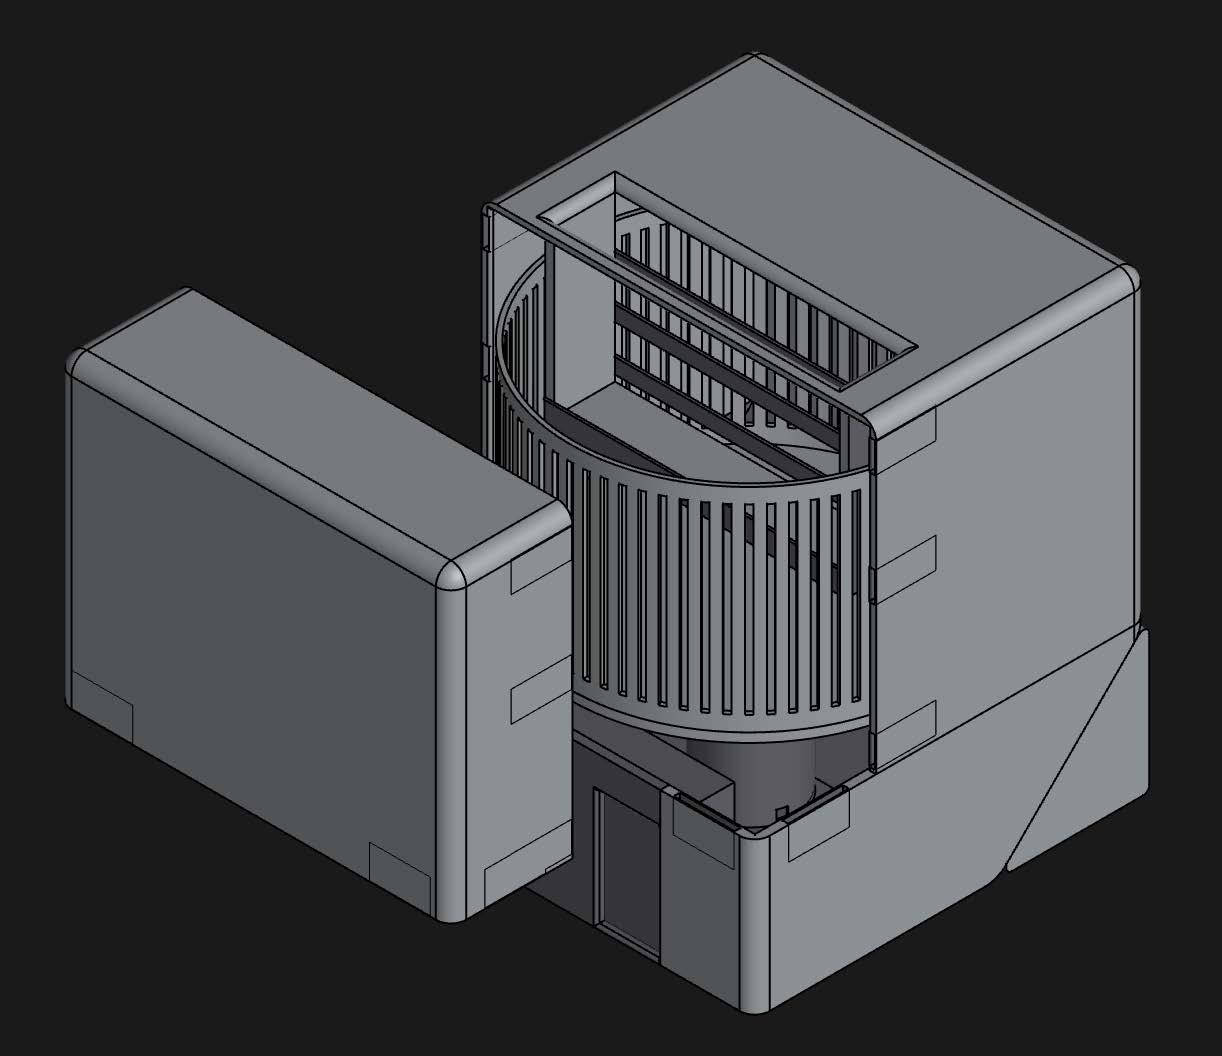
CAD model- Points to improve


From the CAD Model, I discovered a lot of problems, mainly related to assembly and the structure, to make it a more usable product, I have to refine more details.
CAD model- Improved details


From my last design, i improved the details such as i added the base to hold the motor, i made a hole to fit in the motor head. I also made small fences to keep the phone in there without falling out, the edges have also been rounded for better using experience. However, how the parts will be connected will still need to be figured out. As well as how the power will work more elegantly.
Refine Details/ Structure/ Power system
I decided to use a DC motor for my design, however i had the choice to connect the motor to an arduino board or directly to a battery box, since it's a portable device, as well as the form consideration, the battery box is a better choice.
At the same time, another problem emerged, what is the best way to change battery ?

17
What is the best way to change battery ?
The Piano hinge doesn't seem to work because the width of the battery box.

Doesn't fit at the back. Perfect here, but how to change the battery ?
Battery Box


Groove for the magnet
Hole for reaching the switch
Instead of having two sticks to be the axis of the rotaion, i think using a piano hinge will be better.


3D Printing test model


Visualization of the device in use.

I tried to make the shell and the battery pack rotate around the axis, i discovered that my previous perception was wrong, this mechanism will work.
I put two 2 cm stick into the groove, and i will stick the battery box to the shell. Which will make it rotate.
But another problem emerged- how would the sticks fit in? It would be hard to assemble.

Experiment drawings with the hinge.


Groove will be made to fit in magnets.

This need to a separate part
Edges will need to be rounded.
There need to be a small fence up to prevent the phone from falling out.
This hole will be cancelled because the battery box will not need a wire.
These materials will need to be removed for putting in the battery box.
18
How can the user easily attach/ detach the shell ?
Smoother details
Fence created
How different parts function.
The next stage of perfecting this product will be conducting tests to ensure everything is running smoothly, and fix any bugs may occur.
TO BE CONTINUED...
Piece separated
Spaced opened for the switch
Groove opened for magnets
Stand created for the motor
How the lid open/ close How the battery will be changed. How it can adjust the angle.
19
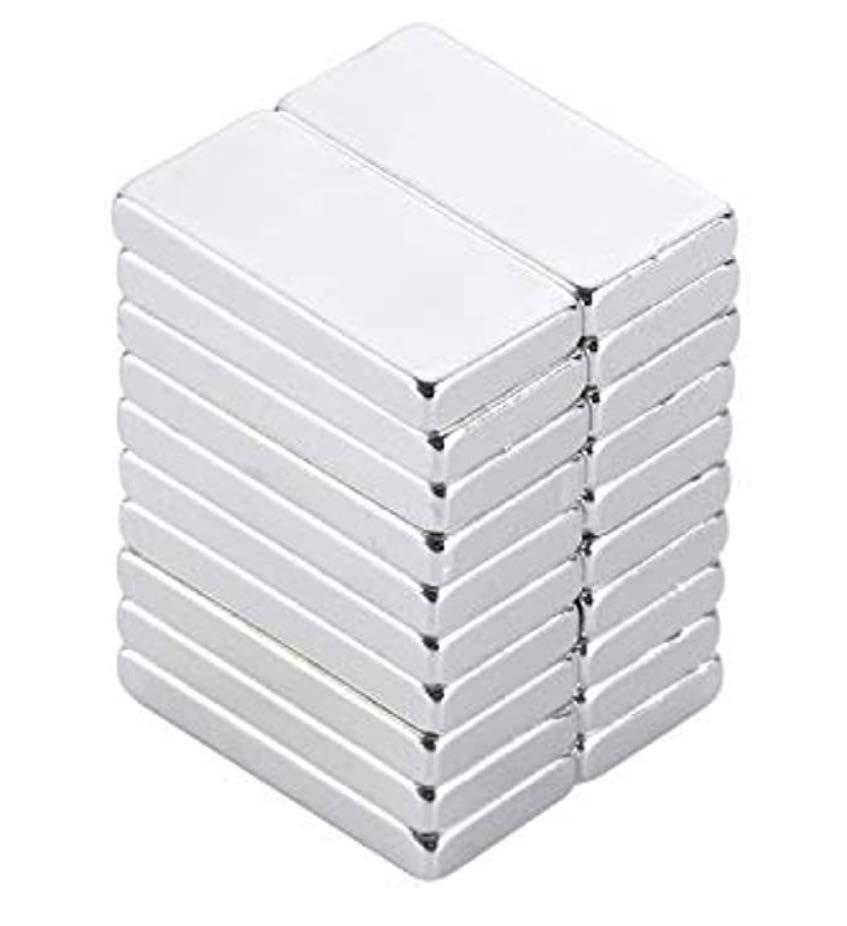
Neodymium Magnets 20*10*2 mm
Improved CAD Model