
1 Owner’s Manual Owner’s Manual PAGE 2........THE TEN COMMANDMENTS OF FIREARM SAFETY PAGE 6........IMPORTANT PARTS OF THE FIREARM PAGE 9........ASSEMBLY INSTRUCTIONS PAGE 11 ........LOADING AND UNLOADING PAGE 12 DISASSEMBLY INSTRUCTIONS PAGE 14 MAINTENANCE INSTRUCTIONS IMPORTANT! READ ALL WARNINGS AND INSTRUCTIONS IN THIS MANUAL BEFORE USING THIS SHOTGUN

With the privilege of owning a firearm comes the responsibility to use it safely. You must understand and follow the Ten Commandments of Firearms Safety at all times. These time-honored safety rules apply to your ownership and handling of any firearm. They must govern your actions whenever and wherever you are involved with firearms . . . in the field, on the range, or in your home. Commit these Ten Commandments to your memory.
The proper use and performance of your firearm depends on correct assembly and maintenance, so it’s critical that you familiarize yourself with the information in this instruction book. Even if you’re a veteran shooter with a collection of Remington firearms, take the time to read this literature. Not all firearms are the same. That means the first step in safe handling is to learn the features and requirements of your new Remington.
In 1816 Eliphalet Remington was confident he could make a flintlock that was as good or better than any he could buy. His confidence was well founded. The barrel he handcrafted set a new standard for firearm accuracy and spawned generations of products that have made Remington ® Arms America’s leading gunmaker. While performance and style are certainly hallmarks of Remington firearms, one factor ultimately drives their performance. Safety. Eliphalet Remington never lost sight of the fact that his rifles were potentially lethal and could kill someone if handled improperly. And after more than 180 years the same holds true for any firearm, including your new Remington. Eliphalet Remington’s first flintlock launched a proud tradition of accuracy and responsibility.
1st COMMANDMENT
2
A Tradition of Performance and Safety.
THE TEN COMMANDMENTSOF FIREARM SAFETY
Always Keep the Muzzle Pointed in a Safe Direction.
A superbly crafted gun is only as good as the hands that hold it. You can never be too careful. Shooting accidents are often caused by careless oversights such as failing to control the direction of the muzzle, failing to fully engage the safety, leaving ammunition in the chamber or using improper loads. These oversights can result in the destruction of life, limb or property. There’s no calling back a bullet once it’s been fired, so it’s critical that you know the principles of safe gun handling and storage before you ever take your new Remington firearm out of the box.
Safety is Critical to Performance.
This is the most important gun safety rule. A safe direction is one in which an accidental discharge will not cause injury to yourself or others. Never allow your gun to point at anythingyou don’t intend to shoot. Be especially careful when you’re loading or unloading. Treat every gun as if it were loaded. And make it a habit to know where the muzzle is pointed at all times, even when your firearm is unloaded. No one will be injured by an accidental discharge if you keep your firearm pointed in a safe direction. It’s as simple as that.
2nd COMMANDMENT
Firearms Should be Unloaded When Not in Use and Secured from Unauthorized Use.
Load your firearm only when you are in the field or on the range and ready to shoot. Unload your firearm as soon as you are finished shooting. Never bring a loaded firearm into your camp, home or vehicle. Unloading means unloading both the chamber and the magazine. Before handling a firearm or passing it on to someone else, visually check the chamber, receiver, and magazine to make sure there is no ammunition anywhere in the firearm. Never assume a firearm is unloaded, and never take someone’s word for it - look for yourself. When you are finished shooting and have completely unloaded the firearm, leave its action open.
Never Rely on Your Firearm’s Safety Mechanism to Justify Careless Handling.
Use Proper Ammunition.
Never fire a shot unless you know exactly where the shot is going and what it will strike. Bullets and shot can travel great distances with deadly velocity. When hunting game, never fire at a sound, a movement or a patch of color - an impulsive shot can have tragic consequences. A fellow hunter in camouflage may be mistaken for game by an impulsive shooter
Every firearm is designed to use only a specified caliber, gauge or length of ammunition. Use of the wrong ammunition can cause serious personal injury or death. It is your responsibility to make sure the ammunition exactly matches the specifications for your firearm.
Know Your Target and What’s Beyond It.
In addition to being sure of your target, you must know what lies beyond the target. In other words, make sure of your backstop. Also, beware of ricochets - never shoot at water or a hard surface.
Use of improperly reloaded ammunition can also be dangerous. Firearms are designed, manufactured, and proof-tested to specified industr y standards. Hand-loaded or reloaded ammunition that deviates, either intentionally or accidentally, from specified loadings can be extremely hazardous. It is strongly recommended, therefore, that you use only factor y ammunition from a reputable ammunition manufacturer. If you do reload, you have assumed the risks and responsibilities of an ammunition manufacturer.
33 2nd COMMANDMENT (cont’d)
5th COMMANDMENT
Whenever you are carrying a loaded firearm in the field, you must unload it before crossing a fence, climbing into a tree stand or blind or in any other situation where you may not be able to fully control the firearm. Never pull or push a loaded firearm toward yourself or another person.
If your firearm is equipped with a manual safety mechanism, do not rely on the safety as an excuse for improper or careless handling of the firearm. The safety mechanism is merely a supplement to your proper handling of the firearm. The safety mechanism may be broken or altered. Even if you think you have previously engaged the safety in the “safe” position, it may have been inadvertently disengaged without your knowledge while being carried. Never assume that the safety mechanism is engaged in the “safe” position. Your assumption may be wrong or mistaken. Treat your firearms safety mechanism like you would treat any other mechanical device - as something that could break or fail.
Not all safety mechanisms operate in the same manner Before using any firearm, know and understand precisely how the safety mechanism on that particular firearm operates. Never pull the trigger when the safety mechanism is in the “safe” position, and keep your fingers away from the trigger while loading, unloading, and engaging or disengaging the safety mechanism.
4th COMMANDMENT
Store your firearms unloaded in a secure place where unauthorized persons cannot gain access to them. Store firearms and ammunition separately. If you use an external security device such as a cable lock or trigger lock, you must still keep the firearm unloaded when locked. Whether you utilize a locked gun safe or external locking device, it is your responsibility to make sure that children and other unauthorized persons cannot gain access to your firearm and ammunition.
3rd COMMANDMENT
Firearms Should be Unloaded When Not in Use and Secured from Unauthorized Use.
With your firearm completely unloaded, open the action and make sure there are no obstructions or debris in the barrel. Even a small obstruction such as snow or mud in the barrel can cause the barrel or receiver to burst when the next round is fired. Use a cleaning rod to remove obstructions and residues from the barrel. If the firing noise or recoil seems weak, stop and completely unload your firearm to check for obstructions before firing another shot. NEVER tr y to shoot out an obstruction by loading and firing another round of ammunition.
6th COMMANDMENT
Be Sure the Barrel is Clear of Obstructions Before Shooting.
If Your Firearm Fails to Fire When You Pull the Trigger,Handle With Care.
If a chambered round of ammunition does not fire when you pull the trigger, stop and keep the muzzle pointed in a safe direction. Treat your firearm as if it could still discharge. Keep your face away from the breech. Slowly and carefully open the action, return the safety mechanism to the “safe” position, and unload the cartridge from the chamber. Dispose of the cartridge safely. If your firearm repeatedly fails to fire when you pull the trigger, take your firearm and ammunition to a competent gunsmith or return the firearm to the manufacturer for inspection.
Learn How Your Firearm Operates.
8th COMMANDMENT
7th COMMANDMENT
Wear protective shooting glasses and hearing protection when shooting. Be sure to wear eye protection when disassembling or cleaning a firearm to protect your eyes from springs and other tensioned parts. Continued exposure to shooting noise can permanently damage your hearing.
9th COMMANDMENT
Proper cleaning and lubrication are also important to maintain the safe and proper functioning of your firearm. Follow the cleaning and lubrication instructions set forth in the owner’s manual for your firearm. NEVER attempt to clean or lubricate a loaded firearm.
4
Always Wear Eye and Ear Protection.
Not all firearms are alike. Before you use any firearm for the first time, you must become totally familiar with how that firearm operates. When you receive a new firearm, read and understand the owner’s manual before assembling the firearm for the first time. If you acquire a used firearm, request an owner’s manual and have the rifle inspected by a competent gunsmith to determine whether it is in good working order. If you do not have an owner’s manual, contact the manufacturer to obtain one. If you are selling or trading your firearm to someone else, be sure to transfer the owner’s manual to the new owner.
Never Alter or Modify Your Firearm and Have it Cleaned and Serviced Regularly.
10th COMMANDMENT
Your firearm has been carefully designed and manufactured to operate according to certain factory specifications. NEVER alter or modify your firearm, especially its trigger or safety mechanism, in any way. Such alterations or modifications can adversely affect the safe operation of your firearm, endangering you and those around you. As with any mechanical device, the parts of a firearm are subject to wear or breakage. To assure optimum safety and performance, your firearm must be maintained and serviced on a regular basis. Only a competent gunsmith or a Remington Authorized Ser vice Center should service or repair your firearm.
Discharging firearms in poorly ventilated areas, cleaning firearms or handling ammunition may result in exposure to lead, a substance known to cause birth defects, reproductive harm, cancer and other serious physical injury. Have adequate ventilation at all times. Wash hands thoroughly after exposure.
Remington® Premier™ Over & Under Shotgun

PRIMERHEADGAUGEMARKING Picture 2 Picture 1
STOCKASSEMBLY TRIGGER TRIGGER GUARD BARREL MUZZLE RECEIVER SAFETY MECHANISM TOPLEVER FRONTSIGHT FORE LATCHEND FORE END
SHOOT SOBER!
LEAD EXPOSURE WARNING
5
This picture shows the main parts of the REMINGTON Premier™ OVER AND UNDER SHOTGUN. The picture will aid in understanding the instructions in this manual. See page 14 for instructions on changing choke tubes.
Shotgun Shell

Congratulations on your choice of a Remington®. With proper care, it should give you many years of dependable use and enjoyment. (See Picture 1).
Guns and alcohol or drugs don’t mix. Never consume anything that would even mildly impair your judgement or physical coordination while handling a firearm.
WARNING!
Failure to follow any of these safety rules may cause personal injury or death to the shooter or bystander and damage to property. Do not use a firearm until you fully understand and practice the Ten Commandments of Firearm Safety. If you have any questions about the safe use of a Remington firearm, write to us at Remington Arms Company, Inc., Consumer Service, P.O. Box 700, Madison, NC 27025-0700, or call us at 1-800-243-9700
Now that you’re a gun owner you have the obligation to help ensure that shooting sports are safe for everyone–participants and bystanders alike. You can do that by practicing these principles of firearm safety and passing them on to others – especially new shooters. Set an example for beginners. Be a guide to their safe entry into the exciting world of shooting sports. Invest your time and patience for the love of the sport and for its future. After all, it’s your love of the sport that led you to buy a new Remington. Firearm ownership is a right and privilege. It’s a right guaranteed in this nation’s Constitution. It’s a privilege which carries with it a personal responsibility to use your firearm in a way which will ensure your safety and the safety of others. The preser vation of this right and privilege depends on the personal commitment of you and your fellow shooters to the safe and responsible use of firearms. Let the Ten Commandments of Firearm Safety outlined in the book guide you at all times. Teach and promote these rules whenever you can. Remember, firearm safety depends on you! That’s the only way to really enjoy your new Remington firearm and to preserve sport shooting as we know it today
DON’T KEEP THIS TO YOURSELF.
(See Picture 2). This picture shows the parts of the ammunition.
Never pull the trigger when the safety mechanism is engaged in the ‘SAFE’ position.
WARNING!
WARNING!
Important Parts of the Firearm
The firearm will fire when the trigger is pulled with the safety mechanism in the forward or ‘FIRE’ position.
Immediately after firing the firearm, put the safety mechanism back in the ‘SAFE’ position. The safety should be in the ‘SAFE’ position except when the firearm is actually being fired. The safety should always be in the ‘SAFE’ position before you open the action to load or unload. Once you have fired the firearm, opening the action automatically returns the safety to the ‘SAFE’ position in the Premier Field and Premier Upland models. The Premier STS Competition model, however, does not automatically re-set the safety mechanism when opening the action. You must manually move the safety to the ‘Safe’ position. Even when the safety mechanism is engaged, careless handling can cause the firearm to fire. See the Ten Commandments of Firearm Safety on pages 2, 3 and 4.
The safety mechanism on the Premier Over & Under is a tang safety located in the center of the top of the receiver to the rear of the top lever. (See Pictures 3 and 4).


SAFETYMECHANISMINDISENGAGED
WARNING!
The Safety Mechanism
SAFETY
The safety mechanism provides protection against accidental or unintentional discharge under normal usage when properly engaged and in good working (See Picture 3) order. To engage the safety mechanism in the ‘SAFE’ position, pull it fully rearward. The letter ‘S’ WILL SHOW. (See Picture 3). Regardless of the position of the safety mechanism, treat every firearm as if it were loaded, and always point the muzzle in a safe direction. Always engage the safety mechanism in the ‘SAFE’ position before handling, (See Picture 3) loading or unloading the shotgun.
Do not touch the trigger while moving the safety mechanism. When you are ready to fire the firearm, push the safety mechanism fully forward so that the letter ‘S’ DOES NOT SHOW. The safety mechanism is now in the ‘FIRE’ position. (See Picture 4).
Picture 3
MECHANISMINENGAGED 'SAFE' POSITION LETTER 'S' WILL SHOW LETTER 'U' WILLSHOWSBOTTOMBARRELWILLFIREFIRST
'FIRE' POSITIONLETTER 'S' WILLNOTSHOW LETTER 'O' SHOWSTOPBARRELWILLFIREFIRST
Picture 4
6
WARNING!
WARNING! THE USE OF THE LOCKING DEVICE IS NOT A SUBSTITUTE FOR SAFE GUN HANDLING AND STORAGE, INCLUDING KEEPING THIS AND EVERY GUN UNLOADED AND LOCKED IN A SECURE PLACE WHEN NOT IN USE. READ AND FOLLOW THESE AND OTHER SAFETY RULES IN THIS INSTRUCTION BOOK. FAILURE TO READ, UNDERSTAND AND OBEY THESE RULES CAN RESULT IN SERIOUS PERSONAL INJURY OR DEATH TO YOU OR OTHERS. SEE THE TEN COMMANDMENTS OF FIREARM SAFETY ON PAGES 2, 3 and 4.
The ejectors are part of the shell case head support system. Never shoot the firearm with either ejector not in place as a shell head may rupture and cause serious personal injury.
Do not alter or modify the trigger or firing mechanism. CAUTION: Dry firing the Premier Over & Under Shotguns with empty chambers is not recommended unless caps are used to cushion the firing pins to prevent damage to the firing pin holes. Excessive dry firing without snap caps could cause the firing pin to bind, resulting in misfires.
The ejectors automatically eject any fired rounds from the barrels when the action is opened. Unfired rounds will not be ejected but will be lifted away from the breech face of the barrels when the action is opened. This will allow unfired shells to be easily removed by hand.
To select the bottom barrel to fire first, push the barrel selector to the right. This will expose the letter ’U’. (See Picture 3). The barrel selector can be operated only when with the safety mechanism is engaged in the ‘Safe’ position.
The Security System
WARNING!
DO NOT TOUCH THE TRIGGER UNTIL YOU ARE READY TO FIRE. Pulling the trigger will fire the firearm. After the first barrel has been fired, release the trigger to its full forward position and then pull the trigger again to fire th second barrel.
WARNING!
WARNING!
7
The Barrel Selector
Important Parts of the Firearm (cont’d)
NOTE: Your Premier Over & Under shotgun has two barrels and one trigger. A barrel selector is provided to allow you to select which barrel to fire first. The barrel selector is part of the safety mechanism. Moving the barrel selector right or left determines which barrel will fire first. To select the top barrel to fire first, push the barrel selector to the left. This will expose the letter ‘O’. (See Picture 4).
The Automatic Ejectors
The Trigger
An external lock has been supplied with your firearm. The gun lock is a security device to help you prevent unauthorized use of your firearm. The instructions for the safe and proper use of the gun lock are provided in the packaging for your lock. READ AND FOLLOW THE INSTRUCTIONS for the gun lock. You may also obtain the instructions and warnings for the gun lock on the Remington website at WWW.REMINGTON.COM or by calling Remington’s toll-free number at 1-800-243-9700.
I.TO CHECK THE INSIDE OF THE BARRELS:
The Barrels
WARNING! The inside of both barrels must be clean and free of obstructions.
The top lever is used to open the action.
Beware of pinch points as you open and close the action.
WARNING!
WARNING! When the action is closed, the firearm can be fired.
5.Look through both barrels from the breech end to make sure there no obstructions in them.
1.Remove the barrel assembly following the instructions on Pages 12 and 13.
WARNING!
2. Rotate the barrel assembly downward to open (break) the action.
3.Insert the cleaning rod into the muzzle and lightly tap the rod to free the object.
4. If an object cannot be easily pushed out of the barrel with a cleaning rod, return the firearm to a Remington ® Authorized Service Center
3.Push the rear of the top lever to the right.
III. TO CLEAN THE BARRELS AND CHOKE TUBES FOLLOW THE INSTRUCTIONS ON PAGES 14 AND 15 BEFORE LOADING THE FIREARM:
WARNING! Make sure that the inside of both barrels are free of dirt or other objects.
Picture5
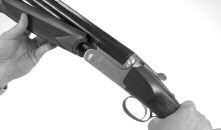
Whenever you open the action, keep the muzzle pointed in a safe direction and the safety mechanism in the ‘SAFE’ position. TO OPEN (BREAK) THE ACTION:
2.Engage the safety mechanism in the ‘SAFE’ position so the letter ‘S’ SHOWS.
II.TO REMOVE AN OBJECT FROM INSIDE A BARREL:
8
1.Push the rear of the top lever to the right to unlock the action and allow the firearm to open. (See Picture 5).
Important Parts of the Firearm (cont’d)
The Top Lever
1.Point the muzzle of the firearm in a safe direction.

4.Rotate the barrel assembly down to open (break) the action.
WARNING! NEVER try to remove an object from a barrel by loading another shell and firing. This may cause the barrel to burst or a shell to rupture, and cause serious personal injury or death to you and those around you.
2. Use the correct size cleaning rod.
3.Open the action and check the chambers to make sure there are no shells in either barrel.
6.Select the desired choke tube and insert the tube into the barrel.
9
The Choke Tubes
WARNING!
TO CHANGE THE CHOKE TUBES:
1.Point the firearm in a safe direction.
7.Tighten the choke tube snugly but DO NOT OVER-TIGHTEN.
9.Following the above procedure, check the choke tubes occasionally to make sure they have not loosened.
8.Close the action.
I.TO ASSEMBLE:
Important Parts of the Firearm (cont’d)
2.Pull the safety to the ‘SAFE’ position so the letter ‘S’ SHOWS.
4.Place the choke tube wrench into the choke tube.
Your Premier Over & Under shotgun is equipped with ProBore™ choke tubes to allow you to utilize the specific type of choke constriction desired for specific types of hunting or target shooting. A choke tube wrench is also supplied for use when changing or tightening the choke tubes.
WARNING! Never attempt to change the choke tubes on a loaded shotgun.
NEVER place your hand over the muzzle when changing or tightening the choke tubes.
WARNING! NEVER alter a barrel by overboring or lengthening the forcing cone. This may cause the barrel to burst, and cause serious personal injury or death to you or those around you.
5.Turn the wrench counter-clockwise and remove the choke tube.
WARNING! Always wear eye protection when assembling or disassembling the firearm to prevent injuries caused by compressed springs and other parts. The Premier® Shotgun is shipped with the barrel/fore-end assembly removed from receiver. (See Picture 6) for location of parts.
WARNING! NEVER fire the firearm without the choke tubes installed.
Picture 6 FORE BARRELEND CHOKETUBEBOX RECEIVER STOCK
Assembly Instructions

7. Push the fore-end assembly against the bottom of the barrel to latch the fore-end assembly into place.

6. Carefully place the fore-end assembly at a slight angle to the barrel, and fit radius of the fore-end iron to the matching radius of the frame. (See Picture9).
Picture 7
1.Before assembling, clean the barrel assembly following the instructions on Pages 14 and 15.
10
2.Push the rear of the top lever to the right until it latches open. (See Picture 5).
PIVOT PIN

TO ASSEMBLE:
Assembly Instructions) (cont’d)
PCEJECTORAMINS
4. Align the circular cuts on the underside of the bar rel assembly with the pivot pins in the front of the frame. (See Picture 8).
5. Hold the barrel assembly in engagement with the pivot pins and align the ejector cam pins with their cam slot in the frame. Then rotate the barrel assembly until the top lever latches into place in the center of the frame top tang.
Picture9
CIRCULARCUTS
3.Remove fore-end from barr Picture 7).
Picture 8
Do not load your firearm until you are in the field or at a target range and ready to shoot. NEVER load your firearm in a dwelling, building, vehicle or camp. NEVER leave your loaded firearm unattended - even momentarily.
3.Push the rear of the top lever to the right to unlock the action.
4.Rotate the barrel assembly downward to open (break) the action.
5.Place a shell of the correct gauge and length into one or both of the barrel chamber. (See Picture 10).
WARNING!
2.Pull the safety mechanism rearward to the ‘SAFE’ position so the letter ‘S’ SHOWS.
How To Load And Unload
11
2.Pull the safety to the ‘SAFE’ position so the letter ‘S’ SHOWS.
TO UNLOAD THE FIREARM:
3.Push the rear of the top lever to the right to open the action.
7.To fire the firearm, point in the direction of the intended target.
TO LOAD THE FIREARM:
9.Pull the trigger to fire the firearm.
1.Point the firearm in a safe direction.
1.Point the firearm in a safe direction.
WARNING! Always check the shell for the correct gauge and length before loading the firearm.
6.While still controlling the direction of the muzzle, rotate the barrel assembly upward to close and lock the action. Make sure that the top lever has returned to its central position on the frame top tang.
If only one barrel is to be loaded, check to make sure the barrel selector is positioned to fire that barrel first.
8. Push the safety mechanism for ward to the ‘Fire’ position, so that the letter ‘S’ DOES NOT SHOW. THE FIREARM IS NOW READY TO FIRE BY PULLING THE TRIGGER.
10.Release the trigger and then pull the trigger again to fire the second barrel.
11.Engage the safety mechanism as soon as you ar e done firing.

WARNING! Always unload your firearm whenever you are not shooting.
THE FIREARM IS NOW LOADED:
Picture 10
6.Pull the front of the fore-end assembly away from the barrel slightly.
Picture 11
7.Move the fore-end forward towards the muzzle and remove the fore-end assembly from the firearm.
2.Pull the safety mechanism rearward to the ‘SAFE’ position so the letter ‘S’ shows.
5.An unfired shell will be partially extracted from the chamber and may be removed by hand.
TO DISASSEMBLE:
9.Rotate the barrel assembly downward as far as possible to open the action.
4. Any fired shell will be automatically ejected from the firearm when the action is fully opened. (See Picture 11).
Your Premier® shotgun has automatic ejectors. While still controlling the direction of the muzzle, position the chambers to eject the fired shells in a direction away from your face.
WARNING! Once you have unloaded the shotgun, check to make sure that both barrels are free of obstructions.
4.Close the action.
Disassembly Instructions
1.Point the firearm in a safe direction.
12
WARNING! Before any disassembly, make sure the firearm is completely unloaded.
How To Load And Unload (cont’d)
8.Push the rear of the top lever to the right to unlock the action.
WARNING! Always check the chambers to make sure there are no shells in the firearm.
3.Open the action to make sure there are no shells in the firearm.

TO UNLOAD THE FIREARM:
WARNING!
5.Push the fore-end latch rearward. (See Picture7).
Picture 13
10.Move the barrel assembly up and rearward to disengage the barrel assembly from the pivot pins in the frame. (See Picture 12).
Disassembly Instructions (cont’d)
TO CLOSE THE TOP LATCH:
13
TO DISASSEMBLE:
1. Use a hard blunt object to depress the top lever detent to unlatch the top lever. (See Picture 13).


CAUTION: Except as described in this owner’s manual, your Premier shotgun should only be disassembled by a Remington® Authorized Service Center.
Picture 12
TO CLEAN THE INSIDE OF THE RECEIVER:
14 Picture
7. Remove all shooting residue from the locking lugs, ejectors and ejector sears. (See Picture 14).


TO CLEAN THE CHOKE TUBES:
1. Use the instructions and equipment in a good cleaning kit. For cleaning kit recommendations, see your Remington® Authorized Service Center.
Picture 15 EJECTORSEAR
4.With the action open, push the cleaning brush through the barrel several times.
WARNING! NEVER lubricate or clean your shotgun unless it is completely unloaded.
Lubrication And Maintenance
5. Remove the brush from the rod, attach tip with cleaning patch and push through the bore.
LOCKING LUGEJECTORS
1.Remove the choke tube from the barrel. (See instructions on PAGE 8).
3. Apply Rem™ Oil on the threads and reassemble the choke tube to the barrel following the instructions on Page 9.
6.Repeat several times, using a new clean patch each time until the patch is not dir ty.
TO CLEAN THE BARREL ASSEMBLY:
3.Put the cleaning brush into gun cleaning solvent.
1. Brush the inside of the receiver with cleaning solvent and wipe dr y. (See Picture15). 14
RADIUSFRONTCAMSLOTSEJECTORPIVOTPINS
2.Clean the choke tube including the threads with gun cleaning solvent and wipe dry.
2.Select the correct gauge cleaning brush and attach the brush to the cleaning rod.
WARNING! After cleaning, always make sure that both barrels are free of obstructions.
TO CLEAN THE FORE-END IRON:
TO REASSEMBLE THE FIREARM:
WARNING! Excessive use of non-recommended lubricants could adversely affect the function and safe operation of the firearm and ammunition. Failure to properly maintain your firearm can expose you and others to unnecessary risk of personal injury or death.
Lubrication And Maintenance (cont’d)
1. Reassemble the rest of the firearm following the instructions on Pages 9 and 10. Picture 16
15
2. Lightly grease the hammer cocking rod cam surface and radius where the fore-end iron matches the receiver. Use a good extreme pressure lubricant. (See Picture 15).
TO CLEAN THE BARREL ASSEMBLY:
1. Lightly grease the two pivot pins, the ejector cam slot, the inside walls where contact is made with the barrel assembly, and the front radius of the receiver where it matches the fore-end iron. Use a good extreme pressure grease. (See Picture 15).

FCAMSURFACECOCKINGRODHAMMEROREENDIRON
1. Brush the rear of the fore-end iron with cleaning solvent and wipe dry. (See Picture 16).
Manufacturer’s Warning
DANGER – Ammunition Warning
2. USE CAUTION while using solvents in gun cleaning. Prolonged or excess contact with solvents can damage the gun’s bluing and finish. Be sure to wipe away all excess solvent and then lubricate with oil.
Firearms may be damaged and serious personal injury or death to the shooter or bystanders may result from any condition which contributes to the generation of excessive pressure or uncontrolled release of gas within the firearm. Such adverse conditions can be caused by bore or chamber obstructions, propellant powder overloads or by defective, incorrect or improperly loaded and assembled cartridge components. Even the strongest firearm can be blown up as a result of excessive pressure. It is extremely dangerous to use a cartridge whose pressure is greater than that developed by cartridges loaded to industry standards.
16
1.All external surfaces should be wiped down with a light coat of rust preventative. Avoid using too much oil as powder, dust or other foreign material may get trapped in the oil. This could lead to congealed deposits which may interfere with the safe and reliable operation of this shotgun.
Lead or lead compounds are known to the State of California to cause cancer, birth defects, reproductive toxicity, and other serious physical injury. Those who clean firearms should take protective measures to avoid contact or exposure to such chemicals.
This firearm was manufactured to properly perform with the original parts as designed. It is your duty to make sure any parts you buy are correctly installed and that neither replacements nor originals are altered or changed. Your shotgun has many parts that must relate correctly to other parts for safe and accurate operation. Putting a gun together wrong or with modified parts can result in a damaged gun, or personal injury or death to you or others. Always let a qualified gunsmith work on your gun or at least, check any work not performed by a gunsmith. Firearms safety is your primary concern. THE GUN OWNER MUST ACCEPT FULL RESPONSIBILITY FOR THE CORRECT REASSEMBLY AND FUNCTIONING OF THE FIREARM AFTER ANY DISASSEMBLY OR REPLACEMENT OF PARTS.
WARNING
To Clean and Maintain The Exterior Of Your Shotgun
WARNING! Never lubricate or clean your shotgun unless it is completely unloaded.
To obtain information about returning your shotgun for service or repairs, call (321) 639-4842.
This shotgun is warranted to the original retail customer for one year from the date of retail purchase against defects in material and workmanship. All par ts and labor or replacement at our option are covered. The wood stock is not covered by the one year warranty. The warranty on the wood stock is 60 days and is limited to the original retail customer and extends 60 days from the date of retail purchase and covers only manufactured and material defects.
ALL PARTS ARE SUBJECT TO A $10.00 CHARGE FOR SHIPPING AND HANDLING. Some parts are restricted and may only be installed by returning the shotgun to us. When ordering parts, please state the Model, Gauge, Serial Number, and Finish Color. For parts information, call (321) 639-4842 or look us up online at www.eaacorp.com.
PARTS AND SERVICE To Order Parts
Ammunition (Cartridges) Notice
We specifically disclaim responsibility for any damage, injury or death occurring in connection with or as the result of the use of the shotgun with faulty, non-standard, remanufactured, hand loaded or reloaded ammunition for which the shotgun was originally chambered.
Firing a shotgun with oil, grease or any other material even partially obstructing the bore may result in damage to the shotgun and personal injury to the shooter and those nearby. Do not spray or apply lubricants directly on ammunition. If the powder charge of a cartridge is affected by the lubricant, they may not fully ignite yet the energy from the primer and/or powder may still be sufficient to push the projectile or wad into the bore where it may become lodged. Firing a subsequent cartridge into the obstructed bore will damage the shotgun and may cause personal injury to the shooter and those nearby. Use lubricants properly. You are responsible for the proper care and maintenance of your firearm and ammunition.
Service
17
Lubrication Warning
One Year Limited Warranty
NOTICE: It is illegal to ship a firearm with ammunition in the firearm or in the same packaging. Firearms and ammunition must be shipped separately. For information about shipping ammunition, call (321) 639-4842.
To the extent any provision of this warranty is prohibited by federal, state, or municipal law, which cannot be preempted, it shall not be applicable. This warranty gives you specific legal rights, and you may also have other rights which may vary from state to state.
Transportation to and from our repair facilities, government fees, damage caused by failure to perform normal maintenance, sales outside the United States, damage caused by use of high velocity, high pressure, reloaded or other nonstandard ammunition, or by any unauthorized repair, modification, misuse, abuse or alteration of the shotgun is not covered by this Limited Warranty.
One Year Limited Warranty
PARTS AND SERVICE (cont’d)
Implied Warranty
Always keep this manual with your shotgun. Make sure you understand all the warnings, operation instructions and safety procedures. When you lend, give or sell the firearm, be sure this manual goes with it. You can get a copy of this manual from Remington upon request.
To obtain warranty service, send your shotgun with proof of retail purchase, freight prepaid to: REMINGTON I.S.P. c/o USSG 1426 King Street Cocoa, FL 32922
ANY IMPLIED WARRANTIES, INCLUDING THE IMPLIED WARRANTIES OF MERCHANT ABILITY AND FITNESS FOR A PARTICULAR PURPOSE, ARE LIMITED IN DURATION TO ONE YEAR FROM THE DATE OF ORIGINAL RETAIL PURCHASE. SOME STATES DO NOT ALLOW LIMITATIONS ON HOW LONG AN IMPLIED WARRANTY LASTS, SO THE ABOVE LIMITATION MAY NOT APPLY TO YOU.
Your Owner’s Manual
18
1.barrels 29.firing pin spring 54.trigger plate79.single trigger safety spring 2.ejector spring 30.lower firing pin 55.hammer pin 80.inertia block 3.ejector spring guide31.top lever spring 56.trigger pin81.inertia block spring 4.left ejector 32.upper firing pin 57.trigger guard stop pin82.single trigger pin 5.right ejector 33.firing pin spring 58.right trigger83.single trigger 6.left ejector catch-plate34.locking bolt 59.left trigger84.forearm catch spring 7.right ejector catch-plate35.safety spring 60.trigger guard 85.forearm catch spring guide 8.catch-plate stop piston spring36.sear spring 61.stock bolt washer86.forearm catch 9.catch-plate stop piston37.sear 62.stock bolt lock washer87.forearm catch screw 10.joint pin 38.safety plate 63.stock bolt 88.left ejector hammer 11.joint pin stop pin39.top lever spring guide (outside)64.stock sling swivel89.cocking bar spring guide 12.front sling swivel40.top lever spring guide (inside)65.butt plate screws 91.cocking bar spring 13.sling swivel screw41.top lever spring contrast screw66.butt plate 92.cocking bar 14.front sight 42.trigger plate assembling pin 67.stock 93.hammer spring guides nut 15.fore-end hinge screw43.top lever stop pin 68.automatic safety bar94.hammer spring guide washer 16.cocking hook 44.firing pin stop pin 69.extractor 95.fore-end nut 17.fore-end iron 45.receiver 70.extractor stop screw96.choke tube 18.cocking hook screw46.right trigger plate 71.barrels 97.choke tube 19.forearm wood 47.left trigger plate 72.top level stop spring 24.top lever 48.hammers spring 73.top lever stop pin 25.sears pin 49.hammer spring guide74.top lever releasing pin 26.safety spring pin50.left hammer 75.single trigger safety 27.safety button 51.right hammer 76.safety block 28.strap screw 52.right cocking bar 77.block spring 53.left cocking bar 78.safety position ball

List of Premier® Over and Under Components
Premier® Over and Under Shotgun Exploded View
19
PARTS LIST
Choke Tubes
A WORD ON THE MAINTENANCE AND CARE OF YOUR REMINGTON FIREARM
20
FULLY TIGHTEN THE CHOKE TUBE.
4.Before using the shotgun make sure that the choke tubes are installed correctly.
5Keep choke tubes lubricated and installed. Never fire the gun without a choke tube installed. Handle choke tubes carefully since the leading edge is very thin.
Don’t Alter or Modify Your Gun and Have it Serviced Regularly.
ProBore™ Chokes Symbols/Markings
1. Only tighten or loosen choke tubes with wr ench supplied with shotgun.
(This is an option – not all Premier® Over and Under shotguns have this feature)
Your firearm has been designed to operate according to certain factory specifications. You’ll jeopardize your safety and that of others around you by attempting to alter its trigger, mechanical safety or other mechanisms. So never alter or modify your firearm in any way. Like any mechanical device, a firearm is subject to wear. It must be maintained and periodically serviced to assure optimum safety and performance. Only a qualified service facility should service, repair or modify your Remington ® firearm. Consult your instruction book for instructions on how to send your firearm to the factory or for the location of the nearest Remington Authorized Service Center. Remington recommends that you have your firearm professionally serviced annually. You should also have your firearm professionally serviced after prolonged storage, or if there is ever any question pertaining to the proper functioning characteristics of your firearm. Proper cleaning and lubrication are also important to firearm maintenance and are necessary to assure accuracy, safety and reliability. Before cleaning, always make sure that your gun is completely unloaded. And always clean the bar rel from the chamber end to the muzzle when possible.
2.Never shoot the shotgun with a partially installed choke tube
Shooting with a loose choke tube can cause damage to your shotgun.
3. Correctly installed choke tubes: Flush choke tubes should fit flush or slightly below the muzzle end of the barrel. Extended choke tubes will protrude out from the barrel about 3/4” and the mating lip will be flush with barrel end.
The end of the choke tubes are marked with notches to identify the choke construction:
WARNING
Never install or remove choke tubes while the firearm is loaded. Only install or remove choke tubes with the firearm unloaded, the action open and the trigger block safely engaged.
Additional Information On ProBore™ Choke Tubes:
//- Improved Modified ///- Light Modified ////- Modified /////- Improved Cylinder //////- Full
MAKEWARNINGSUREYOU
/- Skeet
c/o USSG 1426 King Street Cocoa, FL
Manufacturer:32922
Sabatti s.p.a. Via Alessando Volta, 90 25063 Gardone Valtrompia (Brescia) Italy
REMINGTON21
I.S.P.
Remington is a trademark registered in the United States Patent and Trademark Office by Remington Arms Company, Inc.