
Program and Implementation Guide
K–5 Math
Acknowledgment
Thank you to all the Texas educators and stakeholders who supported the review process and provided feedback. These materials are the result of the work of numerous individuals, and we are deeply grateful for their contributions.
Notice
These learning resources have been built for Texas students, aligned to the Texas Essential Knowledge and Skills, and are made available pursuant to Chapter 31, Subchapter B-1 of the Texas Education Code.
If you have further product questions or to report an error, please email openeducationresources@tea.texas.gov.
Introduction
The K–5 Math instructional materials are a comprehensive and clearly sequenced suite of materials that provides teachers with the knowledge and tools outlined in the Texas Essential Knowledge and Skills (TEKS) and guides students to be thinkers and doers of mathematics.
One key feature of these high-quality instructional materials is the way they tell the unfolding story of mathematics as expressed in the standards, lesson by lesson, throughout each grade. The story draws together mathematical concepts as it emphasizes key themes: the creation and manipulation of units, and the relationships among those units.
A second key feature is its major focus on meaningful assessment. Well-designed materials anticipate student misconceptions and misunderstandings around content. Because assessment tools promote selfmonitoring and self-improvement, they also serve as learning devices for students and are essential for creating effective student-teacher partnerships, as evidenced in Visible Learning 1 A teacher who may have previously said, “I taught this standard to my students, and I hope they understand it,” can now assert, “My students and I collaborated on this standard until they understood it. Here, let them show you their proficiency with it.”
A third key feature is an engaging lesson structure that helps teachers lead students through fast-paced practice, encourage perseverance, and foster thoughtful development of understanding. The four-part lesson structure helps teachers focus their energy on engaging students in the mathematical story through the introduction of challenging problems that call for quantitative and creative thinking. At the same time, lessons provide problem-solving tools and models and help students identify common patterns. This is so students’ understanding of subjects, such as algebra, extends naturally from their knowledge of numbers, as the authors of Elementary Mathematics for Teachers2 point out.
Rooted in Cognitive and Developmental Science
These instructional materials are built on basic scientific insights about math learning, growing out of cognitive and developmental science. From cognitive science comes a picture of what it means to know math and be prepared to use mathematical knowledge in the future. 3 From developmental science comes a picture of how a classroom environment or culture can best motivate and engage the young learner’s brain.4
This scientific evidence base wasn’t available when most teachers were growing up. Therefore, most teachers encountered instructional materials based on conventional ideas. Now, however, this established science is widely available, and the implications for math instructional materials are more fully understood.
1 Hattie, et al., Visible Learning for Mathematics
2 Parker, Thomas, et al., Elementary Mathematics for Teachers.
3 Bransford, et al., How People Learn.
4 Yeager, David S. 10 to 25: The Science of Motivating Young People; McNeil, Nicole M. 2014. “A Change–Resistance Account.”
Improving Upon the Conventional Model of Math Education
What is the key difference relative to the past? Previous instructional materials grew out of a very specific theory of math learning where the young math learner was viewed primarily in terms of what they did not yet understand—that is, their deficit in knowledge and skill. Therefore, the math instructional materials were designed to remediate or fix a student’s deficient knowledge. This is why most lesson plans followed a familiar pattern in which expertise flowed only from the teacher to the student, sometimes referred to as I do, We do, You do.
Though the K-5 Math instructional materials do not follow the conventional “I do, We do, You do” model, responsive scaffolding and a gradual release of responsibility is still necessary for students to engage in appropriate productive struggle. If a teacher releases responsibility to students too early or doesn’t model effectively, then students’ working memory may be overloaded, preventing the formation of schema in long-term memory. Gradual release must be iterative and balanced because accuracy and fluency help students apply the skills, procedures, and concepts they have learned to math problems in a new context. When instructional materials ignore this science, it leads to a situation that math teachers find frustrating: Students who have been clearly told how to solve a type of problem one way, but then fail to get it right on the assessment (or in the next course). When students are appropriately supported by the teacher to build automaticity, procedural fluency, and conceptual understanding, they can transfer their learning into new and more complex situations that they have not seen before.
The K-5 Math instructional materials reflect developmental science of what motivates and engages the young learner’s brain.5 As the young brain develops, especially in the years leading up to and including puberty, the brain increasingly craves experiences such as independence, autonomy, and respect. When a student answers a question incorrectly, they may think my effort does not matter if the answer is not correct, or I’ll never be able to do this without help, or even the teacher does not believe in me. This may lead students to reject a teacher’s instruction, shy away from mistakes, fear challenges, and generally disengage from math. The K-5 Math materials equip teachers with the tools to acknowledge incorrect responses and support students as they work through misconceptions to increase their understanding and stay engaged in the math.
A Culture of Learning
These materials respond to this updated cognitive and developmental science, in part, by aiming to establish a different kind of classroom culture. Simply put, they aim to shift math classrooms from a culture of compliance to a culture of learning.6 In the former, the student’s main job is to memorize and reproduce what the teacher has explained. In the latter, the student’s main job is to piece together mathematical knowledge that they can use to solve newer and increasingly difficult mathematical problems in the future. The differences appear in the table on the next page.7
5 Yeager, David S., 10 to 25: The Science of Motivating Young People; McNeil, Nicole M., “A Change–Resistance Account of Children’s Difficulties Understanding Mathematical Equivalence,” 42–47.
6 Hecht, Cameron A., et al. “Shifting the Mindset Culture.”
7 Murphy, Mary C. Cultures of Growth; Yeager, David S., 10 to 25: The Science of Motivating Young People
Teacher’s…
Role
View of struggle/mistakes
Student’s…
Role
View of struggle/mistakes
Math Classroom Culture of Compliance
Explain only one way to solve a problem and require students to only use that way
Results from student disobedience, disengagement, or lack of potential
Math Classroom Culture of Learning
Create the conditions for students to build increasingly complex conceptual models
Results from teacher’s deliberate surfacing of misconceptions so that students can benefit from a learning opportunity
Response to struggle/mistakes
Reproduce only the one way shown to solve a problem
Something to be ashamed of (because teacher looks down on them) or mad about (because of teacher’s unfair expectations)
Unproductive struggle (giving up, avoidance); Less self-efficacy (“I’m bad at math”)
Tinker until they assemble a better conceptual understanding
A normal part of the learning process, and a sign that the teacher is taking students seriously as math learners
Productive struggle (persistence); More selfefficacy (“I can do challenging math”)
Learning Shallow and quickly forgotten Complex and retained
Why do the two cultures lead to different kinds of learning? Research has found that a culture of compliance comes across as less respectful to students, and that respect is a critical ingredient to learning. How? The culture of compliance implies to students that they don’t have the potential to form an independent understanding of mathematics. If students in math courses start to suspect that their teacher doesn’t think they have the potential to learn, they may conclude that the teacher doesn’t see them as a worthwhile investment of time and energy to teach. It is easy to see how such a belief might make a student feel deflated and disrespected.
On the other hand, a culture of learning comes across as highly respectful.8 In a culture of learning, students know that teachers see a mistake or struggle not as a sign of weakness, but as a sign that they have the courage to take chances, work independently, and push the limits of their abilities. That is, students come to
8 Hecht, Bryan, and Yeager, “A Values-Aligned Intervention.”
view a mistake as something worthy of respect. This can be highly motivating to them because they can start to feel that teachers view them as capable of doing difficult tasks.
Note that studies have consistently shown that a large majority of teachers prefer the culture of learning. Math materials, however, have typically been misaligned to it, instead promoting a culture of compliance. The K–5 Math instructional materials are meant to be a step toward correcting the misalignment between what teachers have always wanted to do (and what young learners have always needed), and what instructional materials have allowed teachers to do. It does so by making it simpler for instructors to create a culture of learning.
The Classroom Culture and Learning Pyramid
To see how these materials are aligned to a culture of learning, it can help to think of the metaphor of a pyramid (see Fig 1 right). At the top of the pyramid is a culture of learning, in which all students are prepared for independent and fluent mathematical reasoning. The three foundational corners to the pyramid are:
(1) instructional materials that encourage students’ “ownership” over their mathematical thinking; (2) a teacher’s intention for all students to meet that high standard, when provided with appropriate support; and (3) language and communication styles that clarify the teacher’s and materials’ intent to students. Language is a critical part of the pyramid because many students are coming from a culture of compliance, and so it needs to be clear how these materials present new and expanded opportunities for mathematical competency.
1
3
1. The K–5 Math Instructional Materials and a Culture of Learning
CULTURE OF LEARNING
2
These materials accomplish this shift by changing the structure of the lesson and by assigning students problems at varying levels of complexity. The figure on the following page previews some—but not all—of the key differences. The primary difference is that instead of explaining a correct way to solve a problem (on the left), teachers engage students in the challenging task of developing ownership over the concept (on the right). There are other, more subtle differences as well. For example, in a conventional lesson, the common goal for bell ringers and guided practice is for all students to get 100% of the problems correct. In any one of these lessons, however, the goal during fluency practice is rarely to get 100% right. If that happens, it is often because the problems were not sufficiently challenging, given students’ preparation. Moreover, in a conventional lesson, more time is spent on teachers explaining rather than students reflecting. Student reflection is essential for allowing students the opportunity to consolidate what they have learned and prepare to apply it in the future. Later in this guide, and throughout the modules, you will learn more details about each of the elements.
Figure 1
Classroom encourages productive struggle
MATERIALS
Require “ownership” of mathematical thinking
LANGUAGE
Clarifies the intent of teachers and materials
Conventional Lesson (Culture of Compliance)
Math Lesson (Culture of Learning)
Although the figure above may seem like a dramatic shift, in fact these materials are more aligned to what most teachers already know about how to get better at any skill. In general, the path from being a novice to becoming an expert goes through struggle and difficulty. Thus, instructional materials that prevent students from facing productive struggle or difficulty are a poor fit with how people actually learn.9 K–5 Math instructional materials seek to change this.
2. Supporting Teachers’ Intentions to Maintain High Standards for All Students
The foundation in cognitive and developmental science of these materials, with an emphasis on students’ independent thinking and reasoning, brings some potential concerns for teachers. Chief among them is the fact that students tend to feel discomfort during struggle and difficulty. Because of this, students may avoid challenges in math. Students may even want teachers to quickly explain the right answer rather than having to solve problems independently.
This creates a dilemma for teachers. If they lower standards and do students’ thinking for them, then students will not receive the benefits of the materials and could experience bigger concerns later in their mathematical journeys. If teachers maintain high standards for student thinking, then students may feel uncomfortable or distressed–or may even end up failing. This is called the mentor’s dilemma, 10 which refers to the difficulty of upholding high standards while motivating all students to meet them.
The K–5 Math instructional materials are designed with an awareness of this dilemma and include resources to help teachers resolve it, including within the vignette, the student debrief, and the margin notes of each lesson. Specifically, these materials have an explicit focus on helping students embrace productive struggle. Productive struggle is when students engage in productive problem solving, including multiple opportunities for practice, discussion, representations, and writing that requires them to explain and revise their thinking. Students show productive struggle when they reconsider their strategy, consult the learning materials, or ask for appropriate help from peers or teachers. In contrast, unproductive struggle is when a student does not grasp a concept, recognize the need to revise, or disengages. Productive struggle is not “sink or swim.” The goal is that students are able to persist with challenging math to become independent problem solvers. Striking a balance of maintaining rigorous standards and providing scaffolds is key in creating the ideal conditions for productive struggle. It is essential to provide direct and explicit initial instruction, clear modeling, and then support students as they apply their new skills to problem-solving contexts.
9 National Academies of Sciences et al., How People Learn II: Learners, Contexts, and Cultures
10 Cohen, G.L., et al. “The Mentor’s Dilemma; Yeager, David S. 10 to 25, 25.
Bell Ringer
3. Language and Communication Styles that Clarify Intentions
How can teachers best promote a culture of learning—and therefore promote students’ productive struggle? Language and communication—or how instructional activities are presented to students—represent one powerful method. Indeed, research has found that consistently communicating your intentions and beliefs for every student’s potential to learn and grow their ability can be a powerful tool for helping to engage students in productive struggle 11
Why do language and communication matter? Students are more likely to embrace discomfort or productive struggle when they are given a good reason that resonates with them.12 If students are coming from a culture of compliance, then struggling in class is likely to be interpreted in a negative light—as a sign that the teacher is looking down on them for failing to pay attention or feels that the student lacks the innate potential to do well. Students who experience a culture of compliance are unlikely to presume positive intent when they are challenged.
A survey of Texas math students illustrates this point. Students were asked why they thought teachers used various practices that are known to support student learning:
⬛ Why do you think math teachers call on kids in the middle of class to answer a question?
Student Answer: “To make sure you are paying attention.”
⬛ Why does that teacher ask you to show your work?
Student Answer: “To make sure you are not cheating.”
An important thing to notice is that many teachers’ behaviors were viewed by students in the worst possible light. Clearly, teachers’ good intentions were not being recognized or understood. Even if teachers are exerting a tremendous amount of effort to help students learn, they could be negatively impacting student learning by leaving students feeling resentful and alienated throughout the school year. Communicating why teachers are asking certain questions or engaging in difficult tasks will help motivate students to answer the question or try the task and persevere through challenges while making them feel cared for at the same time.
The power of language. Language that clarifies the teacher’s intentions is a powerful tool that teachers can use to help transition students out of a culture of compliance and into a culture of learning.
Psychological experiments have found that even small shifts in language have led students to comply more willingly with a teacher’s demanding coursework.13 Examples of short but important clarifications from teachers include explaining the teacher’s intentions (e.g., “The reason why we’re about to do this is because…”) and clarifying the teacher’s belief in students potential (e.g., “I’m asking you to think independently on this assignment because I have very high standards and I know you can meet them.”).
The teacher’s edition of each module offers vignettes that include teacher/student conversations. These vignettes emphasize that the activities and lessons are designed to help students meet high standards while thinking independently and learning from mistakes. Moreover, the vignettes can be adapted to match different teaching styles and encourage students to embrace the challenge of productively struggling in math.
11 Hecht, Bryan, and Yeager, “A Values-Aligned Intervention.”
12 Reeve, Jang, Hardre, and Omura. “Providing a Rationale in an Autonomy-Supportive Way.”
13 Yeager, 10 to 25: The Science of Motivating Young People
Language and Communication
Redefining Mistakes and Learning Moments
One of the most important philosophical underpinnings of the K–5 Math instructional materials is in responding to student mistakes. As shown in the culture of learning vs. culture of compliance table on page 4, a mistake should not be seen as a definitive statement about a student’s potential. Instead, it should be viewed as the beginning of a learning opportunity. Indeed, it is well-known that students need to productively struggle after they make mistakes to learn from them. A teacher’s language and communication about mistakes can have a profound impact on their culture of learning.
Why does the way we talk about mistakes matter? Because when students make mistakes, they feel vulnerable and sometimes embarrassed. After all, nobody likes admitting that they failed at something. Young people in particular may fear making mistakes if they think they are disappointing teachers, or if they worry they will be punished. Therefore, one of the most significant things a teacher can do to create a culture of learning is to have routines to celebrate and reinforce the importance of mining mistakes for good mathematical thinking and reframing them into learning moments. One way to accomplish this is to incorporate a routine for collaboratively troubleshooting misconceptions which is facilitated by the K–5 Math instructional materials.
Collaboratively Troubleshooting Misconceptions
Collaborative troubleshooting is a three-step routine to help teachers gain a deeper understanding from conversations with students so they can better examine mistakes and uncover misconceptions.14
The three steps to collaborative troubleshooting are:
1. Surface student thinking.
2. Validate what the student did right.
3. Bridge to a better understanding.
14 Yeager, 10 to 25: The Science of Motivating Young People, 25; Texas Behavioral Science & Policy Institute, University of Texas, “FUSE: Fellowship Using the Science of Engagement.”
Throughout the materials, there are opportunities to engage in collaborative troubleshooting with students. Examples of elements that help address common student misconceptions and bridge to a better understanding include the following:
⬛ “Sprint” activities help students surface misconceptions and practice fluency.
⬛ Turn and talk routines allow students to share their solutions and thinking with peers.
⬛ Vignettes in the Concept Development section of the materials provide examples of student thinking so that teachers can anticipate typical student responses.
⬛ Error analysis of fictitious student work helps students feel comfortable examining and then collaboratively troubleshooting their own errors or misconceptions.
⬛ Daily Debriefs and Exit Tickets help students make connections between the lessons and problems and allow students to reflect on their own depth of understanding.
The Value of Collaborative Troubleshooting
Collaborative troubleshooting helps students overcome the culture of fearing mistakes. When teachers consistently use this routine, teachers and students work together—or “collaborate”—to make valuable contributions to the learning process. While “troubleshooting” toward a better understanding, students do not feel judged and may feel encouraged to tinker with their genuine curiosity.
In addition, collaborative troubleshooting helps teachers understand students’ thinking as they reason through math. The more teachers view math through the eyes of the student, the better they can adapt instruction in the moment. The routine provides teachers with valuable information that can be helpful in anticipating how students may misunderstand their language or actions so they can communicate more clearly and intentionally next time.
Indeed, different sources of error require different teaching strategies to fix them. If a student makes a simple computation error, it is sometimes effective just to ask the student to try again. But if the student misunderstands something foundational—or if they are too terrified to even try the problem—a teacher will probably need to say something different.
Similarly, if a student arrives at a correct answer but has a misconception in their thought process, collaborative troubleshooting may help catch the misconception before it becomes solidified as part of the learning. Thus, if teachers collaborate with the student—and surface their thinking—then teachers can troubleshoot the source of the error more effectively.
How to Collaboratively Troubleshoot
1. Surface student thinking. This first step is important because teachers can’t always guess exactly what young people were thinking when they made a decision. If teachers make incorrect assumptions, young people can feel disrespected and shut down. Therefore the best approach is to ask, not assume An example is this: Could you show me what you’ve tried already, so I can understand your reasoning? Then we can try to troubleshoot it together.
2. Validate what they got right: Say something concrete and transparent about what the young person did correctly, even if they made a mistake somewhere else. This step matters because the brain tends to focus only on the negative. That can make young people take an all-or-nothing perspective on a mistake. They may think the teacher believes their answer offers nothing of value, which feels
disrespectful. Also, if teachers don’t acknowledge the parts they got right, students may discard such thinking as well as the learning that came with it. Therefore, it’s important to make a clear and authentic statement of what young people got right. An example is this: I noticed you showed some careful thinking when … [describe what they got right]. … That really helped you move toward a solution. Now we just need to figure out how to do the final piece…
3. Bridge to a better understanding. Leading questions can help young people bridge to a better understanding. These questions build on what they already know and help them see a connection to what they need to learn. Leading questions are a way to impart knowledge while also having young people “own” their thinking. Leading questions (How might you… or What would happen if…) are a clear signal to troubleshoot and tinker. An example is this: Let’s build on the thinking you already did. What would happen if you ...?
Importance of Clear Communication
At each step in the collaborative troubleshooting routine, it’s important to pay attention to language and communication. Young people are used to hearing language with negative connotations in a culture of compliance. Therefore, it’s important to be explicit and say what we intend, and override what they are used to hearing.
The table below shows the kinds of questions that may appear in a collaborative troubleshooting routine. An exemplar of what Collaborative Troubleshooting can look and sound like at a specific grade level can be found in the Course Guide for that grade level.
Collaborative troubleshooting step
What we often say or do
1. Surface thinking What were you thinking?
What young people are used to hearing (in a culture of compliance)
You weren’t thinking.
2. Validate what they got right
3. Bridge to a better understanding
I already told you how to do it. Why don’t you remember?
The only thing that matters is if the answer is correct.
This is an easy problem, just do X [simple algorithm].
You don’t even know how to do the easiest stuff.
What we intend to communicate (in a culture of learning)
What can you tell me about your thinking on this problem? Where did you start? What did you do next?
I notice you’re using a strategy we learned before. That has really helped you get almost all the way to the solution.
You already have most of what you need to solve this. Maybe we could draw something to help you see how they fit together.
Instructional Materials Design
The design of these instructional materials is based on the principle that mathematics is most effectively taught as a logical, engaging story.15 In these instructional materials, the main character is the unit—the basic building block of arithmetic. Themes such as measurement, place value, and fractions run throughout the storyline, and each is given the amount of time proportionate to its role in the overall story. The story culminates with students learning to add, subtract, multiply, and divide fractions and to solve multi-step word problems with multiplicative and additive comparisons.
Each module is a chapter in the larger story within and across grades, creating a path for teachers and students to travel together, developing profound conceptual understanding along the way.16 Through the underlying and coherent theme of the unit, the lesson materials highlight the connectedness of math. This connectedness promotes deep learning and transfer learning, in which students relate ideas and extend them to apply their understanding in new situations.17 Teachers and students experience mathematics as a unified body of knowledge.
The Significance of the Unit
Even as new concepts are introduced, the overarching theme of the story remains: developing an understanding of the basic building block of arithmetic, the unit. Studying, relating, manipulating, and converting the unit allows students to complete word problems; to add, subtract, multiply, and divide; and to understand concepts such as place value, fractions, measurements, area, and volume.
Example 1: Addition of Like Units
An understanding of the unit starts with everyday objects (e.g., fingers, dogs, apples) and then moves into both a measurement and a number context (e.g., centimeters, tens, eighths). As this sample sequence shows, the unit changes but the way to operate on the numbers remains the same. Add like units: 2 units plus 3 units equals 5 units, whether the units are dogs, fours, or tenths.
2 dogs3 dogs5 dogs +=
2 fours3 fours5 fours +=
2 meters3 meters5 meters +=
2 tens3 tens5 tens +=
2 tenths3 tenths5 tenths +=
2 eighths3 eighths5 eighths +=
15 Schmidt, et al., “A Coherent Curriculum,” 13–28.
16 Ma, Knowing and Teaching.
17 Hattie, et al., Visible Learning for Mathematics.
Example 2: Addition of Like Units with Decomposition
Out of this foundation grows the understanding that units can be manipulated (e.g., composed, decomposed, renamed). 11 units can be decomposed as 10 units and 1 unit, whether it is 11 tens or 11 tenths. Students apply this knowledge in a new way to create 1 whole when they decompose 11 eighths as 8 eighths and 3 eighths.
tens 1 ten 2 tenths9 tenths11 tenths1 one 1 tenth +==
tenths 1 tenth
2 eighths9 eighths11 eighths1 whole 3 eighths +==
8 eighths 3 eighths
Example 3: Addition of Mixed Units 2 dogs 4 puppies3 dogs 5 puppies5 dogs 9 puppies +=
2 ones 4 eighths3 ones 5 eighths5 ones 9 eighths6 ones 1 eighth +== 8 eighths 1 eighth
After students have established conceptual understanding using unit form, they can write equations using standard form.
As the examples show, learning sequences progress within and across grade levels, giving students opportunities to apply their knowledge across concepts. As Hattie, et al assert, “…transfer learning happens when students can make connections among mathematical understandings and then use those understandings to solve problems in unfamiliar situations, at the same time being intentionally aware of what they are doing.”18 Through the logical, sequential design of these instructional materials, students learn that unit-based procedures are transferable, and they use them to build upon their knowledge in new ways.
These instructional materials are designed to be educative, that is, to strengthen teachers’ pedagogical and content knowledge while building students’ knowledge and skills.19 Research-based design principles are woven throughout the materials in embedded supports such as the following.
Lesson Structure
⬛ A four-part lesson structure contains learning progressions that move from simple to complex and which create a crucial, daily interplay between the components of fluency, application, and conceptual understanding.20 A Student Debrief ends each lesson, holding space for students to reflect on and process their learning.
⬛ Daily, intentional opportunities for students to engage in, such as
⬛ discourse and reflection through turn and talk, think–pair–share, and error analysis;
⬛ high-level thinking, through tasks that promote reasoning and problem solving; and
⬛ flexible thinking, through the sharing and connecting of multiple representations and solution strategies.

18 Hattie, et al., Visible Learning for Mathematics.
19 Schuchardt, et al., How Much Professional Development, 1015–1033.
20 National Council of Teachers of Mathematics, Principles to Actions.
• Vignette style format accompanied by margin notes and annotations guided by research make pedagogical judgments visible and foster a teacher’s capacity to make pedagogical adaptations for learners.21
Problem 2: Comparing two numbers with an equal amount of the largest units.

Display: 43,021 45,302.
T: Model and read each number. How is this comparison different from our first comparison?
S: Before, our largest unit was thousands. Now, our largest unit is ten thousands. → In this comparison, both numbers have the same number of ten thousands. They both have (4 × 10,000) 40,000.
T: If the digits of the largest unit are equal, how do we compare?
S: We compare the thousands. We compare the next largest unit. We compare the digit one place to the right.
T: Write your comparison statement on your board. Say the comparison statement in two ways.
S: (Write 43,021 < 45,302 and 45,302 > 43,021.) 43,021 is less than 45,302 because (3 × 1,000) 3,000 is less than (5 × 1,000) 5,000. 45,302 is greater than 43,021 because (5 × 1,000) 5,000 is greater than (3 × 1,000) 3,000.
Support for All Learners
Margin notes offer just-in-time scaffolds, accommodations, and suggestions for differentiation to ensure access for all learners.
NOTES
ON MULTIPLE MEANS OF ACTION AND EXPRESSION:
Display charts with the number bonds for 6 so students can refer to it if needed. Creating a place in the classroom for students to access this information will provide a visual aid to all students and support those who have trouble committing things to memory.
NOTES ON MULTIPLE MEANS OF REPRESENTATION:
It may be necessary to explicitly connect times and the symbol ×. Have students analyze the model. “How many times do you see a group of two?” Have them count the groups, write the number sentence, and say the words together.
⬛ 6 groups of two equal 12.
⬛ 6 times 2 equals 12.
Consider posting a visual that includes the written form 6 times 2 equals 12 and the number sentence 6 × 2 = 12. Highlight the word times and the symbol × in the same color and the word equals and the symbol = in the same color. Refer to the visual to support students as needed, including some emergent bilingual students, in connecting the language and symbols when discussing multiplication sentences.
21 Davis and Kracjik, “Designing Educative Curriculum Materials,” 3–14.
NOTES ON MULTIPLE MEANS OF ENGAGEMENT:
Consider offering concrete materials, as needed, to students who may need more support, including some emergent bilingual students, with naming decimals using different unit forms. Try using place value disks to make trades for smaller units. Also, place value understandings from Lessons 1 and 2 help make the connection between 1 hundredth 3 thousandths and 13 thousandths. It may also be fruitful to invite students to extend their Grade 4 experiences with finding equivalent fractions for tenths and hundredths to finding equivalent fraction representations in thousandths.
Concrete-Representational-Abstract Approach
Research shows that instructional sequencing that moves through a concrete-representational-abstract progression promotes deep learning as students make connections between the various representations.22

Concrete-Representational-Abstract Continuum
Coherence of Models
These instructional materials use a finite set of concrete and representational models. The repeated use of familiar models supports the understanding of mathematical concepts across multiple grade levels. This reveals the consistent concepts of arithmetic and operations as students’ work progresses: they first work with single-digit whole numbers, then work with multi-digit numbers, and finally they work with fractional and decimal numbers in the late elementary grades.

5 3 whole part part

22 Hattie, et al., Visible Learning for Mathematics
Assessment
These instructional materials use a systematic approach that includes formative and summative assessments to gain data which can help inform instruction.

These instructional materials are guided by research-based evidence of effective instructional design and best practices to optimize students’ mathematical learning. We believe these materials will encourage teachers to deliver a high-quality learning experience while meeting the unique needs of the students in their classroom.
Developing Self-Efficacy
Self-efficacy is an individual’s belief in their innate ability to achieve goals. According to Kirschner and Hendrick, self-efficacy can influence learning, motivation, and self-regulation.23
Students who are self-regulated learners direct their own learning and are active participants in the learning process. The ability to self-regulate can be influenced by a student’s learning environment. These materials foster the conditions necessary for students to become strategic and goal-directed learners.
Engagement
Lessons engross students in the thinking and doing of mathematics. Rather than passively receiving information, students make sense of information and grapple with ideas as they persist in mathematical tasks. This type of mathematics instruction values productive struggle as a necessary component that gives way to deep learning. The engaging tasks are within students’ reach while still providing challenge and requiring effort. There are several opportunities for capturing student interest within the lesson structure.
23 Kirschner and Hendrick, How Learning Happens, 68.
Representations
Multiple Representations: Students share and compare various representations of mathematical concepts. Teachers pose purposeful questions that support students in making explicit connections between representations. As these connections are made, students see that situations can be represented in different ways.
Multiple Solution Paths: Students self-select strategies and solution paths. Teacher questions and prompts such as “Students may have different solutions. Invite them to share and compare their work.” reinforce that there are multiple ways to approach a problem and that students can learn from their classmates. Students are encouraged to revise their thinking and revisit strategies, which invites them to broaden their view of mathematics.
Discourse and Elaboration: Students regularly explain and justify ideas, which deepens their own understanding of mathematical concepts. Teacher questions and prompts such as the following appear regularly throughout lessons:
⬛ “Talk with your partner. What just happened?”
⬛ “What happened when we added those numbers? Turn and talk.”
⬛ “Explain to your partner the steps you took to solve.”
Additionally, Problem Sets offer opportunities for students to express their reasoning through writing.
Problem-Solving Routines: Students in Grades 1–5 use the Read–Draw–Write (RDW) process to make sense of problems, choose and apply mathematics, and solve. The RDW process prompts students to engage in self-questioning. For example, “Can I draw something?”, “What can I draw?”, and “What does my drawing show me?” Self-questioning promotes metacognition, or thinking about thinking, which supports students in becoming strategic learners and helping them monitor and own their own learning.
Teachers play an important role by providing support when students encounter productive struggle as they think and reason during these rich engagement opportunities.
The following are examples of what productive struggle in a supportive environment might look like and sound like for students and for teachers.
What Productive Struggle Looks Like What Productive Struggle Sounds Like
Students ⬛ Contemplative facial expressions
⬛ Drawing and using tools to make sense of tasks
⬛ Making multiple attempts and revisions
⬛ Asking their teacher or classmates for support
⬛ Taking a short break and restarting
Teachers ⬛ Observing
⬛ Listening
⬛ Demonstrating patience
⬛ Reinforcing that learning takes time
⬛ Resisting the urge to give answers and instead posing questions that require students to think
⬛ Carefully deciding when and if to probe or ask questions to scaffold thinking
⬛ Asking questions that focus on students’ thinking
⬛ Providing feedback related to effort
⬛ “I don’t get it.”
⬛ “Is this what we are supposed to do?”
⬛ “I’m not sure what to do next.“
⬛ “Do you remember what we did in our group yesterday? I think that might work here.”
⬛ “I’m going to try this a different way.”
⬛ “I think I figured it out!”
⬛ “I get it now.”
⬛ “Don’t rush yourself, deep thinking requires time.”
⬛ “Did you use RDW?”
⬛ “When you first got started, I heard you say…”
⬛ “What do you know? What is the problem asking?”
⬛ “Explain your thinking here.”
⬛ “How does your drawing show how you solved the problem?”
⬛ “I see how you started with one approach and when that didn’t work, instead of giving up, you tried a different strategy. That shows your effort.”
⬛ “Take a quick break and try again.”
⬛ That was difficult, but you didn’t give up, and you figured it out.”
Mistakes
Opportunities for productive struggle are also times for making mistakes and uncovering misconceptions. When students are afraid to make errors or worry about getting the wrong answer in front of their classmates, they may be less willing to take risks and engage in challenging tasks. Teachers can create an environment where students see productive struggle as a natural part of learning.24 In this type of environment, errors and
24 National Council of Teachers of Mathematics (NCTM). Principles to Actions, 50.
misconceptions are expected as part of the learning process. The following are suggestions for fostering a learning environment that promotes perseverance.
⬛ Model self-talk that connects learning from mistakes to opportunities for future success. For example, “Now that I know___, I’ll remember to ____ next time I solve a problem like this.”
⬛ Highlight the advantages of engaging in challenging work, such as the opportunity to learn and grow.
⬛ Encourage students to focus on their personal bests and celebrate growth. Discuss how discovering mistakes or errors led to their growth.
⬛ Recognize the role of effort in academic performance, emphasizing that all students can improve with effort. Incorporate stories about real people who have overcome challenges and persevered.
⬛ Support students through challenging work instead of lowering rigor for a task. As students work, help them set realistic goals and creating plans for their own improvement.
Reflection
Students who display metacognitive awareness recognize when they are not learning effectively and adopt more productive learning strategies.25 To support students in developing this type of awareness, teachers can provide multiple opportunities for students to think about their progress and make plans for their own improvement.
⬛ During Lessons: Throughout lessons and during whole-class and partner discussions, encourage students to reflect on their choices of strategies, models, and solution paths and whether they need to revise their thinking. As part of the Student Debrief, students reflect on their progress relative to the Problem Set and the overarching lesson goals.
Any combination of the questions below may be used to lead the discussion.
25
Problem Set Connection
Lesson Connection
Previous Day Connection
⬛ What is the same and different about Problems 1(c) and 1(d)? Did you solve the problems differently? Why or why not?
⬛ Look at Problem 1(f). Did the zero in 405 make the problem challenging? Why?
⬛ How did our fluency activities Rename the Ten and Halfway on the Number Line help with our rounding work today?
⬛ Think back to yesterday’s activity where we measured and then rounded at stations. How did that work help you envision the units we worked with today on the number line?
⬛ After Assessments: Exit Tickets can be used to support students in determining which areas of learning they are confident in and which areas may need more attention. Support students in creating plans for developing proficiency. Additionally, the Assessment Reflection Tool can be used to help teachers promote a culture of productive struggle as students go into testing and to give students the opportunity after testing to reflect on their learning.
Kirschner and Hendrick, How Learning Happens.
Encouraging regular cycles of reflection that combine performance data with plans for improvement support development of students’ self-efficacy. Students recognize that active participation in their own learning contributes to their success.
TEKS Mathematical Process Standards
The TEKS Mathematical Process Standards (MPS) are embedded throughout the program. They are seamlessly woven into the lesson structure to require the level of thinking and behaviors that the standards embody. Here are some examples of how the TEKS MPS live in these materials:
⬛ Purposeful integration of a variety of problem types that range in complexity naturally invites students to analyze givens, constraints, relationships, and goals.
⬛ Models, drawings, numeric representations, and precise language make student learning and thinking understood by others.
⬛ During debriefs, teachers lead students in discussions or writing exercises that prompt students to analyze and explain their work, reflect on their own learning, and make connections between concepts.
TEKS Mathematical Process Standards
The student is expected to:
A. apply mathematics to problems arising in everyday life, society, and the workplace;
B. use a problem-solving model that incorporates analyzing given information, formulating a plan or strategy, determining a solution, justifying the solution, and evaluating the problem-solving process and the reasonableness of the solution;
C. select tools, including real objects, manipulatives, paper and pencil, and technology, as appropriate and techniques, including mental math, estimation, and number sense, as appropriate to solve problems;
D. communicate mathematical ideas, reasoning, and their implications by using multiple representations, including symbols, diagrams, graphs, and language as appropriate;
E. create and use representations to organize, record, and communicate mathematical ideas;
F. analyze mathematical relationships to connect and communicate mathematical ideas; and
G. display, explain, and justify mathematical ideas and arguments using precise mathematical language in written or oral communication.
Review of Exit Ticket
Tool
Although all lessons provide space for TEKS MPS by design, a chart in each grade-level’s Course Guide helps teachers track which lessons emphasize each TEKS MPS, make instructional decisions about lesson sequences, and adapt lessons for their classrooms. More than one TEKS MPS may be identified per lesson.
Module Structure
Module Overview
The Module Overview summarizes the development of student learning throughout each topic of the module. It helps teachers understand the module’s placement in the overall development of learning in and across the grade levels.
Grade 3 • Module 1
Properties of Multiplication and Division and Solving Problems with Units of 2–5 and 10
OVERVIEW
This 22-day module begins the year by building on students’ fluency with addition and their knowledge of arrays. In Topic A, students initially use repeated addition to find the total from a number of equal groups (2.6A). As students notice patterns, they let go of longer addition sentences in favor of more efficient multiplication facts (3.4D, 3.4E, 3.5B). Lessons in Topic A move students’ Grade 2 work with arrays and repeated addition a step further by developing skip counting rows as a strategy for multiplication. Seeing equal groups as equal jumps on a number line and as rows or columns in an array becomes the cornerstone of the module. Students use the language of multiplication as they understand what factors are and differentiate between the size of groups and the number of groups within a given context. In this module, the factors 2, 3, 4, 5, and 10 provide an entry point for moving into other factors in later modules.
The Module Overview describes, topic by topic, the story of learning in the module.
The study of factors links Topics A and B; Topic B extends the study to division. Students understand division as an unknown factor problem and relate the meaning of unknown factors to either the number or the size of groups (3.4H, 3.4J, 3.5D). By the end of Topic B, students are aware of a fundamental connection between multiplication and division that lays the foundation for the rest of the module.
In Topic C, students use the array model and familiar skip counting strategies to solidify their understanding of multiplication and practice related facts of 2 and 3. They become fluent enough with arithmetic patterns to add or subtract groups from known products to solve more complex multiplication problems (3.4D, 3.4E, 3.4F). They apply their skills to word problems using drawings and equations with a symbol to find the unknown factor (3.4K). This culminates in students using arrays to model the distributive property as they decompose units to multiply (3.4K). In Topic D, students model, write, and solve partitive and measurement division problems with 2 and 3 (3.4H). Consistent skip counting strategies and the continued use of array models are pathways for students to naturally relate multiplication and division. Modeling advances as students use strip diagrams to represent multiplication and division. A final lesson in this topic solidifies a growing understanding of the relationship between operations (3.4E).

Each module is structured to incorporate small groups of related lessons which are organized into topics.
Overview
of
Module Topics and Lesson Objectives
A Multiplication and the Meaning of the Factors
Lesson 1: Understand equal groups of as multiplication.
Lesson 2: Relate multiplication to the array model.
Lesson 3: Interpret the meaning of factors—the size of the group or the number of groups.
B Division as an Unknown Factor Problem
Lesson 4: Understand the meaning of the unknown as the size of the group in division.
Lesson 5: Understand the meaning of the unknown as the number of groups in division.
Lesson 6: Interpret the unknown in division using the array model.
Lesson objectives reveal the story of each topic.
C Multiplication Using Units of 2 and 3
Lesson 7: Demonstrate the commutativity of multiplication, and practice related facts by skip counting objects in array models.
Lesson 8: Find related multiplication facts by adding and subtracting equal groups in array models.
Lesson 9: Model the distributive property with arrays to decompose units as a strategy to multiply.
Lesson 10: Represent multiplication facts with area models and equal jumps on a number line.
11: Model division as the unknown factor in multiplication using
Lesson 12: Interpret the quotient as the number of groups or the number of objects in each
Collaboratively Troubleshooting Student Misconceptions
This component includes a table in the Module Overview that presents teachers with guidance on how to address misconceptions that may arise in mathematical concepts in each module. The table identifies common misconceptions and offers teachers suggestions to effectively respond to students during their moments of productive struggle. These just-in-time suggestions are intended for use during regular class instruction as students build on what they know and bridge to new understandings. More guidance is included in each Course Guide and includes instructional strategies and sample guided questions to surface thinking, validate the student’s correct understandings, and create new and sound conceptions about math in the module and the grade.
Terminology
Terminology includes two sections. New or Recently Introduced Terms are discipline-specific words that are introduced to students in the current module. Familiar Terms and Symbols are items that were introduced or used in previous grades or modules. Terminology also includes Spanish cognates where applicable.
K–5 Math instructional materials use an approach to teaching terminology based on language acquisition theory. First, students experience a concept through concrete materials or pictorial representations. Next, they describe or name the concept informally, using familiar, everyday words. Once they have a clear understanding of the concept, they apply discipline-specific terminology, supported by usage of the terminology resource.
For example, in acquiring the term greater, students initially notice differences in quantities of objects or pictures. They might call a number “bigger” or describe a set as having “a lot more.” At that point, the teacher provides the term greater, formally naming the concept by using discipline-specific terminology. From then on, students might use both terms interchangeably as they engage in rich mathematical discourse. The Terminology resource can support and deepen student understanding as the need arises.
In addition, use the Terminology resource to generate supports for students. Show students the visuals from the teacher-facing Module Overview that correspond to the terminology and encourage them to naturally use terminology as they respond in class to discussion questions or in Turn and Talks. Use the list to create just-intime supports to help them internalize the words once they have developed conceptual understanding of the mathematics. Many lessons illustrate possible opportunities for formalizing language as exemplar student responses in lessons, but there are many more points throughout the lesson and the school day to highlight and reinforce these terms.
Each term includes a student-friendly definition or description and an illustration as it appears in the module.


Topic Overview
Each topic in the module begins with a Topic Overview that includes focus standards, the number of instructional days, coherent links to previous and subsequent modules, and a summary of the development of learning. The Topic Overview concludes with a list of teacher-facing objectives and corresponding lessons that comprise the teaching sequence of the topic.
The Topic Overview details the flow of content, calls attention to important strategies or models, and highlights how learning connects to previous or upcoming content.
Lesson Overview
Each lesson is structured into four sections: Fluency Practice, Application Problem, Concept Development, and Student Debrief. (For more details, see Lesson Structure.)
In Grades 1–5, lessons are designed for one 60-minute instructional period. In Grade K, lessons are designed for one 50-minute instructional period.
Answer Keys
The Answer Key for each lesson can be found at the end of every module. Answers are included for the Sprint (if applicable), Problem Set, Exit Ticket, and Homework. In Grade K, Exit Tickets are not included until Module 5.
Lesson Structure
Overview
The lesson structure is comprised of four critical components that promote balanced and rigorous instruction. Each lesson is structured to include fluency activities, development of conceptual understanding and procedural skills, application of concepts to problem solving, and an opportunity to build a shared understanding of the lesson objective. (Note that objectives should not be student-facing unless they are revised to be developmentally-appropriate for the grade level.)
These components are taught through the deliberate progression of material from concrete to representational to abstract. Lesson components and stages of instruction within these components are designed to help students reach higher and higher levels of understanding. Patterns and connections between concepts, tools, strategies, and real-world applications naturally surface with this balanced approach to lesson design.
The Objective states the learning goal of the lesson and informs the major portion of instruction in the Concept Development.
The Suggested Lesson Structure shows the sequence and recommended time length of the components of the lesson.
Each lesson component includes the time allotted for that portion of the lesson.
Margin notes offer strategies and scaffolds that promote flexibility with engagement, representation, and action and expression.
Fluency and Lesson Templates can be found at the end of each lesson. A template may be used inside a personal white board across multiple days, or it may be cut and assembled for one or more lessons.
Lesson 2
Objective: Reason about embedded numbers in varied configurations using number bonds.
Suggested Lesson Structure
■ Fluency Practice (12 minutes)
■ Application Problem (8 minutes)
■ Concept Development (30 minutes)
■ Student Debrief (10 minutes)
Total Time (60 minutes)
Fluency Practice (12 minutes)

⬛ Finger Counting from Left to Right 1.5A (2 minutes)
⬛ Show Me Your Math Fingers: Partners to 5 and 5 More K.2I (5 minutes)
⬛ Number Bond Dash: 5 K.2I (5 minutes)
Finger Counting from Left to Right (2 minutes)
Note: Counting from left to right with their fingers allows students an organized way to use their most readily available tool—their fingers! This type of counting also mimics the number path used in later lessons.
Instruct students to count with their “piano fingers.” Count by ones within 10 on the fingers from left to right, from pinky on the left hand as 1, to pinky on the right hand as 10. Hover the fingers as if playing the piano. Drop the finger as it is counted and leave it down. Start and end at different numbers. (For example, in counting from 5 to 7, the 5 fingers of the left hand have played, and students say, “6, 7,” while playing the thumb and pointer finger of the right hand.)
Show Me Your Math Fingers: Partners to 5 and 5 More (5 minutes)
Note: This activity addresses adding and subtracting within 10.
ON MULTIPLE MEANS OF ENGAGEMENT: As often as possible, create opportunities for every student to respond every time. The vignettes throughout the entire module facilitate this by continuously demonstrating varied response patterns and materials including choral response, partner talk, personal white boards, and individual tools like 5-group cards. Response patterns built on 100% student participation have powerful effects on student engagement and lesson pacing. Choral response allows students, including some emergent bilingual students, to listen to correct pronunciation and language structure while practicing with the support of peer voices. It also allows students who need more support and those with auditory processing differences to be supported by the group as they pick up on language and patterns.

Use of Technology and External Sites
Students solve problems by using a variety of tools and techniques as appropriate. They are expected to self-select tools, including real-world objects, manipulatives, paper and pencil, and technology to support the problem-solving process. Students are also expected to strategically apply techniques, such as mental math, estimation, and number sense, to problem-solving. There are notes in the teacher-facing materials that provide optional opportunities for teachers to engage students through the whole-group use of interactive technology. In some instances, this may entail using a word processing document, spreadsheet, or interactive white board. Teachers may also select an educational site to display and use as a class. Teachers must preview and vet sites they display for students prior to classroom use. Additionally, students may use a calculator, as appropriate, at teacher discretion (e.g. to efficiently generate calculations in service of identifying patterns, to verify solutions).
Fluency Practice
Energizing fluency activities provide distributed practice with previously learned material and prepare students for new learning by activating prior knowledge. Fluency activities comprise about 10 minutes of the total lesson time. Automaticity, or instant recall of basic facts, is critical so that students avoid depleting their attention resources with lowerlevel skills when they are addressing higher-level problems. This automaticity prepares students with the computational foundation to solve problems flexibly, efficiently, and accurately.
Sprints are fluency routines that support students in staying sharp with previously learned skills. To this end, Sprints are not used as a summative assessment tool. However, Sprints can be used to promote self-monitoring and self-improvement. Teachers may use Sprints as a tool to observe student progress, to make note of the types of problems or pattens that pose a consistent challenge for students, and to guide future instructional decisions.
NOTES ON FLUENCY PRACTICE:
Think of fluency Practice as having three goals:
1. Maintenance (staying sharp on previously learned skills).
2. Preparation (targeted practice for the current lesson).
3. Anticipation (skills that ensure that students are ready for the in-depth work of upcoming lessons). Example of anticipatory fluency: Students must be secure in counting to 10 long before they can be expected to decompose 10.
As they prepare to teach a lesson, teachers are encouraged to think flexibly and customize fluency activities to meet their students’ needs. For example, a teacher may select two of the three fluency activities that best support student learning towards the lesson objective. Many fluency activities are flexible enough to be completed during another time of day.
Fluency Practice
Students develop, build, and maintain automaticity with counting and calculating.
Fluency Practice (12 minutes)
⬛ Find the Unknown Factor 3.5D (4 minutes)
⬛ Multiplication Facts as Comparisons 3.5C (4 minutes)
⬛ Group Counting 3.4E (4 minutes)
Group Counting (4 minutes) Routine: Counting
Purpose: Review Module 1
Note: Group counting reviews interpreting multiplication as repeated addition. It reviews foundational strategies for multiplication from Module 1 and anticipates upcoming lessons in Module 3 anticipate Module 3 Direct students to count forward and backward, occasionally changing the direction of the count:
⬛ Threes to 30
⬛ Fours to 40
⬛ Sixes to 60
⬛ Sevens to 70
⬛ Eights to 80
⬛ Nines to 90
Application Problems
Do during lunch line-up
Do during lesson
As students’ fluency with skip-counting improves, help them make a connection to multiplication by tracking the number of groups they count using their fingers Connect finger counting to multiplication
Application Problems generally comprise about 5 minutes of the total lesson time. K–5 Math instructional materials are designed to help students understand how to choose and apply the correct mathematical concepts to solve real-world problems. To achieve this flexible thinking, lessons use tools and models, as well as problems and patterns that cause students to think quantitatively and creatively. Application Problems could relate directly to the Concept Development and may be used to activate schema or prepare students for new learning. Single-step problems help students understand the meaning of new ideas, and multi-step problems support and develop instructional concepts. Student work provides insight into their thought processes and can be used to guide future instructional decisions.
Students in Grades 1–5 use a problem-solving approach called Read–Draw–Write (RDW), described on p. 34. As students read and re-read a problem, they ask themselves questions such as, Can I draw something? What can I draw? What does my drawing show me? This metacognitive strategy helps students become independent problem solvers.26 The more often students use a systematic, transferable approach to reason through problems, the more they internalize those behaviors and thought processes.
Application Problem
Students apply conceptual understanding to make sense of and persevere through new problems.
Application Problem (9 minutes)
Linh and three friends buy snacks for a hike. They buy trail mix for $5.42, apples for $2.55, and granola bars for $3.39. If the four friends split the cost of the snacks equally, how much should each friend pay?

26 The Iris Center, “What evidence-based mathematics practices.”
Concept Development
Concept Development constitutes the major portion of instruction and generally comprises 20–30 minutes of the total lesson time. This includes 10 minutes allotted for the Problem Set, an opportunity for independent practice. The Concept Development is the primary lesson component in which new learning is introduced.
Intentional sequencing of standards and topics within modules ensures that students have a requisite understanding to fully access new learning goals and integrate them into their developing schemas. Much of the Concept Development instruction articulates the TEKS and topics through a deliberate progression of material from concrete to representational to abstract. This structure complements and supports an increasingly complex understanding of concepts.27
Within lessons, students may encounter new and unfamiliar terminology. Students should explore the meanings of key terminology during the conceptual development using everyday language and conversational words. Once they have experienced the context, formalize the term by using the Terminology resource definition and reinforce the proper usage of the term in context. Exemplar responses highlight opportunities for students to use terminology naturally as they respond in class to discussion questions or in Turn and Talks, but there are many more points throughout the lesson and the school day to fortify academic terminology.
Concept Development
Students engage in learning, reasoning, and discourse related to the lesson objective.
Concept Development (32 minutes)
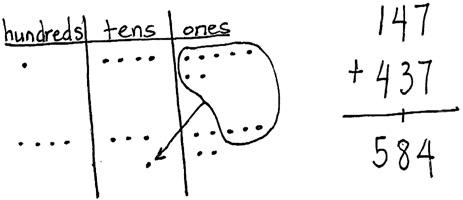
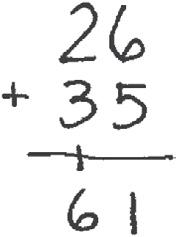
T: (Move the 4 ones disks to join the 6 ones to form the unit ten. See the second image.) What do you see, and what should we do?
S: We made a ten. We have to change 10 ones for 1 ten. Take off 10 ones, and put a ten in the tens place because 11 ones is 1 ten 1.
T: That ’s right! We rename 11 ones as 1 ten 1 one. And where do tens belong?
S: In the tens place!
T: Of course! So watch. (Take off 10 ones disks and place a tens disk in the tens place. See the third image.) We show this step in vertical form by writing the new unit of ten on the line below the tens place. (Write 1 on the line below the tens place as shown in the last image to the right.) This is called new groups below
T: And we write the 1 one below the line in the ones place.

T: Now we add the tens, including the new unit. 2 tens + 3 tens is 5 tens, and 1 more ten equals 6 tens. The answer is 61.
T: Explain to your partner how each change that I modeled on my place value chart matches each step that I recorded in the vertical form.
S: There’s only 1 disk left in the ones place, and you wrote a 1 under the line in the ones place. You showed the new ten by writing a 1 on the line below the tens place. That little 1 under the tens place is close to the 1 under the ones place, so I can see the eleven. Then, we just add up the tens.
27 Agrawal and Morin, “Evidence-Based Practices,” 34–44.
Problem Sets
As part of the Concept Development, students may be asked to complete a Problem Set. The Problem Set often includes fluency pertaining to the Concept Development as well as conceptual understanding and application word problems. Problem Sets are intentionally crafted from simple to complex with various access points based on a student’s current level of proficiency. The primary goal of the Problem Set is for students to apply the conceptual understandings learned during the lesson and to work at their own level for 10 sustained minutes. Teachers are encouraged to think flexibly and adjust the Problem Set depending on the needs of their students. Teachers may specify “must do” problems that meet the objective of the day, and then assign “could do” or “extension” problems if time permits. Alternatively, teachers might capitalize on the simple to complex design by assigning students various starting points, based on their strengths and needs. For example, students who need more proficiency practice might start on Problem 1, whereas students who already demonstrate proficiency can begin at Problem 5, so that they reach the height of complexity and remain challenged. Students are not expected to complete every problem in a 10-minute time frame.
Problem Set
Students apply conceptual understanding to independent practice.
Problem Set (10 minutes)
Student Debrief
The lesson closes with a 10-minute Student Debrief, which includes 3 minutes for the Exit Ticket. Rather than hearing the objective at the beginning of the lesson, students experience the learning through problem solving and concept development. Then, during the debrief, the class gathers to reflect on the lesson and to analyze new learning. This approach allows students, instead of the teacher, to articulate the focus of the lesson. The questions in the Student Debrief develop students’ metacognition by helping them to make connections among parts of the lesson, concepts, strategies, and tools on their own. Teachers invite students to appropriately name the learning they describe, drawing out key vocabulary when the need for the name of a strategy, concept, or tool is most needed—at the point of use.
The goal is for students to see and hear multiple perspectives from their classmates and to mentally construct a multifaceted image of the concepts being learned. Students articulate observations so that the objective of the lesson becomes eminently clear to them. Thoughtful questions and dialogue help make connections explicit and directly engage students in the TEKS Mathematical Process Standards.
Student Debrief
Students engage in discussion, reflect, and synthesize the day’s learning.
Student Debrief (10 minutes)
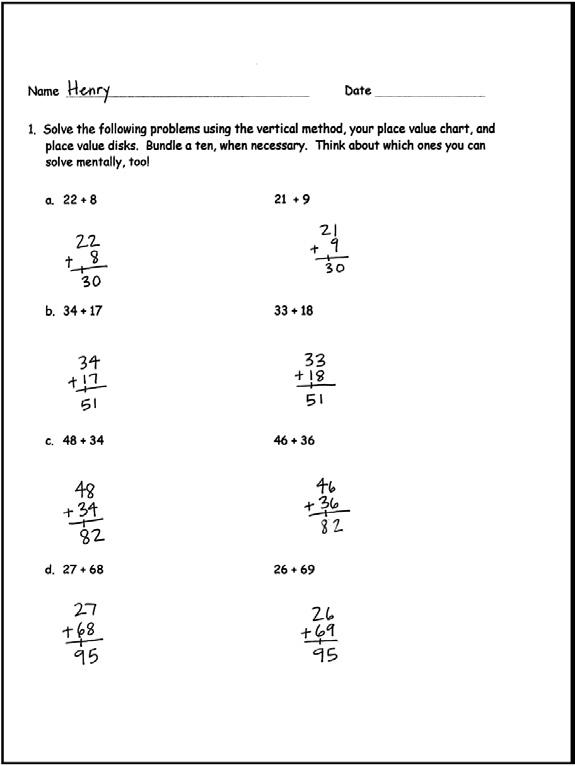
⬛ In Problem 1, which problems were you able to solve mentally? Did you need to compose a ten for all of the problems in the second column? Why not?
⬛ How did you solve Problem 1, Part (c): 48 + 34, 46 + 36? How did you change your place value chart to show the problem in the second column?
⬛ Explain to your partner how you used manipulatives to solve Problem 1, Part (d): 27 + 68. How did this problem help you to solve the second one?
⬛ For Problem 2, how did your work with the place value disks match the vertical form? How did you show new groups below?
⬛ Explain to your partner how you solved Problem 3 using manipulatives and the vertical form. How could you solve this problem differently using a simplifying strategy?
Exit Tickets
The Exit Ticket is a critical element of the lesson structure.28 This brief, 3-minute formative assessment contains specific questions about what was learned that day. The purpose of the Exit Ticket is two-fold: To teach students to grow accustomed to being held individually accountable for the work they have done after one day’s instruction; and to provide the teacher with valuable evidence of the efficacy of that day’s work— which is indispensable for planning purposes.
Exit Ticket
Students demonstrate understanding related to the lesson objective.
Exit Ticket (3 minutes)

28 National Council of Teachers of Mathematics. Principles to Actions.
Homework
In these instructional materials, the Homework provides students with an opportunity for additional practice of the skills and concepts from the day’s lesson. The goal of the Homework is not to introduce new concepts or ideas, but to build student understanding and confidence with the material learned in class. The teacher is encouraged, with the support of families, administrators, and colleagues, to discern the appropriate use of the Homework for students. Fluency exercises can also be considered as an alternative homework assignment.
Homework
Students practice solving problems similar to those in the Problem Set.
Sprints
The Value of Sprints in the K–5 Math Instructional Materials
Myth: The purpose of Sprints is to help students learn how to solve math problems quickly.
Reality: Sprints offer concentrated fluency practice on specific skills and concepts.
A well-managed and carefully timed routine is used in a Sprint to create an environment where students are fully engaged and focused on the activity.29 Students are not expected to complete all of the problems and should not be assessed on their speed. Instead, Sprints are intentionally designed to provide students with opportunities to strive for and measure their improvement from one Sprint to the next within an engaging and motivating environment.
29 Fuchs, L.S., et al., “Assisting Students.”
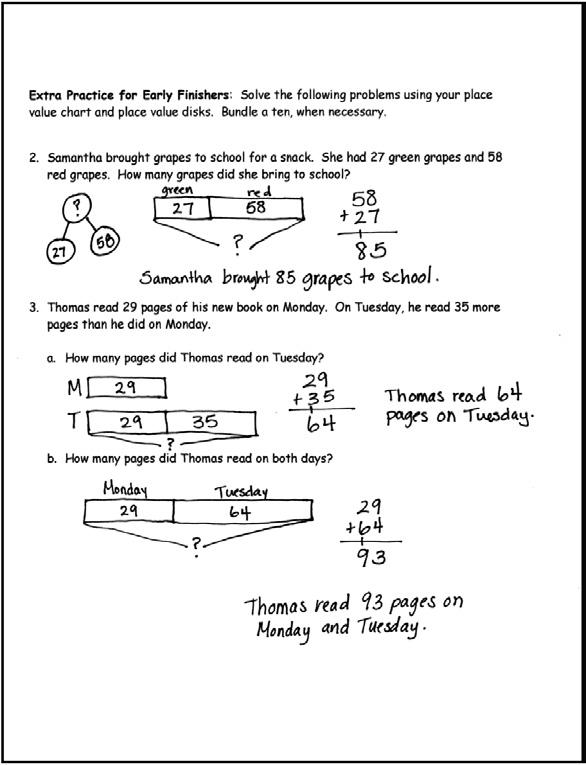
3. Jahsir counted 63 flowers by the door and 28 flowers on the windowsill. How many flowers were by the door and on the windowsill?
4. Antonio’s string is 38 centimeters longer than his reading book. The length of his reading book is 26 centimeters.
a. What is the length of Antonio’s string?
b. The length of Antonio’s reading book is 20 centimeters shorter than the length of his desk. How long is Antonio’s desk?
Myth: Sprints require students to rely on rote memorization or rote procedure.
Reality: Sprints build understanding and flexible problem solving.
12 = 4 × ____
12 = 2 × 2 × ____
12 = 3 × 2 × ____
Sprints support procedural fluency, a critical component of mathematical proficiency by fostering conceptual understanding and flexible problem solving.30 The problems in each Sprint are carefully selected and sequenced to help students recognize patterns and structures to solve subsequent, more complex problems. For example, consider the sequence of problems shown. The first problem contains an unknown factor. The second problem intentionally decomposes the known factor in the first problem, 4, into 2 × 2. The third problem is a variation of the second problem with one given factor changed. This type of sequence allows students to solve the problems by flexibly using factual recall, pattern recognition, and numeracy strategies.
Myth: Sprints introduce new learning in a lesson.
Reality: Sprints distribute practice over time.
Sprints distribute practice over time, which leads to better retention of learning.31 The mathematics in the Sprint may be related to the lesson but it is not used to introduce new learning.
Myth: Sprints use problems that aren’t appropriate for some students.
Reality: Sprints let all students practice at the level appropriate for them.
Sprints allow students to focus on their own growth and to strive for their personal best. The problems are intentionally designed to progress in difficulty from simple to complex, and students are not expected to complete all of the problems. Instead, each student does their personal best based on their current automaticity with a given concept or skill.
Myth: Sprints should be a graded activity.
Reality: Sprints are practice and formative assessments.
Sprints are practice. They are not summative assessments. Sprints allow students to see their improvement from one Sprint to the next and provide teachers with a sense of each student’s automaticity with a particular concept or skill. Grading of Sprints is strongly discouraged.
30 National Council of Teachers of Mathematics (NCTM). “Procedural Fluency in Mathematics: A Position.”
31 Brown, Roediger, and McDaniel. Make It Stick.
Suggested Methods of Instructional Delivery
Directions for Administration of Sprints
Sprints are designed to develop fluency. They should be fun, adrenaline-rich activities that intentionally build energy and excitement. A fast pace is essential. During Sprint administration, teachers assume the role of athletic coaches. A routine fuels students’ motivation to do their personal best. Student recognition of increasing success is critical, and so every improvement is celebrated.
One Sprint has two parts with closely related problems on each. Students complete the two parts of the Sprint in quick succession with the goal of improving on the second part, even if only by one more.
With practice, the following routine takes about 9 minutes.
Sprint A
Pass Sprint A out quickly, face down on student desks with instructions to not look at the problems until the signal is given. (Some Sprints include words. If necessary, prior to starting the Sprint, quickly review the words so that reading difficulty does not slow students down.)
T: You will have 60 seconds to do as many problems as you can. I do not expect you to finish all of them. Just do as many as you can, your personal best. (If some students are likely to finish before time is up, assign a number to count by on the back.)
T: Take your mark! Get set! THINK!
Students immediately turn papers over and work to finish as many problems as they can in 60 seconds. Time precisely.
T: Stop! Circle the last problem you did. I will read just the answers. If you got it right, call out “Yes!” If you made a mistake, circle it. Ready?
T: (Energetically, rapid-fire call the first answer.)
S: Yes!
T: (Energetically, rapid-fire call the second answer.)
S: Yes!
Repeat to the end of Sprint A or until no student has a correct answer. If needed, read the count-by answers in the same way the Sprint answers were read. Each number counted-by on the back is considered a correct answer.
T: Fantastic! Now, write the number you got correct at the top of your page. This is your personal goal for Sprint B.
If the class needs more practice with Sprint A, continue with the optional routine presented below.
T: I’ll give you one minute to do more problems on this half of the Sprint.
T: Stop! I will read just the answers. If you got it right, call out “Yes!” If you made a mistake, circle it. Ready? (Read the answers to the first half again as students stand.)
Movement
To keep the energy and fun going, always do a stretch or a movement game in between Sprints A and B. For example, the class might do jumping jacks while skip-counting by 5 for about 1 minute. Feeling invigorated, students take their seats for Sprint B, ready to make every effort to complete more problems this time.
Sprint B
Pass Sprint B out quickly, face down on student desks with instructions not to look at the problems until the signal is given. (Repeat the procedure for Sprint A.)
T: Well done! Now, take a moment to go back and correct your mistakes. Think about what patterns you noticed in today’s Sprint.
T: How did the patterns help you get better at solving the problems?
T: Rally Robin your thinking with your partner for 1 minute. Go!
Rally Robin is a style of sharing in which partners trade information back and forth, one statement at a time per person, for about 1 minute. This is an especially valuable part of the routine for students who benefit from their friends’ support to identify patterns and try new strategies.
Students may take Sprints home.
Read–Draw–Write
Support students as they problem solve by using a simple, repeatable process. The Read–Draw–Write (RDW) process calls for students to
1. Read the problem.
2. Draw and label.
3. Write a number sentence (equation).
4. Write a word sentence (statement).
Families may support the process by encouraging their student to ask themselves questions such as
⬛ What do I see?
⬛ Can I draw something?
⬛ What conclusions can I make from my drawing?
The more students participate in reasoning through problems with this systematic approach, the more they internalize these practices and thought processes.
Personal Whiteboards
Materials Needed for Personal White Boards
1 heavy-duty clear sheet protector
1 piece of stiff red tag board 11" × 8"
1 piece of stiff white tag board 11" × 8"
1 3" × 3" piece of dark synthetic cloth for an eraser (e.g., felt)
1 low-odor dry-erase marker, fine point
Directions for Creating Personal White Boards
Cut the white and red tag to specifications. Slide into the sheet protector. Store the eraser on the red side. Store markers in a separate container to avoid stretching the sheet protector.
Frequently Asked Questions About Personal White Boards
Why is one side red and one white?
The white side of the board is the “paper.” Students generally write on it, and if working individually, turn the board over to signal to the teacher that they have completed their work. The teacher then says, “Show me your boards,” when most of the class is ready.
What are some of the benefits of a personal white board?
⬛ The teacher can respond quickly to a gap in student understandings and skills. “Let’s do some of these on our personal white boards until we are more proficient.”
⬛ Students can erase mistakes and make corrections to their work.
⬛ They are motivating. Students love both the drill and thrill capability and the chance to do story problems with an engaging medium.
⬛ Checking work gives the teacher instant feedback about student understanding.
What is the benefit of this personal white board over a commercially purchased dry-erase board?
⬛ Templates such as place value charts, number bond mats, hundreds boards, and number lines can be stored between the two pieces of tag board for quick access and reuse.
⬛ Worksheets, story problems, and other problem sets can be done without marking the paper so that students can work on the problems independently at another time.
⬛ Strips with story problems, number lines, and arrays can be inserted and still have a full piece of paper on which to write.
⬛ The red versus white side distinction clarifies expectations. When working collaboratively, there is no need to use the red side. When working independently, students know how to keep their work private.
⬛ The tag board can be removed so that student work can be projected on an overhead.
Differentiation and Scaffolds
Equitable instruction requires that all students have access to the same high-quality grade-level content. To this end, linguistic and academic scaffolding is folded into the instructional materials in such a way that it is part of its very DNA. Therefore, faithful adherence to the modules is the primary scaffolding tool. The modules reinforce that the components of excellent math instruction do not change based on the audience.
There may however be instances when students need individualized attention based on their unique needs. Meeting student needs can happen in several ways, including maximizing learning within the zone of proximal development, drawing on students’ experiences, and creating a rich learning environment with plenty of time for collaboration and specific cognitive supports.32 To this end, strategically placed margin notes are provided within each lesson to elaborate on the use of specific scaffolds at applicable times for all students, including students participating in bilingual education programs and receiving instruction in partner language and English. They address needs presented by emergent bilingual students, students with disabilities, students who demonstrate proficiency, and students who need more practice building proficiency. The scaffolds integrated into these instructional materials give alternatives for how students access information, and how they express and demonstrate their learning.
The suggestions are grounded in three learning principles:
⬛ Provide multiple means of representation by using a variety of methods to present information and support understanding of vocabulary and symbols to maximize comprehension.
⬛ Provide multiple means of action and expression by varying methods for response and ways to demonstrate knowledge and skills.
⬛ Provide multiple means of engagement by optimizing interest and offering varied levels of challenge to promote productive struggle.
The following chart provides examples of scaffolds. Note that some scaffolds may be used in more than one type of note depending on the intent such as language and content for EB students. As appropriate, provide scaffolds in the moment to the whole class or individuals, or in small group settings. With any scaffold, students may use their primary language and be encouraged to make cross-linguistic connections.
Multiple Means of Representation
⬛ Activate prior knowledge.
⬛ Draw students’ attention to important information or structures through strategies such as highlighting or color coding.
⬛ Clarify vocabulary through charts and visuals.
⬛ Engage students in kinesthetic activities.
⬛ Break down tasks into manageable chunks.
⬛ Support processing of information through turn and talks.
Multiple Means of Action and Expression
⬛ Scaffold tasks through questioning.
⬛ Provide templates and graphic organizers.
⬛ Offer alternative materials or access to technology to reduce fine motor demands.
⬛ Offer access to concrete representations.
⬛ Offer choice of response options, either verbally or in writing.
⬛ Provide access to math journals to support communication.
⬛ Offer sentence frames at different levels of rigor to support varied proficiency levels of oral and written language.
32 Darling-Hammond, et al., “Implications for educational practice,” 97–140.
Multiple Means of Engagement
⬛ Adjust the task by offering enrichment and extension activities.
⬛ Adjust the task by providing linguistic and/or academic scaffolds that can be gradually released with increasing independence.
⬛ Make real-world connections to promote relevance.
⬛ Promote active participation by all through turn and talks.
⬛ Support students in monitoring and tracking their progress.
⬛ Offer choice of strategies.
Additionally, most lessons contain a suggested teaching sequence that moves from simple to complex. For example, a lesson could begin with an introductory problem for a math topic and then build up inductively to a general case that encompasses multifaceted ideas. By structuring problems from simple to complex, teachers can locate specific steps that students need proficiency with or stretch problems for students who desire a challenge.
Throughout these instructional materials, teachers are encouraged to give classwork by using a timeframe rather than a task frame. All students are expected to do their personal best, working at their maximum potential within a given timeframe. Some students will complete more work than others. Students are encouraged to strive for personal success. Another vitally important component for meeting the needs of all students is the constant flow of data from student work, including tracking through an Exit Ticket for each lesson, as well as Mid-Module and End-of-Module assessments to determine student understanding at benchmark points. Such data flow keeps the teaching practice firmly grounded in student learning and makes incremental forward movement possible.
Structuring Student Groupings
Responsive instruction includes flexible groups that change frequently based on students’ needs.
⬛ Small groups may address misconceptions by using the guidance found in the Learning from Misconceptions section of each module.
⬛ Small groups may apply the scaffolds and extensions recommended in margin notes.
⬛ Pair students who have different levels of mathematical proficiency and students who have different levels of English language proficiency.
⬛ Group students who achieve above proficiency levels on assessments for enrichment opportunities such as the challenge options found in Multiple Means of Engagement margin notes.
Additionally, teachers can always group students strategically and flexibly in partner pairs based on their mathematical and English language proficiency. Pairing students who speak the same home language can complement any strategic grouping.
Approach to Assessments
Assessments provide an opportunity for students to show their learning accomplishments in addition to offering students a pathway to monitor their progress, celebrate successes, examine mistakes, uncover misconceptions, and engage in self-reflection and analysis. Assessments are driven by a continuous cycle: plan, teach, assess, and analyze. This highly effective structure provides crucial feedback to the teacher. Teachers adjust and respond, basing their instructional choices on the evidence they gather. “Implementing this assessment process leads to significant improvements in children’s academic outcomes and teachers’ own professional growth.”33
33 National Council of Teachers of Mathematics, Catalyzing Change, 35.
Furthermore, the data collected from the assessments provide teachers with specific information about student understanding to help direct instruction. In Principles to Actions, NCTM speaks to the value of datadriven instruction as part of its vision for an effective assessment program (emphasis added):
Effective assessment of mathematics learning is a process that is coherently aligned with learning goals, makes deliberate use of the data gathered as evidence of learning, and provides guidance for next instructional steps and programmatic decision making. In excellent mathematics programs, students learn to assess and recognize high quality in their own work. 34
In these instructional materials, assessment becomes a regular part of the classroom routine in the form of daily, mid-module, and end-of-module assessment tasks. Both mid-module and end-of-module tasks are designed for quick teacher scoring so that teachers can give students instructionally relevant, actionable feedback and monitor the effectiveness of their instruction to make any needed adjustments. These MidModule and End-of-Module tasks should be used in conjunction with instructionally embedded tasks and other formative assessment strategies to realize the full benefits of data-driven instruction. In addition, the Assessment Reflection Tool complements other assessment tools by offering students an opportunity to pause and reflect after the assessment tasks. 34 National Council of Teachers of Mathematics, Principles to Actions, 92.
Problem Sets
Problem Sets are designed to move from simple to complex problems, building on previous knowledge in small attainable steps. The intentionally-crafted teaching sequences found in Problem Sets build confidence and nudge students steadily toward proficiency.35 By focusing on how students interacted with the Problem Set, teachers can ascertain how well students grasped new concepts and skills introduced in the lesson. Teachers may note the number or type of problems that students completed, along with their preferred strategies and models. Then teachers can use this information to probe during the Student Debrief that follows, and/or plan for future instruction. Though designed for practice, Problem Sets can also serve as formative assessments that provide another opportunity to monitor student learning.
Exit Tickets
Exit Tickets are brief, daily, formative assessments which typically contain one or two problems at a similar level of complexity as the Concept Development. Referred to as “power assessments”36 in Visible Learning, they give teachers a snapshot of students’ understanding of the lesson, uncover misconceptions, and indicate which students may benefit from additional practice, all of which drives instruction for the following day in an efficient and responsive manner. With frequent progress-monitoring, teachers can adjust instruction based on students’ strengths and needs
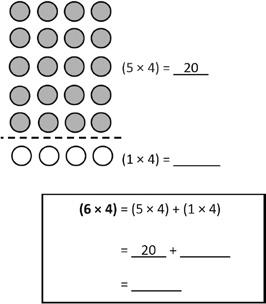
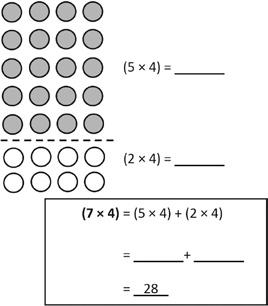

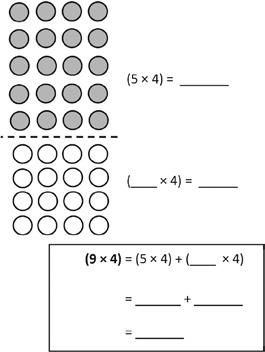

35 Parker and Baldridge, Elementary Mathematics for Teachers.
36 Hattie, et al., Visible Learning for Mathematics, 199.
Kindergarten Interview and Observational Assessments
Interview-style Module Assessments take inspiration from the Latin root word assidere, which means to sit beside. The interview affords students the unique opportunity to showcase what they know, can do, and express through multiple modalities: writing, speaking, and demonstrating. Teachers not only build relationships by sitting beside students to interview them, but they also gain a clear and accurate picture of student understanding that is generally unattainable through pencil and paper options. Interviewing and observing are age-appropriate means of assessment and provide a window into the approach that the student used (subitizing, counting all, or another strategy) to solve a problem. Careful language in the rubric provides teachers with guidance in scoring; more importantly, as students move towards proficiency for each TEKS, the rubric helps teachers understand common student preconceptions or misconceptions for discrete portions of knowledge or specific skills.
Early childhood experts Carol Copple and Sue Bredekamp recommend observing, documenting, and assessing young learners’ progress in multiple contexts, over multiple opportunities, and by acquiring data from multiple sources.37 To this end, the Observational Assessment checklist provides a means of recording observations while students work on math tasks during the day. This convenient tool for formative assessment makes it possible to observe and assess kindergarteners during regular instructional time, as well as during unplanned opportunities such as daily routines and play. Regular use of the Observational Assessment checklist reduces the amount of time spent on module assessments because some items may not need to be administered to all students once observational data is gathered. For example, if the teacher observes and records proficiency with using data to create real-object and picture graphs, they have evidence of student proficiency without needing to administer the corresponding item in the interview assessment. K–5 Math instructional materials provide an opportunity for students to show their learning accomplishments through observational, anecdotal, and formal methods of assessment.
2
3
3
5
5
5,
6
6
37 Copple and Bredekamp, Basics of Developmentally Appropriate Practice.
Grade K Module 1 Observational Assessments
Mid-Module Assessment Task
A Mid-Module Assessment Task is provided with most modules, along with scoring information. These tasks are specifically tailored to address approximately the first half of the student learning outcomes for that module. Careful language in the rubric provides teachers with guidance in scoring; more importantly, the rubric helps teachers understand common student preconceptions or misconceptions for discrete portions of knowledge or specific skills, as students move towards proficiency for each TEKS. Typically, Mid-Module Assessment tasks should be completed independently by students within one class period. The tasks should be new to the students and not preceded by analogous problems. Teachers may use these tasks either formatively or summatively. After students have completed the Mid-Module Assessment Task, it is recommended that teachers review the answers with students.
End-of-Module Assessment Task
A summative End-of-Module Assessment Task, along with a rubric for scoring, is also provided for each module. Tasks are specifically designed, based on the standards addressed to gauge students’ understanding of the module as a whole. Some items test understanding of specific TEKS, while others are synthesis items that assess either understanding of the broader concept addressed in the module or the ability to solve problems by combining knowledge, skills, and understanding.
Similar to the Mid-Module Assessment tasks, the End-ofModule tasks should be completed independently by students within one class period. These tasks should also be new to the students and not preceded by analogous problems.

Note: Question & Test Interoperability (QTI) files are provided for the implementation of digital assessments aligned to each print Midand End-of-Module Assessment Task. It is recommended to administer either the print or the digital assessment method of the Mid- and End-of-Module Assessment. Students should not take both assessment types. For grades 1–5, there are many problem types that students could encounter on digital assessments: multiple-choice, multiselect, text entry/equation editor, graphing, inline choice, hot spot, drag and drop, and fractional model. For grade K, the digital assessments have fewer item types and are designed to be teacher-directed and delivered one-on-one with students.
Responding to Trends in Student Performance
Once scores are obtained by using the Progression Toward Proficiency rubric, teachers can identify trends, and use the coherent structure of these instructional materials to respond to student performance. Topics are clearly labeled with focus standards that help teachers quickly identify materials, problems, and other resources for supporting students in small groups or individually.
Prior to delivering and analyzing the End-of-Module Assessment Task, teachers may review the Collaboratively Troubleshooting Student Misconceptions resource, a pre-emptive tool for understanding trends in student performance and uncovering a need for building foundational or conceptual knowledge fundamental to success on the problems represented in the trend. The coherence across grade levels makes discovering relevant fundamental knowledge easier, as teachers can refer to the Student Misconception resources
in earlier grades and implement those supports with their students. The section covering student misconceptions can be found in each module’s overview.
Finally, use the Additional Days School Year (ADSY) module, one for each grade level, which includes 3 days reserved for flexible use (i.e., flex days) to give students an extra push with content that needs reinforcement. Each ADSY lesson reviews a specific TEKS, chosen strategically based on its coherence with the mathematical understandings that span grade levels. ADSY lessons are supplemental to the core instructional materials, and topics can be taught independently based on students’ needs. The instructional days can be scheduled at any point throughout the school year, so consider using these days to focus on those TEKS that need review.
Assessment Reflection Tool
An assessment reflection can be a powerful tool in helping to surface student thinking and helping students to monitor and track their growth. It can also help students anticipate and process any stress or fear they may have about an assessment.
This assessment reflection tool, found in the Course Guide for each grade level, can help teachers guide discussions both prior to and after an assessment. These discussions help the teacher promote a culture of productive struggle as students go into testing. These discussions also support students’ needs after testing and give students the opportunity to reflect on their new understandings and learn from their mistakes after an assessment.
Support for Emergent Bilingual Students
These instructional materials have built-in support that is needed for emergent bilingual (EB) students to engage with the language-rich lessons. Each lesson’s four-part lesson design has the goal of supporting the expectations outlined in the English Language Proficiency Standards (ELPS) by including the embedded instructional best practices noted in previous sections, paired with linguistic accommodations for building vocabulary and linguistic accommodations for building comprehension and knowledge.
How the Embedded Instructional Best Practices Support EB Students
The four-part lesson design infuses these instructional best practices:
⬛ Present the mathematics as a coherent, systematic story.
⬛ Use formative and summative assessment practices to identify student misconceptions and provide timely feedback.
⬛ Provide multiple entry points to the mathematics, illustrate in multiple modes and formats, and provide opportunities for active processing time and strategic review.
As Ramirez and Celedón-Pattichis state in their book Beyond Good Teaching: Advancing Mathematics Education for ELLs, “These practices expand what we know about good teaching because they specifically address the language demands of students who are developing skill in listening, speaking, reading, and writing in a second language while learning mathematics.” 38 These instructional best practices are supported by language development research to address the lesson’s language demands strategically and systematically. These practices support teachers in deciding on an appropriate comprehensible input for EB
38 Ramirez and Celedón-Pattichis. Beyond Good Teaching, p. 1.
students, work to lower EB students’ affective filter, and help students’ metalinguistic monitoring during knowledge acquisition and language output. 39 When teachers leverage these best practices while addressing the topic’s ELPS, EB students experience a language-rich, safe, supported environment in which to learn mathematics and English.
Linguistic Accommodations for EB Students to Build Vocabulary
Linguistic accommodations for building vocabulary are built into the instructional design of the materials. In addition, the educative nature of the instructional materials support teachers with implementing linguistic accommodations to build vocabulary. Module Overviews offer teachers a comprehensive list of new or recently introduced terms and familiar terms and symbols, often with visuals and cognates, allowing teachers the opportunity to build or activate background knowledge by previewing or pre-teaching familiar terms to EB students.40 Lessons give students experience with a new mathematics concept before naming it with a precise mathematical term.41 Teachers are often provided with educative guidance, either in the body of the lesson or in margin notes, to support EB students in pairing the written term they just experienced with a visual representation, visual cue, or gesture.42 43 This provides a scaffold for EB students to use and apply mathematical language in context.
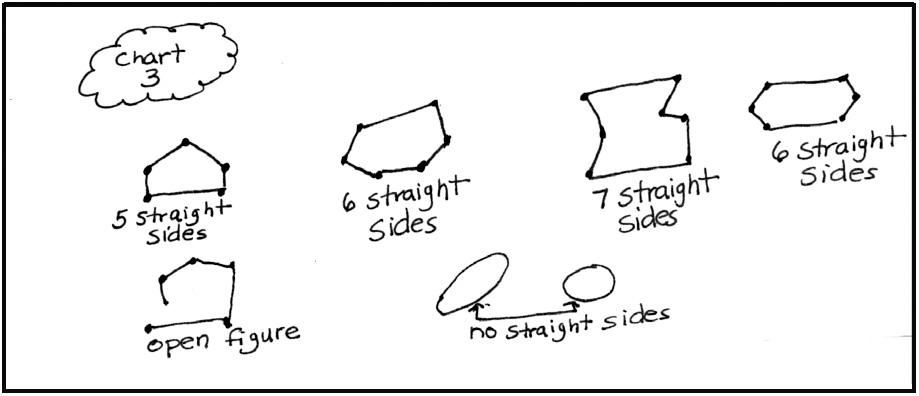
Research-Based Language Routine to Support New Key Terms
A language routine is a structured yet adaptable instructional activity for amplifying, assessing, and developing students’ language.44 The predictable format of language routines serves to lower the affective filter, which allows EB students to engage with metalinguistic thinking about new key terms. One language routine that specifically amplifies EB students’ understanding of new key terms is the Collect and Display language routine.45 The purpose of the Collect and Display language routine is to capture students’ oral words and phrases into a stable, collective reference. The teacher listens for, and scribes, the language students use during
39 Krashen. Principles and Practice
40 Ecchevaria and Graves. Sheltered Content Instruction.
41 Livers, Stefanie D. et al. “Vocabulary Support.” pp. 152–159.
42 Texas Education Agency. ELPS 2-12 Leader Pathway.
43 Texas Education Agency. English Learner Instructional Accommodations.
44 Zwiers, et al., “Principles.”
45 Zwiers, et al., “Principles,” 11.
Collect and Display Language Routine
Circulate and listen to student talk during student-to-student discourse. On separate note cards, scribe students’ frequently used mathematical words and phrases. Pair these notes with a visual: a diagram, a sketch, or a picture of real items. Display the notes and visuals, and pair each with a more precise mathematical term. Refer to the display often during student-to-student discourse to support EB students’ application of new key terms in new and novel situations.
partner, small group, or whole class discussions by using written words, diagrams, or pictures. This collection output can be organized, revoiced, and explicitly connected to new key terms. This routine provides feedback for students in a way that increases sense-making and application of new key terms.
Linguistic Accommodations for EB Students to Build Comprehension and Knowledge
Teachers will find support with implementing linguistic accommodations to build comprehension and knowledge. Elements of the Sheltered Instruction Observation Protocol46 are applied both in the lesson body and in margin notes.
⬛ Fluency Practice serves to build or activate background knowledge, both mathematical knowledge and knowledge of terminology.
⬛ In Concept Development, students have ample opportunities for discussion amongst peers, experiencing hands-on activities, visuals, graphic organizers, and models, and interacting with metacognitive strategies such as think-alouds.
⬛ In Application Problems, students integrate reading, writing, speaking, and listening while practicing new content knowledge and language.
⬛ In the Student Debrief, teachers review key vocabulary and students and teachers summarize the new learning of the lesson while engaging with metacognitive and metalinguistic thinking.
To support language output, teachers can leverage the elements referenced above through strategically grouping students based on varied levels of mathematical proficiency or varied levels of English language proficiency.47 In every part of the four-part lesson structure, teachers can encourage students to turn and talk in their home language. This provides EB students with a chance to clarify new knowledge and terms in their home language, reducing cognitive overload. It also serves to lower EB students’ affective filter, which provides them with a safe space to build comprehension and knowledge. When teachers encourage a turn and talk before a whole-class share-out, EB students have an opportunity to orally rehearse their responses.
NOTES ON MUTLIPLE
MEANS OF ACTION AND EXPRESSION:
Consider using strategic, flexible grouping throughout the module based on students’ mathematical and English language proficiency.
⬛ Pair students who have different levels of mathematical proficiency.
⬛ Pair students who have different levels of English language proficiency.
⬛ Join two pairs of students to form small groups of four.
As applicable, complement any of these groupings by pairing students who speak the same native language.
NOTES
ON MULTIPLE MEANS OF ACTION AND EXPRESSION:
Consider providing sentence starters or frames to support some emergent bilingual students in reflecting during the debrief:
When I got stuck on _____ I tried _____ to keep me going.
Yesterday I learned _____ and this helped me with _____ on problem # _____.
I would tell a classmate who is having trouble _____.
I learned _____ about myself as a problem solver. This will help me be a better problem solver tomorrow because _____.
46 Ecchevaria and Graves. Sheltered Content Instruction.
47 Winsor, Matthew S. “Bridging the Language Barrier.”
Resources
Intentionally-designed resources that support teachers, students, and families. Each resource facilitates and reinforces student learning and conceptual understanding. A comprehensive list of additional resources follows.
Student Editions
Student materials are available in the Learn, Practice, Succeed trio. This series supports differentiation and remediation while keeping student materials organized and accessible. The Learn, Practice, and Succeed series also offers coherent—and therefore, more effective—resources for Response to Intervention (RTI), extra practice, and summer learning.
Learn
Learn serves as a student’s in-class companion; it’s where they show their thinking, share what they know, and watch their knowledge build every day. Learn assembles the daily classwork—Application Problems, Exit Tickets, Problem Sets, templates—in an easily stored and navigated volume.
Practice
Each lesson begins with a series of energetic, joyous fluency activities, including those found in Practice. Students who are fluent in their math facts can become proficient with more material more deeply. With Practice, students build competence in newly acquired skills and reinforce previous learning in preparation for the next lesson.
Together, Learn and Practice provide students with all the print materials that they will use for their core math instruction.
(Note: Grade 4 Module 4 does not have a Practice book as there are no fluency templates required for this module.)
Succeed
Succeed enables students to work individually toward proficiency. These additional problems align lesson by lesson with classroom instruction, making them ideal for use as homework or extra practice. Each Problem Set is accompanied by a Homework Helper, a set of worked examples that illustrate how to solve similar problems when families are supporting students at home.
Teachers and tutors can use Succeed books from prior grade levels as consistent tools for filling gaps in foundational knowledge. Students will thrive and progress more quickly as familiar models facilitate connections to their current grade-level content.
Grade 1
Module 5
IDENTIFYING,
Assessments
The Assessment resource includes a Mid-Module Assessment Task for most modules and an End-ofModule Assessment Task for each module. The assessments provide students the opportunity to show their level of proficiency on the TEKS addressed within the module. A Progression Toward Proficiency accompanies each assessment and helps educators identify and celebrate what the students can already do and what they need to work on next.
Exit Tickets, located within Learn, serve as daily formative assessment. Problem Sets, located within Learn, Homework, located within Succeed, provide other opportunities for formative assessment, and the Assessment Reflection Tool found in each Course Guide provides guidance for students’ next steps for gaining proficiency with specific content.
ADSY Resources
Additional Days School Year (ADSY)
Grade 1 Assessments
The ADSY module, one for each grade level, consists of 25 targeted lessons, 1 pre-test assessment, 1 post-test assessment, and 3 days reserved for flexible use (i.e., flex days) as determined by local decision. Each ADSY lesson reviews a specific TEKS, chosen strategically based on its coherence with the mathematical understandings that span grade levels. Each lesson builds relational understandings about the big ideas in math and prepares students to succeed in not only their current grade level, but also in later years. ADSY lessons are supplemental to the core instructional materials, and topics can be taught independently based on students’ needs. The instructional days can be scheduled at any point throughout the school year, including as a block at the end of the year or intermittently throughout the year.
Leader Resources Protocols
The protocol documents support coaches and administrators in supporting educators to internalize and maximize their understanding and use of the instructional materials. Each protocol provides a level of depth that the coach or administrator can explore with teachers as they work collaboratively to fine tune their practice.
Module Internalization Protocol
The four-step module internalization process is meant to help teachers develop an understanding of the underlying coherence of the module, including the specific TEKS and ELPS, as well as the progression of the module, and pace the instruction. Through a guided conversation, coaches and administrators support teachers as they truly internalize the knowledge and skills of the module.
Lesson Internalization Protocol
The four-step lesson internalization process ensures that teachers are fully prepared to deliver a lesson that is clear, well-paced, organized, and structured and adapted for their classrooms. Coaches and administrators guide teachers through success criteria, alignment, transitions, differentiation, and other customizations for each lesson, never compromising on the rigor of the knowledge and skills.
Observation Tool
The Observation Tool is a resource for coaches and administrators to document specific look-fors while observing teachers’ instruction and implementation of high-quality instructional materials (HQIM). It is not designed to be an evaluation tool.
Student Work Analysis Protocol
Coaches and administrators can use the six-step Student Work Analysis Protocol to collaboratively analyze student work samples with the goal of understanding students’ thinking, identifying strengths and progress toward proficiency, and determining gaps in skills and knowledge. Coaches and administrators can also support teachers in developing a plan to take targeted action to support students’ development of skills and knowledge in future instruction.
•
BLUEBONNET
Coach Module Internalization Protocol
Read the Module Overview and highlight, annotate, or record your thoughts on the progression of content in the module.
Purpose of Prework
Reading the Module Overview orients teachers to the content of the module and its development across topics.
Step 1: Understand the big picture.
• Use the Module Overview, Topic Overview, Terminology, and Collaborative Troubleshooting sections. Revisit the Module Overview and annotations created as part of the prework. Read the Topic Overviews. Identify how the module utilizes the concrete-representational-abstract (CRA) progression to build student learning from lesson to lesson. Identify new and familiar terminology. Preview the table provided in Collaborative Troubleshooting to anticipate student misconceptions that might arise in the course of the learning.
• Use the Scope and Sequence/Pacing Guide provided by your district. Note which days you will be teaching the lessons and administering the assessments.
• Reflect: Why is this module important? How does it connect to the prior modules (if applicable)?
Step 1 Guidance for Coaches
Purpose of This Step
Recommended timing: 5–7 min
In Step 1, teachers will revisit the Module Overview and read the Topic Overviews to understand the knowledge and skills of the module. This helps teachers begin to see the coherence within the modules and how the module is organized to develop student understanding.
Implementation
Guide teachers to discuss their reflections from the prework and Step 1 to ensure alignment to how the module contributes to the students’ knowledge building and content development. Give teachers time to look at their calendars and pace out the module.
Teacher Prework
Going Deeper
• Prior learning: Identify content learned in the previous and/or current grade-level that is prerequisite for the new learning. This can be found under the Topic Overview heading “Coherence.”
• Future learning: Make connections using the information in the “Coherence” section of the Topic Overview.
Step 2: Know your destination.
• Determine how the content aligns to and meets the rigor of the TEKS and ELPS.
• Work with teachers to adjust the scope and sequence/pacing guide provided by your district given student needs.
• Use the Overview of Module Topics and Lesson Objectives and the End-of-Module Assessment Task. Examine the TEKS and ELPS and how they are included. Complete the End-of-Module Assessment Task and review with strategies in the exemplars using the “A Progression Toward Proficiency” rubric. Identify critical knowledge and skills for the assessment.
• Reflect: What models, strategies, or terminology are critical for student success on the assessment?
Step 2 Guidance for Coaches
Purpose of This Step
Recommended timing: 12–15 min
Teachers will complete the End-of-Module Assessment Task as a student with exemplar use of the module’s strategies, models, and terminology. Helping teachers understand the thinking that students will complete at the end of the module will facilitate connections between lessons and topics and emphasize the most important ideas of the module.
Implementation
Guide teachers to discuss or share summaries to ensure aligned understanding of the models, strategies, and terminology that are critical for success on the End-of-Module Assessment Task.
Going Deeper
• Identify how the standards are mastered, spiraled, or introduced within the End-of-Module Assessment Task.
Step 3: Examine the arc of learning.
• Use the Module Overview, Topic Overviews, and Assessments. Make connections between the topics and assessments as students progress in the module. Skim the lesson objectives to understand how lessons build upon one another.
• Use the Terminology and Suggested Tools and Representations. Begin to consider how all students will access grade-level content.
• Reflect: How does the math in the arc of learning move from simple to complex?
Step 3 Guidance for Coaches
Purpose of This Step
Recommended timing: 15–20 min
In Step 3, teachers understand the progression of the topics and lessons and think of the prior learning students should have for the module. It also provides teachers with the opportunity to plan how to scaffold and support students to access learning of the grade-level content.
Implementation
Guide teachers to share and discuss reflections for Step 3 to ensure aligned understanding of the arc of learning and how students will engage with the skills and concepts.
Going Deeper
• Discuss what will be new or different about how students will engage with the skills and concepts.
• Identify potential misconceptions and opportunities for just-in-time supports.
• Determine potential opportunities for enrichment or extension.
Step 4: Organize your resources.
• Use the Module Overview and Suggested Tools and Representations. Locate materials listed. Identify additional supplies needed.
Step 4 Guidance for Coaches
Purpose of This Step
Recommended timing: 8–10 min
In Step 4, it is important for teachers to review the pacing within the module and locate the recommended materials for the module. Teachers can use the Module Overview and Suggested Tools and Representations section to assist in completing this step. This helps teachers successfully prepare in advance for module, topic, and lesson transitions.
Implementation
If time allows, teachers can unbox and/or organize materials.
Going Deeper
• Identify how using the tools and resources allow all students access to grade-level content.
• Plan for additional collaboration between general educators, special educators, interventionists, and bilingual program staff to ensure students are provided with aligned support.
Coach Lesson Internalization Protocol
Teacher Prework
• Re-read the Topic Overview
• Read the lesson
Purpose of Prework
Revisiting the Topic Overview puts this lesson in the context of the content trajectory. Reading the lesson in full will prepare the teachers to engage in conversations about clarity and coherence within their instruction.
Step 1: Understand the lesson purpose and objectives.
• Read the lesson objective and connect to the Topic Overview, TEKS, and ELPS.
• Complete the Problem Set and Exit Ticket from a student perspective.
• Identify knowledge and skills that students build in this lesson.
Step 1 Guidance for Coaches
Purpose of This Step
Recommended timing: 10–15 min
In this step, teachers will understand the content of the lesson and why it is important. This helps teachers analyze the student thinking required in the lesson and begin to make connections around how this thinking is developed in this current lesson and beyond.
Implementation
During collaborative planning time, guide teachers to discuss the essential knowledge and skills of the lesson and where they are assessed in the Problem Set and Exit Ticket. Through the lesson internalization process, teachers should produce their own lesson with annotations that can be easily referenced during the delivery of a lesson. These annotations can also inform lesson rehearsal meetings, observations, and feedback meetings.
Going Deeper
• Identify the success criteria.
• Consider what skills and concepts from relevant foundational standard(s) students will need to access this lesson.
• Connect to specific elements of previous and next lessons.
• Examine the role of the topic in the trajectory of the module’s story and the role of the lesson.
Step 2: Understand the sequence and pacing of activities.
• Review the overall flow of the lesson and connection to the objective and Exit Ticket.
• Plan for pacing of each activity and transitions between components.
Step 2 Guidance for Coaches
Purpose of This Step
Recommended timing: 7–10 min
In this step, teachers will understand the progression of the lesson and how key components contribute to students’ knowledge and content development. This helps teachers develop appropriate transitions between key components and provide appropriate scaffolds and supports within the timing given.
Implementation
During collaborative planning time, guide teachers to share their understanding of the progression of the lesson to ensure alignment and appropriate pacing and transitions between key components.
Going Deeper
• Add a transition statement after each component of the lesson to solidify and connect the learning.
• Add any additional time stamps as needed for pacing.
Step
3: Prepare to teach each activity with an activity deep dive.
Using the lesson:
• Examine how each lesson component (Fluency, Application Problem, Concept Development, Problem Set, Student Debrief, Exit Ticket) builds to support the learning of the objective of the topic/lesson.
• Determine the most critical takeaways from each key component and make instructional decisions for lesson delivery aligned to the specific purpose of each component.
• Create or identify exemplar and example responses to questions and tasks.
• Examine embedded supports and select the appropriate supports to use in the lesson for diverse learners (emergent bilingual, gifted and talented, and students with disabilities).
Step 3 Guidance for Coaches
Purpose of This Step
Recommended timing: 15–20 min
In this step, teachers will prepare to teach each lesson component by understanding how students will demonstrate their understanding. This helps teachers anticipate misconceptions, identify ways to monitor progress, and determine any scaffolds or extensions to ensure all students engage meaningfully and reach the appropriate level of rigor.
Implementation
During collaborative planning time, utilize lesson rehearsals to practice addressing the most critical takeaways from each lesson. This collaboration will ensure all teachers are aligned with key questions, checks for understanding and parts of the lesson narrative that build student understanding of knowledge and skills.
Going Deeper
• Identify opportunities to close student gaps identified in student work analysis.
• Differentiate instruction, as needed, based on students’ English language proficiency levels.
• Identify additional supports to provide students.
• Prioritize specific questions to gauge student progress toward proficiency.
• Prepare exemplar student responses.
• During collaborative planning time, use lesson rehearsals to practice addressing the most critical take-aways from each lesson.
Step 4: Organize your resources.
• Use the lesson and Suggested Tools and Representations: Locate manipulatives or materials listed. Identify additional supplies needed using the “Notes on Multiple Means of Engagement” boxes in the margins to offer customizations/supports for specific groups of students.
Step 4 Guidance for Coaches
Purpose of This Step
Recommended timing: Varied*
This step will ensure that grade level instruction and the appropriate scaffolds (if needed) are planned and implemented during the lesson. This is also a time for teachers to prepare manipulatives or other hands-on materials as detailed in the lesson.
Implementation
This is also an opportunity for teachers to review the materials recommendations for the lesson within the teacher edition, consider the needs of students within their classroom, review student 504s and IEPs and plan for additional items that may be needed to support their students through the module.
Going Deeper
• Guide teachers in identifying customizations, creating learning acceleration plans, and implementing response to student work analysis plans.
• Plan for additional collaboration between general educators, special educators, interventionists, and bilingual program staff to ensure students are provided with aligned support.
• Provide opportunities for lesson rehearsal(s) using lesson materials/manipulatives to support a smooth delivery of the lesson using
the customizations planned. This can be especially important for fluency activities that include many different materials or whiteboard activities.
• Refer to course guide for information on the use of materials within lessons including sprints, whiteboards and the RDW process.
• Guide teachers to review the materials recommendations for the lesson within the teacher edition, consider the needs of students within their classroom, review student 504s and IEPs and plan for additional items that may be needed to support their students through the module.
* The timing for this section will vary from teacher to teacher depending on their students and the manipulatives needed for the lesson. The preparation of materials during the module internalization process can be helpful in minimizing time for materials organization when preparing for a lesson.
The Observation Tool is a resource for coaches to document specific look-fors while observing teachers’ instruction and implementation of high-quality instructional materials (HQIM). This is not an evaluation tool.
Teacher: Date: Grade: Module: Lesson:
Before the Classroom Visit
Review the lesson for purpose, specific instructional materials, and pacing of activities.
Y N Evidenceof teacher internalization
Y N Appropriatemodule within the scope and sequence
Y N Within+/- 5 instructional days of pacing guide
Y N Lessonmeets minimum number of minutes for core instruction
During the Classroom Visit
Identify appropriate sections of the tool to complete and record notes/time stamps. Focus on the look-fors relevant to the portion of the lesson observed if the full lesson is not observed.
Fluency
Y P N Teacherhas materials ready and there is evidence of established fluency routines.
Y P N Studentsfollow established routines to complete fluency in time provided.
Y P N Teachersequences problems from simple to complex and facilitates connections to prior learning or adjusts based on student responses (may not be applicable for Sprints).
Application Problem
Y P N Studentsuse the Read-Draw-Write process.
Y P N Studentsengage in student-to-student discourse around various explanations, models, and/or student work within the time provided.
Y P N Teachervaries delivery method based on student data (interactive questioning, guided practice or independent practice).
Concept Development
Y P N Allstudents are active participants in the learning.
Y P N Teachermaintains alignment to lesson objective, structure, and pacing.
Y P N Teachers and students use models, manipulatives, and academic vocabulary from lesson.
Y P N Teacherregularly checks for understanding at key learning moments and adjusts instruction as needed.
Y P N Studentsengage in problem-solving that requires them to explain their thinking.
Problem Set
Y P N Students complete must-do problems strategically selected by teacher within the ten-minute time frame.
Y P N Studentsindependently practice and teacher allows for productive struggle.
Y P N Studentsreceive in-the-moment feedback on their work.
Student Debrief
Y P N Studentsengage in student-to-student discourse around various explanations, models, and/or student work within the time provided.
Y P N Studentshave the opportunity to reflect and discuss key learning.
Y P N Students complete assigned Exit Ticket after Student Debrief.
Supports All Learners
Y P N Teacheruses embedded support strategies within lesson (e.g., margin boxes).
Y P N Teacherprovides just-in-time instruction using embedded HQIM resources.
After the Classroom Visit
Notes/Time
Notes/Time
Identify the highest leverage action step and discuss with the teacher.
Glows: Grows:
Student Work Analysis Protocol Coach Guide
Purpose
The Student Work Analysis protocol can be used to analyze student work samples individually or collaboratively with the goal of understanding students’ thinking, identifying strengths and progress toward proficiency, and determining gaps in skills and knowledge.
The protocol also supports the creation of a plan to take targeted action to support students’ development of skills and knowledge in future instruction.
Step 0: Reflect on past success.
Before the meeting
Prepare for the meeting by completing the steps below. These steps may have been already completed as part of the unit and lesson internalization process.
• Select one high-leverage task (exit ticket, written response, independent practice, etc.).
• Participants read the lesson plan aligned to tasks before the meeting.
• The teacher completes the task to identify insights, strategies, and skills that would indicate student proficiency.
• Compare responses to the exemplar provided in curricular materials. If no exemplar exists, the teacher/ group should create one prior to examining the work.
1. Share a success from the last student work analysis protocol that yielded growth in student proficiency.
Essential Questions:
• What actions did you take to yield this growth?
• What impact did adjusting instructions have on student proficiency?
Step 1: Understand the task, related text, and standards.
1. Examine the task by considering the questions below.
Essential Questions:
• What are students being asked to do and understand in this task?
• What knowledge and vocabulary do students need to access this task?
• Which standards are being assessed through this task? Is this standard addressed in its entirety, or are other aspects of it taught in the current module/unit or later in the year?
• For literacy-based tasks, including word problems: What will be challenging about this text for students? Where will they likely struggle?
Step 1 Guidance for Coaches
In this step, teachers look deeply at the task students will be expected to complete and connect the task to grade-level standards.
Prompts:
“Take 3 mins: In your own words, what should a student know or be able to do to show proficiency with this task?”
• RLA: “What knowledge demands does the text require?”
• Math: “What must students understand conceptually? Are there procedural skills students must be able to do with fluency?”
Step 2: Determine the success criteria for the tasks.
1. Examine the resources available in your instructional materials, including rubrics and exemplars to develop a deep understanding of what proficiency with the task looks like..
2. List the key components of the ideal student response.
Essential Questions
Establish a shared understanding of the criteria for fully, partially, and not yet meeting expectations.
• Fully meeting expectations: What are the key understandings demonstrated in an ideal answer?
• Partially meeting expectations: What differences are there between the student work in the fully and partially meeting expectation groups?
• Not yet meeting expectations: What foundational understandings are students still developing?
Step 2 Guidance for Coaches
In this step, teachers establish and discuss the success criteria for the task, so that there is a clear understanding of exemplar.
Prompts:
• “Take 1-2 mins to review the exemplar: What is the criteria for an ideal answer?”
• “How does this [part of the exemplar] align with the standard(s) and expectations for the task, and important understandings for the unit?”
Step 3: Analyze and sort student work.
1. Independently identify one student response that demonstrates proficiency then discuss why you selected them.
2. Identify categories to sort student work (levels of proficiency, different solution types).
3. Collaboratively or independently sort the student work into these categories. If working with your teammates, ensure you’re operating from a common lens.
Essential Questions
• What can students do? What can they not do yet?
• What differentiates those who fully meet the success criteria for the task from those who have not met the success criteria for the task yet?
• Which patterns (both successes and struggles) exist across student work samples within this group?
Step 3 Guidance for Coaches
In this step, teachers sort student work to see trends in proficiency and gaps.
Analyze high-proficiency student work:
• “Take 1 min: How does the student work compare to the teacher exemplar? Is there a gap?”
Move to the not-yet proficient student work (look only at a representative sample):
• “Take 2 mins: What are the key gaps between the rest of the student work and the teacher exemplar?”
Step 4: Discussion and analysis.
1. Identify 1-2 major trends for each category.
2. If working in a group, start by discussing someone’s examples or trends across classrooms for a category.
Essential Questions
• What are the students’ strengths, areas for growth, and trends in understanding?
• What are the most frequent and fundamental challenges and/or misconceptions that students appear to have?
• What does the evidence from student responses reveal?
• What happened during the lesson that may have led to bright spots or areas for growth?
Step 4 Guidance for Coaches
In this step, teachers discuss and analyze trends that emerge through the sorting of student work to prepare for the next steps.
Prompts:
• “What are key strengths in students’ understandings?“
• “What are the key misunderstandings for students?”
Step 5: Determine action steps for whole group and sub-groups.
1. Identify areas of focus for upcoming instruction.
2. If necessary, determine the appropriate adjustments to make to upcoming instruction, both short-term (the next 1-2 lessons) and long-term (later in the unit or future units).
Essential Questions
• Based on the analysis above, what whole-class or sub-group instructional adjustments will you make? Which aspects of upcoming lessons will you prioritize?
• As you are internalizing upcoming lessons and units, where do you see opportunities to address misconceptions and extend learning?
• Looking ahead: What is the next sample of student work you want to collect to monitor progress?
Step 5 Guidance for Coaches
In this step, teachers examine results to determine their next steps, including students or groups of students to focus on during upcoming instruction and potential adjustments that do not alter the intention of materials.
Prompts:
• “So, our key missing understanding, procedural gap, or missing habit is _________.”
• “Write down the highest leverage action(s) you will take to adjust upcoming instruction in the short-term or long-term, including which aspects of lessons will be prioritized.”
• “What adjustments will you make to upcoming instruction?”
• “Which students or groups of students need additional support?”
Step 6: Follow up.
1. Identify when you will follow up on the plan through observation of planned instructional improvements or through the collection and analysis of the student work samples that resulted from the planned response.
Essential Questions
• What is the next sample of student work you want to collect to monitor progress?
• When is the next opportunity to observe instructional upgrades being implemented in the classroom?
Teacher Resources
Course Guides
The K–5 Math instructional materials Course Guides are designed to help teachers effectively transition into the program. The Course Guides are specific to each grade level and include information about standards, assessment tools, the focus of each module, and ways for families to support students at home. Each guide also provides background on the developmental advances that affect how students learn in each grade and practical strategies for troubleshooting misconceptions collaboratively with students.
Scope and Sequence Document
The Scope and Sequence table provides teachers with an overview of key information about each module at their grade level. This information includes module names, topic names, a breakdown of total instructional days, and standards covered within each module. Standards information for each module is organized by TEKS Mathematical Process Standards (MPS), grade-level standards (TEKS), and English Language Proficiency Standards (ELPS). Teachers can use the information in this table to aid in their instructional preparation and pacing. They can also look across grade-level tables to see how the content of the modules links to prior and future learning.
Materials and Manipulatives
Manipulatives offer students the opportunity to represent math in different ways using a variety of hands-on experiences. Providing kinesthetic learning opportunities reinforces the expectations of students to solve problems and communicate mathematical ideas through multiple representations. Manipulatives are vital tools that build lasting knowledge for all learners and are essential for implementing K–5 Math instructional materials effectively and with fidelity.
The Materials List resource provides a year-long list of the math manipulatives and additional items that are needed to implement the modules for each grade level. The list can support teachers in their planning and preparation.
Protocols
The protocol documents support educators in their internalization of the instructional materials and their understanding of how analysis of student work can help identify how to support students in their learning. The processes outlined in the documents include a study of the alignment of the standards to the key concepts and skills of the module.
Module Internalization Protocol
The Module Internalization Protocol provides a step-by-step process for understanding each module prior to teaching, including what students will be learning, how students will be assessed, and the high-level arc of learning. By starting with module internalization, teachers can understand how each lesson fits into the big picture prior to using the Lesson Internalization Protocol.
The Teacher Module Internalization Protocol provides a step-by-step process for understanding each module prior to teaching, including what students will be learning, how students will be assessed, and the high-level arc of learning. By starting with module internalization, teachers can understand how each lesson fits into the big picture prior to using the Teacher Lesson Internalization Protocol.
Step 1: Understand the big picture.
• Use the Module Overview, Topic Overview, Terminology, and Collaborative Troubleshooting sections. Revisit the Module Overview and annotations created as part of the prework. Read the Topic Overviews. Identify how the module utilizes the concrete-representational-abstract (CRA) progression to build student learning from lesson to lesson. Identify new and familiar terminology. Preview the table provided in Collaborative Troubleshooting to anticipate student misconceptions that might arise in the course of the learning.
• Use the Scope and Sequence/Pacing Guide provided by your district. Note which days you will be teaching the lessons and administering the assessments.
• Reflect: Why is this module important? How does it connect to prior modules (if applicable)?
Step 2: Know your destination.
• Use the Overview of Module Topics and Lesson Objectives and the End-of-Module Assessment Task. Examine the TEKS and ELPS and how they are included. Complete the End-of-Module Assessment Task and review with strategies in the exemplars using the “A Progression Toward Proficiency” rubric. Identify critical knowledge and skills for the assessment.
• Reflect: What models, strategies, or terminology are critical for student success on the assessment?
Teacher Module Internalization Protocol
Purpose
Prework Read the Module Overview and highlight, annotate, or record your thoughts on the progression of content in the module. BLUEBONNET
Lesson Internalization Protocol
The Lesson Internalization Protocol provides a step-by-step process for understanding each lesson prior to teaching, including what students will be learning, how students will be assessed, and how teachers can support all learners in meeting the rigor of the instructional materials. By using lesson internalization, teachers deepen the understanding developed through the Module Internalization Protocol.
Student Work Analysis Protocol
The Student Work Analysis Protocol can be used to analyze student work samples individually or collaboratively with the goal of understanding students’ thinking, identifying strengths and progress toward proficiency, and determining gaps in skills and knowledge. The protocol also supports the creation of a plan to take targeted action to support students’ development of skills and knowledge in future instruction.
BLUEBONNET
Teacher Module Internalization Protocol
Purpose
The Teacher Module Internalization Protocol provides a step-by-step process for understanding each module prior to teaching, including what students will be learning, how students will be assessed, and the high-level arc of learning. By starting with module internalization, teachers can understand how each lesson fits into the big picture prior to using the Teacher Lesson Internalization Protocol.
Step 1: Understand the big picture.
Read the Module Overview and highlight, annotate, or record your thoughts on the progression of content in the module.
• Use the Module Overview, Topic Overview, Terminology, and Collaborative Troubleshooting sections. Revisit the Module Overview and annotations created as part of the prework. Read the Topic Overviews. Identify how the module utilizes the concrete-representational-abstract (CRA) progression to build student learning from lesson to lesson. Identify new and familiar terminology. Preview the table provided in Collaborative Troubleshooting to anticipate student misconceptions that might arise in the course of the learning.
• Use the Scope and Sequence/Pacing Guide provided by your district. Note which days you will be teaching the lessons and administering the assessments.
• Reflect: Why is this module important? How does it connect to prior modules (if applicable)?
Step 2: Know your destination.
• Use the Overview of Module Topics and Lesson Objectives and the End-of-Module Assessment Task. Examine the TEKS and ELPS and how they are included. Complete the End-of-Module Assessment Task and review with strategies in the exemplars using the “A Progression Toward Proficiency” rubric. Identify critical knowledge and skills for the assessment.
• Reflect: What models, strategies, or terminology are critical for student success on the assessment?
Prework
Step 3: Examine the arc of learning.
• Use the Module Overview, Topic Overviews, and Assessments. Make connections between the topics and assessments as students progress in the module. Skim the lesson objectives to understand how lessons build upon one another.
• Use the Terminology and Suggested Tools and Representations. Begin to consider how all students will access grade-level content.
• Reflect: How does the math in the arc of learning move from simple to complex?
Step 4: Organize your resources.
• Use the Module Overview and Suggested Tools and Representations. Locate materials listed. Identify additional supplies needed.
Teacher Lesson Internalization Protocol
Purpose
The Teacher Lesson Internalization Protocol provides a step-by-step process for understanding each lesson prior to teaching, including what students will be learning, how students will be assessed, and how teachers can support all learners in meeting the rigor of the instructional materials. By using lesson internalization, teachers deepen the understanding developed through the Teacher Module Internalization Protocol.
Step 1: Understand the lesson purpose and objectives.
Use the lesson and Topic Overview.
• Read the lesson objective and connect to the Topic Overview, TEKS, and ELPS.
• Complete the Problem Set and Exit Ticket from a student perspective.
• Identify knowledge and skills that students build in the lesson.
Step 2: Understand the sequence and pacing of activities.
Use the lesson.
Re-read the Topic Overview and lesson.
• Review the overall flow of the lesson and connection to the objective and Exit Ticket.
• Plan for pacing of each activity and transitions between components.
Step 3: Prepare to teach each activity with an activity deep dive.
Use the lesson.
• Examine how each lesson component (Fluency, Application Problem, Concept Development, Problem Set, Student Debrief, Exit Ticket) builds to support the learning objective of the topic/lesson.
• Determine the most critical takeaways from each key component and make instructional decisions for lesson delivery aligned to the purpose of each component.
• Create or identify exemplar and example responses to questions and tasks.
• Examine embedded supports and select the appropriate supports to use in the lesson for diverse learners (emergent bilingual, gifted and talented, and students with disabilities).
Step 4: Organize your resources.
Use the lesson and Suggested Tools and Representations.
• Locate manipulatives or materials listed.
• Identify additional supplies needed using the “Notes on Multiple Means of Engagement” boxes in the margins to offer customizations/supports for groups of students.
Prework
Student Work Analysis Protocol Teacher Guide
Purpose
The Student Work Analysis protocol can be used to analyze student work samples individually or collaboratively with the goal of understanding students’ thinking, identifying strengths and progress toward proficiency, and determining gaps in skills and knowledge.
The protocol also supports the creation of a plan to take targeted action to support students’ development of skills and knowledge in future instruction.
Before the meeting
Prepare for the meeting by completing the steps below. These steps may have already been completed as part of the unit and lesson internalization process.
• Read the lesson plan.
• Complete the task to identify insights, strategies, and skills that would indicate student proficiency.
• Compare responses to the exemplar provided in the instructional materials. If no exemplar exists, the teacher/group should create one prior to examining the work.
The protocol below can be used by individual teachers or groups. If you’re short on time, prioritize the essential questions that are in bold.
Step 1: Discuss the task, related text, and standards.
1. Examine the task by considering the questions below.
Essential Questions
• What are students being asked to do and understand in this task?
• What knowledge and vocabulary do students need to access this task?
• Which standards are being assessed through this task? Is this standard addressed in its entirety, or are other aspects of it taught in the current module/unit or later in the year?
• For literacy-based tasks, including word problems: What will be challenging about this text for students? Where will they likely struggle?
Step 2: Determine the success criteria for the tasks.
1. Examine the resources available in your instructional materials, including rubrics and exemplars to develop a deep understanding of what proficiency of the task looks like.
2. List the key components of the ideal student response.
Essential Questions
Establish a shared understanding of the criteria for fully, partially, and not yet meeting expectations.
• Fully meeting expectations: What are the key understandings demonstrated in an ideal answer?
• Partially meeting expectations: What differences are there between the student work in the fully and partially meeting expectation groups?
• Not yet meeting expectations: What foundational understandings are students still developing?
Step 3: Analyze and sort student work.
1. Independently identify one student response that demonstrates proficiency then discuss why you selected them.
2. Identify categories to sort student work (levels of proficiency, different solution types).
3. Collaboratively or independently sort the student work into these categories. If working with your teammates, ensure you’re operating from a common lens.
Essential Questions
• What can students do? What can they not do yet?
• Which patterns (both successes and struggles) exist across student work samples within this group?
• What differentiates those who fully met the success criteria for the task from those who didn’t?
Step 4: Discussion and analysis.
1. Identify 1-2 major trends for each category.
2. If working in a group, start by discussing someone’s examples or trends across classrooms for a category.
Essential Questions
• What are the students’ strengths, areas for growth, and trends in understanding?
• What are the most frequent and fundamental challenges and/or misconceptions that students appear to have?
• What does the evidence from student responses reveal?
• What happened during the lesson that may have led to bright spots or areas for growth?
Step 5: Determine action steps for whole group and sub-groups.
1. Identify areas of focus for upcoming instruction.
2. If necessary, determine the appropriate adjustments to make to upcoming instruction, both short-term (the next 1-2 lessons) and long-term (later in the unit or future units).
Essential Questions
• Based on the analysis above, what whole-class or sub-group instructional adjustments will you make? Which aspects of upcoming lessons will you prioritize?
• As you are internalizing upcoming lessons and units, where do you see opportunities to address misconceptions and extend learning?
• Looking ahead: What is the next sample of student work you want to collect to monitor progress?
Family Resources
Family Guide
The Family Guide provides families with information about these instructional materials. It describes available family resources. The guide, available in both English and Spanish, also includes additional information on math tools and models used throughout grades K–5.
K–5 Math Family Guide
Homework Helpers
Homework Helpers, located within Succeed, provide step-by-step explanations of how to work problems like those found in Succeed. The explanations include key terms and details that promote conceptual understanding. Each homework practice set in Succeed is accompanied by a Homework Helper.
Learn, Practice, and Succeed Books
Families can use the student work in the Learn, Practice, and Succeed books as a conversation point with teachers to determine their students’ success with mathematical concepts and find ways to support and extend learning at home, including extra practice and opportunities for summer learning.
Learn
Learn includes daily classwork: Application Problems, Exit Tickets, Problem Sets, and Templates.
Practice
Sprint activities are easily replicated at home for extra practice, and students who are fluent in their math facts can become proficient with more material more deeply. Practice problems can be revisited, discussed, or re-worked at home as well.
Succeed
The Succeed book enables students to work individually toward proficiency. These additional problem sets align lesson by lesson with classroom instruction, making them ideal for use as homework or extra practice. Each Homework is accompanied by a Homework Helper, a set of worked examples that illustrate how to solve similar problems.
Teachers and tutors can use Succeed books from prior grade levels as consistent tools for filling gaps in foundational knowledge. Students will thrive and progress more quickly as familiar models facilitate connections to their current grade-level content.
Bibliography
Agrawal, Jugnu, and Lisa L. Morin, “Evidence-Based Practices: Applications of Concrete Representational Abstract Framework across Math Concepts for Students with Mathematics Disabilities,” Learning Disabilities Research & Practice, 31(1), (2016), 34–44.
Baker, Austin T., and Josh Cuevas, “The Importance of Automaticity Development in Mathematics,” Georgia Educational Researcher, Vol 14: Iss. 2, Article 2, (2018) p. 2.
Bransford, John D., Ann L. Brown, and Rodney R. Cocking. 1999. How People Learn. Washington, DC: National Academy Press.
Brown, Peter C., Henry L. Roediger III, and Mark A. McDaniel. 2014. Make It Stick: The Science of Successful Learning Cambridge, MA: Harvard University Press.
CAST. Universal Design for Learning Guidelines version 2.2. Retrieved from https://udlguidelines.cast.org/2018.
Cohen, G.L., C.M. Steele, and L.D. Ross. 1999. “The Mentor’s Dilemma: Providing Critical Feedback Across the Racial Divide.” Personality and Social Psychology Bulletin 25 (10): 1302–18. https://doi.org/10.1177/0146167299258011.
Copple, Carol, and Sue Bredekamp. eds. 2022. Developmentally Appropriate Practice in Early Childhood Programs Serving Children from Birth Through Age 8, 3rd Edition. Washington, DC: National Association for the Education of Young Children.
Darling-Hammond, Linda, and Lisa Flook, Channa Cook Harvey, Brigid Barron, and David Osher. 2019. “Implications for Educational Practice of the Science of Learning and Development.” Applied Developmental Science: 97–140. https:// doi.org/10.1080/10888691.2018.1537791.
Davis, Elizabeth A., and Joseph S. Kracjik. 2005. “Designing Educative Curriculum Materials to Promote Teacher Learning.” Educational Researcher 34(3).
Ecchevaria, Jana J. and Anne Graves. 2010. Sheltered Content Instruction: Teaching English-Language Learners with Diverse Abilities, 4th Ed. New York: Pearson.
Fuchs, L.S., Newman-Gonchar, R., Schumacher, R., Dougherty, B., Bucka, N., Karp, K.S., Woodward, J., Clarke, B., Jordan, N. C., Gersten, R., Jayanthi, M., Keating, B., and Morgan, S. (2021). Assisting Students Struggling with Mathematics: Intervention in the Elementary Grades (WWC 2021006). Washington, DC: National Center for Education Evaluation and Regional Assistance (NCEE), Institute of Education Sciences, U.S. Department of Education. Retrieved from http://whatworks.ed.gov/.
Hattie, John, Douglas Fisher, and Nancy Frey. 2017. Visible Learning for Mathematics, Grades K–12: What Works Best to Optimize Student Learning. Dallas: Corwin.
Hecht, Cameron A., Christopher J. Bryan, and David S. Yeager. 2023. “A Values-Aligned Intervention Fosters Growth Mindset–Supportive Teaching and Reduces Inequality in Educational Outcomes.” Proceedings of the National Academy of Sciences 120, no. 25 (June): e2210704120. https://doi.org/10.1073/pnas.2210704120.
Hecht, Cameron A., Mary C. Murphy, Carol S. Dweck, Christopher J. Bryan, Kali H. Trzesniewski, Fortunato N. Medrano, Matt Giani, Pratik Mhatre, and David S. Yeager. 2023. “Shifting the Mindset Culture to Address Global Educational Disparities.” Npj Science of Learning 8, no. 1 (August): 1–10. https://doi.org/10.1038/s41539-023-00181-y.
Hiebert, James, and Douglas A. Grouws. 2007. “The Effects of Classroom Mathematics Teaching on Students’ Learning.” Second Handbook of Research on Mathematics Teaching and Learning 1 (1): 371–404.
The Iris Center, Peabody College, Vanderbilt University, Nashville, TN. Accessed January 30, 2024. https://iris.peabody. vanderbilt.edu/module/math/cresource/q2/p07/#content-mobile.
Kirschner, Paul A. and Carl Hendrick. 2020. How Learning Happens: Seminal Works in Educational Psychology and What They Mean in Practice. London: Routledge.
Krashen, Stephen D. 1982. Principles and Practice in Second Language Acquisition. Oxford: Pergamon Press Inc. Accessed Jan 29, 2024. https://www.sdkrashen.com/content/books/principles_and_practice.pdf
Livers, Stefanie D. and Jennifer M. Bay-Williams. 2014. “Vocabulary Support: Constructing (Not Obstructing) Meaning.” Mathematics Teaching in Middle School, 20(3), Oct 2014, pp. 152–159.
Ma, Liping. 2010. Knowing and Teaching Elementary Mathematics. New York: Routledge.
McNeil, Nicole M. 2014. “A Change–Resistance Account of Children’s Difficulties Understanding Mathematical Equivalence.” Child Development Perspectives 8 (1): 42–47.
Moschkovich, Judit. 2005. “Using Two Languages When Learning Mathematics.” Educational Studies in Mathematics (2005)64. doi: 10.1007/s10649-005-9005-1.
Murphy, Mary C. 2024. Cultures of Growth. New York, NY: Simon and Schuster.
National Academies of Sciences, Engineering, and Medicine. 2018. How People Learn II: Learners, Contexts, and Cultures. Washington, DC: National Academies Press. https://doi.org/10.17226/24783
and Implementation
National Council of Teachers of Mathematics (NCTM). Catalyzing Change in Early Childhood and Elementary Mathematics: Initiating Critical Conversations. Reston, VA: NCTM, 2018.
National Council of Teachers of Mathematics (NCTM). “Procedural Fluency in Mathematics: A Position of the National Council of Teachers of Mathematics.” Accessed Jan 29, 2024. http://www.nctm.org/Standards-and-Positions/PositionStatements/Procedural-Fluency-in-Mathematics/.
National Council of Teachers of Mathematics (NCTM). Principles to Actions: Ensuring Mathematical Success for All. Reston, VA: NCTM, 2014.
Parker, Thomas H., and Scott Baldridge. 2004. Elementary Mathematics for Teachers. London: Sefton-Ash.
Ramirez, Nora and Sylvia Celedón-Pattichis. 2012. Beyond Good Teaching: Advancing Mathematics Teaching for ELLs. Reston, VA: NCTM.
Reeve, Johnmarshall, Hyungshim Jang, Pat Hardre, and Mafumi Omura. 2002. “Providing a Rationale in an AutonomySupportive Way as a Strategy to Motivate Others During an Uninteresting Activity.” Motivation and Emotion 26 (3): 183–207. https://doi.org/10.1023/A:1021711629417.
Schmidt, William, Richard Houang, and Leland Cogan. 2004. “A Coherent Curriculum: The Case of Mathematics.” Journal of Direct Instruction 4(1).
Schuchardt, Anita M., Miray Tekkumru-Kisa, Christian D. Schunn, Mary Kay Stein, and Birdy Reynolds. 2017. “How Much Professional Development Is Needed with Educative Curriculum Materials? It Depends Upon the Intended Student Learning Outcomes ” Science Education 101(6).
Stigler, James W., and James Hiebert. 2009. The Teaching Gap: Best Ideas from the World’s Teachers for Improving Education in the Classroom. New York, NY: Simon and Schuster.
Texas Behavioral Science & Policy Institute, University of Texas. 2024. “FUSE: Fellowship Utilizing the Science of Engagement.” University of Texas at Austin.
Texas Education Agency. 2023. ELPS 2-12 Leader Pathway. Accessed Jan 29, 2024. https://www.txel.org/media/kpil1uby/ elps-2-12leaderpathwayinteractive.pdf
Texas Education Agency. 2021. English Learner Instructional Accommodations Checklist. Accessed Jan 29, 2024. https:// www.txel.org/media/pflbc1kd/el-checklist-1-27-21.pdf.
Winsor, Matthew S. “Bridging the Language Barrier in Mathematics.” Mathematics Teacher 101(5) Dec 2007/Jan 2008. https://doi.org/10.5951/MT.101.5.0372.
Yeager, David S. 2024. 10 to 25: The Science of Motivating Young People. New York, NY: Avid Reader Press.
ISBN 979-8-89072-266-9
Copyright © 2024 Texas Education Agency. This work based on or adapted from materials contained in Great Minds’ Eureka Math® K–5 PDF Files.
These materials are made available by the Texas Education Agency under an open license. For information about the license and your rights to use the materials, visit: https://tea.texas.gov/K-5Math
Printed in the USA