Start with a blank document... Every tutorial in this book starts with the same first step: Start with a blank document, create Text Box with no fill and no outline, and type word X, with font Y, sized Z pt. Usually center aligned.
If you are not sure how to perform this task, keep reading. Otherwise, feel free to jump right to the tutorials section. It is just two pages ahead!
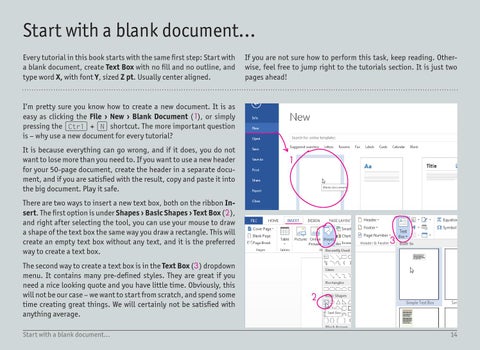
I’m pretty sure you know how to create a new document. It is as easy as clicking the File › New › Blank Document (1), or simply pressing the (Ctrl) + (N) shortcut. The more important question is – why use a new document for every tutorial? It is because everything can go wrong, and if it does, you do not want to lose more than you need to. If you want to use a new header for your 50-page document, create the header in a separate document, and if you are satisfied with the result, copy and paste it into the big document. Play it safe.
1
There are two ways to insert a new text box, both on the ribbon Insert. The first option is under Shapes › Basic Shapes › Text Box (2), and right after selecting the tool, you can use your mouse to draw a shape of the text box the same way you draw a rectangle. This will create an empty text box without any text, and it is the preferred way to create a text box. The second way to create a text box is in the Text Box (3) dropdown menu. It contains many pre-defined styles. They are great if you need a nice looking quote and you have little time. Obviously, this will not be our case – we want to start from scratch, and spend some time creating great things. We will certainly not be satisfied with anything average. Start with a blank document...
3
2
14